9 min read
Overview
Welcome to lesson 2 of Quicknode's DeFi DEX course! After understanding the basics of DeFi and its various components in Lesson 1, we are now ready to start our hands-on journey, pivoting more into the programmatic side of building in DeFi. This lesson, our focus is on creating a decentralized exchange platform and building our first smart contract, the Factory contract.
Note that the smart contracts we will build in this course are based on Uniswap V1. Uniswap V1 is a big deal in the DeFi world; it was one of the first smart contracts on the Ethereum network (and other blockchains) where users can trade different cryptocurrencies (tokens) directly with each other. The code was originally written using a language called Vyper, but to make things easier for everyone in this course, we'll use Solidity. We will translate the original Vyper code from Uniswap V1 into Solidity. This way, more people can understand and use what we're building.
Uniswap V1 is built using two smart contracts, one to create trading pairs (i.e., Factory Contract), and the other to faciliate trading (i.e., Exchange Contract). The Factory contract is a key component in order for users to trade tokens. It serves as a template for creating pairs of tokens that users can trade. Building this contract is the first step in bringing our DEX platform to life. With this contract, users will be able to deploy their own trading pairs on the DEX platform, opening up the possibility for cryptocurrency trading. Keep in mind that this isn't just about code. Understanding the logic and mechanisms behind these contracts are crucial, which is why we'll take stops along the way (and even include a handy Excel sheet) to better understand the math and code behind the DEX platform we build. The Exchange contract will be explained in Lesson 3, but for now, you should understand that this is another smart contract which inherits the ERC-20 standard and incorporates logic for facilitating trading between users.
Smart Contract Design
To kick off lesson 2, we will start by presenting an overview of the smart contract design. We'll discuss the architecture, structure, and data flow between the smart contracts. We will also explain the role of the Factory contract within a DEX. You'll find a helpful graph below that visualizes the smart contracts architecture.
Factory Contract
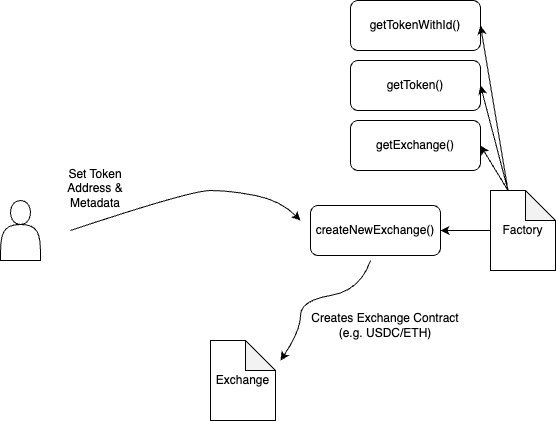
The Factory contract functions as the central hub of our DEX. Its primary role is the creation of individual Exchange contracts for each ERC-20 token. Think of it as a public registry for all of the Exchange contracts created. Each token-exchange pair is unique and tracked on the Factory contract. The beauty of this decentralized structure is that if an exchange for a specific ERC-20 token doesn't exist, anyone can set it up using the Factory contract.
Exchange Contract
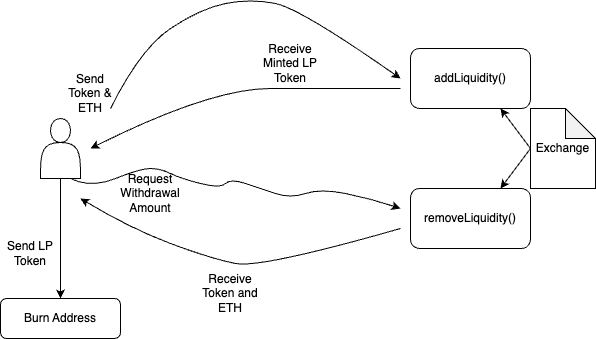
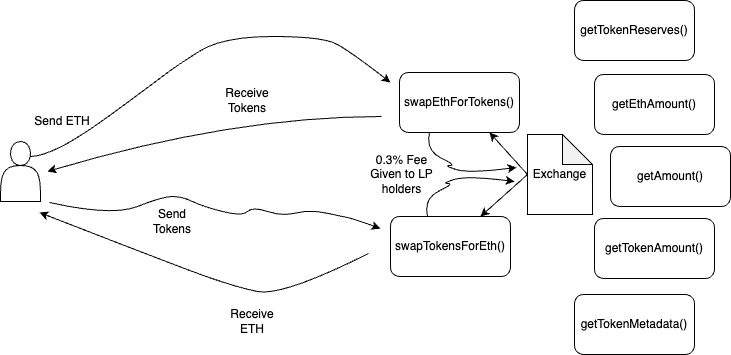
Each Exchange contract is a direct reflection of its associated ERC-20 token. Its key functionalities can be divided into two main components:
Liquidity Pool (LP): The Exchange contract holds reserves of both ETH and its respective ERC-20 token. Liquidity providers (users) can contribute to these reserves by depositing an equivalent value of both ETH and the associated ERC-20 token. In return, they receive a minted "LP tokens", aka ERC-20 tokens that track their relative contribution to the liquidity pool. The liquidity pool acts as the market maker between the underlying ETH-ERC20 pair and a small fee (0.30 %) is taken from each trade and added back to the liquidity pool reserves when a trade occurs. This acts as an incentive for liquidity providers as they can earn fees when trades occur and withdraw the earnings when they burn their LP tokens.
Automated Market Maker (AMM): The Exchange contract serves as the transaction facilitator between the ETH and ERC-20 pair, in either direction. It enables users to swap tokens by altering the liquidity reserves of the pair, thus impacting the token's price with each transaction. The larger the transaction relative to the total size of the reserves, the more significant the price slippage. Uniswap uses a "constant product" market-making formula (we'll talk about later on), which defines the exchange rate based on the size of the trade and the current ETH and ERC-20 reserves.
It's worth noting that an asset (e.g., ERC-20 token) can experience price changes between when a transaction is signed and when it is included in a block. However, Uniswap allows for the specification of transaction parameters, such as the minimum amount bought or the maximum amount sold, acting as similiar to limit orders. Transactions can also have deadlines, providing a mechanism to cancel orders that aren't executed quickly enough.
Now that we have a base understanding of what we'll be building and how it works at a high level, let's continue! In the next section, we'll start the setup of our project, which consists of setting up our development environment.
Developer Environment Setup
Before we can start coding, we need to set up our development environment. In this section, we guide you through installing and configuring all necessary tools and software, including Ethereum development tools like Foundry and Viem. While the DEX we build throughout this course is not dependent on these specific web3 libraries but are the ones we recommend due to popularity, continued development, and efficiency.
To get started, open up a terminal window and start the first step.
Install Foundry
Foundry is a popular toolkit for Ethereum application development. It consists of different modules (e.g., forge, cast, anvil, chisel) which provide capabilities like smart contract testing, local blockchain development, and smart contract interaction. You can install Foundry a couple of ways, such as via cURL, source, or Docker. We will use the cURL option and install it with the following command:
curl -L https://foundry.paradigm.xyz | bash
NOTE: If you're on Windows, you will need to install and use Git BASH or WSL, as your terminal, since Foundryup currently does not support Powershell or Cmd.
The cURL request above will initiate the installation of Foundryup. Follow the subsequent instructions on your screen to complete the process. As a result, you'll gain access to the foundryup command within your terminal window. Executing foundryup independently will lead to the installation of the most recent precompiled binaries, which includes forge, cast, anvil, and chisel. You can explore more options, such as installing a specific version or commit, by using foundryup --help.
Create a Project & Install Dependencies
With Foundry installed, run the following forge init command to initialize a foundry project called defi_dex and navigate inside it:
forge init defi_dex && cd defi_dex
The initialized project will look something like the below:
.
├── lib
├── script
├── src
└── test
Now, let's install our smart contract dependencies. We'll be using OpenZeppelin's library for this. In your terminal, run the forge install commmand:
forge install openzeppelin/openzeppelin-contracts
Then, you will need to create a remappings.txt file in the main directory (e.g., defi_dex) and input the following:
@openzeppelin/=lib/openzeppelin-contracts/
With this set, we'll be able to import libraries with the @openzeppelin/ prefix. If you run into any issues, check out this link.
Note that later on we may install some other dependencies such as
dotenvorviemwhen building out the frontend, but for now, you only need to install OpenZeppelin's libary.
Next, let's create the files that will hold our smart contract code. Run the command below to navigate into your src directory and create a Exchange.sol and Factory.sol file:
cd src && echo > Exchange.sol && echo > Factory.sol && echo > ERC20.sol
In the next section, we'll dive into creating the first smart contract of our DEX platform, the Factory contract.
Building the Factory Contract
Now that the development environment is set up, we'll start the process of coding our Factory contract. Using Uniswap V1 as our model, we'll guide you step-by-step through building this contract. You can find the original Vyper code here (take a peek, I dare you!).
Now, open the src/Factory.sol file in your editor of choice (we recommend VSCode) and paste the following Solidity code:
// SPDX-License-Identifier: MIT
pragma solidity ^0.8.13;

import "./Exchange.sol";

contract Factory {
    mapping(address => address) public tokenToExchange;
    mapping(address => address) public exchangeToToken;
    mapping(uint256 => address) public idToToken;
    Exchange[] public exchangeArray;

    event ExchangeCreated(address indexed tokenAddress, address indexed exchangeAddress);

    function createNewExchange(address _tokenAddress) public returns(address) {
        require (_tokenAddress != address(0), "Invalid token address");
        require(tokenToExchange[_tokenAddress] == address(0),"exchange already exists");
        Exchange exchange = new Exchange(_tokenAddress);
        exchangeArray.push(exchange);
        tokenToExchange[_tokenAddress] = address(exchange);
        emit ExchangeCreated(_tokenAddress, address(exchange));
        return address(exchange);
    }

    function getExchange(address _tokenAddress) public view returns(address) {
        return tokenToExchange[_tokenAddress];
    }

    function getToken(address _exchange) public view returns (address) {
        return exchangeToToken[_exchange];
    }

    function getTokenWithId(uint256 _tokenId) public view returns (address) {
        return idToToken[_tokenId];
    }
}
Save the file for now! Next, let's dive into the code.
Diving Into the Code
Alright, now that we've provided the full code for the Factory contract, let's dig into it to fully grasp its functionality.
Pragmas and Imports
pragma solidity >=0.8.0;

import "./Exchange.sol";
The contract starts by specifying the Solidity compiler version. Additionally, the Factory contract imports the Exchange contract (which we build in the next lesson!).
Events
event ExchangeCreated(address indexed tokenAddress, address indexed exchangeAddress);
Events are a mechanism to log meaningful activities on the blockchain. Here, the NewExchange event is emitted every time a new exchange contract is created. This helps dApps and external entities listen for and react to this event.
State Variables & Mappings
tokenCount: A public variable that keeps track of the total number of tokens registered with the FactorytokenToExchange,exchangeToToken,idToToken: Public mappings that associate tokens' addresses with their corresponding exchange addresses and vice versa. TheidToTokenmapping correlates token IDs with token addressesexchangeArray: An public array of Exchange contracts
Creating an Exchange
The createExchange function facilitates the creation of a new exchange contract for a given token. It checks if the token address is valid and if the address for the given ERC-20 token already exists. Then, the Factory contract creates a new instance of the Exchange contract with the given token address. After, the new exchange address and its associated token are stored in the respective mappings and exchangeArray. In the end, the ExchangeCreated event is emitted and exchange address of the newly created contract is returned.
Getter/Read Functions
getExchange(address token): Fetches the address of the exchange associated with a specific tokengetToken(address exchange): Retrieves the address of the token associated with a particular exchangegetTokenWithId(uint256 tokenId): Gets the address of the token using its unique ID
Each of these getter functions provides a means to access data within the smart contract, making it more user friendly to access data.
ERC20.sol
Next, let's fill in the logic for the ERC20.sol file we created earlier. This will be used next lesson in our Exchange contract.
Open the ERC20.sol file and paste the following code:
pragma solidity ^0.8.13;

import "@openzeppelin/contracts/token/ERC20/ERC20.sol";
import "@openzeppelin/contracts/access/Ownable.sol";

contract MyToken is ERC20, Ownable {
    constructor(address initialOwner)
        ERC20("MyToken", "MTK")
        Ownable(initialOwner)
    {
        _mint(msg.sender, 10000 * 10 ** decimals());
    }

    function mint(address to, uint256 amount) public onlyOwner {
        _mint(to, amount);
    }
}
Save the file!
In the upcoming lessons, we will expand our DEX by creating the Exchange contract, then work towards deploying our smart contracts and designing a user interface for the frontend. Stay tuned!
Quiz Component
To reinforce what you've learned, let's finish off with a quiz. This quiz will cover the topics discussed during the lesson, including questions on the purpose, design, and code of the Factory contract.