15 min read
Overview
We created our first Solana Program using Anchor and Solana Playground in the last lesson. We learned how to create a program, deploy it to Solana's Devnet, and call it from a client. In this lesson, we will add functionality to this same Program to create an update state on-chain. Specifically, we will create a data account that tracks how many times we call hello_world. We will then learn about a special type of Account, Program Derived Accounts (PDAs), and how they can be used to create unique accounts (in this case, counters) for each user of your program.
What You Will Do
In this lesson, you will create your first Solana program using Anchor and Solana Playground, a web-based tool for compiling and deploying Solana Programs. You will:
- Create a program instruction to initialize a new data account
- Update the
hello_worldfunction to increment a data account on each call - Create a client-side request to modify our account state (increment our counter)
- Introduce Program Derived Accounts (PDAs) and use them to create unique accounts for each user of our program
Create a Counter Account
Start by opening your hello_world program from the previous lesson and open lib.rs.
Create Initialize Structs
To count how many times our hello_world function has been called, we will need to create a new data account owned by our program. That data account will need two new structs:
- An account struct, Counter, that will be used to keep track of our
count(this will be an unsigned 64-bit integer, u64).#[account]pulls in some of the muscle of Anchor that does a lot of heavy lifting for us regarding serializing and deserializing our data.
#[account]
pub struct Counter {
    count: u64
}
- A new Context will be used to create a new counter account. The context, Initialize, will tell our program which Public Keys we will need to provide when sending our transaction instructions from the client. #[derive(Accounts)] is abstracting a lot of content for us--we will cover that in a future guide. For now, know that Anchor is simplifying our code quite a bit!
#[derive(Accounts)]
pub struct Initialize<'info> {
    #[account(init, payer = signer, space = 8 + 8)]
    pub counter: Account<'info, Counter>,
    #[account(mut)]
    pub signer: Signer<'info>,
    pub system_program: Program<'info, System>,
}
Our Initialize struct will require three Public Keys:
counter, the public key of the new data account we are creating (of type, Counter created above). Note here that we must pass a few arguments to initiate our new account:initto tell Anchor we are initializing a new account.payerto define the account responsible for paying the rent associated with the new account, which we have set to oursignerspaceis used to calculate how many bytes our account will need (more bytes require more rent, so we want to be accurate with our requirements). We will need 8 bytes for our account discriminator (required for every account) and 8 bytes for our u64. See Anchor's Space Reference Guide for space requirements for all types.
signer, the wallet responsible for signing theinitializetransaction (and for paying the fees outlined above).system_programwill be invoked to create our new account.
If you recall from our very first lesson in this course, every transaction instruction requires an array of all the accounts used in the transaction. This is precisely what our Initialize struct is doing. We are telling the runtime that we will need three accounts to initialize our counter: the counter account, the signer, and the system program.
Create Initialize Counter Function
Great! Now that our structs are defined, we need to create an initialize function. Inside of hello_world after the say_hello function, create a new function, initialize_counter that takes a context of type Initialize and returns a Result:
    pub fn initialize_counter(ctx: Context<Initialize>) -> Result<()> {
        let counter = &mut ctx.accounts.counter;
        counter.count = 0;
        msg!("Initialized new count. Current value: {}!", counter.count);
        Ok(())
    }
Our function will pass a context, ctx of type Initialize (from our previous step). Because we have included all of the necessary account information in our Initialize struct, Anchor can do most of the heavy lifting for us to create our new account. However, we need to call our counter account and set its initial value to 0. Because we are modifying counter, we must tag the variable as mutable using &mut. Finally, we will add a log showing that our counter has been initiated with the correct initial balance. Anchor will make sure our data is serialized correctly!
Great job! Let's create our counter.
Initialize Counter from Client
First, we will need to Build and Update our program:
- Click 🔧 Build on the left side of your screen to compile your code and check for errors. You should see a log like this in your console.
- Click the Tools Icon 🛠 on the left side of the page, and then click "Upgrade." This will upgrade the program that we have already deployed to devnet.
While the Program is deploying, head back to your client-side code, client.ts. You can delete the previous code and create a new call initializeCounter():
// 1 - Generate a new Keypair for the Counter Account
const counter = anchor.web3.Keypair.generate();
console.log('creating counter: ', counter.publicKey.toString());


// 2 - Call initialize_counter and send the transaction to the network
const tx = await pg.program.methods
  .initializeCounter()
  // 3a - Pass the counter public key into our accounts context
  .accounts({counter: counter.publicKey})
  // 3b - Append the counter keypair's signature to transfer authority to our program
  .signers([counter])
  .transaction();

// Send and confirm the transaction and log the tx URL
const txid = await web3.sendAndConfirmTransaction(pg.connection, tx, [pg.wallet.keypair, counter])
console.log(`https://explorer.solana.com/tx/${await}?cluster=devnet`);
Let's break that down:
- Generate a new keypair that we will use for our new counter account.
- Like before, we will use Anchor to call our program's
initialize_counter(note here in TypeScript, it is formattedinitializeCounter). For this instance, we must pass the accounts we developed in our Initialize struct: counter, signer, and system program. Anchor knows we need to pass the system program and signer, so we do not need to add that here. Finally, since we want our Program to be able to update the data in this account in the future, we must have the counter assign authority to our program. We must append the account's signature to our method to do that.
Alright, let's make some magic. Click "▶️ Run" in the left sidebar to initialize your account. After the transaction processes, you should see a transaction URL in your terminal. Open it and scroll down to the transaction instructions. You should see something like this:
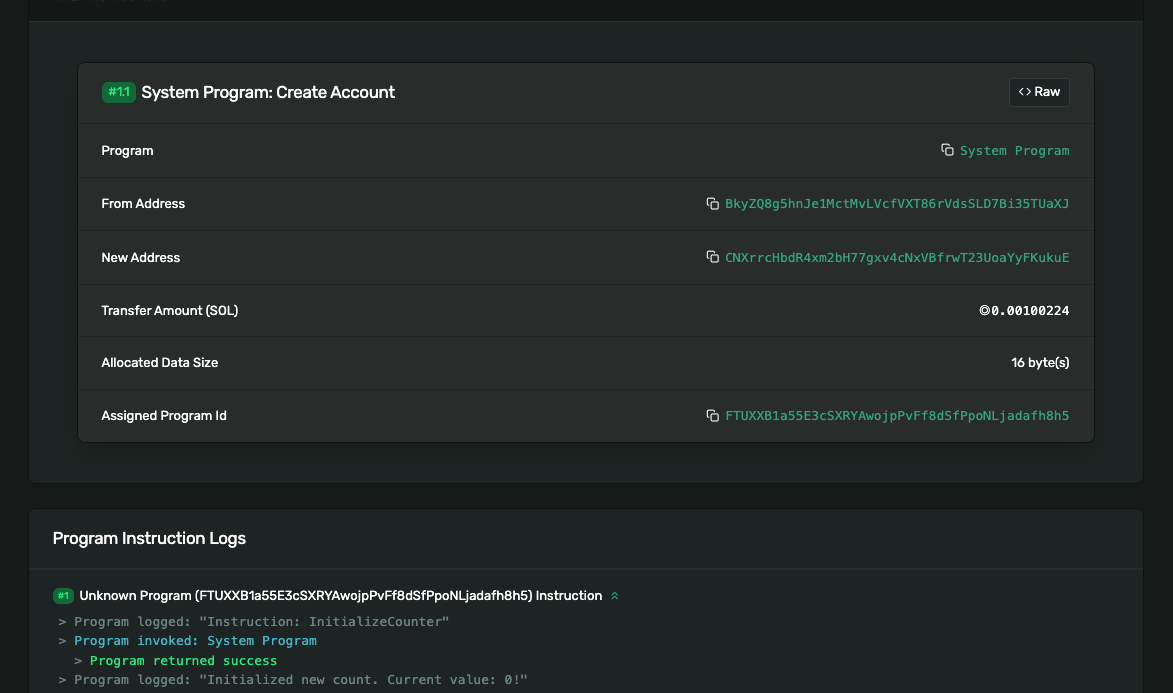
You can see that our Playground wallet created a new account that is assigned to our Program! You'll also notice that the account has been allocated 16 bytes of data. Finally, if you scroll down to our logs, you can see that our account state is 0, as expected. Nice job! Now we need to add our counter to our say_hello function, and we will be tracking devnet hello's forever!
Before moving on, copy your counter public key from your console and replace the contents of your client-side code with the public key (we will use this for the next step):
const COUNTER = 'S61VvavzvHtGLEMxxavPdsKydRnwShxfbubGbw1mkPU'; //Replace with your public key
Implement Counter
Open your program (lib.rs). We should now have a program that can say hello and a data account that can hold an integer value. We need to get those talking to each other. We need to update our say_hello function and the context we pass into, SayHello. Replace your say_hello function with:
    pub fn say_hello(ctx: Context<SayHello>) -> Result<()> {
        let counter = &mut ctx.accounts.counter;
        counter.count += 1;
        msg!("Hello World! - Greeting # {}", counter.count);
        Ok(())
    }
Our updated function first fetches the counter from the accounts object in our context. Since we will modify it, we must mark it as mutable, using &mut. We then increment our counter by one and log our new value with our greeting using msg!. We are almost ready, but first, we must update our SayHello struct to pass our counter account. Update SayHello to include counter as a mutable account:
#[derive(Accounts)]
pub struct SayHello<'info> {
    #[account(mut)]
    pub counter: Account<'info, Counter>,
}
Run it! 🏃♂️
Again, we will need to Build and Update our program:
- Click 🔧 Build on the left side of your screen to compile your code and check for errors. You should see a log like this in your console.
- Click the Tools Icon 🛠 on the left side of the page, and then click "Upgrade." This will upgrade the program that we have already deployed to devnet.
While the Program is deploying, head back to your client-side code, client.ts. After your COUNTER address, add the following code:
const COUNTER = 'S61VvavzvHtGLEMxxavPdsKydRnwShxfbubGbw1mkPU'; //Replace with your public key

console.log(pg.wallet.publicKey.toString(), "saying hello:");

//1. Fetch latest blockhash
let latestBlockhash = await pg.connection.getLatestBlockhash('finalized');

//2. Call say_hello and send the transaction to the network
const counter = new anchor.web3.PublicKey(COUNTER);
 const tx = await pg.program.methods
  .sayHello()
  .accounts({counter})
  .transaction();

//3. Confirm the transaction and log the tx URL
const txid = await web3.sendAndConfirmTransaction(pg.connection, tx, [pg.wallet.keypair])
console.log('Transaction Complete: ',`https://explorer.solana.com/tx/${txid}?cluster=devnet`);

//4. Query the chain for our data account and log its value
const data = await pg.program.account.counter.fetch(counter);
console.log('greeted', data.count.toNumber(),' times');
This should look very familiar to Part 1's call to sayHello with a couple of small but significant differences:
- In Step 2, we must now add the
.accounts()method and pass ourcounterpublic key so that our program knows which counter to update (in theory, our program could handle any number of different counters). - Remember when we initialized
counter, we needed to sign the transaction with the counter keypair? We do not need to do that here because we previously assigned the authority of the counter account to our program, meaning the program has the authority to change the data! - Finally, Step 4 is new. Now that we are writing data to the cluster, we must also read it. Anchor makes this easy by letting us call
.fetch()on our data account. And then, we log our results.
Feel free to click "▶️ Run" a couple of times. You should see that your program is now tracking how many times it has said "Hello World":
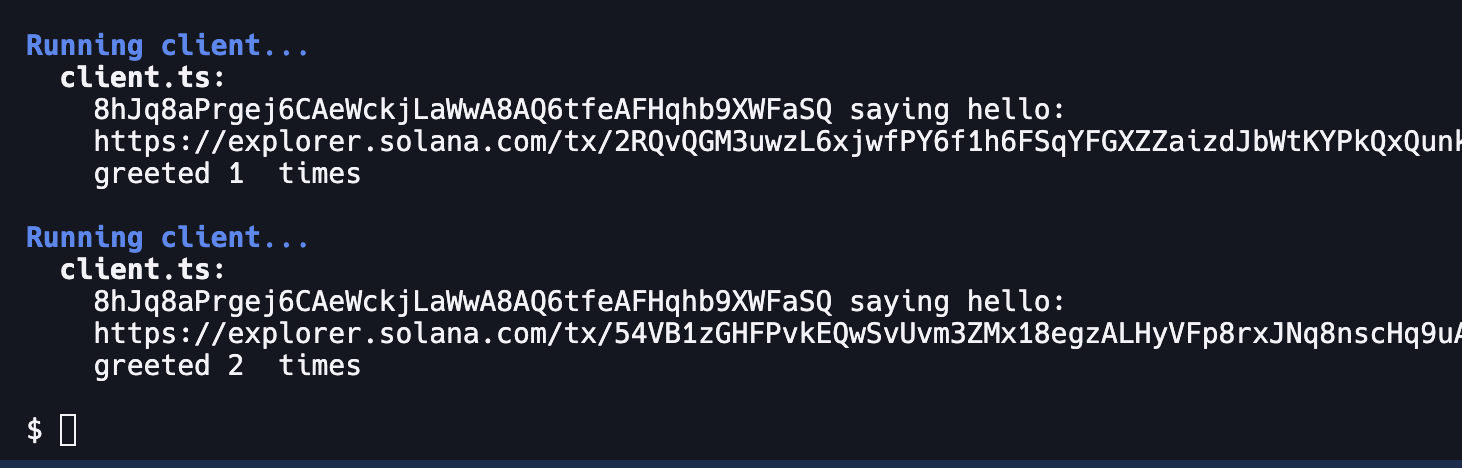
Pretty nifty, huh? You are now updating account state on Solana. But there's something a little off here. If you recall, we used a random keypair when we initialized our account. We also did not specify who could update our counter. This means:
- Anyone can call our program and update our counter. For this simple use case, maybe that's fine, but for more complex programs, we will want to be able to create unique accounts for each user of our program.
- If we lose our counter keypair, we will not be able to update our counter. We will need to create a new account and update our program to use the new account. This could be better.
- Any random keypair could be used for a new account. This means tracking down the correct counter account could be challenging, if even possible.
Let's fix that.
Program Derived Accounts (PDAs)
A Program Derived Address (PDA) is a type of account on the Solana blockchain associated with and owned by a program rather than a specific user or account. PDAs allow us to create unique data associations, manage escrow balances, and handle many other trustless applications. PDAs are deterministically generated by passing an array of seeds (e.g., escrow_account, signer_id, etc.) and the program ID. Unlike typical keypairs, PDAs do not have corresponding private keys. They are generated by passing the seeds and program ID through a sha256 hash function to look for an address that is not on the ed25519 elliptic curve (addresses on the curve are keypairs). The "bump" is effectively a set distance off the curve we use to find our PDA deterministically.
Our program will use a PDA to store counter data for each user. We will allow any users to create a counter account and then track the number of times they say hello. To do this, we must deterministically generate a "counter" PDA for every unique user. The figure below illustrates how this might work in practice:
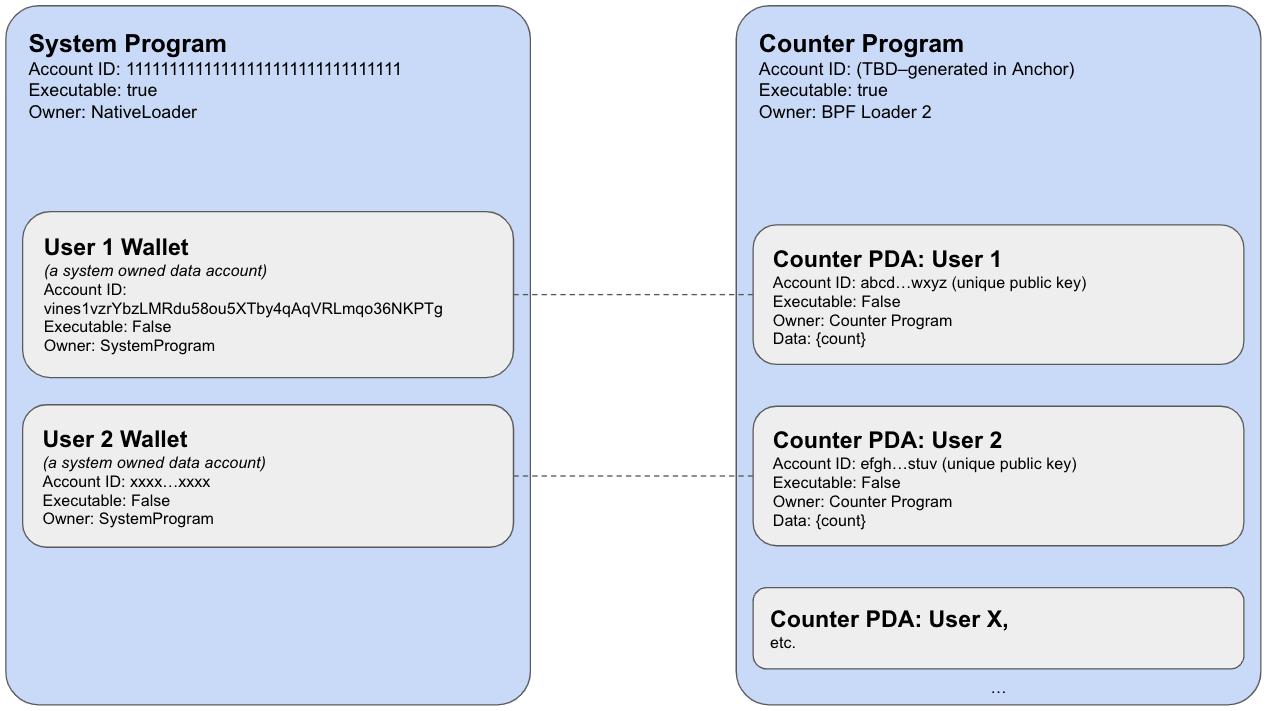
As you can see, any user can have a "counter" PDA associated with only them. Do not worry if this does not entirely make sense just yet. Practice helps these concepts sink in a bit more. Let's jump in and build it!
Create a User-Specific Counter
To implement user-specific PDA counters, we are going to need to do three things:
- First, update our Initialize struct to specify the seeds we will use to generate our PDA.
- Next, we must update our SayHello struct to specify the same seeds so that our program can find the correct PDA to update.
- Finally, we will need to store our PDA bump into our counter account data to prevent potentially malicious users from creating a PDA with a different bump.
Anchor has built-in constraints to make using seeds easy. Update your Initialize struct:
#[derive(Accounts)]
pub struct Initialize<'info> {
    #[account(
        init,
        payer = signer,
        space = 8 + 8 + 1, // Discriminator + count + bump
        seeds = [b"counter", signer.key().as_ref()],
        bump,
    )]
    pub counter: Account<'info, Counter>,
    #[account(mut)]
    pub signer: Signer<'info>,
    pub system_program: Program<'info, System>,
}
Here, we have added two new arguments to our counter account:
seedsis an array of seeds we will use to generate our PDA. The first seed is a string, "counter", and the second is the signer's public key. We will use these seeds to generate a PDA that is unique to each user. Though the string seed is not required, it is good practice to include it to ensure that our PDA is unique to our specific activity (e.g., if we wanted to add another PDA to this program where we stored a user's favorite color, we would want to use a different seed to ensure that the PDA is unique to that activity).bumpis a number we will use to "bump" our PDA off the ed25519 elliptic curve. We do not need to pass a value here because Anchor will automatically generate a bump for us using Solana'sfind_program_addressfunction. We will come back to bumps a bit later. Notice that we have also added an additional 1 byte to our space requirement. This is because we will need to store our bump in our counter account data as a u8.
Let's do the same for our SayHello struct:
#[derive(Accounts)]
pub struct SayHello<'info> {
    #[account(
        mut,
        seeds = [b"counter", signer.key().as_ref()],
        bump = counter.bump
    )]
    pub counter: Account<'info, Counter>,
    #[account(mut)]
    pub signer: Signer<'info>,
}
Here, we added the same seeds and bump as our previous step. We also added the signer account to the context. This is required because we are using the signer's public key as a seed. If you are paying attention, you should notice that we are adding a constraint here: the bump must equal a value stored in our counter account. We will need to add that to our counter account. Update your counter struct to include a u8 called bump:
#[account]
pub struct Counter {
    count: u64,
    bump: u8
}
Finally, we need to initialize the bump value when we create our counter account. Update your initialize_counter function to include a bump setter:
    pub fn initialize_counter(ctx: Context<Initialize>) -> Result<()> {
        let counter = &mut ctx.accounts.counter;
        counter.count = 0;
        counter.bump = ctx.bumps.counter;
        msg!("Initialized new count. Current value: {}!", counter.count);
        Ok(())
    }
The new line here is counter.bump = ctx.bumps.counter;. This line pulls the bump value from our context (using the ctx.bumps object) and sets it in our counter account.
If you would like, you can check your code against ours here.
Run it! 🏃♂️
Just like before, you will need to recompile your code and deploy it to the cluster:
- Click 🔧 Build on the left side of your screen to compile your code and check for errors. Follow any instructions that appear in your console to correct any errors.
- Click the Tools Icon 🛠 on the left side of the page, and then click "Upgrade." This will upgrade the program that we have already deployed to devnet.
Now let's create a couple of client scripts to init and update our PDAs. First, click the "New File" button (📄) and create a new file called init.ts. Copy the following code into your new file:
//1. Find PDA Public Key
const COUNTER_SEED = Buffer.from("counter");

const [counterPda, counterBump] = web3.PublicKey.findProgramAddressSync(
  [COUNTER_SEED, pg.wallet.publicKey.toBuffer()],
  pg.PROGRAM_ID
);
console.log("Initializing Counter PDA:", counterPda.toBase58());

//2. Call say_hello and send the transaction to the network
const tx = await pg.program.methods
  .initializeCounter()
  .accounts({
    counter: counterPda,
    signer: pg.wallet.publicKey,
  })
  .transaction();

//3. Confirm the transaction and log the tx URL
const txid = await web3.sendAndConfirmTransaction(pg.connection, tx, [pg.wallet.keypair])
console.log('Transaction Complete: ',`https://explorer.solana.com/tx/${txid}?cluster=devnet`);
This should look pretty similar to our previous example, except for a couple of differences:
- We are using the
findProgramAddressSyncfunction to find our PDA public key (as opposed to generating a random keypair). This function takes an array of seeds (as Buffers) and the program ID and returns a tuple of the PDA and the bump. We use theCOUNTER_SEED(a buffer of the string "counter") and the signer's public key as seeds. We are also passing the program ID. These seeds must match the seeds we defined in our program, or we will get an error. - Our
.initializeCounter().accountsnow expects two arguments: the counter PDA and our signer's public key.
In the Solana Playground terminal, run this script by entering:
run client/init.ts
You should see something like this:
$ run client/init.ts
Running client...
  init.ts:
    Initializing Counter PDA: DU41Ng522kjc3zCd2dbsjdyGi7Q8WRAaRUUVM49o8ADC
    https://explorer.solana.com/tx/49tTZnQAtUM8LhYR1X2KMh1eZabgHMp5ZGAeNDuLkd2Mw2dJ1ZZSTeE3joiod7n7HTHVaZc25KUkcxXC75mkSTFP?cluster=devnet
Nice job! If you try to rerun this, the script should fail. This is because we used the init constraint in our program. Anchor will prevent the account from being initialized again.
Let's create a script to say hello and increment our counter. Click the "New File" button (📄) and create a new file called sayHello.ts. Copy the following code into your new file:
//1. Find PDA Public Key
const COUNTER_SEED = Buffer.from("counter");

const [counterPda, counterBump] = web3.PublicKey.findProgramAddressSync(
  [COUNTER_SEED, pg.wallet.publicKey.toBuffer()],
  pg.PROGRAM_ID
);
console.log(pg.wallet.publicKey.toString(), "saying hello:");

//2. Call say_hello and send the transaction to the network
const tx = await pg.program.methods
  .sayHello()
  .accounts({
    counter: counterPda,
    signer: pg.wallet.publicKey,
  })
  .transaction();

//3. Confirm the transaction and log the tx URL
const txid = await web3.sendAndConfirmTransaction(pg.connection, tx, [pg.wallet.keypair])
console.log('Transaction Complete: ',`https://explorer.solana.com/tx/${txid}?cluster=devnet`);

//4. Query the chain for our data account and log its value
const data = await pg.program.account.counter.fetch(counterPda);
console.log("greeted", data.count.toNumber(), " times");
The function here is nearly identical to our initialize script except for a couple of differences:
- We call the
sayHellomethod instead ofinitializeCounter.sayHellorequires the same two accounts:counterandsigner. - We are fetching the counter data account and logging its value using
counter.fetch(counterPda).
In the Solana Playground terminal, run this script by entering:
run client/sayHello.ts
You should see that your account has greeted one time. Nice job! Feel free to run this a few times and see how the counter increments.
Wrap Up
Because we set up our counter to use dynamic PDAs, you should be able to connect any different wallet to your Solana Playground and create a new counter. Try it out! I hope you can start to see that PDAs are a powerful tool for creating unique accounts for each user of your program. But do not let what we have done limit your thinking on what can be done. Imagine using a PDA as a seed in a different PDA to create a tree of accounts. PDAs can be used to create unique one-to-one, one-to-many, or many-to-many relationships.
We will start building our Tic Tac Toe game in our next lesson!