8 min read
Introduction
In the last lesson, you learned how to build a simple Solana program using Anchor. Now, you will develop your own Peer-to-Peer Arcade using the skills you have learned so far (and some new ones, too!). Our end product will be a program and UI that includes:
- A digital arcade that allows users to create a profile and play games
- A profile that tracks a user's wins and losses
- A "play token" that a user must burn to play a game
- An example game implementation of Tic-Tac-Toe that allows two players to play a game against each other
- Web sockets that allow users to play a game in real-time
- An NFT prize that users can mint after winning a specified number of games
This lesson will be focused on the backend Solana program using Anchor and Solana Playground. In the next lesson, we will build the UI using Next.js and the Solana Wallet Adapter. Today, we will start with our program architecture and build out the basic framework for our program.
Project Architecture
Before we start coding, let's look at our program's architecture. Though you can ultimately design programs however you like, there are some common patterns you will see in many programs. The folder/file structure of our program will look like this:
src/
├── instructions/
│   ├── (instruction name).rs
│   └── mod.rs
├── state/
│   ├── (state name).rs
│   └── mod.rs
├── lib.rs
└── errors.rs
Let's take a look at each of the files, then the folders:
- lib.rs - This is the main file of our program. It will contain our program's entry point, as well as the program's ID and name. It will also contain the program's primary functions. The functions here will be pretty bare, as they will simply invoke the functions in the instructions folder.
- errors.rs - This file will contain the program's errors. We will use the Anchor error macro to declare our program's errors. This macro will generate a unique error ID and message for each error. We will then use these error IDs in our program's instructions.
- instructions - This folder will contain the program's instructions. Each instruction will be its own file. The instruction files will contain the program's primary functions. These functions will be responsible for executing the program's logic. They will also be responsible for invoking the program's state functions.
- state - This folder will contain the program's state, effectively defining the data structures we will store in our on-chain PDAs. Each state will be its own file. The state files will contain the program's state functions. These structs and their implementations will be responsible for defining and interacting with the program's state.
If you are new to Rust, you may wonder what the mod.rs files are. These files are used to define the module structure of our program. They are kind of like a table of contents for our program. Our library file, lib.rs, will reference these files to know where to find our program's instructions and state.
It is not uncommon to see your errors in a model directory or the inclusion of a constants directory or file. You can organize your program however you like (even all inside of lib.rs as we did in our previous example), but this is a typical pattern that you will see in many programs.
Library - lib.rs
First, we will create a new Anchor project in Solana Playground (if you are experienced with Anchor and prefer to use Anchor CLI, feel free to do so). Navigate to Solana Playground and click on the "Create a new project" button. Name your project something like "Arcade" or "Quick-Tac-Toe" and select "Anchor (Rust)".
Click the "Create" button. Solana Playground will initiate your project. Open lib.rs and note your program name (derived from your project name using snake case after pub mod). Remove the default code and replace it with the following:
use anchor_lang::prelude::*;
use instructions::*;
use state::game::Square;

pub mod errors;
pub mod instructions;
pub mod state;

declare_id!("11111111111111111111111111111111");

#[program]
pub mod quick_tac_toe { // 👈 Replace with your program name
    use super::*;

    // 1. Create a New Token Mint for Playing the Game
    pub fn init(ctx: Context<Init>) -> Result <()> {
        instructions::init::init(ctx)
    }

    // 2. Init New Player Account
    pub fn create_player(ctx: Context<CreatePlayer>) -> Result <()> {
        instructions::create_player::create_player(ctx)
    }

    // 3. Create new game
    pub fn create_game(ctx: Context<CreateGame>, game_id: u64) -> Result<()> {
        instructions::create_game::create_game(ctx, game_id)
    }

    // 4. Join Game
    pub fn join_game(ctx: Context<JoinGame>) -> Result<()> {
        instructions::join_game::join_game(ctx)
    }

    // 5. Make a move
    pub fn play(ctx: Context<Play>, square: Square) -> Result<()> {
        instructions::play::play(ctx, square)
    }

    // 6. Claim reward
    pub fn claim_reward(ctx: Context<ClaimReward>) -> Result<()> {
        instructions::claim_reward::claim_reward(ctx)
    }

}
Make sure to replace the program name with your program name.
This code is the basic framework for our program. We are defining the program to have six primary functions:
- init - This function will create a new token mint for our arcade's play token. We will also initialize a program-state PDA to track our program version and game IDs.
- create_player - This function will create a new player account and airdrop a specified number of play tokens to the user.
- create_game - This function will initialize a new Tic-Tac-Toe game.
- join_game - This function will allow a player to join an open game.
- play - This function will allow a player to make a move in a game.
- claim_reward - This function will allow a player to claim their reward after winning a specified number of games.
We will be building out each of these functions in future lessons. For now, let's create the rest of our program architecture. Before moving on, take note of the top of the code. We are importing our program's instructions, errors, and state. Let's outline those now.
Errors - errors.rs
Create a new file in your /src directory by clicking the new file icon. Name the file errors.rs. Add the following code to the file:
use anchor_lang::error_code;

#[error_code]
pub enum TicTacToeError {
    #[msg("Square is not inside 3x3 board")]
    SquareOffBoard,
    #[msg("Someone has already played this square")]
    SquareAlreadySet,
    #[msg("The game is not active")]
    GameNotActive,
    #[msg("Not your turn")]
    NotPlayersTurn,
    #[msg("This game has already started")]
    GameAlreadyStarted,
    #[msg("Invalid Player")]
    InvalidPlayer,
    #[msg("Reward already claimed")]
    RewardAlreadyClaimed,
    #[msg("Not eligible for reward")]
    NotEligibleForReward
}
This code uses the Anchor error macro to declare our program's errors. We will predefine a few errors that we will use in our program. Each error code (e.g., SquareOffBoard) will be assigned a unique message. We will use these error codes in our program's instructions.
State and Instructions
Let's create the file structure for our state and instructions. Create a new directory by clicking the "New Folder" icon, and name it state. Create another new directory and call it instructions. Make sure both are in your /src directory.
Inside both of the new directories, create a new file, mod.rs.
State
For our program, we will want to define three types of state or data that will be stored in our program's PDAs:
- Game State - This will be the state of a game. It will include the game board, the players, and the game's status.
- Player State - This will be the state of a player. It will include the player's profile, wins and losses, and reward status.
- Program State - This will be the state of our program. It will include the program's version and the game IDs.
We will create those states in the next lesson, but for now, let's define the modules for our state. Open /src/state/mod.rs and add the following code:
pub use game::*;
pub use player::*;
pub use program_state::*;

pub mod game;
pub mod player;
pub mod program_state;
The use statements are importing our state files (we have not created them yet but will soon). The mod statements are defining these as modules. We will use these modules to reference our program's state (e.g., like how we used use state::game::Square; in lib.rs).
Note: You will see in-line errors in your code. This is because we have not yet created the files that we are importing. We will do that in the next lesson.
Instructions
For our program, we will need to define each of the instructions that we outlined in lib.rs. We will create those instructions in a later lesson, but for now, let's define the modules for our instructions as we did for state. Open /src/instructions/mod.rs and add the following code:
pub use init::*;
pub use create_player::*;
pub use create_game::*;
pub use join_game::*;
pub use play::*;
pub use claim_reward::*;

pub mod init;
pub mod create_player;
pub mod create_game;
pub mod join_game;
pub mod play;
pub mod claim_reward;
We are declaring one module for each of our instructions. We will use these modules to reference our program's instructions.
Wrap Up
Great job! You have created the basic framework for your program. If you have followed along with us, your Solana Playground should look like this:
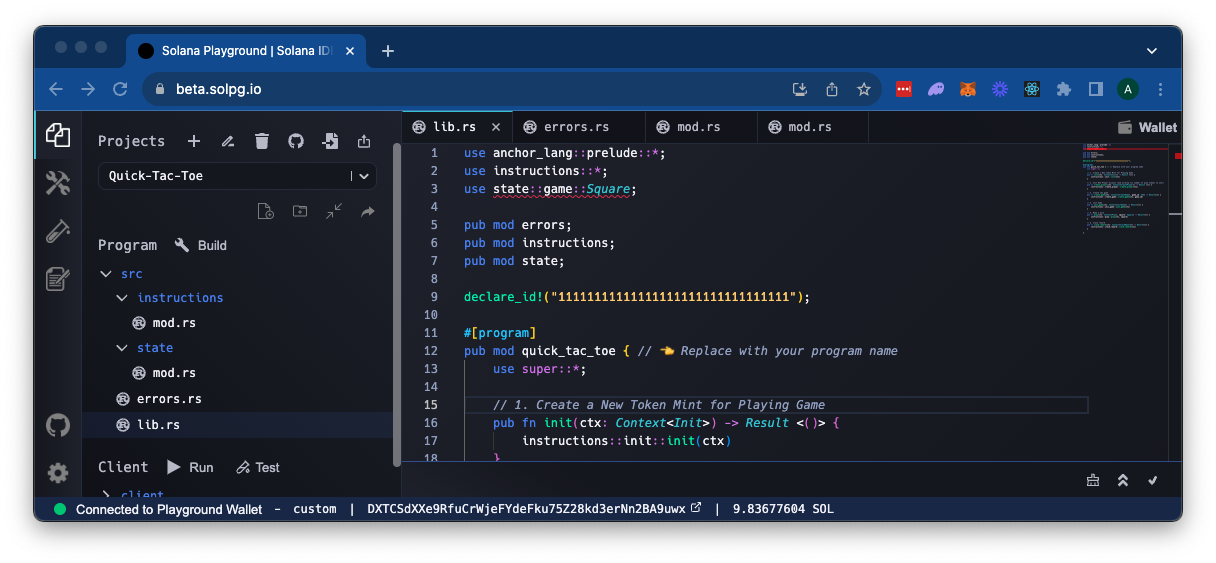
Getting the architecture right is an essential first step in building a program that can save you time down the road and help your program scale. Though this was a quicker exercise, we have a lot of work ahead of us. In the next lesson, we will create the state for our program.