28 min read
Introduction
In the previous lessons, you created a Solana program that allows players to create an account, create a game, and play a game of Tic Tac Toe. In this lesson, you will create client side tests for the Arcade/Tic Tac Toe game you created in the previous lesson.
Anchor has a built in test suite that allows you to test your program in a simulated environment. This is useful for testing your program before deploying it to the Solana devnet or mainnet. In this lesson, you will create a test suite for your game. Let's get started!
Test Setup
Open your project in Solana Playground. The project, when created, was initiated with a ./tests/anchor.test.ts file. This file contains a basic test suite that you can use to test your program. Open it and remove the default contents. We will be writing our own tests.
Solana Playground imports a lot of modules for us, but we will need a few others. Let's add them now. In your editor, add the following imports to help with our PDA derivations and minting our NFT prize:
import { getAssociatedTokenAddressSync } from "@solana/spl-token";
import { PROGRAM_ID as TOKEN_METADATA_PROGRAM_ID } from "@metaplex-foundation/mpl-token-metadata";
Next, let's define a few types we will use in our tests to help us interact with our program. Add the following types to your test file:
type Square = { row: number; column: number };
type Status = { active: {} } | { won: {} } | { tie: {} } | { notStarted: {} };
type Board = ({ x: {} } | { o: {} } | null)[][];
interface PlayArgs {
  square: Square;
  player: web3.Keypair;
  playerRecord: web3.PublicKey;
  otherPlayerRecord: web3.PublicKey;
  game: web3.PublicKey;
  expectedTurn: number;
  expectedState: Status;
  expectedBoard: Board;
  winner?: web3.PublicKey;
}
Notice how enums from our program are typed. They are typed as objects with a single key (e.g., our "X" enum is typed as { x: {} }). You may want to familiarize yourself with the Anchor JavaScript types to help translate between your client and your program.
Next, let's add a few functions that will be helpful to reuse in our tests. First, let's create a function to create a buffer from a number. We will use this when deriving PDAs for our game accounts. Add the following function to your test file:
function numberBuffer(value: bigint): Uint8Array {
  const bytes = new Uint8Array(8);
  for (let i = 0; i < 8; i++) {
    bytes[i] = Number(value & BigInt(0xff));
    value = value >> BigInt(8);
  }
  return bytes;
}
Next, let's create a function that we can call to play a square in our game. Streamlining this step will help us test entire games. Add the following function to your test file:
async function play({
  square,
  player,
  playerRecord,
  otherPlayerRecord,
  game,
  expectedTurn,
  expectedState,
  expectedBoard,
  winner,
}: PlayArgs): Promise<void> {
  try {
    const tx = await pg.program.methods
      .play(square)
      .accounts({
        player: player.publicKey,
        playerRecord,
        otherPlayerRecord,
        game,
      })
      .signers([player])
      .transaction();
    const txHash = await web3.sendAndConfirmTransaction(pg.connection, tx, [player]);

    const gameData = await pg.program.account.game.fetch(game);
    assert.strictEqual(
      gameData.turn,
      expectedTurn,
      `Turn should be ${expectedTurn}`
    );

    assert.deepEqual(gameData.state, expectedState, "State does not match");
    assert.deepEqual(gameData.board, expectedBoard, "Board does not match");
    if (winner) {
      assert.strictEqual(
        gameData.winner.toBase58(),
        player.publicKey.toBase58(),
        "Expect Player O to be in Player O position"
      );
    }
  } catch (err) {
    console.log(err);
  }
}
There's quite a bit happening in this test, so let's break it down:
- First, we pass a
PlayArgsobject to the function (we defined this a moment ago). This object contains everything we need to play a square in our game. - We call the
playmethod on our program, passing the square we want to play. - We pass the player, their player PDA (defined as
playerRecord), the other player's PDA (defined asotherPlayerRecord), and the game account to theaccountsmethod. - We sign the transaction with the player's keypair and call the
rpcmethod to send the transaction to the Solana cluster. - We fetch the game account and assert that the turn, state, and board match what we expect (we pass our expectations in the
PlayArgsobject). - Finally, if we expect a winner (by passing one in our Args), we assert that the winner is the player we expect.
We now have a reusable test function that we can use to play squares in our game. Let's use it to test our game.
Testing Scaffold
Now that our helper types and functions are set up, let's write some tests. We will write a test for each instruction in our program. Let's create our test suite and add some scaffolding to build on. Add the following code to your test file:
describe("Quick-Tac-Toe", () => {
  // Define mint and program state PDAs
  const [mint] = web3.PublicKey.findProgramAddressSync(
    [Buffer.from("play_token_mint")],
    pg.PROGRAM_ID
  );
  const [programState] = web3.PublicKey.findProgramAddressSync(
    [Buffer.from("program_state")],
    pg.PROGRAM_ID
  );

  // Define Player, Keypairs, PDAs, and ATAs
  const playerXKp = new web3.Keypair();
  const playerOKp = new web3.Keypair();

  const [playerXPda] = web3.PublicKey.findProgramAddressSync(
    [Buffer.from("player"), playerXKp.publicKey.toBuffer()],
    pg.PROGRAM_ID
  );
  const [playerOPda] = web3.PublicKey.findProgramAddressSync(
    [Buffer.from("player"), playerOKp.publicKey.toBuffer()],
    pg.PROGRAM_ID
  );

  const playerXAta = getAssociatedTokenAddressSync(mint, playerXKp.publicKey);
  const playerOAta = getAssociatedTokenAddressSync(mint, playerOKp.publicKey);

  const GAME_ID = 1;

  const [game] = web3.PublicKey.findProgramAddressSync(
    [Buffer.from("new_game"), numberBuffer(BigInt(GAME_ID))],
    pg.PROGRAM_ID
  );

  before(async () => {
    // Request and confirm airdrops
    const [drop1, drop2] = await Promise.all([
      pg.connection.requestAirdrop(playerXKp.publicKey, web3.LAMPORTS_PER_SOL),
      pg.connection.requestAirdrop(playerOKp.publicKey, web3.LAMPORTS_PER_SOL),
    ]);
  });

  it("1. Initialize mint", async () => {
    // Add code here
  });

  it("2. Create players", async () => {
    // Add code here
  });

  it("3. Create game", async () => {
    // Add code here
  });

  it("4. Cannot join own game", async () => {
    // Add code here
  });

  it("5. Player O joins game", async () => {
    // Add code here
  });

  it("6. Player X wins game", async () => {
    // Add code here
  });

  it("7. Claims reward", async () => {
    // Add code here
  });
});
Let's break down what's happening here:
- We will need to use a few variables in all of our tests. Let's start by declaring some variables in our global scope:
- Mint and program state PDAs (we derive them using
findProgramAddressSyncand the same seeds we defined in our program) - Player keypairs (we will generate them randomly using
Keypair) - Player PDAs (we derive them using
findProgramAddressSyncand the "player" seed we defined in our program) - Player Token Accounts (we derive them using
getAssociatedTokenAddressSyncand the mint PDA we defined above) - Game PDA (we derive it using
findProgramAddressSyncand the "new_game" seed we defined in our program, and we will start withGAME_IDof 1)
- Mint and program state PDAs (we derive them using
- Next, we will request and confirm airdrops for our players. We will need to do this before each test, so we will add this to a
beforehook. This is necessary to ensure both players have enough SOL to cover transaction fees. - Finally, we will add a few tests. We will add a test for each instruction in our program. We will add the code for each test in the next section.
Testing Instructions
Now that our test suite is set up, let's code each test. If you would like, feel free to take a shot at coding each test on your own. If you need help, you can follow along with the code below.
Initialize Mint
Let's start by testing our init instruction. Update the first test in your test suite to the following:
  it("1. Initialize mint", async () => {
    try {
      // Send transaction
      const tx = await pg.program.methods
        .init()
        .accounts({
          mint,
          programState,
          payer: pg.wallet.publicKey,
        })
        .signers([])
        .transaction();

      // Confirm transaction
    const txHash = await web3.sendAndConfirmTransaction(pg.connection, tx, [pg.wallet.keypair], {skipPreflight: true});

      // Assert token supply
      const tokenSupply = await pg.connection.getTokenSupply(mint);
      assert.strictEqual(
        tokenSupply.value.uiAmount,
        0,
        "Initial token supply should be 0"
      );
    } catch (error) {
      assert.fail(`Error in transaction: ${error}`);
    }
  });
Here's what's happening in this test:
- We call the
initmethod on our program, passing themintandprogramStatePDAs as accounts and the wallet as the payer. - We fetch the token supply for our mint and assert that it is 0.
Feel free to add more checks here if you would like. You could also try running a test beforehand by passing a different mint address--that test should fail because our anchor constraints are looking for a specified mint address seeded with our "play_token_mint" seed.
Create Players
Now that our arcade is initialized let's create player accounts with both users we defined previously. Update your second test with the following code:
  it("2. Create players", async () => {
    try {
      const ixPlayerX = await pg.program.methods
        .createPlayer()
        .accounts({
          player: playerXKp.publicKey,
          playerPda: playerXPda,
          playerTokenAccount: playerXAta,
          mint,
        })
        .instruction();
      const ixPlayerO = await pg.program.methods
        .createPlayer()
        .accounts({
          player: playerOKp.publicKey,
          playerPda: playerOPda,
          playerTokenAccount: playerOAta,
          mint,
        })
        .instruction();
      const tx = new web3.Transaction().add(ixPlayerX, ixPlayerO);
      const txHash = await web3.sendAndConfirmTransaction(
        pg.connection,
        tx,
        [playerXKp, playerOKp],
        { skipPreflight: false, commitment: "finalized" }
      );

      const [playerXData, playerOData] = await Promise.all([
        pg.program.account.player.fetch(playerXPda),
        pg.program.account.player.fetch(playerOPda),
      ]);
      assert.strictEqual(
        playerXData.record.wins,
        0,
        "Should have record with 0 wins."
      );
      assert.strictEqual(
        playerXData.record.losses,
        0,
        "Should have record with 0 losses."
      );
      assert.strictEqual(
        playerXData.record.ties,
        0,
        "Should have record with 0 ties."
      );
      assert.strictEqual(
        playerOData.record.wins,
        0,
        "Should have record with 0 wins."
      );
      assert.strictEqual(
        playerOData.record.losses,
        0,
        "Should have record with 0 losses."
      );
      assert.strictEqual(
        playerOData.record.ties,
        0,
        "Should have record with 0 ties."
      );

      const [playerXTokenBalance, playerOTokenBalance] = await Promise.all([
        pg.connection.getTokenAccountBalance(playerXAta),
        pg.connection.getTokenAccountBalance(playerOAta),
      ]);

      assert.strictEqual(
        playerXTokenBalance.value.uiAmount,
        10,
        "Should have received 10 Tokens."
      );
      assert.strictEqual(
        playerOTokenBalance.value.uiAmount,
        10,
        "Should have received 10 Tokens."
      );
    } catch (error) {
      assert.fail(`Error in transaction: ${error}`);
    }
  });
Here's what's happening in this test:
- We call the
createPlayermethod on our program, passing the player, player PDA, player token account, and mint as accounts. - Instead of calling
.rpc(), this time we call.instruction()to get the instruction data. This allows us to create an instruction for each player and add them to a single transaction using the.addmethod on the Transaction class. - We can then send a single transaction with both instructions using the
sendAndConfirmTransactionmethod on the web3 class (note that we must sign with both of our player keypairs). - Finally, we fetch both players' data using
Promise.alland assert that their records and token balances are correct based on our default values defined in our program.
Create Game
Now that we have our players let's create a game. Update your third test with the following code:
  it("3. Create game", async () => {
    try {
      // Send transaction
      const tx = await pg.program.methods
        .createGame(new BN(GAME_ID))
        .accounts({
          game,
          playerX: playerXKp.publicKey,
          playerPda: playerXPda,
          mint,
          playerTokenAccount: playerXAta,
          programState
        })
        .signers([playerXKp])
        .transaction();

      // Confirm transaction
      const txHash = await web3.sendAndConfirmTransaction(pg.connection, tx, [playerXKp], {skipPreflight: true})

      const gameData = await pg.program.account.game.fetch(game);

      assert.strictEqual(gameData.turn, 0, "Turn should be 0");
      assert.strictEqual(gameData.id.toNumber(), GAME_ID, "ID Should be 1.");
      assert.strictEqual(
        gameData.playerX.toBase58(),
        playerXKp.publicKey.toBase58(),
        "Expect Player X to be in Player X position"
      );

      assert.deepEqual(
        gameData.state,
        { notStarted: {} },
        "State should be not started"
      );
      assert.deepEqual(
        gameData.board,
        [
          [null, null, null],
          [null, null, null],
          [null, null, null],
        ],
        "Board should be empty"
      );
    } catch (error) {
      assert.fail(`Error in transaction: ${error}`);
    }
  });
This test should look pretty similar to our others, but I do want to point out the use of numbers. When using u64/u128/i64/i128 in our program, Anchor's client side types are BN (Big Number):
- Note our game ID parameter in the
createGamemethod. We must convert our number. - Similarly, when we check our game ID in the assertion, we must convert it to a number using the
toNumbermethod.
Tip: If you are using numbers when reading or writing data from your program and you are getting errors, make sure you are using the correct types.
Join Game (expected error)
Now that your game has been initiated by our playerXKp, let's write a test to make sure the same player cannot join their own game. Replace your fourth test with the following code:
  it("4. Cannot join own game", async () => {
    let didThrow = false;
    try {
      // Expect this transaction to fail (Player X join own game as player O)
      const tx = await pg.program.methods
        .joinGame()
        .accounts({
          game,
          playerO: playerXPda,
          playerPda: playerXPda,
          mint,
          playerTokenAccount: playerXAta,
        })
        .signers([playerXKp])
        .transaction();

      // Confirm transaction
    const txHash = await web3.sendAndConfirmTransaction(pg.connection, tx, [playerXKp], {skipPreflight: true})

      // Expect to fail
    } catch (error) {
      didThrow = true;
    } finally {
      assert(didThrow, "Transaction should have thrown an error but didn't.");
    }
  });
All we are doing here is attempting to pass the playerXKp into the jointGame method as the playerO parameter. This should throw an error because the player cannot join their own game. If an error is caught, we will update a didThrow variable to true and assert that it is true in our finally block. This should pass since this player created the game.
Join Game (expected success)
Now, let's test adding the real Player O. Update your 5th test with the following code:
  it("5. Player O joins game", async () => {
    try {
      const txHash = await pg.program.methods
        .joinGame()
        .accounts({
          game,
          playerO: playerOKp.publicKey,
          playerPda: playerOPda,
          mint,
          playerTokenAccount: playerOAta,
        })
        .signers([playerOKp])
        .transaction();

      // Confirm transaction
    const txHash = await web3.sendAndConfirmTransaction(pg.connection, tx, [playerOKp], {skipPreflight: true})

      const gameData = await pg.program.account.game.fetch(game);

      assert.strictEqual(gameData.turn, 1, "Turn should be 1");
      assert.strictEqual(gameData.id.toNumber(), GAME_ID, "ID Should be 1.");
      assert.strictEqual(
        gameData.playerO.toBase58(),
        playerOKp.publicKey.toBase58(),
        "Expect Player O to be in Player O position"
      );
      assert.deepEqual(
        gameData.state,
        { active: {} },
        "State should be not started"
      );
    } catch (error) {
      assert.fail(`Error in transaction: ${error}`);
    }
  });
This test is very similar to our previous test, but this time we are passing the playerOKp into the joinGame method as the playerO parameter (and as our signer). After sending the transction to the netwrok, we are doing a few checks to make sure our game state has updated appropriately:
- verifying that the turn is 1
- verifying that the game ID is unchanged (1)
- verifying that the playerO is now the playerO PDA
- verifying that the game state is now "active" (meaning the game has started)
Play Game
Finally, let's test playing a game. This will require several calls to our play function we created before to allow us to play a full game. If you are going to deploy a program like this to mainnet, you may want to consider testing many different games and variants, but this should be sufficient for our purposes.
Update your 6th test with the following code:
  it("6. Player X wins game", async () => {
    try {
      await play({
        square: { row: 0, column: 0 },
        player: playerXKp,
        playerRecord: playerXPda,
        otherPlayerRecord: playerOPda,
        game,
        expectedTurn: 2,
        expectedState: { active: {} },
        expectedBoard: [
          [{ x: {} }, null, null],
          [null, null, null],
          [null, null, null],
        ],
      });
      await play({
        square: { row: 0, column: 1 },
        player: playerOKp,
        playerRecord: playerOPda,
        otherPlayerRecord: playerXPda,
        game,
        expectedTurn: 3,
        expectedState: { active: {} },
        expectedBoard: [
          [{ x: {} }, { o: {} }, null],
          [null, null, null],
          [null, null, null],
        ],
      });
      await play({
        square: { row: 1, column: 0 },
        player: playerXKp,
        playerRecord: playerXPda,
        otherPlayerRecord: playerOPda,
        game,
        expectedTurn: 4,
        expectedState: { active: {} },
        expectedBoard: [
          [{ x: {} }, { o: {} }, null],
          [{ x: {} }, null, null],
          [null, null, null],
        ],
      });
      await play({
        square: { row: 1, column: 1 },
        player: playerOKp,
        playerRecord: playerOPda,
        otherPlayerRecord: playerXPda,
        game,
        expectedTurn: 5,
        expectedState: { active: {} },
        expectedBoard: [
          [{ x: {} }, { o: {} }, null],
          [{ x: {} }, { o: {} }, null],
          [null, null, null],
        ],
      });
      await play({
        square: { row: 2, column: 0 },
        player: playerXKp,
        playerRecord: playerXPda,
        otherPlayerRecord: playerOPda,
        game,
        expectedTurn: 5, // Since game is over - turn won't increment
        expectedState: { won: {} },
        expectedBoard: [
          [{ x: {} }, { o: {} }, null],
          [{ x: {} }, { o: {} }, null],
          [{ x: {} }, null, null],
        ],
        winner: playerXKp.publicKey,
      });
    } catch (error) {
      assert.fail(`Error in transaction: ${error}`);
    }
  });
Here, we are running our play function five times to play a complete game. We alternate the player each time and specify an unplayed square. We have constructed expected states based on our program logic and our expected board based on our moves. We do not need to make any assertions in this test because they are all handled in our play function.
Feel free to create variants of this test that test different game scenarios (e.g, you could also create a test that tests a tie game).
Claim Reward
Now, we just need to test claiming a reward. To do this we are going to need to derive PDAs for our mint, metadata, and edition accounts. We will also need to derive an associated token account for our player. Update your 7th test with the following code:
  it("7. Claims reward", async () => {
    const mintKeypair = new web3.Keypair();

    // Derive the PDA of the metadata account for the mint.
    const [metadataAddress] = web3.PublicKey.findProgramAddressSync(
      [
        Buffer.from("metadata"),
        TOKEN_METADATA_PROGRAM_ID.toBuffer(),
        mintKeypair.publicKey.toBuffer(),
      ],
      TOKEN_METADATA_PROGRAM_ID
    );

    // Derive the PDA of the master edition account for the mint.
    const [editionAddress] = web3.PublicKey.findProgramAddressSync(
      [
        Buffer.from("metadata"),
        TOKEN_METADATA_PROGRAM_ID.toBuffer(),
        mintKeypair.publicKey.toBuffer(),
        Buffer.from("edition"),
      ],
      TOKEN_METADATA_PROGRAM_ID
    );

    // Derive the associated token address account for the mint and payer.
    const associatedTokenAccountAddress = getAssociatedTokenAddressSync(
      mintKeypair.publicKey,
      playerXKp.publicKey
    );

    try {
      // Send transaction
      const tx = await pg.program.methods
        .claimReward()
        .accounts({
          player: playerXKp.publicKey,
          playerPda: playerXPda,
          metadataAccount: metadataAddress,
          editionAccount: editionAddress,
          mintAccount: mintKeypair.publicKey,
          associatedTokenAccount: associatedTokenAccountAddress,
          tokenMetadataProgram: TOKEN_METADATA_PROGRAM_ID,
        })
        .signers([playerXKp, mintKeypair])
        .transaction();

      // Confirm transaction
      const txHash = await web3.sendAndConfirmTransaction(pg.connection, tx, [playerXKp, mintKeypair], {skipPreflight: true})
      const playerData = await pg.program.account.player.fetch(playerXPda);
      assert(playerData.rewardClaimed, "Reward should be claimed.");
    } catch (error) {
      assert.fail(`Error in transaction: ${error}`);
    }
  });
This instruction is a little different since it is interacting with new accounts and the Metaplex Metadata program. Here's what's happening:
- We create a new keypair for our mint.
- We derive the metadata and edition PDAs for our mint. For more information on these accounts and seeds, check out Metaplex documentation.
- We derive the token account for our mint and player.
- We call the
claimRewardmethod on our program. We sign with both the player and mint keypairs (necesary for creating the new mint account). - We fetch the player data to ensure the reward state has been updated to claimed.
Nice job! We are not ready to test our program.
Local Testing
Now that we have our test suite set up, let's run it on a local cluster to ensure it works. First, update your Solana Playground cluster to localhost by clicking the ⚙️ icon in the bottom left and selecting "Localhost":
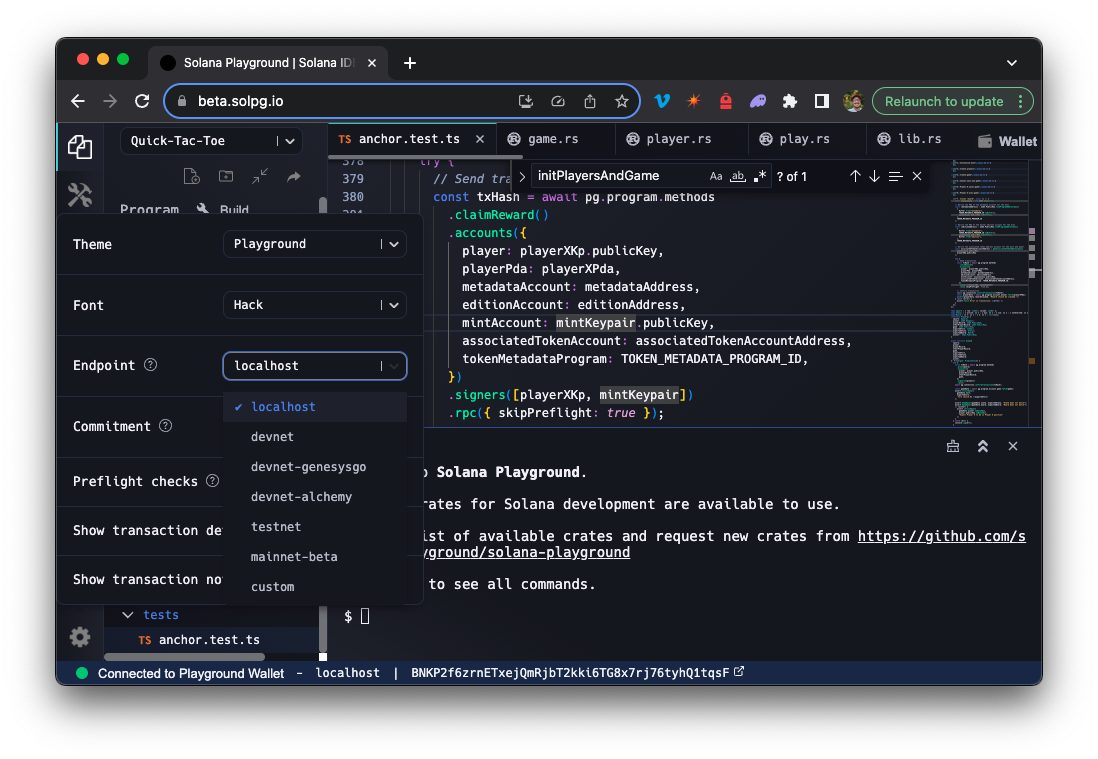
Before we start a local validator, we are going to need to fetch the program data for the Metaplex metadata program. This is because the program is not included in the Solana CLI toolkit (it is a non-native program), but we need it for our claim reward step. To do this, open a new terminal and navigate to a project directory. Run the following command:
solana program dump -u m metaqbxxUerdq28cj1RbAWkYQm3ybzjb6a8bt518x1s metadata.so
This will fetch the executable program data for the Metaplex metadata program (from the mainnet cluster) and save it to a file called metadata.so in your current directory.
Now let's start our local validator. Open a new terminal and run the following command:
solana-test-validator -r --bpf-program metaqbxxUerdq28cj1RbAWkYQm3ybzjb6a8bt518x1s metadata.so
This will start a new local validator instance (-r will reset the ledger to the genesis state) with the Metaplex metadata program loaded. For more information on loading programs into your local environment, check out our Guide: How to Fork and Deploy Solana Accounts & Programs from Mainnet to Localhost.
Now that our validator is running let's run our tests. Head back over to your Solana Playground terminal and follow the following steps:
- Airdrop your wallet some SOL (this is necessary because our localhost was just started from genesis state). In the Solana Playground terminal, run the following command:
solana airdrop 100
- Build your program by clicking "Build" or entering
buildin your playground terminal. - Deploy your program to the local cluster by clicking "Deploy" or entering
deployin your playground terminal. - After your program is deployed, you are all ready to go. Click "Test" or enter
testin your playground terminal to run your test suite. You should see the following output:
$ deploy
Deploying... This could take a while depending on the program size and network conditions.
Deployment successful. Completed in 8s.

$ test
Running tests...
  anchor.test.ts:
  Quick-Tac-Toe
    ✔ 1. Initialize mint (21319ms)
    ✔ 2. Create players (20625ms)
    ✔ 3. Create game (20352ms)
    ✔ 4. Cannot join own game
    ✔ 5. Player O joins game (20449ms)
    ✔ 6. Player X wins game (3192ms)
    ✔ 7. Claims reward (571ms)
  7 passing (1m)
$
Nice job! You have successfully created and tested a test suite for your program on a local cluster. Feel free to double check your code against us if you have run into any issues. Here is a link to our project. Also, feel free to jump into our Discord--we are here to help!
Deploy to Devnet
You are welcome to continue testing your program (and soon, front end) using localhost. However, if you want to try your program on a public network, you can deploy it to the Solana devnet. To do this, reconfigure your Solana Playground back to devnet by clicking the ⚙️ icon in the bottom left and selecting "Devnet" (or pasting your Quicknode devnet endpoint).
Since your program is already built, you just need to deploy it. Make sure you have ~5-10 devnet SOL in your wallet. If you do not, jump over to Solana's faucet and request some. Once you have some SOL, click "Deploy" or enter deploy in your playground terminal.
After a minute or two, you should see a success message. You should be able to search for your Program ID in Solana Explorer (devnet) and see your program deployed. Here's ours: https://explorer.solana.com/address/QTTmCrRSrMhPtZS431TSmtiosubJoqfExRhi7JHcJhC?cluster=devnet.
Great job!
Init Your Program
Since we will not want to build a UI for program initialization, let's leverage a handy tool inside of Solana Playground to do that for us. Click the test tube 🧪 icon ("Test") on the side bar. This will open a test suite where you can call any instruction in your program. Under "init," utilize Playground's PDA generator by clicking "mint" and selecting "from seed." Enter our mint seed ("play_token_mint") and click "Generate":
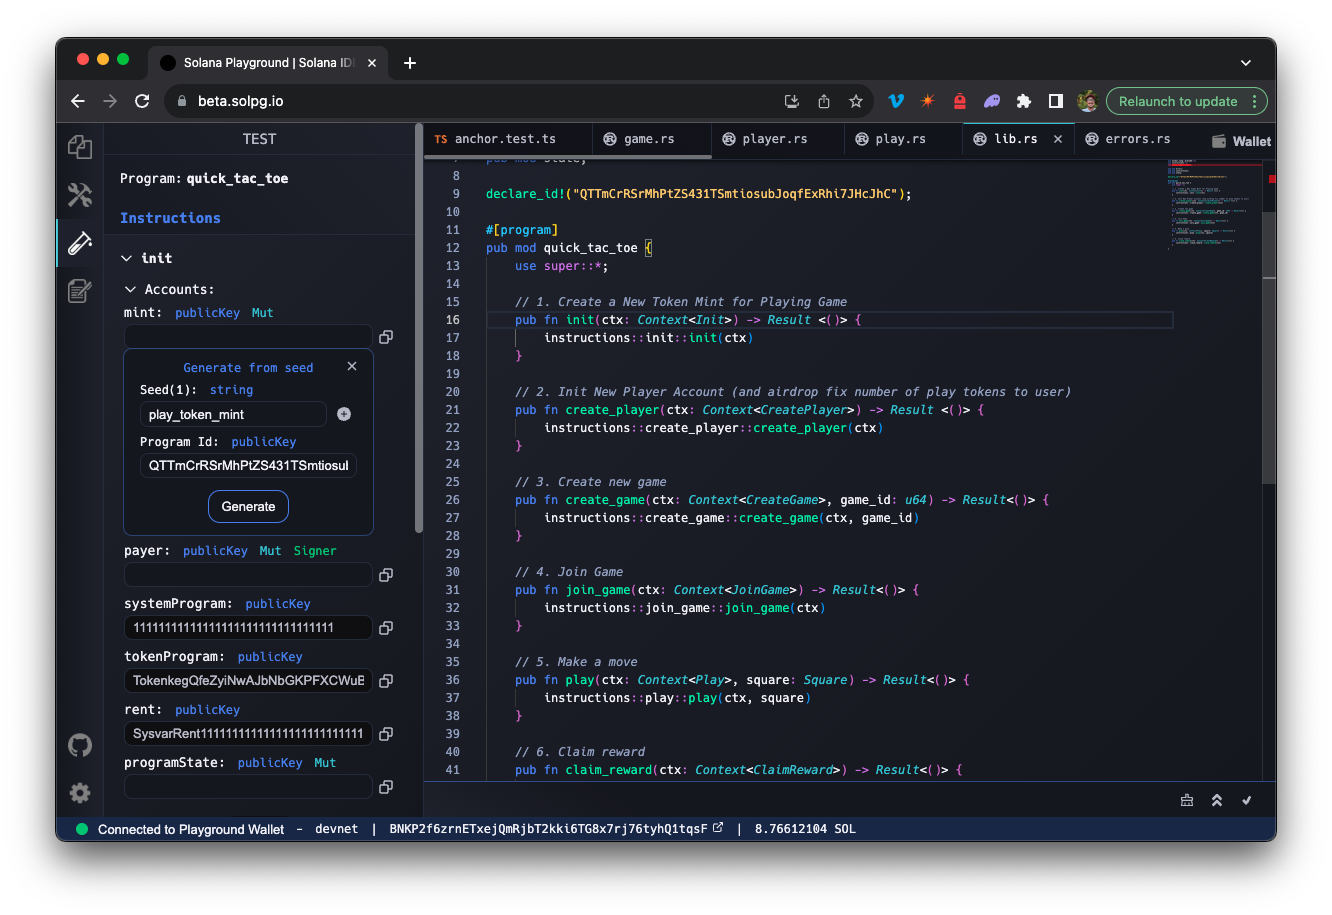
For "payer," select "My address," and for "programState," derive the address using the "program_state" seed.
Click "Test," and Solana Playground will execute your instruction for you. How cool is that? You should be able to see your new mint account on Solana Explorer!
If you run into any errors, try and trace the error codes. Often this is due to an issue with passing an incorrect PDA, a timing issue (e.g., missing an await in one of your tests), or a typo in your program. If you're still running into issues--feel free to reach out to us on Discord. We're here to help.
All set!
You have done it! You have built and deployed your program to Solana's devnet. We have tested it to make sure it is working correctly. Great work! Building programs gets easier with practice, so if you struggled at all with this, do not worry. Revisit the code, ask questions, and keep building.
Next lesson, we will build a front end to bring our game to life!