8 min read
Introduction
In the last lesson, we talked about many of the basic building blocks of Solana. You learned about the different types of accounts and how to browse account data on Solana Explorer. You also learned about instructions and transactions and conceptually how those get processed on the Solana blockchain. In this lesson, we will use the Solana Command Line Interface to read account and transaction data and send transactions to the Solana blockchain.
Solana CLI
The Solana Command Line Interface is a handy tool for interacting with the Solana blockchain directly from your terminal. Once installed, you can use the CLI by calling solana followed by a command. As you will see, the CLI can be used to create a new wallet, check your balance, send transactions, and more.
If you do not already have it, you will need to install Solana CLI. You can find instructions for your operating system here. Once you have the CLI installed, you can run the following command to see a list of all the available commands:
Though we will not be using it today, we recommend installing the SPL Token CLI as well. This tool works with the Solana CLI to make it easy for you to create and manage Solana tokens.
Version and Help
Let's start by checking the version of the Solana CLI we have installed. In your terminal, enter:
solana -V
You should see something like this:
qn-demo % solana -V
solana-cli 1.17.3 (src:c9e8f9c8; feat:3079302975, client:SolanaLabs)
You can also get a menu of commands by running solana help followed by the command you want help with. Give it a shot. You should see a list of dozens of commands. We will not cover all of these, so feel free to take some time to explore and experiment with the CLI.
Similarly, you may also get help on any command by running solana COMMAND_NAME -h For example, if you want to get help on the config command, you can run:
solana config -h
This will return details about the command, including subcommands, options, and flags that can be used with the command.
Configuration Overview
Before we can use the Solana CLI, we need to configure it for a specific cluster and keypair (wallet). We can fetch the current config by running:
solana config get
This should return a directory where your config is stored, along with the RPC endpoint and path to your paper wallet:
Config File: /Users/qn-demo/.config/solana/cli/config.yml
RPC URL: http://localhost:8899
WebSocket URL: ws://localhost:8900/ (computed)
Keypair Path: /Users/qn-demo/.config/solana/wallet.json
Commitment: confirmed
Here's a summary of what's returned:
- Config File: This is the path to the configuration file being used. You can open this file in a text editor to see the details of your config.
- RPC URL: This specifies to the CLI which Solana cluster we want to communicate with (e.g., Mainnet, Devnet, or Testnet)
- WebSocket URL: This is the WebSocket URL for the cluster we are using. The CLI computes this based on the RPC URL.
- Keypair Path: This is the path to the keypair (file system wallet) we are using. This is a JSON file that contains a Unit 8 Array of 64 bytes. This is the private key for the keypair. The public key can be derived from the private key.
- Commitment: This specifies the commitment level for the cluster. This is used to determine how many blocks to wait before considering a transaction final.
A file system wallet, or FS wallet, is a directory in your computer's file system. Each file in the directory holds a keypair. We will use these frequently throughout this course.
File System Wallet Security
A file system wallet is the most convenient and least secure wallet. It is convenient because the keypair is stored in a simple file. You can generate as many keys as you would like and trivially back them up by copying the files. It is insecure because the keypair files are unencrypted. If you are the only user of your computer and you are confident it is free of malware, an FS wallet is a fine solution for small amounts of cryptocurrency. If, however, your computer contains malware and is connected to the Internet, that malware may upload your keys and use them to take your tokens. Likewise, because the keypairs are stored on your computer as files, a skilled hacker with physical access to your computer may be able to access it. Using an encrypted hard drive, such as FileVault on MacOS, minimizes that risk.
Source: Solana CLI Wallet Guide
Let's create a wallet and configure our Solana CLI with the new wallet and our Quicknode endpoint.
Create and Set a Wallet
In your terminal, run the following command to create a new wallet:
solana-keygen new --silent --no-bip39-passphrase --outfile wallet.json
Though you do not have to, I am using a couple of flags here to make the process a little easier.
- The
--silentflag will prevent the CLI from displaying a seed phrase (which we will not need for our demonstrations). - The
--no-bip39-passphraseflag will prevent the CLI from asking you to enter a passphrase. - The
--outfileflag will allow you to specify the path and filename for the keypair. You will need to specify a path or use the--forcetag to overwrite the default path (Be careful never to overwrite a keypair you are using in production).
The result is a new wallet named wallet.json. To configure our CLI to use this wallet, we need to copy the path to the wallet and run the following command:
solana config set -k PATH/TO/wallet.json
Where you replace wallet.json with the path to your newly created wallet. We recommend using an absolute path to avoid any issues if you change the directory in your terminal.
You should not be able to run solana config get and see your new wallet path in the output, and you can also use the address command to fetch the public key for your wallet:
solana address
Nice job! You should see your wallet's address in the terminal, demonstrating that you have successfully configured your Solana CLI to use your new wallet.
For more information on creating wallets with different security and cosmetic features, you can check out the help menu by running solana-keygen new --help in your terminal or by checking out our Guide: Create a Vanity Wallet Address with Solana-Keygen.
Set Your Endpoint
Head over to your Quicknode Dashboard to get your HTTP endpoint for Solana's devnet (check back to Lesson 1 for instructions if you need help):
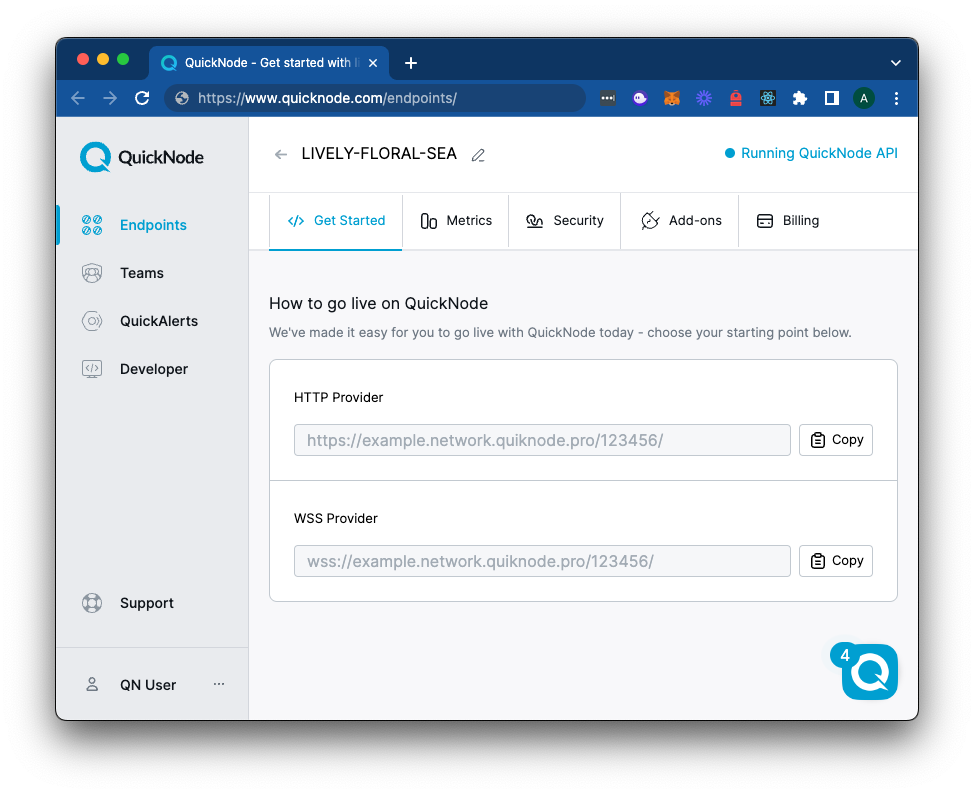
Simply sign in, copy the HTTP Endpoint in your account dashboard, and use it in the script below:
solana config set --url https://YOUR_QUICKNODE_ENDPOINT.quiknode.pro/123456
Make sure to replace the endpoint with your own, or you will not be able to connect to the Solana cluster.
You should see the updated configuration in your terminal pointing to your wallet and endpoint!
You can now verify that our new wallet has a 0 balance on Solana devnet by running:
solana balance
You should see:
0 SOL
That's great, but we will need some SOL to get anything done. Let's get some!
🪂 Airdrop SOL
As we learned in the previous lesson, we need Solana's native token, SOL, to pay transaction fees and to create accounts on the Solana blockchain. For interacting with Devnet, we can get some SOL for testing from a faucet. Faucets are services that will send you a small amount of Devnet SOL for free. You can access a faucet through the CLI by running:
solana airdrop 1
This should give you 1 SOL for testing. If you try running the command multiple times, you may see this error: Error: airdrop request failed. This can happen when the rate limit is reached. As you journey more into Solana development, you will likely need more dev SOL than the faucet can provide. Fortunately, there are other public faucets you can use:
Transfer SOL
Now that we have some SOL let's send some to another wallet. We can do this by running:
solana transfer SOME_WALLET_ADDRESS 0.1
Make sure to replace SOME_WALLET_ADDRESS with one of your own. You can use the same address as your wallet, but we recommend using a different one so you can see the balance change. You should see something like this:
Signature: YZ4w7cTcHZqYoDvu8PSyzWiGzsPRfByCzywjNPnKCRdjQDtY4rVjc25N8SKM8tN5dwBEF59owUeP3fBSKdJPVYS
You can head over to Solana Explorer and search for the transaction (make sure you select Devnet). You should see both accounts in the transaction with your account debited 0.1 SOL and the other account credited 0.1 SOL:
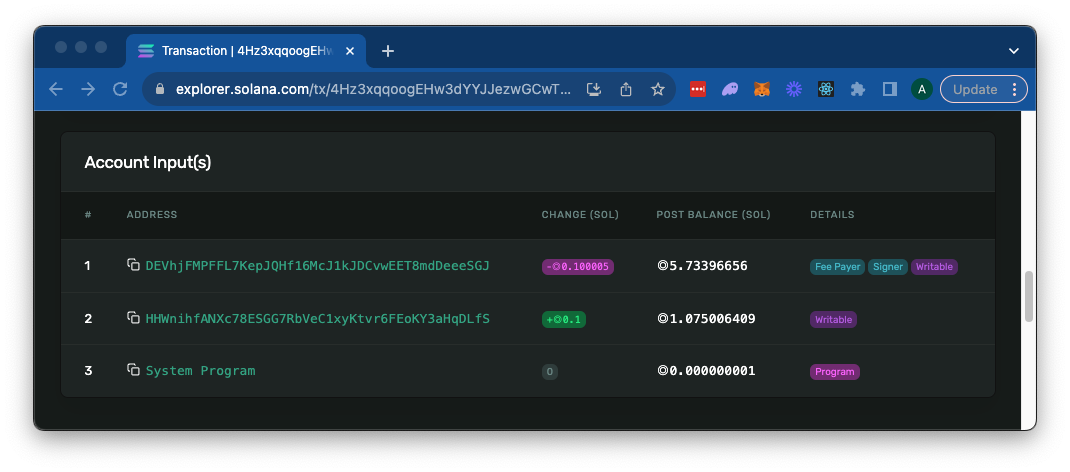
You can also check the confirmation status of your transaction by using the signature in the following CLI command:
solana confirm YOUR_TRANSACTION_SIGNATURE -v
The -v flag will return the transaction details, similar to what you saw on the Explorer. Among other information, you should be able to identify the transfer instruction and the summary of balance changes:
  Instruction 0
    Program:   11111111111111111111111111111111 (2)
    Account 0: DEVhjFMPFFL7KepJQHf16McJ1kJDCvwEET8mdDeeeSGJ (0)
    Account 1: HHWnihfANXc78ESGG7RbVeC1xyKtvr6FEoKY3aHqDLfS (1)
    Transfer { lamports: 100000000 }
  Status: Ok
    Fee: ◎0.000005
    Account 0 balance: ◎5.83397156 -> ◎5.73396656
    Account 1 balance: ◎0.975006409 -> ◎1.075006409
    Account 2 balance: ◎0.000000001
Easy, right? There is a ton you can do with Solana and Solana CLI. We will use some additional functionality throughout the course, but we encourage you to take some time to explore the CLI and see what else you can do with it. Remember, you can see all available commands with solana help, and you can get help on any command by running solana COMMAND_NAME -h.
Recap
In this lesson, we learned how to use the Solana CLI to read and write to the Solana blockchain. We covered the basics of creating a new wallet, connecting to a Solana cluster, querying accounts, and sending transactions. With CLI, we have the basic building blocks for building on Solana from our terminal. In the next lesson, we will learn how to use Solana-Web3.js to interact with Solana from a JavaScript application.