23 min read
Introduction
In the previous lesson, you learned how to use Solana-Web3.js. Though this tool is quite handy, we only discussed how to use a file system wallet for signing. What if you want to connect to a user's wallet from your website and have users sign transactions with their wallet? In this lesson, we will learn about the Solana Wallet Adapter and how to use it to read and write to the Solana blockchain from your dapp.
Solana Wallet Adapter
The Solana Wallet Adapter is an open-source library maintained by Solana Labs that makes it easy to connect to a wallet and sign transactions. The adapter supports the Wallet Standard and is compatible with many popular wallets, including Phantom, Solflare, etc. If you have used a Solana dapp before, you have likely used the Solana Wallet Adapter. In addition to based utilities, the adapter also provides react and UI libraries to make it easy to connect to a wallet and display wallet information in your dapp.
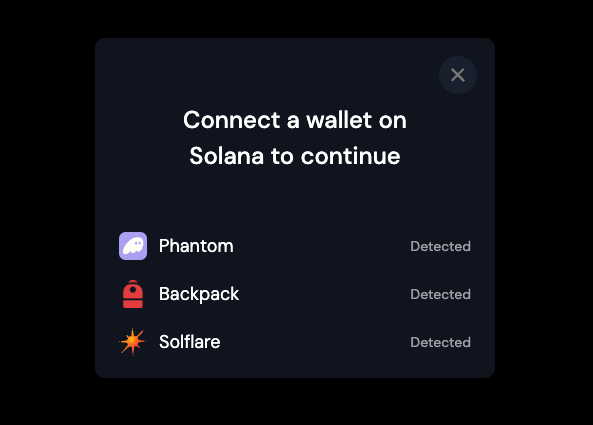
A typical implementation of the Solana Wallet Adapter is to wrap your entire application in a WalletProvider component. This will allow your entire app access to your wallet to connect to a wallet and sign transactions. Let's build an app and try it out!
Create a Next.js App
Clone the Quicknode Examples Repository:
git clone https://github.com/quiknode-labs/qn-guide-examples.git
Open the Solana Basics Starter project in your terminal:
cd courses/solana-basics/starter
And install the dependencies (which includes the Solana Wallet Adapter):
npm install # or yarn
Great job. You should be able to test that everything is running by running the development environment:
npm run dev
When you are ready, let's start building our app!
App
Our app folder includes the principal, top-level components of our app. We are working with a simple create-next-app app that will require a few changes to get our app up and running.
app/layout.tsx
Open up the layout.tsx file, which includes our root layout and metadata. Let's update metadata with your project name/details:
export const metadata: Metadata = {
  title: 'Quick-Tac-Toe',
  description: 'Solana Basics Course',
}
Feel free to update the title and description to whatever you like.
app/page.tsx
The page.tsx file is the UI for the / URL of our app. Replace your home page with the following:
'use client'

import React from 'react';
import SolanaProviders from '@/components/SolanaProviders';
import Main from '@/components/Main';
import Navbar from '@/components/Navbar';

export default function Home() {

  return (
    <SolanaProviders>
      <Navbar/>
      <Main/>
    </SolanaProviders>
  )
}
This will outline our basic page structure. You see we have wrapped the main body of our application with a SolanaProviders component (this will allow us to connect to a wallet and the Solana blockchain). We have also added a Navbar and Main component. We will create these components and add more components to this page later.
Environment Variables
Create an .env.local file in the root of your project to store your environment variables:
echo > .env.local
Add two environment variables to your .env.local file: NEXT_PUBLIC_CLUSTER and NEXT_PUBLIC_ENDPOINT. These will be used to connect to the Solana blockchain:
echo NEXT_PUBLIC_CLUSTER=devnet >> .env.local && echo NEXT_PUBLIC_ENDPOINT=https://example.solana-devnet.quiknode.pro/123456/ >> .env.local
Make sure to update your endpoint with your Quicknode endpoint, as the one above is just an example and will not work.
Utils
Let's add some utility functions to our app that will handle some repetitive tasks for us. In your terminal, run the following command to create a new utils directory and create the files we will need for our constants and utils functions:
mkdir utils && echo > utils/constants.ts && echo > utils/utils.ts
Open up the newly created constants.ts and add the following code:
import { WalletAdapterNetwork } from "@solana/wallet-adapter-base";
import { Cluster, clusterApiUrl } from "@solana/web3.js";

export const cluster: Cluster = process.env.NEXT_PUBLIC_CLUSTER as Cluster || 'devnet';
export const endpoint: string = process.env.NEXT_PUBLIC_URL || clusterApiUrl(WalletAdapterNetwork.Devnet);
This will allow us to use our environment variables throughout our application easily. We use || to provide a default value if the environment variable is not set (in this case, devnet).
Open up the newly created utils.ts and add the following code:
import { Cluster, Connection, TransactionSignature, TransactionConfirmationStatus, SignatureStatus } from "@solana/web3.js";
export const getExplorerUrl = (signature: string, cluster: Cluster) => {
    return `https://explorer.solana.com/tx/${signature}?cluster=${cluster}`;
}
export const shortenHash = (str:string) => {
    return `${str.slice(0, 4)}...${str.slice(-4)}`;
}
async function confirmTransaction(
    connection: Connection,
    signature: TransactionSignature,
    desiredConfirmationStatus: TransactionConfirmationStatus = 'confirmed',
    timeout: number = 30000,
    pollInterval: number = 1000,
    searchTransactionHistory: boolean = false
): Promise<SignatureStatus> {
    const start = Date.now();

    while (Date.now() - start < timeout) {
        const { value: statuses } = await connection.getSignatureStatuses([signature], { searchTransactionHistory });

        if (!statuses || statuses.length === 0) {
            throw new Error('Failed to get signature status');
        }

        const status = statuses[0];

        if (status === null) {
            await new Promise(resolve => setTimeout(resolve, pollInterval));
            continue;
        }

        if (status.err) {
            throw new Error(`Transaction failed: ${JSON.stringify(status.err)}`);
        }

        if (status.confirmationStatus && status.confirmationStatus === desiredConfirmationStatus) {
            return status;
        }

        if (status.confirmationStatus === 'finalized') {
            return status;
        }

        await new Promise(resolve => setTimeout(resolve, pollInterval));
    }

    throw new Error(`Transaction confirmation timeout after ${timeout}ms`);
};
This will create two utility functions that we will use later to create links to the Solana Explorer and shorten long hashes.
Components
Let's start by building out the components we outlined in our app/page.tsx file. In your terminal, run the following command to create a new components directory and create the files we will need for our Main, Navbar, and SolanaProviders components:
mkdir components && \
    echo > components/Main.tsx && \
    echo > components/Navbar.tsx && \
    echo > components/SolanaProviders.tsx
Solana Providers
To use the Solana Wallet Adapter, we need to wrap our application in a few Contexts from the Wallet Adapter's libraries. These will allow our app to access the wallet (for connecting, signing, etc.), the network (for connecting to the Solana blockchain), and a handy modal to make connecting to a wallet easier.
Open up the newly created SolanaProviders.tsx and add the following code:
import { ConnectionProvider } from '@solana/wallet-adapter-react';
import React, { useMemo } from 'react';
import { WalletProvider } from '@solana/wallet-adapter-react';
import { WalletModalProvider } from '@solana/wallet-adapter-react-ui';
import { PhantomWalletAdapter, SolflareWalletAdapter } from '@solana/wallet-adapter-wallets';
import { endpoint } from '@/utils/constants';

require('@solana/wallet-adapter-react-ui/styles.css');

type SolanaProvidersProps = {
    children: React.ReactNode;
}
const SolanaProviders = ({ children }: SolanaProvidersProps) => {
    const walletEndpoint = useMemo(() => endpoint, []);
    const wallets = useMemo(() => [
        new PhantomWalletAdapter(),
        new SolflareWalletAdapter(),
    ], [])

    return (
        <ConnectionProvider endpoint={walletEndpoint}>
            <WalletProvider wallets={wallets} autoConnect>
                <WalletModalProvider>
                    {children}
                </WalletModalProvider>
            </WalletProvider>
        </ConnectionProvider>
    );
}

export default SolanaProviders;
Let's break down everything that is included in this wrapper:
- Our outermost wrapper is the
ConnectionProvider. This will allow our app to connect to the Solana blockchain. We pass in our endpoint from our environment variables. - Next, we wrap our app in the
WalletProvider. This will allow our app to connect to a wallet. We pass in our wallets array, which contains the wallets we want to support (we have imported Phantom and Solflare, but you can include others if you would like from the@solana/wallet-adapter-walletslibrary). We also setautoConnecttotrueso the wallet will automatically connect to the first available wallet. - Finally, we wrap our app in the
WalletModalProvider. This will allow us to use the default modal to connect to a wallet.
If you recall, we use this component in our app/page.tsx file:
    <SolanaProviders>
      <Navbar/>
      <Main/>
    </SolanaProviders>
This will wrap our entire app in these contexts, allowing us to access them from anywhere in our app.
Navbar
Let's create a Navbar with a button that users can use to connect/disconnect their wallet from our app. Open up the newly created Navbar.tsx and add the following code:
'client'
import React from "react";
import dynamic from "next/dynamic";
import Link from 'next/link';

const WalletMultiButtonDynamic = dynamic(
  async () => (await import('@solana/wallet-adapter-react-ui')).WalletMultiButton,
  { ssr: false }
);

const Navbar = () => {
  return (
    <div className="w-full h-20 bg-gray-800 sticky top-0 z-20">
      <div className="container mx-auto px-4 h-full">
        <div className="flex justify-between items-center h-full">
          <Link href="/">
          Quick-Tac-Toe
          </Link>
          <WalletMultiButtonDynamic />
        </div>
      </div>
    </div>
  );
};

export default Navbar;
All we are doing here is defining some styling to create a bar at the top of our screen and including the WalletMultiButton from the @solana/wallet-adapter-react-uit library.
Instead of importing the button directly, we must use Next's dynamic method to disable prerendering on this specific component, which can prevent hydration mismatches. (Ref: Next.js Docs)
Main
Finally, let's create our Main component. This will be the main content of our page. Open up the newly created Main.tsx and add the following code:
import { useWallet } from '@solana/wallet-adapter-react';
import Balance from './Balance';

const Main = () => {
    const { connected } = useWallet();
    return (
        <div className="flex flex-col items-center justify-between p-24">
            {connected ?
                <div className="flex flex-col items-center justify-center">
                    <Balance />
                </div>
                :
                <div>Wallet Not Connected</div>}
        </div>
    )
}
export default Main;
Here, we use the useWallet hook from the @solana/wallet-adapter-react library to check if the user is connected to a wallet. If they are, we display the Balance component (we will create this next). If they are not, we show a message that the wallet is not connected. The useWallet hook is provided by the WalletProvider we created in the SolanaProviders component--it is a handy hook that will allow us to interact with the wallet.
Balance
In the previous step, we called a Balance component when the user's wallet is connected. Let's create that component now to display the connected wallet's SOL balance. First, create a new component, Balance.tsx:
echo > components/Balance.tsx
Open Balance.tsx and add the following code:
import { useWallet, useConnection } from "@solana/wallet-adapter-react";
import { LAMPORTS_PER_SOL } from "@solana/web3.js";
import { useEffect, useState } from "react";

const useSolanaBalance = () => {
    const [balance, setBalance] = useState(0);
    const [isLoading, setLoading] = useState(false);
    const { publicKey } = useWallet();
    const { connection } = useConnection();
    useEffect(() => {
        async function fetchBalance() {
            // ADD CODE HERE
        }

        fetchBalance();
    }, [publicKey, connection]);

    return { balance, isLoading };
};

const Balance = () => {
    const { balance, isLoading } = useSolanaBalance();

    return (
        <div className="flex justify-center items-center v-screen">
            {isLoading ? "Loading..." : `Balance: ${balance} SOL`}
        </div>
    );
};

export default Balance;
Here, we are creating a custom hook, useSolanaBalance, that will fetch the balance of the connected wallet. We use the useWallet hook to get the public key of the connected wallet and the useConnection hook to get the connection to the Solana blockchain. We use the useEffect hook to fetch the balance when the public key or connection changes (we will create the fetchBalance function next). Finally, we return the balance and a loading state from our hook.
Next, we use our custom hook in the Balance component. We display the balance if it is not loading and display a loading message if it is.
If you would like, go ahead and try to write the fetchBalance function yourself based on the Solana-Web3.js lesson. If you get stuck, you can find the solution below:
        async function fetchBalance() {
            if (!publicKey) return;

            setLoading(true);
            try {
                const balance = await connection.getBalance(publicKey, 'confirmed');
                setBalance(balance / LAMPORTS_PER_SOL);
            } catch (error) {
                console.error('Failed to fetch balance:', error);
            } finally {
                setLoading(false);
            }
        }
- First, we check if the public key exists. If it does not, we exit the function.
- Next, we set the loading state to
trueto indicate that we are fetching the balance. - Now, we use the
getBalancemethod from the@solana/web3.jslibrary to fetch the balance of the connected wallet. - We divide the returned
balancebyLAMPORTS_PER_SOLto convert it from lamports to SOL. We also add a try/catch block to handle any errors that may occur. - Finally, we set the loading state to
falseonce the balance has been fetched.
If you are following along, your code should be error-free, and you should be able to test it out by running the following command:
npm run dev
Or you can use your preferred package manager
If you open up your browser to localhost:3000, you should see a page that displays your devnet wallet balance after connecting your wallet:
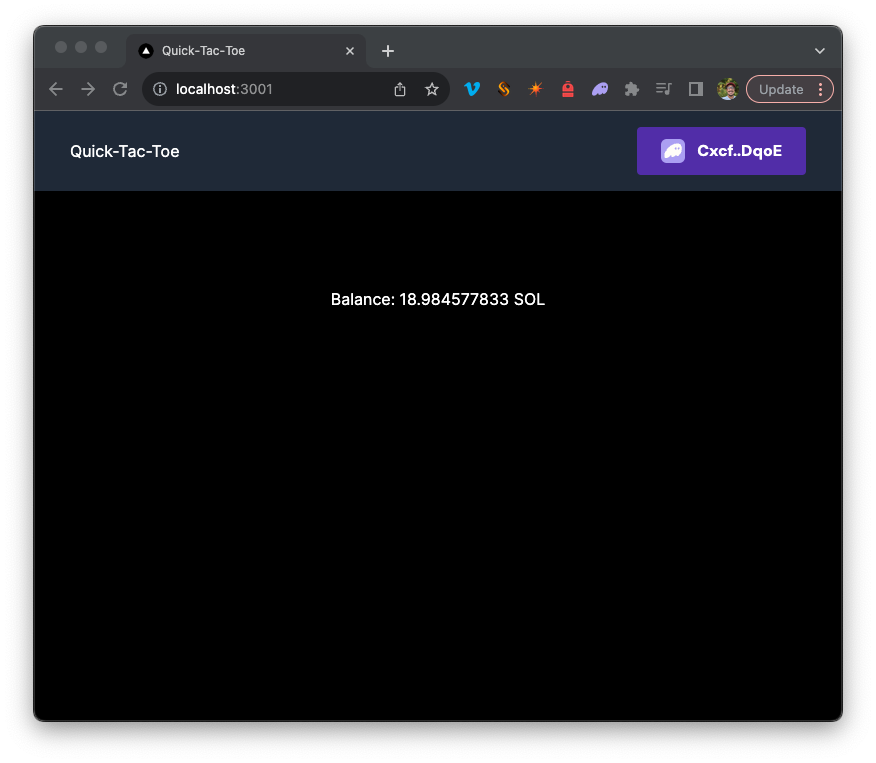
Nice job! You are now reading the blockchain and rendering it to your web application. Let's take it a step further and write to the blockchain by constructing and sending a basic transaction.
Add Transaction Button
Before we build out our transaction, let's start by adding a new component to our Main component. This will help us see what we need to build. Inside of your Main component,
- Add this to your import statements at the top of the file:
import SendMemoButton from './SendTransactionButtons/SendMemo';
- Add this to your return statement directly below
<Balance />:
<SendMemoButton message='Hello from Quicknode!' />
Create a Transaction Template
So, we now need to create a SendMemoButton component. For our project, we are likely to need to send a few different types of transactions, but many of those transactions will have similar properties. Let's create a transaction template that we can use to assemble transactions for our project.
In your terminal, create a new directory and file for our transaction template:
mkdir components/SendTransactionButtons && echo > components/SendTransactionButtons/SendTransactionTemplate.tsx
Open up the newly created SendTransactionTemplate.tsx and add the following code:
import React, { FC, useCallback, useState } from 'react';
import { Transaction, TransactionInstruction } from '@solana/web3.js';
import { useConnection, useWallet } from '@solana/wallet-adapter-react';
import type { Keypair, TransactionSignature } from '@solana/web3.js';
import { getExplorerUrl, shortenHash, confirmTransaction } from '@/utils/utils';
import { Toaster, toast } from 'sonner';
import { cluster } from '@/utils/constants';

type SendTransactionTemplateProps = {
    transactionInstructions: TransactionInstruction[];
    buttonLabel: string;
    extraSigners?: Keypair[];
    invisible?: boolean;
    width?: number;
    onSuccess?: () => void;
};

export const SendTransactionTemplate: FC<SendTransactionTemplateProps> = ({ transactionInstructions, buttonLabel, extraSigners, width, invisible = false, onSuccess }) => {
    const { connection } = useConnection();
    const { publicKey, sendTransaction } = useWallet();
    const [isLoading, setIsLoading] = useState(false);

    const onClick = useCallback(async () => {
        // Add code here

    }, [publicKey, connection, sendTransaction, transactionInstructions, extraSigners, onSuccess]);

    return (
        <div className={`${invisible ? 'w-full h-full': ''} flex items-center justify-center w-full h-full`}>
            <Toaster richColors />
            <button
                onClick={onClick}
                disabled={!publicKey || isLoading}
                className={invisible
                    ? `w-full h-full bg-transparent border-none focus:outline-none z-10 text-opacity-0 hover:text-opacity-40 text-white`
                    : `w-${width ?? 80} inline-flex items-center justify-center bg-blue-500 hover:bg-blue-700 text-white font-bold py-2 px-4 rounded focus:outline-none focus:shadow-outline disabled:opacity-50 disabled:cursor-not-allowed transition duration-150 ease-in-out transform active:scale-95 m-5 ${isLoading ? 'opacity-75' : ''}`
                }

            >
                {isLoading ? (
                    <div className="flex items-center justify-center">
                        <SpinnerIcon />
                    </div>
                ) : (
                    buttonLabel
                )}
            </button>

        </div>
    );

};

const SpinnerIcon = () => (
    <svg className="animate-spin h-5 w-5 text-white" xmlns="http://www.w3.org/2000/svg" fill="none" viewBox="0 0 24 24">
        <circle className="opacity-25" cx="12" cy="12" r="10" stroke="currentColor" strokeWidth="4"></circle>
        <path className="opacity-75" fill="currentColor" d="M4 12a8 8 0 0116 0H4z"></path>
    </svg>
);
It looks like there is a lot here, but let's break it down:
- First, we import the
TransactionandTransactionInstructionclasses from the@solana/web3.jslibrary. We also import theuseConnectionanduseWallethooks from the@solana/wallet-adapter-reactlibrary. Finally, we import a few of the utility functions we created earlier and a few components from thesonnerlibrary to display toast messages when a transaction succeeds or fails. - Next, we define the props for our component. Since we want to reuse most of this component, we will pass in the transaction instructions and button label as props. This will allow us to easily create a new transaction by passing different instructions and labels. We are also including an extra signers prop. This will allow us to pass in any extra signers that may be required for the transaction (we will not use this today, but we might need it for other transactions in the future).
- Next, we create our component:
- We start by defining our hooks. We use the
useConnectionhook to get the connection to the Solana cluster and theuseWallethook to get the wallet's public key and thesendTransactionfunction from the connected wallet. We also define a loading state to indicate when the transaction is being sent. - We define an
onClickfunction that will be called when the button is clicked. This function will create and send the transaction. We will fill this in later. - Finally, we return a button (that displays the
buttonLabelprop) that will call theonClickfunction when clicked. We also disable the button if the user is not connected to a wallet or if the transaction is being sent. We also display a loading spinner if the transaction is being sent. We have applied some basic styling, but feel free to change this to fit your needs.
- We start by defining our hooks. We use the
- Note, we have inluced a couple of optional parameters (
invisibleandwidth) that we will use for a more customized UI later on when we build our game. You can disregard them for now.
Let's build our onClick. Replace the onClick function in your code with the following:
    const onClick = useCallback(async () => {
        try {
            if (!publicKey) throw new Error('Wallet not connected!');
            setIsLoading(true);

            const {
                context: { slot: minContextSlot },
                value: { blockhash, lastValidBlockHeight },
            } = await connection.getLatestBlockhashAndContext();

            const transaction = new Transaction().add(...transactionInstructions);
            transaction.recentBlockhash = blockhash;
            transaction.feePayer = publicKey;
            if (extraSigners) transaction.partialSign(...extraSigners);
            let signature: TransactionSignature = await sendTransaction(transaction, connection, { minContextSlot });
            const url = getExplorerUrl(signature, cluster);
            await confirmTransaction(connection, signature);
            toast.success(<div><a href={url} target='_blank' rel='noreferrer'>Success! {shortenHash(signature)}</a></div>);
            if (onSuccess) {onSuccess()}
        } catch (error: any) {
            toast.error(`Error: ${error.message}`);
        } finally {
            setIsLoading(false);
        }
    }, [publicKey, connection, sendTransaction, transactionInstructions, extraSigners, onSuccess]);
This should look familiar to the transaction code we wrote in the last lesson. Let's break down what's happening here:
- First, we check if the user is connected to a wallet. If they are not, we throw an error.
- Next, we set the loading state to
trueto indicate that the transaction is being sent. - Next, we use the
getLatestBlockhashAndContextmethod from the@solana/web3.jslibrary to get the latest blockhash and context. We will use this to construct our transaction. - Next, we create a new transaction and add the transaction instructions that were passed in as props using the spread operator.
- We set the recent blockhash from the previous step and define the
feePayeras the connected wallet. - If any extra signers were passed in as props, we use them to partially sign the transaction.
- Finally, we use the
sendTransactionmethod from ouruseWallethook to send the transaction to the cluster. This will return the signature of the transaction. - We then use the
confirmTransactionfunction to confirm the transaction was successful. If it succeeds (does not throw an error), we use thesignatureto create a toast message to display the transaction signature and a link to the Solana Explorer. - If the transaction succeeds, we also call the
onSuccessfunction if it was passed in as a prop. - Finally, we set the loading state to
falseto indicate that the transaction has been sent (this will enable our button and turn off our spinner).
This construct will work for many basic transactions and should suffice for this course, but more complex transactions (e.g., multi-signers) may require additional code. Let's use this template to create a transaction to send a memo to the blockchain.
Send Memo Transaction
First, we will create a new component to send a memo. In your terminal, run the following command to create a new component:
echo > components/SendTransactionButtons/SendMemo.tsx
Open SendMemo.tsx and add the following code:
import { TransactionInstruction, PublicKey } from "@solana/web3.js";
import { SendTransactionTemplate } from "./SendTransactionTemplate";

interface SendMemoButtonProps {
    message: string;
}

const SendMemoButton = ({ message }: SendMemoButtonProps) => {
    const transactionInstruction = new TransactionInstruction({
        data: Buffer.from(message),
        keys: [],
        programId: new PublicKey('MemoSq4gqABAXKb96qnH8TysNcWxMyWCqXgDLGmfcHr'),
    })

    return (
        <SendTransactionTemplate
            transactionInstructions={[transactionInstruction]}
            buttonLabel="Send Memo Transaction"
        />
    );
}

export default SendMemoButton;
Here, we are using our SendTransactionTemplate to build a button that will send a memo to the blockchain. Let's break down what's happening here:
- First, import the
TransactionInstructionandPublicKeyclasses from the@solana/web3.jslibrary. We also import ourSendTransactionTemplatecomponent. - Next, we define the props for our component. We will pass in the memo message as a prop. This will be the message that is sent to the memo program.
- Then, we define our component which accepts the
messageprop.- Since we defined most of our transaction logic in the template, we really need to focus here on our TransactionInstruction. If you recall from our first lesson, instructions include three things:
data: The data that will be sent to the program. In this case, we are sending the memo message. We use theBuffer.frommethod to convert themessageto a buffer.keys: The accounts that will be used in the transaction. In this case, the memo instruction does not require passing any accounts.programId: The program that will be called. In this case, we use the memo program, a known value:MemoSq4gqABAXKb96qnH8TysNcWxMyWCqXgDLGmfcHr.
- Finally, we return our
SendTransactionTemplatecomponent, passing in ourtransactionInstructionas an array and a button label.
- Since we defined most of our transaction logic in the template, we really need to focus here on our TransactionInstruction. If you recall from our first lesson, instructions include three things:
As you can see, the template we created makes it easy to create new transactions! Since we have already added the SendMemoButton to our Main component, you should be able to test it out by running the following command:
npm run dev
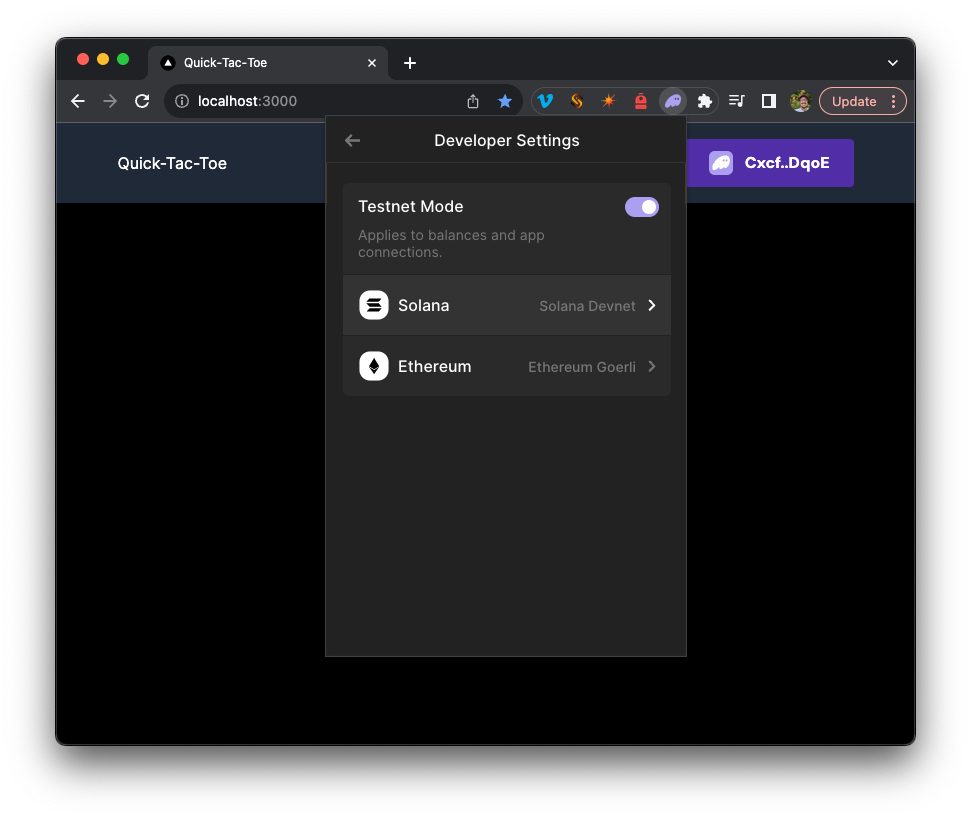
Before you test your memo transaction, make sure to set your wallet cluster to devnet. You can do this by selecting it from "Developer Settings" in your wallet:
If you open up your browser to localhost:3000, you should see a page that displays your devnet wallet balance after connecting your wallet. You should also see a button that will send a memo transaction:
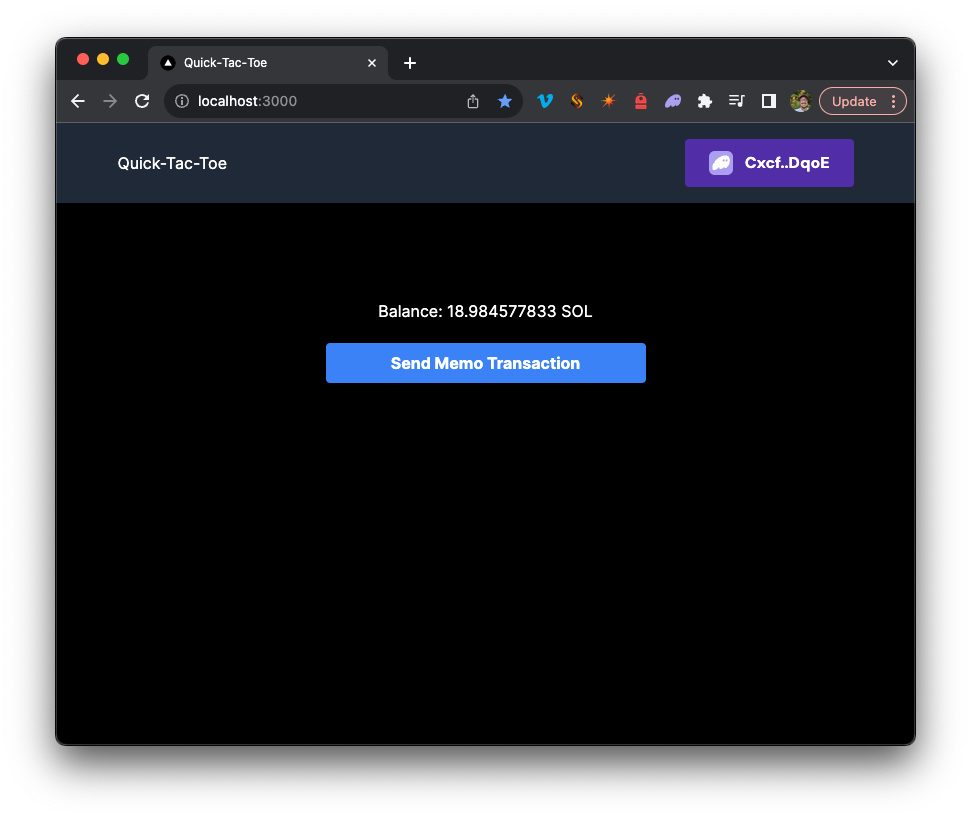
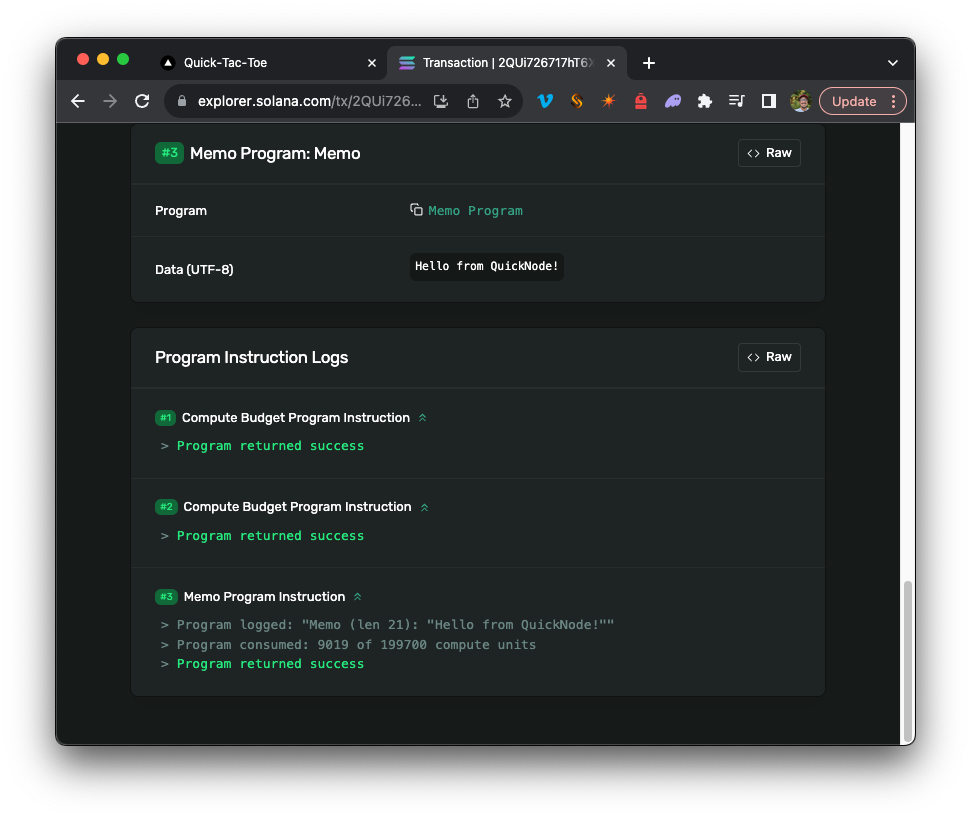
Click it, and approve the transaction in your wallet (note: you'll need devnet SOL to cover the gas fee--refer back to our previous lesson if you need some). Once the transaction is confirmed, you should see a toast message with the transaction signature and a link to the Solana Explorer. Head to Solana Explorer to see your transaction and your message!
Wrap Up
Nice job! You are now writing to the blockchain from your web application. Believe it or not, this framework is most of what you need to know to build a simple dapp. We will use this as our starting place for the rest of the course, so keep this repository. In the next lesson, we will work with tokens on Solana and add more functionality to our dapp.