13 min read
Overview
In the previous lesson, you learned about the SPL Token Program. This lesson will discuss using the Solana SPL Token library to interact with the SPL Token Program. We will cover the following topics:
- Creating a new Token Mint
- Creating new Token Accounts
- Minting new tokens
- Transferring tokens between accounts
- Burning tokens
Ready to start coding? Let's go!
Set Up Your Project
Create a new project directory in your terminal with the following:
mkdir spl-test && cd spl-test
Create a file for your app, app.ts:
echo > app.ts
Initialize your project with the "yes" flag to use default values for your new package:
yarn init --yes
#or
npm init --yes
Create a tsconfig.json with .json importing enabled:
tsc -init --resolveJsonModule true
Install Solana Web3 Dependency
We must add the Solana Web3 and SPL Token libraries for this exercise. In your terminal, type:
yarn add @solana/web3.js@1 @solana/spl-token
#or
npm install @solana/web3.js@1 @solana/spl-token
Import Solana Web3 and SPL Token Dependencies
Open app.ts, and paste the following imports on line 1:
import { Connection, Keypair, PublicKey, sendAndConfirmTransaction, SystemProgram, Transaction } from "@solana/web3.js";
import {
    getOrCreateAssociatedTokenAccount,
    getMinimumBalanceForRentExemptMint,
    getAssociatedTokenAddressSync,
    MINT_SIZE, TOKEN_PROGRAM_ID,
    createInitializeMintInstruction,
    createMintToInstruction,
    createAssociatedTokenAccountIdempotentInstruction,
    transfer,
    burnChecked
} from "@solana/spl-token";
We will need these methods and classes to interact with the SPL Token Program.
Define Keys
Let's start by defining the keys we will need for our transactions. Like our previous lesson, we must sign several transactions with our private key to authorize the transaction and the transfer of lamports to fund new account rent. Let's define our keypair as the tokenAuthority and generate a new key to receive tokens from a sample transfer, receiver. Use the same secret key as you did in the previous lesson (alternatively, you can create a new one using the solana-keygen command; just make sure you fund the new account with devnet SOL).
Let's add the following code to app.ts:
    // 👇 Replace the secret with your own
    const secret = [0, 0, 0, 0];
    const tokenAuthority = Keypair.fromSecretKey(new Uint8Array(secret));
    const receiver = Keypair.generate();
Establish Connection
Just like the last lesson, we will use the Connection class to establish a connection to the Solana cluster. Inside app.ts, add the following code, making sure to update the example endpoint with your own:
const quickNodeEndpoint = 'https://example.solana-devnet.quiknode.pro/123/' // 👈 REPLACE THIS WITH YOUR ENDPOINT
const connection = new Connection(quickNodeEndpoint);
Frame Your Code
Let's create a couple of async functions to frame our code. Add the following code to app.ts:
async function createNewToken(authority: Keypair, connection: Connection, numDecimals: number) {

}

async function mintTokens(mint: PublicKey, authority: Keypair, connection: Connection, numTokens: number) {

}

async function transferTokens(mint: PublicKey, authority: Keypair, destination: PublicKey, connection: Connection, numTokens: number) {

}

async function burnTokens(mint: PublicKey, authority: Keypair, connection: Connection, numberTokens: number, decimals: number) {

}
This will guide us through the steps we need to take to create a new token, mint new tokens, burn tokens, and transfer tokens. We will fill in the details in the following steps.
We should be ready to go. Let's get started.
Create a New Token
To create a new token, we are going to need to do the following:
- create an account for our new token mint
- initialize the new account as a mint
Let's create a transaction with two instructions, one for each step. Add the following code to the createNewToken function:
async function createNewToken(authority: Keypair, connection: Connection, numDecimals: number) {
    // Instruction 1 - Create a new account
    const requiredBalance = await getMinimumBalanceForRentExemptMint(connection);
    const mintKeypair = Keypair.generate();
    const ix1 = SystemProgram.createAccount({
        fromPubkey: authority.publicKey,
        newAccountPubkey: mintKeypair.publicKey,
        space: MINT_SIZE,
        lamports: requiredBalance,
        programId: TOKEN_PROGRAM_ID,
    });

    // Instruction 2 - Initialize the new account as a mint
    const ix2 = createInitializeMintInstruction(
        mintKeypair.publicKey,
        numDecimals,
        authority.publicKey,
        authority.publicKey
    );

    // Create and send transaction
    const createNewTokenTransaction = new Transaction().add(ix1, ix2);
    const initSignature = await sendAndConfirmTransaction(connection, createNewTokenTransaction, [tokenAuthority, mintKeypair]);
    return { initSignature, mint: mintKeypair.publicKey };
}
Let's walk through this code.
- To create a new account on Solana, we first need to calculate the minimum balance required to create a new account. We can do this with the
getMinimumBalanceForRentExemptMintfunction. We will use this to determine how many lamports are required to fund our new account. - Next, we will create a new keypair for our new mint account. We will use this to sign our transaction. Note: you can alternatively use the
Keypair.fromSecretKeymethod andsolana-keygencommand to create vanity mint address IDs. - We then use the SystemProgram's
createAccountmethod to create a new account. We will need to pass in the following parameters:fromPubkey: the public key of the account that will fund the new accountnewAccountPubkey: the public key of the new accountspace: the number of bytes of memory to allocate for the new account (we can use the importedMINT_SIZEconstant for this)lamports: the number of lamports to transfer to the new accountprogramId: the program ID of the program that will own the new account (the importedTOKEN_PROGRAM_IDconstant is the program ID of the SPL Token Program)
- We then use the
createInitializeMintInstructionfrom the @solana/spl-token library to create another instruction to initialize the new account as a token mint type. We will need to pass in the following parameters:mint: the public key of the mint accountdecimals: the number of decimals to use for the new mintmintAuthority: the public key of the mint authorityfreezeAuthority: the public key of the freeze authorityprogramId: the program ID of the program that will own the new account (the importedTOKEN_PROGRAM_IDconstant is the program ID of the SPL Token Program)
- Finally, we create a new transaction and add both instructions (notice how we use
.add()to include multiple instructions in a single transaction). We then sign and send the transaction to the Solana cluster.
Note: as you can see here, transaction instructions can include many accounts, which can be a bit disorienting when you are getting started. That is okay. Take your time, and make sure you are passing in the correct accounts for each instruction. You can always CTRL/CMD + click on a method or class to double-check the underlying parameters to ensure you pass the correct information.
Though we are not done with our lesson yet, you should be able to test your code to ensure your mint function works correctly. At the bottom of your app.ts file, add the following code:
async function main() {
    const { initSignature, mint } = await createNewToken(tokenAuthority, connection, 0);
    console.log(`Init Token Tx: https://explorer.solana.com/tx/${initSignature}?cluster=devnet`);
    console.log(`Mint ID: ${mint.toBase58()}`);
}

main().then(() => process.exit());
And in your terminal, run:
ts-node app.ts
You should see your transaction URL and mint ID printed to the console. You should see your transaction on the Solana Explorer if you click on the transaction URL. If you scroll down, you should notice both instructions in your transaction.
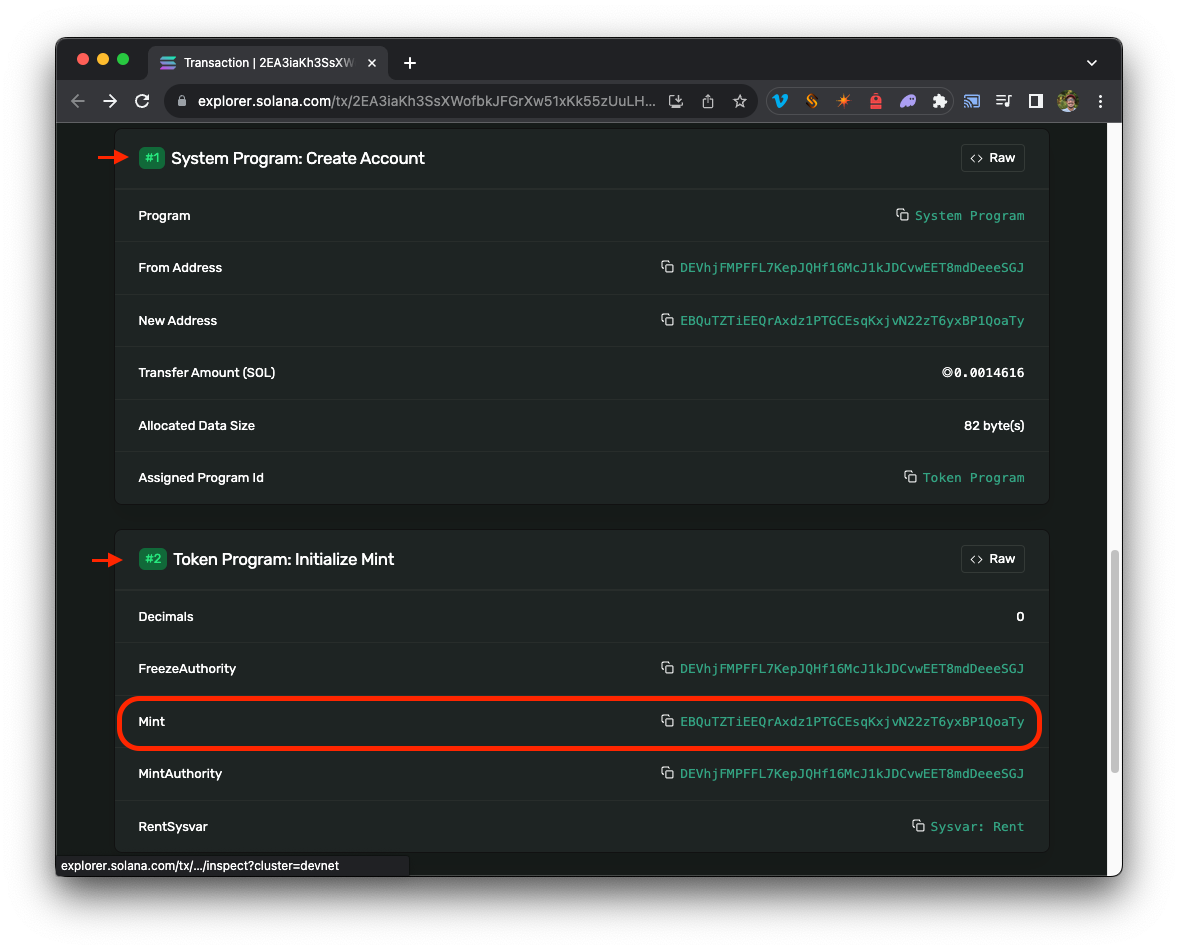
If you click on the mint ID, you should see your mint account on the Solana Explorer.
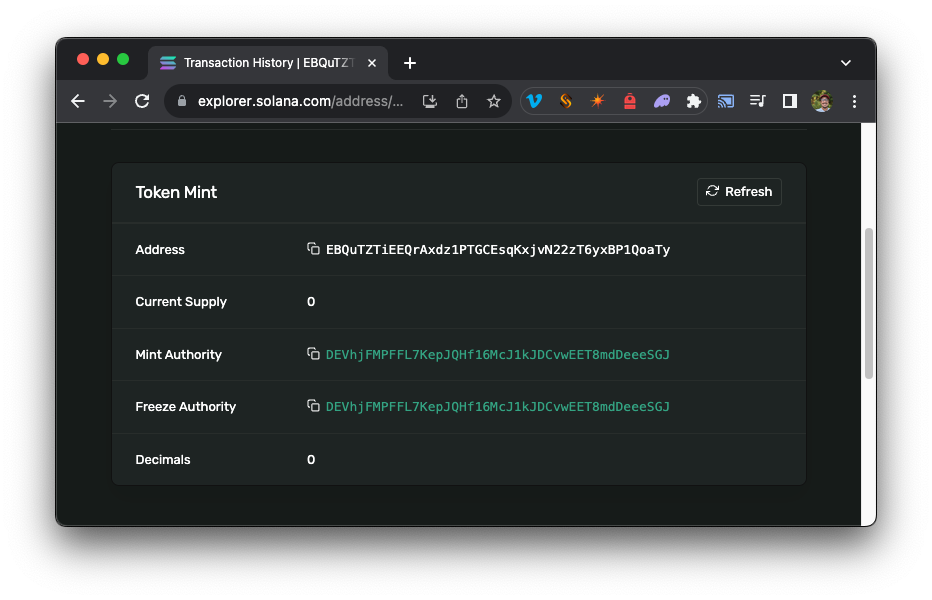
Congrats! You have successfully created a new token mint. You will notice, however, that the token supply is still 0. That's because we have not minted any tokens yet. Let's do that next.
Mint New Tokens
To mint new tokens, we are going to need to do the following:
- Create a token account for the destination wallet (remember that each wallet must have an associated token account for each mint)
- Mint new tokens to the destination wallet
Let's create a transaction with two instructions, one for each step. Add the following code to the mintTokens function:
async function mintTokens(mint: PublicKey, authority: Keypair, connection: Connection, numTokens: number) {
    // Instruction 1 - Create a new token account
    const tokenATA = getAssociatedTokenAddressSync(mint, authority.publicKey);
    const ix1 = createAssociatedTokenAccountIdempotentInstruction(
        authority.publicKey,
        tokenATA,
        authority.publicKey,
        mint
    );

    // Instruction 2 - Mint tokens to the new account
    const ix2 = createMintToInstruction(
        mint,
        tokenATA,
        authority.publicKey,
        numTokens
    );

    // Create and send transaction
    const mintTokensTransaction = new Transaction().add(ix1, ix2);
    const mintSignature = await sendAndConfirmTransaction(connection, mintTokensTransaction, [tokenAuthority], { skipPreflight: true });
    return { mintSignature };
}
Here's what we are doing:
-
First, we use the
getAssociatedTokenAddressSyncmethod from the @solana/spl-token library to create a new token account for the destination wallet. We will need to pass in the following parameters:mint: the public key of the mint accountowner: the public key of the owner of the new token account
-
Next, we create a new instruction to create the new token account (Note: If a token account already exists, this instruction would be skipped, but since we know that our token is brand new, we also know this account could not have been created yet.). We will need to pass in the following parameters:
payer: the public key of the source account that will pay for the new token accountassociatedToken: the public key of the new token account being createdowner: the public key of the owner of the new token accountmint: the public key of the mint account
-
Then, we create a new instruction to mint tokens to the new token account. We will need to pass in the following parameters:
mint: the public key of the mint accountdestination: the public key of the destination token accountauthority: the public key of the mint authorityamount: the number of tokens to mint
-
Finally, we create a new transaction and add both instructions. We then sign and send the transaction to the Solana cluster.
You may have noticed that we included a { skipPreflight: true } parameter in our sendAndConfirmTransaction method. This is because we are sending several back-to-back transactions without waiting for the previous transaction to be confirmed by the network. The preflight check is basically a transaction simulation that ensures the network can process your transaction. Since we are sending multiple transactions in a row, the simulation is likely to fail when it expects a state that has not yet been updated by the previous transaction (e.g., the mint account has not yet been created). We can skip the preflight check to avoid this error. Note: generally, it is not recommended to skip the preflight check in production code.
Let's update our main() function with our new mintTokens function. Add the following code to the bottom of the main() function:
    const { mintSignature } = await mintTokens(mint, tokenAuthority, connection, 100);
    console.log(`Mint Tokens Tx: https://explorer.solana.com/tx/${mintSignature}?cluster=devnet`);
You can rerun your code, and you should see a successful transaction. Follow the link to Solana Explorer, and you should see that the account has been initiated, and the account state shows a balance change of +100 tokens:
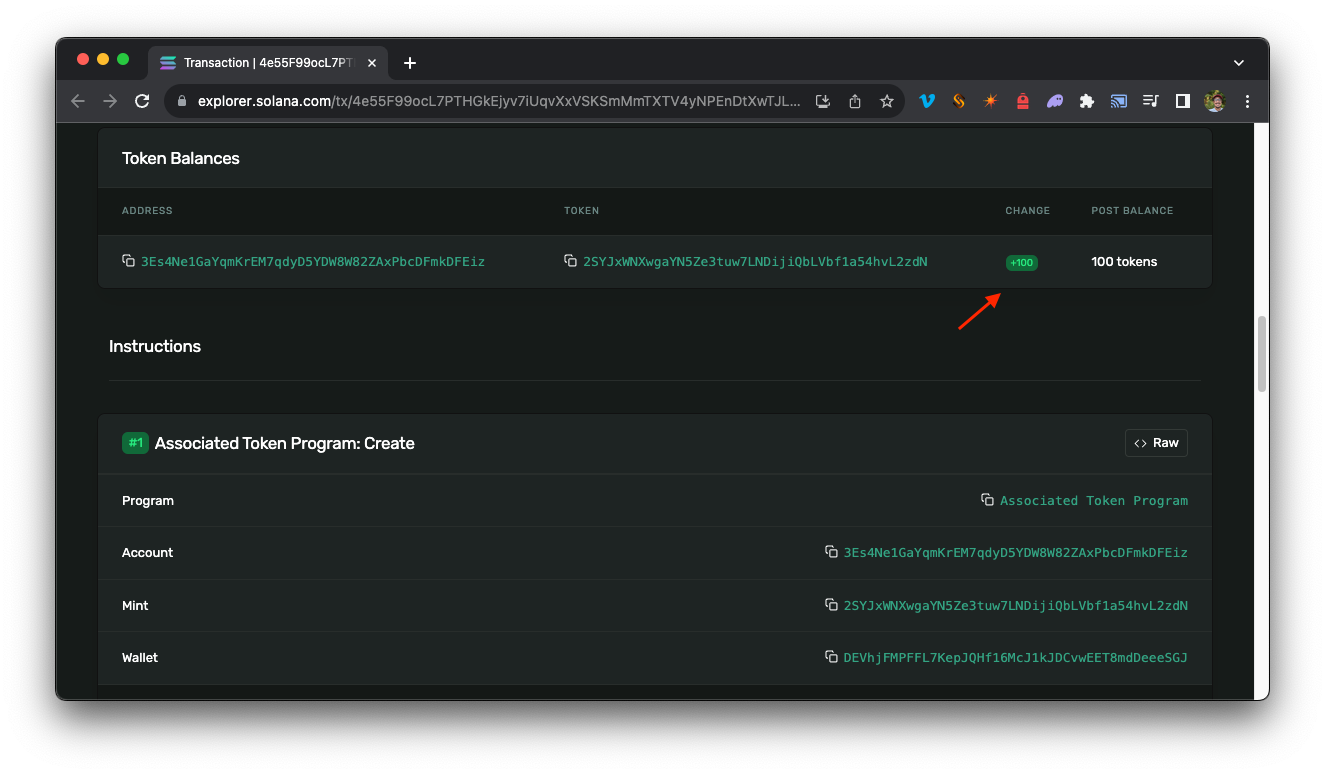
Create Transfer Function
To transfer tokens from one account to another, we will need to make sure we have the associated token address for both wallets (sender and receiver), and we need to make sure that both of those accounts have already been initiated. If the receiver still needs to be initialized, we must initialize it. Add the following code to the transferTokens function:
async function transferTokens(mint: PublicKey, authority: Keypair, destination: PublicKey, connection: Connection, numTokens: number) {
    const destinationAta = await getOrCreateAssociatedTokenAccount(connection, authority, mint, destination, undefined, undefined, { skipPreflight: true });
    const sourceAta = await getOrCreateAssociatedTokenAccount(connection, authority, mint, authority.publicKey, undefined, undefined, { skipPreflight: true });
    const transferSignature = await transfer(connection, authority, sourceAta.address, destinationAta.address, authority, numTokens)
    return { transferSignature };
}
We are going to introduce a couple of functions that the SPL token library provides to make this easier. Here's what we are doing:
- First, we use the
getOrCreateAssociatedTokenAccountfunction to determine the public key of our sender and receiver token accounts. Unlike the 2-step process we used earlier (getAssociatedTokenAddressSyncandcreateAssociatedTokenAccountIdempotentInstruction), here we are using a single command to get the account address (and create it if necessary). - Next, we simply use the
transferfunction to create our transaction and send it to the cluster.
Let's add this to our main() function. Add the following code to the bottom of the main() function:
    const { transferSignature } = await transferTokens(mint, tokenAuthority, receiver.publicKey, connection, 1);
    console.log(`Transfer Tokens Tx: https://explorer.solana.com/tx/${transferSignature}?cluster=devnet`);
If you would like, you can test the code--in your terminal, run:
ts-node app
You should see a successful transfer transaction. Follow the Solana Explorer link; you should see the account is initiated, and the account state shows a balance change of +1 token. Unlike our mint instruction, however, this instruction also includes a debit of -1 token from the sender account:
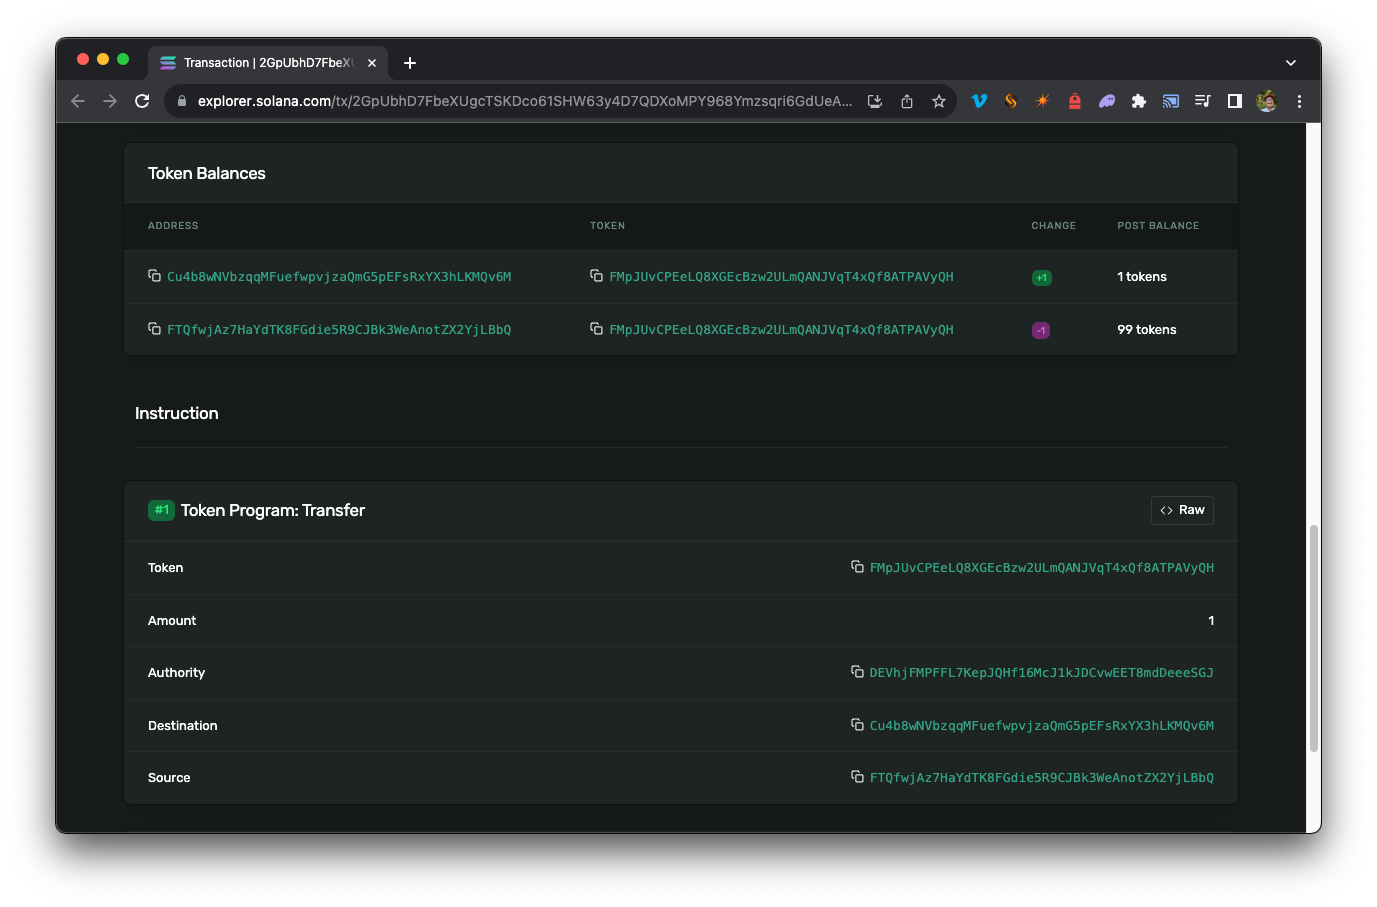
It's worth noting here that we definitely used some of the @solana/spl-token library's shortcuts in this step. You could have alternatively assembled the instructions and transactions just like we did for the create mint and mint tokens steps. We want to expose you to multiple ways of doing things so you can choose the best method for you.
Create Burn Function
We have been having a ton of fun with our new token, but what do you do if you are ready to destroy it? There are plenty of use cases for burning tokens (or removing them from supply). For example, when a user redeems a coupon, you might use a burn function to remove tokens from the supply. Let's create a new function that will allow us to burn tokens from our mint. Add the following code to the burnTokens function:
async function burnTokens(mint: PublicKey, authority: Keypair, connection: Connection, numberTokens: number, decimals: number) {
    const ata = await getOrCreateAssociatedTokenAccount(connection, authority, mint, authority.publicKey, undefined, undefined, { skipPreflight: true });
    const burnSignature = await burnChecked(
        connection,
        authority,
        ata.address,
        mint,
        authority.publicKey,
        numberTokens,
        decimals,
        undefined,
        { skipPreflight: true }
    );
    return { burnSignature };
}
Let's walk through this code:
- First, we use the same
getOrCreateAssociatedTokenAccountfunction to get the associated token account for the authority wallet that we will burn from. - Next, we use the
burnCheckedfunction to create our transaction and send it to the cluster.
The @solana/spl-token library provides several checked instructions that will double-check the number of decimals associated with a token mint to ensure that the user has input the correct number of tokens to utilize in the instruction. This can be helpful to ensure a user intending to send 100 tokens on a token mint with two decimals doesn't accidentally send 10,000 tokens. By double-checking that the user knows the number of decimals, the library assumes that the user has modified the amount appropriately based on the decimal count.
If inclined, try updating the transferTokens function to use transferChecked instead of transfer.
Update your main() function one last time. Your final main() function should look like this:
async function main() {
    const { initSignature, mint } = await createNewToken(tokenAuthority, connection, 0);
    console.log(`Init Token Tx: https://explorer.solana.com/tx/${initSignature}?cluster=devnet`);
    console.log(`Mint ID: ${mint.toBase58()}`);
    const { mintSignature } = await mintTokens(mint, tokenAuthority, connection, 100);
    console.log(`Mint Tokens Tx: https://explorer.solana.com/tx/${mintSignature}?cluster=devnet`);
    const { transferSignature } = await transferTokens(mint, tokenAuthority, receiver.publicKey, connection, 1);
    console.log(`Transfer Tokens Tx: https://explorer.solana.com/tx/${transferSignature}?cluster=devnet`);
    const { burnSignature } = await burnTokens(mint, tokenAuthority, connection, 1, 0);
    console.log(`Burn Tokens Tx: https://explorer.solana.com/tx/${burnSignature}?cluster=devnet`);
}

main()
    .then(() => process.exit())
    .catch((err) => {
        console.error(err);
        process.exit(-1);
    });
Run it in your terminal:
ts-node app
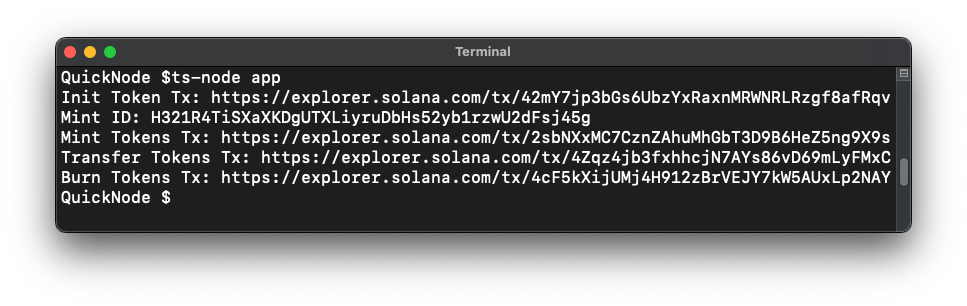
Hopefully, you see something like this:
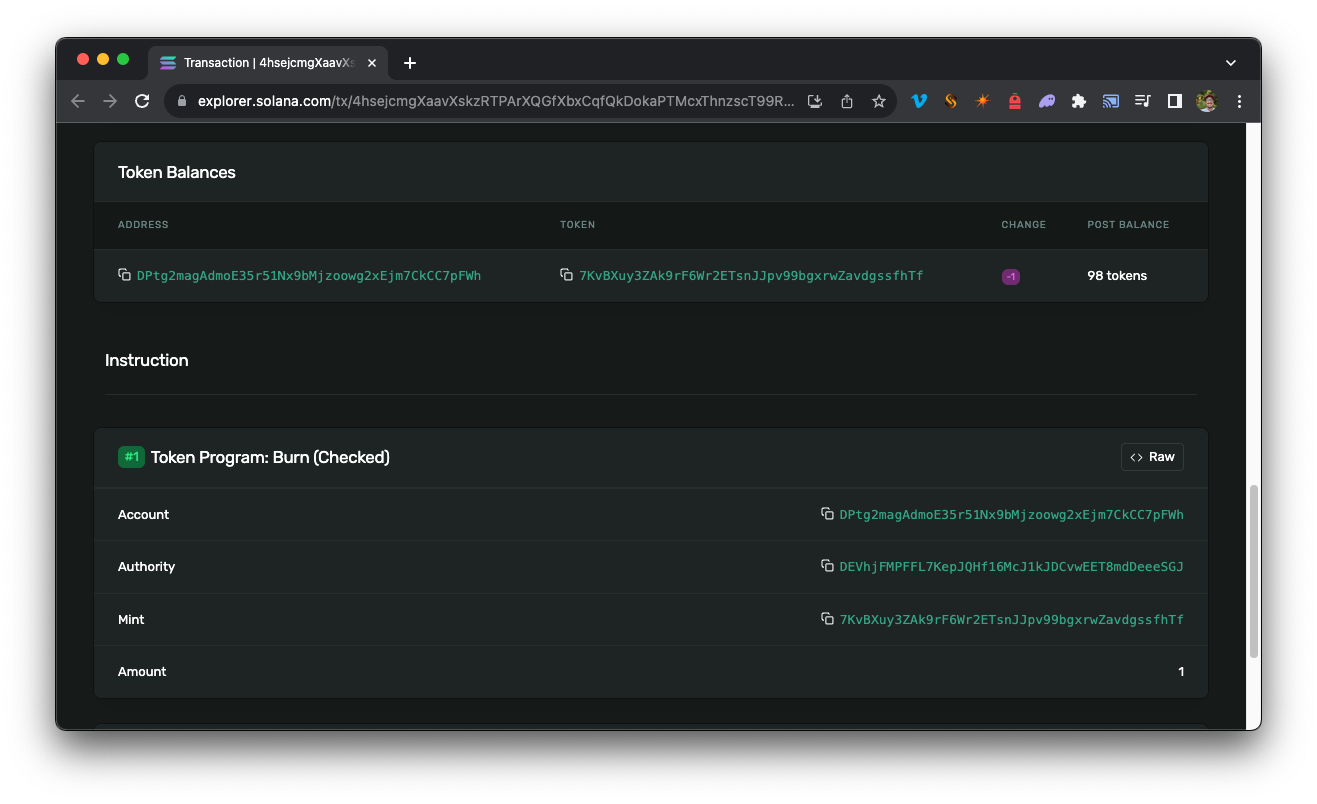
And if you follow the burn transaction link, you should see the token account balance change of -1 token:
Great job! You have now created a new token, minted new tokens, transferred tokens, and burned tokens. You are well on your way to becoming a Solana developer! Let's do a quick knowledge check before we wrap up.
Knowledge Check
Next Steps and Wrap Up
Awesome! You now have many of the tools needed to build and interact with Solana's token program. In the next lesson, we will integrate the SPL token program into our sample dapp that we started in Lesson 2 so that users can create tokens directly from your website!