15 min read
Overview
In this lesson, we will hone our knowledge and understanding of the SPL Token Program JS SDK by adding two new features to our sample dapp:
- An init token button that will create a new token mint and optionally mint tokens to our wallet
- A table that will display all of the tokens in our wallet
Ready to start coding? Open up your Next.js project from lesson 2. We will pick up where we left off. Alternatively you can fork the Demo Progress Repository and start from there.
Set Up Your Project
Install SPL-Token Dependencies
From your project's root directory, run the following command to install the @solana/spl-token library:
yarn add @solana/spl-token
#or
npm install @solana/spl-token
Create SPL Token Utils
Before building our react components, let's create a new utils file containing the functions we will need to interact with the SPL Token Program. Inside of your utils folder, create a new file called token-lib.ts:
echo > utils/token-lib.ts
We will use this file to create functions to help us interact with the SPL Token Program. Let's start by importing the following libraries:
import { Connection, Keypair, PublicKey, SystemProgram, TransactionInstruction } from "@solana/web3.js";
import {
    getMinimumBalanceForRentExemptMint,
    getAssociatedTokenAddressSync,
    MINT_SIZE, TOKEN_PROGRAM_ID,
    createInitializeMintInstruction,
    createMintToInstruction,
    createAssociatedTokenAccountIdempotentInstruction,
} from "@solana/spl-token";
Everything here should look familiar to the previous lesson--we will be building something very similar. Let's define a helper function and some interfaces before we create our function. Add the following code to the file:
const amountToDecimalAmount = (amount: number, decimals: number) => {
    return amount * (10 ** decimals);
}

interface createNewTokenParams {
    authority: PublicKey,
    connection: Connection,
    numDecimals?: number,
    numTokens?: number
}

interface createNewTokenReturn {
    instructions: TransactionInstruction[],
    signers: Keypair[]
}


export async function createNewToken({
    authority,
    connection,
    numDecimals = 2,
    numTokens = 100
}: createNewTokenParams): Promise<createNewTokenReturn> {

}
Here we are defining a helper function, amountToDecimalAmount. This function will take in an amount and the number of decimals and return the amount in decimal form. For example, if we have two decimals and an amount of 1, the function will return 100. If we have three decimals and an amount of 1, the function will return 1,000 (the value expected by the SPL Token Program).
We are also defining two interfaces. The first interface, createNewTokenParams, represents the parameters our function will take in (effectively the same parameters we used in the last example). The second interface, createNewTokenReturn, defines the return value of our function. If you recall, in our previous lesson on the wallet adapter, we created a SendTransactionTemplate, which accepts an array of instructions and an optional array of signers. Our return statement includes both values so that we can easily use them to create a transaction button from our template. Note that we have framed our function as an async function. This is because we will use the getMinimumBalanceForRentExemptMint function, an async function. We are also defining a couple of default values for the function so that the function will still work if we don't pass in any values.
Now that we have defined our helper function and interfaces, let's build our createNewToken function. Add the following code to the createNewToken function:
export async function createNewToken({
    authority,
    connection,
    numDecimals = 0,
    numTokens = 0
}: createNewTokenParams): Promise<createNewTokenReturn> {
    const instructions: TransactionInstruction[] = [];
    // Instruction 1 - Create a new account
    const requiredBalance = await getMinimumBalanceForRentExemptMint(connection);
    const mintKeypair = Keypair.generate();
    const ix1 = SystemProgram.createAccount({
        fromPubkey: authority,
        newAccountPubkey: mintKeypair.publicKey,
        space: MINT_SIZE,
        lamports: requiredBalance,
        programId: TOKEN_PROGRAM_ID,
    });

    // Instruction 2 - Initialize the new account as a mint
    const ix2 = createInitializeMintInstruction(
        mintKeypair.publicKey,
        numDecimals,
        authority,
        authority
    );
    instructions.push(ix1, ix2)

    // If no tokens are to be minted, return the init instructions without appending any minting instructions
    if (numTokens === 0) return { instructions, signers: [mintKeypair] };

    // Instruction 3 - Create an associated token account for the mint
    const tokenATA = getAssociatedTokenAddressSync(mintKeypair.publicKey, authority);
    const ix3 = createAssociatedTokenAccountIdempotentInstruction(
        authority,
        tokenATA,
        authority,
        mintKeypair.publicKey
    );

    // Instruction 4 - Mint tokens to the new account
    const ix4 = createMintToInstruction(
        mintKeypair.publicKey,
        tokenATA,
        authority,
        amountToDecimalAmount(numTokens, numDecimals)
    );
    instructions.push(ix3, ix4)

    return { instructions: instructions, signers: [mintKeypair] };
}
This should look very familiar.
- First, we create an instruction for a new account for the mint using the
SystemProgram.createAccountfunction. - Next, we create an instruction for initializing the new account as a mint using the
createInitializeMintInstructionfunction. - We check to see if we need to mint any tokens. If we don't, we return the instructions and signers (remember we need to sign the transaction with the mint's keypair to initialize it as a new account).
- If we do need to mint tokens, we create an instruction for creating an associated token account using the
createAssociatedTokenAccountIdempotentInstructionfunction and another for minting tokens to the new account using thecreateMintToInstructionfunction. - Finally, we return all of the instructions as an array,
instructionsand themintKeypairas an array as well.
Great job. Because we constructed a return statement that matches the SendTransactionTemplate interface, we can use this function to create a transaction button in our Dapp. Let's do that now.
Create a New Token Button
Let's create a new component that will allow us to create a new token. Create a new file in your components/SendTransactionButtons folder called CreateNewTokenButton.tsx:
echo > components/SendTransactionButtons/CreateToken.tsx
Open the file and add the following code:
import { TransactionInstruction, PublicKey, Keypair } from "@solana/web3.js";
import { SendTransactionTemplate } from "./SendTransactionTemplate";
import { createNewToken } from "../../utils/token-lib";
import { useConnection, useWallet } from "@solana/wallet-adapter-react";
import { useEffect, useState } from "react";

interface CreateTokenButtonProps {
    numDecimals?: number;
    numTokens?: number;
}

const CreateTokenButton = ({ numDecimals, numTokens }: CreateTokenButtonProps) => {
    const [instructions, setInstructions] = useState<TransactionInstruction[]>([]);
    const [extraSigners, setExtraSigners] = useState<Keypair[]>([]);

    // TODO - Add your code here

    return (
        <SendTransactionTemplate
            transactionInstructions={instructions}
            buttonLabel={`Init New Token`}
            extraSigners={extraSigners}
        />
    );
}

export default CreateTokenButton;
Here's all we are doing:
- Importing a few libraries we will need, including our
createNewTokenfunction and theSendTransactionTemplatecomponent we created in the previous lesson. - Defining the props for our component, which will allow us to use the component declaration for determining the number of decimals for our token and the number of tokens to mint (these can be optional since we provided default values in our
createNewTokenfunction). - Defining a couple of state variables that we will use to store the instructions and signers for our transaction.
- We then pass these state variables into our
SendTransactionTemplatecomponent. This will allow us to create a transaction button from our template.
All that is missing is the code that will create the instructions and signers for our transaction. Since our createNewToken function returns a promise for instructions and extra signers, we need to call it and then use the returned values to set our state variables. Let's add that now. Add the following code to the CreateTokenButton component below the state setters and before the return statement:
    const { publicKey: authority } = useWallet();
    const { connection } = useConnection();

    useEffect(() => {
        if (!authority) return;
        createNewToken({ authority, connection, numDecimals, numTokens })
            .then(({ instructions, signers }) => {
                setInstructions(instructions);
                setExtraSigners(signers);
            })
            .catch((err) => {
                console.log(err);
            });
    }, [authority, connection]);
First, we are using the useWallet() and useConnection() hooks to get our connected wallet public key (which we are calling authority) and the connection to the Solana cluster. Remember, since we wrapped our app in SolanaProviders, these hooks are available to us anywhere in our app.
We then use the useEffect hook to call our createNewToken function and set the state variables when the authority or connection changes.
Nice job! We now have a component that will create a new token when we click the button. Let's add it to our app. Open your components/Main.tsx. First, import the CreateTokenButton component:
import CreateTokenButton from './SendTransactionButtons/CreateToken';
Then add the component to the Main component below the SendMemoButton component:
                    <SendMemoButton message='Hello from Quicknode!' />
                    <CreateTokenButton />
You could optionally include the numDecimals and numTokens props to customize the number of decimals and number of tokens to mint. For now, we will leave them out to use the default values.
That's it! Your app should now have a button that will create a new token and mint you some! Try it out:
npm run dev
You should see your Init New Token button. Ensure your wallet is set to Devnet and has some SOL, and then give it a shot! You should see something like this:
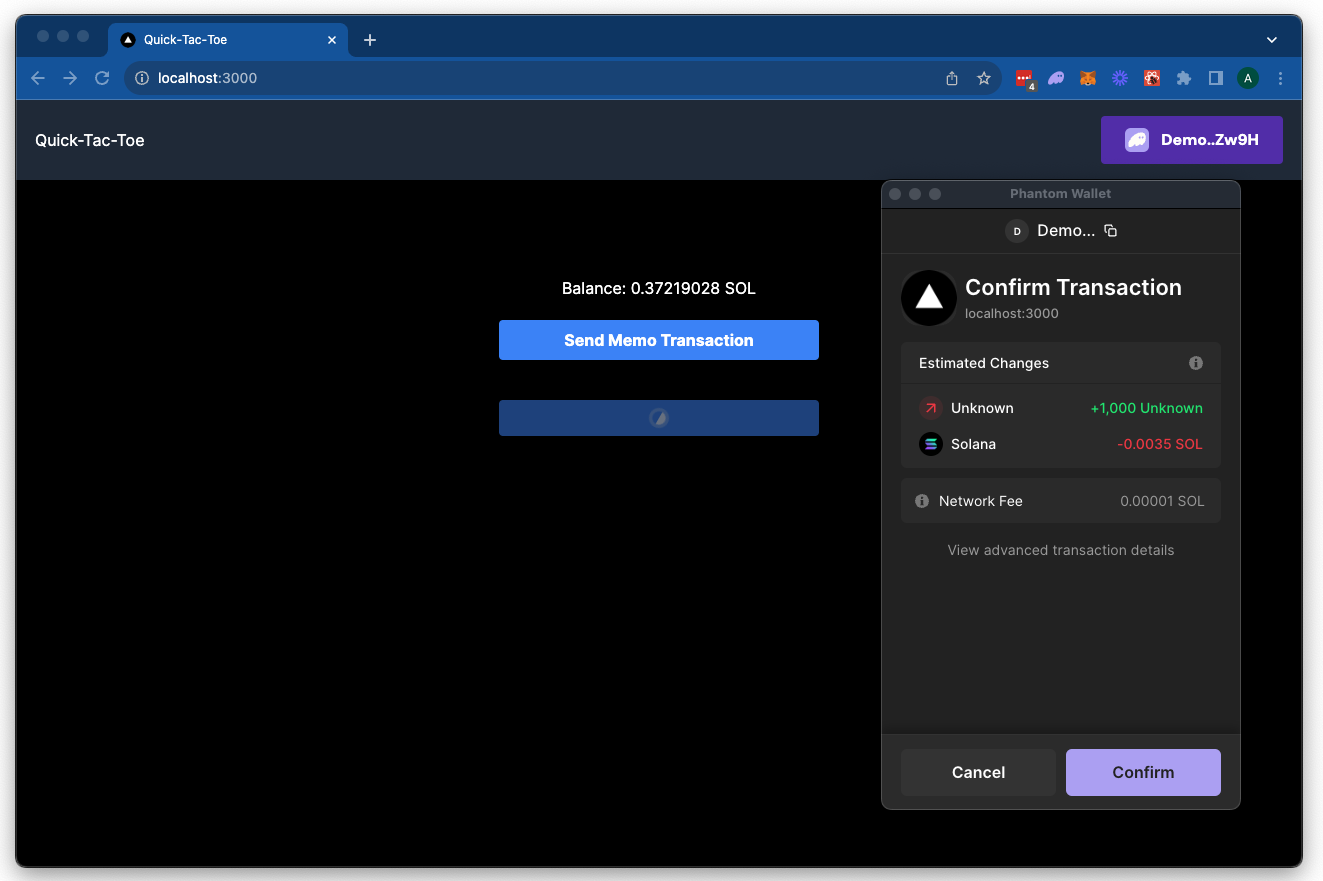
Great job! You now have a button that will create a new token and mint you some! Let's add a table that will display all of the tokens in your wallet.
Display Tokens in Your Wallet
Let's create a new component to display all the tokens in your wallet. Create a new file in your components folder called TokenTable.tsx:
echo > components/TokenTable.tsx
There is only a little Solana interaction to this part, so we are going to share the entire code and then walk through it. Open the file and add the following code:
import { shortenHash } from "@/utils/utils";
import { TOKEN_PROGRAM_ID } from "@solana/spl-token";
import { useConnection, useWallet } from "@solana/wallet-adapter-react";
import { useEffect, useState } from "react";

interface TokenRow {
    mint: string;
    tokenAccountAddress: string;
    tokenAmount: number;
}

const TokenTable = () => {
    const [rows, setRows] = useState<TokenRow[]>([]);
    const { publicKey } = useWallet();
    const { connection } = useConnection();

    useEffect(() => {
        if (!publicKey) return;
        connection.getParsedTokenAccountsByOwner(publicKey, { programId: TOKEN_PROGRAM_ID })
            .then(({ value }) => {
                const tokens: TokenRow[] = value.map((account) => {
                    return {
                        mint: account.account.data.parsed.info.mint,
                        tokenAccountAddress: account.pubkey.toBase58(),
                        tokenAmount: account.account.data.parsed.info.tokenAmount.uiAmount,
                    }
                })
                setRows(tokens);
            })
            .catch((err) => {
                console.log(err);
            });
    }, [publicKey, connection]);

    return (
        <div className="overflow-x-auto mt-4 text-center">
            <table className="min-w-full text-white table-auto">
                <thead>
                    <tr className="border-b border-gray-700">
                        <th className="px-4 py-2">Mint</th>
                        <th className="px-4 py-2">Token Account<br/>Address</th>
                        <th className="px-4 py-2">Amount</th>
                    </tr>
                </thead>
                <tbody>
                    {rows.map((row, index) => (
                        <tr key={index} className={`bg-gray-800 border-b border-gray-700 ${index % 2 === 0 ? 'bg-opacity-50' : ''}`}>
                            <td className="px-4 py-2">{shortenHash(row.mint)}</td>
                            <td className="px-4 py-2">{shortenHash(row.tokenAccountAddress)}</td>
                            <td className="px-4 py-2">{row.tokenAmount}</td>
                        </tr>
                    ))}
                </tbody>
            </table>
            {rows.length === 0 && (
                <div className="text-gray-500 mt-4">No tokens found.</div>
            )}
        </div>
    );

}

export default TokenTable;
In short, here's what we are doing: we use a Solana method on the Connection class called getParsedTokenAccountsByOwner to get our wallet's token accounts. We then use the useEffect hook to call this method when our connected wallet or network connection changes. We store the token accounts to state and use a .map function to create a table row for each token account. Here's a more detailed breakdown:
- First, we import a few libraries we will need.
- Next, we define an interface for our table rows. This will allow us to use the
TokenRowtype to define our state variable and the.mapfunction. - We then define our
TokenTablecomponent. - We define a state variable,
rows, to store our token accounts. - We use the
useWallet()anduseConnection()hooks to get our connected wallet public key and theconnectionto the Solana cluster. - We use the
useEffecthook to call thegetParsedTokenAccountsByOwnermethod when thepublicKeyorconnectionchanges. This method returns a promise for an array of token accounts. We use the.thenfunction to map the array of token account data to an array ofTokenRowobjects. We then set therowsstate variable to this array. - We then return a table that will display the token accounts. We use the
.mapfunction to create a table row for each token account. We also use theshortenHashutility function to shorten the token account and mint addresses. - If no token accounts are found, we display a message saying so.
That's it 🙌 Let's add this component to our app. Open your components/Main.tsx. First, import the TokenTable component:
import TokenTable from './TokenTable';
Then add it to the Main component below the CreateTokenButton component:
                    <CreateTokenButton />
                    <TokenTable />
Now rerun your app:
npm run dev
Do you see your tokens?
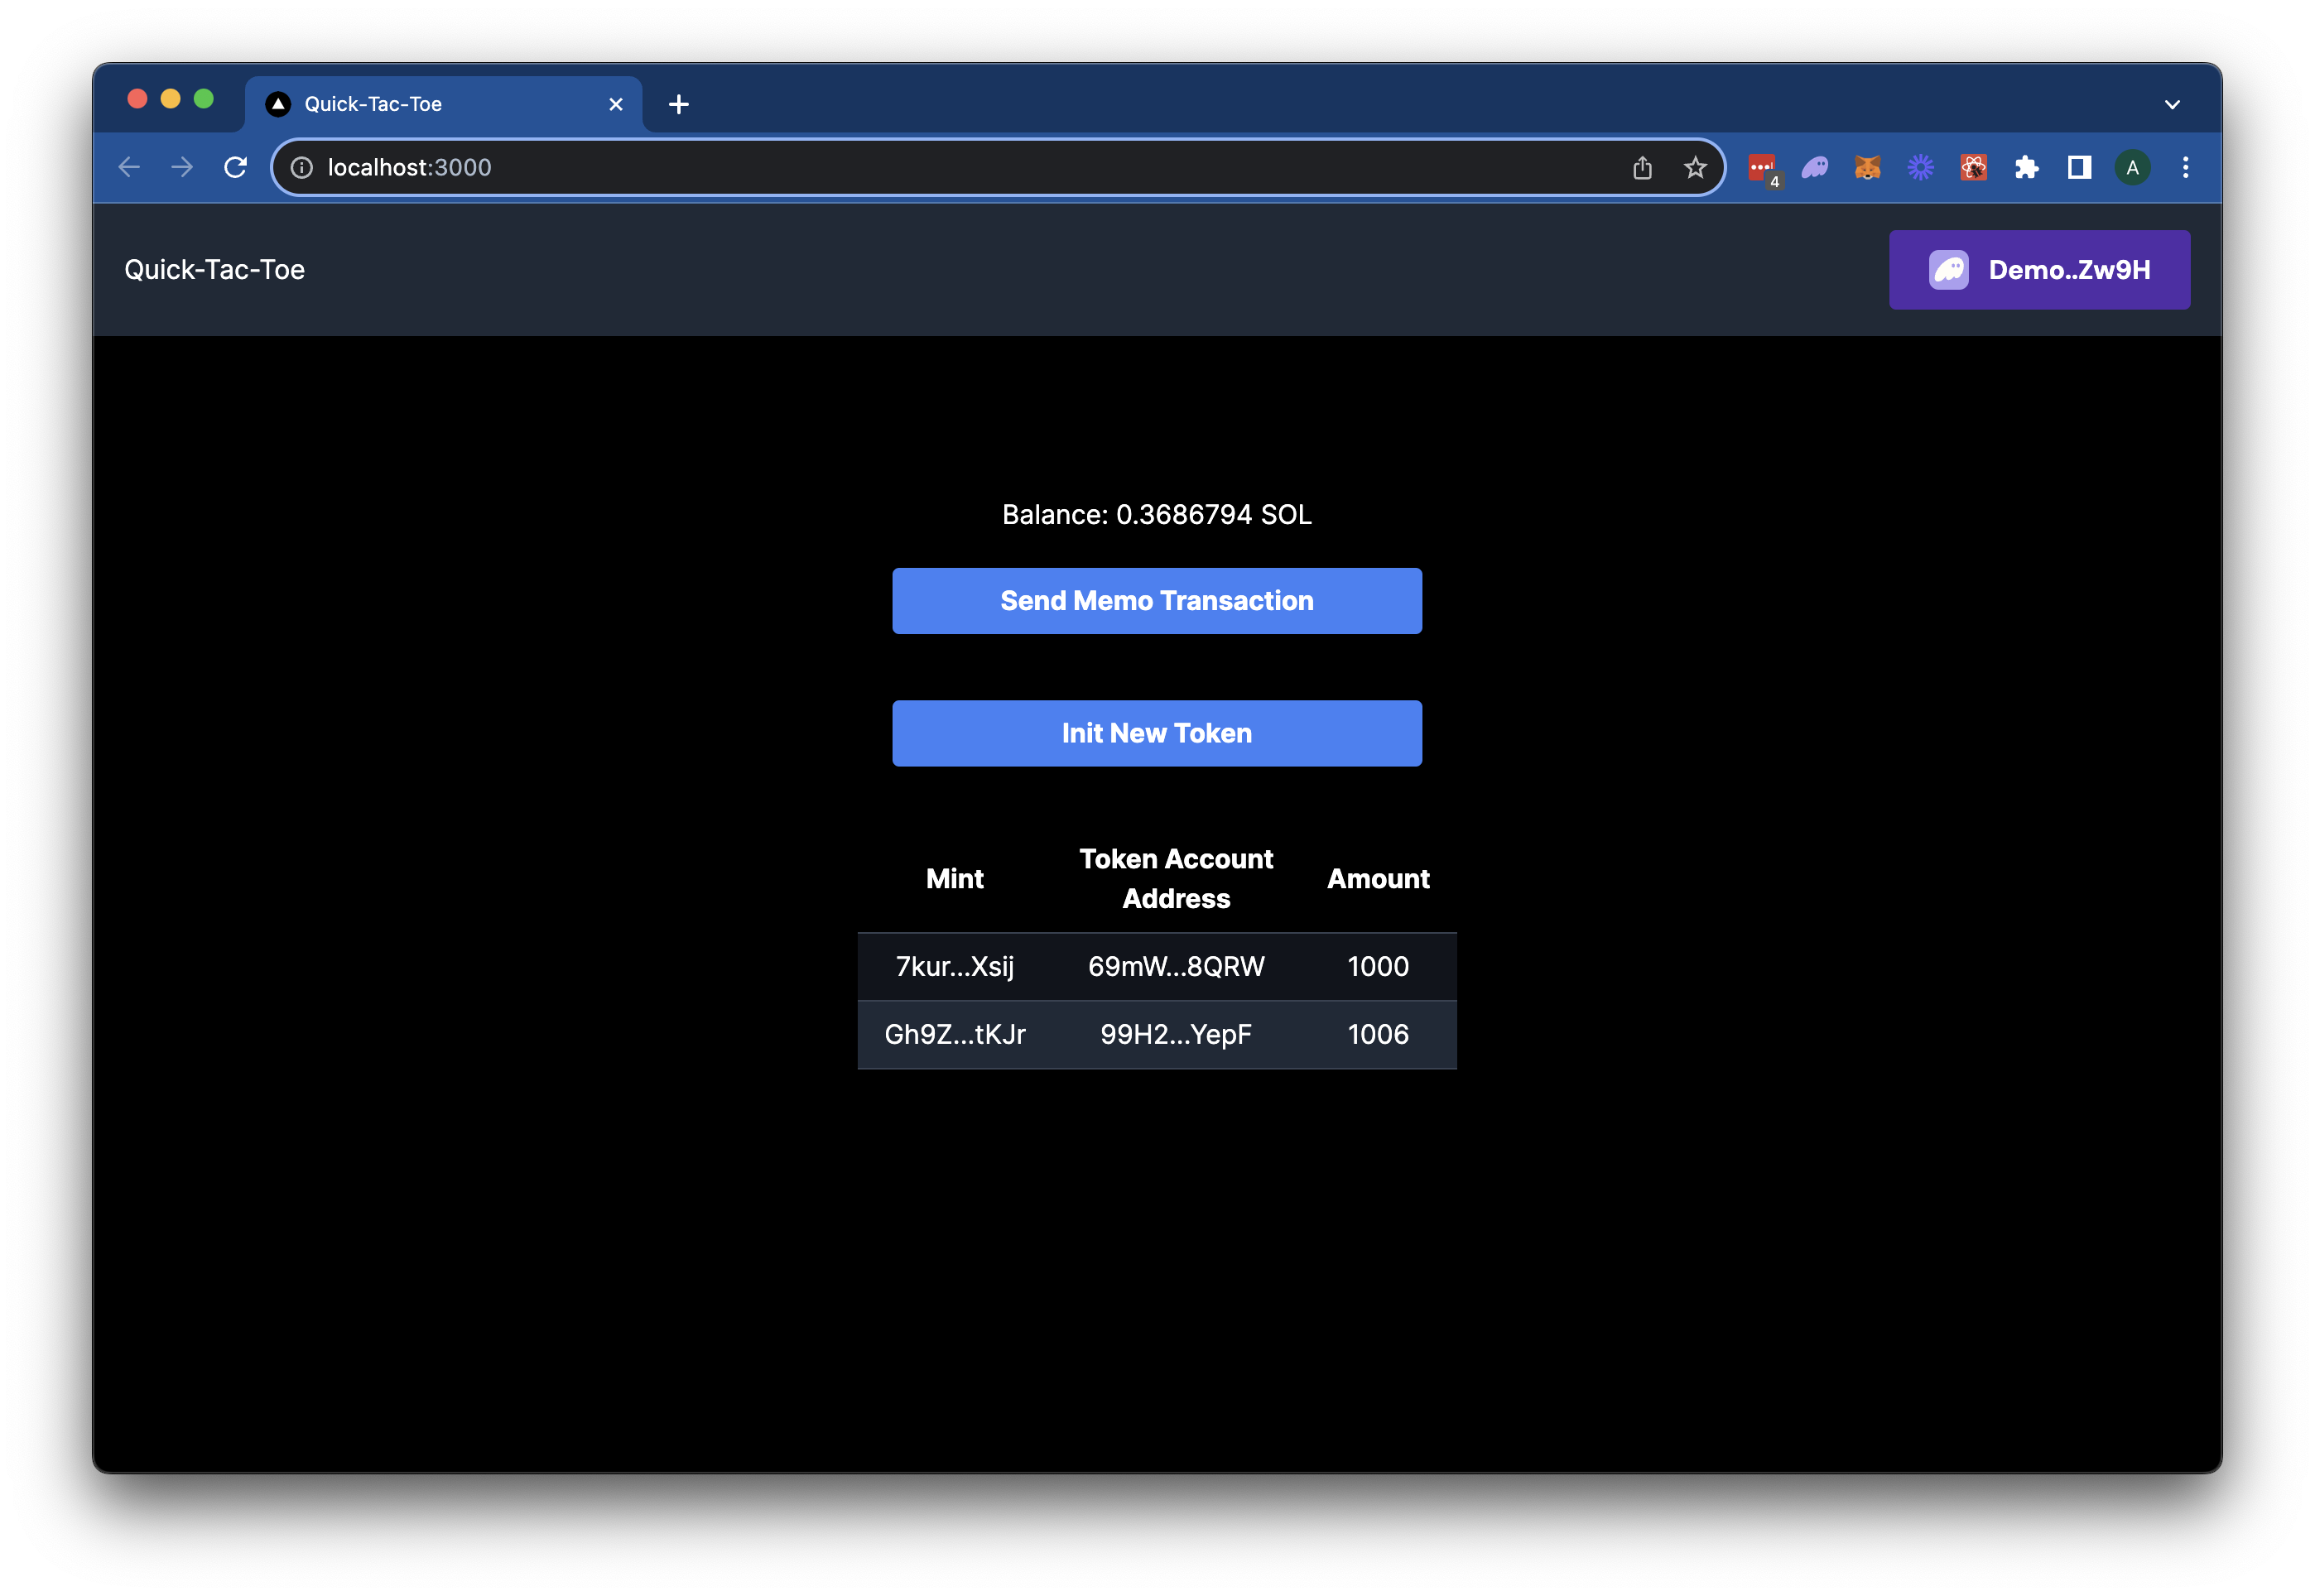
Great work! You now have a table that will display all of the tokens in your wallet.
Continued Practice
You have done a ton of great work here, so feel free to call it a day. If you are looking for more practice, here are a few ideas:
- Add a new column to your table that includes a button to burn one token of that token mint
- Add a refresh button to your table (or add a refreshTokens Context to your
SolanaProviderscomponent) that will refresh the token accounts after you create a new token - Create some filters for your table that will allow you to filter by mint address, token account address, or token amount
Next Steps and Wrap Up
Awesome! You are well on your way to becoming a Token Program master! Though the Token program is quite powerful and an integral part of building on Solana, being able to create your own programs can be even more empowering. The next lesson will teach us how to develop programs using Anchor.
Remember to save your project, as we will use it again later in this course.