7 min read
Getting started
Congratulations on making it this far! You have a working Solana program; now, all you have to do is integrate it into the UI you built in the previous lessons. In this lesson, you will update your existing Next.js project with a few tools to help you create a UI for your game.
Let's jump right in! Open up your existing Next.js project that we used in the SPL Token lesson. Alternatively, you can clone it from the Demo Progress Repository if you do not have it.
Styling
Let's add a new pulse animation to our CSS that we can use to improve our UX when a user is waiting for another player. Open ./app/globals.css, and replace the existing code with the following:
@tailwind base;
@tailwind components;
@tailwind utilities;

:root {
  --foreground-rgb: 255, 255, 255;
  --background-start-rgb: 0, 0, 0;
  --background-end-rgb: 0, 0, 0;
}

@media (prefers-color-scheme: dark) {
  :root {
    --foreground-rgb: 255, 255, 255;
    --background-start-rgb: 0, 0, 0;
    --background-end-rgb: 0, 0, 0;
  }
}

body {
  color: rgb(var(--foreground-rgb));
  background: linear-gradient(
      to bottom,
      transparent,
      rgb(var(--background-end-rgb))
    )
    rgb(var(--background-start-rgb));
}

@keyframes pulse {
  0%, 100% {
      opacity: 1;
  }
  50% {
      opacity: 0.5;
  }
}

.pulse {
  animation: pulse 2s infinite;
}
We are adding a new pulse animation to make an element fade in and out. Additionally, we updated the root CSS variables to create a standard dark mode theme across all devices.
Constants
Next, let's add our seeds and program ID to our ./utils/constants.ts file. This will make it a bit easier to interact with our Program and PDAs. Replace the existing code with the following:
import { WalletAdapterNetwork } from "@solana/wallet-adapter-base";
import { Cluster, PublicKey, clusterApiUrl } from "@solana/web3.js";
export const cluster: Cluster = process.env.NEXT_PUBLIC_CLUSTER as Cluster || 'devnet';
export const endpoint: string = process.env.NEXT_PUBLIC_URL || clusterApiUrl(WalletAdapterNetwork.Devnet);
// ALTERNATE FOR LOCAL TESTING
// export const endpoint: string = 'http://127.0.0.1:8899';

export const SEEDS: { [key: string]: Buffer } = {
    player: Buffer.from("player"),
    mint: Buffer.from("play_token_mint"),
    programState: Buffer.from("program_state"),
    game: Buffer.from("new_game"),
};

// Make sure to replace the .env and fallback with your own program address
const programAddress: string = process.env.NEXT_PUBLIC_PROGRAM_ADDRESS || 'QTTmCrRSrMhPtZS431TSmtiosubJoqfExRhi7JHcJhC';
export const PROGRAM_ID: PublicKey = new PublicKey(programAddress);
MAKE SURE TO REPLACE THE PROGRAM ID WITH YOUR OWN 👆 (here and in .env.local)
Note that we have also added a commented-out local endpoint variable. You will use this instead of the devnet endpoint if you want to test your program locally.
page.tsx
Update your ./app/page.tsx file to utilize a new component, Game instead of Main (we will make this in our next few lessons). Replace the existing code with the following:
import React from 'react';
import SolanaProviders from '@/components/SolanaProviders';
import Navbar from '@/components/Navbar';
import Game from '@/components/Game';
export default function Home() {
  return (
    <SolanaProviders>
      <Navbar />
      <Game /> {/* 👈 This replaces the old Main component */}
    </SolanaProviders>
  )
}
This will allow us to start from scratch when building our game UI.
Solana Providers
Finally, let's update our ./components/SolanaProviders.tsx file to include a new GameProvider. This will allow us to easily access our program state from anywhere in our app. Replace the existing code with the following:
import { ConnectionProvider } from '@solana/wallet-adapter-react';
import React, { useMemo } from 'react';
import { WalletProvider } from '@solana/wallet-adapter-react';
import { WalletModalProvider } from '@solana/wallet-adapter-react-ui';
import { PhantomWalletAdapter, SolflareWalletAdapter } from '@solana/wallet-adapter-wallets';
import { endpoint } from '@/utils/constants';
// 👇 Add the following NEW import
import { GameProgramProvider } from '@/utils/game/useGame';

require('@solana/wallet-adapter-react-ui/styles.css');

type SolanaProvidersProps = {
    children: React.ReactNode;
}
const SolanaProviders = ({ children }: SolanaProvidersProps) => {
    const walletEndpoint = useMemo(() => endpoint, []);
    const wallets = useMemo(() => [
        new PhantomWalletAdapter(),
        new SolflareWalletAdapter(),
    ], [])

    return (
        <ConnectionProvider endpoint={walletEndpoint}>
            <WalletProvider wallets={wallets} autoConnect>
                <WalletModalProvider>
                    <GameProgramProvider> {/* 👈 Add as innermost wrapper around children */}
                        {children}
                    </GameProgramProvider>
                </WalletModalProvider>
            </WalletProvider>
        </ConnectionProvider>
    );
}

export default SolanaProviders;
We will create our Game API and build out the GameProgramProvider in the next section.
Utilities
Types
Create a new folder called' game' Inside your utils folder. Inside this folder, let's define some types. Create a new file, types.ts and add the following:
// ./utils/game/types.ts
import { PublicKey } from "@solana/web3.js";

export interface PlayerInfo {
    playerPda: PublicKey;
    playerTokenAccount: PublicKey;
    record: Record;
    playerTokenBalance: number;
    rewardClaimed: boolean;
}
type Sign = { x: {} } | { o: {} };
export type Square = { row: number; column: number };
type Status = { active: {} } | { won: {} } | { tie: {} } | { notStarted: {} };
type Board = (Sign | null)[][];

export interface Game {
    id: bigint; // u64 is represented as bigint in TypeScript
    playerX: PublicKey;
    playerO: PublicKey;
    board: Board;
    state: Status;
    turn: number; // u8 can be represented as number
    bump: number;
    winner: PublicKey | null;
};


export interface GameAndPda {
    publicKey: PublicKey;
    account: Game;
}

export interface Player {
    auth: PublicKey;
    record: Record;
}

export interface Record {
    wins: number;
    losses: number;
    ties: number;
    airdropReceived: boolean;
    rewardClaimed: boolean;
    bump: number;
}
These types should all look familiar. We are just defining the types that we will use in our API.
IDL
Anchor does some magic to generate TypeScript types from our IDL. This includes our program state and all of our instructions. Let's create a new folder, ./utils/game/idl. Then, open up your project in Solana Playground and click the 🛠️ Icon. At the bottom of the screen, you should see an IDL toggle. Open it up and click "Export".
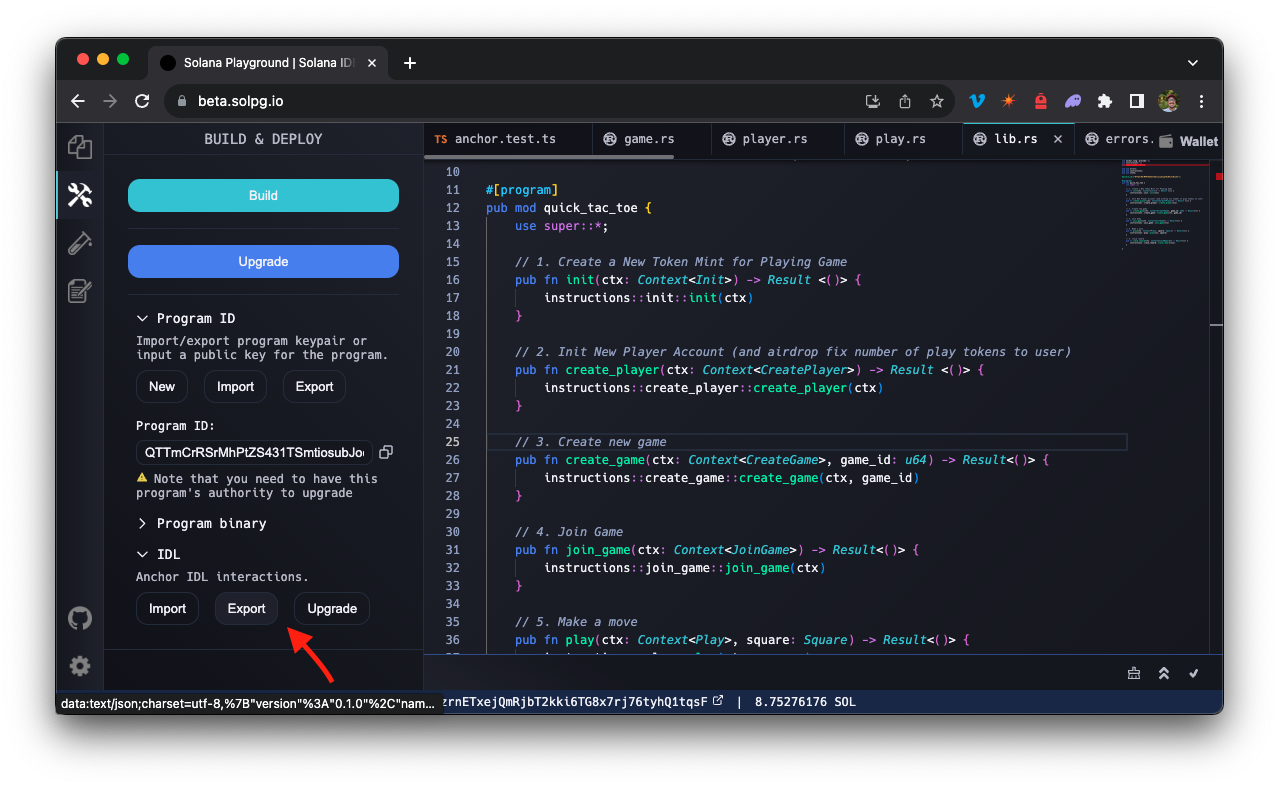
This will generate a .json of your IDL. Save the file to your ./utils/game/idl folder.
If you would like, you can find the IDL of our program here. IDLs can be publicly published like this directly from Solana Playground by clicking "Initialize".
Let's create a type and IDL file for our program. Create a new file, idl.ts, with an exported Type TicTacToe (for our program) and an exported IDL of our program. Add the following code to your idl.ts file (replacing the objects with the json from your IDL file):
export type TicTacToe = {
    // Paste IDL object here
}

export const IDL: TicTacToe = {
    // Paste IDL object here
}
This will make it easier to access our IDL and program state from anywhere in our app (Solana Playground did all of this for us behind the scenes in our testing environment).
Wrap Up
Great job. Your project is now set up to build a UI for your game. In the following lessons, you will:
- Build an API and hook to interact with your program
- Build a UI for your user dashboard
- Build a UI for your game board
Keep it up! You are almost done with your first Solana project!