Wallet Tracking
Monitor a list of wallet addresses on Solana and Ethereum easily with Quicknode Streams. Update the wallet list through a simple UI.



Übersicht
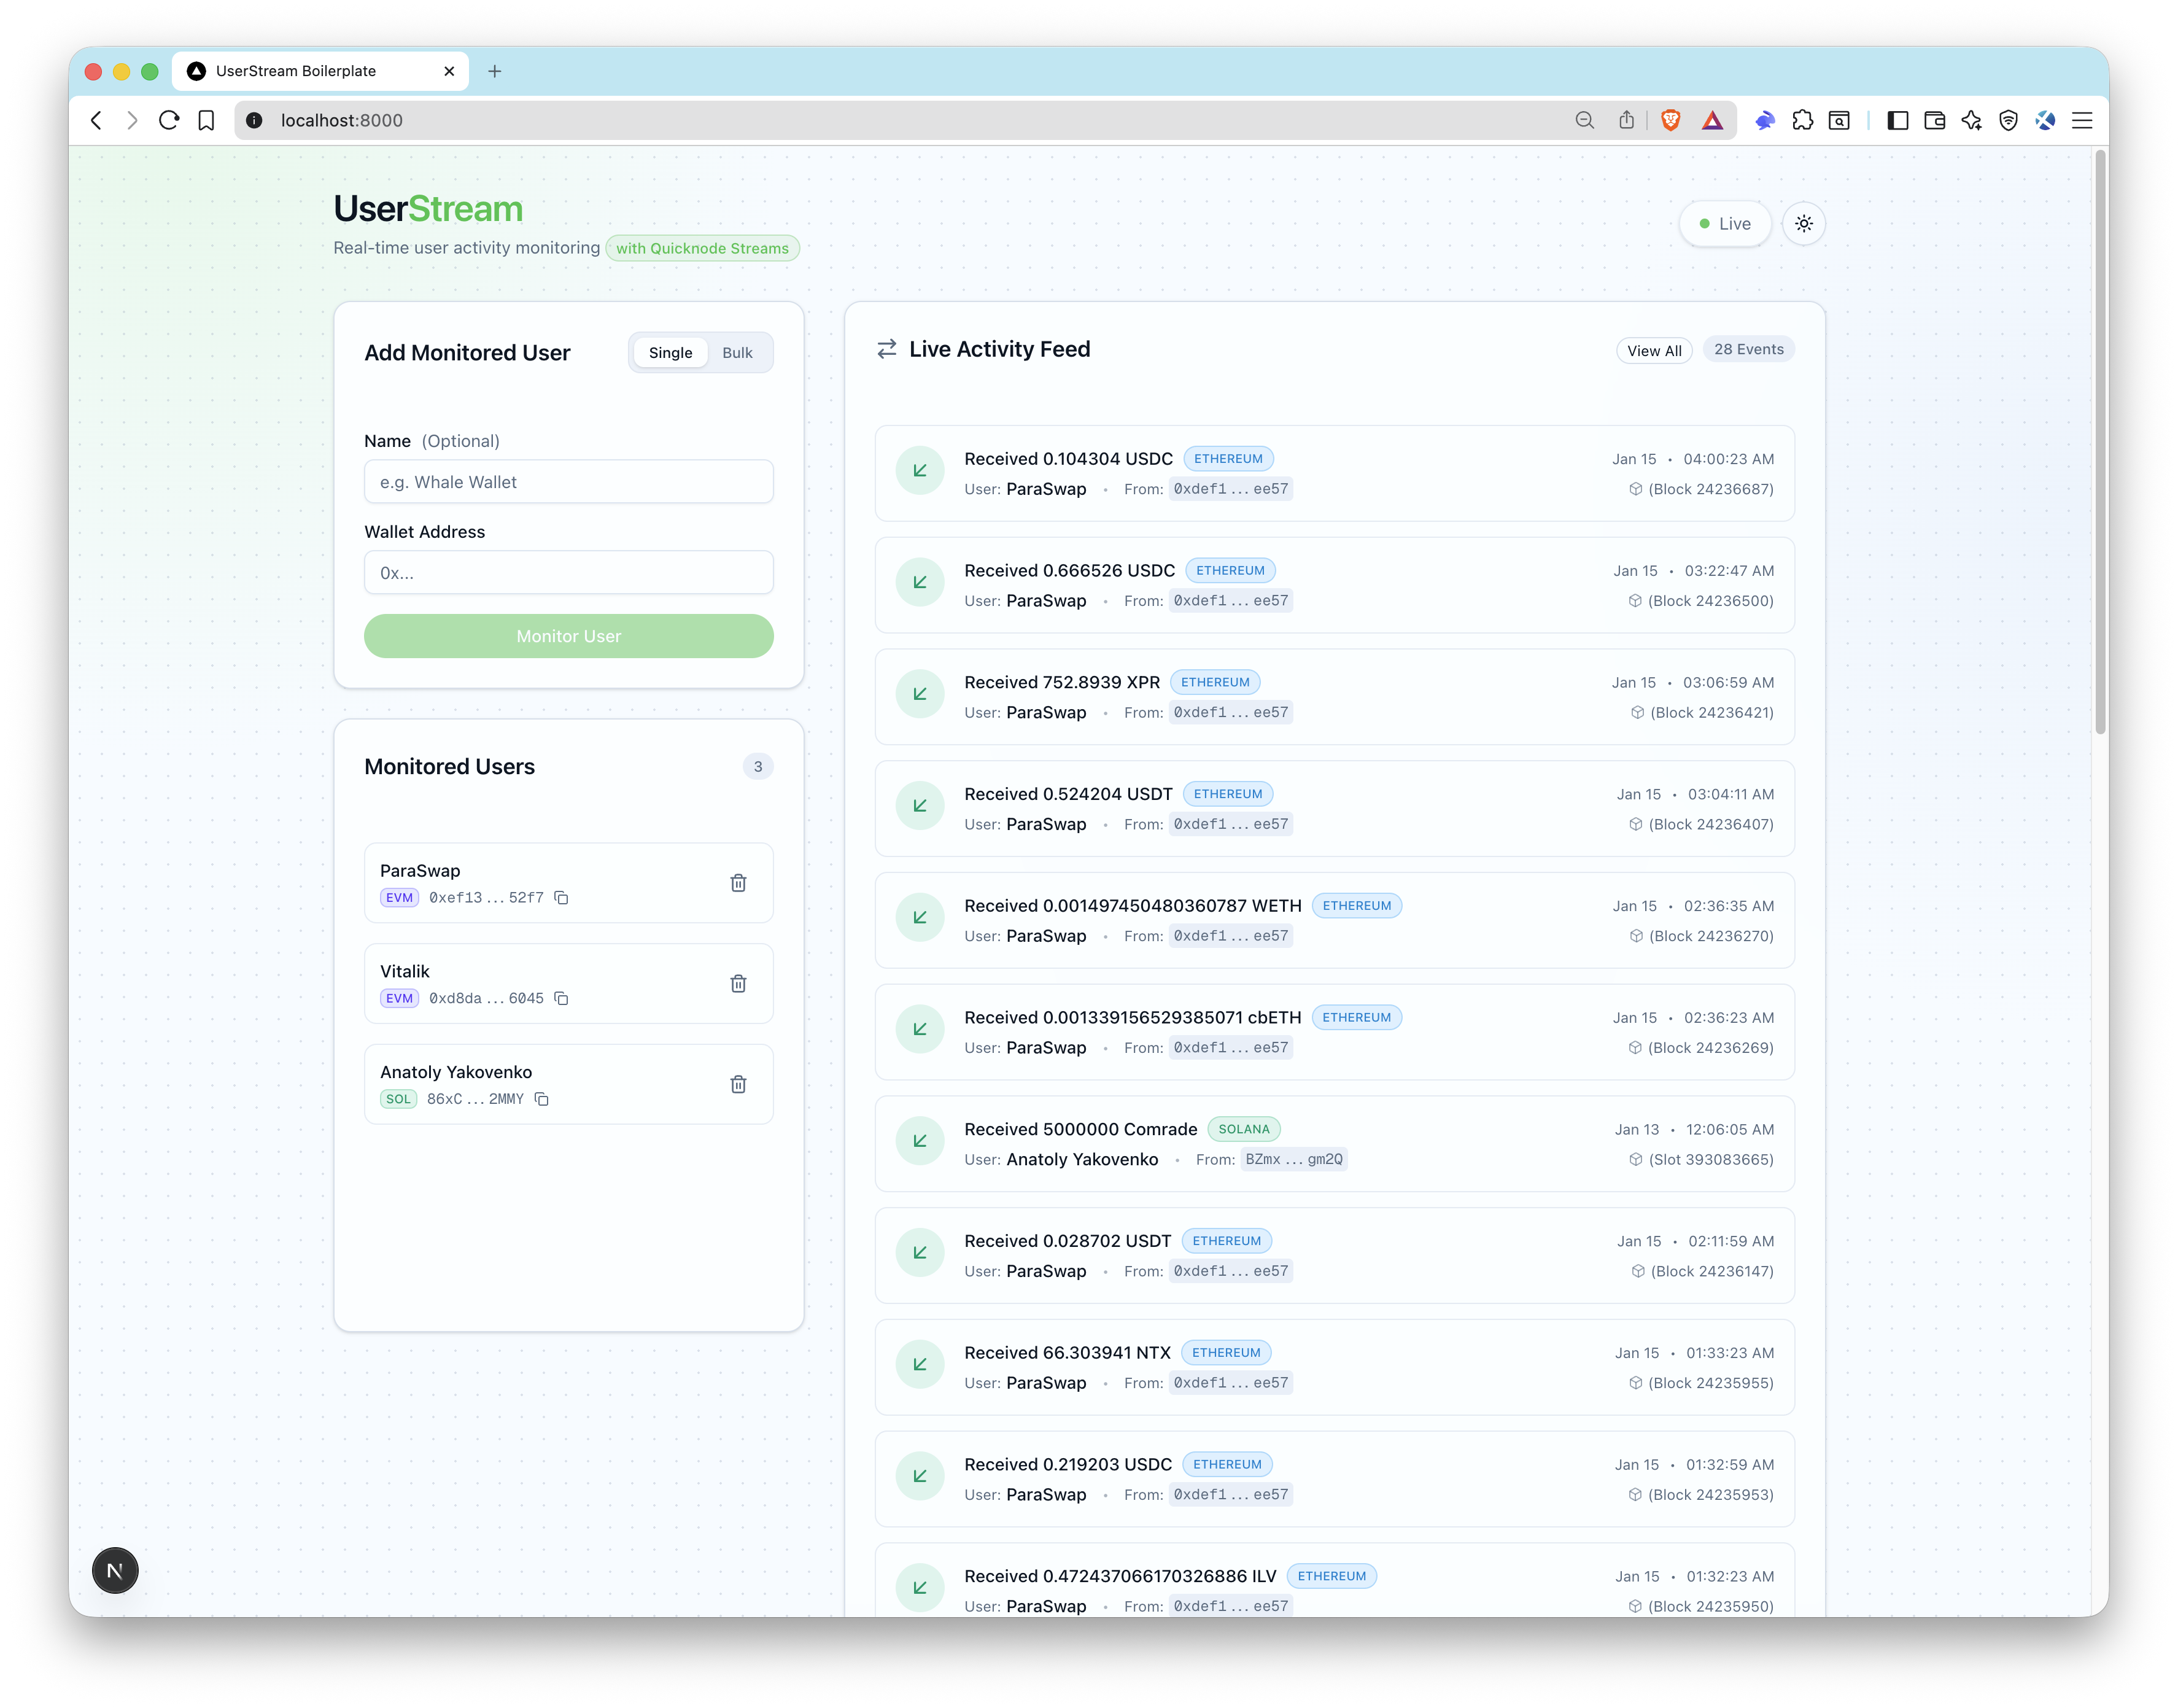
This sample app ships a live user activity feed that wires Quicknode Streams + Key-Value Store (KV Store) to monitor addresses, verify webhooks, store events in SQLite via Prisma, and push updates over SSE in real time (EVM + Solana).
Architektur
Blockchain (EVM + Solana)
  -> Quicknode Streams + KV
    -> POST /api/webhook/streams (signature verified)
      -> DB insert + SSE emit
        -> UI live feed
Funktionen
- Quicknode Streams setup scripts (create + activate)
- EVM filter for native transfers and ERC-20 Transfer logs
- Solana filter for native transfers and SPL token transfers
- Quicknode KV list backed user monitoring, enabling dynamic user monitoring without redeploying the stream
- Labeling monitored addresses
- Bulk add monitored addresses
- Webhook signature verification and timestamp checks
- SSE live updates
- ENS resolution for EVM addresses
- Prisma + SQLite local storage
Voraussetzungen
- Node.js 20+ and a package manager (pnpm, yarn, npm).
- Quicknode account and API key: Create an account, and get your Admin API key for
QN_API_KEY. - EVM endpoint for ENS/ERC-20 metadata: Create an Ethereum endpoint and copy the HTTPS URL for
QN_EVM_ENDPOINT. - Solana RPC endpoint for SPL token metadata: Create a Solana endpoint and copy the HTTPS URL for
QN_SOLANA_ENDPOINT. - Public webhook URL: Use a tunnel like
ngrokor deploy the app soAPP_URLis reachable by Quicknode.
Projektstruktur
filters/
  evm-filter.js           # Quicknode Streams filter (EVM)
  solana-filter.js        # Quicknode Streams filter (Solana)
scripts/
  setup-streams.ts        # Creates KV lists + stream (paused)
  activate-streams.ts     # Activates stream by id
src/
  app/api/                # API routes (webhooks, users, SSE)
  lib/                    # Quicknode, webhook, SSE helpers
  types/                  # Stream payload types
prisma/
  schema.prisma           # SQLite schema
Umgebungsvariablen
Kopieren .env.example zu .env and fill in:
QN_API_KEY=""                  # Quicknode API key
QN_STREAM_SECURITY_TOKEN_EVM="" # EVM stream security token (from setup)
QN_STREAM_SECURITY_TOKEN_SOL="" # Solana stream security token (from setup)
QN_EVM_ENDPOINT=""             # Quicknode EVM endpoint URL
QN_SOLANA_ENDPOINT=""          # Solana RPC endpoint URL
DATABASE_URL="file:./dev.db"   # SQLite DB
APP_URL="http://localhost:3000" # Public app URL (ngrok for local webhooks)
Notes:
QN_STREAM_SECURITY_TOKEN_EVMundQN_STREAM_SECURITY_TOKEN_SOLare returned bysetup:streamsper chain.APP_URLmust be reachable by Quicknode (use ngrok or a deployed URL).
Erste Schritte
1. Install dependencies
npm install
# pnpm install
# yarn install
2. Create your env file
cp .env.example .env
3. Add required variables
Fill in .env (see Voraussetzungen).
For local webhooks, expose your app with ngrok and copy the HTTPS URL into APP_URL:
ngrok http 3000
4. Create Quicknode Streams + KV lists
npm run setup:streams
# pnpm run setup:streams
# yarn setup:streams
Copy the printed security token into .env (QN_STREAM_SECURITY_TOKEN_EVM oder QN_STREAM_SECURITY_TOKEN_SOL).
If you want Solana, run the command again with chain=solana-mainnet (see Quicknode Streams Setup for options).
5. Set up the database and start the app
npx prisma migrate dev --name init
# pnpm prisma migrate dev --name init
# yarn prisma migrate dev --name init
npm run dev
# pnpm dev
# yarn dev
6. Activate the stream
npm run activate:streams
# pnpm run activate:streams
# yarn activate:streams
Open http://localhost:3000, add wallet addresses, and you should see live events as streams deliver webhooks.
Database
SQLite is used by default. Prisma schema is in prisma/schema.prisma.
Common commands:
pnpm prisma migrate dev --name init
pnpm prisma studio
Quicknode Streams Setup
Following the Getting Started section is enough. However, if you want to manage Streams settings or KV lists manually, follow these steps.
1. Check the filter
The EVM filter lives in filters/evm-filter.js. It emits:
nativeTransferevents (ETH transfers with non-zero value)erc20Transferevents (ERC-20 Transfer logs)
The filter checks addresses against the userstream_monitored_users_evm KV list.
The Solana filter lives in filters/solana-filter.js. It emits:
solTransferevents (native SOL transfers)splTransferevents (SPL token transfers)
The filter checks addresses against the userstream_monitored_users_sol KV list.
Adding addresses through UI will update the KV list automatically. However, if you need to manage KV lists manually, you can do so through the Quicknode REST API. Check the Key-Value Store documentation page to learn more.
2. Create stream + KV lists
pnpm run setup:streams
This will:
- Create the KV list for the selected chain (
userstream_monitored_users_evmoderuserstream_monitored_users_sol) - Base64 encode the filter for the chosen chain
- Test the filter with a test block number (as KV list will be empty at first, no events will be emitted.)
- Create a stream with:
status=pauseddataset=block_with_receipts(EVM) ordataset=block(Solana)- required webhook attributes (compression, retries, timeouts)
- Save the stream id to
.quicknode/streams.json - Print the
security_tokenfor.env(QN_STREAM_SECURITY_TOKEN_EVModerQN_STREAM_SECURITY_TOKEN_SOL) - Creates a single stream per run (run again with
chain=solana-mainnetoderchain=ethereum-mainnetto create both).
You can override options using key=value args, for example:
pnpm run setup:streams chain=ethereum-mainnet name="UserStream EVM Monitor" test_block_number=24223192
pnpm run setup:streams chain=solana-mainnet name="UserStream Solana Monitor" test_block_number=393612994
Common options:
chain=ethereum-mainnet(alias:network=ethereum-mainnet)dataset=block_with_receiptsdataset_batch_size=1status=pausedelastic_batch_enabled=truefilter_path=filters/evm-filter.jstest_block_number=24223192destination_compression=nonedestination_headers='{"Content-Type":"application/json"}'destination_max_retry=3destination_retry_interval_sec=1destination_post_timeout_sec=10
Webhook Security and Payload
- Endpoint:
POST /api/webhook/streams - Headers required:
x-qn-nonce,x-qn-timestamp,x-qn-signature - Payload can be gzip compressed; the handler auto-detects
content-encoding: gzip - Signature verification uses
QN_STREAM_SECURITY_TOKEN_EVModerQN_STREAM_SECURITY_TOKEN_SOL
API Endpoints
GET /api/health- health checkGET /api/users- list monitored usersPOST /api/users- add a single user (walletAddress, optionalName)PATCH /api/users?id=...- update user name/displayNameDELETE /api/users?id=...- delete a userPOST /api/users/bulk- bulk add users (newline separated)POST /api/webhook/streams- Quicknode Streams webhookPOST /api/webhook/test- local-only webhook testGET /api/sse- SSE stream of activity events
Vorschau
- Das Repository forken
- Erstelle einen Feature-Branch:git checkout -b feature/amazing-feature
- Speichere deine Änderungen:git commit -m "Tolle Funktion hinzufügen"
- Deinen Branch pushen:git push origin feature/amazing-feature
- Erstelle einen Pull Request.