38 min read
Overview
Hyperliquid pairs two layers under one unified state: HyperCore, an ultra-low-latency order-book engine accessed via signed actions, and HyperEVM, a fully EVM-compatible network for standard Solidity development.
Chainlink CCIP enables bridging assets between chains using a burn-and-mint mechanism. Within Hyperliquid, conversions between HyperCore (HIP-1) assets and their HyperEVM representations are handled by native protocol flows.
In this guide, you’ll use Foundry to wrap a HyperEVM token that corresponds to a HIP-1 asset and bridge that token between HyperEVM and BNB Smart Chain (BSC) using CCIP.
What You Will Do
- Create a wrapper contract for a HyperEVM token linked to a HIP-1 asset
- Deploy and configure CCIP token pools on HyperEVM and BSC
- Verify our deployed token and pool contracts on-chain
- Execute CCIP transfers between HyperEVM and BSC with Foundry scripts
What You Will Need
- Node.js v22+ and a package manager (npm, yarn, or pnpm) installed
- MetaMask with the HyperEVM Mainnet and Binance Smart Chain Mainnet networks added
- Quicknode endpoints for HyperEVM and Binance Smart Chain
- Prior experience with Solidity and Foundry
We are using the MAINNETS of each chain in this guide. This is due to Chainlink CCIP not being available on HyperEVM Testnet at the time of writing. Please exercise caution and only use funds you can afford to lose.
Setting up the Development Environment
We will use Foundry to compile, deploy, and interact with our smart contracts. If you haven't installed Foundry yet, you can do so by running the following command in your terminal:
curl -L https://foundry.paradigm.xyz | bash
Follow the on-screen instructions and afterwards, you will be able to use the foundryup command to install Foundry. Ensure you execute this command in a new terminal session which accounts for the changes to your PATH variable.
foundryup
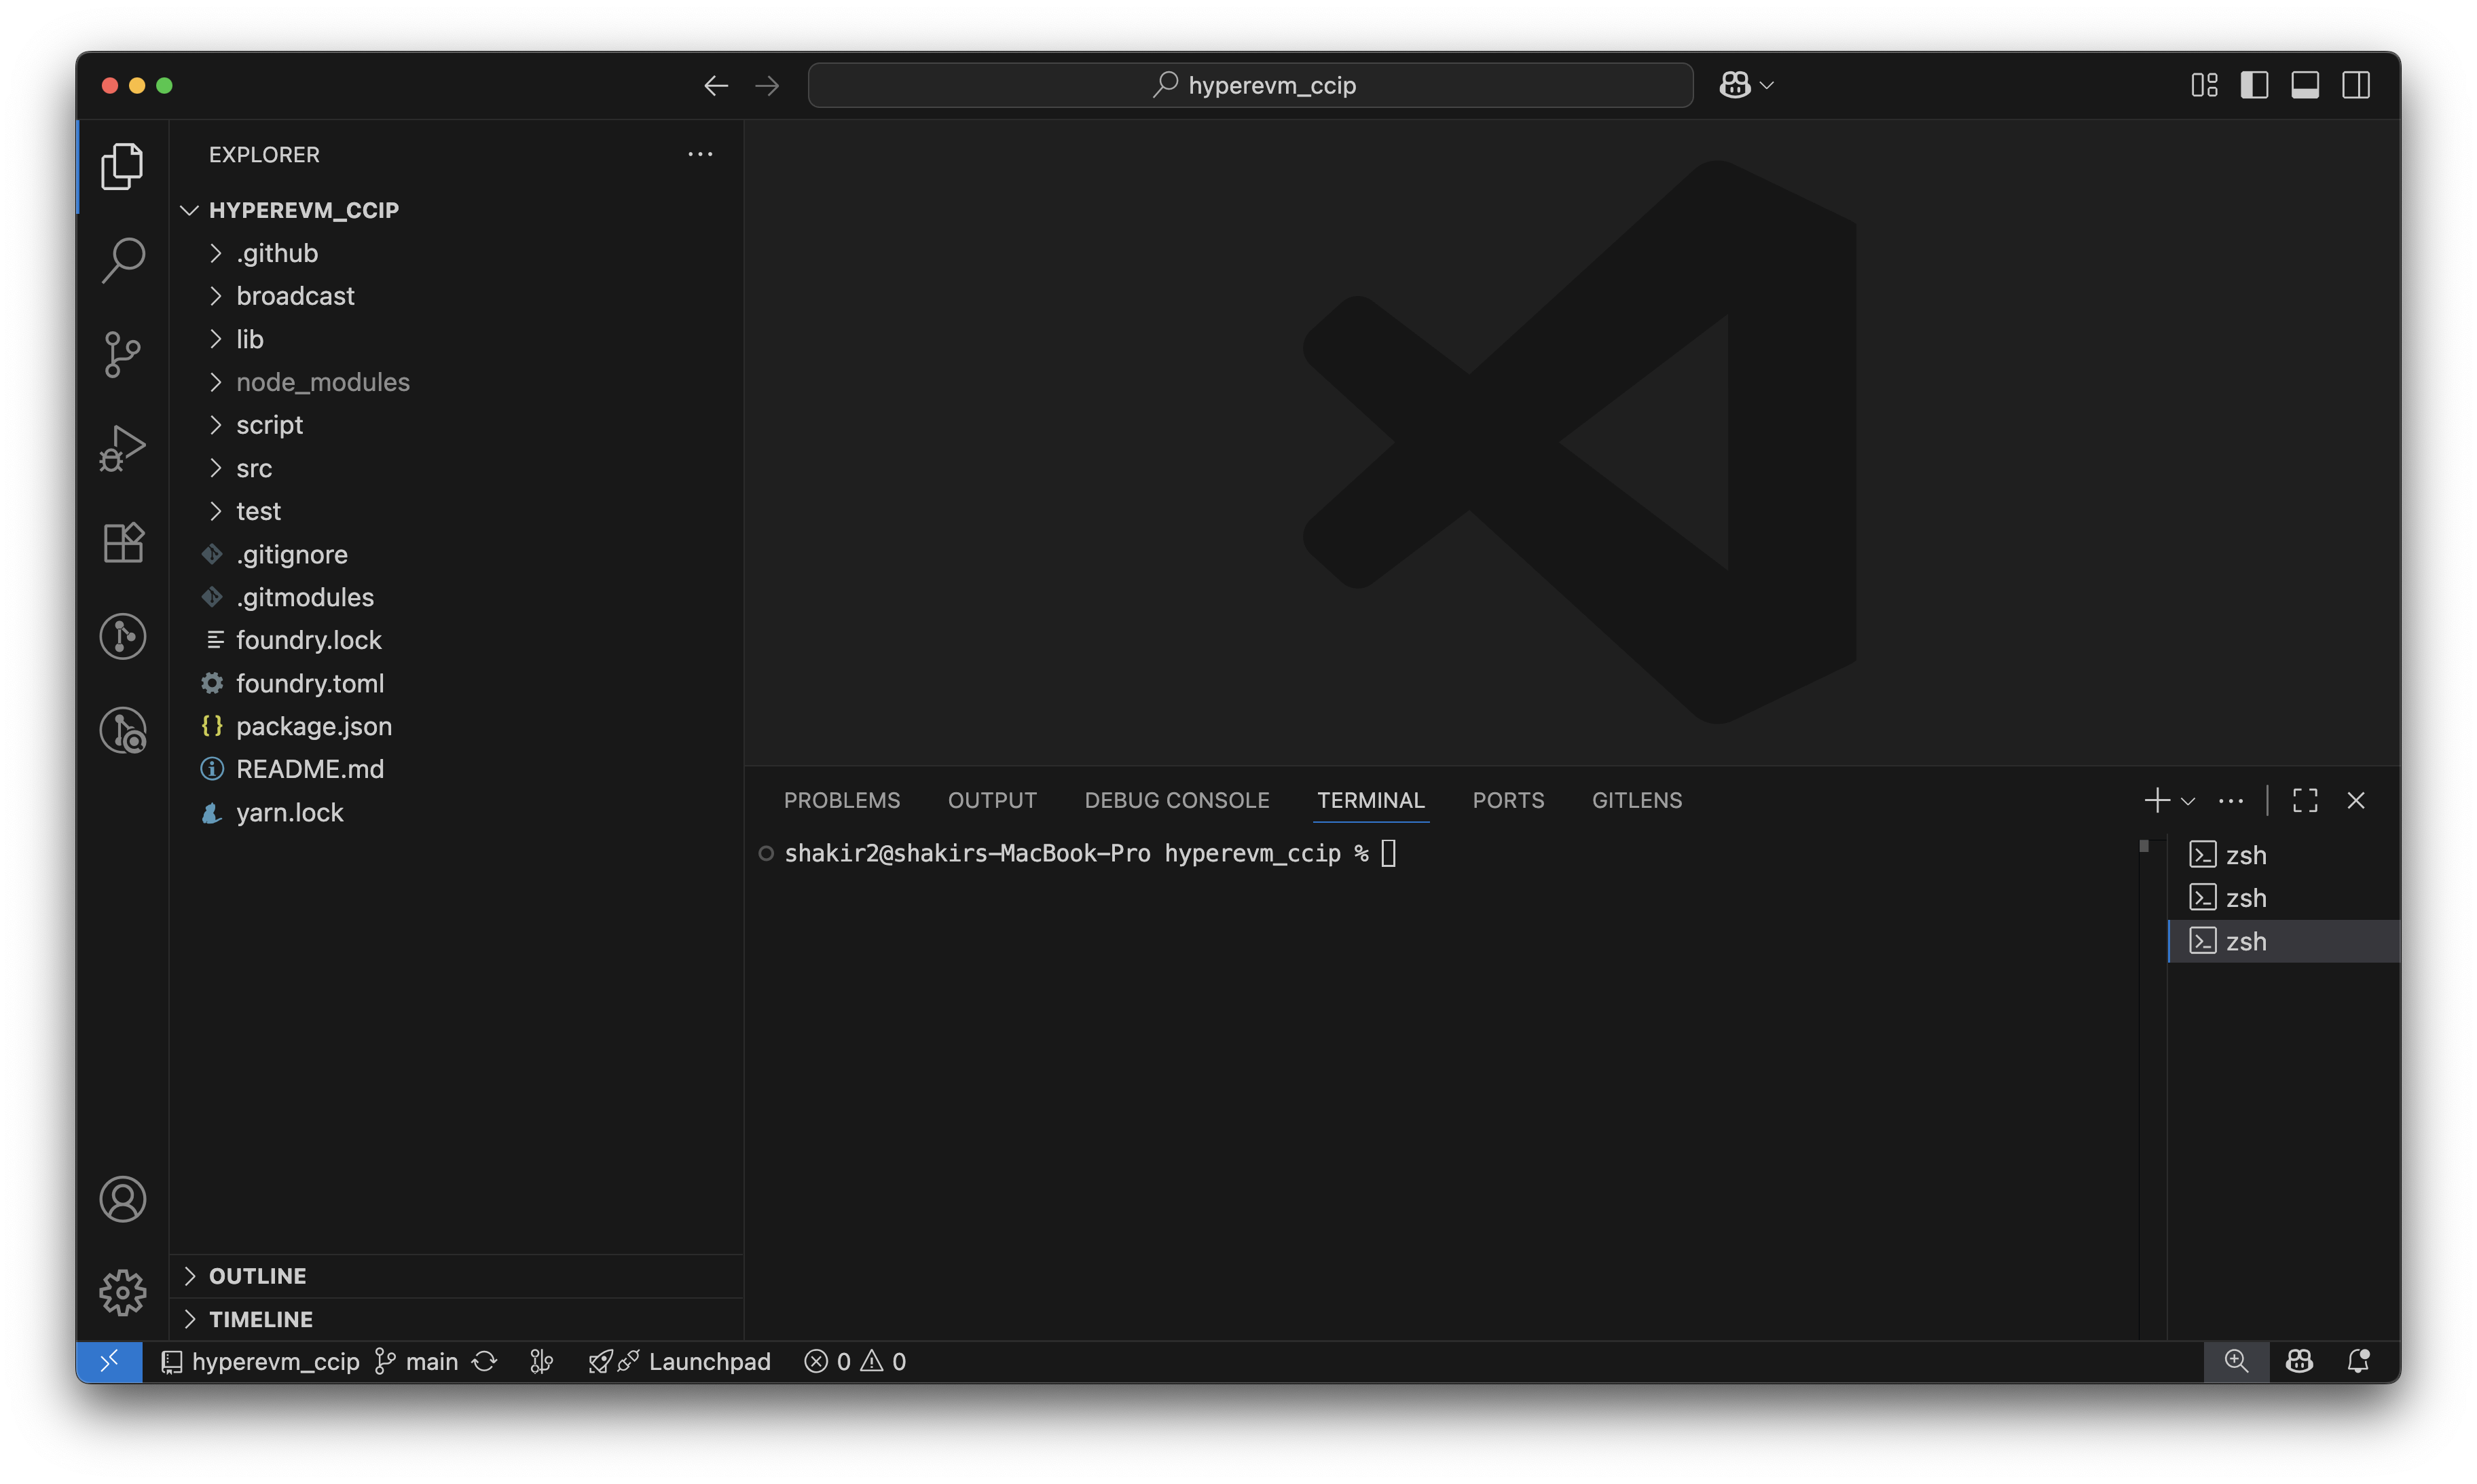
We will need a new folder locally where our project for this guide will live. We will name ours hyperevm_ccip, but you can call it anything you like. Run these commands in your terminal to create the folder and navigate into it with your code editor. In this guide, we will be using VS Code.
forge init hyperevm_ccip
cd hyperevm_ccip
code .
At this point, your setup should look something like this:
Great! Our Foundry project structure is now setup. Next create an .env file in the root of your project folder. This is where we will store our environment variables, such as our private key and RPC URLs. Here is what the format of the .env file should look like:
HYPEREVM_RPC="your_hyperevm_rpc_url"
BSC_RPC="your_bsc_rpc_url"
PRIVATE_KEY="your_private_key"
ETHERSCAN_API_KEY="your_etherscan_api_key"
We will discuss what each of these variables are shortly and how to obtain them. The next step is to delete the default src/Counter.sol contract and script/Counter.s.sol script that Foundry generates for us. We will not be using these in this guide. Alternatively, you can run the following commands in your terminal to remove these files:
rm src/Counter.sol
rm script/Counter.s.sol
You will also need to configure the foundry.toml file in the root of your project folder to include important settings for the Solidity compiler and remappings for the import statements we will be using. Here is what your foundry.toml file should look like:
[profile.default]
src = "src"
out = "out"
libs = ["lib"]
optimizer = true
optimizer_runs = 200

remappings = [
  '@chainlink/contracts-ccip/=node_modules/@chainlink/contracts-ccip/',
  '@chainlink/contracts/=node_modules/@chainlink/contracts/',
]

fs_permissions = [{ access = "read-write", path = "./" }]
In this file, we added optimizer settings to optimize our smart contracts for deployment. The fs_permissions entry allows Foundry to read and write files in the project directory. The remappings entries are the paths of the Chainlink contracts packages that we will be using in this guide. We will install these packages next.
Installing Dependencies
We will be using two Chainlink contracts packages in this guide: @chainlink/contracts-ccip and @chainlink/contracts. The first package contains the core CCIP contracts that we will be interacting with and the CCIP token pool contracts that we will be deploying. The second package contains the tailored ERC20 contracts that comply with Chainlink's Cross Chain Transfer requirements.
We will also be installing the @layerzerolabs/hyperliquid-composer package, which will be used to increase the gas limit for our transactions on HyperEVM. HyperEVM has a multi-block architecture that consists of smaller blocks with gas limits of 2 million gas units and larger blocks with gas limits of 30 million gas units. Smaller blocks have 1-second block times, while larger blocks have 1-minute block times. By default, an account on HyperEVM is limited to sending transactions that comply with the smaller block gas limit. This package will allow us to enable our account to send transactions with higher gas limits to fit within the larger blocks.
To install these packages, enter the following commands using your preferred package manager:
- npm
- yarn
npm install @chainlink/contracts-ccip @chainlink/contracts @layerzerolabs/hyperliquid-composer
yarn add @chainlink/contracts-ccip @chainlink/contracts @layerzerolabs/hyperliquid-composer
Great! You have successfully installed the dependencies we will be using in this guide. Next, we will discuss the environment variables we need to populate in our .env file.
Environment Variables
Quicknode Endpoints
Firstly, we need to obtain the appropriate RPC Endpoints for HyperEVM and BSC. You can get these from Quicknode. Simply sign up for a free trial, create a new multi-chain endpoint, and copy the HTTPS URLs for each chain. Paste the corresponding URLs into the HYPEREVM_RPC and BSC_RPC variables in your .env file.
Etherscan API
Next, go to your profile on Etherscan and navigate to the API KEYS tab. If you do not have an account, create one here. Here you will create an API key that will help you verify your smart contracts on-chain. Copy the API key and paste it into the ETHERSCAN_API_KEY variable in your .env file.
Private Key
Lastly, go into your MetaMask and copy the private key of one of your accounts. To learn how to access your private key, check out this short guide. Paste this private key into the PRIVATE_KEY variable in your .env file.
With that, all the environment variables in your .env file should now be populated. The final step in this setup process is to add the appropriate networks to our MetaMask wallet.
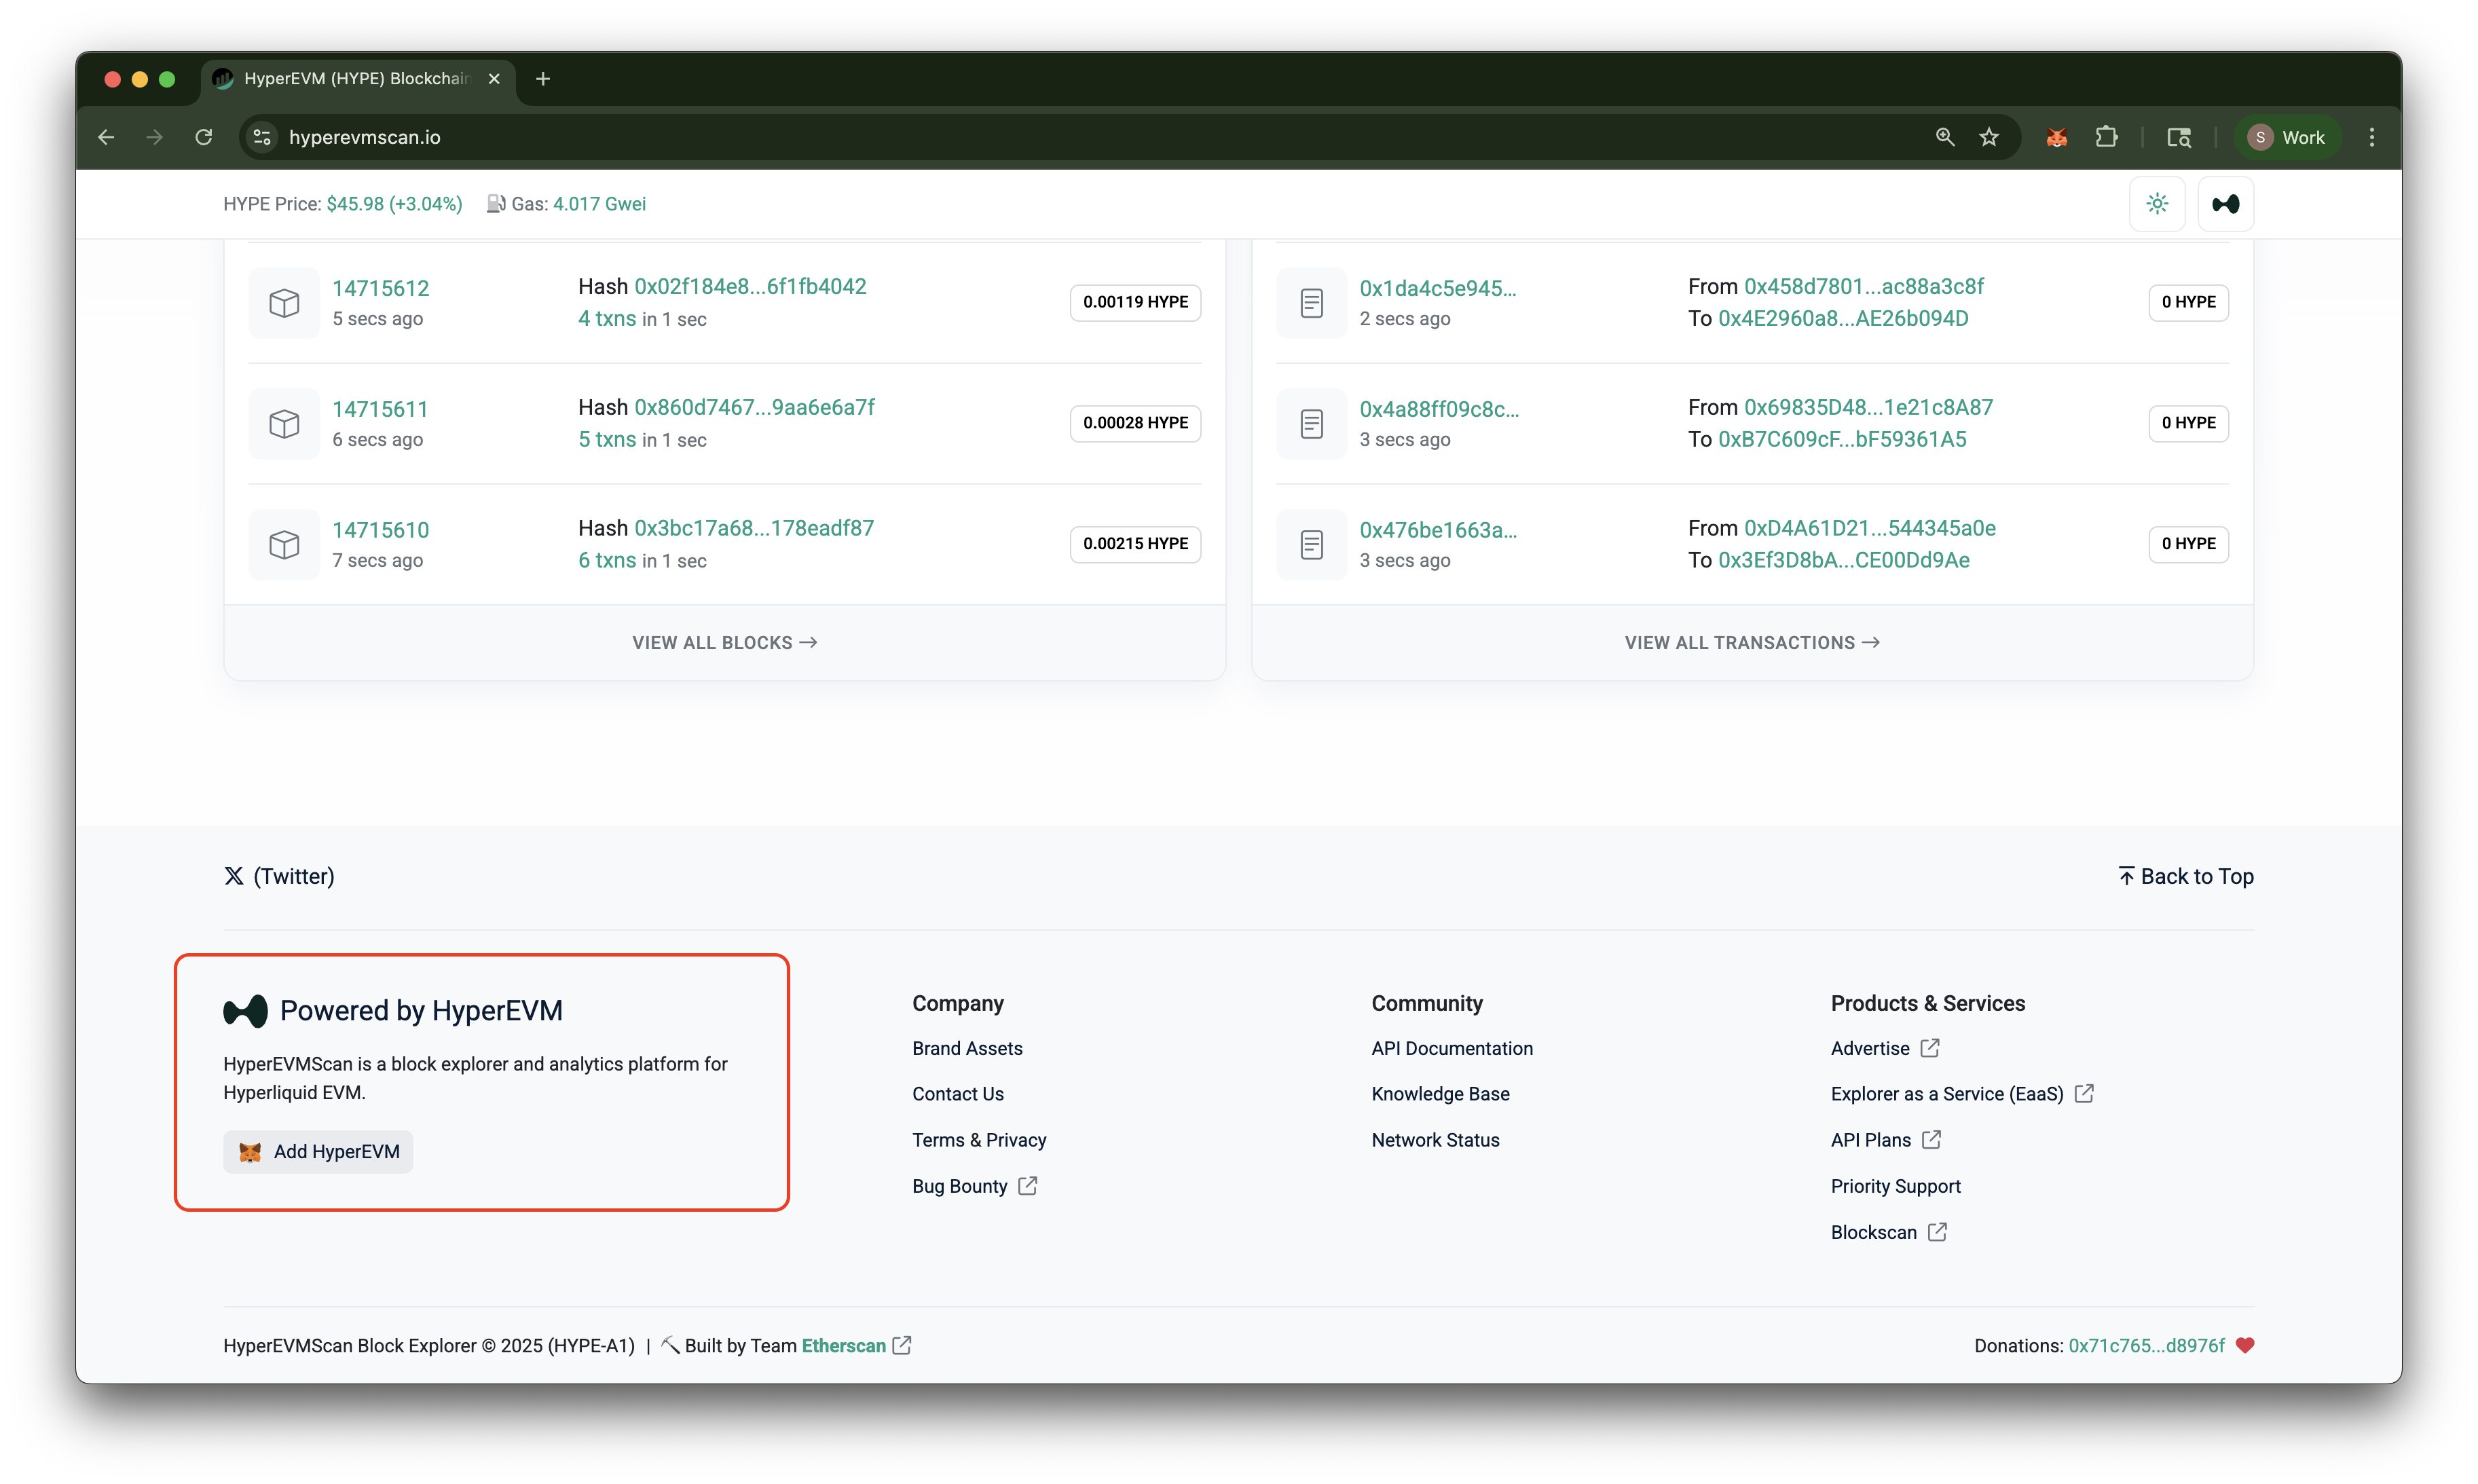
Adding Networks to MetaMask
We will be adding the HyperEVM Mainnet and Binance Smart Chain Mainnet networks to our MetaMask wallet. The easiest way to add these networks is to go to hyperevmscan.io and bscscan.com and click on the Add button on the bottom left of the page. This will add the networks to your MetaMask wallet:
Congratulations! You have successfully set up your development environment for this guide. Our next step is to bridge an HIP-1 asset from HyperCore to HyperEVM.
Bridging from HyperCore to HyperEVM
You will now bridge an HIP-1 asset from HyperCore to HyperEVM. This process involves converting the HIP-1 asset to its corresponding HyperEVM token representation. For this guide, we will be using Hyperliquid's native ecosystem coin: HYPE. Head over to the Hyperliquid trading interface and login with MetaMask to get started.
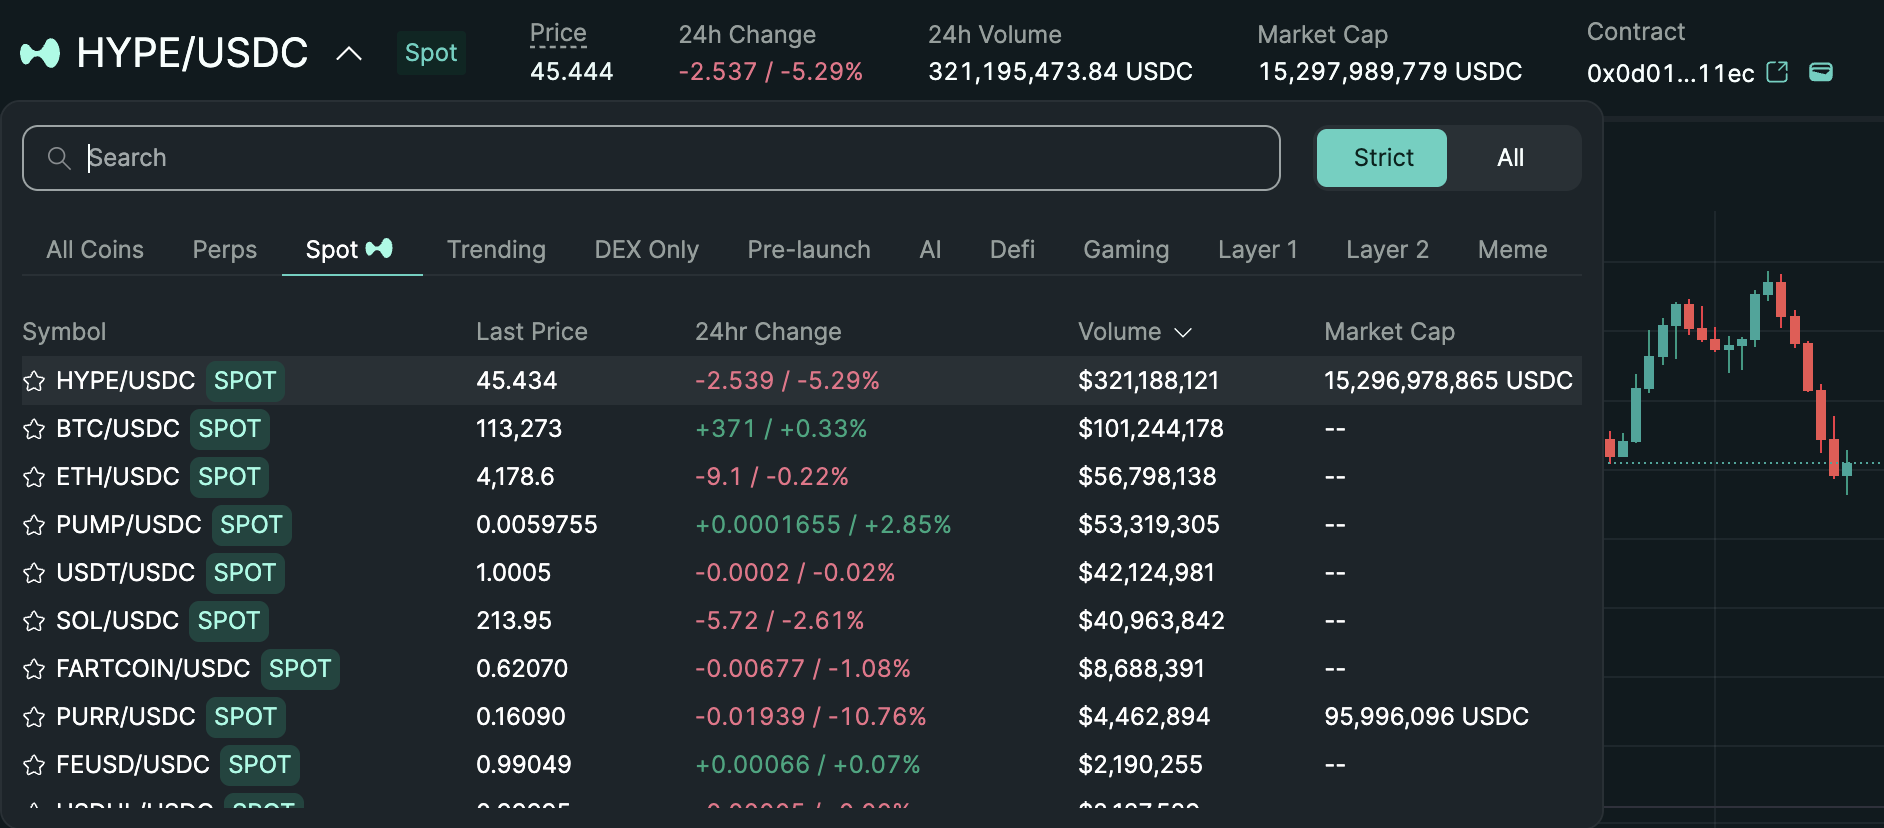
If you do not already have HYPE coins, you can acquire some by depositing USDC from Arbitrum Mainnet into Hyperliquid and then trading it for HYPE on Spot on the trading interface:
Once you have some HYPE, you can proceed to bridge it to HyperEVM. To do this click on the Transfer to/from EVM button on the bottom of the page below the chart. Simply enter the amount of HYPE you want to bridge and click Confirm.

Bridging HYPE to HyperEVM
Great! You have successfully bridged HYPE from HyperCore to HyperEVM. You should now be able to see your HYPE balance in MetaMask on the HyperEVM network. We will now move on to creating a wrapper contract for HYPE that complies with Chainlink's Cross Chain Transfer requirements.
Creating a Wrapper Contract for HYPE
To bridge HYPE between HyperEVM and BSC using Chainlink CCIP, we need to create a wrapper contract that adheres to Chainlink's Cross Chain Transfer requirements. This involves creating a new ERC20 token contract that wraps the existing HYPE asset on HyperEVM and a corresponding ERC20 token contract on BSC.
We will create a Quicknode Wrapped Hype token with the symbol qWHYPE. Enter the following command to create a new Solidity file in the src folder of your project directory and paste the code below into it.
- Create File
- Code
touch src/qWHYPE.sol
// SPDX-License-Identifier: MIT
pragma solidity 0.8.24;

import {BurnMintERC20} from "@chainlink/contracts/src/v0.8/shared/token/ERC20/BurnMintERC20.sol";

contract qWHYPE is BurnMintERC20 {
    event Deposit(address indexed account, uint256 amount);
    event Withdraw(address indexed account, uint256 amount);

    constructor() BurnMintERC20("Quicknode Wrapped HYPE", "qWHYPE", 18, 0, 0) {}

    function deposit() public payable {
        _mint(msg.sender, msg.value);
        emit Deposit(msg.sender, msg.value);
    }

    function withdraw(uint256 amount) external {
        _burn(msg.sender, amount);
        payable(msg.sender).transfer(amount);
        emit Withdraw(msg.sender, amount);
    }
}
Understanding the Wrapper Contract
Let's break down the code in the qWHYPE.sol contract. The contract imports the BurnMintERC20 contract from the @chainlink/contracts package, which provides the necessary functionality for minting and burning tokens. When users deposit HYPE into the contract, it mints an equivalent amount of qWHYPE tokens to their address. Conversely, when users withdraw qWHYPE tokens, the contract burns the tokens and transfers the corresponding amount of HYPE back to the user's address.
This specific contract will be deployed on the HyperEVM network. On BSC, we will be deploying the base BurnMintERC20 contract directly, as it does not require any additional functionality. We will be deploying both contracts using scripts in the next section.
Writing Foundry Scripts
We will be writing several Foundry scripts to deploy and interact with our smart contracts. This section will be divided into several parts to cover each script in detail. We will be creating the following scripts and executing them in this order:
| Script Name | Description |
|---|---|
DeployTokens.s.sol | Deploys the qWHYPE contract on HyperEVM and the base BurnMintERC20 contract on BSC |
DeployPools.s.sol | Deploys the CCIP token pool contracts on both HyperEVM and BSC |
SetupAdmin.s.sol | Register and configure admin roles on the CCIP contracts for each chain |
ConfigurePools.s.sol | Configures our CCIP token pools for cross-chain transfers between each other |
DepositAndTransferTokens.s.sol | Deposits a small amount of HYPE on the qWHYPE contract to mint qWHYPE tokens and then execute a cross-chain transfer to BSC |
TransferTokens.s.sol | Execute a cross-chain transfer of qWHYPE tokens from either direction |
Prerequisites
Before we write the scripts we will need a way to track our deployed contract addresses and a file to store common constants we will use throughout our scripts.
Execute the following commands to create the appropriate files:
touch script/Constants.s.sol
mkdir -p script/output
touch script/output/deployments.json
We will be using the deployments.json file to track the deployed contract addresses on each chain.
Here is what the Constants.s.sol file should look like:
Click to Expand Code
// SPDX-License-Identifier: MIT
pragma solidity 0.8.24;

import {Script} from "forge-std/Script.sol";

contract Constants is Script {

    struct CCIPConstants {
        uint64 chainSelector;
        address router;
        address rmnProxy;
        address tokenAdminRegistry;
        address registryModuleOwnerCustom;
        string nativeCurrencySymbol;
    }

    function getCCIPConstants(uint256 chainId) public pure returns (CCIPConstants memory) {
        if(chainId == 999) {
            return CCIPConstants({
                chainSelector: 2442541497099098535,
                router: 0x13b3332b66389B1467CA6eBd6fa79775CCeF65ec,
                rmnProxy: 0x07f15e9813FBd007d38CF534133C0838f449ecFA,
                tokenAdminRegistry: 0xcE44363496ABc3a9e53B3F404a740F992D977bDF,
                registryModuleOwnerCustom: 0xbAb3aBB5F29275065F2814F1f4B10Ffc1284fFEf,
                nativeCurrencySymbol: "HYPE"
            });
        } else if (chainId == 56) {
            return CCIPConstants({
                chainSelector: 11344663589394136015,
                router: 0x34B03Cb9086d7D758AC55af71584F81A598759FE,
                rmnProxy: 0x9e09697842194f77d315E0907F1Bda77922e8f84,
                tokenAdminRegistry: 0x736Fd8660c443547a85e4Eaf70A49C1b7Bb008fc,
                registryModuleOwnerCustom: 0x47Db76c9c97F4bcFd54D8872FDb848Cab696092d,
                nativeCurrencySymbol: "BNB"
            });
        }
        revert("Chain not supported");
    }
}
Script Menu
- DeployTokens.s.sol
- DeployPools.s.sol
- SetupAdmin.s.sol
- ConfigurePools.s.sol
- DepositAndTransferTokens.s.sol
- TransferTokens.s.sol
This script will deploy the Create the file: Paste the code below into the file:qWHYPE contract on HyperEVM and the base BurnMintERC20 contract on BSC. Create a new file in the script folder of your project directory named DeployTokens.s.sol and paste the code below into it.Click to Expand Code
touch script/DeployTokens.s.sol// SPDX-License-Identifier: MIT
pragma solidity 0.8.24;
import {Script, console} from "forge-std/Script.sol";
import {qWHYPE} from "../src/qWHYPE.sol";
import {BurnMintERC20} from "@chainlink/contracts/src/v0.8/shared/token/ERC20/BurnMintERC20.sol";
contract DeployTokens is Script {
string internal constant OUTPUT_PATH = "script/output/deployments.json";
/// forge script script/DeployTokens.s.sol:DeployTokens
function run() external {
// Load env vars
bytes memory hyperevm = bytes(vm.envString("HYPEREVM_RPC"));
bytes memory bsc = bytes(vm.envString("BSC_RPC"));
uint256 pk = vm.envUint("PRIVATE_KEY");
// Check if env vars are set
require(hyperevm.length != 0, "HYPEREVM_RPC not set");
require(bsc.length != 0, "BSC_RPC not set");
// print deployer address
address deployer = vm.addr(pk);
console.log("Deployer address:", deployer);
// Deploy on both chains
address hyperAddr = deployOn(hyperevm, deployer, pk);
address bscAddr = deployOn(bsc, deployer, pk);
// Write deployed addresses to JSON file
string memory obj = vm.serializeString("deployments", "qWHYPE_hyperevm", vm.toString(hyperAddr));
obj = vm.serializeString("deployments", "qWHYPE_bsc", vm.toString(bscAddr));
vm.writeJson(obj, OUTPUT_PATH);
}
function deployOn(bytes memory rpc, address deployer, uint256 pk) internal returns (address) {
vm.selectFork(vm.createFork(string(rpc)));
vm.startBroadcast(pk);
string memory chainName = getChainName(block.chainid);
address tokenAddr = address(block.chainid == 999 ? new qWHYPE() : new BurnMintERC20("Quicknode Wrapped HYPE", "qWHYPE", 18, 0, 0));
console.log("\nDeployed qWHYPE to:", tokenAddr, "on", chainName);
BurnMintERC20(tokenAddr).grantMintAndBurnRoles(deployer);
console.log("Granted minter and burner roles on", chainName, "qWHYPE to:", deployer);
vm.stopBroadcast();
return tokenAddr;
}
function getChainName(uint256 chainId) internal pure returns (string memory) {
if (chainId == 56) return "\x1b[36mBSC Mainnet\x1b[0m";
else if (chainId == 999) return "\x1b[32mHyperEVM Mainnet\x1b[0m";
else revert("Unsupported chain ID");
}
}
Understanding the DeployTokens Script
In this script, we first load the environment variables for the RPC URLs and private key. We then define a deployOn function that takes an RPC URL, deployer address, and private key as parameters. This function creates a fork of the specified chain, starts broadcasting transactions using the provided private key, and deploys either the qWHYPE contract (on HyperEVM) or the base BurnMintERC20 contract (on BSC). After deployment, it grants the deployer address minting and burning roles on the deployed token contract.
This script will deploy the CCIP token pool contracts on both HyperEVM and BSC. Create a new file in the Create the file: Paste the code below into the file:script folder of your project directory named DeployPools.s.sol and paste the code below into it.Click to Expand Code
touch script/DeployPools.s.sol// SPDX-License-Identifier: MIT
pragma solidity 0.8.24;
import {Script} from "forge-std/Script.sol";
import {BurnMintERC20} from "@chainlink/contracts/src/v0.8/shared/token/ERC20/BurnMintERC20.sol";
import {IBurnMintERC20} from "@chainlink/contracts/src/v0.8/shared/token/ERC20/IBurnMintERC20.sol";
import {BurnMintTokenPool} from "@chainlink/contracts-ccip/contracts/pools/BurnMintTokenPool.sol";
import {Constants} from "./Constants.s.sol";
contract DeployPools is Script {
string internal constant OUTPUT_PATH = "script/output/deployments.json";
/// forge script script/DeployPools.s.sol:DeployPools
function run() external {
// Load env vars
bytes memory hyperevm = bytes(vm.envString("HYPEREVM_RPC"));
bytes memory bsc = bytes(vm.envString("BSC_RPC"));
uint256 pk = vm.envUint("PRIVATE_KEY");
// Check if env vars are set
require(hyperevm.length != 0, "HYPEREVM_RPC not set");
require(bsc.length != 0, "BSC_RPC not set");
// Read deployed token addresses from JSON
string memory json = vm.readFile(OUTPUT_PATH);
address tokenHyp = vm.parseJsonAddress(json, ".qWHYPE_hyperevm");
address tokenBsc = vm.parseJsonAddress(json, ".qWHYPE_bsc");
// Fetch CCIP constants
Constants constants = new Constants();
Constants.CCIPConstants memory cfgHyp = constants.getCCIPConstants(999);
Constants.CCIPConstants memory cfgBsc = constants.getCCIPConstants(56);
// Create forks up front
uint256 hyperFork = vm.createFork(string(hyperevm));
uint256 bscFork = vm.createFork(string(bsc));
// Deploy pool on HyperEVM
vm.selectFork(hyperFork);
vm.startBroadcast(pk);
address poolHyp = address(new BurnMintTokenPool(IBurnMintERC20(tokenHyp), 18, new address[](0), cfgHyp.rmnProxy, cfgHyp.router));
BurnMintERC20(tokenHyp).grantMintAndBurnRoles(poolHyp);
vm.stopBroadcast();
// Deploy pool on BSC
vm.selectFork(bscFork);
vm.startBroadcast(pk);
address poolBsc = address(new BurnMintTokenPool(IBurnMintERC20(tokenBsc), 18, new address[](0), cfgBsc.rmnProxy, cfgBsc.router));
BurnMintERC20(tokenBsc).grantMintAndBurnRoles(poolBsc);
vm.stopBroadcast();
// Write deployed addresses to JSON file
string memory out = vm.serializeString("deployments", "qWHYPE_hyperevm", vm.toString(tokenHyp));
out = vm.serializeString("deployments", "qWHYPE_bsc", vm.toString(tokenBsc));
out = vm.serializeString("deployments", "qWHYPE_pool_hyperevm", vm.toString(poolHyp));
out = vm.serializeString("deployments", "qWHYPE_pool_bsc", vm.toString(poolBsc));
vm.writeJson(out, OUTPUT_PATH);
}
}
Understanding the DeployPools Script
In this script, we first load the environment variables for the RPC URLs and private key. We then read the deployed token addresses from the deployments.json file created in the previous script. We fetch the necessary CCIP constants for both HyperEVM and BSC using the Constants contract.
These constants include the core CCIP contracts deployed by Chainlink on each chain including the Router, TokenAdminRegistry, RegistryModuleOwnerCustom and the RiskManagementNetwork (RMN) proxy addresses needed for the pool deployment. The Router is responsible for routing cross-chain messages, the TokenAdminRegistry manages a mapping of token addresses to their respective pools, the RegistryModuleOwnerCustom is used for token admin registration for different ownership patterns, and the RMN proxy is used for verifying RMN signatures for cross-chain messages.
Using these constants, we deploy the BurnMintTokenPool contracts on both chains, granting them minting and burning roles on their respective token contracts. Finally, we update the deployments.json file with the addresses of the deployed token pools.
This script will register the admin of the tokens we have deployed on the CCIP registry contracts for each chain. Create a new file in the Create the file: Paste the code below into the file:script folder of your project directory named SetupAdmin.s.sol and paste the code below into it.Click to Expand Code
touch script/SetupAdmin.s.sol// SPDX-License-Identifier: MIT
pragma solidity 0.8.24;
import {Script, console} from "forge-std/Script.sol";
import {TokenAdminRegistry} from "@chainlink/contracts-ccip/contracts/tokenAdminRegistry/TokenAdminRegistry.sol";
import {RegistryModuleOwnerCustom} from "@chainlink/contracts-ccip/contracts/tokenAdminRegistry/RegistryModuleOwnerCustom.sol";
import {Constants} from "./Constants.s.sol";
contract SetupAdmin is Script {
string internal constant OUTPUT_PATH = "script/output/deployments.json";
/// forge script script/SetupAdmin.s.sol:SetupAdmin
function run() external {
// Load env vars
bytes memory hyperevm = bytes(vm.envString("HYPEREVM_RPC"));
bytes memory bsc = bytes(vm.envString("BSC_RPC"));
uint256 pk = vm.envUint("PRIVATE_KEY");
// Check if env vars are set
require(hyperevm.length != 0, "HYPEREVM_RPC not set");
require(bsc.length != 0, "BSC_RPC not set");
// Read deployed token addresses
string memory json = vm.readFile(OUTPUT_PATH);
address tokenHyp = vm.parseJsonAddress(json, ".qWHYPE_hyperevm");
address tokenBsc = vm.parseJsonAddress(json, ".qWHYPE_bsc");
// Fork both chains up front
uint256 hyperFork = vm.createFork(string(hyperevm));
uint256 bscFork = vm.createFork(string(bsc));
// Do HyperEVM
vm.selectFork(hyperFork);
_registerAndAccept(tokenHyp, pk);
// Do BSC
vm.selectFork(bscFork);
_registerAndAccept(tokenBsc, pk);
}
function _registerAndAccept(address token, uint256 pk) internal {
Constants constants = new Constants();
Constants.CCIPConstants memory cfg = constants.getCCIPConstants(block.chainid);
address ownerCustomModule = cfg.registryModuleOwnerCustom;
address tokenAdminRegistry = cfg.tokenAdminRegistry;
string memory chainName = _getChainName(block.chainid);
vm.startBroadcast(pk);
// Register admin on RegistryModuleOwnerCustom (msg.sender becomes pending admin)
RegistryModuleOwnerCustom(ownerCustomModule).registerAdminViaGetCCIPAdmin(token);
console.log("Proposed admin via OwnerCustom on", chainName);
// Accept the admin role from the pending admin
TokenAdminRegistry tokenAdminRegistryContract = TokenAdminRegistry(tokenAdminRegistry);
TokenAdminRegistry.TokenConfig memory config = tokenAdminRegistryContract.getTokenConfig(token);
address pendingAdmin = config.pendingAdministrator;
require(pendingAdmin == vm.addr(pk), "Pending admin mismatch");
tokenAdminRegistryContract.acceptAdminRole(token);
console.log("Successfully registered and accepted admin role for token on", chainName, ": ", token);
vm.stopBroadcast();
}
function _getChainName(uint256 chainId) internal pure returns (string memory) {
if (chainId == 56) return "BSC";
if (chainId == 999) return "HyperEVM";
return "Unknown";
}
}
Understanding the SetupAdmin Script
In this script, we first load the environment variables for the RPC URLs and private key. We then read the deployed token addresses from the deployments.json file. These token addresses will be needed by the CCIP registry contracts to fetch and then register the admins of each token on their respective chains.
Registering who the admin of a CCIP token is done in two steps. First, the RegistryModuleOwnerCustom contract is called. This contract is used to propose a new admin for the token. The current admin, which is retrieved via getCCIPAdmin on our qWHYPE contract, becomes the pending admin. The RegistryModuleOwnerCustom calls the TokenAdminRegistry contract to propose the new admin. This state is then mapped to a TokenConfig struct in the TokenAdminRegistry contract. Then the final step, the TokenAdminRegistry contract is called to accept the admin role from the pending admin found from the TokenConfig for the given token.
You may be wondering why registering the admin of a token is done in this sophisticated two step process. Why not just register the admin directly on the TokenAdminRegistry contract? There are several reasons for this design choice:
- Enhanced security: the two-step flow lets the current admin review and approve the new admin before finalization.
- Multisig compatibility: Compatible with multisig wallets (e.g., Safe) by proposing and later accepting admin changes.
- Ownership patterns: compatible with CCIP’s ownership model via
getCCIPOwnerand with OpenZeppelin’s Ownable-style ownership, among others allowing for onboarding a variety of existing tokens.
This script will configure our CCIP token pools for cross-chain transfers between each other. Create a new file in the Create the file: Paste the code below into the file:script folder of your project directory named ConfigurePools.s.sol and paste the code below into it.Click to Expand Code
touch script/ConfigurePools.s.sol// SPDX-License-Identifier: MIT
pragma solidity 0.8.24;
import {Script, console} from "forge-std/Script.sol";
import {TokenAdminRegistry} from "@chainlink/contracts-ccip/contracts/tokenAdminRegistry/TokenAdminRegistry.sol";
import {TokenPool} from "@chainlink/contracts-ccip/contracts/pools/TokenPool.sol";
import {RateLimiter} from "@chainlink/contracts-ccip/contracts/libraries/RateLimiter.sol";
import {Constants} from "./Constants.s.sol";
contract ConfigurePools is Script {
struct Params {
address localToken;
address localPool;
address tokenAdminRegistry;
uint64 remoteSelector;
address remotePool;
address remoteToken;
uint256 pk;
string chainName;
}
string internal constant OUTPUT_PATH = "script/output/deployments.json";
/// forge script script/ConfigurePools.s.sol:ConfigurePools
function run() external {
// Load env vars
bytes memory hyperevm = bytes(vm.envString("HYPEREVM_RPC"));
bytes memory bsc = bytes(vm.envString("BSC_RPC"));
uint256 pk = vm.envUint("PRIVATE_KEY");
require(hyperevm.length != 0, "HYPEREVM_RPC not set");
require(bsc.length != 0, "BSC_RPC not set");
// Load deployed addresses
string memory json = vm.readFile(OUTPUT_PATH);
address tokenHyp = vm.parseJsonAddress(json, ".qWHYPE_hyperevm");
address tokenBsc = vm.parseJsonAddress(json, ".qWHYPE_bsc");
address poolHyp = vm.parseJsonAddress(json, ".qWHYPE_pool_hyperevm");
address poolBsc = vm.parseJsonAddress(json, ".qWHYPE_pool_bsc");
// Preload constants for both chains
Constants constants = new Constants();
Constants.CCIPConstants memory cfgHyp = constants.getCCIPConstants(999);
Constants.CCIPConstants memory cfgBsc = constants.getCCIPConstants(56);
// Forks
uint256 hyperFork = vm.createFork(string(hyperevm));
uint256 bscFork = vm.createFork(string(bsc));
// Configure HyperEVM pool and registry
vm.selectFork(hyperFork);
Params memory pHyp = Params({
localToken: tokenHyp,
localPool: poolHyp,
tokenAdminRegistry: cfgHyp.tokenAdminRegistry,
remoteSelector: cfgBsc.chainSelector,
remotePool: poolBsc,
remoteToken: tokenBsc,
pk: pk,
chainName: "HyperEVM"
});
_setPoolAndApplyChainUpdates(pHyp);
// Configure BSC pool and registry
vm.selectFork(bscFork);
Params memory pBsc = Params({
localToken: tokenBsc,
localPool: poolBsc,
tokenAdminRegistry: cfgBsc.tokenAdminRegistry,
remoteSelector: cfgHyp.chainSelector,
remotePool: poolHyp,
remoteToken: tokenHyp,
pk: pk,
chainName: "BSC"
});
_setPoolAndApplyChainUpdates(pBsc);
}
function _setPoolAndApplyChainUpdates(Params memory p) internal {
// Set pool in TokenAdminRegistry (maps token -> pool)
vm.startBroadcast(p.pk);
TokenAdminRegistry(p.tokenAdminRegistry).setPool(p.localToken, p.localPool);
console.log("setPool set on ", p.localPool);
// Configure pool with remote chain, pool, rate limits
TokenPool pool = TokenPool(p.localPool);
TokenPool.ChainUpdate[] memory chainUpdates = new TokenPool.ChainUpdate[](1);
// Encode remote pool addresses (single entry)
bytes[] memory remotePoolAddressesEncoded = new bytes[](1);
remotePoolAddressesEncoded[0] = abi.encode(p.remotePool);
chainUpdates[0] = TokenPool.ChainUpdate({
remoteChainSelector: p.remoteSelector,
remotePoolAddresses: remotePoolAddressesEncoded,
remoteTokenAddress: abi.encode(p.remoteToken),
outboundRateLimiterConfig: RateLimiter.Config({isEnabled: false, capacity: 0, rate: 0}),
inboundRateLimiterConfig: RateLimiter.Config({isEnabled: false, capacity: 0, rate: 0})
});
// No removals, apply chain updates
uint64[] memory chainSelectorRemovals = new uint64[](0);
pool.applyChainUpdates(chainSelectorRemovals, chainUpdates);
console.log("Chain update applied to pool at address:");
console.log(p.localPool);
vm.stopBroadcast();
}
}
Understanding the ConfigurePools Script
In this script, we first load the environment variables for the RPC URLs and private key. We then read the deployed token and pool addresses from the deployments.json file. We fetch the necessary CCIP constants for both HyperEVM and BSC using the Constants contract. These constants include the TokenAdminRegistry address and chain selector needed to set the pool for each token.
We defined a Params struct to hold all the necessary parameters for configuring each pool. Not only is it more readable, but it also helps avoid "stack too deep" errors in Solidity. We call the setPool function on the TokenAdminRegistry contract to map each token to its respective pool. Next, we configure each pool with the remote chain selector, remote pool address, and remote token address using the applyChainUpdates function on the TokenPool contract. In this example, we disable rate limiting for simplicity, but in a production environment, you can configure appropriate rate limits to your needs.
This script will deposit a small amount of HYPE on the qWHYPE contract to mint qWHYPE tokens and then execute a cross-chain transfer to BSC. Create a new file in the Create the file: Paste the code below into the file:script folder of your project directory named DepositAndTransferTokens.s.sol and paste the code below into it.Click to Expand Code
touch script/DepositAndTransferTokens.s.sol// SPDX-License-Identifier: MIT
pragma solidity 0.8.24;
import {Script, console} from "forge-std/Script.sol";
import {IERC20} from "@chainlink/contracts/src/v0.8/vendor/openzeppelin-solidity/v4.8.3/contracts/token/ERC20/IERC20.sol";
import {IRouterClient} from "@chainlink/contracts-ccip/contracts/interfaces/IRouterClient.sol";
import {Client} from "@chainlink/contracts-ccip/contracts/libraries/Client.sol";
import {Constants} from "./Constants.s.sol";
import {qWHYPE} from "../src/qWHYPE.sol";
contract DepositAndTransferTokens is Script {
string internal constant OUTPUT_PATH = "script/output/deployments.json";
/// forge script script/DepositAndTransferTokens.s.sol:DepositAndTransferTokens
function run() external {
// Load env vars
bytes memory hyperevm = bytes(vm.envString("HYPEREVM_RPC"));
bytes memory bsc = bytes(vm.envString("BSC_RPC"));
uint256 pk = vm.envUint("PRIVATE_KEY");
require(hyperevm.length != 0, "HYPEREVM_RPC not set");
require(bsc.length != 0, "BSC_RPC not set");
// Read deployed token addresses
string memory json = vm.readFile(OUTPUT_PATH);
address tokenHyp = vm.parseJsonAddress(json, ".qWHYPE_hyperevm");
// Create forks and select HyperEVM (source)
uint256 hyperFork = vm.createFork(string(hyperevm));
vm.selectFork(hyperFork);
// Resolve CCIP constants for source and destination
Constants constants = new Constants();
Constants.CCIPConstants memory cfgHyp = constants.getCCIPConstants(999);
Constants.CCIPConstants memory cfgBsc = constants.getCCIPConstants(56);
address router = cfgHyp.router;
uint64 destinationChainSelector = cfgBsc.chainSelector;
address sender = vm.addr(pk);
// Amount to wrap and transfer: 0.01 HYPE -> 0.01 qWHYPE (18 decimals)
uint256 amount = 0.01 ether;
vm.startBroadcast(pk);
// Deposit HYPE to mint qWHYPE on HyperEVM
qWHYPE(tokenHyp).deposit{value: amount}();
console.log("Deposited and minted qWHYPE amount");
console.log(amount);
// Approve router to spend qWHYPE
IERC20(tokenHyp).approve(router, amount);
console.log("Approved router to spend qWHYPE");
// Build CCIP EVM2AnyMessage for token transfer
Client.EVMTokenAmount[] memory tokenAmounts = new Client.EVMTokenAmount[](1);
tokenAmounts[0] = Client.EVMTokenAmount({token: tokenHyp, amount: amount});
Client.EVMExtraArgsV1 memory extraArgs = Client.EVMExtraArgsV1({gasLimit: 0});
bytes memory extraArgsBytes = Client._argsToBytes(extraArgs);
Client.EVM2AnyMessage memory message = Client.EVM2AnyMessage({
receiver: abi.encode(sender),
data: abi.encode(),
tokenAmounts: tokenAmounts,
feeToken: address(0), // pay fees in native
extraArgs: extraArgsBytes
});
// Route via CCIP using native token for gas
IRouterClient routerClient = IRouterClient(router);
require(routerClient.isChainSupported(destinationChainSelector), "Dest chain not supported");
uint256 fee = routerClient.getFee(destinationChainSelector, message);
console.log("Estimated fee (native)", fee);
bytes32 messageId = routerClient.ccipSend{value: fee}(destinationChainSelector, message);
console.log("CCIP messageId");
console.logBytes32(messageId);
vm.stopBroadcast();
}
}
Understanding the DepositAndTransferTokens Script
In this script, we first load the environment variables for the RPC URLs and private key. We then read the deployed token address from the deployments.json file. We create a fork of the HyperEVM chain, which will be our source chain for the cross-chain transfer.
We fetch the necessary CCIP constants for both HyperEVM and BSC using the Constants contract. These constants include the Router address and chain selector needed to send the cross-chain message. We define the amount of HYPE we want to deposit and transfer, which is 0.01 HYPE in this example.
We call the deposit function on the qWHYPE contract to mint qWHYPE tokens by depositing HYPE. Next, we approve the Router to spend our qWHYPE tokens. We then build a Client.EVM2AnyMessage struct that contains the details of our cross-chain transfer, including the receiver address, token amounts, and any extra arguments.
Finally, we call the ccipSend function on the Router contract to send the cross-chain message, paying the required fee in the native token of the source chain (HYPE). The script logs the estimated fee and the message ID of the CCIP transfer. This message ID can be used to track the status of the transfer on the Chainlink CCIP Explorer.
This script will execute a cross-chain transfer of qWHYPE tokens from either direction. Create a new file in the Create the file: Paste the code below into the file:script folder of your project directory named TransferTokens.s.sol and paste the code below into it.Click to Expand Code
touch script/TransferTokens.s.sol// SPDX-License-Identifier: MIT
pragma solidity 0.8.24;
import {Script, console} from "forge-std/Script.sol";
import {IERC20} from "@chainlink/contracts/src/v0.8/vendor/openzeppelin-solidity/v4.8.3/contracts/token/ERC20/IERC20.sol";
import {IRouterClient} from "@chainlink/contracts-ccip/contracts/interfaces/IRouterClient.sol";
import {Client} from "@chainlink/contracts-ccip/contracts/libraries/Client.sol";
import {Constants} from "./Constants.s.sol";
// Transfer-only script: does NOT deposit. Assumes caller holds qWHYPE on source chain.
contract TransferTokens is Script {
string internal constant OUTPUT_PATH = "script/output/deployments.json";
uint256 internal constant AMOUNT = 0.01 ether;
/// forge script script/TransferTokens.s.sol:TransferTokens --sig 'run(string)' <to-bsc | to-hyperevm>
function run(string memory to) external {
bool toBsc = _eq(to, "to-bsc");
require(toBsc || _eq(to, "to-hyperevm"), "to must be 'to-bsc' or 'to-hyperevm'");
_run(toBsc);
}
function run() external {
string memory to = vm.envOr("TO", string(""));
require(bytes(to).length != 0, "Set TO or use run(string)");
bool toBsc = _eq(to, "to-bsc");
require(toBsc || _eq(to, "to-hyperevm"), "to must be 'to-bsc' or 'to-hyperevm'");
_run(toBsc);
}
function _run(bool toBsc) internal {
// Validate RPCs and select source fork
require(bytes(vm.envString("HYPEREVM_RPC")).length != 0, "HYPEREVM_RPC not set");
require(bytes(vm.envString("BSC_RPC")).length != 0, "BSC_RPC not set");
vm.selectFork(vm.createFork(toBsc ? vm.envString("HYPEREVM_RPC") : vm.envString("BSC_RPC")));
// Resolve router and destination selector
address router = (new Constants()).getCCIPConstants(block.chainid).router;
uint64 destSelector = (new Constants()).getCCIPConstants(toBsc ? 56 : 999).chainSelector;
// Source token address
address srcToken = toBsc
? vm.parseJsonAddress(vm.readFile(OUTPUT_PATH), ".qWHYPE_hyperevm")
: vm.parseJsonAddress(vm.readFile(OUTPUT_PATH), ".qWHYPE_bsc");
// Start broadcasting
vm.startBroadcast(vm.envUint("PRIVATE_KEY"));
// Approve router to spend qWHYPE
IERC20(srcToken).approve(router, AMOUNT);
console.log("Approved router to spend qWHYPE");
// Build token amounts
Client.EVMTokenAmount[] memory tokenAmounts = new Client.EVMTokenAmount[](1);
tokenAmounts[0] = Client.EVMTokenAmount({token: srcToken, amount: AMOUNT});
// Send via CCIP using native gas as fee
require(IRouterClient(router).isChainSupported(destSelector), "Dest chain not supported");
uint256 fee = IRouterClient(router).getFee(
destSelector,
Client.EVM2AnyMessage({
receiver: abi.encode(vm.addr(vm.envUint("PRIVATE_KEY"))),
data: abi.encode(),
tokenAmounts: tokenAmounts,
feeToken: address(0),
extraArgs: Client._argsToBytes(Client.EVMExtraArgsV1({gasLimit: 0}))
})
);
console.log("Estimated fee (native)");
console.log(fee);
console.log("CCIP messageId");
console.logBytes32(
IRouterClient(router).ccipSend{value: fee}(
destSelector,
Client.EVM2AnyMessage({
receiver: abi.encode(vm.addr(vm.envUint("PRIVATE_KEY"))),
data: abi.encode(),
tokenAmounts: tokenAmounts,
feeToken: address(0),
extraArgs: Client._argsToBytes(Client.EVMExtraArgsV1({gasLimit: 0}))
})
)
);
vm.stopBroadcast();
}
function _eq(string memory a, string memory b) internal pure returns (bool) {
return keccak256(bytes(a)) == keccak256(bytes(b));
}
}
Understanding the TransferTokens Script
In this script, we first check if the passed argument in the terminal is either to-bsc or to-hyperevm, indicating the direction of the transfer. Based on this, we create a fork of the appropriate source chain (HyperEVM or BSC). We fetch the necessary CCIP constants for both chains using the Constants contract. These constants include the Router address and chain selector needed to send the cross-chain message.
We define a constant amount of qWHYPE to transfer, which is 0.01 qWHYPE in this example. We approve the Router to spend our qWHYPE tokens and build a Client.EVM2AnyMessage struct that contains the details of our cross-chain transfer, including the receiver address, token amounts, and any extra arguments.
Finally, we call the ccipSend function on the Router contract to send the cross-chain message, paying the required fee in the native token of the source chain (HYPE or BNB). The script logs the estimated fee and the message ID of the CCIP transfer. This message ID can be used to track the status of the transfer on the Chainlink CCIP Explorer.
Great! We have now written all the necessary scripts to deploy and configure our CCIP token pools and perform cross-chain transfers of qWHYPE tokens between HyperEVM and BSC. We will now proceed to execute these scripts in the next section.
Running the Scripts
Now that we have written all the necessary scripts, we can execute them in sequence to deploy and configure our CCIP token pools and perform a cross-chain transfer of qWHYPE tokens.
Earlier, we discussed the multi-block architecture of Hyperliquid, smaller blocks use a maximum of 2M gas while larger blocks can use up to 30M gas. Our contract deployment transactions will most definitely exceed the 2M gas limit so we need to first enable our account to use larger blocks. To do this execute the following command in your terminal:
source .env
npx @layerzerolabs/hyperliquid-composer set-block --size big --network mainnet --private-key $PRIVATE_KEY
We suggest not passing your private key directly in the command line as it may be stored in your shell history. Always use environment variables or secure methods to handle sensitive information!
If your wallet isn't registered on HyperCore, this command may fail with User or API Wallet does not exist. Ensure you've made a deposit or trade on Hyperliquid to register your wallet. If you followed the steps in Bridging from HyperCore to HyperEVM correctly, your wallet is already registered!
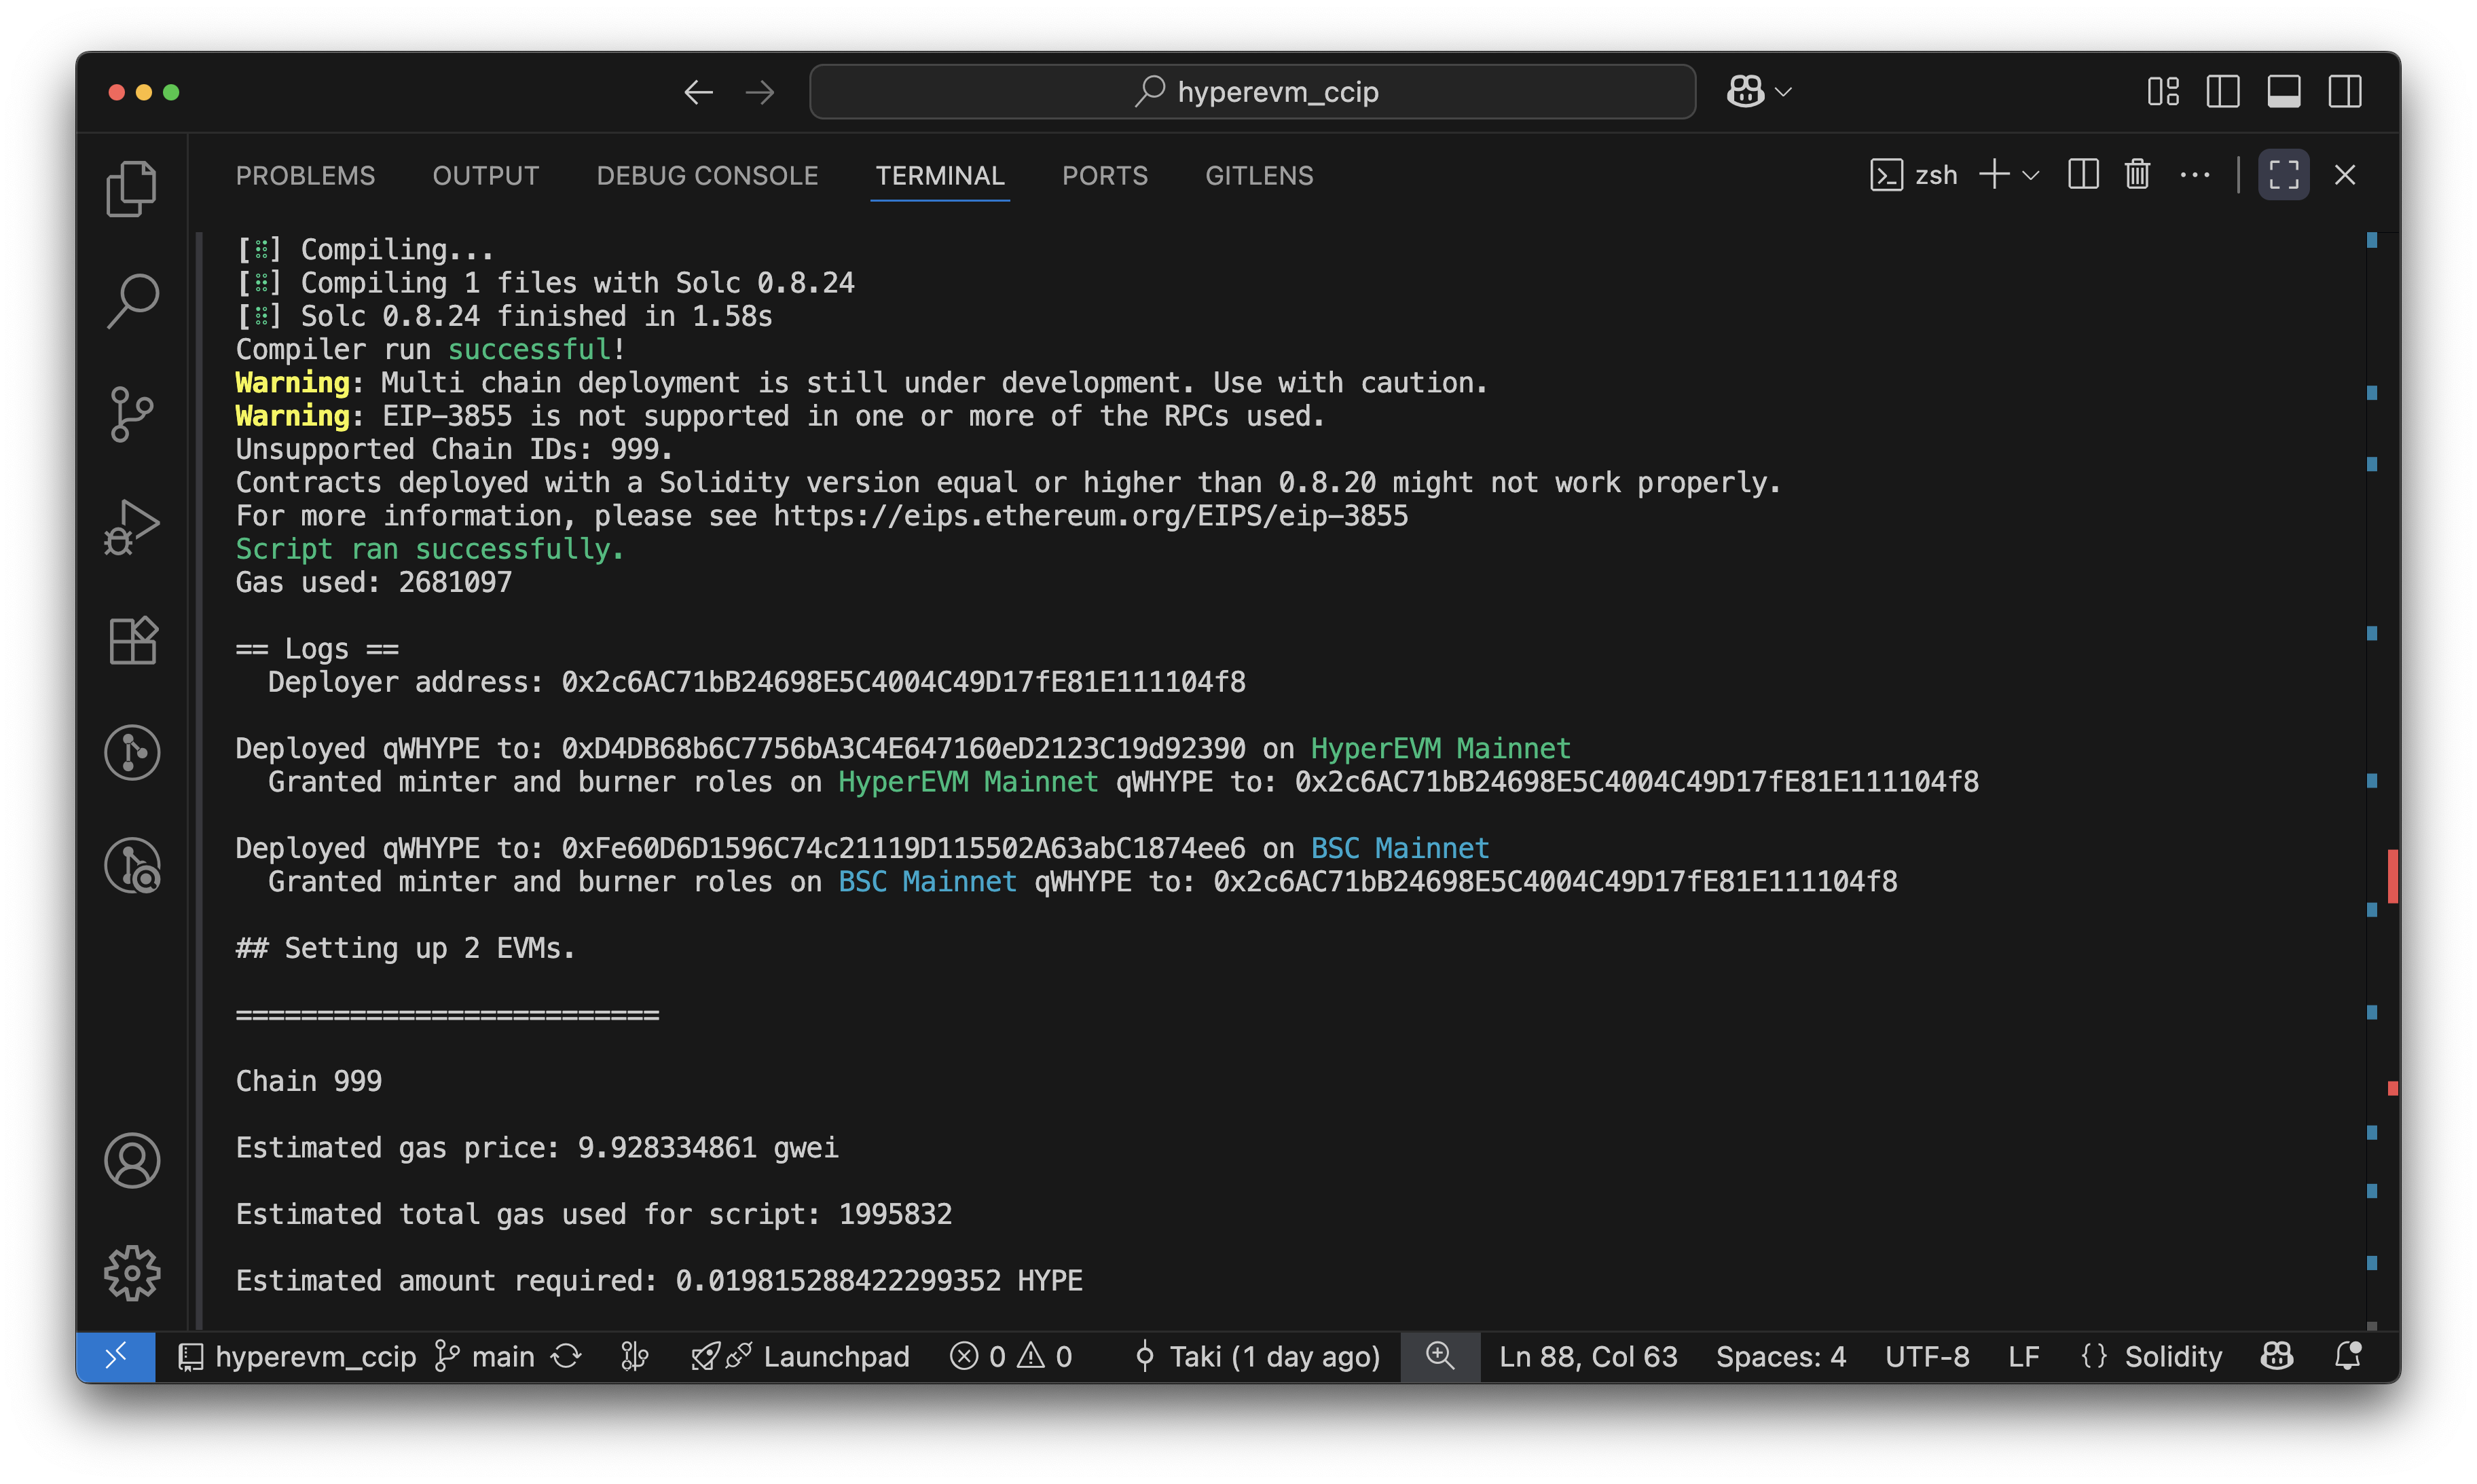
Great! Our account can now use larger blocks. We will now deploy our tokens using the DeployTokens.s.sol script:
forge script script/DeployTokens.s.sol:DeployTokens --broadcast --verify --verifier etherscan
This command will deploy our tokens to both the HyperEVM and BSC networks. You will see the deployment progress in your terminal and the transaction hashes once the transactions are confirmed. The --broadcast flag indicates that we want to send the transactions to the network, while the --verify and --verifier etherscan flags will automatically verify our contracts on hyperevmscan.io and bscscan.com after deployment. You will also notice that your deployments.json file has been populated with the deployed contract addresses. Your terminal output should look something like this:
Next, we will deploy our CCIP token pools using the DeployPools.s.sol script:
forge script script/DeployPools.s.sol:DeployPools --broadcast --verify --verifier etherscan
This command will deploy our token pools to both the HyperEVM and BSC networks. Similar to the previous step, you will see the deployment progress in your terminal and the transaction hashes once the transactions are confirmed. The deployments.json file will be updated with the deployed pool addresses. Your terminal output should look something like this:
Next, we will set up the admin for our tokens using the SetupAdmin.s.sol script and configure our pools using the ConfigurePools.s.sol script. We can execute both scripts in sequence using the following commands:
forge script script/SetupAdmin.s.sol:SetupAdmin --broadcast
forge script script/ConfigurePools.s.sol:ConfigurePools --broadcast
Like the previous step, you will see a similar terminal output with the transaction hashes once the transactions are confirmed.
Our First Cross-Chain Transfer
Finally, we will perform a cross-chain transfer of qWHYPE tokens from HyperEVM to BSC using the DepositAndTransferTokens.s.sol script:
forge script script/DepositAndTransferTokens.s.sol:DepositAndTransferTokens --broadcast
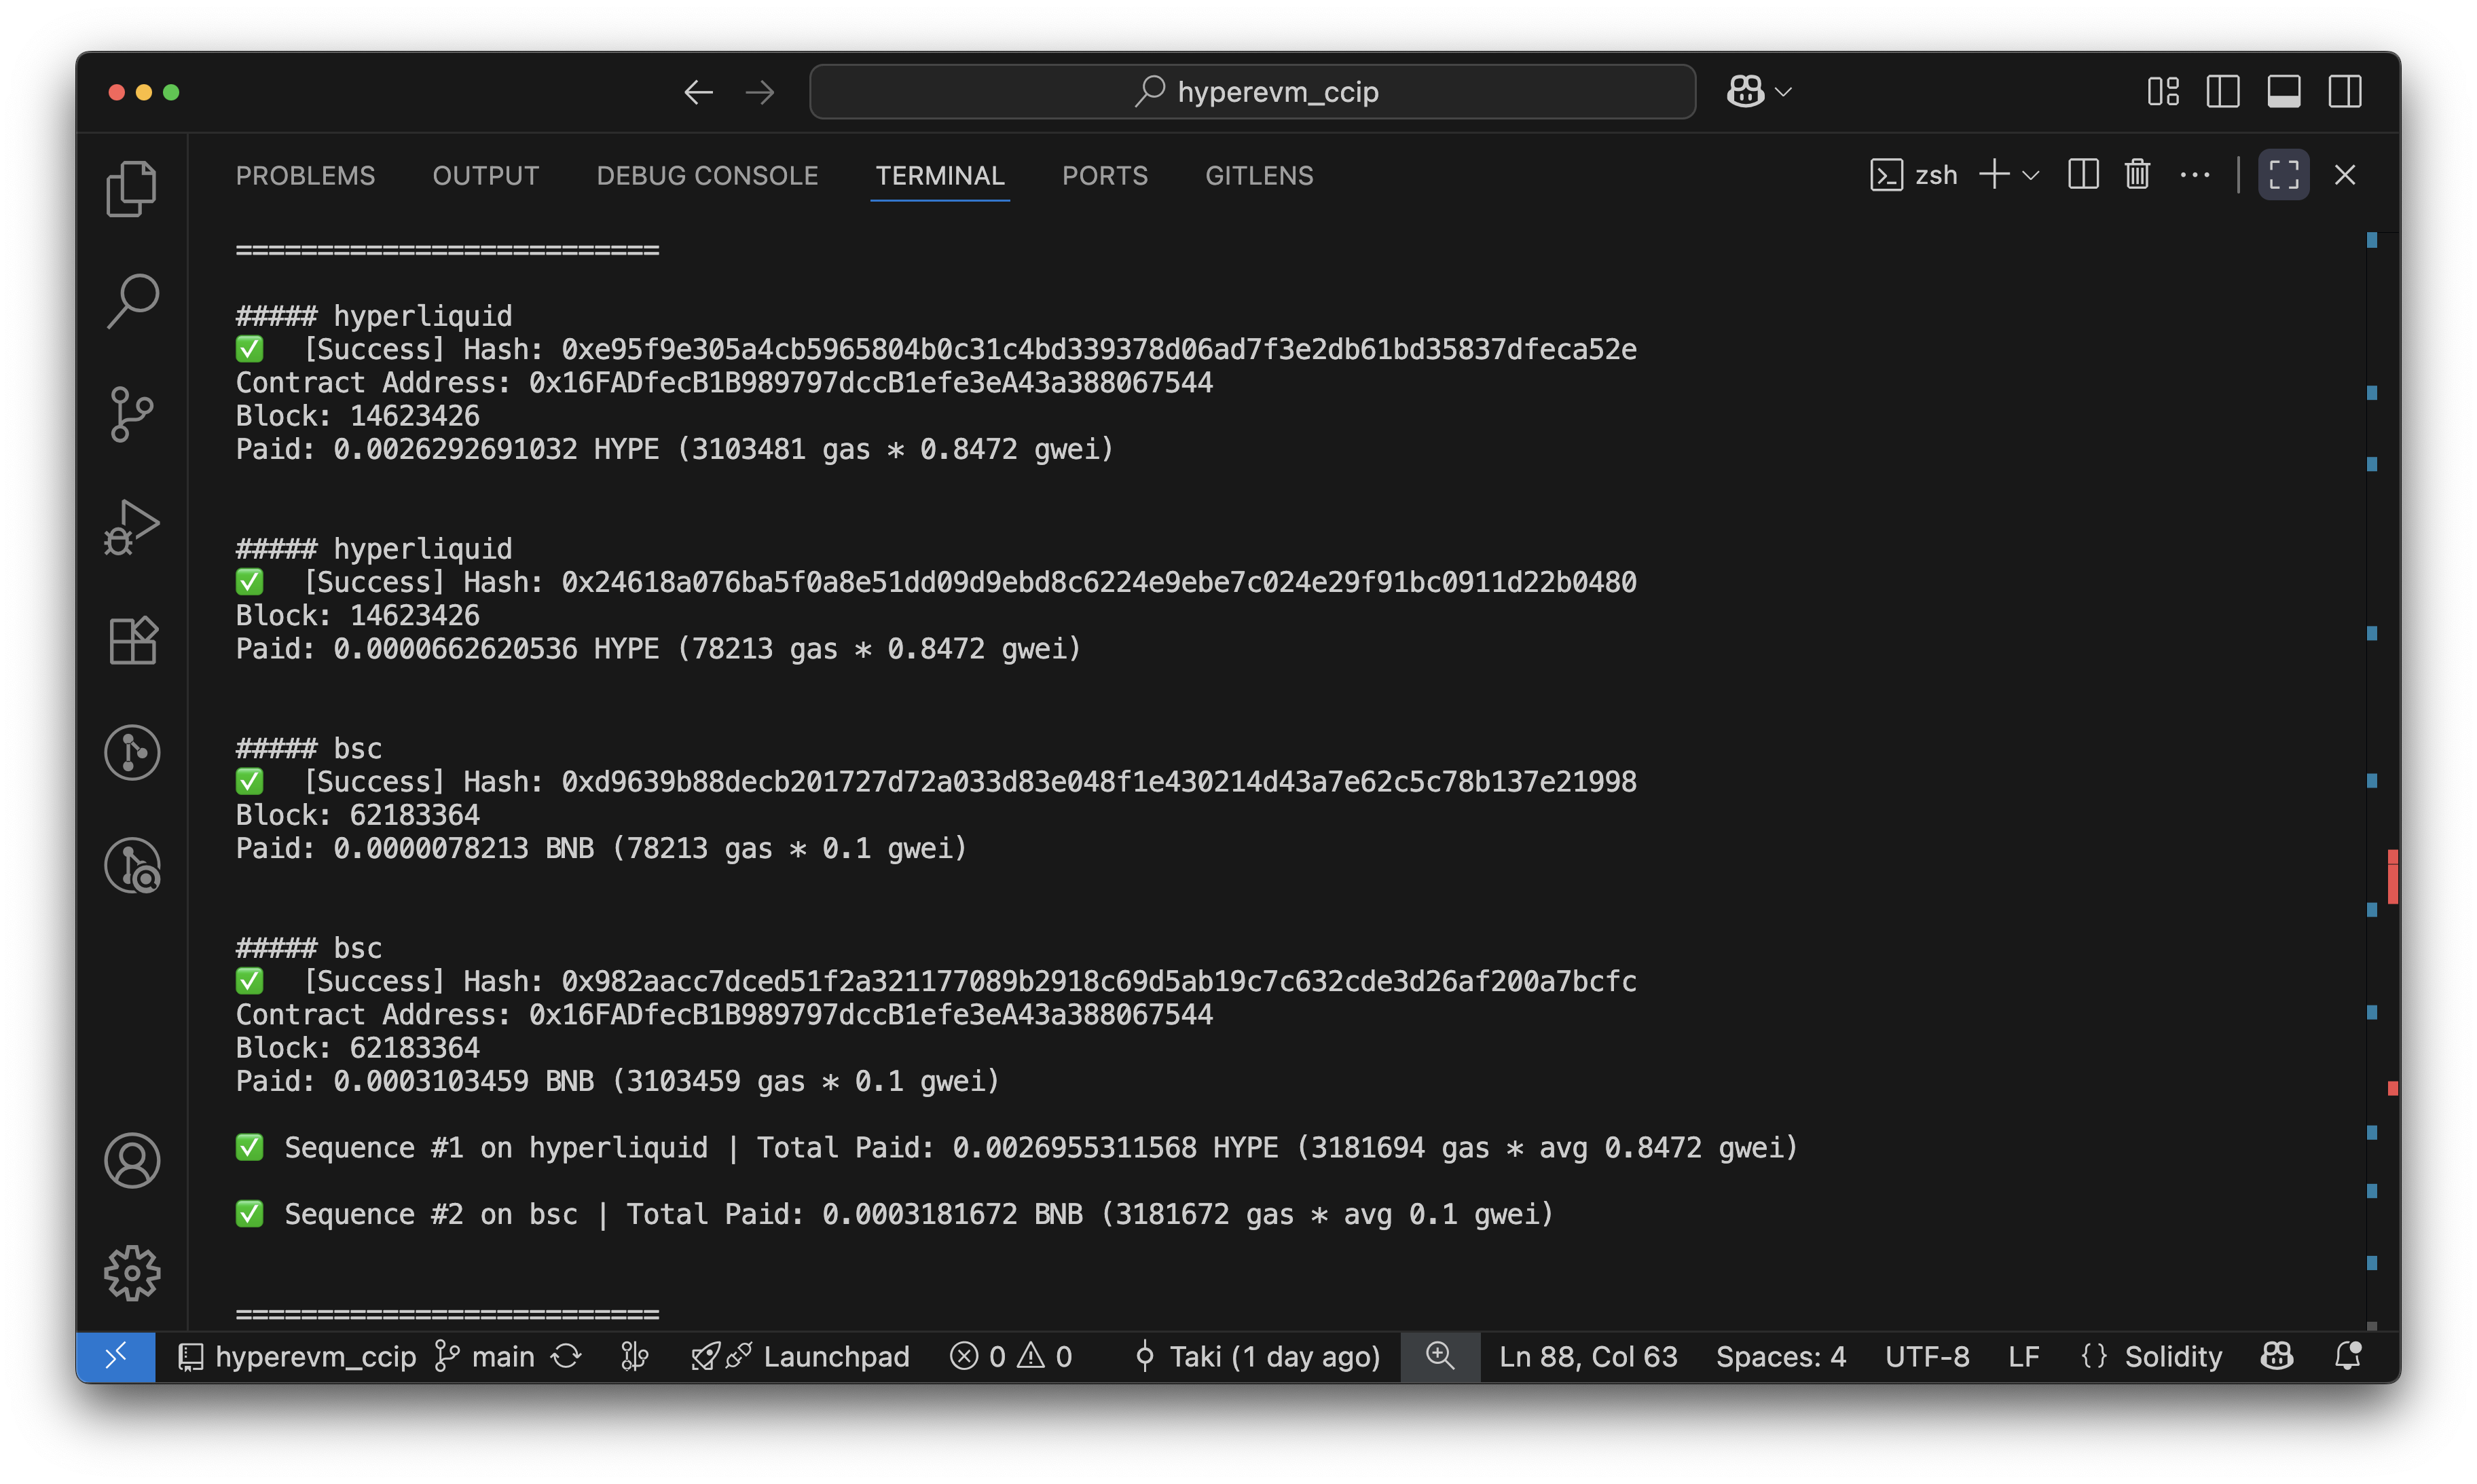
This command will deposit HYPE to mint qWHYPE on HyperEVM and then transfer the qWHYPE tokens to BSC. You will see the transfer progress in your terminal and the transaction hash once the transaction is confirmed. You will also see the CCIP message ID of the transfer, which you can use to track the status of the transfer on the Chainlink CCIP Explorer. Your terminal will output the message ID as shown below:
- Terminal Output
- CCIP Explorer
- HyperEVM Explorer
- BSC Explorer
 Terminal output showing the CCIP message ID
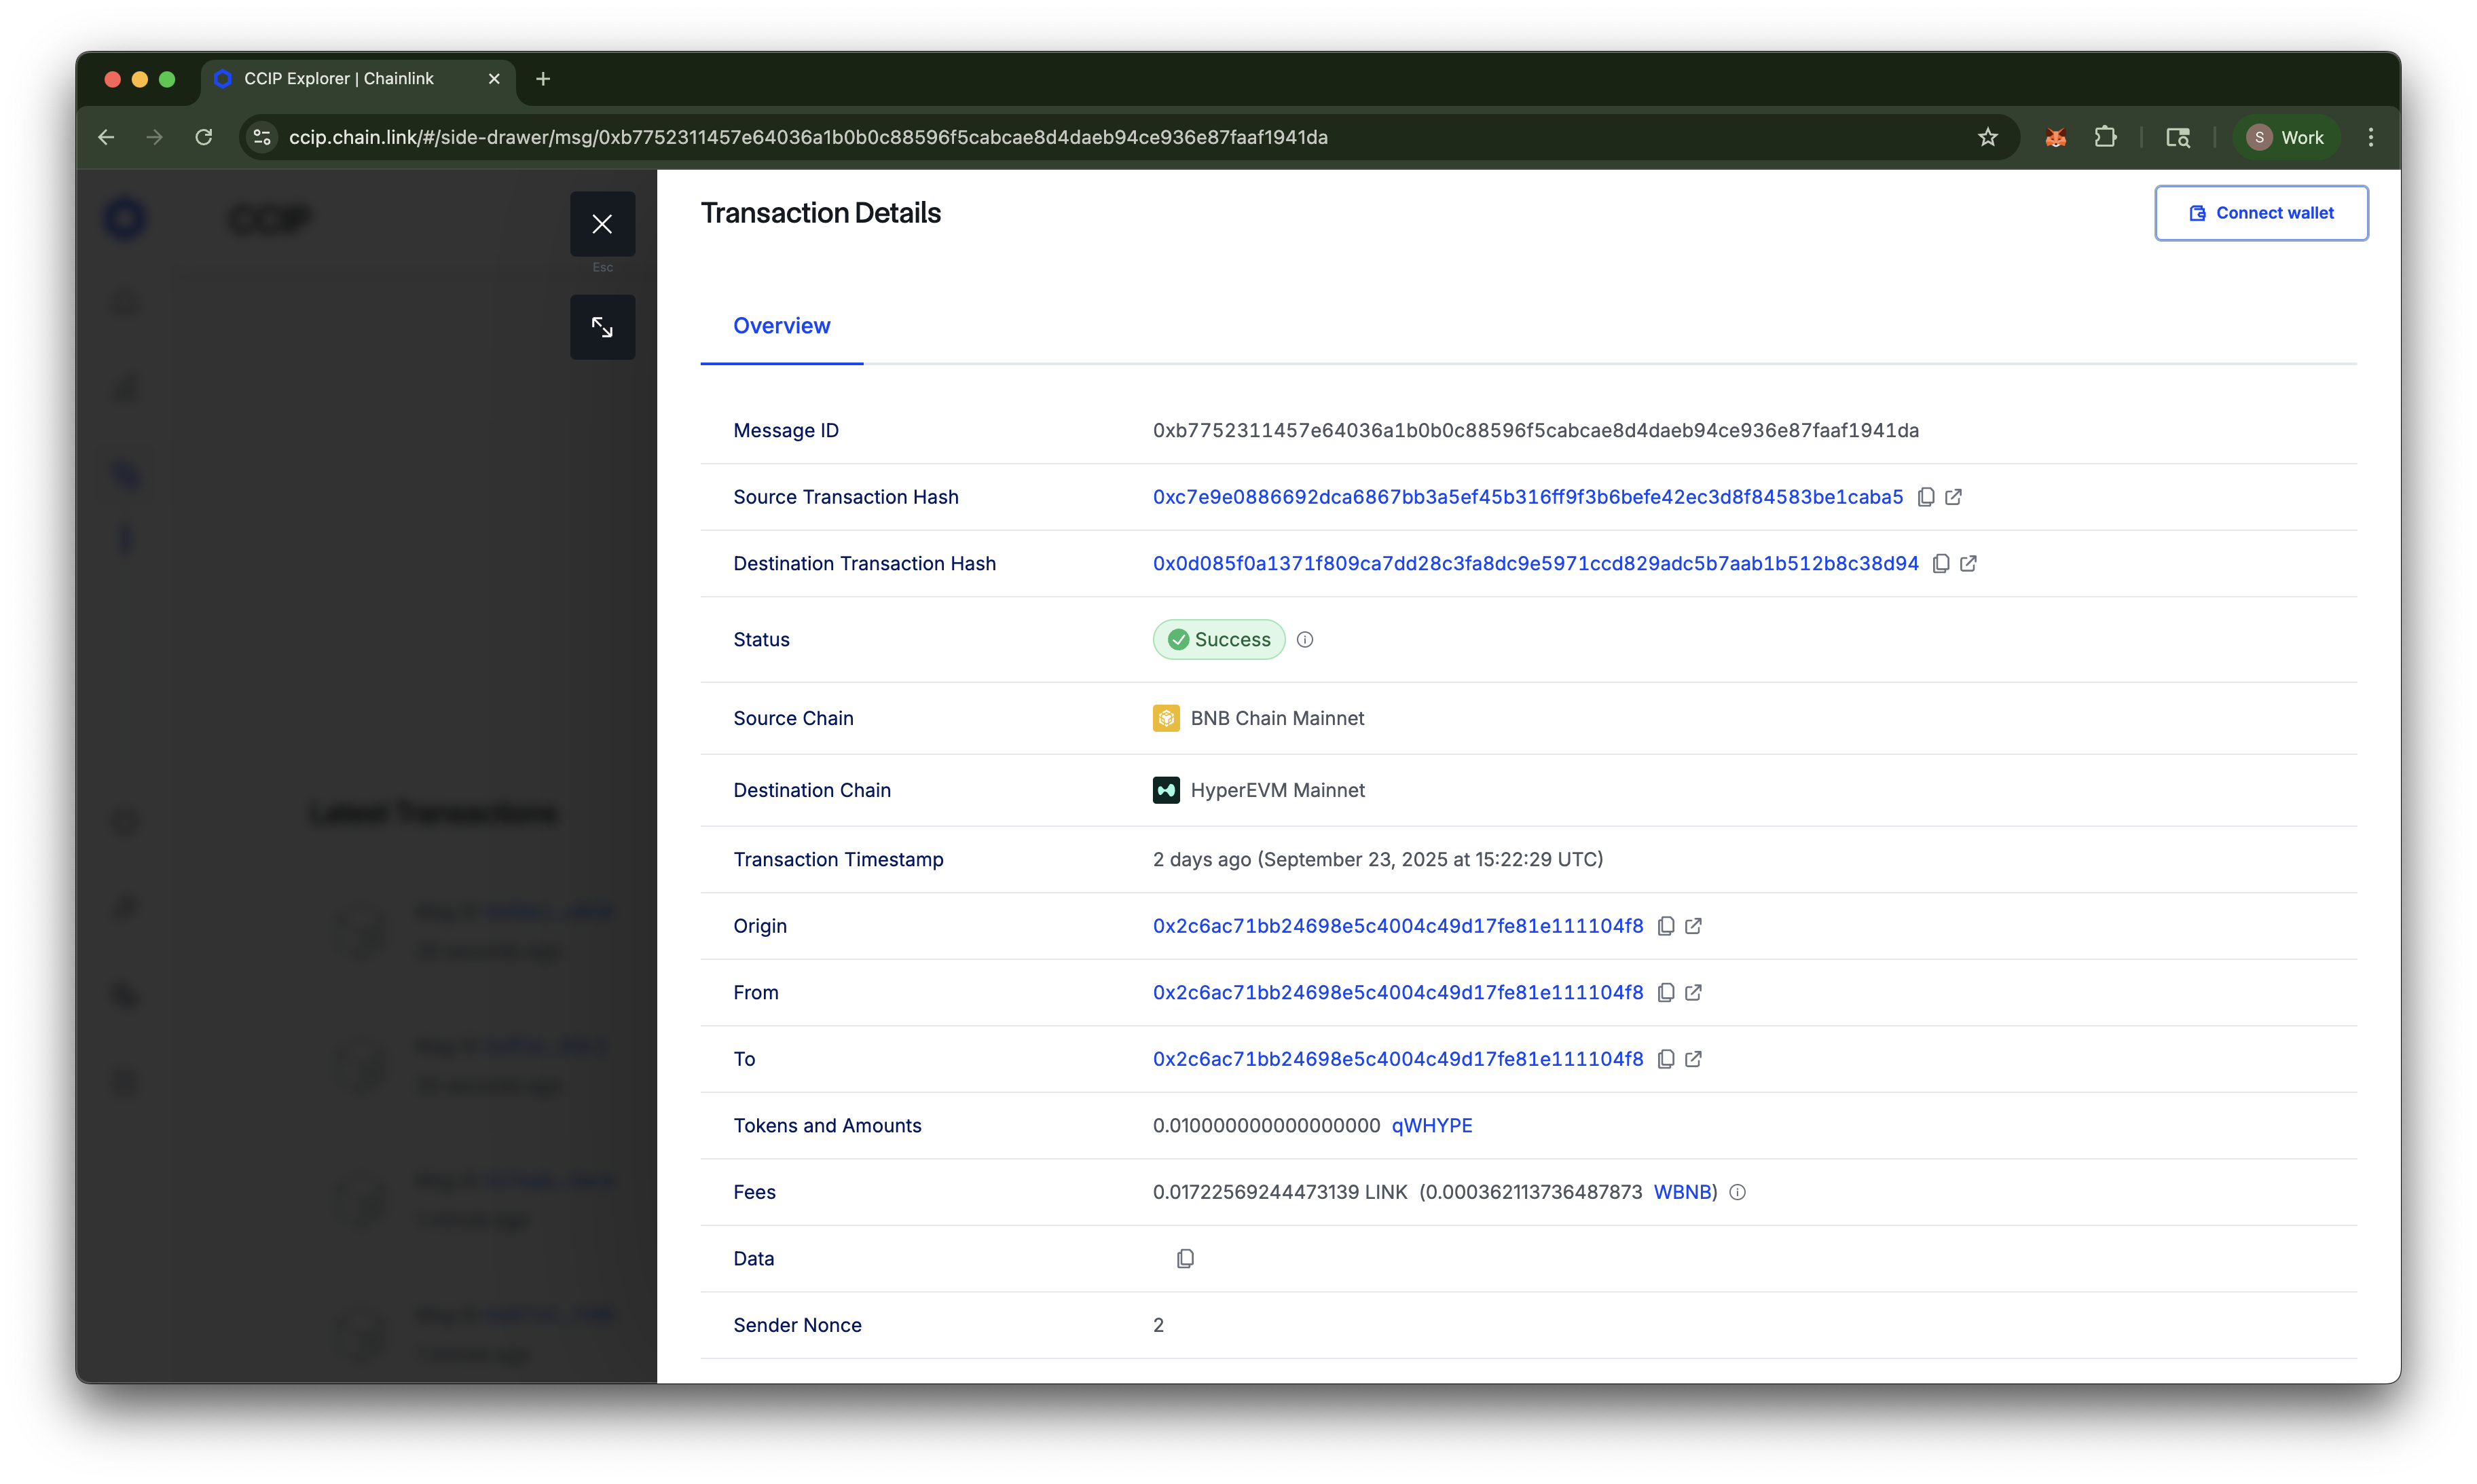
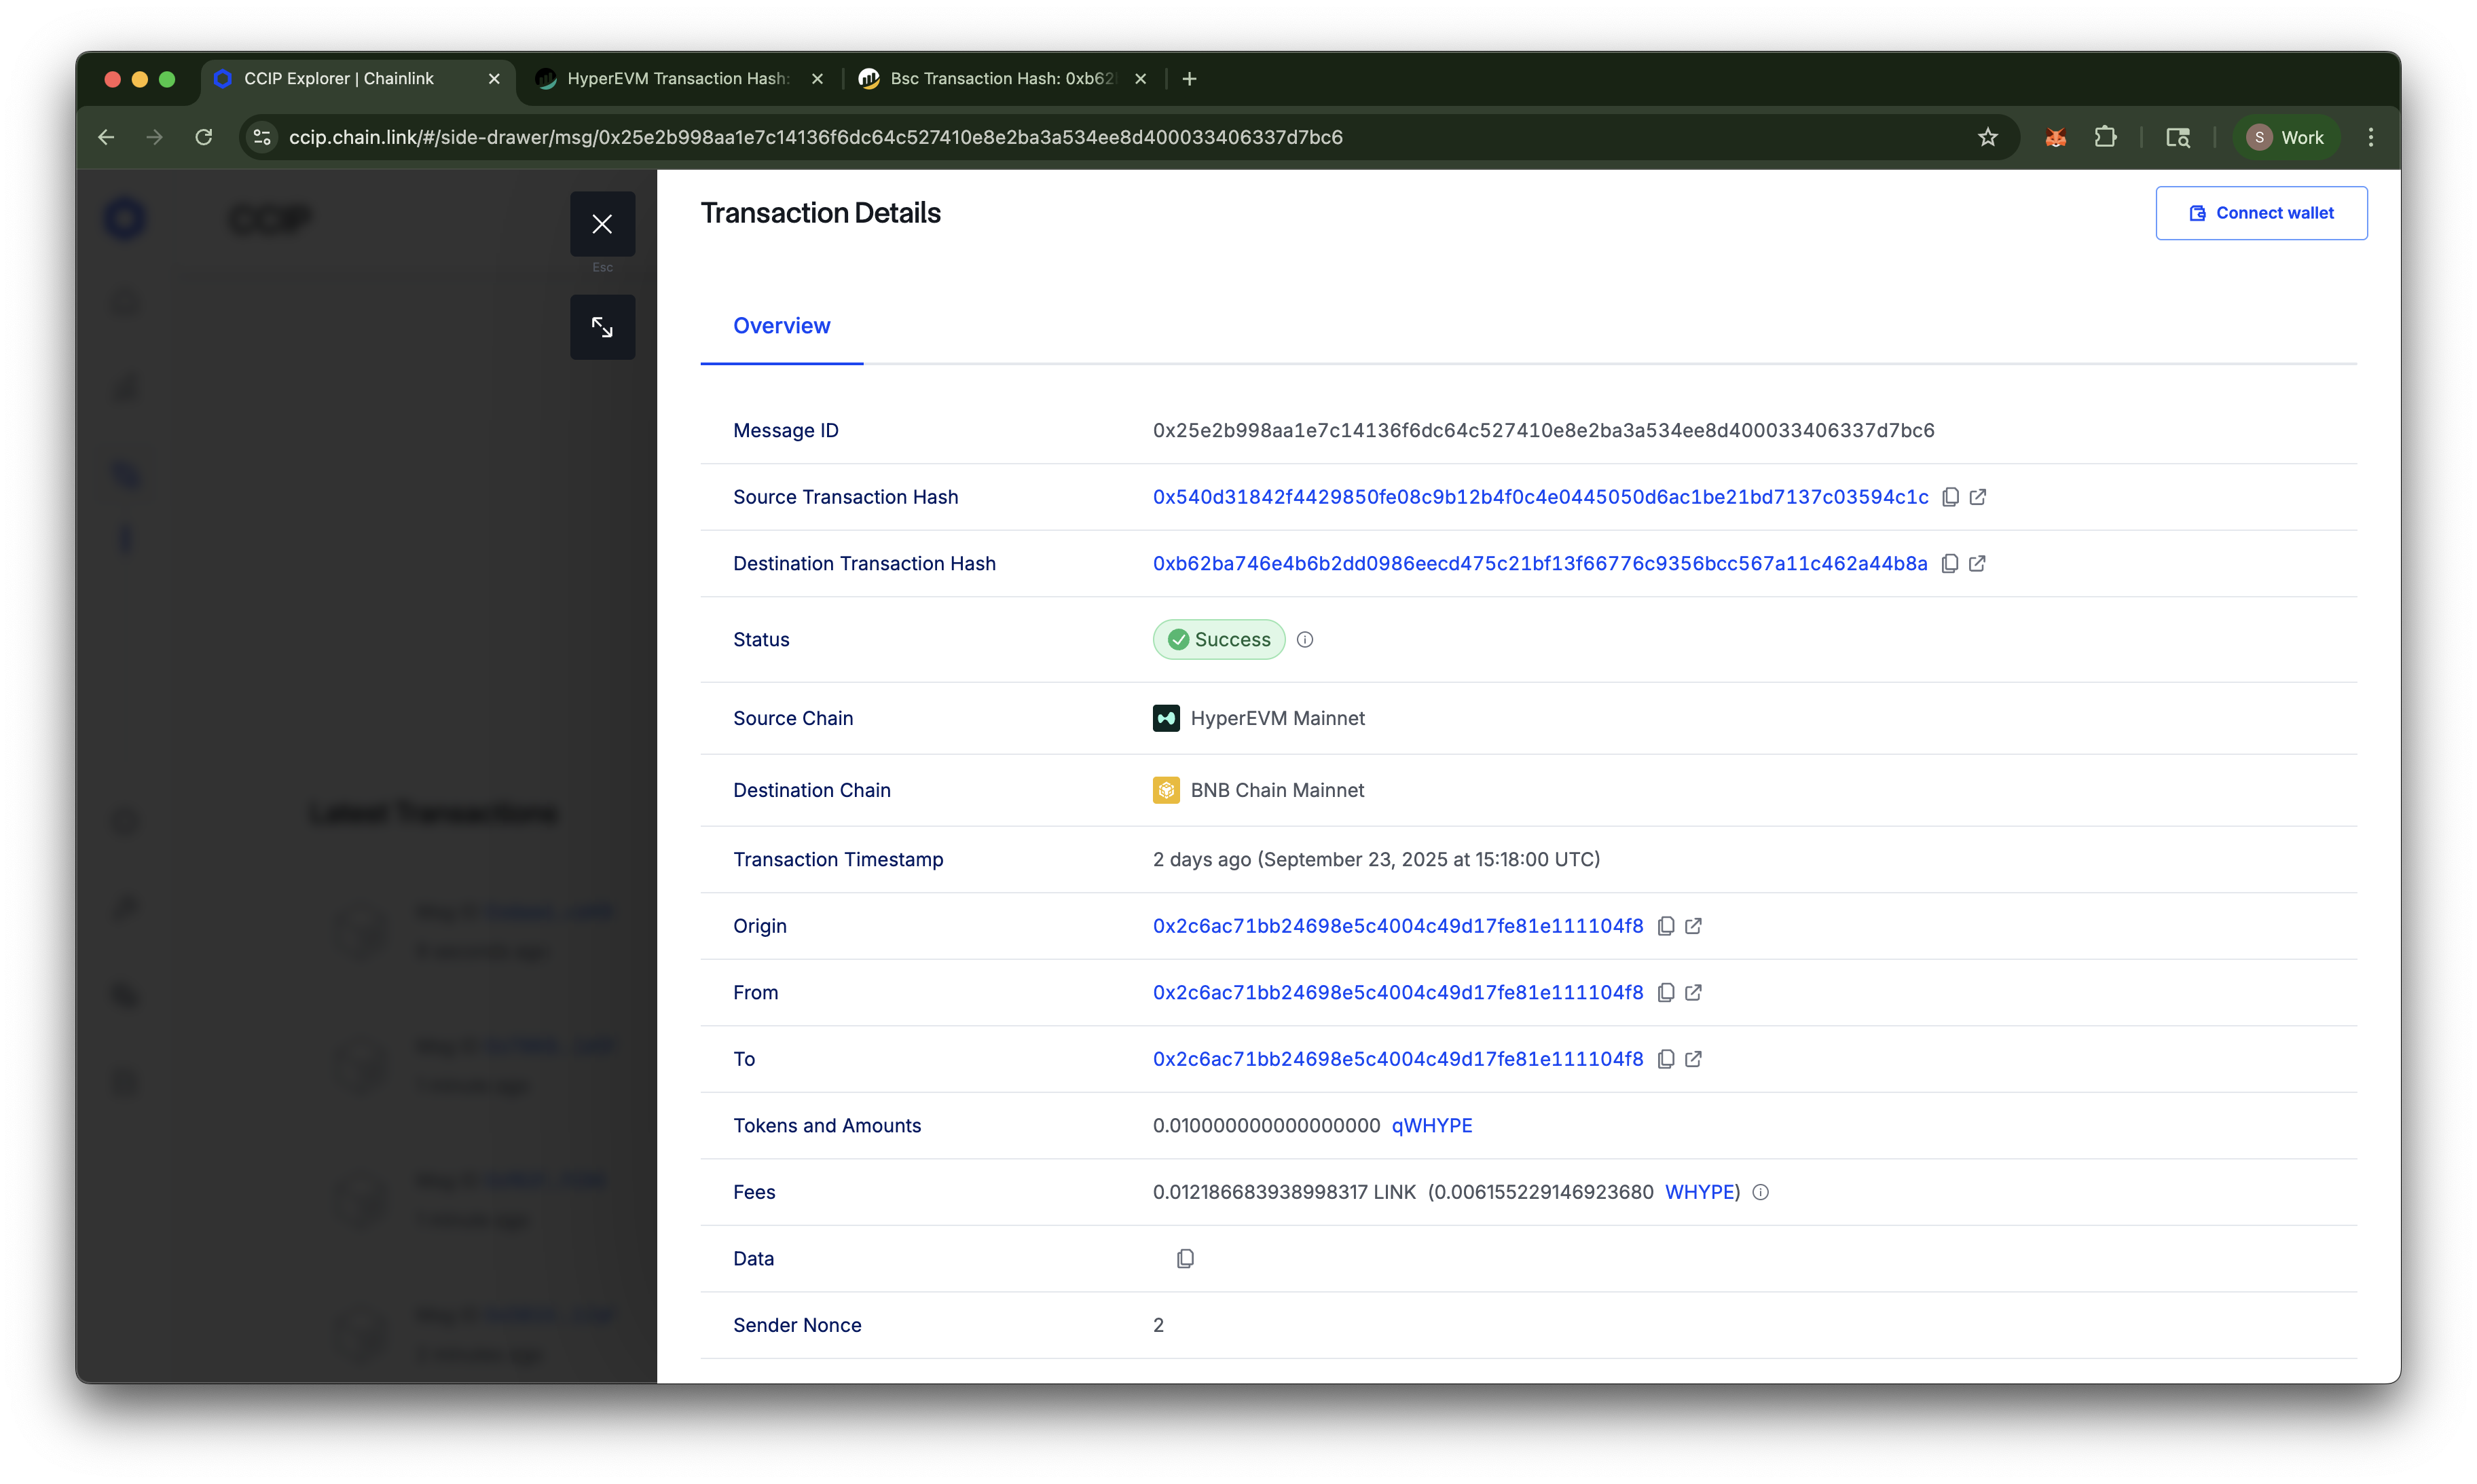 CCIP Explorer showing the status of the cross-chain transfer
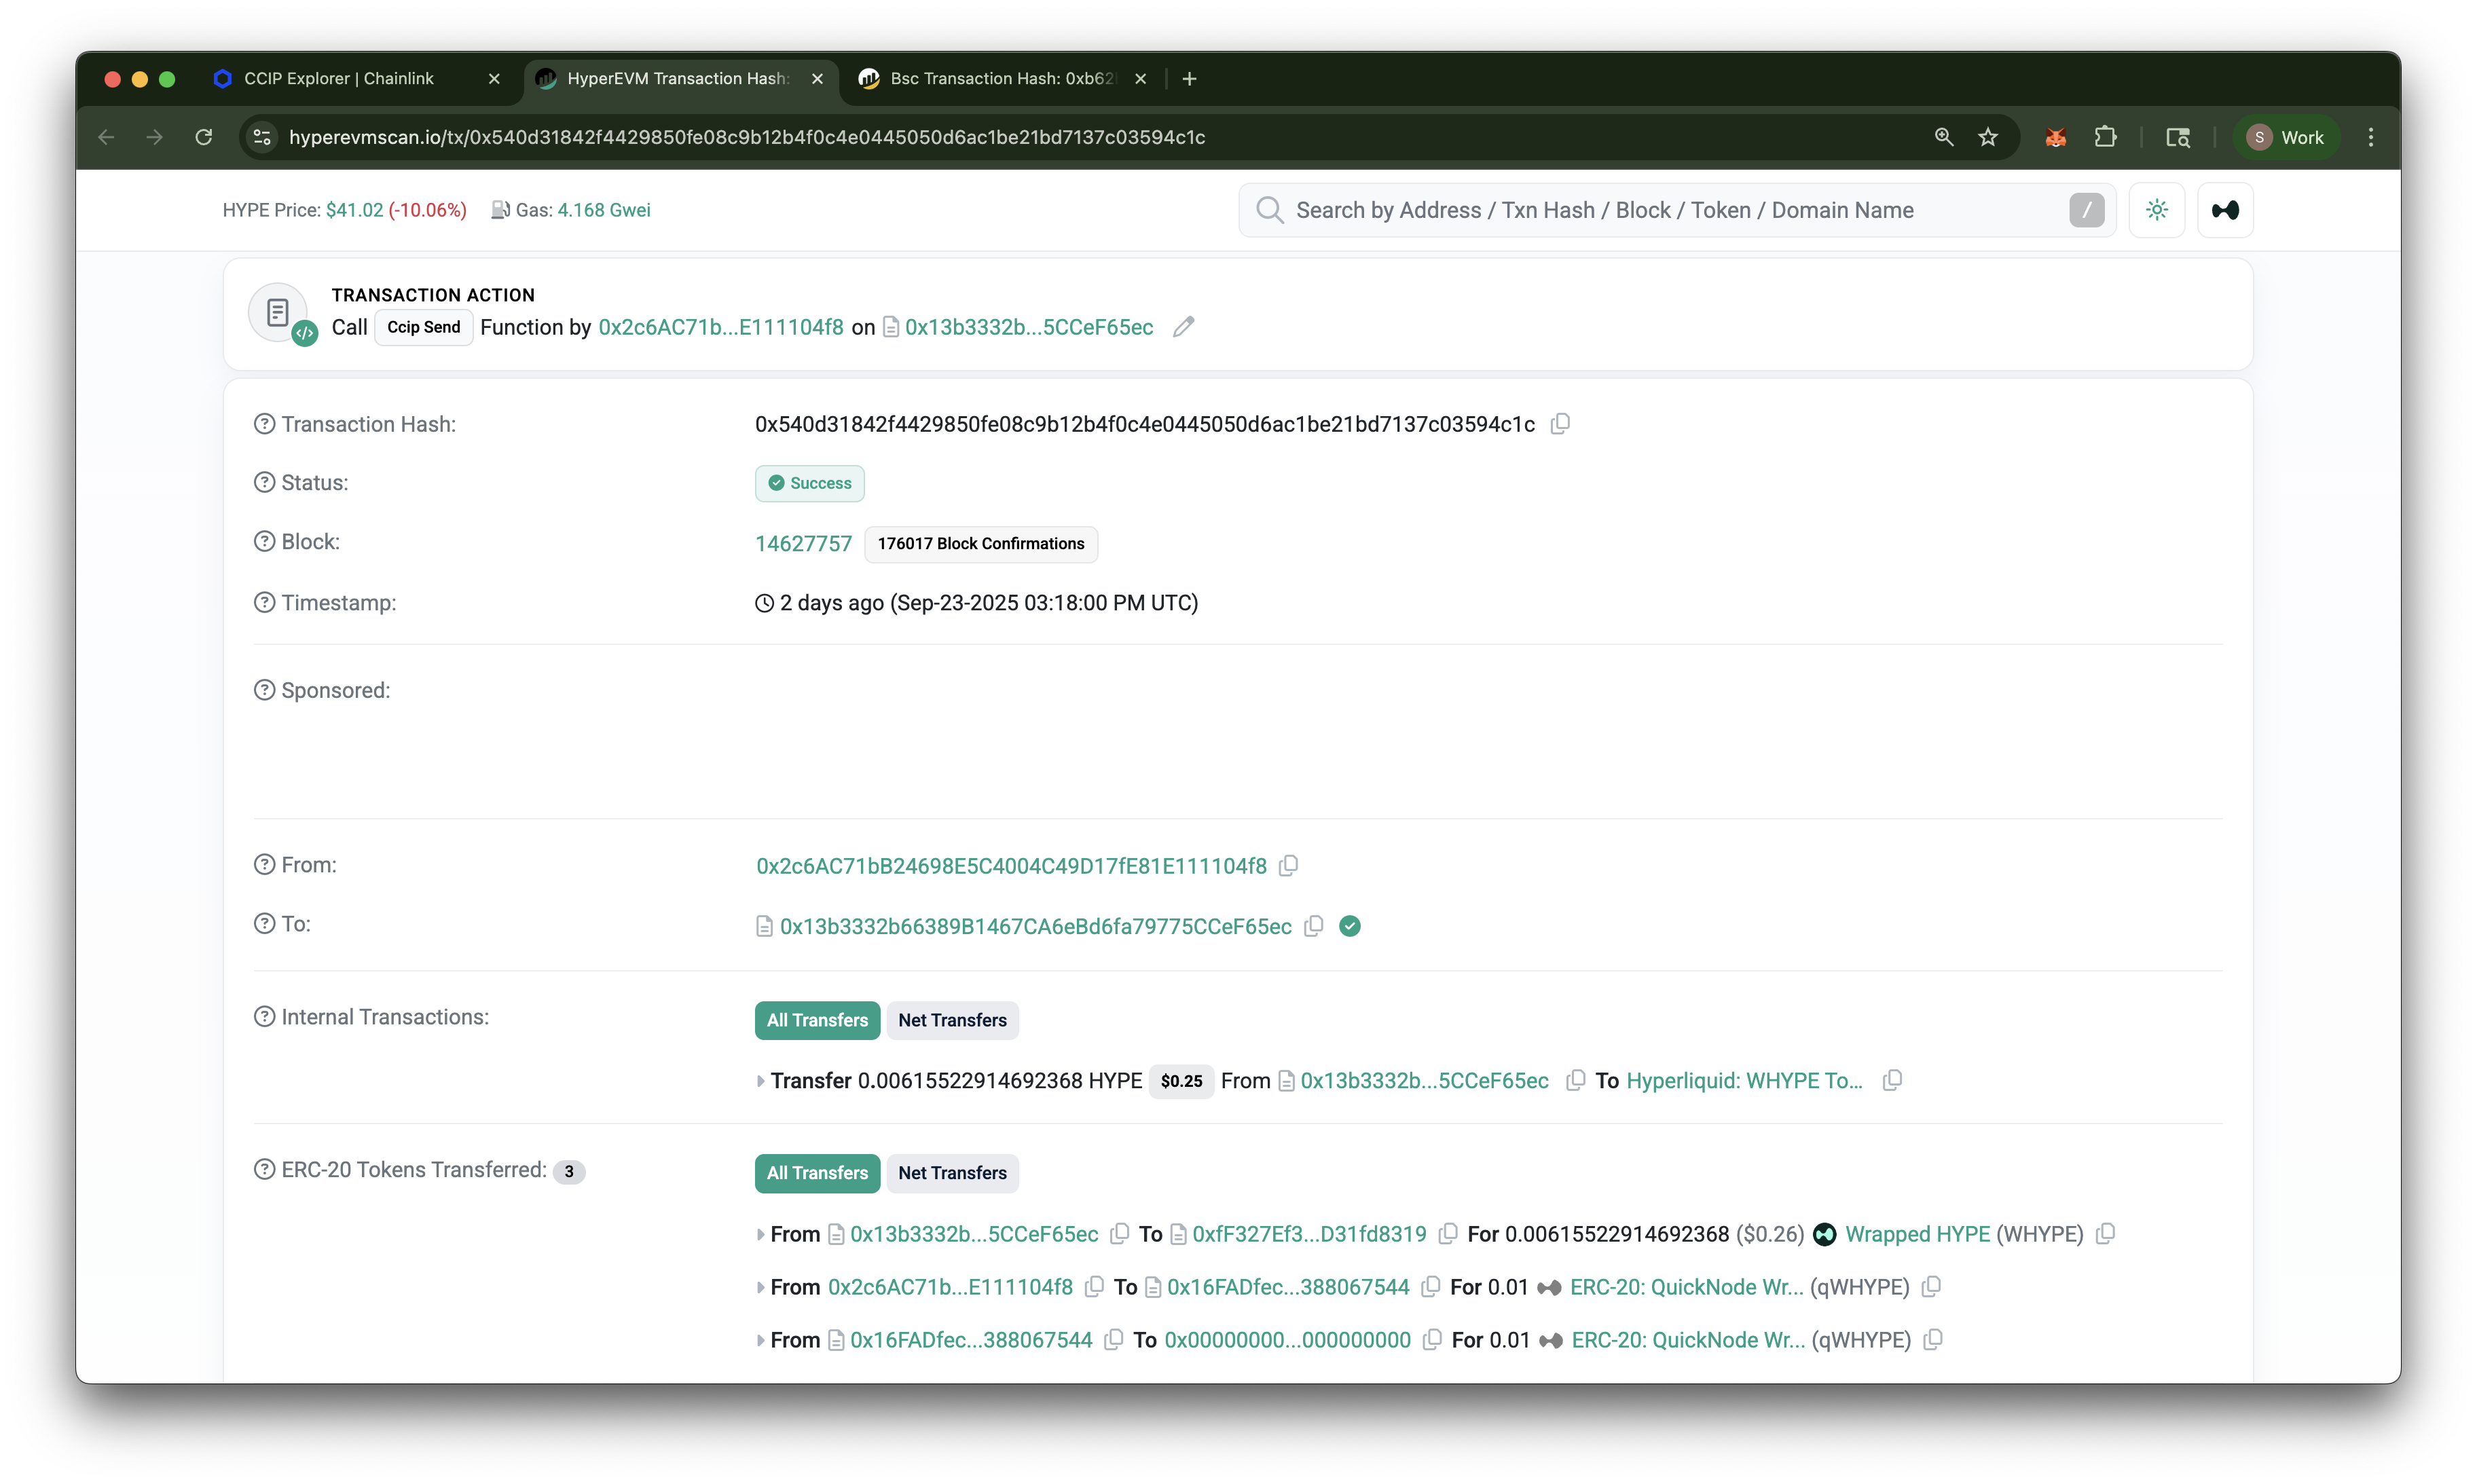 HyperEVM Explorer showing the details of the transfer transaction
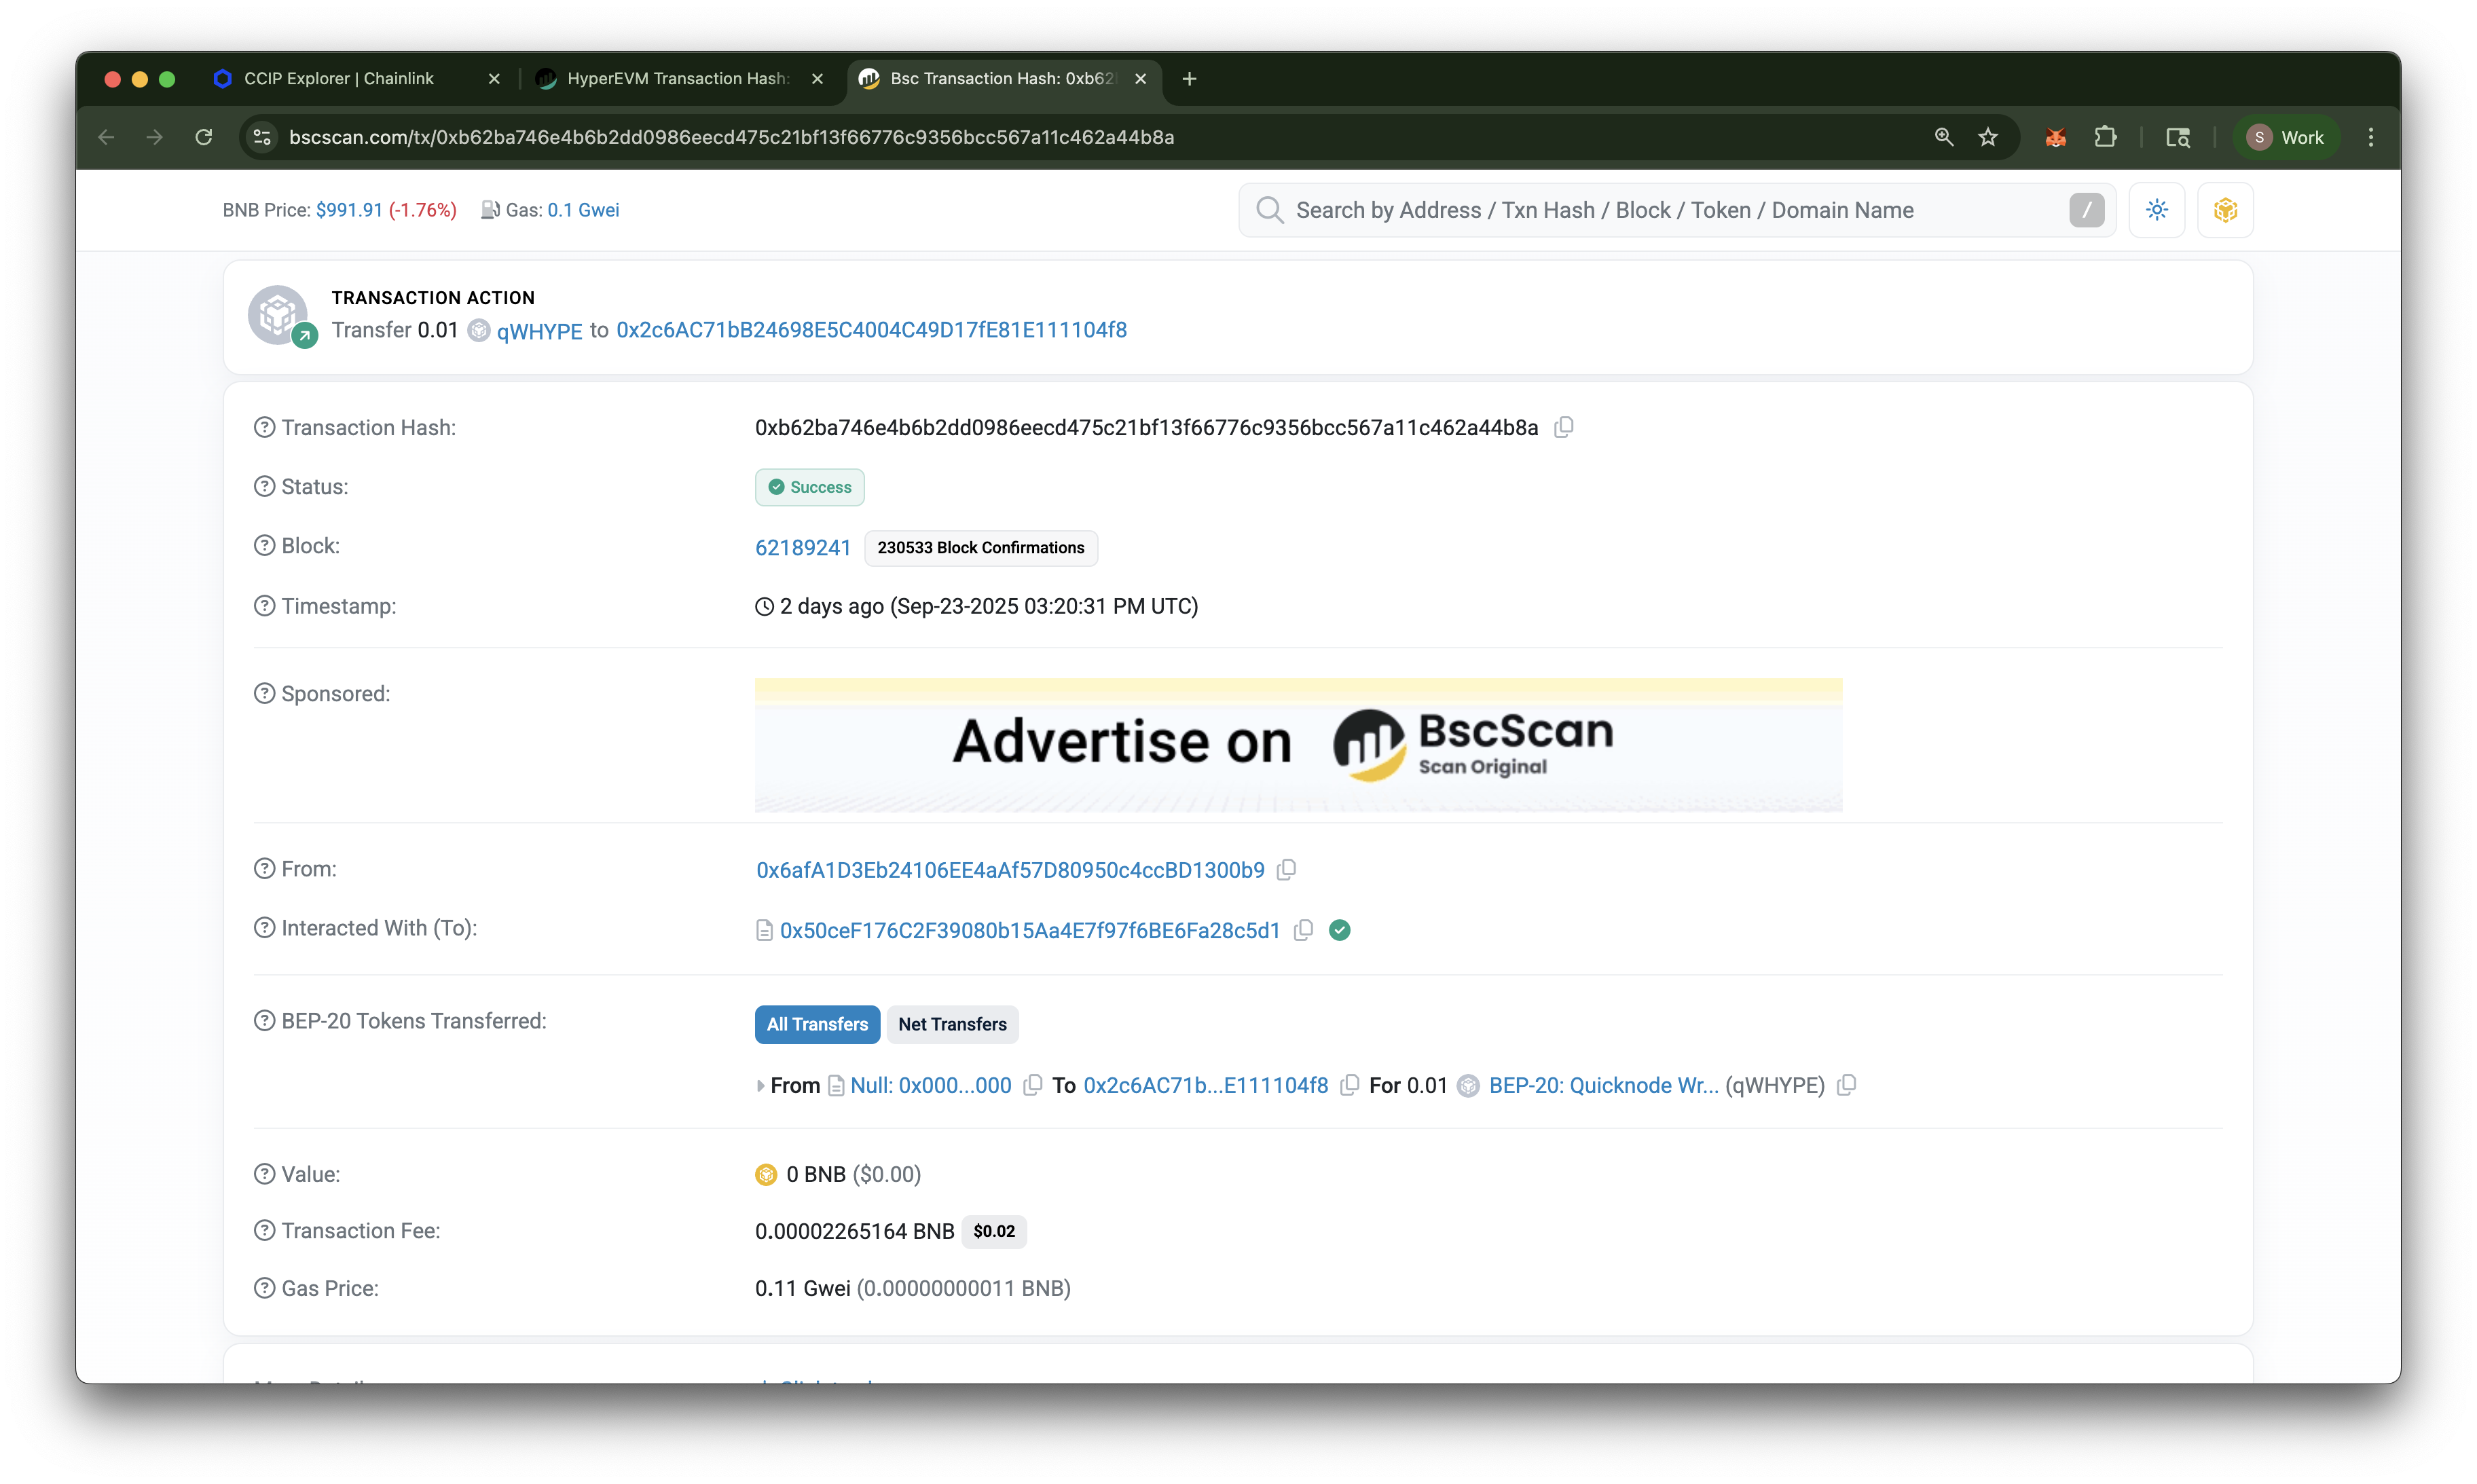 BSC Explorer showing the details of the received transfer transaction
Let's verify if the qWHYPE tokens have been received on BSC. Open your MetaMask Wallet, switch to the BSC network, and import the qWHYPE token using the address found in your deployments.json file with the key qWHYPE_bsc. If you need help importing a token, follow MetaMask’s guide here. You should see a balance of 0.01 qWHYPE tokens in your wallet, confirming that the cross-chain transfer was successful!

Transferring In Any Direction
The TransferTokens.s.sol script can be used to transfer qWHYPE tokens in either direction between HyperEVM and BSC. You can specify the direction of the transfer by passing either to-bsc or to-hyperevm as an argument when running the script. For example, to transfer qWHYPE tokens from BSC to HyperEVM, you would run the following command:
forge script script/TransferTokens.s.sol:TransferTokens --broadcast --sig 'run(string)' 'to-hyperevm'
The output will be similar to our first cross-chain transfer, showing the transaction hash and CCIP message ID. Pasting the message ID into the Chainlink CCIP Explorer will now show the transfer in the opposite direction:
Conclusion
Congratulations! You have successfully learned how to bridge tokens on Hyperliquid using Chainlink CCIP. You have deployed your own ERC-20 tokens, set up CCIP token pools, and performed cross-chain transfers of qWHYPE tokens between HyperEVM and BSC.
Next Steps
Now that you have a working cross-chain bridge, you can further improve and customize your setup. Here are some ideas:
- Hyperliquid Bridge UI: Build a user-friendly interface for your bridge using frameworks like React or Vue.js. This will allow users to easily interact with your bridge without needing to use command-line tools.
- Rate Limiting: Implement rate limiting on your token pools to prevent abuse and ensure fair usage. You can configure rate limits in the
ConfigurePools.s.solscript. - Implement Additional Chains: Extend your bridge to support additional chains supported by Chainlink CCIP. You can follow the same steps outlined in this guide to deploy and configure token pools on other chains. Check the lanes and supported chains on the CCIP Directory.
- Wrap Additional HIP-1 Assets: You can create and deploy additional wrapped tokens for other HIP-1 assets on Hyperliquid, following a similar process as we did for HYPE. The only difference would be that a wrapper ERC-20 contract would need to be created for each asset. This will allow users to bridge a wider range of assets between HyperEVM and other chains.
Further Resources
- Hyperliquid Documentation
- Quicknode Hyperliquid Guides
- Quicknode Hyperliquid Docs
- Foundry Book
- Video: What is Hyperliquid HyperEVM and How to Get Started
If you are stuck or have questions, drop them in our Discord. Stay up to date with the latest by following us on X (@Quicknode) or our Telegram announcement channel.
We ❤️ Feedback!
If you have any feedback or questions about this documentation, let us know. We'd love to hear from you!