
12 min read
Overview
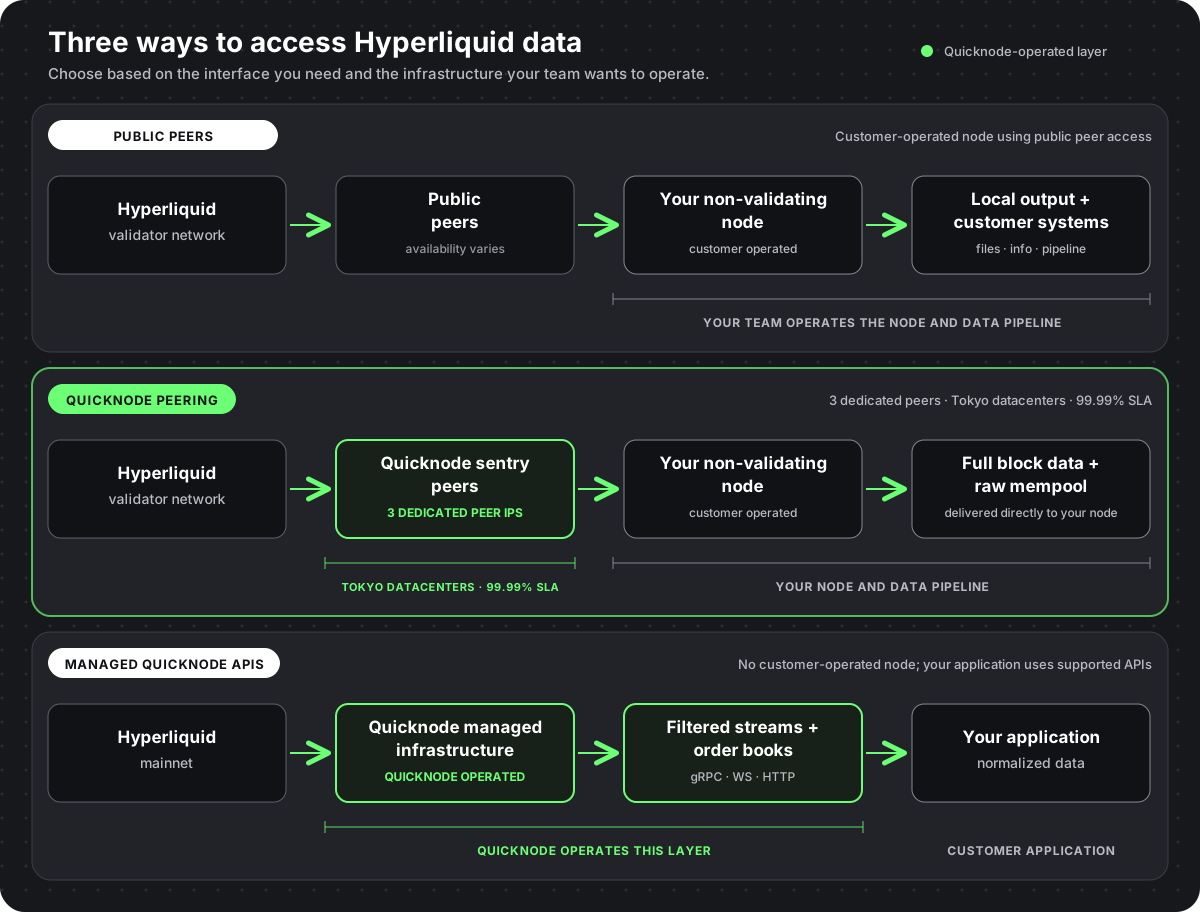
Node peering is the peer-to-peer connection through which a node exchanges chain data with upstream nodes. A Hyperliquid non-validating node uses those connections to follow the chain and write network data to local disk without joining consensus. Quicknode Peering provides dedicated sentry peers across multiple Tokyo datacenters, delivers full block and raw mempool data, and carries a 99.99% SLA. You still operate the node.
This guide is the step-by-step deployment path. In eight steps you will configure your supplied peers, start a Mainnet node with Docker Compose, confirm it writes full blocks and raw mempool files, set a retention policy, and survive a reboot.
Every command comes from quicknode/hyperliquid-peering-node, which contains the Docker Compose deployment, configuration renderer, verification scripts, pruning controls, and systemd unit used in this walkthrough.
- Activate Peering, send Quicknode your node's public IPv4, and receive the root and reserved peer addresses for your deployment
- Clone
quicknode/hyperliquid-peering-node, fill in.env, and rundocker compose up -d --build - Raw mempool delivery needs
split_client_blocks: trueon every peer between your node and the validator network. Peering supplies that path - Compose starting is not readiness. Run
./scripts/verify.shuntil it returns0 - Raw mempool output is roughly 1.1 TB per day. Set retention before the disk fills
- Peering gives you raw files, not a prebuilt order book. Use managed Quicknode datasets for L2 or L4 books
What You Will Learn
- How to configure a Hyperliquid non-validating node against Quicknode peers
- How to start the node with one Docker Compose command
- How to prove the node is synchronized and using only your Quicknode peers
- Where full block and raw mempool files land, and what they contain
- How to preview and enable pruning without deleting unprocessed data
- When a managed Quicknode endpoint is a better fit than Peering
What You Will Need
- A Quicknode account with an active plan and Hyperliquid Peering activated
- The root and reserved peer addresses Quicknode supplies after allowlisting your node
- A clean Ubuntu 24.04 host with a stable public IPv4 address
- Docker Engine, Buildx, and the Compose plugin (official install instructions)
- Inbound TCP ports
4001and4002, plus outbound network access - Basic familiarity with Linux, Docker Compose, and peer-to-peer node networking
Quicknode Peering does not depend on Docker. It needs your node's allowlisted public IPv4 address and the peer addresses from Step 1. You can run hl-node from the official Hyperliquid repository your own way, for example directly under systemd.
This guide uses Docker Compose because the repository's build, verification, and retention tooling in Steps 4 to 7 assumes the Compose stack. If you skip Docker, replace those tools with your own.
This guide covers Quicknode Peering configuration and the repository's deployment, verification, and retention controls. Use the official Hyperliquid node repository as the source of truth for upstream node requirements, releases, and behavior.
Step 1: Activate Peering and Get Your Peer IPs
Provisioning is manual. Subscribe to Quicknode Peering, then send support@quicknode.com two things:
- Your Quicknode account email
- The stable public IPv4 address of the node you will run
A Quicknode engineer allowlists that address and returns the root and reserved peer addresses required by this deployment. Root addresses are known upstream targets that the node uses to bootstrap and establish network connectivity. Reserved peer addresses populate Hyperliquid's separate peer-admission list, which keeps incoming connections from those addresses allowed. In the repository, root addresses populate QUICKNODE_ROOT_NODE_IPS, while reserved peer addresses populate QUICKNODE_RESERVED_PEER_IPS. Quicknode supplies both lists; use each one in its matching variable and do not substitute one for the other. Check the Peering page for current pricing and evaluation terms.
Treat the returned addresses as operationally sensitive. Do not commit them, paste them into an issue, or print them in logs.
Step 2: Size and Prepare the Host
Hyperliquid's node README lists a base specification of 16 vCPUs, 128 GB RAM, a 500 GB SSD, and Ubuntu 24.04. Its latency guide lists at least 32 logical cores and 500 MB/s disk throughput for latency-sensitive reads, and names Tokyo as the lowest-latency region.
The 500 GB base figure is not a retention target. Quicknode has observed roughly 1.1 TB per day of raw mempool data, while Hyperliquid estimates node logs can reach about 100 GB per day. Both volumes vary with network activity. These default outputs are separate from NODE_OUTPUT_FLAGS; enabling optional outputs adds further workload-specific storage requirements that you should measure using the exact flags you need.
The walkthrough used this reference host:
| Component | Reference configuration |
|---|---|
| Operating system | Ubuntu 24.04 |
| CPU | 16 dedicated vCPUs |
| Memory | 128 GiB RAM |
| Storage | 2,340 GiB local NVMe |
| Inbound firewall | TCP 4001 and 4002 |
| Container tools | Docker Engine, Buildx, and Docker Compose |
This configuration is a starting point for the walkthrough; production requirements depend on your workload, enabled parameters, retention, catch-up load, downstream processes, network activity, and whether you compile Hyperliquid or other software on the node host.
Benchmark your full workload before production.
Size NVMe capacity and throughput for the feeds and retention window you actually need. Then open TCP 4001 and 4002 through both the host firewall and your cloud firewall.
Step 3: Clone and Configure the Repository
The systemd unit in Step 8 expects the project at /opt/hyperliquid-peering-node. Use sudo where required if your operator account is not root.
cd /opt
git clone https://github.com/quicknode/hyperliquid-peering-node.git
cd hyperliquid-peering-node
cp .env.example .env
chmod 600 .env
Open .env and replace every placeholder address with the values from Step 1:
PEER_MODE=quicknode
PUBLIC_IP=x.x.x.x
QUICKNODE_ROOT_NODE_IPS=x.x.x.x,x.x.x.x,x.x.x.x
QUICKNODE_RESERVED_PEER_IPS=x.x.x.x,x.x.x.x,x.x.x.x
QUICKNODE_ACTIVE_ROOTS=all
TRY_NEW_PEERS=false
SPLIT_CLIENT_BLOCKS=true
ENABLE_PRIORITY_ORDERING=false
NODE_OUTPUT_FLAGS=""
REQUIRE_MEMPOOL=true
PRUNE_ENABLED=false
PRUNE_MODE=dry-run
Leave the non-address values as shown. These settings control the raw mempool request, readiness enforcement, and whether public fallback can mask a Quicknode path failure:
| Setting | Why it matters |
|---|---|
SPLIT_CLIENT_BLOCKS=true | Requests the peer path that writes raw pending transactions. Every upstream peer must support it. |
REQUIRE_MEMPOOL=true | Turns missing or stale mempool output into a readiness failure instead of a silent gap. |
TRY_NEW_PEERS=false | Blocks public peer discovery, so a Quicknode path failure cannot be masked. |
QUICKNODE_ACTIVE_ROOTS | Uses all three roots. Values 1, 2, and 3 are reserved for isolated tests. |
ENABLE_PRIORITY_ORDERING=false renders node_gossip_priority_config.json as {"enabled": false}. This optional onchain gossip-auction setting is independent of raw mempool delivery, which remains randomly ordered by default. Keep false unless Quicknode instructs you to enable it.
Every environment value, generated file, and health boundary is documented in the repository's CONFIGURATION.md.
Choose Optional Node Output Files
The Docker image always starts the node with --replica-cmds-style actions-and-responses and --disable-output-file-buffering. The first flag retains block actions plus responses, while the second flushes each output line immediately. This makes output complete and timely for downstream readers, but larger records and more frequent disk writes add resource pressure, especially during catch-up. An undersized host can run out of memory and have the node terminated by the Linux OOM killer.
Monitor the running container and check whether Docker recorded an out-of-memory termination:
docker stats --no-stream "$(docker compose ps -q node)"
docker inspect --format '{{.State.OOMKilled}}' "$(docker compose ps -q node)"
Raw mempool output comes from SPLIT_CLIENT_BLOCKS=true, not from a command-line flag.
Set NODE_OUTPUT_FLAGS when you also need purpose-specific files:
| Data needed | Flag | Additional output |
|---|---|---|
| Trades | --write-trades | data/node_trades/hourly/ |
| Fills and TWAP statuses | --write-fills | data/node_fills/hourly/ and data/node_twap_statuses/ |
| Every order lifecycle status | --write-order-statuses | data/node_order_statuses/hourly/ |
| Every raw L1 order book difference | --write-raw-book-diffs | data/node_raw_book_diffs/hourly/ |
| HIP-3 deployer oracle updates | --write-hip3-oracle-updates | data/hip3_oracle_updates/hourly/ |
| Miscellaneous events | --write-misc-events | data/misc_events/hourly/ |
| CoreWriter and HyperCore transfer events | --write-system-and-core-writer-actions | data/system_and_core_writer_actions/hourly/ |
You can also change how these optional events are written:
| Format needed | Flag | Behavior |
|---|---|---|
| One record per block | --batch-by-block | Batches events into {local_time, block_time, block_number, events}. |
| Stream events with block data | --stream-with-block-info | Writes events as processed while including the same block metadata. |
For example:
NODE_OUTPUT_FLAGS="--write-fills --write-order-statuses"
--write-fills overrides --write-trades when both are present. See the repository's CONFIGURATION.md and the official Hyperliquid flag reference for the complete schemas.
There is no single host specification for every flag combination. Each selected output adds file writes, storage, retention work, and downstream processing. Daily volume can differ materially by feed, network activity, catch-up state, and output format, so this guide does not publish fixed per-flag size estimates.
Before production, enable the exact combination you need and measure per-directory growth, disk latency, and consumer lag during both catch-up and normal operation. Size storage for the retention window while preserving the MIN_FREE_PERCENT safety margin.
verify.sh does not check these optional directories, and the included pruner does not delete them. Add freshness monitoring and a reviewed retention or archival policy for each one you enable.
If you want a rough view of storage growth, you can capture exact byte counts after enabling your flags and again after a representative interval:
docker compose exec -T node sh -c '
for output_dir in \
  node_trades node_fills node_twap_statuses node_order_statuses \
  node_raw_book_diffs hip3_oracle_updates misc_events \
  system_and_core_writer_actions
do
  path="/home/hluser/hl/data/${output_dir}"
  [ ! -d "${path}" ] || du -sb "${path}"
done
'
Comparing the two snapshots can help you estimate growth for your workload. As a planning aid, you can convert the difference into a daily rate, multiply each feed by its retention days, and add the retained default outputs and restart state. If you use the default 20% free-space threshold, dividing that total by 0.80 gives a directional minimum-capacity estimate before additional operational headroom.
Treat the result as directional rather than a universal requirement. Short catch-up samples are particularly unsuitable for production extrapolation because catch-up and network activity can change both resource use and output volume.
Step 4: Build and Start the Stack
docker compose up -d --build
This is the direct Docker Compose lifecycle option. If you want the host to manage the stack as a boot service, complete the readiness checks first and then install the systemd wrapper in Step 8. Once systemd owns the stack, use systemctl for full-stack start, stop, and reload operations; the unit delegates to this same Compose project.
This one command builds the image, verifies the Hyperliquid signing-key fingerprint and Mainnet visor signature, renders your configuration into a private volume, refuses placeholder or duplicate peer values, and starts the node only after that gate passes. The pruning scheduler starts with deletion disabled.
The command automates deployment, not production operations. It does not select the outputs your application needs, size storage for them, monitor optional directories, set their retention, or confirm that downstream consumers keep up.
Confirm the configuration gate passed:
docker compose ps -a
docker compose logs --no-color config
The config service should be exited (0). The node and pruner services should be running. The config logs print peer counts and boolean settings only, never the addresses.
Step 5: Verify Readiness and Peer Isolation
Compose starting is not synchronization. On an empty volume, the node must receive and replay a checkpoint, a state snapshot used to bootstrap or catch up, before it can follow current blocks. Its processes run while readiness correctly fails.
./scripts/verify.sh
Repeat until it returns 0. It checks configuration validity, container health, at least two recent applied-block signals with an advancing height, fresh replica_cmds output, fresh mempool_txs output, and free disk space.
A passing run returns output like this; the restart count and free-disk percentage reflect the host at the time of the check:
Configuration valid: Mainnet, 3 root peer(s), try_new_peers=false, split_client_blocks=true, reserved_peers=3, priority_ordering=false; addresses not printed.
Verification passed: configuration valid; container running; health=healthy; restarts=0; applied height advanced; outputs fresh; disk free=81%. Addresses not printed.
Next, confirm public peers did not quietly fill the gap:
./scripts/verify-peer-isolation.py --since 30m
This reads the configuration copy used by the current node container, inspects its established gossip sockets, and scans the requested recent-log window for unexpected activity. It fails if public discovery is enabled, no approved current or recent peer connection exists, an unexpected target appears, or candidate-peer discovery occurs. It prints counts only. A three-root deployment may keep one approved socket open in steady state; recent socket churn across all three roots is not required.
Treat verify.sh as the data-readiness boundary and the isolation script as the network boundary. A healthy container proves neither.
Step 6: Find Your Data
The node writes into the hl-home volume:
| Path inside the node container | Contents |
|---|---|
/home/hluser/hl/data/replica_cmds/ | Executed block actions and their responses |
/home/hluser/hl/data/mempool_txs/ | Raw pending signed transaction inputs |
/home/hluser/hl/data/node_logs/ | Node-generated logs |
/home/hluser/hl/hyperliquid_data/ | Restart and synchronization state. Never delete this. |
Block output records contain abci_block, height, and resps with full responses. Raw mempool records are list-form, and their transaction object contains signed_actions and tx_hash without execution-result fields.
Raw mempool files hold uncommitted transactions. They may fail, change relative position, or never enter a block. Hyperliquid also streams them in random order by default. Do not read their presence or file order as confirmed state.
Step 7: Set Retention Before the Disk Fills
Pruning ships disabled. At roughly 1.1 TB per day, you need a policy before the node runs unattended.
The pruner deletes regular files only under data/mempool_txs, data/replica_cmds, and data/node_logs. It refuses an unexpected volume and never touches hyperliquid_data.
First preview the candidates. Set these values in .env:
PRUNE_ENABLED=true
PRUNE_MODE=dry-run
Then recreate only the pruner and read its report:
docker compose up -d --force-recreate pruner
docker compose logs --no-color pruner
Review the class, retention window, candidate count, and candidate bytes. The example windows are six hours for mempool_txs and 24 hours for replica_cmds and node_logs. They are starting points, not a policy. Choose yours from your disk capacity and, critically, from whether your downstream consumers have already processed those files.
When the report looks right, set PRUNE_MODE=apply, recreate the pruner again, and rerun ./scripts/verify.sh to confirm output is still fresh.
Step 8: Run at Boot with systemd
Docker's restart: unless-stopped policy restores containers after the Docker daemon restarts. Install the systemd unit when the host should manage the whole Compose application as one service:
systemd-analyze verify systemd/hyperliquid-peering-node.service
install -m 0644 systemd/hyperliquid-peering-node.service \
  /etc/systemd/system/hyperliquid-peering-node.service
systemctl daemon-reload
systemctl enable --now hyperliquid-peering-node.service
The unit expects /opt/hyperliquid-peering-node and preserves both named volumes when stopped. After any restart or reboot, wait for checkpoint replay, then rerun the Step 5 checks.
After changing a node setting in .env, apply it with:
systemctl reload hyperliquid-peering-node.service
Reload force-recreates the Compose containers so the node copies the new generated files before starting. Allow up to the documented 120-second stop window, wait for checkpoint replay, and rerun the Step 5 checks. For retention-only changes, continue to recreate only the pruner as shown in Step 7.
The current signed Mainnet visor can run until Docker's 120-second stop allowance expires, after which Docker may report forced exit 137. The systemd unit allows for this. Preserve the hl-home volume through the restart.
To stop the stack while keeping both volumes, run docker compose down, or systemctl disable --now hyperliquid-peering-node.service if systemd owns it. Deleting hl-home discards your local output and restart state.
Troubleshooting
| Symptom | Check |
|---|---|
config exits non-zero | Replace placeholders, remove duplicate addresses, and supply every required peer. |
| No initial peer connection | Confirm allowlisting, the advertised public IPv4, and TCP 4001-4002 in both firewalls. |
Compose runs but verify.sh fails | Wait for checkpoint replay. Look for advancing applied heights and fresh output. |
| Mempool is missing or stale | Confirm SPLIT_CLIENT_BLOCKS=true and REQUIRE_MEMPOOL=true, then contact support. |
| Isolation check fails | Confirm TRY_NEW_PEERS=false and inspect the count-only current/recent connection evidence. |
| Output goes stale after working | Check peer connectivity, checkpoint activity, disk headroom, and node logs. |
| Node exits or restarts under load | Check docker stats, Docker's .State.OOMKilled value, and host memory pressure. |
| Pruner refuses to run | Keep the expected volume and data root. Do not bypass its safety guards. |
For monitoring signals, update procedures, and recovery steps, see the repository README. Process uptime is one signal among many: also watch peer disconnects, file growth gaps, disk headroom, and downstream consumer lag.
Peering or a Managed Endpoint?
Peering changes the upstream connectivity contract, not the data interface. It delivers raw files to a node you own and operate. It does not return a prebuilt order book, normalized events, or filtered payloads.
| Access model | Who runs the node? | What you get | Best fit when |
|---|---|---|---|
| Public peers | You | Whatever the peer path happens to support, no SLA | You can operate the full stack and accept public-peer availability |
| Quicknode Peering | You | Full blocks and raw mempool, three sentry IPs, 99.99% SLA | You need continuous raw local data and want a contracted upstream path |
| Managed Quicknode endpoint | Quicknode | Filterable gRPC and WebSocket datasets | You want managed APIs or normalized datasets without operating a node |
With Peering, your team still owns the hardware, operating system, firewall, storage, retention, upgrades, monitoring, and incident response. That boundary is the decision point. If your team does not want to operate and size these raw-output pipelines, use the managed datasets that fit your application instead.
Quicknode's managed Hyperliquid APIs cover the other side: BLOCKS and MEMPOOL_TXS gRPC streams, purpose-built order books through StreamL2Book and StreamL4Book, HyperCore REST and WebSocket, and HyperEVM JSON-RPC. Managed streaming bills on post-filter data received, so filters cut cost when you need selected markets or event types. The Peering plan includes full mempool delivery with no separate usage meter.
The two are not exclusive. Run Peering for raw local files and add managed gRPC when you also need a normalized L2 or L4 book. Check the Hyperliquid pricing documentation before you buy, because plan access and terms change.
Final Thoughts
Congratulations, you now have a Mainnet non-validating node writing full block and raw mempool output through dedicated Quicknode peers, with readiness checks, peer isolation, persistent state, and a retention policy you approved. What you build on top of those files is yours. Start from the repository, and reach for managed datasets when you need a normalized interface instead of raw data.
Next Steps
- Clone
quicknode/hyperliquid-peering-nodeonce your IPv4 is allowlisted - Read
CONFIGURATION.mdfor every environment value and health boundary - Review Quicknode Hyperliquid Peering for current pricing and activation
- Compare Quicknode Hyperliquid datasets when you need a managed order book
- Read the official Hyperliquid node repository before sizing or upgrading
- Use Hyperliquid's latency guidance to plan production-region measurements
Frequently Asked Questions
What is Hyperliquid node peering?
Hyperliquid node peering connects a non-validating node to upstream root or sentry peers that forward network data. You still run the node and maintain its data pipeline. Quicknode Peering changes the upstream path by providing three dedicated sentry peer IPs across multiple Tokyo datacenters; it does not change node ownership.
How do I know when my Hyperliquid node is ready?
Docker Compose startup only confirms that the processes launched. Wait for the initial checkpoint to be received and replayed, then run the repository's verify.sh script until it confirms advancing applied heights, fresh block and mempool output, healthy processes, and sufficient disk headroom. Run the peer-isolation script separately to confirm that only approved Quicknode paths were observed.
How do I access raw Hyperliquid mempool data?
Run a non-validating node with split_client_blocks enabled in override_gossip_config.json. Every peer between your node and the validator network must enable the same setting. Quicknode Peering includes the full raw mempool with no separate usage meter. Quicknode also offers the managed MEMPOOL_TXS gRPC stream for teams that prefer API delivery and filtering.
What hardware does a Hyperliquid non-validating node require?
The official base specification currently lists 16 vCPUs, 128 GB RAM, a 500 GB SSD, and Ubuntu 24.04. Hyperliquid's Optimizing latency guide lists at least 32 logical cores, 128 GB RAM, and 500 MB/s disk throughput for latency-sensitive reads. Raw mempool retention needs far more storage than the base 500 GB figure.
How much storage does raw Hyperliquid mempool data need?
Quicknode observed approximately 1.1 TB per day of raw mempool data, and volume changes with network activity. Hyperliquid separately estimates that default node logs can reach about 100 GB per day. Size storage from your own measured growth and retention window, and enable a retention policy before running the node unattended.
When should I use Quicknode Peering?
Use Quicknode Peering when full block data and raw mempool files are required on a node your team operates. It provides three dedicated sentry peer IPs across multiple datacenters, a published 99.99% SLA, and full mempool delivery with no separate usage meter. Use a managed Quicknode endpoint instead when supported APIs and filtering meet the requirement.
Does Quicknode Peering host my Hyperliquid node?
No. Your team operates the Hyperliquid non-validating node. Quicknode allowlists your node and supplies three dedicated sentry peer IPs across multiple datacenters, full block and raw mempool delivery, a published 99.99% SLA, and direct engineer support. Your team remains responsible for the node and its data pipeline.
Does Quicknode Peering provide a Hyperliquid order book?
Quicknode Peering delivers full block and raw mempool data to your non-validating node, but it does not provide a prebuilt order book. You can construct one from node output or use Quicknode managed gRPC datasets such as StreamL2Book and StreamL4Book for purpose-built order-book delivery.
Can I use Quicknode Peering and managed APIs together?
Yes. Peering can provide raw blocks and mempool files to your own node while managed Quicknode gRPC or WebSocket services provide filtered or normalized application data. Managed streaming is billed on post-filter data received, while the Peering plan includes full mempool delivery without a separate usage meter.