11 min read
Overview
This guide covers Arbitrum Nova, a blockchain that offers low transaction costs and high security through the AnyTrust protocol. Users will learn how to build, deploy and interact with a simple storage smart contract on Arbitrum Nova using well-known developer tools such as QuickNode and Hardhat.
What You Will Need
- Basic understanding of Javascript
- A web3 wallet with access to your private key (e.g., Torus, MetaMask)
- Node.js & npm installed
- Hardhat installed
What You Will Do
- Learn about the Arbitrum Nova chain
- Build a simple storage smart contract
- Deploy the storage contract on Arbitrum Nova
- Interact with your deployed storage contract
What is Arbitrum Nova?
Arbitrum Nova is a blockchain offered by Arbitrum that offers ultra-low transaction costs paired with high security. The chain utilizes a technology called AnyTrust, a variation of Arbitrum Nitro technology that accepts a mild trust assumption in return for low fees to end users.
Let's briefly cover how AnyTrust works.
AnyTrust Protocol
AnyTrust is built on top of Arbitrum Nitro technology, an upgrade to the "classic" Arbitrum. AnyTrust significantly reduces fees for end users by implementing a protocol called Data Availability Committee (aka DACs).
Let's now cover exactly how these trust assumptions work and how Data Availability Committees (DACs) participate in this.
Data Availability Committee (DAC)
The Data Availability Committee's goal is to ensure data availability for end users. Some of the best companies in the industry came together to form Nova's Data Availability Committee (like Google Cloud, QuickNode, and Reddit). DAC members must run the Data Availability Server (DAS) software, which consists of a Sequencer API to submit data blocks to the DAS for storage and a REST API for querying block data.
The trust assumption is that the Committee has N members, of which AnyTrust assumes at least two are honest. This means that if N-1 Committee members promise to provide access to some data, at least one of the promising parties must be honest, ensuring that the data will be available and the protocol can continue functioning.
Suppose committee members cannot provide the required data for AnyTrust to operate. In that case, the Committee loses consensus, and the Nova chain will use the Arbitrum Rollup protocol as a fallback (i.e., storing transaction data on the Ethereum chain) until the DAC committee regains consensus.
Why Arbitrum Nova?
By utilizing AnyTrust Technology and Nitro's shared codebase, Nova offers superior speed, security, and Ethereum interoperability. Transaction fees on Nova are up to 90% cheaper and faster to mine than Ethereum, all while using the same security.
Nova can be advantageous for users or projects with large transaction volumes, such as game developers, social projects, and blockchain applications like NFTs, & DeFi.
Now that we have a better understanding of why one might use Arbitrum Nova, let's move on to the technical part of this guide which will demonstrate how to deploy a smart contract on Arbitrum Nova using well-known developer tools such as QuickNode and Hardhat.
Developer Set Up
Accessing Arbitrum Nova with QuickNode
You'll need an API endpoint to communicate with the Arbitrum Nova chain. You're welcome to use public nodes or deploy and manage your own infrastructure; however, if you'd like 8x faster response times, you can leave the heavy lifting to us. Sign up for a free account here.
Once signed in, click Create Endpoint and then select the Arbitrum Nova mainnet chain.
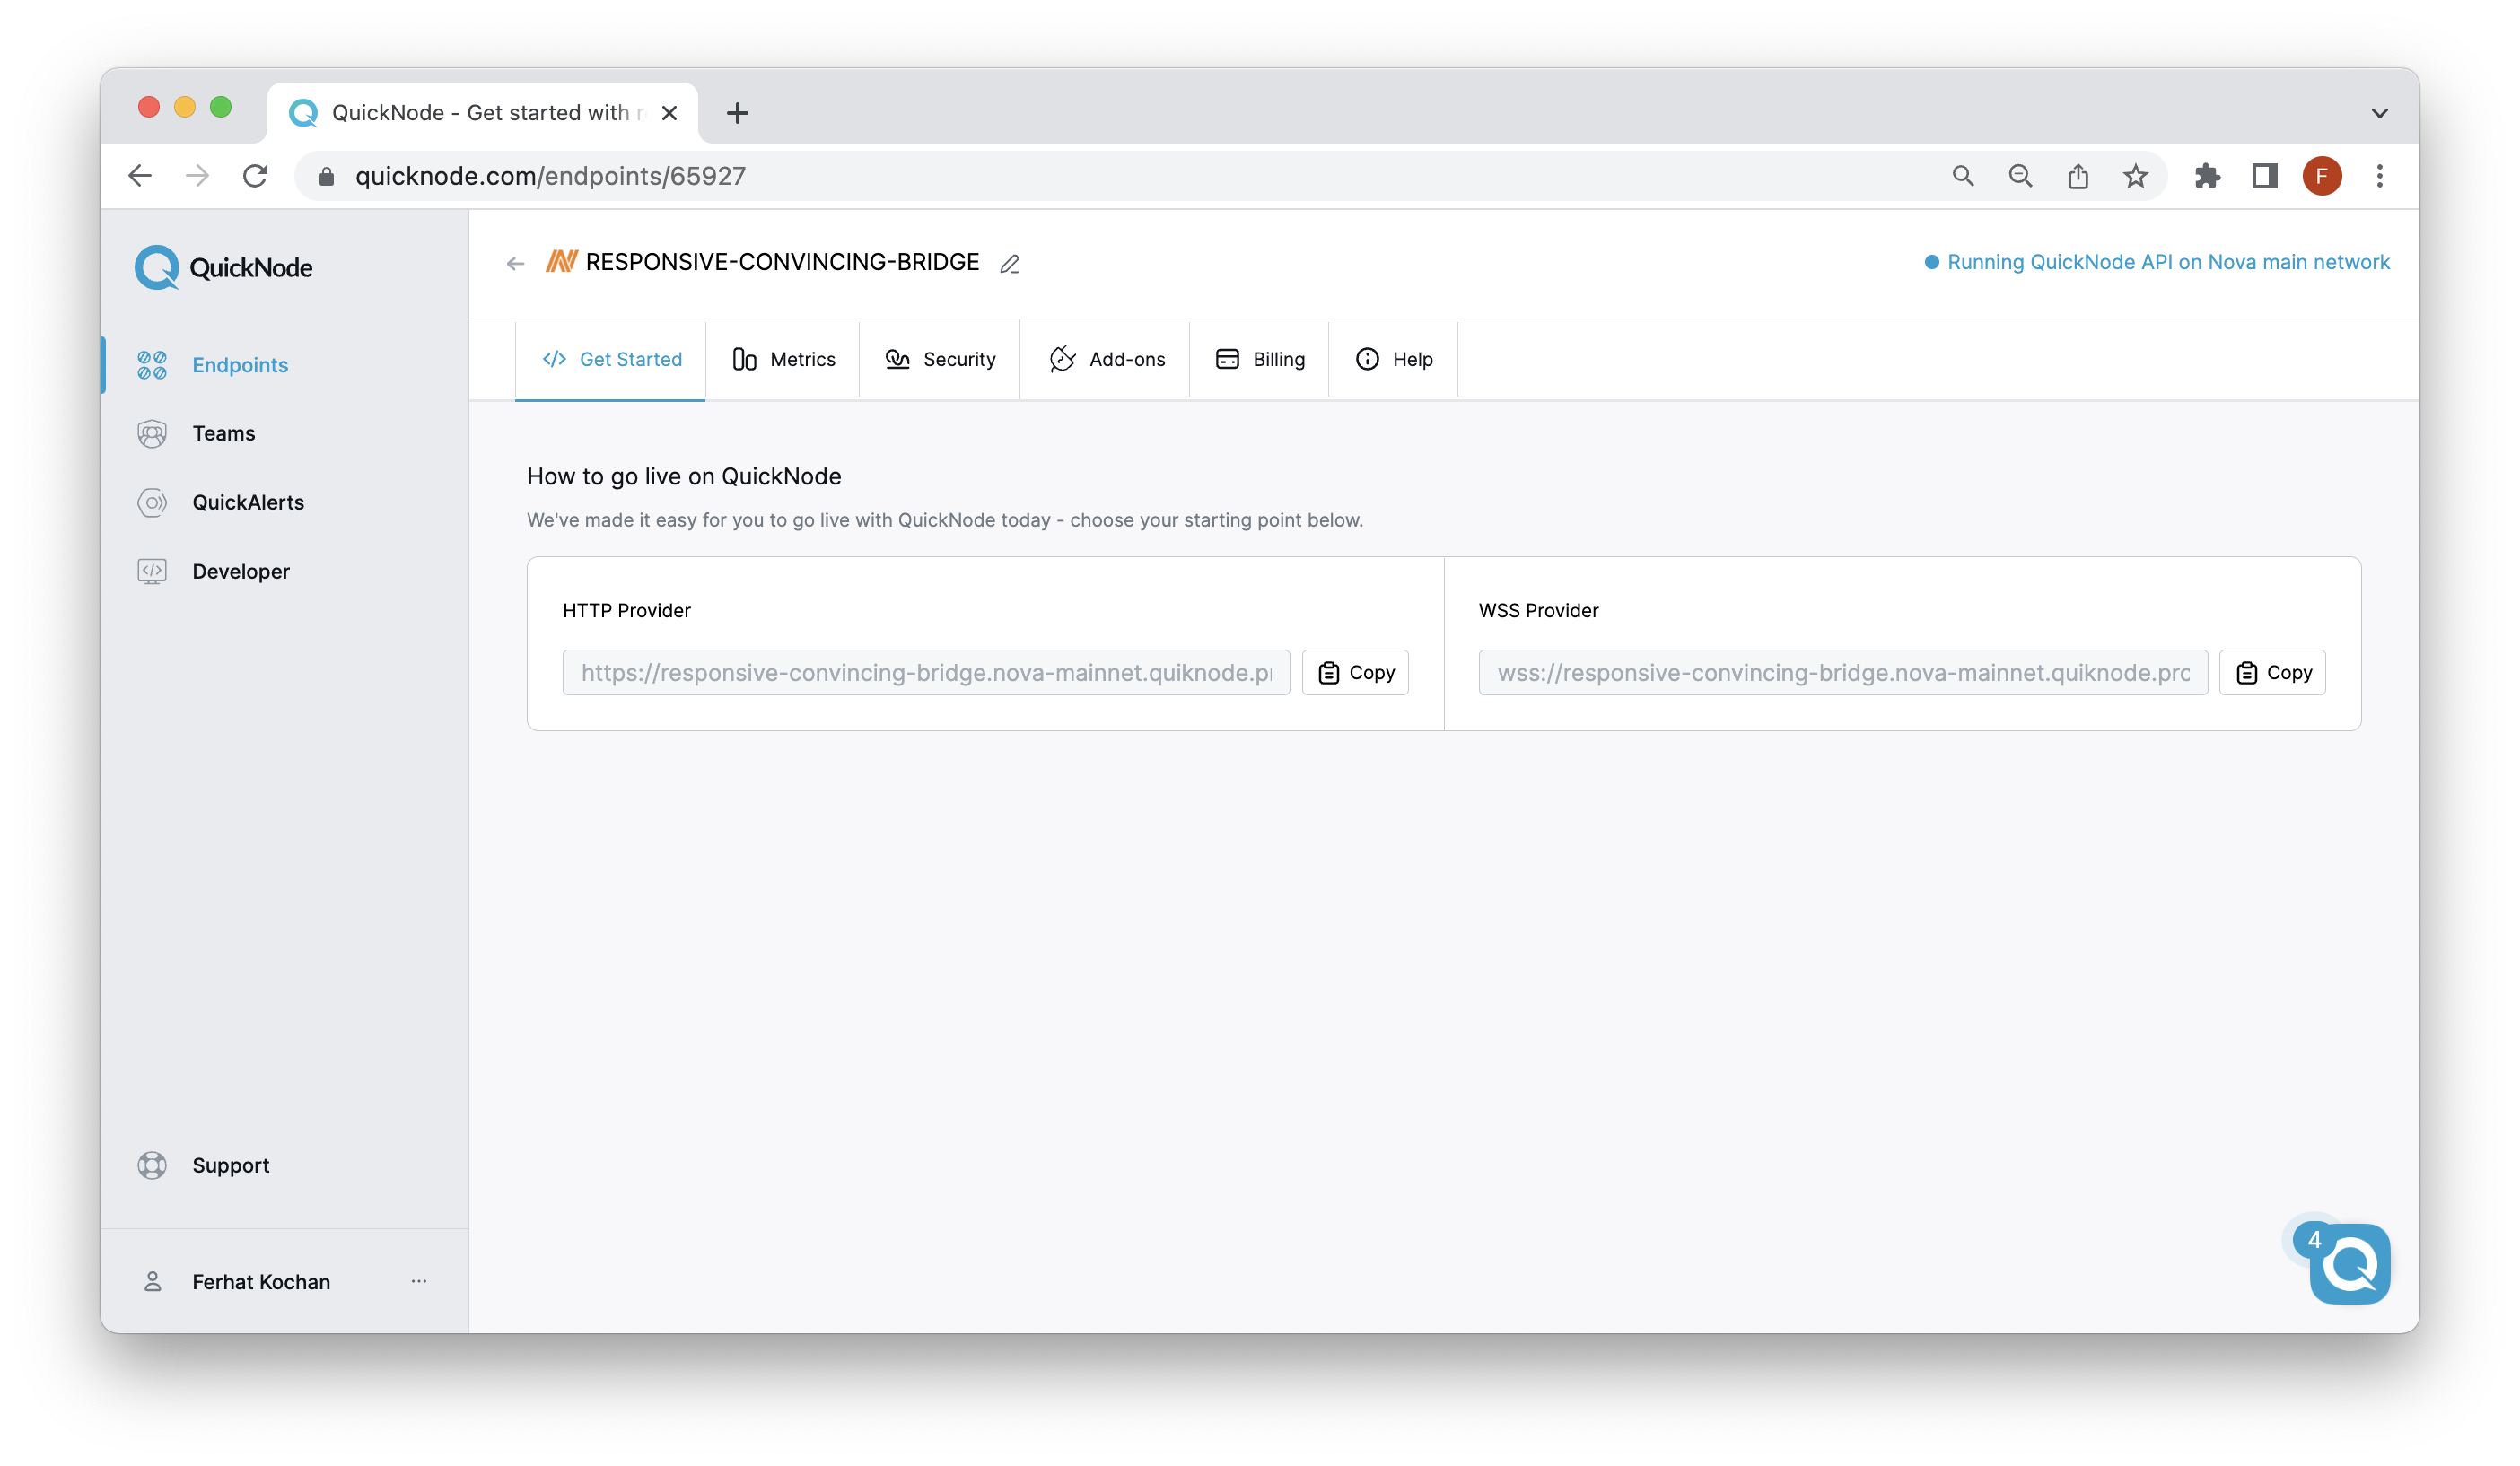
Once your endpoint is created, keep the HTTP Provider URL handy, as you'll need it in the deployment section.
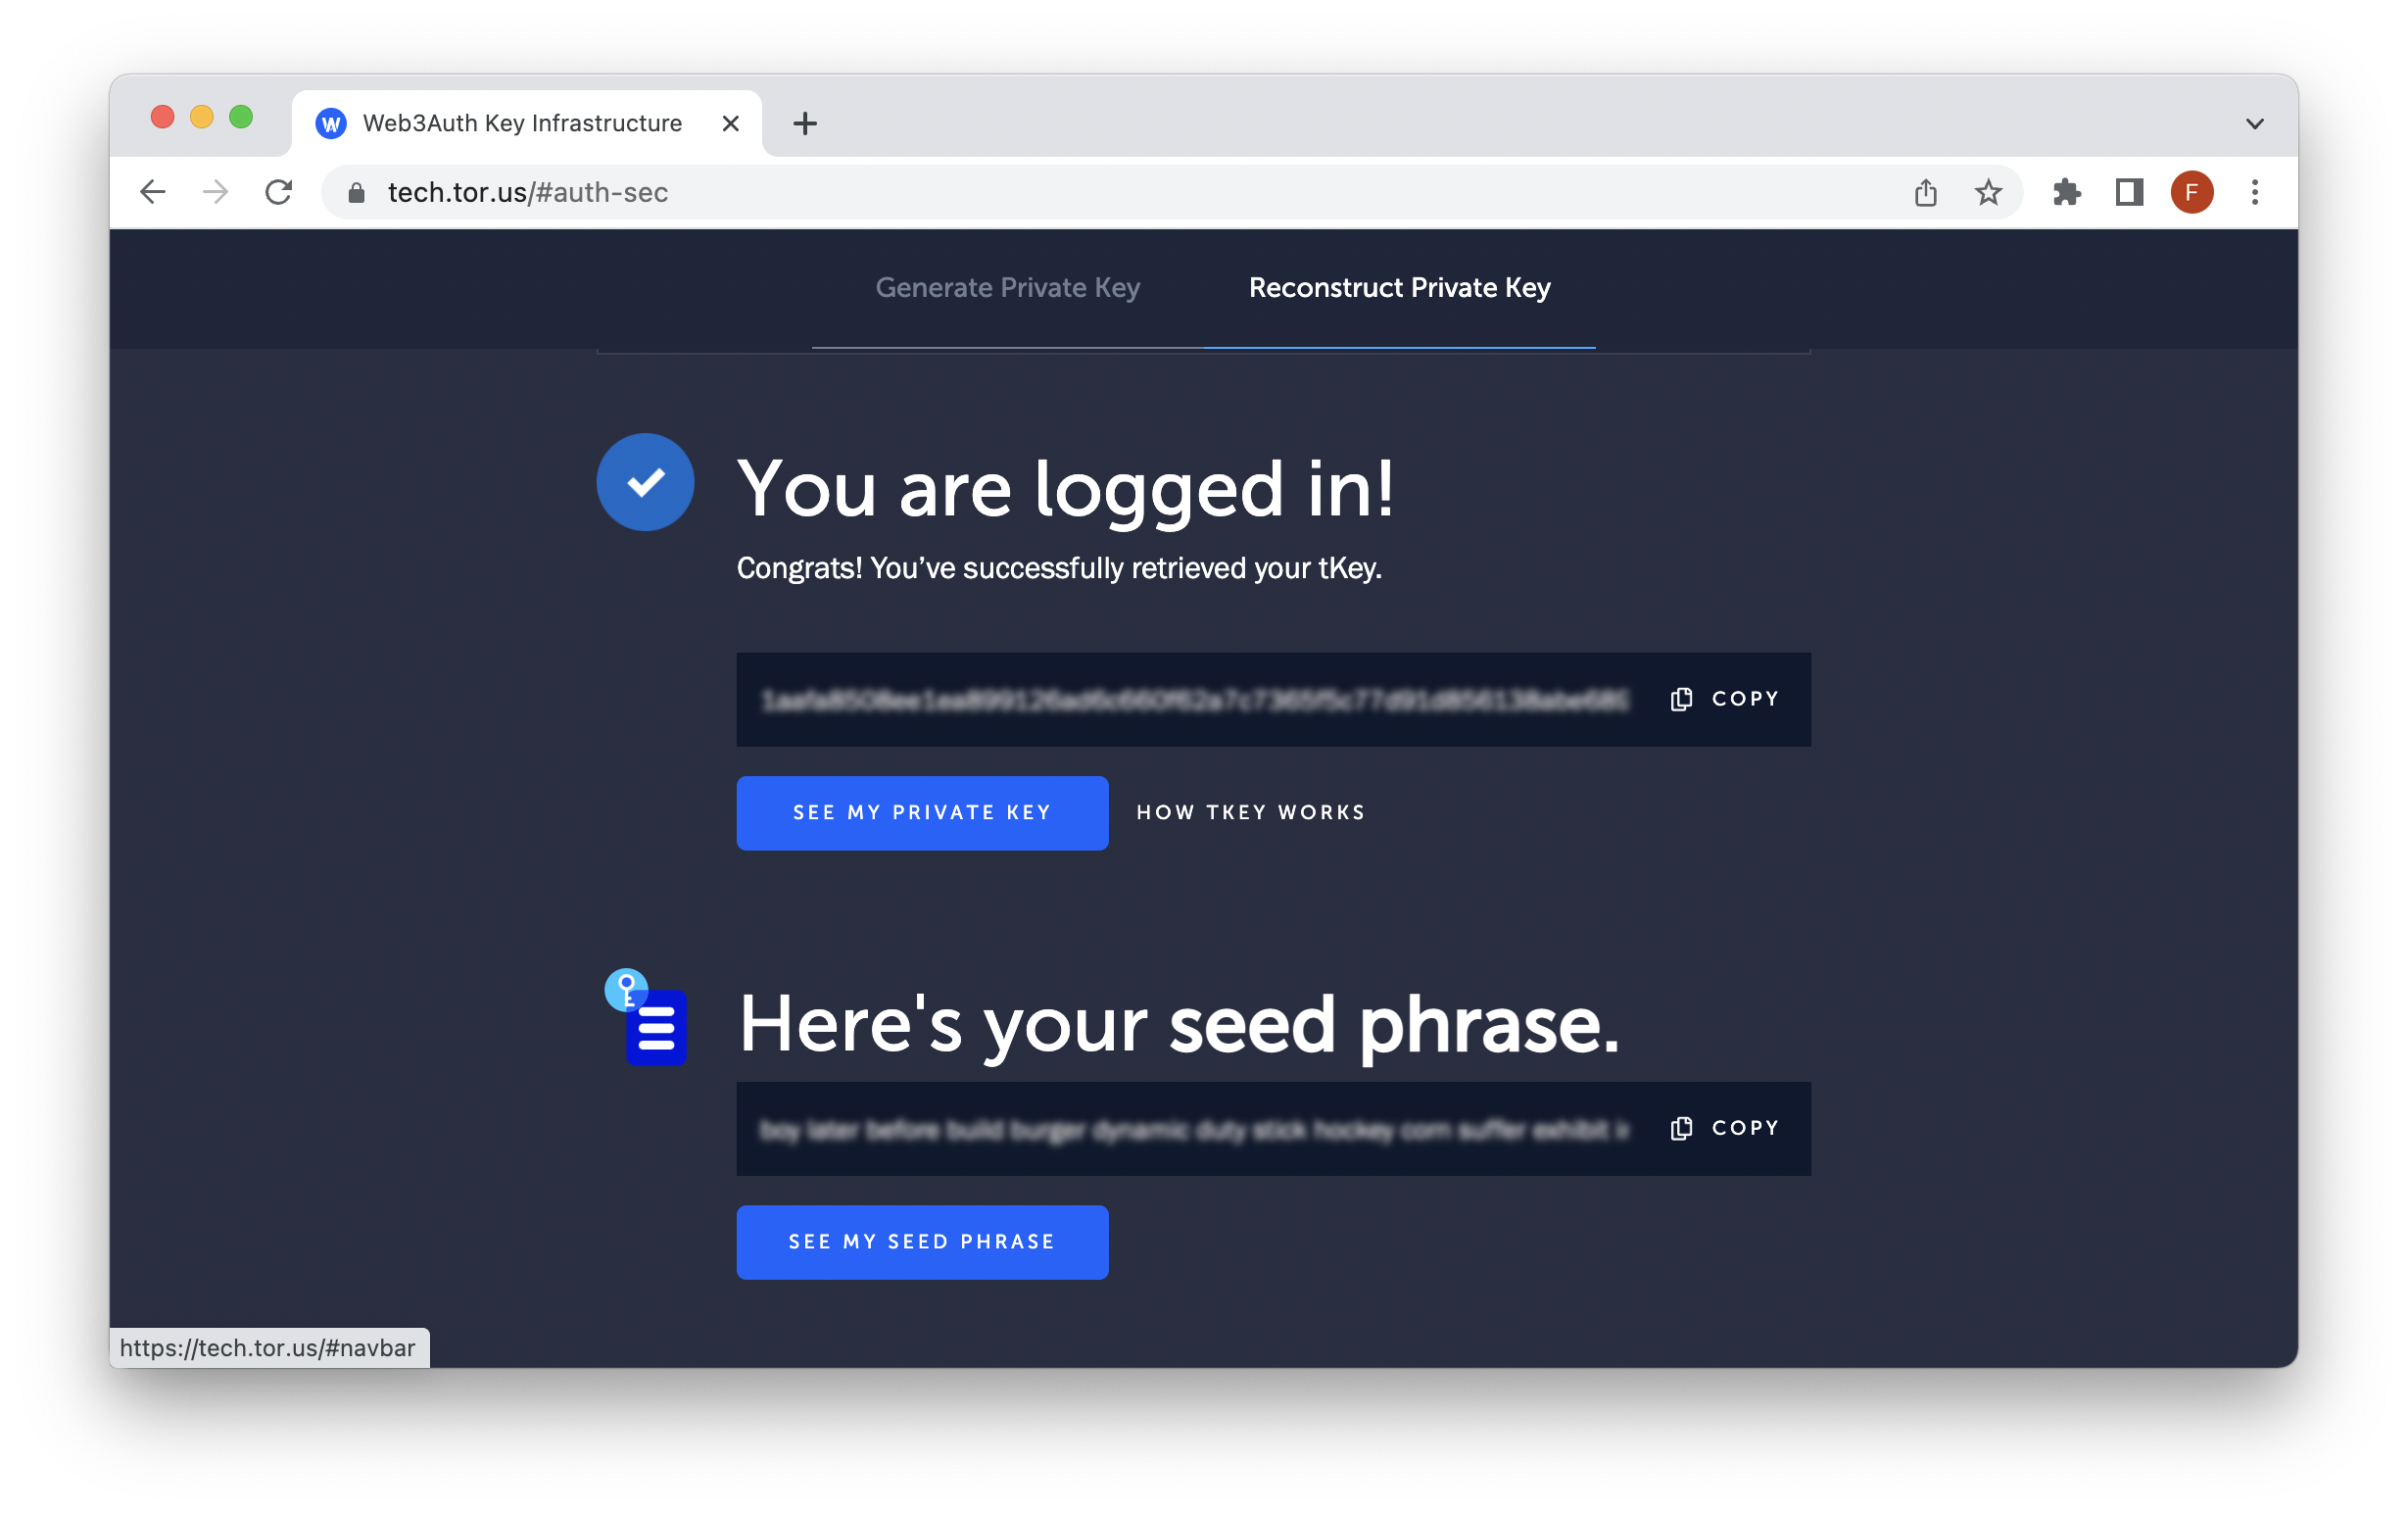
Torus Wallet
There are a number of crypto wallets you can use to deploy smart contracts. For this guide, we will be using Torus Wallet, which is a non-custodial wallet that has multi-chain and network availability (e.g., Ethereum, Arbitrum One, Arbitrum Nova, and other EVM-related chains).
Note that since this guide covers the deployment on Arbitrum Nova Mainnet, you'll need real funds (aka ETH) to pay for transaction fees. However, this should be extremely cheap and should not cost more than .25 cents. ETH can be obtained on decentralized exchanges such as Uniswap or custodial exchanges such as Coinbase.
Navigate to Torus and complete the workflow to generate a private key.
Before starting the technical part of this guide, ensure you have enough funds on your Arbitrum Nova mainnet address to pay for the contract deployment and interaction.
Hardhat
Hardhat is a popular development framework for EVM-related blockchains. It consists of different components, from compiling, debugging, testing, and deploying smart contracts. You can deploy smart contracts on Hardhat using Solidity, Yul, and Assembly. You can find more information about Hardhat here.
In the next section, we will start the development of our smart contract using Hardhat.
Setting up the Project
To set up the project, we must create a folder called StorageContract and install the required dependencies.
To do this, run the following set of terminal commands:
mkdir StorageContract && cd StorageContract
npm init -y
npm install --save-dev hardhat
npm i dotenv
npm i @nomicfoundation/hardhat-toolbox
npx hardhat
When Hardhat prompts you on what kind of project you want to create, choose the Create an empty hardhat.config.js option.
Once the Hardhat project is created, we'll run the following set of terminal commands to create an organized development environment for our smart contract.
mkdir contracts
mkdir test
mkdir scripts
echo > .env
Then, we'll configure the hardhat.config.js file to have the following code:
require("@nomicfoundation/hardhat-toolbox");
require("dotenv").config();

module.exports = {
  solidity: "0.8.17",
  networks: {
    nova: {
      url: process.env.RPC_URL,
      accounts: [process.env.PRIVATE_KEY]
    }
  }
};
Finally, open the .env file and paste the following environment variables.
PRIVATE_KEY=<FILLME>
RPC_URL=<FILLME>
Fill in the values with your private key and RPC URL you created in the previous section. Remember to save the file you've edited so far.
Building a Smart Contract on Arbitrum Nova
Time to get to building! If you don't have any Solidity experience already, take a moment to review the Solidity 101 section in this How to Create a "Hello World" Smart Contract with Solidity guide.
Once you're ready, create a file in your contracts foler called SimpleStorage.sol:
echo > contracts/SimpleStorage.sol
Open the file and input the following code:
// SPDX-License-Identifier: MIT
pragma solidity ^0.8.17;

contract SimpleStorage {
    address public owner;  // Public variable to store the address of the owner of the contract
    uint public value;     // Public variable to store the value

    event NewValueSet(uint value);    // Event emitted when the value is set
    event OwnerChanged(address newOwner); // Event emitted when the owner is changed

    constructor() {
        owner = msg.sender;  // Initialize the owner as the address that deployed the contract
    }

    // Modifier to check if the msg.sender is the owner before execution
    modifier onlyOwner() {
        require(msg.sender == owner, "Only the owner can perform this action.");
        _;
    }

    /**
     * @dev Function to read the current value stored in the contract
     * @return uint - the value stored in the contract
     */
    function readValue() public view returns (uint) {
        return value;
    }

    /**
     * @dev Function to set a new value in the contract
     * @param _value - the new value to be set
     */
    function setValue(uint _value) public onlyOwner {
        value = _value;
        emit NewValueSet(value);
    }

    /**
     * @dev Function to read the current owner stored in the contract
     * @return address - the value stored in the contract
     */
    function getOwner() public view returns (address) {
        return owner;
    }

    /**
     * @dev Function to change the owner of the contract
     * @param _newOwner - the new owner of the contract
     */
    function changeOwner(address _newOwner) public onlyOwner {
        require(_newOwner != address(0), "The new owner address cannot be 0x0");
        owner = _newOwner;
        emit OwnerChanged(owner);
    }
}
Before moving on to the next section, take a few minutes to review the code comments to understand the storage contracts logic better. The code uses solidity concepts such as events, require statements, modifiers, and other solidity best practices.
Testing the Smart Contract Before Deployment
Before we deploy this basic storage contract, we will want to make sure the contract behaves as expected. We can do this by running some tests. In your test folder, create a file called storageTest.js with the following command:
echo > test/storageTest.js
Then, open the file in your code editor and input the following code:
const { expect } = require("chai");

describe("Storage Contract Test", function () {
    let owner;

    beforeEach(async function () {
        // Retrieve the default account from ethers
        [owner] = await ethers.getSigners();

        // A helper to get the contracts instance and deploy it locally
        const SimpleStorage = await ethers.getContractFactory("SimpleStorage");
        simpleStorage = await SimpleStorage.deploy();
    });

    it("should set and get value correctly", async () => {
        // Set a new value
        const newValue = 12345;
        await simpleStorage.setValue(newValue);


        // Read the value and expect it to be 12345
        const value = await simpleStorage.readValue();
        expect(value).to.equal(newValue);
    });

    it('should return the address of the contract owner', async () => {
        // Get the owner address stored in the contract
        const contractOwner = await simpleStorage.getOwner();

        // Expect the contract owner to be the address that deployed the contract
        expect(contractOwner).to.equal(owner.address);
    });

    it("should change the owner correctly", async () => {
        // Change ownership to a new address
        await simpleStorage.changeOwner("0x95222290DD7278Aa3Ddd389Cc1E1d165CC4BAfe5");
        const updatedOwner = await simpleStorage.getOwner();

        // Expect the contract owner to be the new address
        expect(updatedOwner).to.equal("0x95222290DD7278Aa3Ddd389Cc1E1d165CC4BAfe5");
    });

});
Take a few minutes to read the code comments and understand the code
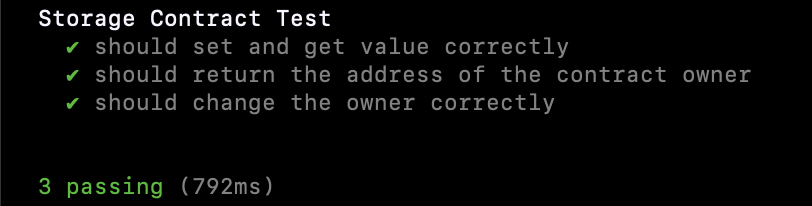
To run the test, navigate into your main directory (e.g., StorageContract) and run the following terminal command:
npx hardhat test
You should see an output similar to:
Deploying the Smart Contract on Arbitrum Nova
This section will deploy the smart contract onto Arbitrum Nova Mainnet.
In your scripts folder, create a file called deploy.js:
echo > scripts/deploy.js
This file will contain the logic needed to deploy our contract to Arbitrum Nova Mainnet. Open the file and input the following code:
const hre = require("hardhat");

async function deploy() {
    // Deploy the contract
    const SimpleStorage = await hre.ethers.getContractFactory("SimpleStorage");
    const simpleStorage = await SimpleStorage.deploy();

    // Print the deployed contracts address
    console.log("SimpleStorage contract deployed at:", simpleStorage.address);
}

deploy()
    .then(() => console.log("Deployment complete"))
    .catch((error) => console.error("Error deploying contract:", error));
To deploy the contract, run the following hardhat command in your terminal:
npx hardhat run --network nova scripts/deploy.js
You should see an output that contains your deployed contract address.
Interacting with the Smart Contract on Arbitrum Nova
Navigate to Arbitrum Nova's block explorer to verify that the smart contract was deployed by putting in the address returned from the deployment script above.
To interact with the Storage contract, create an additional script within your scripts directory called interactStorage.js:
echo > scripts/interactStorage.js
Then open the file and input the following code:
const hre = require("hardhat");

async function main() {
    // Get contract factory for the SimpleStorage contract
    const SimpleStorage = await ethers.getContractFactory("SimpleStorage");

    // Attach to deployed contract at the specified address
    const simpleStorage = await SimpleStorage.attach(
      "DEPLOYED_CONTRACT_ADDRESS" // Your deployed contract address
    );

    // Call the readValue function to get the current value
    let getValue = await simpleStorage.readValue();
    console.log("currentValue: ", getValue)

    // Call the setValue function to update the value
    let setValueTx = await simpleStorage.setValue(420)
    console.log("setValue function call. Waiting for confirmation...")

    // Wait 3 blocks for the transaction to be confirmed
    await setValueTx.wait(confirm=3);

    // Call the readValue function again to get the latest value
    let latestValue = await simpleStorage.readValue();
    console.log("latestValue: ", latestValue)
}

// Start the script and handle any errors
main()
    .then(() => console.log("Script complete"))
    .catch((error) => console.error("Error running script:", error));
The script above will test setting a value in our storage contract by calling the setValue function. It will also call the readValue function to get the current value in storage. To run the script, use the following hardhat command:
npx hardhat run --network nova scripts/interactStorage.js
That's it! You have just created a smart contract on Arbitrum Nova using Hardhat and QuickNode!
Arbitrum Ecosystem
Now that you have deployed your first smart contract on Arbitrum Nova explore some of the resources the Arbitrum Nova chain offers:
Additional Resources
If you want to continue learning about Arbitrum Nova and smart contracts, check out these resources:
- QuickNode Arbitrum Nova Developer Documentation
- Smart Contract Development Guides
- QuickNode & Arbitrum Nova
Final Thoughts
Congrats! You now understand more about Arbitrum Nova and how to deploy smart contracts! What are you using Arbitrum Nova for? We'd love to see what you're creating! Share your app with us on Discord or Twitter. If you have any feedback or questions on this guide, we’d love to hear from you!