

15 min read
Overview
When building applications that interact with the blockchain, your Quicknode endpoint serves as your gateway to the network. Whether you are building a decentralized application (dApp), a trading bot, or a backend service, securing your endpoint is essential. You can think of your endpoint URL as a sensitive API key; if it falls into the wrong hands, it can be abused. An exposed or unprotected endpoint can be exploited by malicious actors, potentially running up your bill and causing performance issues. In this guide, you will learn various strategies to protect your endpoint:
| Tactic | Ease/Complexity | Effectiveness | Quicknode Plan |
|---|---|---|---|
| Rotate Keys | 🟡 Moderate | 🟢 High | All plans |
| Dot Env with Backend Proxy | 🟢 Easy | ⚪ Moderate | n/a |
| Rate Limiting | 🟢 Easy | ⚪ Moderate | All plans* |
| Method Whitelisting | 🟢 Easy | ⚪ Moderate | Build Plan and above |
| Method Blocklist | 🟢 Easy | ⚪ Moderate | Build Plan and above |
| Block Range Limits | 🟢 Easy | ⚪ Moderate | Build Plan and above |
| Request Filters | 🔴 Complex | 🟢 High | Enterprise |
| Domain Whitelisting | 🟡 Moderate | ⚪ Moderate | Build Plan and above |
| IP Whitelisting | 🟢 Easy | 🟢 High | Build Plan and above |
| Blocked IPs | 🟢 Easy | ⚪ Moderate | Build Plan and above |
| JSON Web Tokens (JWT) | 🔴 Complex | 🟢 High | Build Plan and above |
*Basic rate limiting is available on all plans. Rate limiting by method requires the Accelerate Plan or higher. See the Pricing page for more details.
Managing multiple endpoints? You don't need to click through the dashboard for each security setting. Use the Admin API to automate your security settings. Check out the Manage Your RPC Infrastructure with Quicknode Admin API guide for a walkthrough.
Rotate Keys
Rotating your keys is a simple yet effective method for protecting your endpoint. It involves regularly rotating your endpoint's private token to prevent unauthorized access. This means that even if your endpoint is exposed, it will only be vulnerable for a limited time. Quicknode allows you to rotate your keys directly from your Quicknode dashboard.
Open your Quicknode Dashboard and select the endpoint you want to rotate keys for. Click the Settings tab, then the Authentication tab, and find the Tokens section. Here, you can add or delete new keys. New keys will be available immediately. Simply copy the new key and use it in your application. You can delete old keys by clicking the 🗑️ button next to the key you want to remove. Any previously compromised keys that have been removed are no longer valid.
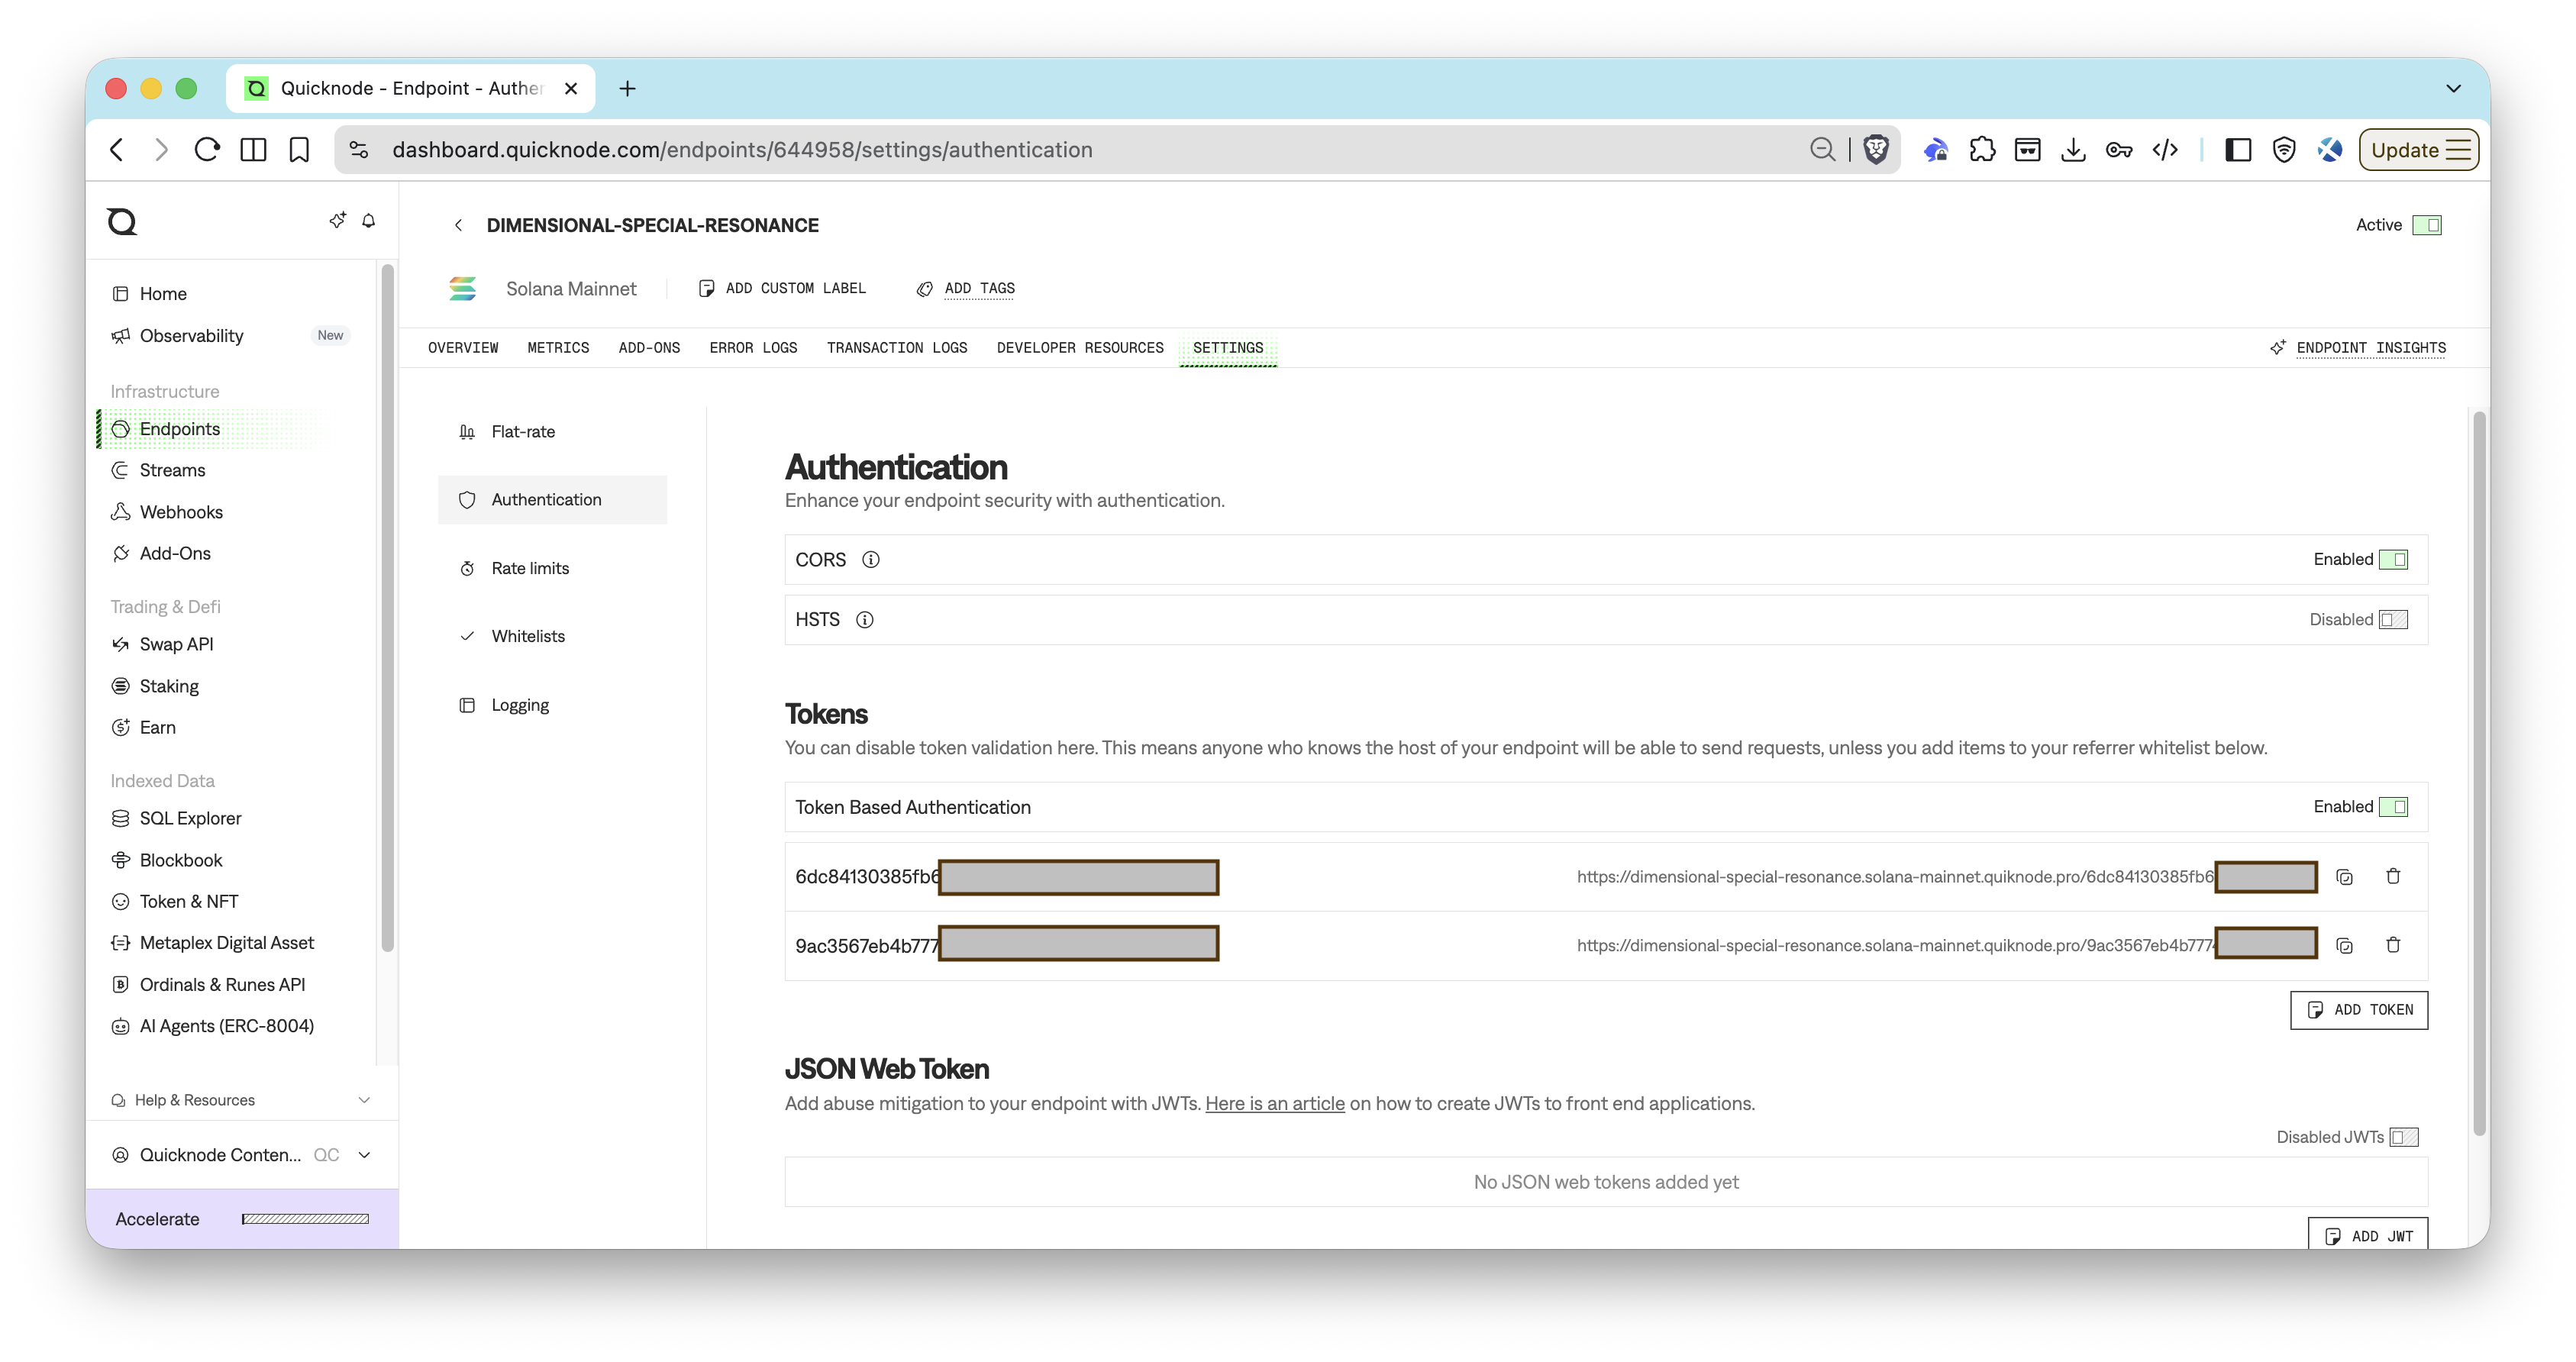
Regularly rotating your keys can significantly reduce the risk of unauthorized access to your endpoint. For more information on how to rotate your keys, check out our Guide: How to Set Up Multi-Token Authentication on Quicknode.
- Pros: Simple, Secure
- Cons: Time-consuming (requires regular key rotation), Key Management
Dot Env and Backend Proxy
Dot Env
Dot Env (.env) is a simple yet effective method for managing environment variables in your application. It involves using a .env file to store configuration settings and sensitive information, such as API keys and database passwords. This approach centralizes configuration management, making it easier to update and maintain. Dot Env has several benefits:
- Security: Keeps sensitive data out of your codebase, reducing the risk of exposing it in version control systems.
- Flexibility: Allows different configurations for different environments (e.g., development, testing, production) without changing the code.
- Ease of Use: Simplifies managing environment-specific variables.
Backend Proxy
While .env organizes your secrets, it does not hide them if you are building a client-side application (like a React or Vue dApp). If you bundle your .env variables into a frontend build, they are visible to anyone who inspects your site's code.
A Backend Proxy solves this. Instead of your frontend talking directly to Quicknode, it talks to your own server (the proxy). Your server then attaches the API key and forwards the request to Quicknode. It can handle requests requiring sensitive data, like your endpoint, without exposing them to the client.
Here's an example of a backend proxy making a Solana getBalance request:
const dotenv = require('dotenv');
const express = require('express');
const solanaWeb3 = require('@solana/web3.js');
const PRIVATE_ENDPOINT = process.env.PRIVATE_ENDPOINT;

dotenv.config();
const app = express();

app.get('/getBalance', async (req, res) => {
  const connection = new solanaWeb3.Connection(
    PRIVATE_ENDPOINT,
    'confirmed',
  );
  const publicKey = new solanaWeb3.PublicKey(req.query.publicKey)
  const balance = await connection.getBalance(publicKey);
  res.send(balance);
});

app.listen(3000, () => {
    console.log('Server is running on port 3000');
});
This approach has several benefits:
- Secure Data Handling: The backend proxy can securely handle requests and manage sensitive data, like API keys, without exposing them to the client side.
- Environment Variables: Store sensitive data in
.envon the server and use the backend proxy to mediate interactions with external services. - Reduced Exposure Risk: This approach significantly reduces the risk of sensitive information exposure, as the data never reaches the front end.
Best Practices
- Use Dot Env Server-Side: Store sensitive variables in
.envserver files, not client-side code. - Do not Commit
.envFiles: Ensure.envfiles are not committed to public repositories (use.gitignore). - Implement Backend Proxy: Use a backend proxy to handle requests that require sensitive data, ensuring this data is not exposed in the client-side application.
By combining Dot Env with a backend proxy, you can maintain the ease and security of environment variable management while safeguarding against the risks of client-side exposure.
- Pros: Adaptable, Scalable, Secure
- Cons: Codebase Complexity (additional server-side code) and Performance Overhead
Rate Limiting
Rate limiting is crucial to endpoint security, especially in web applications and APIs. It involves setting a maximum number of requests your endpoint can handle within a given time frame. Though this will not prevent others from accessing your endpoint, it will limit the number of requests they can make. This can help prevent abuse and overuse of resources, which can lead to performance issues and increased costs.
Setting Rate Limits
Quicknode lets you set rate limits for any endpoints directly from your Quicknode dashboard. Go to your Quicknode Dashboard and select the endpoint you want to apply rate limits to. Under the Settings tab, click the Rate limits tab. Here, you can apply limits to your endpoint regarding Requests per Second, Minute, Day, or Month. Also, you can limit the number of requests per IP address, which can help prevent abuse from a single IP address.
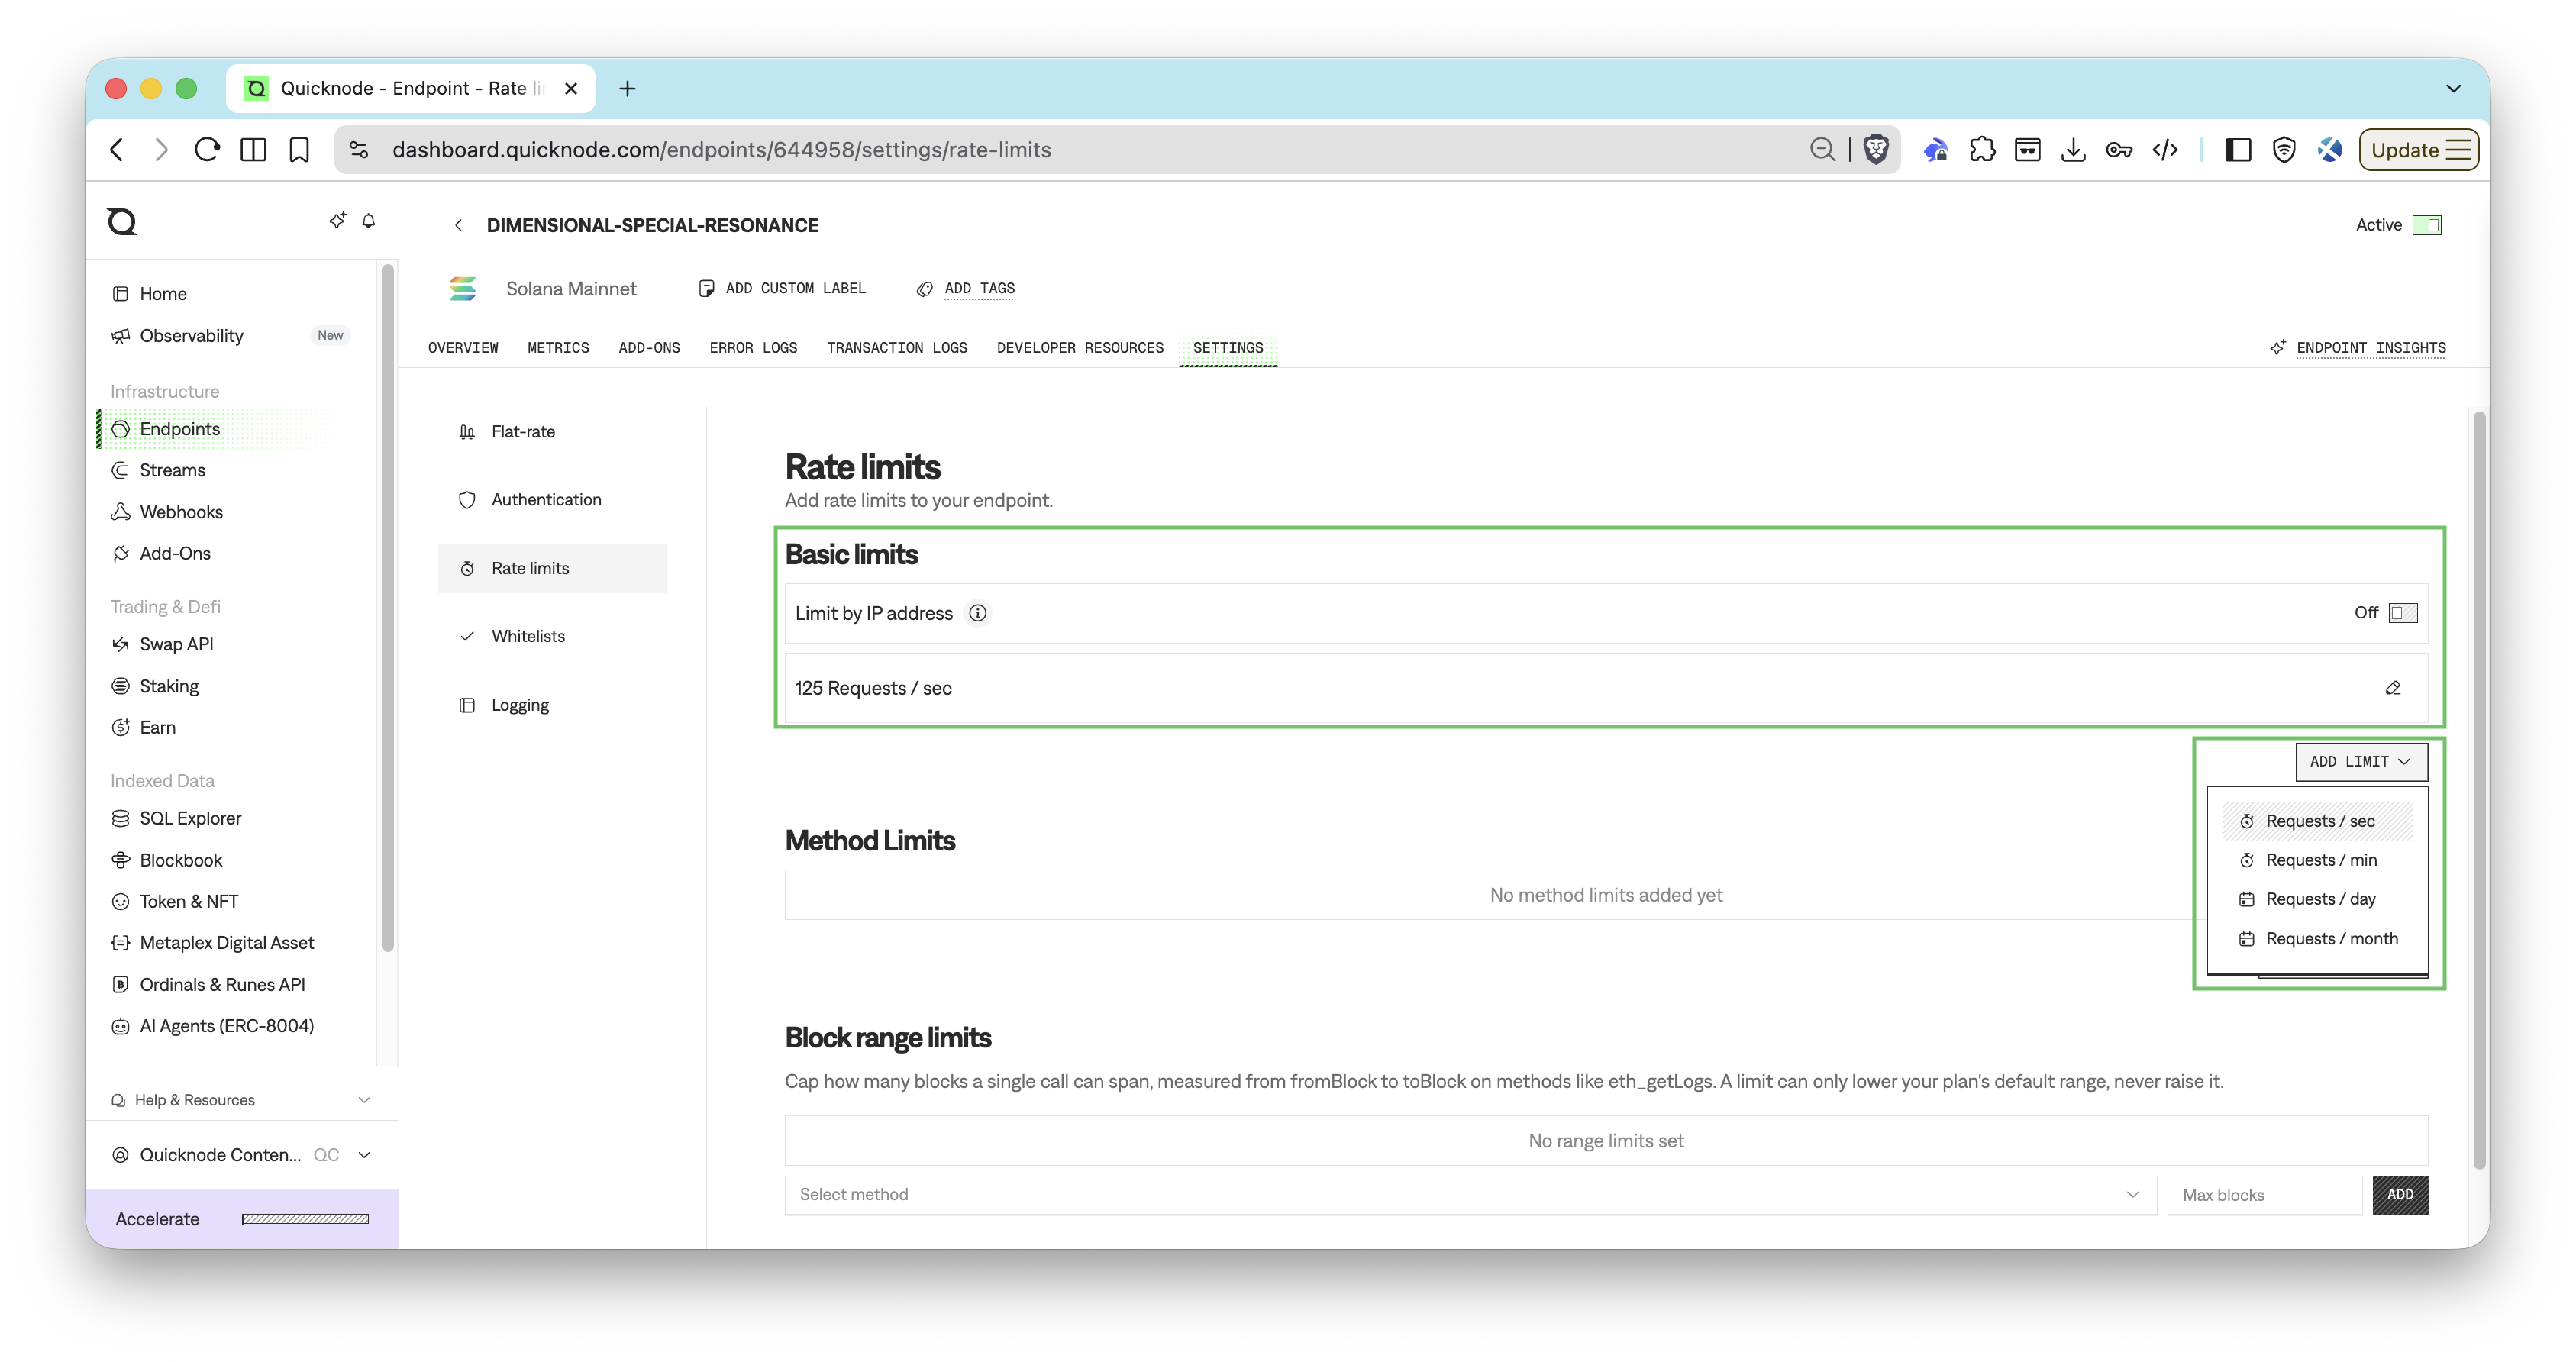
Click Add Limit, select the rate limit type you want to apply, and enter the limit. Your rate limits will be applied immediately.
Method Rate Limits
Quicknode also offers method-specific rate limits. These are in the Method Limits section of the Rate limits tab. Method rate limits allow you to set different limits for different API methods, providing more granular control over your endpoint's usage.
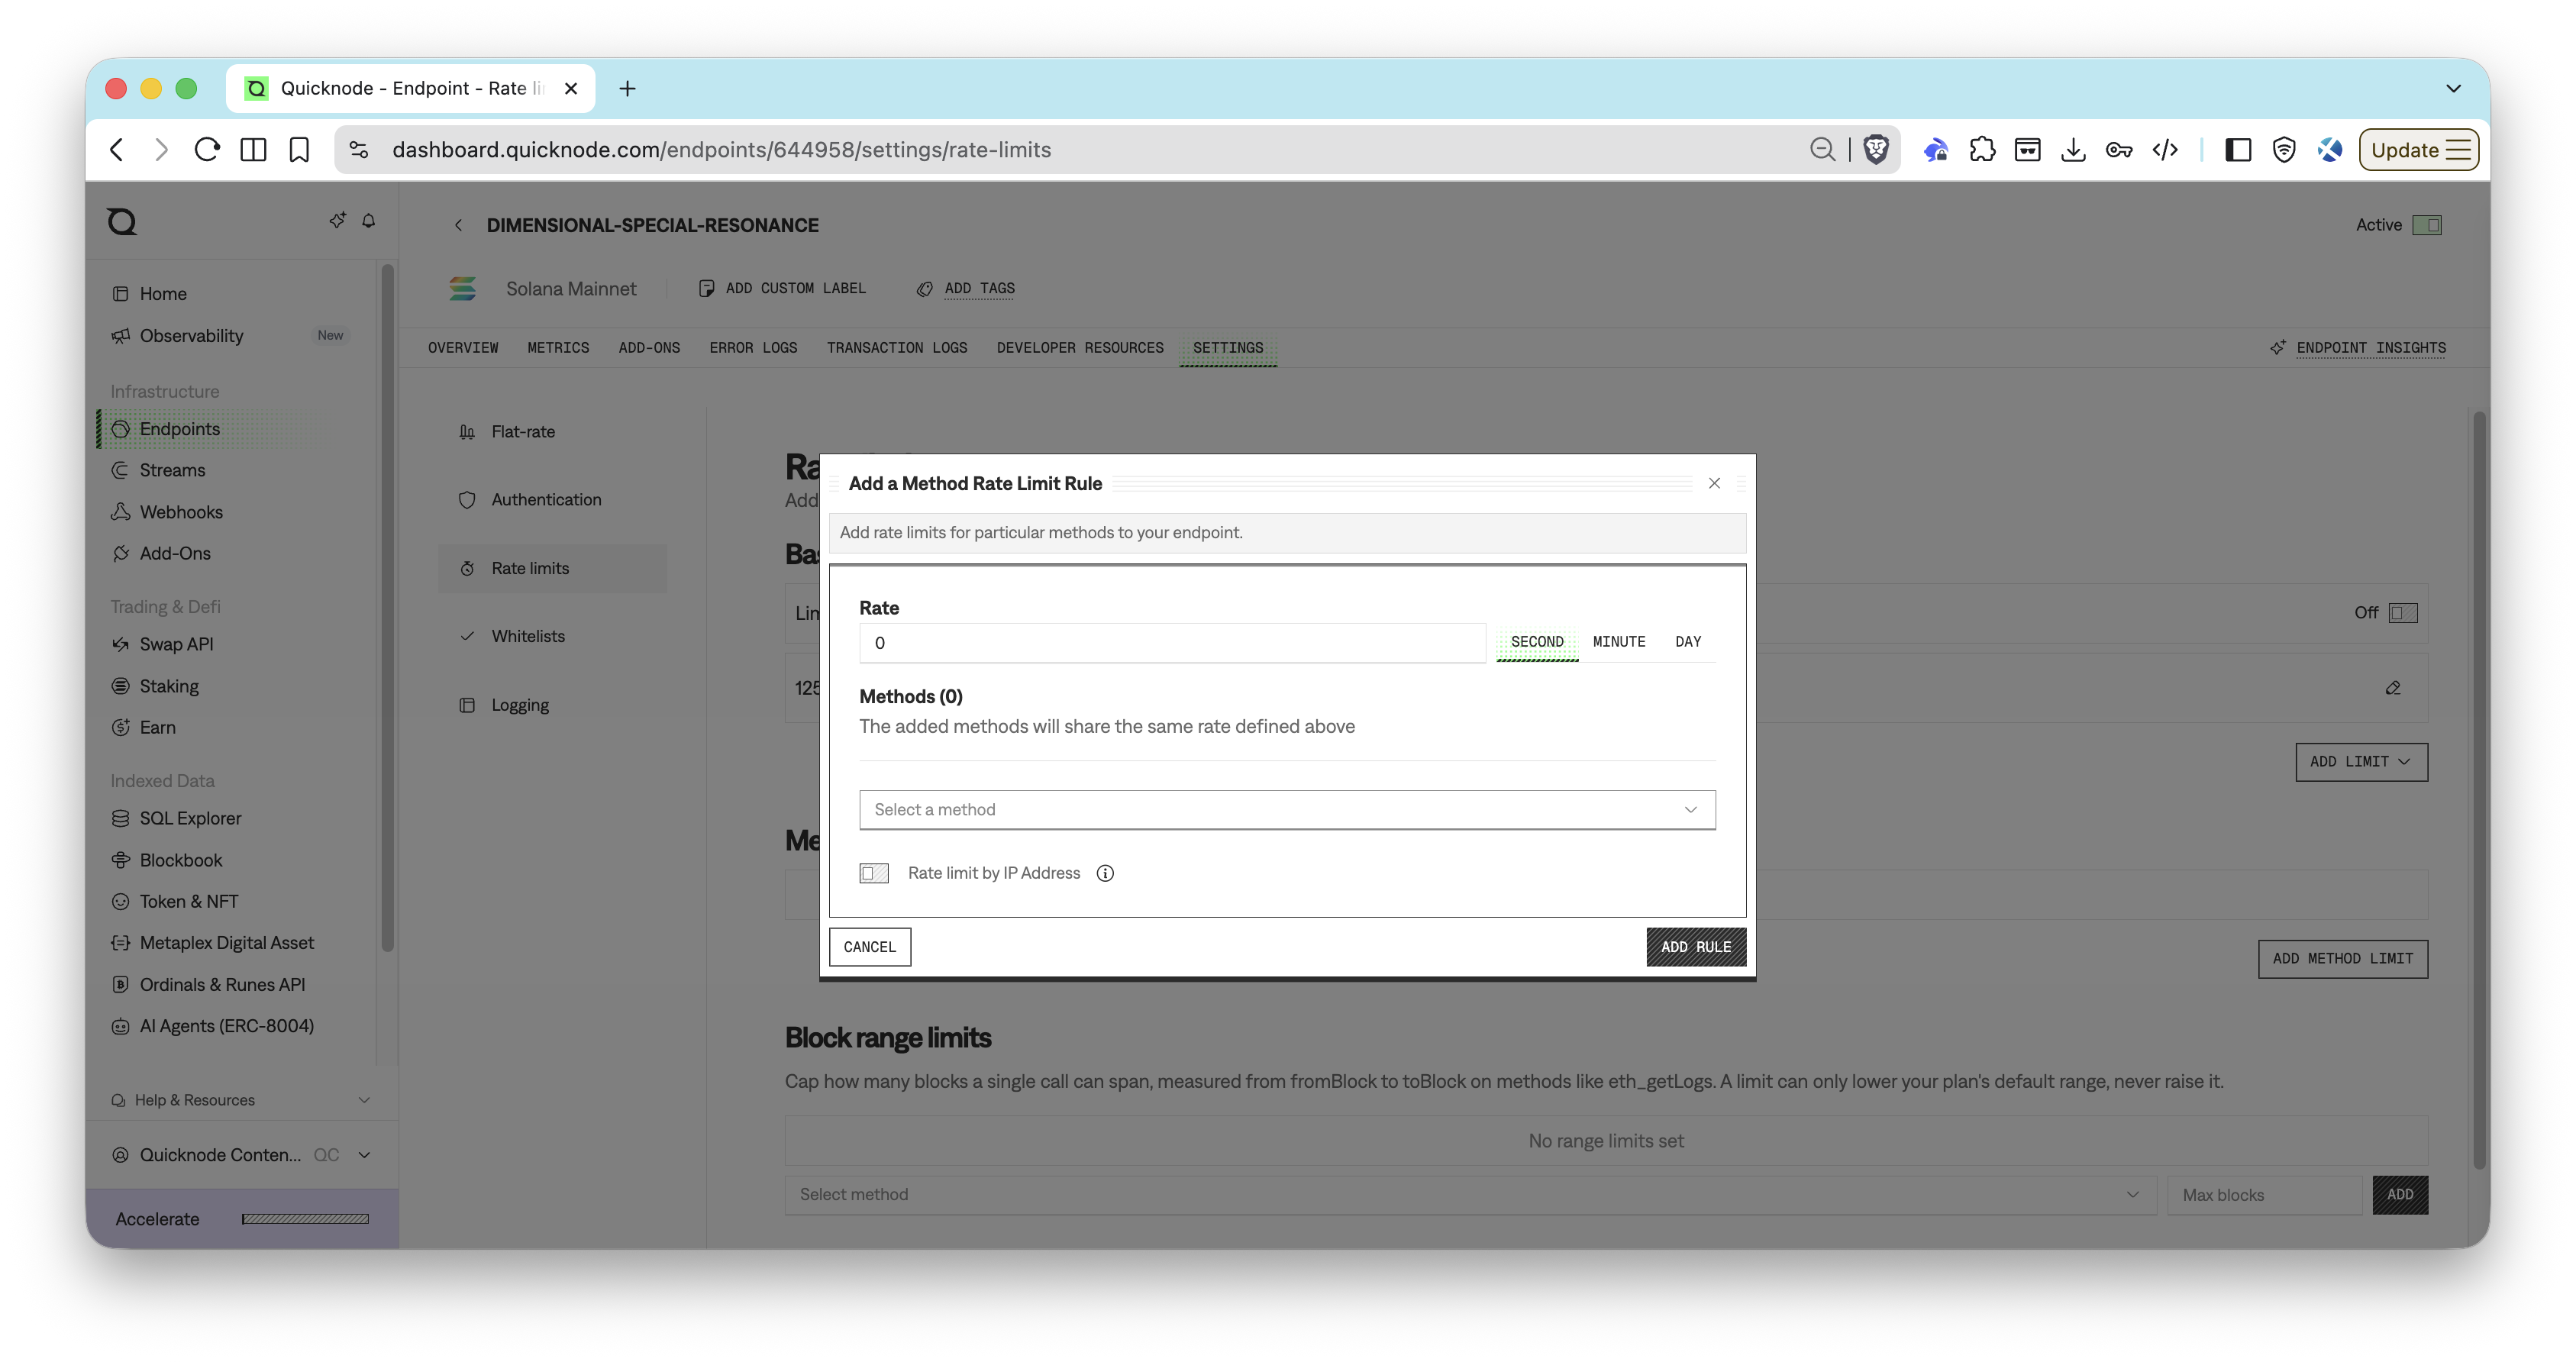
- Pros: Easy to implement/modify
- Cons: Could impact user experience if limits are too low, Does not prevent access to endpoint
Method Whitelisting
A highly effective security strategy is to restrict which JSON-RPC methods your endpoint can accept. By creating a whitelist of methods, you ensure that only the specific functions your dApp requires will be processed. Any other method calls will be forbidden.
For example, if your application only needs to read data from the blockchain using getBlock and getBalance, you can enable only these two methods. This will prevent any other method calls from being processed, reducing the risk of unauthorized access and abuse of your endpoint.
Enabling Method Whitelisting
Go to your Quicknode Dashboard and select the endpoint you want to apply method restrictions to. Under the Settings tab, click the Whitelists tab and find the Methods section. Click Add Methods and Enable. In the window that opens, select the methods from the dropdown and add them. Your whitelist will be applied immediately. You can easily modify the list or disable restrictions if needed.
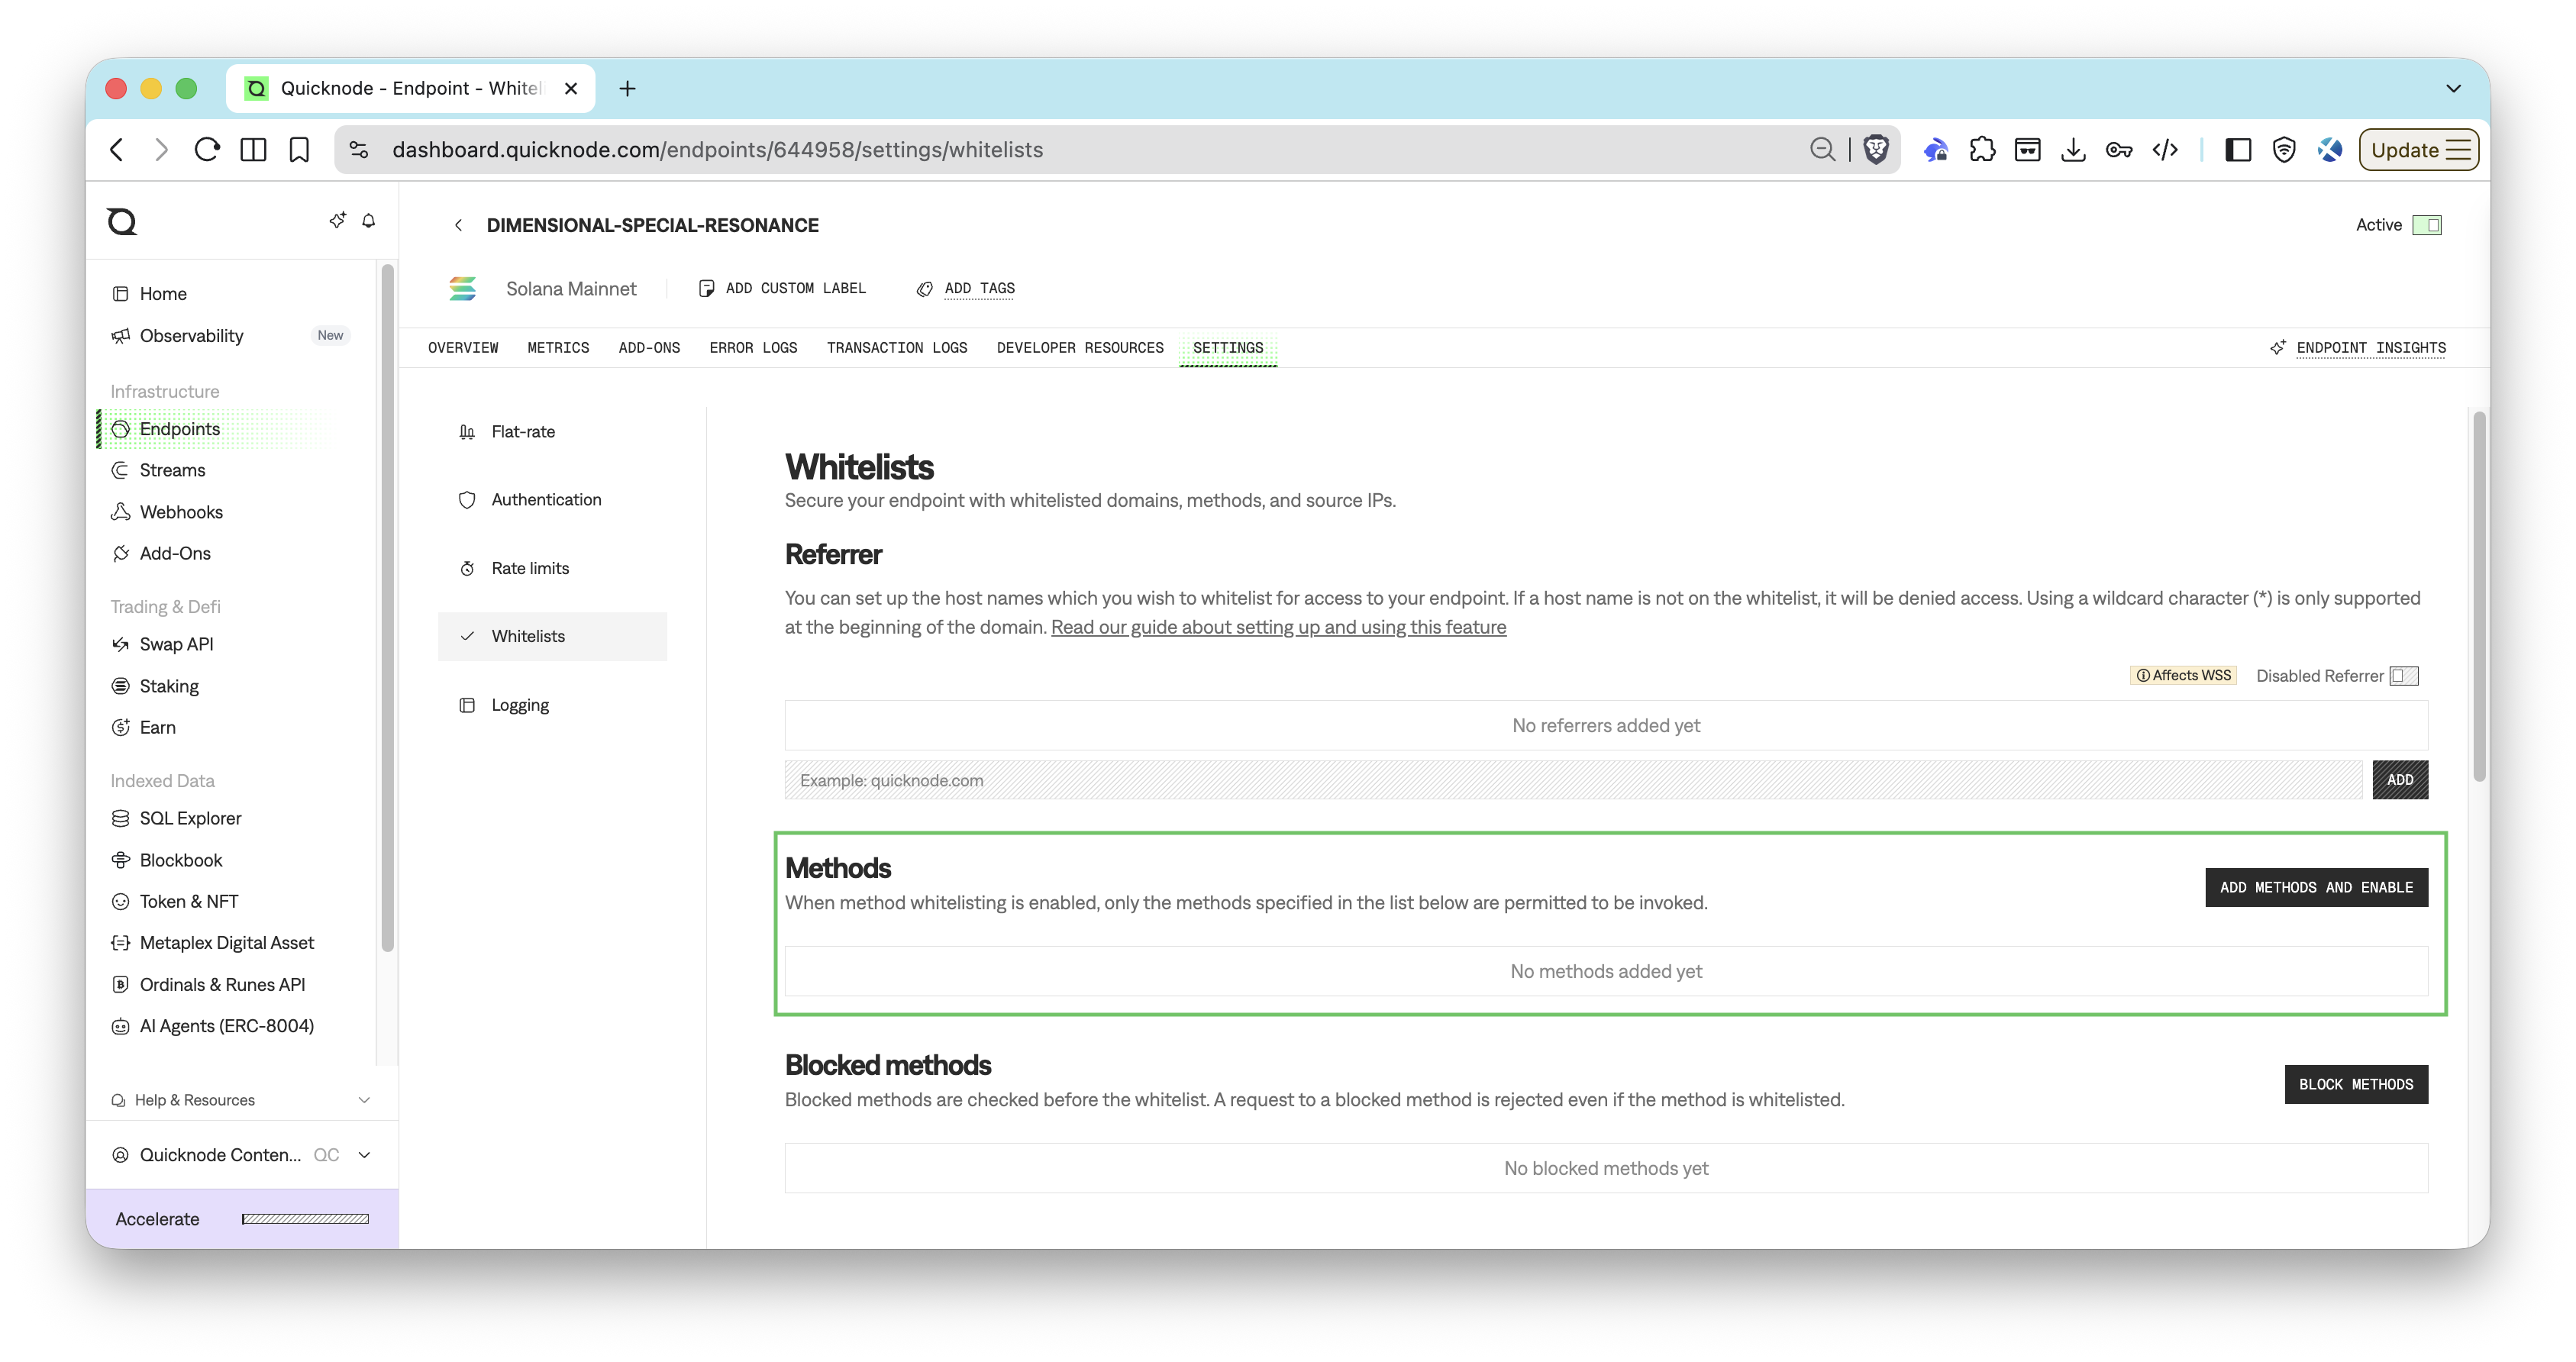
After you have saved your method restrictions, you can test your endpoint by making a request to a method that is not whitelisted. You should receive an error response indicating that the method is not allowed.
For example, this request:
curl https://your-endpoint.solana-mainnet.quiknode.pro/123/ \
  -X POST  \
  -H "Content-Type: application/json"  \
  --data '{"jsonrpc":"2.0","id":1, "method":"getSlot"}'
Should return:
{
  "jsonrpc": "2.0",
  "id": 1,
  "error": {
    "code": -32611,
    "message": "rejected due to request filter settings"
  }
}
Method Blocklist
A whitelist allows only the methods you list. A blocklist works the other way. It rejects the methods you list. Use it to turn off a few expensive or unneeded methods, such as debug_traceTransaction.
A blocked method is rejected even when it is on the method whitelist.
In the dashboard, open the endpoint Settings tab, then the Whitelists tab. In the Blocked methods section, click Block Methods and add the methods you want to block. With the Admin API, use PUT /v0/endpoints/{id}/security/method_blacklist. The path uses the name method_blacklist. The call replaces the full list. Send an empty list to clear it.
curl -X PUT 'https://api.quicknode.com/v0/endpoints/{id}/security/method_blacklist' \
  -H 'accept: application/json' \
  -H 'Content-Type: application/json' \
  -H 'x-api-key: YOUR_API_KEY' \
  -d '{"methods": ["debug_traceTransaction", "trace_block"]}'
Use GET on the same path to read the current list.
After changes are applied, a request for a blocked method returns:
{
  "jsonrpc": "2.0",
  "id": 1,
  "error": {
    "code": -32618,
    "message": "rejected due to method blacklist"
  }
}
- Pros: Easy to implement/modify
- Cons: Does not cover methods you forget to list
Block Range Limits
Some methods, such as eth_getLogs, scan a range of blocks. A wide range is slow and costly. A block range limit sets the largest range a method accepts on your endpoint.
A limit only lowers the default range of your plan.
In the dashboard, open the endpoint Settings tab, then the Rate limits tab. In the Block range limits section, select a method, enter the Max blocks value, and click Add. With the Admin API, use PUT /v0/endpoints/{id}/security/range_limits. The call replaces the full map of limits. Send an empty map to clear it.
curl -X PUT 'https://api.quicknode.com/v0/endpoints/{id}/security/range_limits' \
  -H 'accept: application/json' \
  -H 'Content-Type: application/json' \
  -H 'x-api-key: YOUR_API_KEY' \
  -d '{"limits": {"eth_getLogs": 1000}}'
GET on the same path returns the current limits and a supported_methods list. The list shows which methods can take a limit on the chain of your endpoint.
After changes are applied, a request with a range wider than the limit is rejected. For example, with a limit of 10 blocks, an eth_getLogs request for 100 blocks returns:
{
  "jsonrpc": "2.0",
  "id": 1,
  "error": {
    "code": -32614,
    "message": "eth_getLogs is limited to a 10 range"
  }
}
- Pros: Easy to implement/modify, Caps the cost of range queries
- Cons: Applies only to methods that take a block range
Request Filters
A method whitelist checks only the method name. Request filters check the JSON-RPC request body. A request passes if it matches at least one filter. The method whitelist is one kind of request filter.
Custom request filters match a pattern against the request body. Custom request filters are available on the Enterprise plan.
With the Admin API, use POST /v0/endpoints/{id}/security/request_filters. Send method for a method whitelist, or pattern for a custom filter. Send one of them, not both.
curl -X POST 'https://api.quicknode.com/v0/endpoints/{id}/security/request_filters' \
  -H 'accept: application/json' \
  -H 'Content-Type: application/json' \
  -H 'x-api-key: YOUR_API_KEY' \
  -d '{"method": ["eth_blockNumber", "eth_getBalance"]}'
A request that matches no filter returns rejected due to request filter settings, the same error as in the method whitelist example above. On an account without Enterprise access, a pattern request returns Request filters are not available for this account.
The pattern field takes a Quamina pattern object. Use GET on the same path to list filters. Use PUT or DELETE on /v0/endpoints/{id}/security/request_filters/{request_filter_id} to change or remove one. The requestFilters option in PATCH /v0/endpoints/{id}/security_options turns request filters on or off.
- Pros: Precise control over what a request can contain
- Cons: Needs knowledge of the JSON-RPC request format, Enterprise plan for custom filters
Domain Whitelisting
Domain whitelisting (also known as Referrer whitelisting) restricts access based on the website making the request. This is specifically designed for browser-based applications, where requests include a referrer indicating the originating website. Quicknode allows you to whitelist multiple referrers for any of your endpoints directly from your Quicknode dashboard.
By whitelisting myapp.com, you ensure that your endpoint works when called from your website, but fails if someone tries to use it from another website.
Note that domain whitelisting is not fully secure. While it stops unauthorized websites from using your key, attackers can easily bypass this by faking their domain using scripts. Use this as a basic layer of protection, but do not rely on it as your only security measure.
Whitelisting Domains
Go to your Quicknode Dashboard and select the endpoint you want to apply whitelists to. Under the Settings tab, click the Whitelists tab and find the Referrer section. Here, you can add domains (without the http:// or https:// prefix) to your whitelist. Enter the domain you want to whitelist and click Add. Your whitelist will be applied immediately. You can easily delete a whitelisted domain by clicking the 🗑️ button next to the domain you want to remove.
Note: You cannot use domain whitelisting if your application connects via WebSockets (WSS).
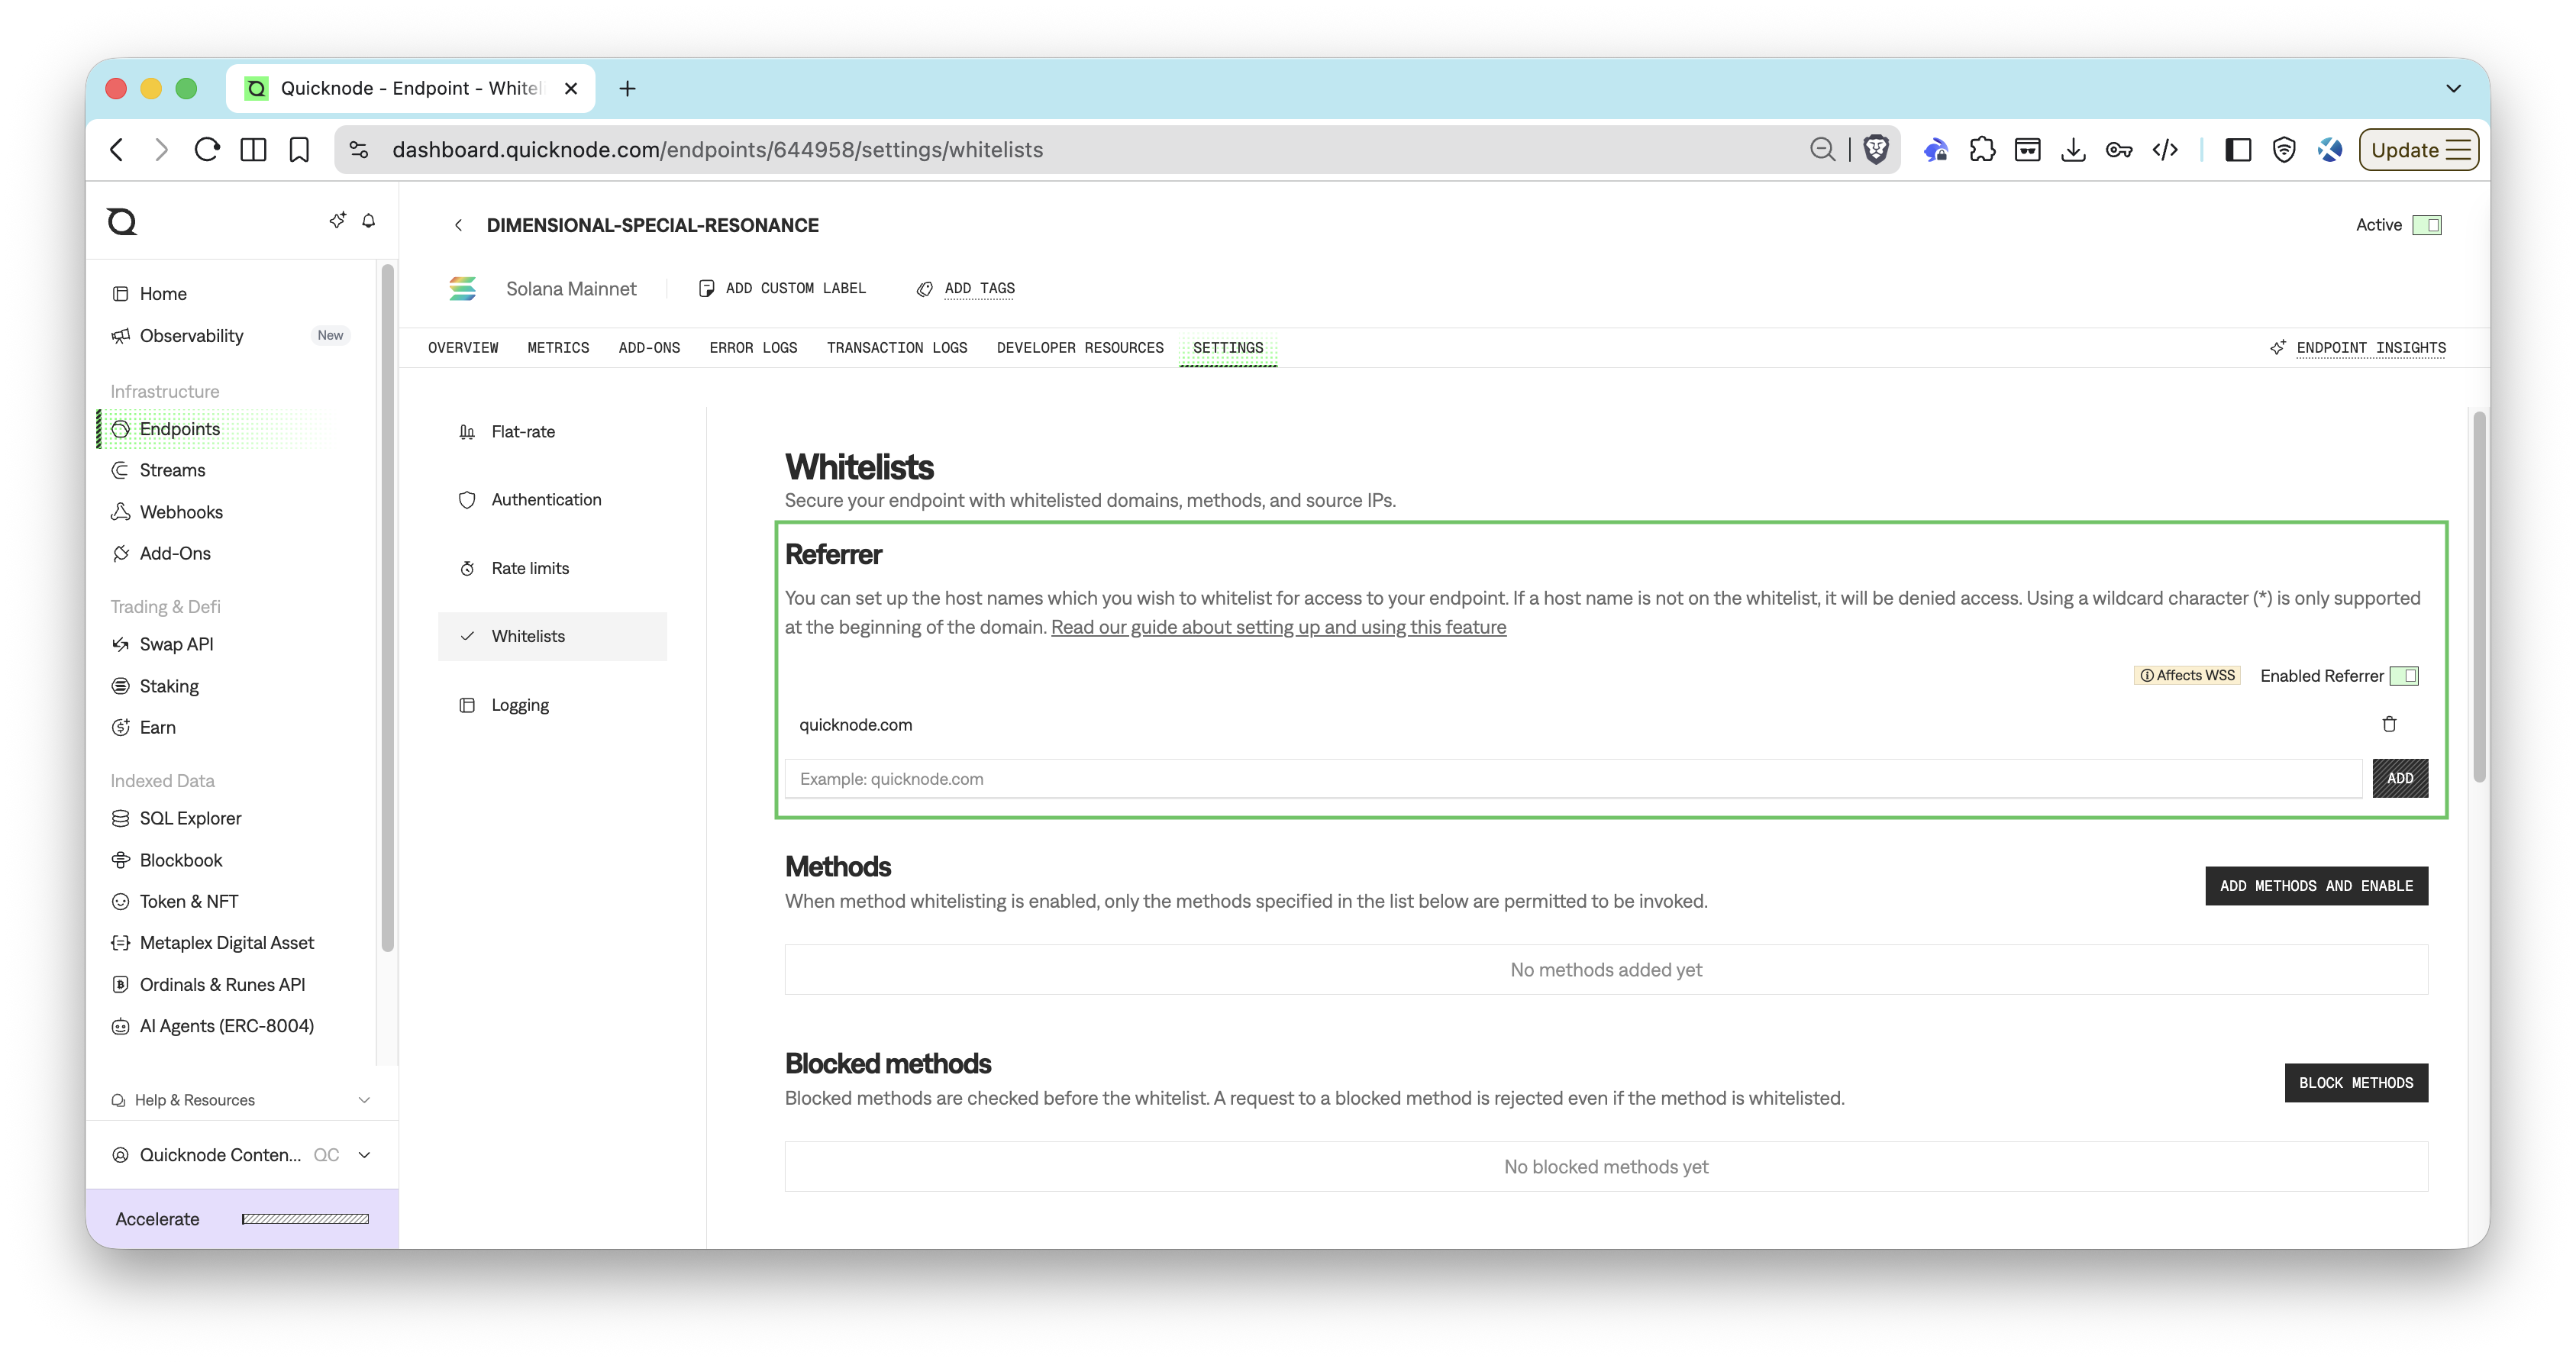
After it's saved, you can test your whitelist by making a request to your endpoint with a cURL script or from a domain that is not whitelisted. You should receive an UNAUTHORIZED response.
For example, this request:
curl https://your-endpoint.solana-mainnet.quiknode.pro/123/ \
  -X POST \
  -H "Content-Type: application/json" \
  --data '{"jsonrpc":"2.0","id":1, "method":"getBlock"}'
Should now return:
{
    "error":"UNAUTHORIZED",
    "instance":"your-endpoint",
    "request-id":""
}
- Pros: Easy to implement/modify
- Cons: Limited effectiveness
For more information on how to whitelist domains, check out our Guide: How to setup referrer whitelist with Quicknode.
IP Whitelisting
IP Whitelisting is one of the strongest security controls available especially for backend infrastructure. It restricts endpoint access to specific IP addresses. When enabled, only requests from whitelisted IPs will be accepted and all others will be denied. You can add up to 25 IP addresses to your whitelist.
If you are running a Backend Proxy (as described above), a trading bot, or a server-side indexer, your server likely has a static IP address. By whitelisting this IP, even if an attacker steals the key, they cannot use it because they aren't sending requests from the whitelisted IP.
IP whitelisting is not suitable for front-end applications where users access your dApp from browsers. End users have dynamic IP addresses that change frequently (home networks, mobile devices, VPNs), making it impossible to whitelist all potential user IPs.
Whitelisting IPs
Go to your Quicknode Dashboard and select the endpoint you want to apply whitelists to. Under the Settings tab, click the Whitelists tab and find the IP filtering section. Here, you can turn on the IP filtering switch and add IP addresses to the Source IP whitelist. Enter the IP address you want to whitelist and click Add. Your whitelist will be applied immediately. You can easily delete a whitelisted IP by clicking the 🗑️ button next to the IP you want to remove.
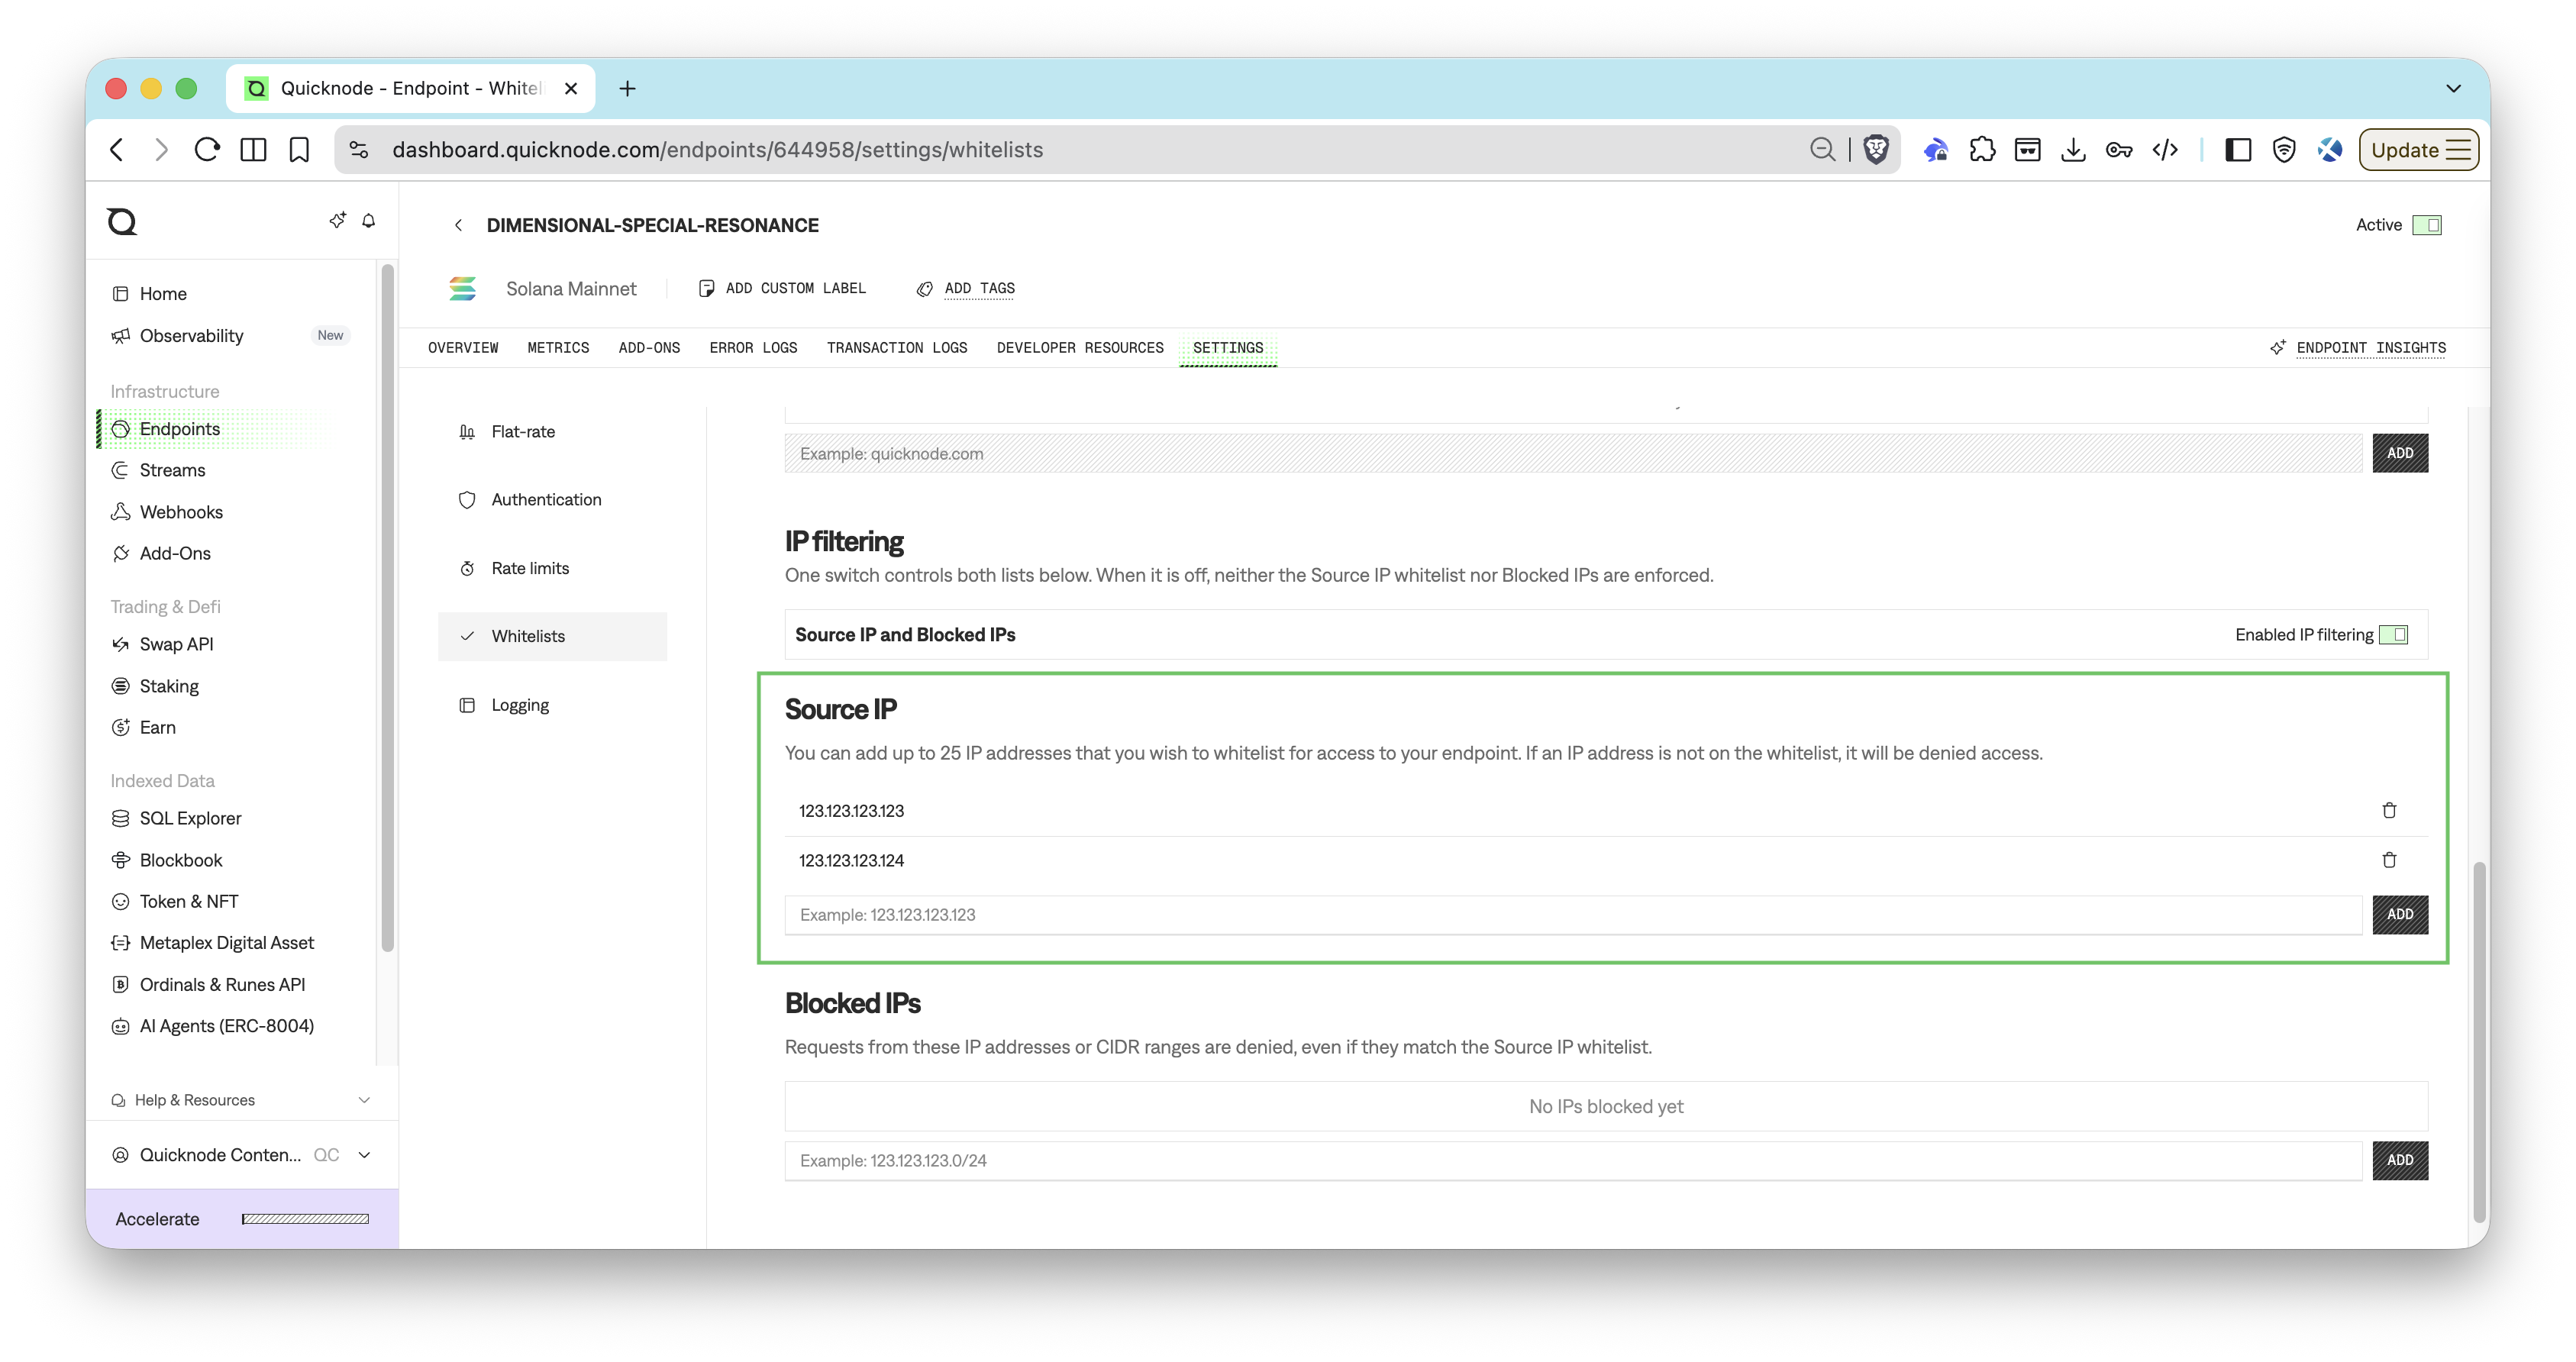
After it's saved, any request from an IP address not on the whitelist will be denied access to your endpoint.
For example, this request:
curl https://your-endpoint.solana-mainnet.quiknode.pro/123/ \
  -X POST \
  -H "Content-Type: application/json" \
  --data '{"jsonrpc":"2.0","id":1, "method":"getBlock"}'
Should now return:
{
  "error": "UNAUTHORIZED",
  "instance":"your-endpoint",
  "request-id": ""
}
- Pros: Highly effective, Simple to configure, Strong access control
- Cons: Only suitable for static IP environments, Not practical for end-user facing applications, Requires updating when IPs change
Blocked IPs
A whitelist is not a good fit for a public application. You cannot list every user. Blocked IPs solve a different problem. You find one abusive client and you block that address or a CIDR range.
A blocked IP is rejected even when it is on the IP whitelist. The IP filtering switch controls both the Source IP whitelist and Blocked IPs. When the switch is off, neither list is enforced. In the Admin API, this switch is the ips security option.
In the dashboard, open the endpoint Settings tab, then the Whitelists tab. In the Blocked IPs section, enter the IP address or CIDR range you want to block and click Add. With the Admin API, use POST /v0/endpoints/{id}/security/blocked_ips.
curl -X POST 'https://api.quicknode.com/v0/endpoints/{id}/security/blocked_ips' \
  -H 'accept: application/json' \
  -H 'Content-Type: application/json' \
  -H 'x-api-key: YOUR_API_KEY' \
  -d '{"ip": "203.0.113.0/24"}'
The response returns an id for the entry. Use GET on the same path to list blocked IPs. To unblock an address, send DELETE to /v0/endpoints/{id}/security/blocked_ips/{ip_id}.
You do not need a Source IP whitelist to use Blocked IPs. A change can take a few seconds to apply. After that, a request from a blocked IP returns the same response as a request from an IP that is not on the whitelist:
{
  "error": "UNAUTHORIZED",
  "instance": "your-endpoint",
  "request-id": ""
}
- Pros: Easy to implement/modify, Stops one abusive client without a full whitelist
- Cons: Reactive, an attacker can change IP address
JSON Web Tokens (JWT)
JSON Web Tokens (JWT) are a popular method for securing APIs. They are an open standard (RFC 7519) that defines a compact and self-contained way for securely transmitting information between parties as a JSON object. JWTs can be signed using a secret (with the HMAC algorithm) or a public/private key pair using RSA or ECDSA. JWTs are commonly used for authentication and information exchange in web applications and APIs.
JWTs prevent unauthorized access by verifying the integrity of the information contained within the token. This is accomplished by signing a duration-limited token with a secret or a public/private key pair. Requests received without a token or with an invalid token (either because it has expired or was not signed with the correct secret) will be rejected.
Implementing JWTs
Here's a simple example of how to implement JWTs in your application (for a more detailed walkthrough, check out our Guide: How to Implement JWT Authorization with Quicknode):
- Key Generation: Generate a public/private key pair using RSA or ECDSA. Example:
const { generateKeyPairSync } = require('crypto');
var jwt = require('jsonwebtoken');

// Generate RSA keys
const { publicKey, privateKey } = generateKeyPairSync('rsa', {
    modulusLength: 2048,
    publicKeyEncoding: {
        type: 'spki',
        format: 'pem'
    },
    privateKeyEncoding: {
        type: 'pkcs8',
        format: 'pem',
    }
});
- Define Key: Add your public key to your Quicknode dashboard (Settings Tab, Authentication Section).
- Token Generation: Generate a limited duration JWT using your private key (e.g., 60 seconds for handling a transaction request). Example:
const app = express();
const jwt = require("jsonwebtoken");

app.get('/get_token', (req, res) => { // endpoint to retrieve JWT
  const privateKey = process.env.PRIVATE_KEY;
  var token = jwt.sign({}, privateKey, {
    algorithm: 'RS256', // RSA signature with SHA-256
    expiresIn: "60000"  // 60 seconds
  });
  return res.json({ token: token }); // return an object containing the signed JWT
});
- Use the Token: Include the JWT in requests to your Quicknode endpoint. Example:
import { createSolanaRpcFromTransport, createDefaultRpcTransport } from '@solana/kit';

async function makeRequest() {
    const response = await fetch('/get_token'); // fetch JWT from your token service
    const { token } = await response.json();

    // Create a transport with the Authorization header
    const transport = createDefaultRpcTransport({
        url: 'https://example.solana-devnet.quiknode.pro/12345/',
        headers: {
            Authorization: `Bearer ${token}`
        }
    });

    // Create the RPC client using the transport
    const rpc = createSolanaRpcFromTransport(transport);

    // Make RPC calls
    const slot = await rpc.getSlot().send();
    // do something with the slot
}

makeRequest();
- Token Verification: When we receive the request, we can verify the token using the public key you added to your Quicknode dashboard. This will ensure the token is valid and has not been tampered with.
Best Practices
- Key Management: Securely manage and regularly rotate cryptographic keys.
- Token Expiration: Set appropriate token expiration times to reduce the risk of token misuse.
- Pros: Secure, Scalable, Adaptable
- Cons: Codebase Complexity (additional server-side code and key management)
Wrap Up
Practicing good endpoint security is crucial for protecting your endpoint from unauthorized access and abuse. By implementing the strategies outlined in this guide whether you're building front-end dApps or backend services, you can significantly reduce the risk of unauthorized access to your endpoint.
If you are stuck or have questions, drop them in our Discord. Stay up to date with the latest by following us on X (@Quicknode) or our Telegram announcement channel.