
23 min read
Overview
Your dev endpoint runs on Ethereum Sepolia. Staging needs the same setup, plus Base Sepolia. If you create both in the dashboard, you repeat every setting by hand, and the next change can leave the two environments out of sync. Your team has no diff to review before a change goes live, and rebuilding a lost setup means clicking through it all again.
Terraform removes that work by turning your setup into code. You describe what you want in configuration files. Terraform compares the files with what exists, shows the difference, and applies only the changes you approve. A provider is the plugin that connects Terraform to one service. The Quicknode Terraform provider connects it to your Quicknode account, so an endpoint, a rate limit, or a Stream becomes a few lines in a file.
This guide shows how to manage Quicknode infrastructure as code with that provider. You get three things the dashboard does not give you:
- Version control. Your files live in Git, so every change has an author, a date, and a history you can revert.
- Collaboration. Teammates review a plan in a pull request before anything changes.
- Reproducibility. One configuration builds the same setup for dev, staging, or a replacement.
The examples use testnets. Every file lives in the qn-guide-examples repository, in numbered folders (01-first-endpoint through 09-ci) that match the sections below. Each section shows the key part of a file and links to the full file, so you can work through one folder without changing the others.
- Manage Quicknode endpoints, security rules, rate limits, Streams, and Key-Value Store lists as Terraform code, with version control, team review, and repeatable setups.
- Create an Ethereum Sepolia endpoint from a file, and read the plan before you apply it.
- Reuse one module for dev and staging. Each environment chooses its own networks and keeps its own state.
- Adopt dashboard endpoints with
import, keep state in an encrypted remote backend, and runterraform planon every pull request.
What You Will Learn
- Change a Quicknode endpoint by editing a file, and read the plan before it applies.
- Build dev and staging from one module, each with separate state.
- Put security rules, rate limits, and a Streams watchlist through pull request review.
- Adopt an endpoint you already run without rebuilding it.
- Share state and run plans on pull requests as a team.
What You Will Need
- A Quicknode account on a paid plan, and a Quicknode API key. The provider uses this key to manage your resources.
- Terraform 1.13 or later. The next section covers installation.
- The example files from GitHub. You can download them as a ZIP file, so Git is optional. See Get the Example Files.
openssl, to create a key pair for JSON Web Token (JWT) rules if you follow the security section.- A URL that can receive POST requests, if you follow the Streams section. A free test receiver such as webhook.site gives you one.
- An S3 bucket and AWS credentials that can read and write it, if you follow the state sharing section.
Create Your First Quicknode Endpoint with Terraform
Start with one endpoint so you can see the whole Terraform cycle before you add environments. Every later section repeats this cycle: write a file, read the plan, apply it, and let Terraform record the result.
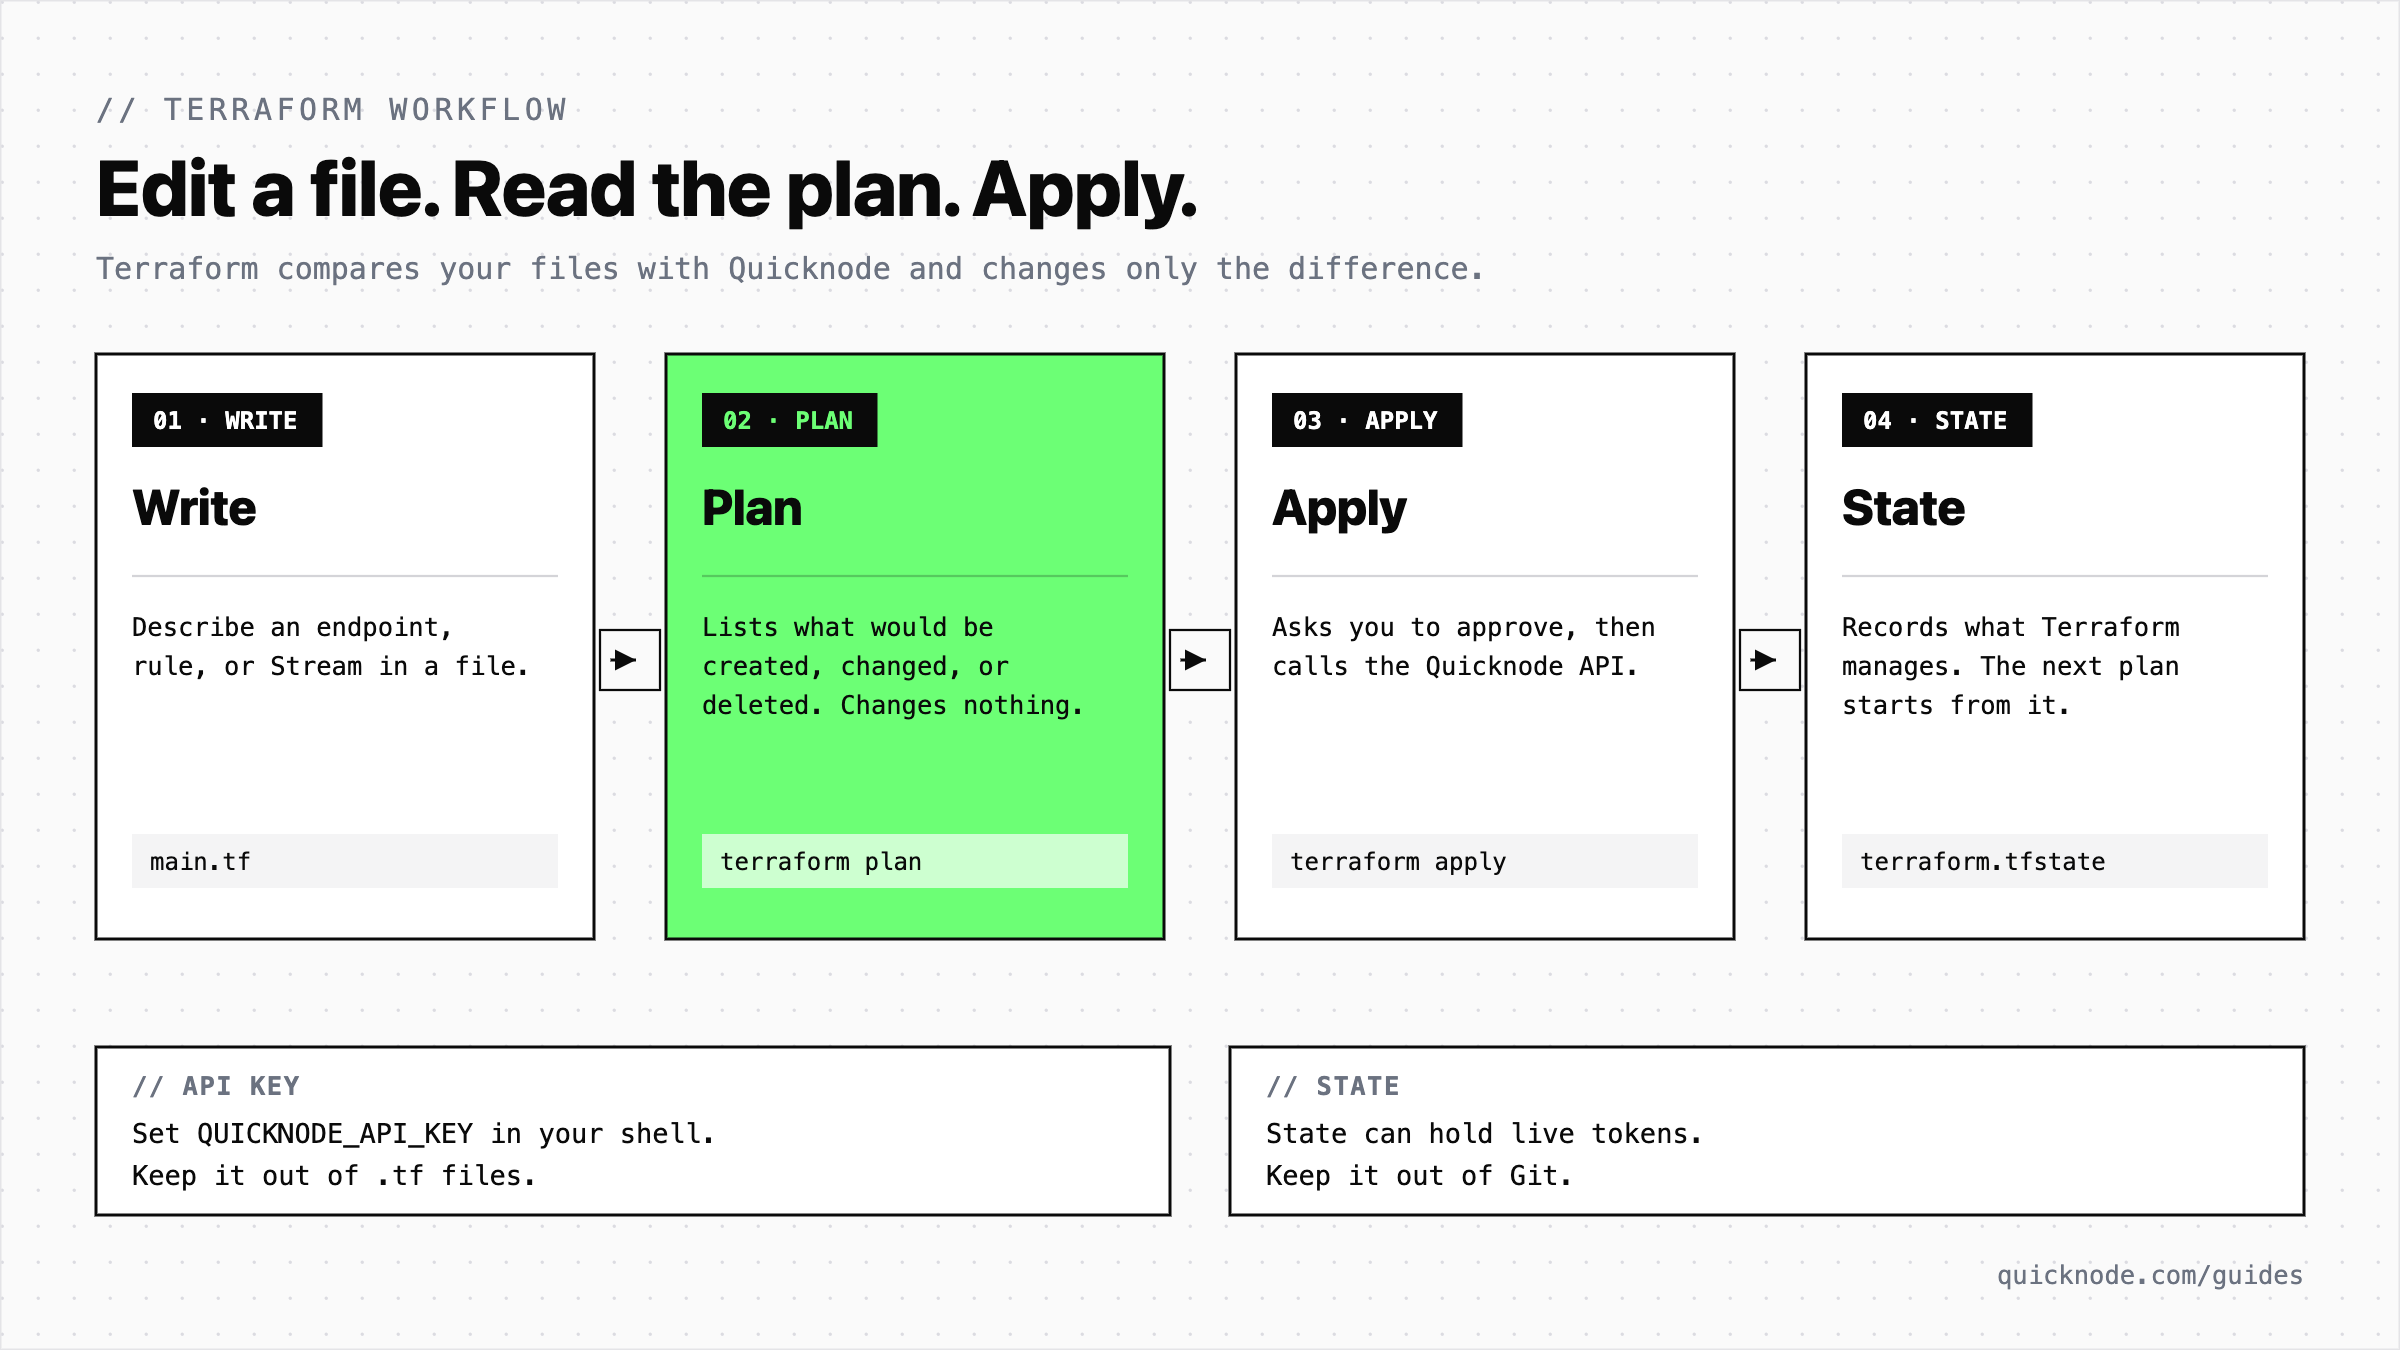
The first example creates an Ethereum Sepolia endpoint, prints a URL without its token, and keeps the working URL sensitive.
Install Terraform
Terraform is a single command-line tool. On macOS, install it with Homebrew and check the version:
brew tap hashicorp/tap
brew install hashicorp/tap/terraform
terraform version
On Linux or Windows, follow HashiCorp's install guide. The version must be 1.13 or later.
Set Your API Key
The provider reads your API key from the QUICKNODE_API_KEY environment variable, so the key never appears in a Terraform file. Prompt for the key instead of typing it into a command. That keeps it out of your shell history:
printf 'Quicknode API key: '
# The -s flag hides the key as you paste it.
read -rs QUICKNODE_API_KEY
printf '\n'
# Make the variable available to Terraform in this terminal session.
export QUICKNODE_API_KEY
The variable lasts for this terminal session only, so run the prompt again in each new session. You can create a key on the API keys page of your dashboard.
Get the Example Files
Every example in this guide lives in one GitHub repository. Pick the way that suits you:
-
Download a ZIP file. Download the repository, unzip it, and open the
terraform/quicknode-terraform-providerfolder. Git is not required. -
Clone with Git. If you prefer Git, run:
git clone https://github.com/quiknode-labs/qn-guide-examples.gitcd qn-guide-examples/terraform/quicknode-terraform-provider -
Type the files yourself. For the first example, create an empty folder and copy the two files from the next section. The later examples have more files, so download those.
The numbered folders, such as 01-first-endpoint, sit inside quicknode-terraform-provider. Each cd command in this guide starts from that folder.
Define the Endpoint
Terraform reads every .tf file in a folder. If you downloaded or cloned the examples, 01-first-endpoint already has both files below, so read them and change nothing. If you type the files yourself, create them in an empty folder.
In versions.tf, select the provider and its version:
terraform {
  required_version = ">= 1.13"
  required_providers {
    quicknode = {
      source  = "quicknode/quicknode"
      version = "~> 0.4"
    }
  }
}

provider "quicknode" {}
A Terraform data source reads information without creating a resource. In main.tf, quicknode_chains supplies valid chain and network names, so you don't guess them. The configuration selects Sepolia from that list, then creates the endpoint. The provider requires status and multichain.
data "quicknode_chains" "all" {}

locals {
  ethereum = one([for c in data.quicknode_chains.all.chains : c if c.slug == "eth"])
  sepolia  = one([for n in local.ethereum.networks : n if n.slug == "ethereum-sepolia"])
}

resource "quicknode_endpoint" "dev" {
  chain      = local.ethereum.slug
  network    = local.sepolia.slug
  label      = "example-dev"
  status     = "active"
  multichain = false
  tags       = ["example"]
}
Plan and Apply the Endpoint
Move into the example folder, then run the three Terraform commands:
# Run this from quicknode-terraform-provider. Skip the cd if you typed the files in your own folder.
cd 01-first-endpoint
terraform init
terraform plan
terraform apply
init downloads the provider. plan lists what Terraform would create, change, or delete, and it changes nothing, so read it before you continue. For this file, the plan ends with one resource to add:
Terraform will perform the following actions:

  # data.quicknode_endpoint_urls.dev will be read during apply
  # (config refers to values not yet known)
 <= data "quicknode_endpoint_urls" "dev" {
      + endpoint_id                = (known after apply)
      + http_url_with_token        = (sensitive value)
      + multichain_urls_with_token = (sensitive value)
      + safe_http_url              = (known after apply)
      + safe_multichain_urls       = (known after apply)
      + safe_wss_url               = (known after apply)
      + wss_url_with_token         = (sensitive value)
    }

  # quicknode_endpoint.dev will be created
  + resource "quicknode_endpoint" "dev" {
      + chain            = "eth"
      + id               = (known after apply)
      + label            = "example-dev"
      + multichain       = false
      + network          = "ethereum-sepolia"
      + safe_http_url    = (known after apply)
      + safe_wss_url     = (known after apply)
      + security_options = (known after apply)
      + status           = "active"
      + tags             = [
          + "example",
        ]
    }

Plan: 1 to add, 0 to change, 0 to destroy.
apply shows the plan again and waits for you to type yes. Terraform then creates the endpoint and records it in state, its record of the live resources it manages.
When the apply finishes, Terraform prints the outputs and keeps the working URL hidden:
Apply complete! Resources: 1 added, 0 changed, 0 destroyed.

Outputs:

chain_id = 11155111
endpoint_id = "123456"
http_url_with_token = <sensitive>
safe_http_url = "https://your-endpoint-name.ethereum-sepolia.quiknode.pro/REPLACE_WITH_TOKEN/"
The chain_id and endpoint_id outputs come from the full main.tf file. Your endpoint ID and name differ.
Run terraform plan again to check the result. With nothing left to change, it reports:
No changes. Your infrastructure matches the configuration.
Read the Endpoint URL
The example has two URL outputs. safe_http_url replaces the token with REPLACE_WITH_TOKEN, so you can print it and commit it. The quicknode_endpoint_urls data source returns the URL with its token. Mark that output sensitive = true, and Terraform hides it in terminal output:
output "safe_http_url" {
  value = quicknode_endpoint.dev.safe_http_url
}

data "quicknode_endpoint_urls" "dev" {
  endpoint_id = quicknode_endpoint.dev.id
}

output "http_url_with_token" {
  value     = data.quicknode_endpoint_urls.dev.http_url_with_token
  sensitive = true
}
To use the URL, read it with -raw and send a request:
curl -s -X POST "$(terraform output -raw http_url_with_token)" \
  -H 'content-type: application/json' \
  -d '{"jsonrpc":"2.0","id":1,"method":"eth_blockNumber","params":[]}'
The endpoint answers with the latest block number. Treat the printed URL like a password. Terraform stores the token in state in plain text, so never commit terraform.tfstate. The state sharing section shows where to keep it instead.
Manage Dev and Staging Endpoints with One Terraform Module
Your first endpoint is in code. Now staging needs the same setup without a copied and edited endpoint block. A module is a reusable group of Terraform files. One module creates endpoints the same way in every environment, while each environment chooses its networks and keeps its own state.
This example lives in 02-environments. If you downloaded the files, you already have it, so open the files as you read. Applying it creates dev and staging endpoints. It does not take over the endpoint from the first example.
The folder holds one shared module and one folder per environment:
02-environments/
├── modules/quicknode-env/
│   ├── main.tf               # the endpoint resource, created with for_each
│   ├── variables.tf          # inputs: the environment name and the endpoint map
│   ├── outputs.tf            # the IDs and URLs of the endpoints
│   └── versions.tf           # the provider version
└── envs/
    ├── dev/
    │   ├── main.tf           # calls the module with this environment's endpoint map
    │   ├── terraform.tfvars  # the networks for dev
    │   └── versions.tf       # the provider setup and Terraform version
    └── staging/              # the same three files, with the staging networks
Terraform keeps state in the folder where you run it, so envs/dev and envs/staging each have their own.
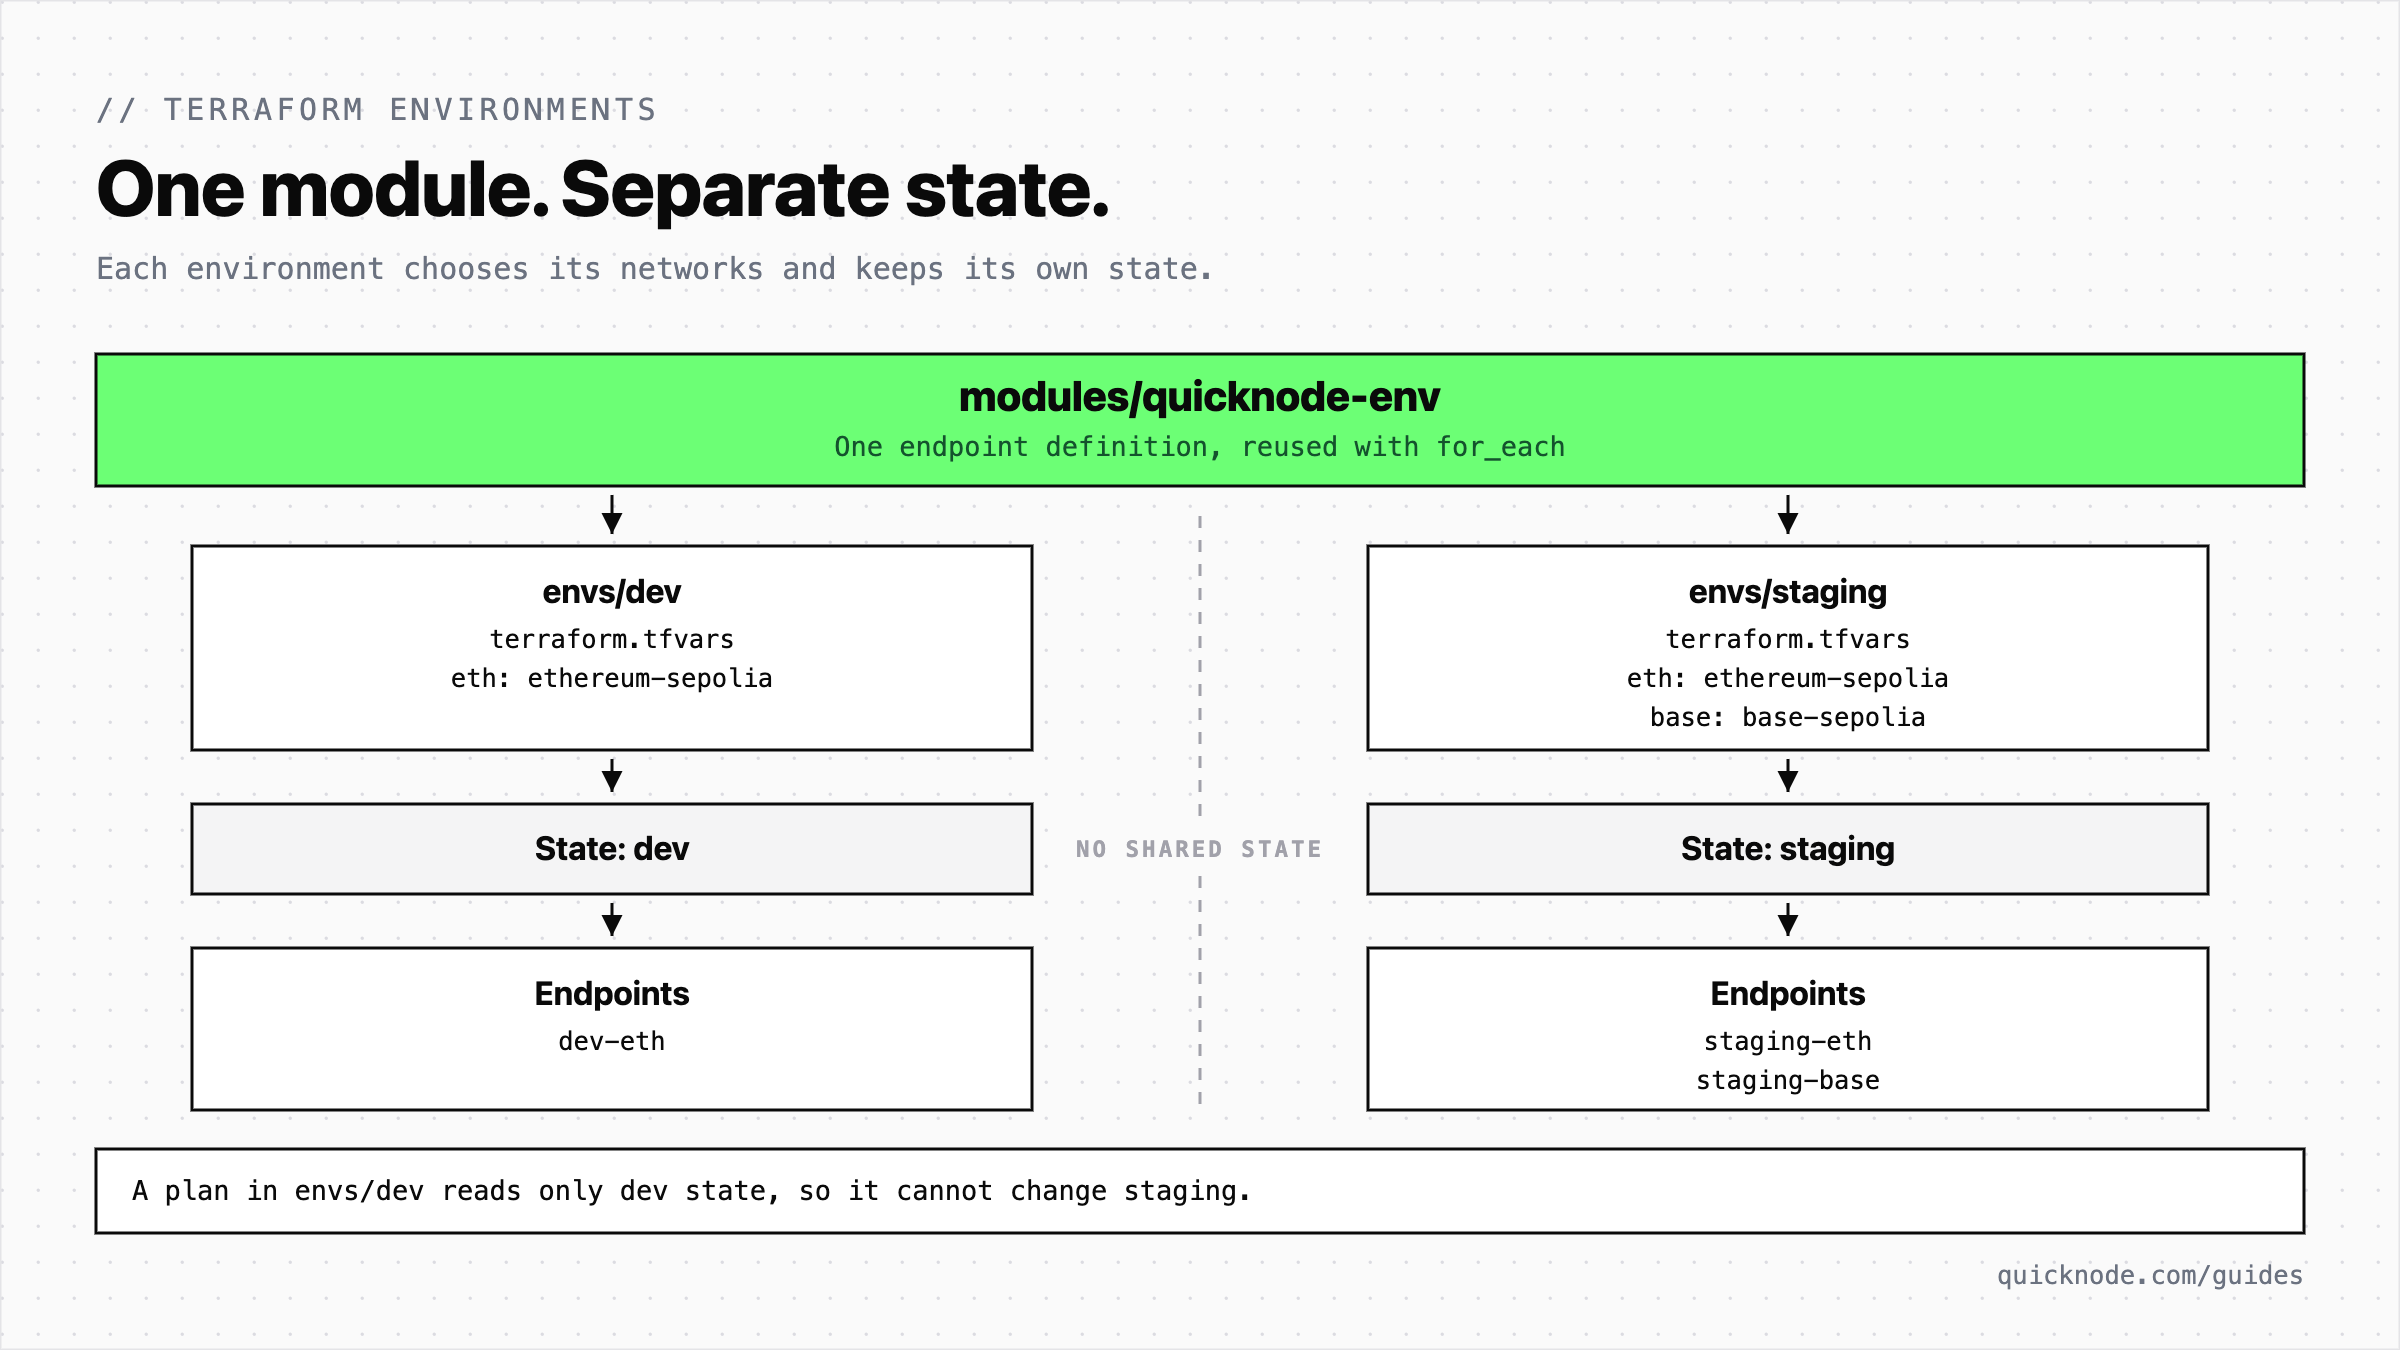
Dev needs Ethereum Sepolia. Staging needs Ethereum Sepolia and Base Sepolia. These terraform.tfvars files hold that whole difference:
endpoints = {
  eth = { chain = "eth", network = "ethereum-sepolia" }
}
endpoints = {
  eth  = { chain = "eth", network = "ethereum-sepolia" }
  base = { chain = "base", network = "base-sepolia" }
}
Each environment's main.tf passes its map to the same module. For dev, the call is:
module "quicknode" {
  source      = "../../modules/quicknode-env"
  environment = "dev"
  endpoints   = var.endpoints
}
In modules/quicknode-env/main.tf, for_each creates one endpoint per map entry. The short map key, such as eth or base, gives each endpoint a stable Terraform address. Labels follow the pattern <environment>-<key>, so you get dev-eth and staging-base.
resource "quicknode_endpoint" "this" {
  for_each = var.endpoints

  chain      = each.value.chain
  network    = each.value.network
  label      = "${var.environment}-${each.key}"
  status     = "active"
  multichain = false
  tags       = ["example", var.environment]
}
Create dev first:
# Run this from quicknode-terraform-provider.
cd 02-environments/envs/dev
terraform init
terraform plan
terraform apply
Then run the same commands in 02-environments/envs/staging. Each environment folder is a separate Terraform root, the folder where you run Terraform and keep its state. A plan in envs/dev therefore cannot include staging resources.
To see the payoff, add one line to the staging map:
arb = { chain = "arb", network = "arbitrum-sepolia" }
The staging plan shows one endpoint to add, and dev stays unchanged. Removing eth instead plans one deletion and leaves base alone, because each endpoint has its own key. The full dev files and staging files include the variables and outputs omitted here.
Secure a Quicknode Endpoint with Tokens, IP Allowlists, Referrers, and JWTs
Quicknode secures an endpoint with access rules, and each rule limits who can call it. You can issue extra tokens, allow only certain IP addresses or referrers, and require JWTs. The endpoint security best practices guide explains when to use each rule and which plans include it.
In Terraform, each rule is a resource. The example adds IP, referrer, and JWT rules. It also gives an indexer its own token when you set extra_token = true.
Every rule has two parts: an entry (the token, address, referrer, or key) and a switch on the endpoint that tells Quicknode to enforce that rule type. Terraform manages both:
| Rule | Entry resource | Switch in security_options |
|---|---|---|
| Extra token | quicknode_endpoint_token | tokens |
| IP allowlist | quicknode_endpoint_ip | ips |
| Referrer allowlist | quicknode_endpoint_referrer | referrers |
| JWT | quicknode_endpoint_jwt | jwts |
The security configuration declares both parts. The enforce_* variables control the switches, so you can add entries first and turn each switch on when its callers are ready:
resource "quicknode_endpoint" "secure" {
  chain      = "eth"
  network    = "ethereum-sepolia"
  label      = "example-secure"
  status     = "active"
  multichain = false
  tags       = ["example", "security"]

  security_options = {
    tokens    = true
    ips       = var.enforce_ips
    referrers = var.enforce_referrers
    jwts      = var.enforce_jwt
  }
}

resource "quicknode_endpoint_token" "indexer" {
  count       = var.extra_token ? 1 : 0
  endpoint_id = quicknode_endpoint.secure.id
}

resource "quicknode_endpoint_ip" "allowed" {
  for_each    = toset(var.allowed_ips)
  endpoint_id = quicknode_endpoint.secure.id
  ip          = each.value
}

resource "quicknode_endpoint_referrer" "app" {
  endpoint_id = quicknode_endpoint.secure.id
  referrer    = "https://app.example.com"
}

resource "quicknode_endpoint_jwt" "signer" {
  endpoint_id = quicknode_endpoint.secure.id
  name        = "example-signer"
  kid         = "example-kid-1"
  public_key  = file("${path.module}/jwt.pub.pem")
}
The JWT rule reads a public key from jwt.pub.pem in the 03-security folder, so create a key pair there before you run Terraform:
# Run this from quicknode-terraform-provider.
cd 03-security
openssl genpkey -algorithm RSA -out jwt.key -pkeyopt rsa_keygen_bits:2048
openssl rsa -pubout -in jwt.key -out jwt.pub.pem
Keep jwt.key private and out of Git. Terraform reads only jwt.pub.pem. Then create the endpoint and its rules in the same folder:
terraform init
terraform plan
terraform apply
Roll the rules out in two steps. First add the entries, which the first apply above does. Then turn on each switch when its callers are ready. An entry does nothing while its switch is off, and Terraform warns you about it. Rules combine, so a caller must pass every rule you enable. With the IP, referrer, and JWT rules all on, a call that misses any one of them gets HTTP 401 with UNAUTHORIZED. A changed rule takes a few seconds to take effect after apply.
To turn on a switch, add its variable to a terraform.tfvars file in 03-security, such as enforce_referrers = true, and run terraform apply again. Terraform loads that file by itself.
When ips is on, Quicknode rejects every address that is not on the list, including yours. Set allowed_ips in terraform.tfvars to the addresses that call the endpoint, then set enforce_ips = true.
Three details help when you use the other rules:
- Extra token. Set
extra_token = trueinterraform.tfvarsto give the indexer its own token. Its URL comes from the token resource, so mark any output that uses itsensitive. To revoke only that token later, set the variable back tofalse. The primary token keeps working, and the revoked token can still answer for a few seconds. - JWT. Put only the public key in Terraform. The private key stays with the service that signs tokens. The
kidin your token header must match thekidyou set here, or the call gets HTTP 401. - Domain masking. The provider also has a
quicknode_endpoint_domain_maskresource. Follow the domain masking guide if you need that rule.
For the behavior behind each rule, see multi-token authentication, referrer allowlisting, and JWT authorization. The endpoint security best practices guide covers IP allowlists and lists which plans include each rule.
Set Rate Limits and a Request Filter on an Endpoint
A token tells you which client can call an endpoint, but one busy client can still use up your quota. Three controls cover this: a limit for the whole endpoint, a tighter limit for an expensive method such as eth_getLogs, and a request filter that allows only the methods your app needs.
In main.tf, these resources attach to an endpoint named quicknode_endpoint.limited:
resource "quicknode_endpoint_rate_limits" "limited" {
  endpoint_id = quicknode_endpoint.limited.id
  rps         = 5
}

resource "quicknode_endpoint_method_rate_limit" "heavy_reads" {
  endpoint_id = quicknode_endpoint.limited.id
  methods     = ["eth_getLogs"]
  rate        = 2
  interval    = "second"
  enabled     = var.heavy_reads_enabled
}

resource "quicknode_endpoint_request_filter" "read_only" {
  endpoint_id = quicknode_endpoint.limited.id
  methods     = ["eth_blockNumber", "eth_call", "eth_getBalance", "eth_getLogs"]
}
Apply the file from its folder:
# Run this from quicknode-terraform-provider.
cd 04-rate-limits
terraform init
terraform plan
terraform apply
Here is what a caller sees. A call that goes over either rate limit gets HTTP 429. A call to a method outside the filter gets HTTP 401 with the JSON-RPC error -32611. Limits and filters need a few seconds to take effect after apply, so wait a moment before you test.
The filter is also a quick way to give a frontend a read-only endpoint. It allows four read methods, so a call to eth_sendRawTransaction is rejected.
To switch off the method limit without deleting it, set heavy_reads_enabled = false in a terraform.tfvars file in 04-rate-limits and apply the change. Terraform updates the limit in place, and eth_getLogs calls no longer hit it. The endpoint-wide limit still applies. Set the variable back to true to restore the method limit. The method rate limit guide helps you choose limits for your workload.
Manage a Quicknode Stream and Key-Value Store Watchlist with Terraform
Streams sends blockchain data to a destination such as a webhook, and a filter you write decides what to send. Key-Value Store holds lists that a filter can read. Together they let you watch a changing list of addresses.
If that list lives in a dashboard, an address change can bypass review. Instead, manage the watchlist in Key-Value Store through Terraform, and let a Stream filter read it by key. A pull request then shows the exact list change. The Streams documentation covers the rest of the product.
Build it in three parts:
- Create the watchlist in Key-Value Store.
- Write a Stream filter that reads the list by key.
- Create the Stream, which runs the filter and sends matches to a webhook.
The Streams configuration uses the Sepolia block dataset. templatefile inserts the list key into the filter, so the key is defined in one place.
A Stream needs a URL to deliver to. For a test, open webhook.site. It gives you a unique URL and lists each request that arrives. Pass that URL to Terraform through an environment variable:
export TF_VAR_webhook_url="https://webhook.site/YOUR_UNIQUE_ID"
resource "quicknode_kv_list" "watchlist" {
  key   = "example-stream-watchlist"
  items = var.watchlist
}

resource "quicknode_stream" "blocks" {
  name    = "example-blocks"
  network = "ethereum-sepolia"
  dataset = "block"
  region  = "usa_east"
  status  = var.status

  filter_function = templatefile("${path.module}/filter.js.tftpl", {
    list_key = quicknode_kv_list.watchlist.key
  })

  destination = {
    webhook = {
      url = var.webhook_url
    }
  }
}
In filter.js.tftpl, the filter checks each transaction recipient against the list in one batch. Returning null skips delivery for a block with no match.
async function main(stream) {
  const block = stream.data[0];
  const txs = block.transactions;
  if (txs.length === 0) return null;

  const flags = await qnLib.qnContainsListItems(
    '${list_key}',
    txs.map((tx) => tx.to || '')
  );

  const matches = txs.filter((tx, i) => flags[i]).map((tx) => tx.hash);
  if (matches.length === 0) return null;
  return { number: block.number, matches };
}
Apply the configuration from the 05-streams folder, in the terminal where you set TF_VAR_webhook_url:
# Run this from quicknode-terraform-provider.
cd 05-streams
terraform init
terraform plan
terraform apply
The Stream has no start_range, so it starts at the newest block. When a block contains a transaction sent to a watched address, the webhook receives the block number and the matching transaction hashes. See Streams filters with Key-Value Store and webhook destinations for more on the filter and delivery behavior.
Choose Who Owns the List
Terraform offers two ways to manage list items. They differ in what happens to an item that someone adds outside Terraform.
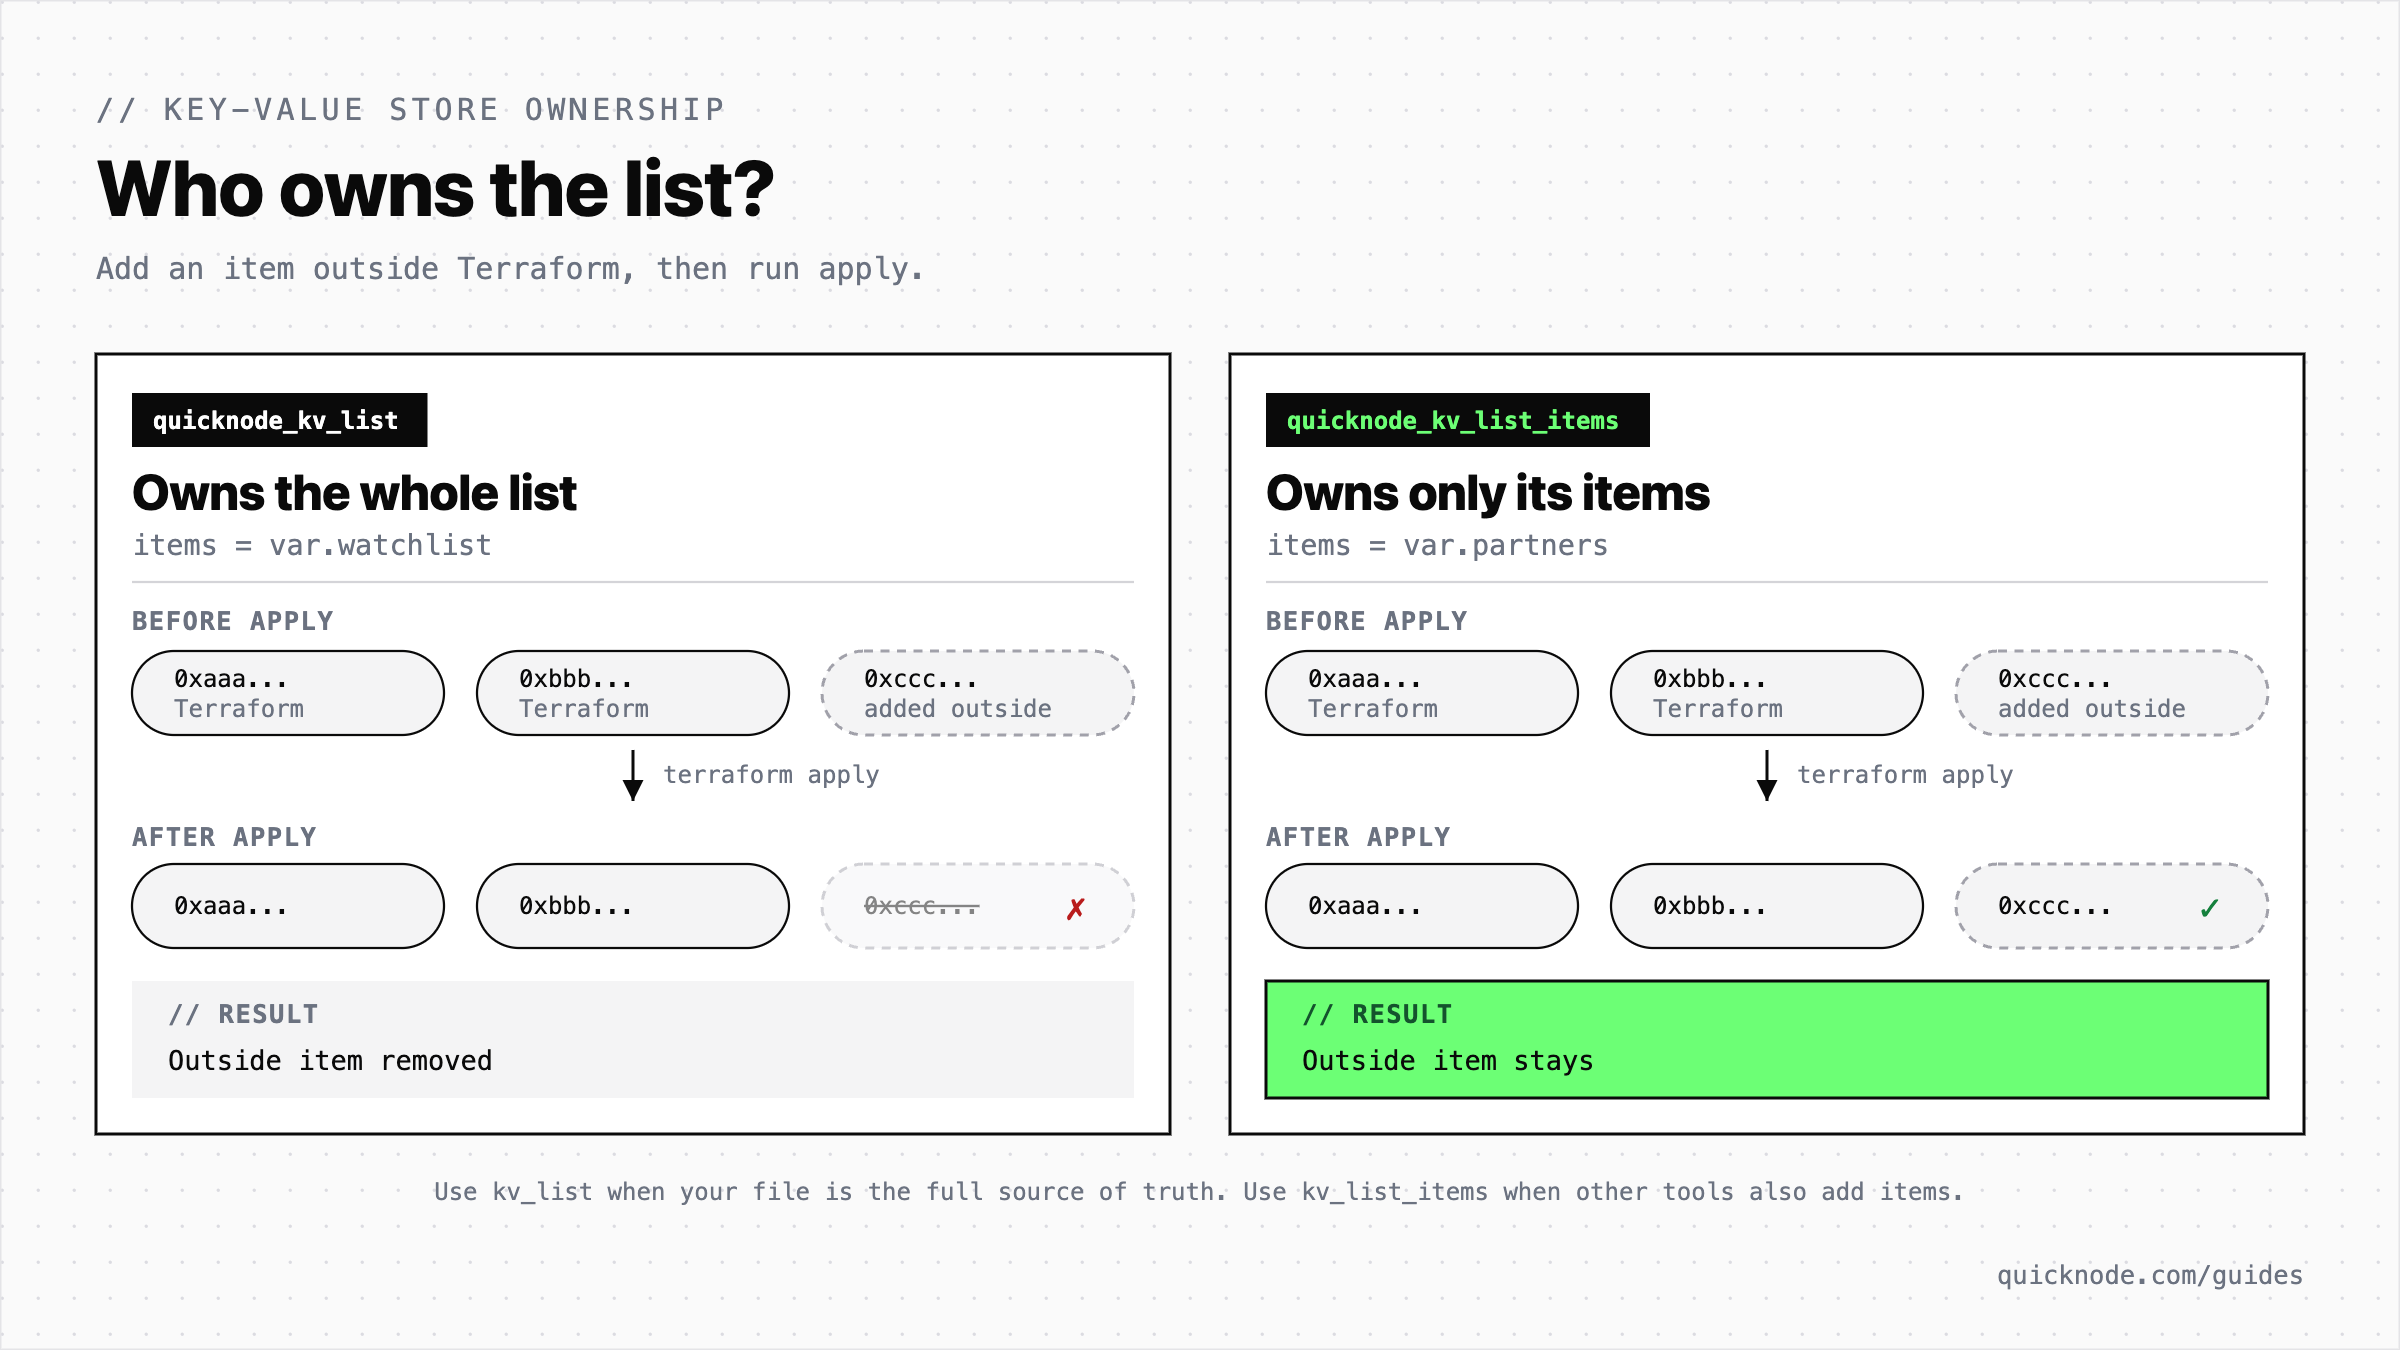
Use quicknode_kv_list when your file is the full source of truth. Use quicknode_kv_list_items when other tools also add items to the same list. The Key-Value Store configuration shows both resources and a quicknode_kv_value resource for single values. Changing a value is an in-place update. To try them, run init, plan, and apply in the 06-kv folder. See the Key-Value Store documentation for list and value concepts.
Pause, Resume, and Recover a Stream
A Stream is a running service, so its status can change outside your files. The status variable sets the status you want, and you can change it in a terraform.tfvars file in 05-streams. These cases cover the changes you are likely to meet:
| Situation | What happens | What to do |
|---|---|---|
| You edit only the watchlist | The plan shows one change, the list. The Stream stays active. | Review and apply the pull request. |
You pause the Stream with status = "paused" | Deliveries stop. | Set status = "active". The Stream replays the blocks it missed. |
| The webhook keeps failing | The Stream ends as terminated, and the next plan shows the change. | Fix the webhook, then apply status = "active". The Stream restarts at the failed block. |
Import an Existing Quicknode Endpoint into Terraform and Detect Drift
You do not need to rebuild a working dashboard endpoint to put it under review. An import connects a live endpoint to a Terraform resource block, so future plans show changes to it.
Import the Endpoint
Put the endpoint's ID in an import block, then ask Terraform to draft the matching resource configuration. The Admin API list endpoints call returns the ID of each endpoint in your account.
The files in 07-import end in .example, so Terraform ignores them. Create a folder with the same versions.tf as the first example, then copy the first block of import.tf.example into a new import.tf file. Replace ENDPOINT_ID with your endpoint's ID:
import {
  to = quicknode_endpoint.adopted
  id = "ENDPOINT_ID"
}
The example file has a second block that imports a token. A token ID takes the form ENDPOINT_ID/TOKEN_ID. Keep only the blocks you need. Then ask Terraform to write the configuration:
# Run this in the folder that holds versions.tf and import.tf.
terraform init
terraform plan -generate-config-out=generated.tf
Terraform writes generated.tf from the live endpoint and labels this feature experimental, so read the file before you apply it. Then run terraform apply to finish the import. The next plan reports no changes.
Catch Drift
After the import, a plan also catches drift, a difference between your files and the live endpoint. Suppose someone pauses the endpoint and renames it outside Terraform. The next plan shows both changes, including:
~ status = "paused" -> "active"
Applying the configuration restores the label and the active status. Check why a change happened before you apply a plan that reverses it.
Protect or Release an Adopted Endpoint
To protect an adopted endpoint from deletion, add lifecycle { prevent_destroy = true } inside its resource block. A destroy plan then fails with Instance cannot be destroyed, and the endpoint stays.
To stop managing an endpoint while leaving it live, remove its resource block and add a removed block. The removed.tf.example file holds it:
removed {
  from = quicknode_endpoint.adopted

  lifecycle {
    destroy = false
  }
}
The plan says the endpoint will no longer be managed by Terraform but will not be destroyed. After apply, Terraform forgets the resource and the endpoint remains active. If you also imported its token, release it with a second removed block that uses quicknode_endpoint_token.default. The removed block requires Terraform 1.7 or later, which this guide's minimum version covers.
Share Terraform State and Run Plans on Pull Requests
Once teammates review plans together, they all need to plan against the same state. A state file on one laptop breaks that, and two people can apply conflicting changes at the same time. State can also hold live endpoint tokens and credentialed URLs. The quicknode_endpoint_urls data source and the quicknode_endpoint_token resource put them there. Keep state out of the repository.
Store State in an Encrypted Remote Backend
Choose a remote backend with encryption, locking, and versioning. Locking blocks a second apply while the first one runs. Versioning keeps earlier copies of state. The backend.tf.example file configures an S3 backend with a state key for dev. Copy the block into a backend.tf file in the environment folder that should use it, then replace the two placeholders:
terraform {
  backend "s3" {
    bucket       = "YOUR_STATE_BUCKET"
    key          = "dev/terraform.tfstate"
    region       = "YOUR_AWS_REGION"
    encrypt      = true
    use_lockfile = true
  }
}
Give staging a different key. The encrypt = true line asks S3 to encrypt the state file. Also turn on versioning for the bucket, and limit who can read it.
Terraform connects to the bucket when you run terraform init, so it needs AWS credentials first. It reads them from the standard AWS sources, such as a profile in ~/.aws/credentials that you select with AWS_PROFILE. The S3 backend reference lists the permissions the credentials need.
While one apply runs, a second plan fails with Error acquiring the state lock and shows the lock ID and path. The lock clears when the first apply finishes.
Run terraform plan on Every Pull Request
A plan comment on each pull request shows the exact change before anyone merges it. Put QUICKNODE_API_KEY in your continuous integration (CI) secrets, so the workflow can plan without a key in your code. If the jobs use the S3 backend, add two more secrets, AWS_ACCESS_KEY_ID and AWS_SECRET_ACCESS_KEY. The GitHub Actions workflow runs separate dev and staging jobs when files in the environments folder change. Copy it to .github/workflows/terraform-plan.yml in your repository, and change the paths and working-directory values to match where your environments live. This excerpt shows the trigger, the environment matrix, and the plan step:
on:
  pull_request:
    paths:
      - "terraform/quicknode-terraform-provider/02-environments/**"

jobs:
  plan:
    runs-on: ubuntu-latest
    strategy:
      matrix:
        env: [dev, staging]
    env:
      QUICKNODE_API_KEY: ${{ secrets.QUICKNODE_API_KEY }}
    defaults:
      run:
        working-directory: terraform/quicknode-terraform-provider/02-environments/envs/${{ matrix.env }}
    steps:
      - uses: actions/checkout@v4
      - uses: hashicorp/setup-terraform@v3
        with:
          terraform_version: "1.16.4"
          terraform_wrapper: false
      - name: Terraform init
        run: terraform init -input=false
      - name: Terraform plan
        shell: bash
        run: terraform plan -input=false -no-color 2>&1 | tee plan.txt
The full workflow also posts each plan as a pull request comment, and each push adds a new comment. The shell: bash line matters. It makes the job fail when terraform plan fails, even though the output passes through tee.
Connect each job to its environment's remote state. Commit the backend.tf file in each environment folder, and pass the two AWS secrets in the same env block as QUICKNODE_API_KEY. Without remote state, a CI job starts with empty state and plans to create everything, including endpoints that already exist.
The Quicknode provider also works with OpenTofu. The same endpoint configuration ran with OpenTofu 1.12.6: tofu init, tofu plan, and tofu apply created a Sepolia endpoint, and the next plan showed no changes. Install the provider from the OpenTofu registry. This guide does not cover moving an existing Terraform state to OpenTofu.
Destroy the Test Resources
The testnet resources in this guide stay active until you remove them. In each example directory that you applied, review a destroy plan, then delete only that directory's managed resources:
terraform plan -destroy
terraform destroy
If an imported endpoint has prevent_destroy = true, Terraform blocks its deletion. Remove that guard only when you intend to delete the endpoint, or use a removed block to release it without deleting it. Delete any test webhook receiver separately.
Conclusion
The next time staging needs another testnet, you edit its terraform.tfvars file, open a pull request, and read the plan before anyone applies it. The same loop covers endpoint rules, limits, Streams, and watchlists, and your Git history records each change. Keep shared state protected, because it can contain live access tokens and URLs.
Next Steps
The examples give you a starting point for your own setup. Adapt the full Terraform examples to your environments. Then read the endpoint security best practices and the provider reference for the resources you plan to manage.
Frequently Asked Questions
What is the Quicknode Terraform provider?
It is a plugin that lets Terraform manage Quicknode resources from configuration files. It covers endpoints, security rules, rate limits, request filters, Streams, and Key-Value Store lists and values. You set QUICKNODE_API_KEY in your environment, and the provider uses it to call the Quicknode API.
Does Terraform store my Quicknode endpoint token in state?
Yes, in some cases. The quicknode_endpoint_urls data source and the quicknode_endpoint_token resource put credentialed URLs and tokens in state. Mark outputs sensitive, keep state out of your repository, and use encrypted remote storage with access controls.
Can I manage an endpoint I created in the dashboard with Terraform?
Yes. Add an import block with the endpoint ID, run terraform plan -generate-config-out to draft the resource, review it, and apply. A later plan shows dashboard changes as drift.
Why is my IP, referrer, or JWT rule not blocking requests?
The rule entry and the endpoint's security_options switch are separate. Turn on the matching switch (ips, referrers, or jwts) and allow a few seconds for the change to take effect. Quicknode then rejects calls that fail the rule with HTTP 401.
What happens to a Stream when I change its Key-Value Store watchlist?
The Stream reads the list by key, so a list change alters which transactions match. The plan shows only the list change, and the Stream stays active.
Can I use the Quicknode Terraform provider with OpenTofu?
Yes. Install the provider from the OpenTofu registry and run tofu init, tofu plan, and tofu apply on the same files. This guide does not cover moving an existing Terraform state to OpenTofu.