7 min read
Overview
Need a self-hosted RPC for Robinhood Chain? This guide walks through running a Robinhood Chain mainnet or testnet full node with Docker and the Robinhood-compatible Nitro release. (For an overview of the chain itself, see What is Robinhood Chain?.)
If your goal is to communicate and interact with the Robinhood Chain, a Quicknode Robinhood Chain endpoint is the easier option: Quicknode operates the RPC infrastructure for you (& if you need a dedicated set of nodes, consider Dedicated Clusters). Run your own node when you need a private RPC endpoint, more control over availability and access, or direct local access to Robinhood Chain data.
What You Will Do
- Get one Quicknode Ethereum endpoint for the required execution and Beacon APIs
- Download the appropriate Robinhood Chain configuration for mainnet or testnet
- Run Nitro as a restart-safe systemd service with persistent local-NVMe-backed storage
What You Will Need
- A Linux server with Docker; this guide uses Ubuntu 24.04 examples
- At least 8 modern CPU cores, 64 GB RAM (128 GB recommended), and several TB of locally attached NVMe storage. Plan for at least twice the current chain size plus 20% headroom. See Robinhood's current hardware requirements.
- An Ethereum mainnet endpoint from Quicknode with both execution JSON-RPC and Beacon REST API access
sudoaccess and basic familiarity with the Linux command line
We validated this setup on an AWS i3en.2xlarge with 8 vCPUs, 64 GiB RAM, and two locally attached 2.5 TB NVMe SSDs configured as a RAID 0 volume (about 4.6 TB usable). AWS is an example, not a requirement: the commands work on any suitable Linux server. RAID setup and AWS CLI provisioning are intentionally outside this guide because they are destructive or cloud-provider-specific.
What is Robinhood Chain?
Robinhood Chain is an Arbitrum Orbit Layer 2 built by Robinhood. Developers can use it to build onchain applications and interact with Stock Tokens.
For an independent view of the Ethereum scaling ecosystem, see L2BEAT.
Why This Node Needs Ethereum Data
Robinhood Chain executes transactions on the L2 while publishing data to Ethereum. Your Nitro node uses Ethereum data to reconstruct and verify Robinhood Chain, which is why it needs access to two L1 interfaces:
- Execution JSON-RPC to read Ethereum execution-layer data
- Beacon REST API to retrieve blob data
One Quicknode Ethereum mainnet endpoint can provide both interfaces. Do not point either value at a Robinhood Chain endpoint: its eth_chainId is Robinhood Chain's chain ID, not Ethereum mainnet's 0x1.
This guide also uses Robinhood's low-latency sequencer feed. The feed URL must begin with wss://, not https://.
Get Your Ethereum Endpoint
Sign in to Quicknode, create an Ethereum Mainnet endpoint, and copy its HTTPS URL. The same URL supplies the execution JSON-RPC and Beacon REST APIs that Nitro needs. Save it only on the node host or in your secrets manager; never commit it to a repository.
On the server, write it to a root-readable environment file:
sudo install -m 700 -d /etc/robinhood-nitro
sudo tee /etc/robinhood-nitro/node.env > /dev/null <<'EOF'
ROBINHOOD_NETWORK=mainnet
ETHEREUM_RPC_URL=https://YOUR-QUICKNODE-ENDPOINT.quiknode.pro/YOUR-TOKEN/
ETHEREUM_BEACON_URL=https://YOUR-QUICKNODE-ENDPOINT.quiknode.pro/YOUR-TOKEN/
EOF
sudo chmod 600 /etc/robinhood-nitro/node.env
The values can be the same Quicknode Ethereum URL. These quick checks confirm you copied an Ethereum endpoint rather than a Robinhood Chain endpoint before you start the node:
set -a
source /etc/robinhood-nitro/node.env
set +a

curl -sS "$ETHEREUM_RPC_URL" \
  -H 'Content-Type: application/json' \
  --data '{"jsonrpc":"2.0","id":1,"method":"eth_chainId","params":[]}'

curl -sS "$ETHEREUM_BEACON_URL/eth/v1/node/version"
The first command must return "result":"0x1"; the second must return HTTP 200 and a Beacon node version. If either check fails, stop here and correct the endpoint. An L2 endpoint can look valid but will prevent Nitro from syncing.
Prepare the Host
Install Docker and the utilities used in this guide, then enable Docker:
sudo apt-get update
sudo apt-get install -y ca-certificates curl docker.io jq
sudo systemctl enable --now docker
Choose a data directory on your locally attached NVMe volume. The example assumes it is mounted at /data; adapt this value if your mount point differs.
sudo install -d -m 755 /opt/robinhood-nitro/config
sudo install -d -m 755 /data/robinhood-nitro-data-mainnet
sudo install -d -m 755 /data/robinhood-nitro-data-testnet

# The pinned Nitro image writes its database as UID/GID 1000.
sudo chown 1000:1000 /data/robinhood-nitro-data-mainnet /data/robinhood-nitro-data-testnet
The service below binds HTTP and WebSocket to 127.0.0.1 only. This avoids unintentionally exposing a public, unauthenticated RPC service. If a separate application needs access, put an authenticated reverse proxy or private network control in front of it instead of opening ports 8547 and 8548 directly to the internet.
Download Robinhood Chain Configuration
Download the current chain-info files published by Robinhood. Mainnet also requires its custom genesis file:
sudo curl --fail --retry 8 --retry-all-errors -L \
  https://cdn.robinhood.com/assets/generated_assets/hoodchain_docsite/chain-node-configs/robinhood-chain-info.json \
  -o /opt/robinhood-nitro/config/robinhood-chain-info.json

sudo curl --fail --retry 8 --retry-all-errors -L \
  https://cdn.robinhood.com/assets/generated_assets/hoodchain_docsite/chain-node-configs/robinhood-genesis.json \
  -o /opt/robinhood-nitro/config/robinhood-genesis.json

sudo curl --fail --retry 8 --retry-all-errors -L \
  https://cdn.robinhood.com/assets/generated_assets/hoodchain_docsite/chain-node-configs/robinhood-chain-testnet-info.json \
  -o /opt/robinhood-nitro/config/robinhood-chain-testnet-info.json
Testnet uses its own chain-info file and does not use a custom genesis.
Create the Node Runner
Create a small runner that loads the protected endpoint values and starts the pinned Nitro image:
sudo tee /usr/local/bin/run-robinhood-nitro > /dev/null <<'EOF'
#!/usr/bin/env bash
set -euo pipefail

source /etc/robinhood-nitro/node.env

NETWORK="${ROBINHOOD_NETWORK:-mainnet}"
DATA_DIR="/data/robinhood-nitro-data-${NETWORK}"
case "$NETWORK" in
  mainnet)
    CHAIN_INFO=/home/nitro/config/robinhood-chain-info.json
    FEED_URL=wss://feed.mainnet.chain.robinhood.com
    INIT_ARGS=(--init.genesis-json-file=/home/nitro/config/robinhood-genesis.json)
    ;;
  testnet)
    CHAIN_INFO=/home/nitro/config/robinhood-chain-testnet-info.json
    FEED_URL=wss://feed.testnet.chain.robinhood.com
    INIT_ARGS=()
    ;;
  *)
    echo "ROBINHOOD_NETWORK must be mainnet or testnet" >&2
    exit 1
    ;;
esac

exec /usr/bin/docker run --name robinhood-nitro \
  -v "$DATA_DIR":/home/user/.arbitrum \
  -v /opt/robinhood-nitro/config:/home/nitro/config:ro \
  -p 127.0.0.1:8547:8547 \
  -p 127.0.0.1:8548:8548 \
  offchainlabs/nitro-node:v3.11.2-3599aca \
    --chain.info-files="$CHAIN_INFO" \
    --parent-chain.connection.url="$ETHEREUM_RPC_URL" \
    --parent-chain.blob-client.beacon-url="$ETHEREUM_BEACON_URL" \
    "${INIT_ARGS[@]}" \
    --node.feed.input.url="$FEED_URL" \
    --execution.forwarding-target=null \
    --http.addr=0.0.0.0 --http.port=8547 --http.api=net,web3,eth
EOF

sudo chmod 700 /usr/local/bin/run-robinhood-nitro
Choose a Network
The runner uses mainnet unless you set ROBINHOOD_NETWORK=testnet in /etc/robinhood-nitro/node.env. It uses separate /data/robinhood-nitro-data-mainnet and /data/robinhood-nitro-data-testnet directories, so never reuse a mainnet database for testnet or the reverse.
sudo sed -i 's/^ROBINHOOD_NETWORK=.*/ROBINHOOD_NETWORK=testnet/' /etc/robinhood-nitro/node.env
sudo systemctl restart robinhood-nitro
For mainnet, omit that line or set ROBINHOOD_NETWORK=mainnet.
Important Configuration Details
- For
offchainlabs/nitro-node:v3.11.2-3599aca, the active data directory is/home/user/.arbitrum. Mounting/home/nitro/.arbitrumleaves the intended host data volume unused. --execution.forwarding-target=nullis required for a non-sequencer node with this Nitro version. Without it, Nitro exits withForwardingTarget not set and not sequencer.- Docker sees
--http.addr=0.0.0.0inside the container, while the host port mapping keeps it private at127.0.0.1.
Run It as a Systemd Service
Create the service definition:
sudo tee /etc/systemd/system/robinhood-nitro.service > /dev/null <<'EOF'
[Unit]
Description=Robinhood Chain Nitro full node
After=docker.service network-online.target
Wants=network-online.target
Requires=docker.service

[Service]
Type=simple
Restart=always
RestartSec=15
ExecStartPre=-/usr/bin/docker rm -f robinhood-nitro
ExecStart=/usr/local/bin/run-robinhood-nitro
ExecStop=/usr/bin/docker stop -t 120 robinhood-nitro

[Install]
WantedBy=multi-user.target
EOF

sudo systemctl daemon-reload
sudo systemctl enable --now robinhood-nitro
sudo systemctl status robinhood-nitro --no-pager
Initial synchronization can take substantial time. Follow logs in another terminal:
sudo journalctl -u robinhood-nitro -f
Verify Sync and Query the Node
Check whether the local RPC server is available:
curl -sS http://127.0.0.1:8547 \
  -H 'Content-Type: application/json' \
  --data '{"jsonrpc":"2.0","id":1,"method":"eth_chainId","params":[]}'
Use eth_syncing to check progress. false means the node is fully synchronized:
curl -sS http://127.0.0.1:8547 \
  -H 'Content-Type: application/json' \
  --data '{"jsonrpc":"2.0","id":1,"method":"eth_syncing","params":[]}'
Once the node responds, retrieve its latest block:
curl -sS http://127.0.0.1:8547 \
  -H 'Content-Type: application/json' \
  --data '{"jsonrpc":"2.0","id":1,"method":"eth_getBlockByNumber","params":["latest",false]}'
See the Robinhood Chain RPC reference for methods you can query.
Optional: Validate Data Against a Trusted RPC
After eth_syncing returns false, compare your node with a trusted Robinhood Chain RPC at the same fixed block. Do not compare latest across endpoints because the chain can advance between requests. First, set the fixed block tag and the reference URL, then run the same request against both endpoints:
export BLOCK_TAG=0xYOUR_FIXED_BLOCK_NUMBER
export REFERENCE_RPC_URL=https://YOUR_TRUSTED_ROBINHOOD_CHAIN_RPC_URL

for RPC_URL in http://127.0.0.1:8547 "$REFERENCE_RPC_URL"; do
  curl -sS "$RPC_URL" \
    -H 'Content-Type: application/json' \
    --data "{\"jsonrpc\":\"2.0\",\"id\":1,\"method\":\"eth_getBlockByNumber\",\"params\":[\"$BLOCK_TAG\",false]}"
  echo
done
The two block responses should agree. For a deeper check, compare eth_chainId, net_version, and read-only state calls such as eth_getBalance, eth_getCode, or eth_getStorageAt using the same fixed block tag.
Troubleshooting
The Service Repeats or Exits Immediately
Start with the service and container logs:
sudo systemctl status robinhood-nitro --no-pager
sudo journalctl -u robinhood-nitro -n 100 --no-pager
sudo docker logs robinhood-nitro
If logs report ForwardingTarget not set and not sequencer, confirm the runner includes --execution.forwarding-target=null. If the issue began after a Robinhood Chain upgrade, check Robinhood's node documentation for the supported Nitro and ArbOS versions before changing images.
Sync Does Not Start or Stalls
Re-run the two L1 checks from Get Your Ethereum Endpoint. The execution request must return 0x1, and the Beacon request must return HTTP 200. A fully synchronized L1 endpoint is mandatory; an L1 execution endpoint pointed at Robinhood Chain will not work.
Also monitor both your L1 request allowance and disk capacity:
df -h /data
sudo du -sh /data/robinhood-nitro-data-*
Initial sync makes significant L1 requests. Slow or network-attached storage can make synchronization much slower than local NVMe.
The Data Directory Remains Empty
For the pinned image in this guide, confirm the host volume is mounted at /home/user/.arbitrum, not /home/nitro/.arbitrum, and that it is owned by UID/GID 1000:
sudo ls -ldn /data/robinhood-nitro-data-*
sudo docker inspect robinhood-nitro --format '{{range .Mounts}}{{println .Source "->" .Destination}}{{end}}'
RPC Connection Is Refused During Startup
Docker can bind port 8547 before Nitro's JSON-RPC handler has finished initializing. A connection reset or refusal is expected temporarily. Continue following the logs and retry after Nitro reports that its HTTP server is available.
See It in Action
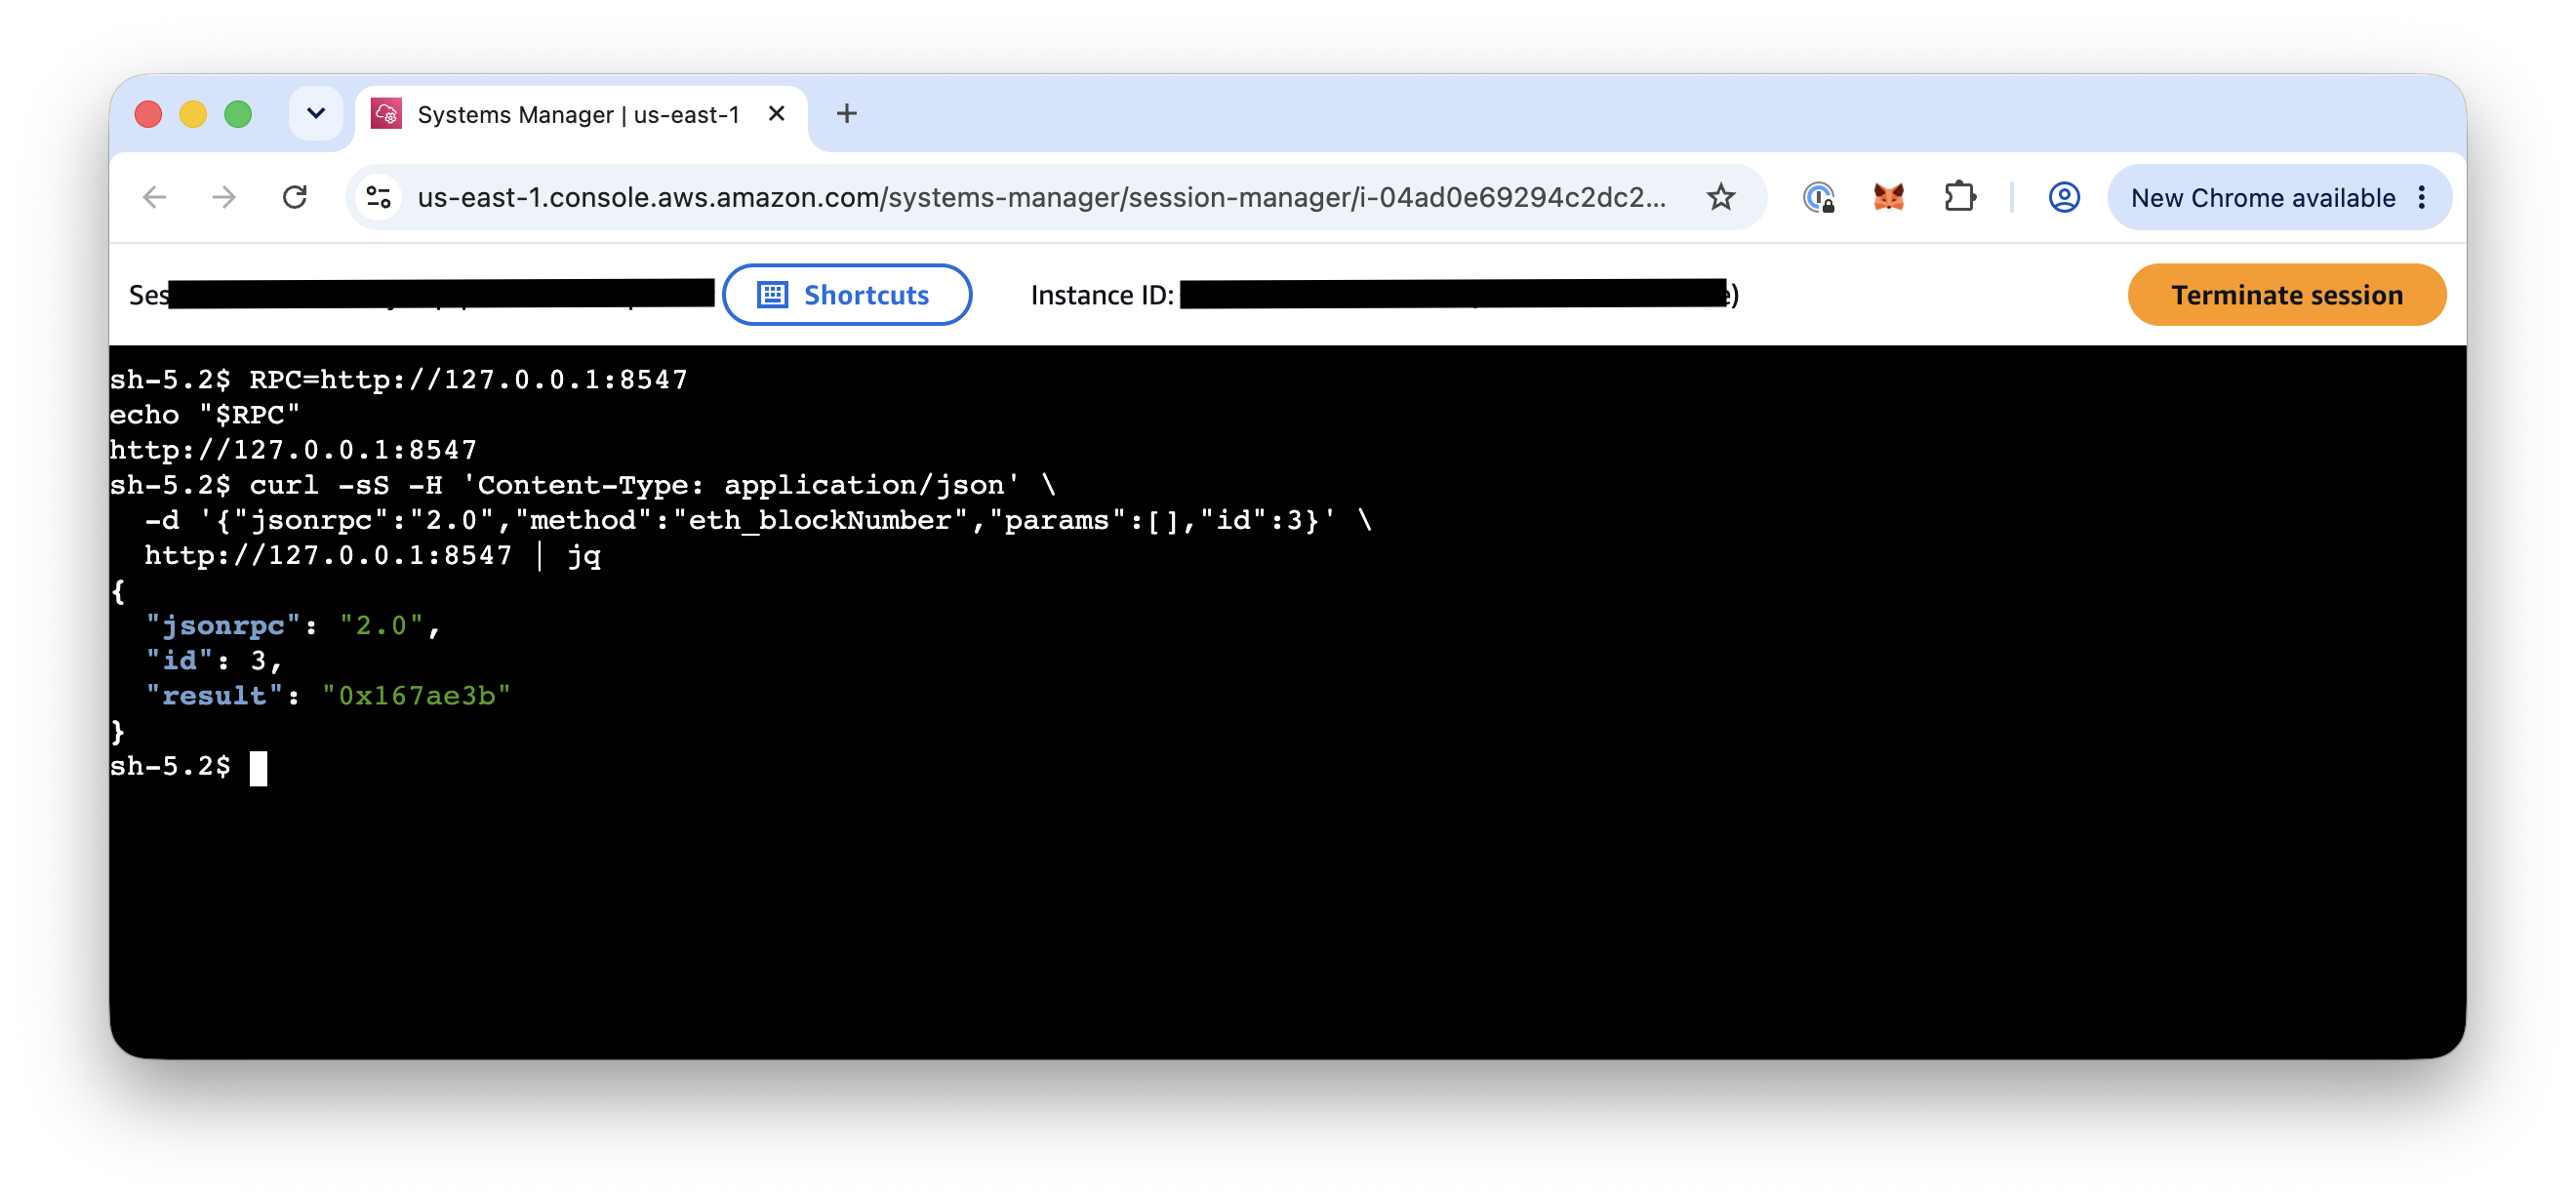
After the node has synchronized, a local eth_blockNumber request returns the current Robinhood Chain block height. The example below runs the request through AWS Systems Manager against the node's loopback-only RPC endpoint.
Keep Building
Check out the rest of our Robinhood Chain technical guides to learn more:
- Read Stock Token Data on Robinhood Chain
- Track Stock Token Activity on Robinhood Chain
- Robinhood Chain API Documentation
Final Thoughts
You now have a private Robinhood Chain full node that persists its database on local storage and uses Quicknode for the required Ethereum execution and Beacon APIs. Keep the server patched, watch disk growth and L1 usage, and verify the supported Nitro release before applying Robinhood Chain upgrades.