8 min read
Overview
When building on Solana, you will often have situations where you need to rapidly build and redeploy programs for testing. Though you can use Solana's Devnet and Testnet clusters, you may want to run a local cluster for faster development. Local clusters are faster because there are no network latency issues.
Solana CLI has a handy command to quickly start a local validator on your computer. This guide will walk you through setting up and using a local, single-node cluster on your workstation.
What You Will Do
In this guide, you will:
- Initiate a local Solana validator
- Create a wallet using the Solana CLI
- Perform basic transactions using the Solana CLI
- Explore the Local Validator on Solana Explorer
- Interact with localhost using the Solana-Web3.js library
- Deploy a program to the local validator using Solana Playground
What You Will Need
Please make sure you have installed the required dependencies before proceeding:
- Solana CLI latest version installed
- Nodejs (version 16.15 or higher) installed
- Basic JavaScript experience
- Knowledge of Rust and/or Anchor will be helpful but is not required
Understanding Solana Clusters
"A Solana cluster is a set of validators working together to serve client transactions and maintain the integrity of the ledger. Many clusters may coexist." (Source: docs.solana.com/cluster/overview). In fact, Solana maintains three clusters that each serve different purposes:
- Mainnet Beta: production, a permissionless environment where real tokens are used
- Devnet: a playground for application developers testing Solana applications (tokens on Devnet are not real and have no financial value). Devnet usually runs the same software release as Mainnet Beta
- Testnet: an environment where Solana core contributors and validators stress test new updates and features, with a focus on testing network performance (tokens on Testnet are not real and have no financial value)
Source: docs.solana.com/clusters
A local cluster is a single-node cluster that runs on your local machine. It is useful for testing and development rapidly without having to wait for network latency when processing transactions. This means that your local workstation will run a private instance of the Solana blockchain. Because local clusters are single-node, we will use the terms "local cluster" and "local validator" interchangeably.
Let's get started!
Initiate a Local Solana Validator
Start a new project in your code editor of choice.
In your terminal, create a new directory for your project and navigate into it:
mkdir solana-local-validator && cd solana-local-validator
Before starting our local validator, let's look at some of its functionality. In your terminal, call the help menu by entering:
solana-test-validator --help
There's a lot of useful information here about what you can do with the solana-test-validator command. This is a good reference if you ever have a question about using a subcommand. We recommend browsing through the help menu to get a feel for what features are available (there are many nifty things you can do). For now, let's focus on the basics. Here are a few of the flags that you will likely interact with often:
--reset: Reset the ledger to genesis (by default, your local validator will start with the existing snapshot of the ledger)--quiet: Suppress all output (by default, the local validator will output information about each slot)--bpf-program: Specify a BPF program to load into the validator- No rate-limits
- No airdrop limits
- Direct on-chain program deployment (
--bpf-program ...) - Clone accounts from a public cluster, including programs (--clone ...)
- Load accounts from files (
--account ...) - Configurable transaction history retention (
--limit-ledger-size ...) - Configurable epoch length (
--slots-per-epoch ...) - Jump to an arbitrary slot (
--warp-slot ...) Ref/More Info: docs.solana.com/developing/test-validator
When you are ready, let's start our local validator. In your terminal, start your local validator by entering the following:
solana-test-validator
This command will create a new directory called test-ledger in your project directory. This directory will contain all the data for your local cluster.
Since we didn't use the --quiet flag, you should see a continuous flow of output in your terminal. This output will give you information about slot confirmation statuses. If this is your first time running a local validator, you will see blocks starting with the genesis block. You should see something like this:
Great job! You are now running a local Solana cluster.
Create a Wallet Using the Solana CLI
Let's create a wallet for interacting with our local cluster. Open a new terminal (we will want to keep our existing terminal open and running our local cluster). From your project directory, in your new terminal, enter:
solana-keygen grind --ignore-case --starts-with QN:1
We are using the solana-keygen grind command to generate a new wallet. The --ignore-case flag will allow us to use uppercase and lowercase letters in our wallet address. The --starts-with flag will allow us to specify the first characters of our wallet address. In this case, we are specifying that our wallet address must start with QN:1 (for QuickNode 🚀, but you can choose any characters you like).
For more information on the solana-keygen grind command, check out our Guide: How to Create a Custom Solana Vanity Address.
The wallet creation process will take some time, depending on the specified prefix (but 2 characters should be almost instant, depending on the speed of your machine). Once it's done, you should see an output similar to this:
sh
quicknode-am solana-local-validator % solana-keygen grind --ignore-case --starts-with QN:1
Searching with 10 threads for:
        1 pubkey that starts with 'qn' and ends with ''
Wrote keypair to QN1seG8d1zZb5p5Do5gi5Y5Y5Y5Y5Y5Y5Y5Y5Y5Y.json
It should write a key to your project directory (e.g., ./solana-local-validator/QN1seG8d1zZb5p5Do5gi5Y5Y5Y5Y5Y5Y5Y5Y5Y5Y.json). This is your wallet that we will use for interacting with our local cluster.
Set Your Solana CLI Config
Now that we have a wallet let's set our Solana CLI config. In your terminal, enter:
solana config set --url localhost --keypair <PATH_TO_WALLET> ## e.g., ./QN1seG8d1zZb5p5Do5gi5Y5Y5Y5Y5Y5Y5Y5Y5Y5Y.json
The Solana CLI is now configured to your local network and your wallet. You can now interact with your local cluster using the wallet you just created.
Interact with Your Local Cluster
Now that we have a wallet and our local cluster is running let's put it to work.
Since the wallet we created is new, the balance should be 0 SOL. We will request an airdrop from the local validator to fund our wallet. In your terminal, enter:
solana airdrop 100
You should see output similar to this:
Requesting airdrop of 100 SOL
Signature: WKDwF5uYSqKds6C9AKCsHf1KYwPzLbUnF1ZzLr6h2sJ6VLQqfk3kU9FrECUTRtBnsvcM9AjsZbmagh9Yu6uffbo
100 SOL
Congrats! You just interacted with your local cluster. You can check that the balance was updated by entering solana balance in your terminal; however, we find it helpful to use Solana Explorer to check what is happening. Open up Solana Explorer and select the Custom RPC URL Cluster from the menu in the top right corner. Make sure to enter the URL of your local cluster (e.g., http://localhost:8899) and select Enable custom url param:
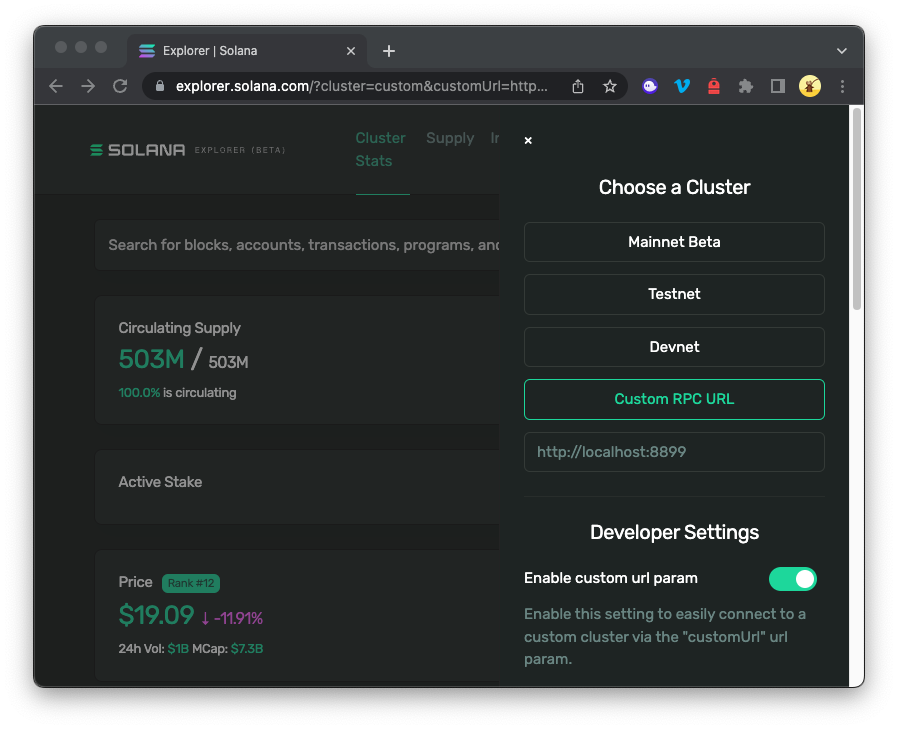
You should now be able to search your airdrop transaction ID in the search bar, and the explorer should parse the transaction from your cluster! If you have not experimented with clusters before, feel free to toggle between clusters in the menu--you should notice that your transaction should only be visible on your local cluster.
Great job! Let's keep going and transfer some SOL to another user.
solana transfer DEmoM52P1ci8Y6YQJbZVZjxUa4Arbb8pAjaPmg7nVda5 10 --allow-unfunded-recipient
Note, we must use the --allow-unfunded-recipient flag because there are no recipient wallets yet on your cluster - it is new and has no balance.
Feel free to check out your transaction on Solana Explorer following the same steps we did above.
Great job! If you feel like you got the hang of it, great, but if you want to keep going, read on--we are going to interact with Solana-Web3.js and deploy a program to our local cluster.
Running Solana-Web3.js with Localhost
Let's create a simple JS file that will interact with our local cluster. In your project directory, create a new file called app.js:
echo > app.js
Initialize your project with the "yes" flag to use default values for your new package:
yarn init --yes
#or
npm init --yes
We will need to add the Solana-Web3 library for this exercise. In your terminal, type:
yarn add @solana/web3.js
#or
npm install @solana/web3.js
Now, let's add some code to app.js. We will use the Connection class from the Solana-Web3 library to connect to our local cluster. You may have missed it when you started your local validator, but the local validator also starts a JSON RPC server. This server lets you interact with your local cluster using the Solana-Web3.js library. At start-up, the local validator will print out the URL of the JSON RPC server. Unless you altered any default configs, you should have seen this:
JSON RPC URL: http://127.0.0.1:8899
Let's use that to connect to our cluster and get some basic information about the state of our cluster. In your app.js file, add the following code:
const solana = require('@solana/web3.js')
const connection = new solana.Connection('http://127.0.0.1:8899', 'confirmed')

;(async () => {
    const version = await connection.getVersion()
    console.log('Connection to cluster established:', version)
    const epoch = await connection.getEpochInfo()
    console.log('Epoch info', epoch)
})()
What this is doing is:
- Importing the Solana-Web3 library
- Creating a new connection to our local cluster using the JSON RPC URL (http://127.0.0.1:8899)
- Getting and logging the version of the cluster
- Getting and logging the epoch info of the cluster
Now, let's run our code. In your terminal, enter:
node app.js
You should see output similar to this:
Connection to cluster established: { 'feature-set': 1211687720, 'solana-core': '1.15.2' }
Epoch info {
  absoluteSlot: 4251,
  blockHeight: 4247,
  epoch: 0,
  slotIndex: 4251,
  slotsInEpoch: 432000,
  transactionCount: 4432
}
Great job! You just interacted with your local cluster using the Solana-Web3.js library--feel free to update this code with your own to experiment with the local cluster.
Deploying a Program to Your Local Cluster with Solana Playground
Now that we have a local cluster running let's deploy a program to it. We will use the Solana Playground to do this. Solana Playground is a web-based IDE that allows you to write, compile, and deploy Solana programs. It is an excellent tool for learning and experimenting with Solana programs.
If you have Rust and/or Anchor installed, feel free to deploy using your preferred method. Since Solana CLI is configured to your localhost, you should be able to follow your standard deployment process.
If you are using Anchor, update Anchor.toml to point to cluster = "localnet".
If you are new to Anchor or Rust and want to learn more, check out our Guide: Your First Anchor Program
Open Solana Playground in your browser and click '+ Create a New Project'. Name your project (e.g., qn-local-demo) and select "Anchor (Rust)" framework.
Set the endpoint to localhost by clicking the gear in the bottom left corner:
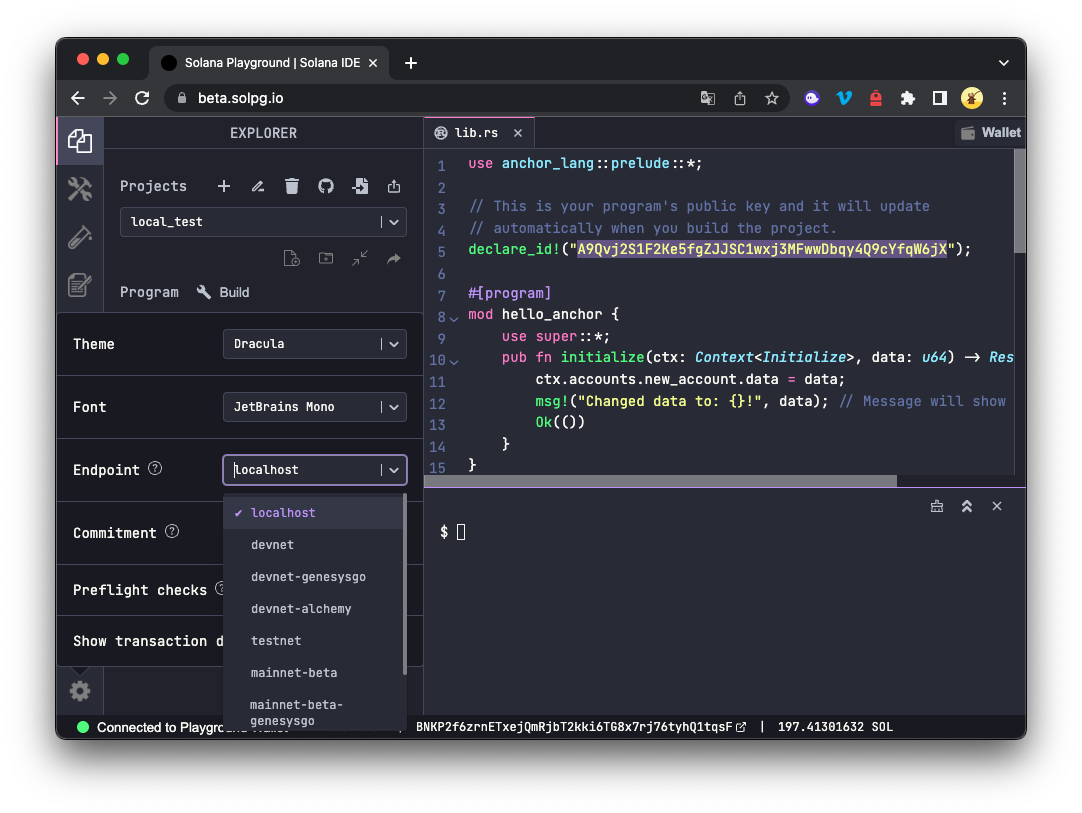
Feel free to customize the default program template to your liking, but since this exercise is aimed to get you up and running with a local cluster, we will keep it simple and use the default. Click the "🔧 Build" button to compile your program, and then click the "🛠️" icon in the top left corner. You should see a "Deploy" button. Click it to deploy your program to your local cluster.
You should see a success message in your playground terminal:
Deployment successful. Completed in 3s.
Wow, that's fast. This is one of the benefits of using a local cluster--rapid deployment of Solana programs (this can save you a ton of time on larger programs). In your lib.rs file, you should see a declare_id!(<YOUR_PROGRAM_ID>);. Copy the program ID and paste it into the search bar of Solana Explorer (still pointed at your localhost). You should see your program live on localhost! 🔥
Wrap Up
Now you have a fully functional local Solana validator, which you can use to rapidly build and deploy Solana programs for testing and development. Hopefully this helps you get your programs to mainnet faster!
We would love to hear more about what you are building. Drop us a line in Discord, or give us a follow on Twitter to stay up to date on all the latest information!
We ❤️ Feedback!
Let us know if you have any feedback or requests for new topics. We'd love to hear from you.