
5 min read
Overview
The Quicknode Multichain feature allows you to manage multiple blockchain networks simultaneously with a single endpoint. This feature is particularly useful for developers who need to work with multiple blockchains, such as when building cross-chain applications or integrating with multiple blockchain networks.
In this guide, we'll walk you through how to set up a Quicknode Multichain endpoint and how to use it to manage multiple blockchain networks.
What You Will Do
- Enable the Multichain feature for your Quicknode endpoint
- Manage multiple blockchain networks with one endpoint
- Centralize and configure security settings for all your chains
- Run a test to ensure two different chains are working together through a single endpoint
What You Will Need
- A Quicknode account on our newest pricing plans (upgrade here if you are on an older plan)
- Basic understanding of blockchain endpoints and security settings
Understanding Quicknode’s Multichain Feature
Quicknode’s Multichain feature enables you to interact with multiple blockchain networks through a single endpoint, available on both free and paid plans.
Key Advantages
-
One Endpoint for All Chains: Interact with multiple chains through a single endpoint, simplifying workflows for cross-blockchain projects.
-
Centralized Security Management: Apply security policies and streamline routine checks, such as rotating API keys or managing referrer lists, across all chains through one endpoint.
-
Consistent Rate Limits: Set and adjust rate limits in one place, eliminating the hassle of managing limits across multiple endpoints.
Quicknode Endpoint URL Structure
Quicknode organizes endpoints using a specific URL structure, where each supported chain has a subdomain. This structure maintains a consistent security token and endpoint name while using chain-specific subdomains (except Ethereum mainnet).
https://{YOUR_ENDPOINT_NAME}.{NETWORK_NAME}.quiknode.pro/{YOUR_TOKEN_ID}
https://{YOUR_ENDPOINT_NAME}.quiknode.pro/{YOUR_TOKEN_ID}
For most chains, the NETWORK_NAME follows the pattern chainName-networkName. However, a few exceptions exist and some chains (i.e., Avalanche) require specific path segments at the end of the URL due to their unique configurations. Always refer to your Quicknode dashboard for the exact URL format for each network.
| Chain Name | Network Name | Network Name in Quicknode | Example URL |
|---|---|---|---|
| Ethereum | Mainnet | mainnet | https://{YOUR_ENDPOINT_NAME}.quiknode.pro/{YOUR_TOKEN_ID} |
| Bitcoin | Mainnet | btc | https://{YOUR_ENDPOINT_NAME}.btc.quiknode.pro/{YOUR_TOKEN_ID} |
| Solana | Mainnet | solana-mainnet | https://{YOUR_ENDPOINT_NAME}.solana-mainnet.quiknode.pro/{YOUR_TOKEN_ID} |
| Base | Mainnet | base-mainnet | https://{YOUR_ENDPOINT_NAME}.base-mainnet.quiknode.pro/{YOUR_TOKEN_ID} |
| Binance Smart Chain | Mainnet | bsc | https://{YOUR_ENDPOINT_NAME}.bsc.quiknode.pro/{YOUR_TOKEN_ID} |
| Avalanche | C-Chain Mainnet | avalanche-mainnet | https://{YOUR_ENDPOINT_NAME}.avalanche-mainnet.quiknode.pro/{YOUR_TOKEN_ID}/ext/bc/C/rpc |
How to Enable the Multichain Feature
Step 1: Log in to your Quicknode Account
To enable the Multichain feature, you need to log in to your Quicknode account. If you don't have an account, you can create one for free here.
After signing in, navigate to the Endpoints section.
Step 2: Create or Select an Endpoint
If you don’t have an endpoint yet, click Create Endpoint to create one by choosing your preferred blockchain network. If you already have an endpoint, select the one you want to use for multichain access.
Step 3: Enable Multichain
Once you’ve selected or created your endpoint, toggle the Multichain switch to enable the feature. Then, you can select any supported network from the list, and Quicknode will provide the corresponding URL for that network on the dashboard.
Note: The Multichain feature is only available to users on our newest pricing plans. You can upgrade your plan on the Quicknode Dashboard.
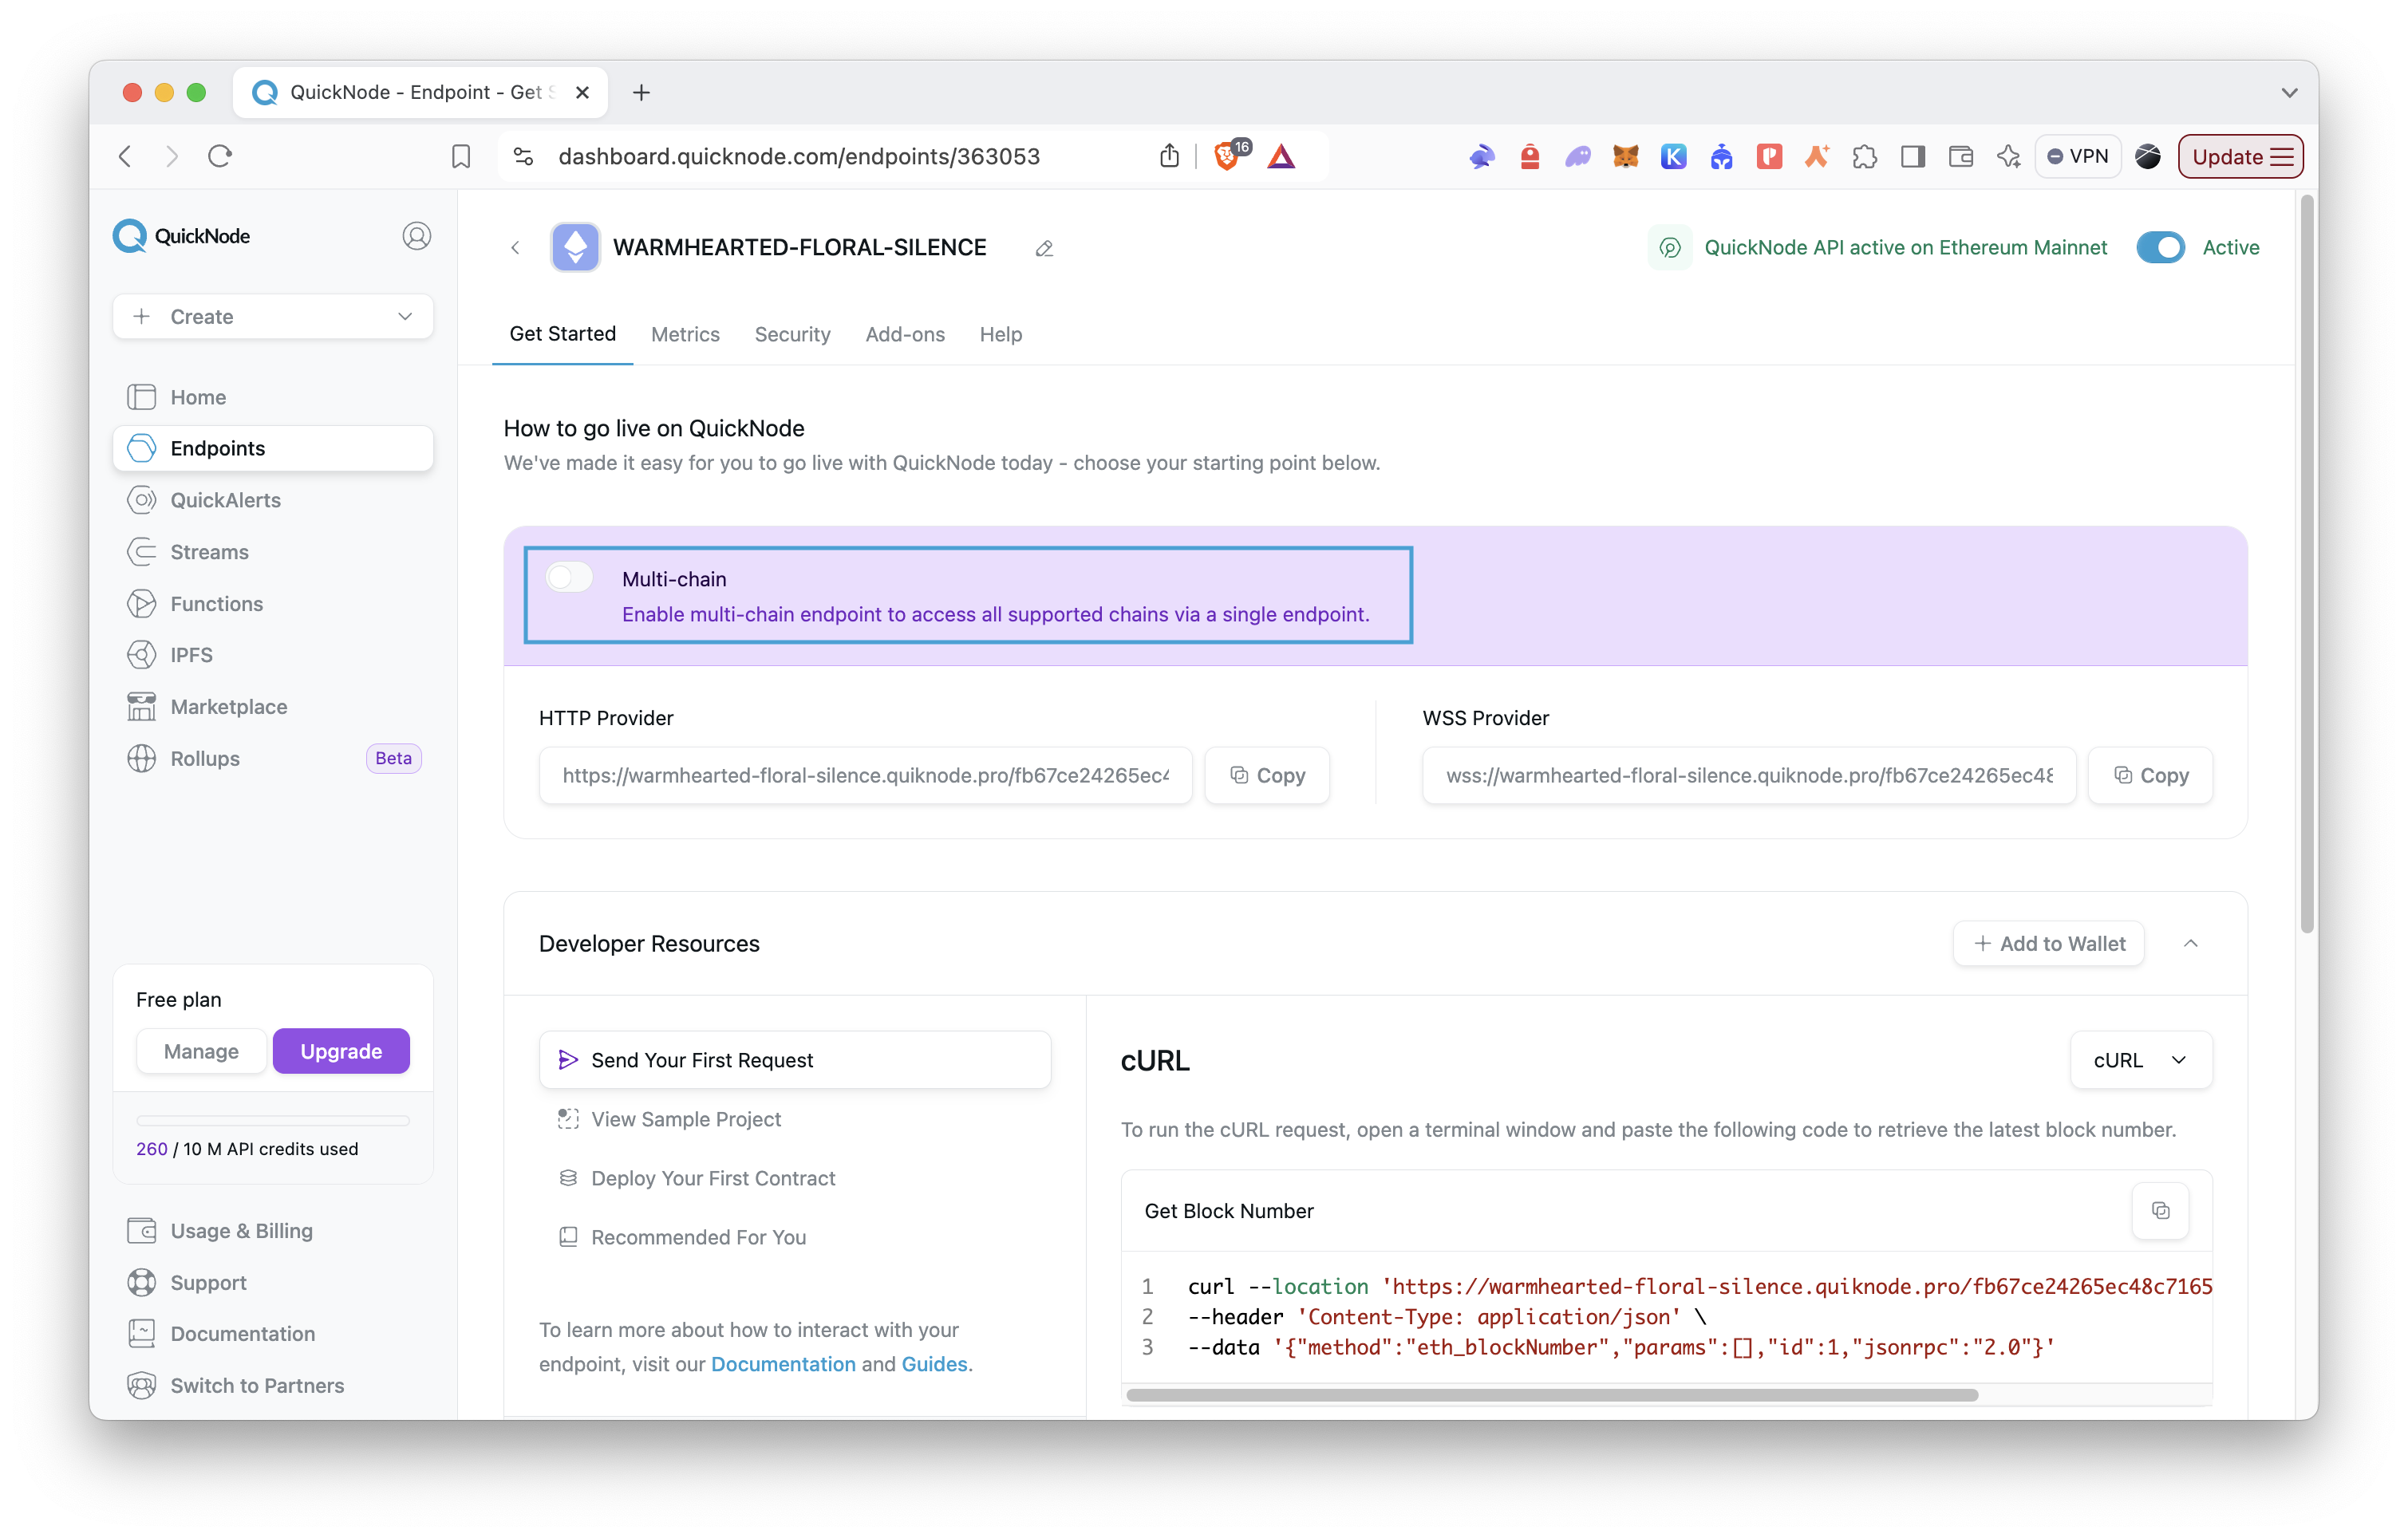
Step 4: Configure Security Settings
Now that multichain is enabled, you can centralize security settings for all networks on this endpoint. Click Security to configure settings such as rate limits, IP whitelisting, and other policies that will apply across all chains.
Testing Multichain Endpoints
To test your Multichain endpoints, you can use a simple bash script that makes RPC calls to each endpoint in parallel. This script will print the block number for each endpoint and the response time for each call.
Note: Be sure to replace YOUR_ENDPOINT_URL_1 and YOUR_ENDPOINT_URL_2 with your actual Quicknode endpoint URLs.
- Create a new file called
multichain_test.shand paste the following code. - Save the file and make it executable by running
chmod +x multichain_test.sh - Run the script by running
./multichain_test.sh
#!/bin/bash

# Function to get timestamp with microseconds
get_timestamp() {
    date +"%Y-%m-%d %H:%M:%S.%6N"
}

# Function to make RPC call with detailed timing
make_rpc_call() {
    local endpoint=$1
    local start_timestamp=$(get_timestamp)
    echo "[START] $start_timestamp - Making call to $endpoint"

    local start_time=$(date +%s.%N)
    response=$(curl -s -X POST -H "Content-Type: application/json" --data '{
        "jsonrpc":"2.0",
        "method":"eth_blockNumber",
        "params":[],
        "id":1
    }' "$endpoint")
    local end_time=$(date +%s.%N)
    local duration=$(echo "$end_time - $start_time" | bc)

    local end_timestamp=$(get_timestamp)
    echo "[END] $end_timestamp - Completed call to $endpoint"

    # Extract block number and convert from hex to decimal
    block_hex=$(echo $response | grep -o '"result":"[^"]*"' | cut -d'"' -f4)
    if [ ! -z "$block_hex" ]; then
        block_dec=$((16#${block_hex#0x}))
        echo "Endpoint: $endpoint"
        echo "Block Number: $block_dec"
        printf "Response Time: %.3f seconds\n" $duration
    else
        echo "Error for endpoint $endpoint: $response"
    fi
    echo "-------------------"
}

# Print script start time
echo "Script started at $(get_timestamp)"
echo "-------------------"

# List of endpoints (replace with your actual endpoints)
ENDPOINT1="YOUR_ENDPOINT_URL_1" # 👈 Replace with your endpoint URL for first network (i.e., Ethereum Mainnet)
ENDPOINT2="YOUR_ENDPOINT_URL_2" # 👈 Replace with your endpoint URL for second network (i.e., Base Mainnet)

# Make RPC calls in parallel
make_rpc_call "$ENDPOINT1" &
make_rpc_call "$ENDPOINT2" &

# Wait for all background processes to complete
wait

echo "-------------------"
echo "All RPC calls completed at $(get_timestamp)"
After running the script, you should see the following output:
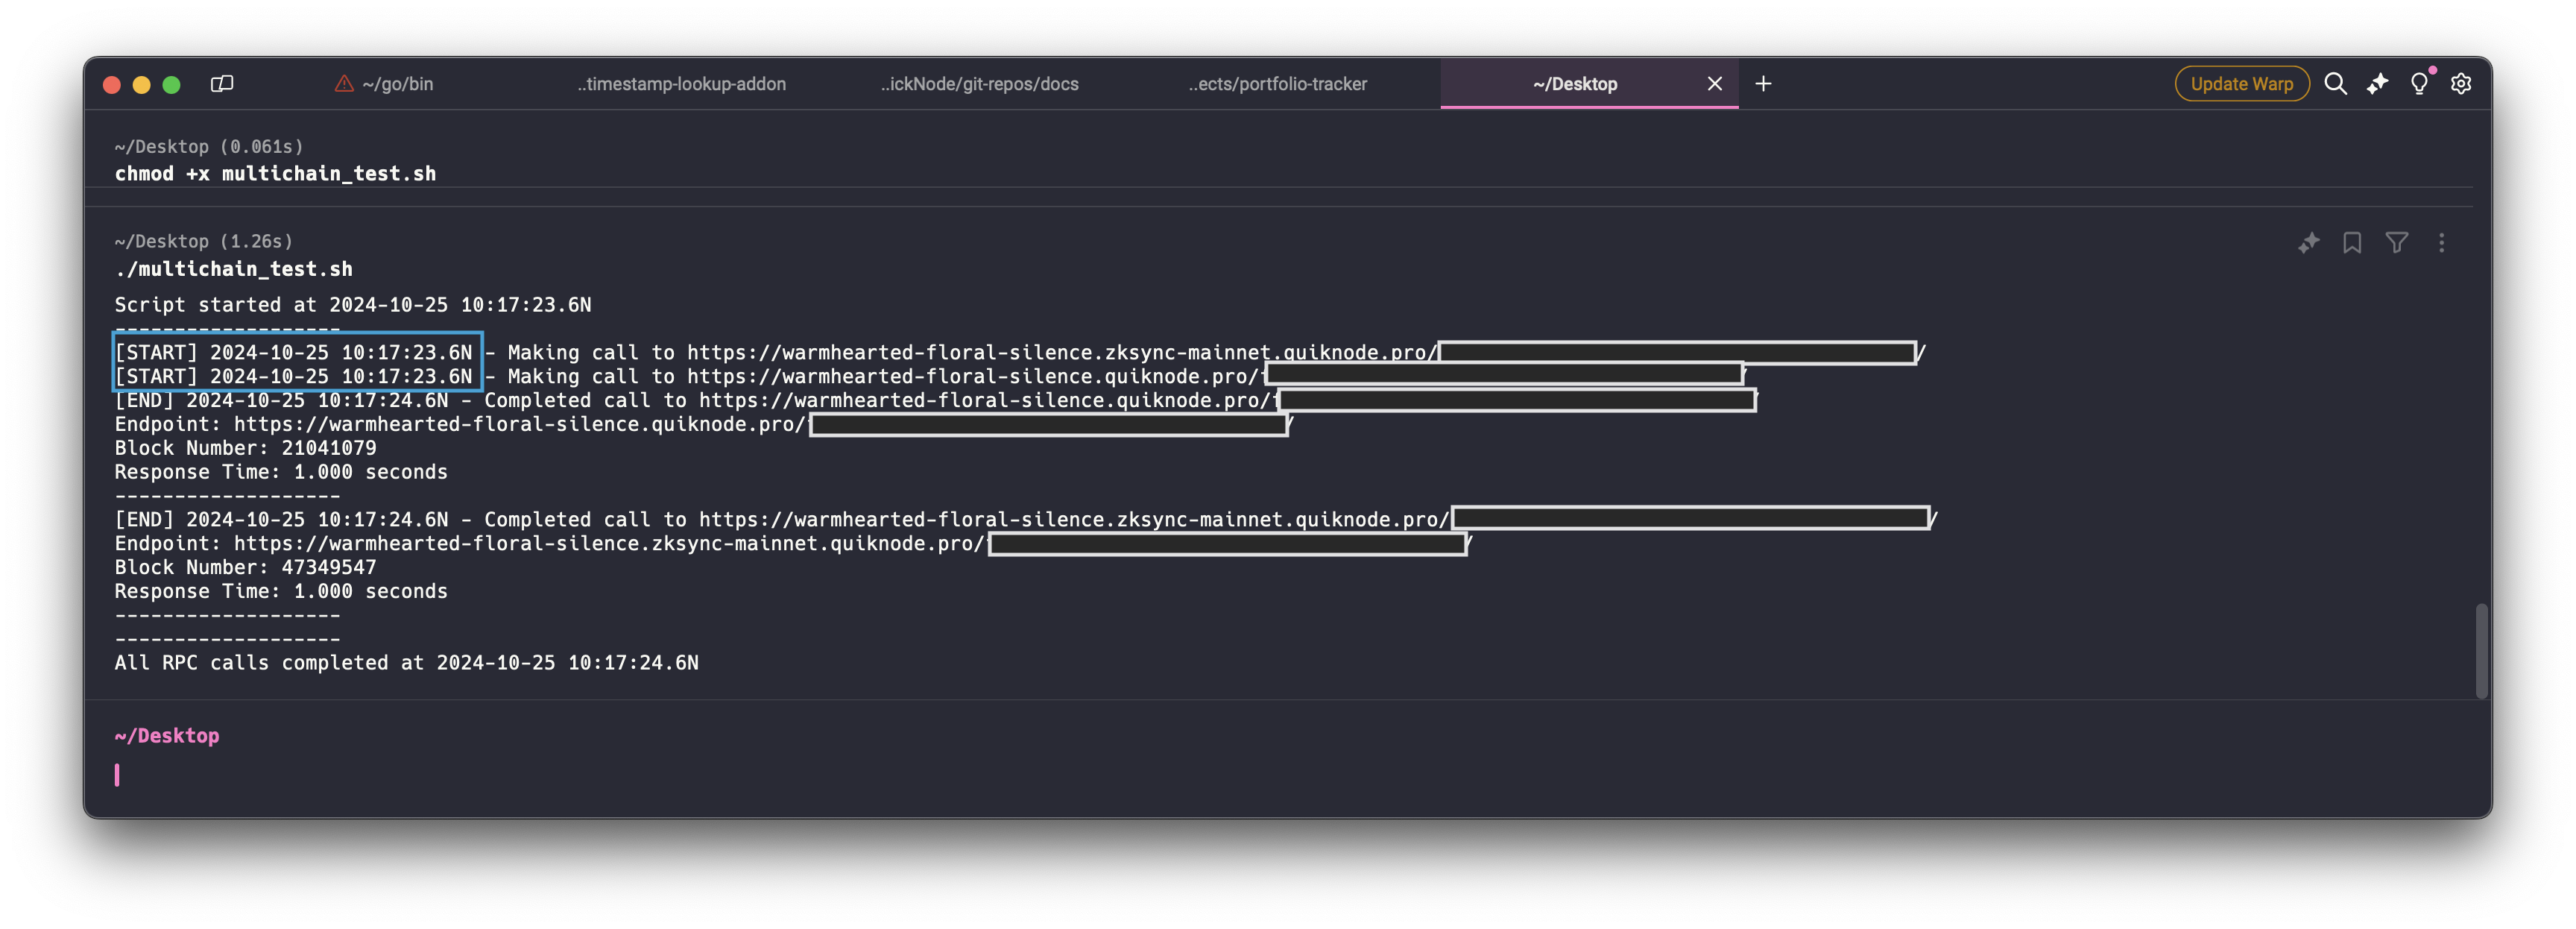
So, you have successfully run two RPC calls on different blockchains at the same time using only one Quicknode Multichain endpoint.
Conclusion
Quicknode's Multichain feature provides a structured way to manage multiple blockchain networks through a unified endpoint format. This approach reduces complexity, centralizes security settings, and is available to all users, whether on a free or paid plan. For projects working across different chains, this feature saves time and enhances operational efficiency.
If you need help or want to share what you are building, let us know on Discord or Twitter.