
11 min read
Présentation générale
🔥🔥🔥
Building a deflationary token protocol? Want to destroy a rugged NFT? Just want to have some fun with your community? The Solana SPL Token Program's Burn feature is what you need to take your Solana community to the next level.
In this guide, you'll learn how to burn Solana tokens using TypeScript and the SPL Token Program. By the end, you'll understand how to permanently remove tokens from circulation.
Ce dont vous aurez besoin
- A free Quicknode account, with a Solana devnet endpoint deployed
- Nodejs (version 16.15 or higher) installed
- TypeScript experience and the latest version of ts-node installed
- A Solana Paper wallet (.json) with Devnet SOL (Example script)
- One or more Devnet SPL tokens or Solana NFTs in your Devnet Wallet:
- Review our Guides: How to Create a Fungible SPL token with the Metaplex Token Standard and How to Mint an NFT on Solana using Typescript for more information
- Or mint some from the SPL token Faucet
Set Up Your Project
Create a new project directory in your terminal with the following:
mkdir burn-spl
cd burn-spl
Create a file for your app, app.ts:
echo > app.ts
Initialize your project with the "yes" flag to use default values for your new package:
yarn init --yes
#or
npm init --yes
Create a tsconfig.json with .json importing enabled:
tsc -init --resolveJsonModule true
Save your paper wallet with devnet SOL and one or more SPL tokens as guideSecret.json (format should be an array of 8-bit integers, e.g. [27,218,103, ...]). If you do not already have devnet SOL in your wallet, you can request some from the form below:
Note: Sending airdrop requests too frequently may trigger a 429 (Too Many Requests) error.
Install Solana Web3 & SPL Token Libraries
We will need to add the Solana Web3 and SPL Token libraries for this exercise. In your terminal, enter:
yarn add @solana/web3.js@1 @solana/spl-token
#or
npm install @solana/web3.js@1 @solana/spl-token
We will need a few components from these libraries and our secret key. Import them in app.ts at line 1 by adding:
import { Connection, PublicKey, Keypair, TransactionMessage, VersionedTransaction, SignatureStatus, TransactionConfirmationStatus, TransactionSignature } from "@solana/web3.js";
import { createBurnCheckedInstruction, TOKEN_PROGRAM_ID, getAssociatedTokenAddress } from "@solana/spl-token";
import secret from './guideSecret.json';

const WALLET = Keypair.fromSecretKey(new Uint8Array(secret));
Set Up Your Quicknode Endpoint
To build on Solana, you'll need an API endpoint to connect with the network. You're welcome to use public nodes or deploy and manage your own infrastructure; however, if you'd like 8x faster response times, you can leave the heavy lifting to us.
See why over 50% of projects on Solana choose Quicknode and sign up for an account here. We're going to use a Solana Devnet node.
Copy the HTTP Provider link:
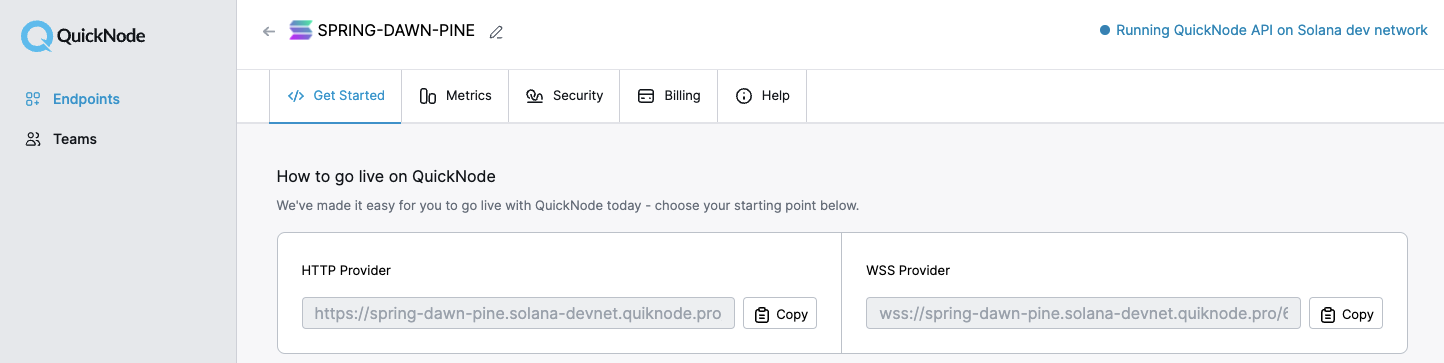
Inside app.ts under your import statements, declare your RPC and establish your Connection to Solana:
const QUICKNODE_RPC = 'https://example.solana-devnet.quiknode.pro/0123456/';
const SOLANA_CONNECTION = new Connection(QUICKNODE_RPC);
Your environment should look like this.
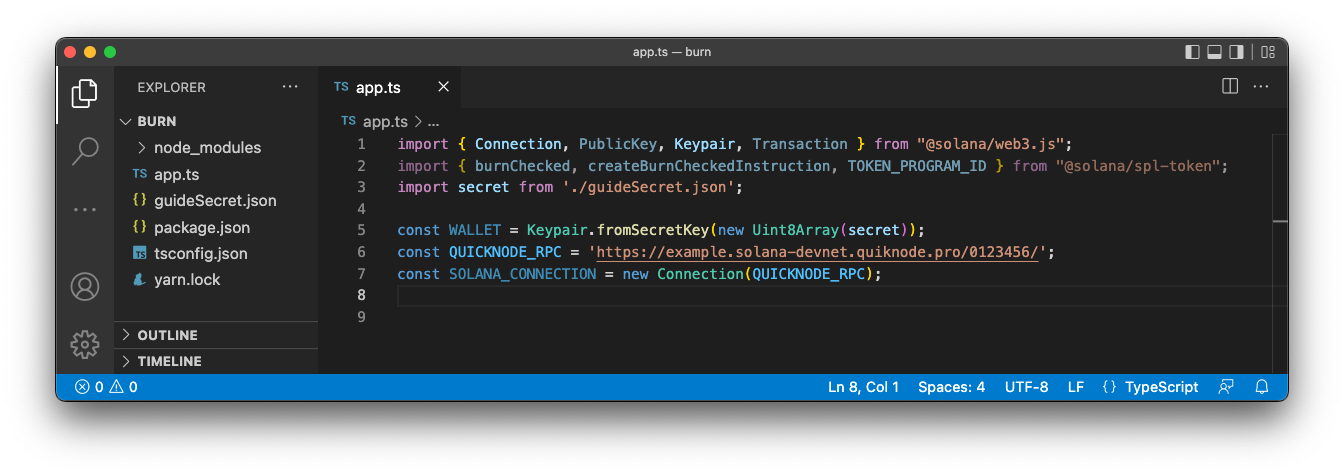
Ready? Let's build!
Set Up a Burn App
Declare the Mint Address
To burn an SPL token, you must have:
- Tokens in your wallet on the correct cluster (in this case, Devnet).
- The token's mint address.
To find the mint address if you do not already have it, head over to Solana Explorer. You should be able to see a list of all of your token holdings.
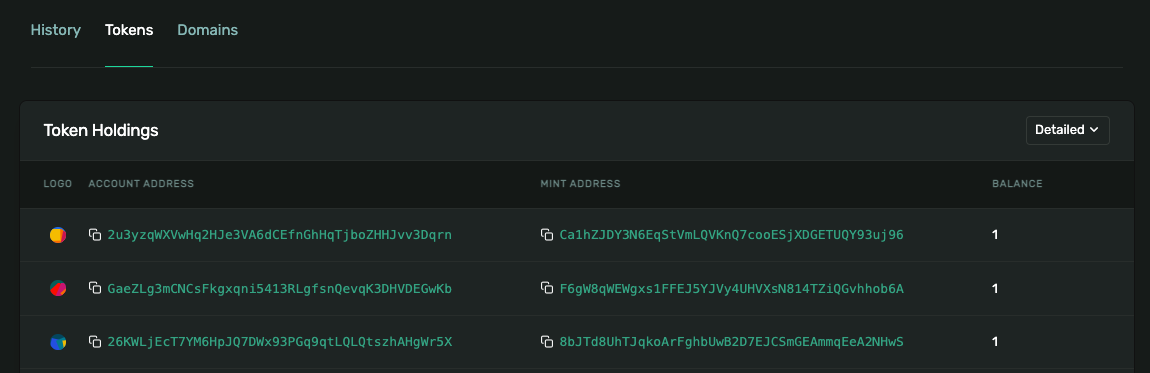
Copy the mint address for the token you would like to use. Click on the mint address and also note the number of decimals. This is important for performing any interaction with the SPL Token program.
If you do not have any SPL tokens on your devnet wallet (skip this step if you already have one), you can mint one for this demo at the SPL Token Faucet. You will need to connect your wallet to do this, so you may need to import your paper wallet into Phantom to do this:
- In Phantom, click on the circle in the top left corner to go to "Settings"
- Click your wallet to see a list of all of your wallets, and then click "Add/Connect Wallet"
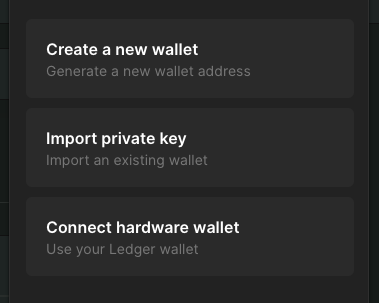
- Name your new wallet and paste the secret key (contents of guideSecret.json)
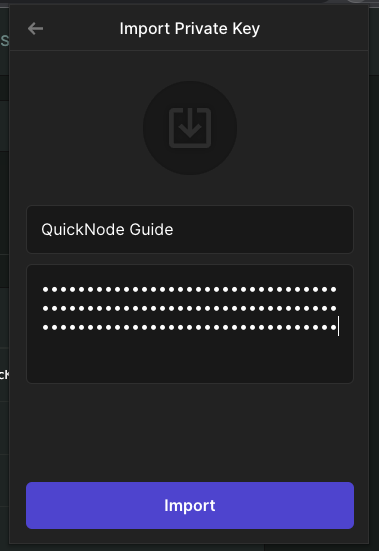
Follow the site's instructions to Mint 1,000 USDC-DEV. The mint address for this token is Gh9ZwEmdLJ8DscKNTkTqPbNwLNNBjuSzaG9Vp2KGtKJr (it has 6 decimals).
Once you have the token you plan to burn and its mint address, open app.ts and add this line:
const MINT_ADDRESS = 'Gh9ZwEmdLJ8DscKNTkTqPbNwLNNBjuSzaG9Vp2KGtKJr'; // USDC-Dev from spl-token-faucet.com | replace with the mint you would like to burn
const MINT_DECIMALS = 6; // Value for USDC-Dev from spl-token-faucet.com | replace with the no. decimals of mint you would like to burn
const BURN_QUANTITY = 1; // Number of tokens to burn (feel free to replace with any number - just make sure you have enough)
Define Helper Functions
We will need a transaction that will confirm that a transaction has been successfully processed by the chain. Below your Connection definition, add the following code:
async function confirmTransaction(
    connection: Connection,
    signature: TransactionSignature,
    desiredConfirmationStatus: TransactionConfirmationStatus = 'confirmed',
    timeout: number = 30000,
    pollInterval: number = 1000,
    searchTransactionHistory: boolean = false
): Promise<SignatureStatus> {
    const start = Date.now();

    while (Date.now() - start < timeout) {
        const { value: statuses } = await connection.getSignatureStatuses([signature], { searchTransactionHistory });

        if (!statuses || statuses.length === 0) {
            throw new Error('Failed to get signature status');
        }

        const status = statuses[0];

        if (status === null) {
            await new Promise(resolve => setTimeout(resolve, pollInterval));
            continue;
        }

        if (status.err) {
            throw new Error(`Transaction failed: ${JSON.stringify(status.err)}`);
        }

        if (status.confirmationStatus && status.confirmationStatus === desiredConfirmationStatus) {
            return status;
        }

        if (status.confirmationStatus === 'finalized') {
            return status;
        }

        await new Promise(resolve => setTimeout(resolve, pollInterval));
    }

    throw new Error(`Transaction confirmation timeout after ${timeout}ms`);
}
This function will poll the Solana network for the transaction status until it is either confirmed or the timeout is reached. We have included some default values for the timeout and poll interval, but you can adjust them as needed.
Create an Async Code Block
Add the following async code block to app.ts. This will frame out our app and create a few steps that we will walk through together:
(async () => {
    console.log(`Attempting to burn ${BURN_QUANTITY} [${MINT_ADDRESS}] tokens from Owner Wallet: ${WALLET.publicKey.toString()}`);
    // Step 1 - Fetch Associated Token Account Address

    // Step 2 - Create Burn Instructions

    // Step 3 - Fetch Blockhash

    // Step 4 - Assemble Transaction

    // Step 5 - Execute & Confirm Transaction

})()
Step-by-Step: Burning Tokens on Solana
Step 1 - Fetch Associated Token Address
In Step 1 of your code block, we will need to find the account address that holds the tokens we want to burn. As a reminder, the user's wallet does not hold the SPL tokens. The user's wallet owns a separate SPL Token account that holds those tokens. We must find that address (the Associated Token Address, ATA). SPL Token accounts are Program Derived Addresses seeded with the public key of the user's wallet and the token mint address. We can pass both into getAssociatedTokenAddress to find our address:
    // Step 1 - Fetch Associated Token Account Address
    console.log(`Step 1 - Fetch Token Account`);
    const account = await getAssociatedTokenAddress(new PublicKey(MINT_ADDRESS), WALLET.publicKey);
    console.log(`    ✅ - Associated Token Account Address: ${account.toString()}`);
Note: you can also find the ATA of an account using Solana. If you look at your token account details, you will see the "Mint Address" and the "Account Address." The account address is the ATA. You can click on it for more information, or copy/paste it into your account variable instead of using getAssociatedTokenAddress. Our token address is the account starting with F9Se...:
You can test your code by running ts-node app in your terminal. You should see a log with your ATA.
Step 2 - Create Burn Instructions
The Solana SPL token program comes with a handy method, createBurnCheckedInstruction, that takes the inputs we have gathered and generates a TransactionInstruction. In Step 2 of your app, add this code:
    // Step 2 - Create Burn Instructions
    console.log(`Step 2 - Create Burn Instructions`);
    const burnIx = createBurnCheckedInstruction(
      account, // PublicKey of Owner's Associated Token Account
      new PublicKey(MINT_ADDRESS), // Public Key of the Token Mint Address
      WALLET.publicKey, // Public Key of Owner's Wallet
      BURN_QUANTITY * (10**MINT_DECIMALS), // Number of tokens to burn
      MINT_DECIMALS // Number of Decimals of the Token Mint
    );
    console.log(`    ✅ - Burn Instruction Created`);
The biggest trick here is getting your types and parameter order correct. Addresses in this instruction are Public Keys, so we need to convert our Mint Address and Wallet. You can mouse over createBurnCheckInstructions to view the parameter inputs or ctrl/cmd + click it for more information about the method.
TypeScript should check that you have all the correct types, but you will need to ensure your parameters are entered in the right order.
Important, notice that we are multiplying BURN_QUANTITY by 10 to the power of the number of decimals. This is necessary for interacting with the SPL token program because they are used to represent the level of precision for the token's value. Without the decimal value, these operations may not produce accurate results and could lead to errors in the token's value.
Step 3 - Fetch the Latest Blockhash
To ensure your transaction efficiently propagates through the network, you will need the latest blockhash. Fetch the latest blockhash information from the cluster using the getLatestBlockhash method. This is necessary to confirm that our transaction has succeeded (and not timed out). Add this code to Step 3 of your app:
    // Step 3 - Fetch Blockhash
    console.log(`Step 3 - Fetch Blockhash`);
    const { blockhash, lastValidBlockHeight } = await SOLANA_CONNECTION.getLatestBlockhash('finalized');
    console.log(`    ✅ - Latest Blockhash: ${blockhash}`);
You can run your code to make sure everything is working. In your terminal, type ts-node app. You should see the latest blockhash!
Step 4 - Assemble Transaction
We will use versioned transactions to burn our token (though legacy should also work). Check our Guide on How to Use Versioned Transactions if they are new to you. In Step 4 of app.ts add:
    // Step 4 - Assemble Transaction
    console.log(`Step 4 - Assemble Transaction`);
    const messageV0 = new TransactionMessage({
      payerKey: WALLET.publicKey,
      recentBlockhash: blockhash,
      instructions: [burnIx]
    }).compileToV0Message();
    const transaction = new VersionedTransaction(messageV0);
    transaction.sign([WALLET]);
    console.log(`    ✅ - Transaction Created and Signed`);
Using our burnIx parameter and the latestBlockhash, we can create a new MessageV0 by constructing a new Message and executing the .compileToV0Message() method. We then pass our message into a new instance of VersionedTransaction. Finally, we sign the transaction by passing our WALLET into transaction.sign as an array (this allows for multiple signers on more complex transactions).
TypeScript should alert you if there are any errors in your code here, but if you are having trouble, hop on our Discord, and we will be happy to help.
Step 5 - Execute & Confirm Transaction
Alright. Everything is ready. We just need to send our transaction to the cluster and confirm that it has been successfully added to the chain. We can do this with the sendTransaction method and the confirmTransaction function we defined earlier. In Step 5 of app.ts, add:
    // Step 5 - Execute & Confirm Transaction
    console.log(`Step 5 - Execute & Confirm Transaction`);
    const txid = await SOLANA_CONNECTION.sendTransaction(transaction);
    console.log("    ✅ - Transaction sent to network");
    const confirmation = await confirmTransaction(SOLANA_CONNECTION, txid);
    if (confirmation.err) { throw new Error("    ❌ - Transaction not confirmed.") }
    console.log('🔥 SUCCESSFUL BURN!🔥', '\n', `https://explorer.solana.com/tx/${txid}?cluster=devnet`);
Here is a quick summary of what is happening:
- sendTransaction sends our transaction to the network and will return a promise for a transaction ID, txid.
- We pass that txid into confirmTransaction to check that our transaction has been confirmed.
- Finally, if our confirmation returns an error, we throw an error.
Run Your Code
You should be all set--let's make some fire! In your terminal, type:
ts-node app.ts

You should see the transaction progress in your terminal:
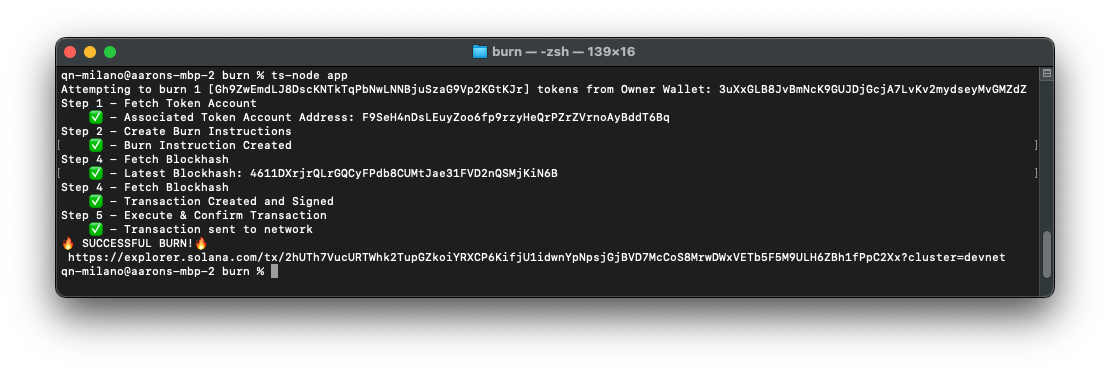
You should be able to open your Solana Explorer link and scroll to the instructions to verify that the burn was a success!
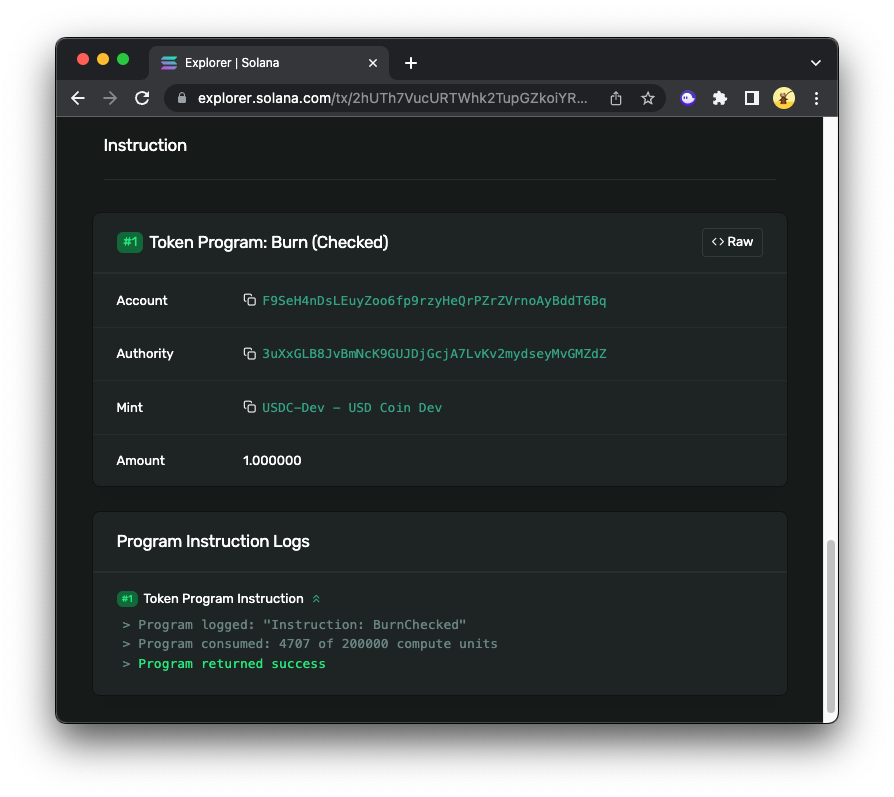
Great work!
Wrap Up: Let it Burn
Let it burn. You now have the tools to build burn tools on Solana! This will work for any SPL token, even NFTs (NFTs will have decimals = 0).
Here are a couple of starter ideas to keep building off of this example:
- Update this script to include a pre and post-token balance (Hint: Get All Token Accounts Held by a Solana Wallet)
- Create a simple burn page that allows a user to select a token in their account and burn it (Hint: How to Connect Users to Your dApp with the Solana Wallet Adapter and Scaffold)
You may also have other questions about burning Solana tokens. Here are common ones that we get:
What is a Solana burn address?
The most common burn address on Solana is 1nc1nerator11111111111111111111111111111111. It has no known private key, making any tokens sent there permanently unrecoverable.
What are other ways to burn SPL tokens?
Besides using the SPL Token Program programmatically, you can:
- Use the spl-token burn CLI command
- Transfer to the burn address manually
- Implement custom burn logic in smart contracts
Why did my token burn transaction fail?
Here are some common pitfalls:
- Wrong token decimals
- Trying to burn from an empty token account
- Using an expired blockhash
- Forgetting to sign the transaction properly
Why would I burn SPL tokens?
Burning tokens reduces supply, and can support:
- Deflationary tokenomics
- NFT destruction
- Removing spam tokens
- Token lifecycle events like migrations or redemptions
We love building and want to hear what you are cooking. Drop us a line on Discord or Twitter to tell us what you are up to!