
読了時間:11分
概要
さまざまなプロトコルにまたがる複数のERC-20トークンの管理は、すぐに頭痛の種になりかねません。時間が経つにつれて、ウォレットには「ダスト」(ごく少量の低価値なトークン)が蓄積されていきますが、それらを整理するには、多くの場合、複数の承認やスワップ、手数料が必要となります。
EIP-7702 streamlines this process by letting you authorize a smart contract to perform multiple actions in a single atomic transaction.
In this guide, you’ll build a decentralized application (dApp) that batches multiple ERC-20 token swaps into one seamless transaction, converting them into a single asset. You’ll use Quicknode add-ons to fetch token balances, get the best swap quotes, and execute batch swaps on the Base and Optimism networks.
By the end, you’ll have a fully functional dApp that turns tedious wallet cleanup into a fast, one-click operation.
始める準備はできましたか?
学習内容
- dAppでEIP-7702を実装し、トランザクションの一括実行を行う方法
- Covalent Token API アドオンを使用してウォレットの残高を取得する方法
- AerodromeおよびVelodromeのスワップAPIを使用して、最適化されたスワップ相場を取得する方法
- これらの技術を組み合わせて、本番環境向けのアプリケーションを構築する方法
必要なもの
- Base Optimism Quicknode
- Covalent Token APIアドオン(無料プランは利用不可)およびAerodromeまたはVelodrome Swap APIアドオン(無料プランあり)
- お使いのマシンにNode.jsがインストールされている
- JavaScript/TypeScriptおよびReactに関する基礎知識
- A MetaMask wallet with some ERC20 tokens and ETH on Base Mainnet or Optimism Mainnet
アプリケーションのFlow アーキテクチャ
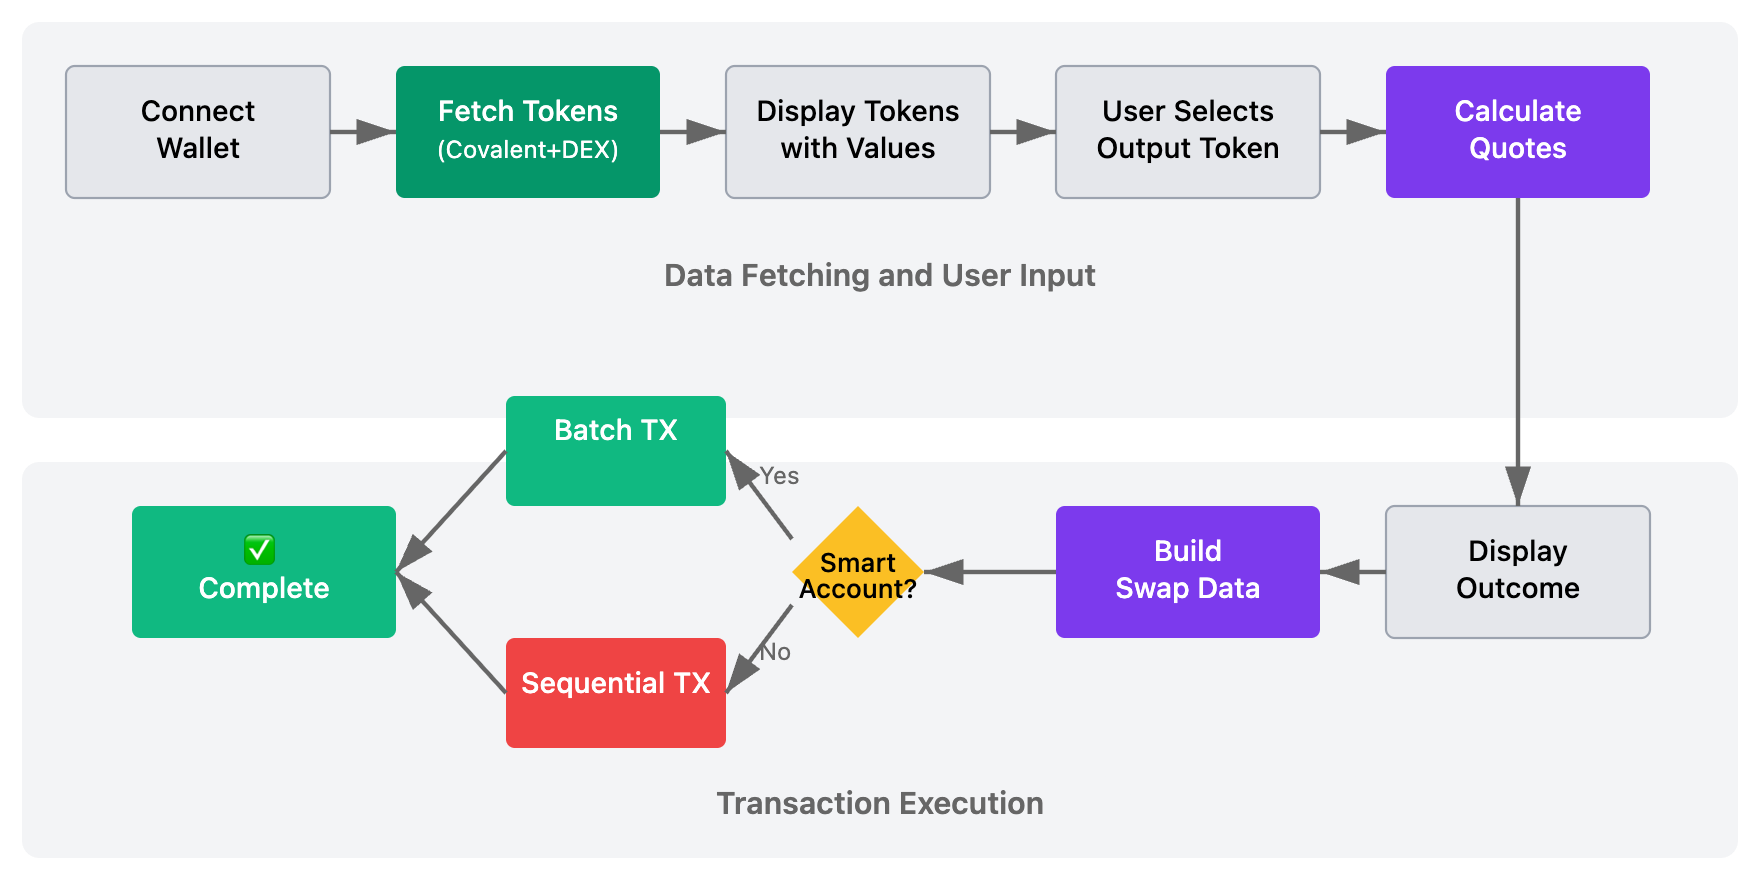
コードを詳しく見る前に、まずアプリケーションのワークフローを大まかに把握しておきましょう。このプロセスでは、複数のAPIを活用してシンプルなフロントエンド体験を実現しています。
The flowchart below provides a high-level overview of the application's stages, illustrating the user's journey from connecting their wallet to the final transaction.
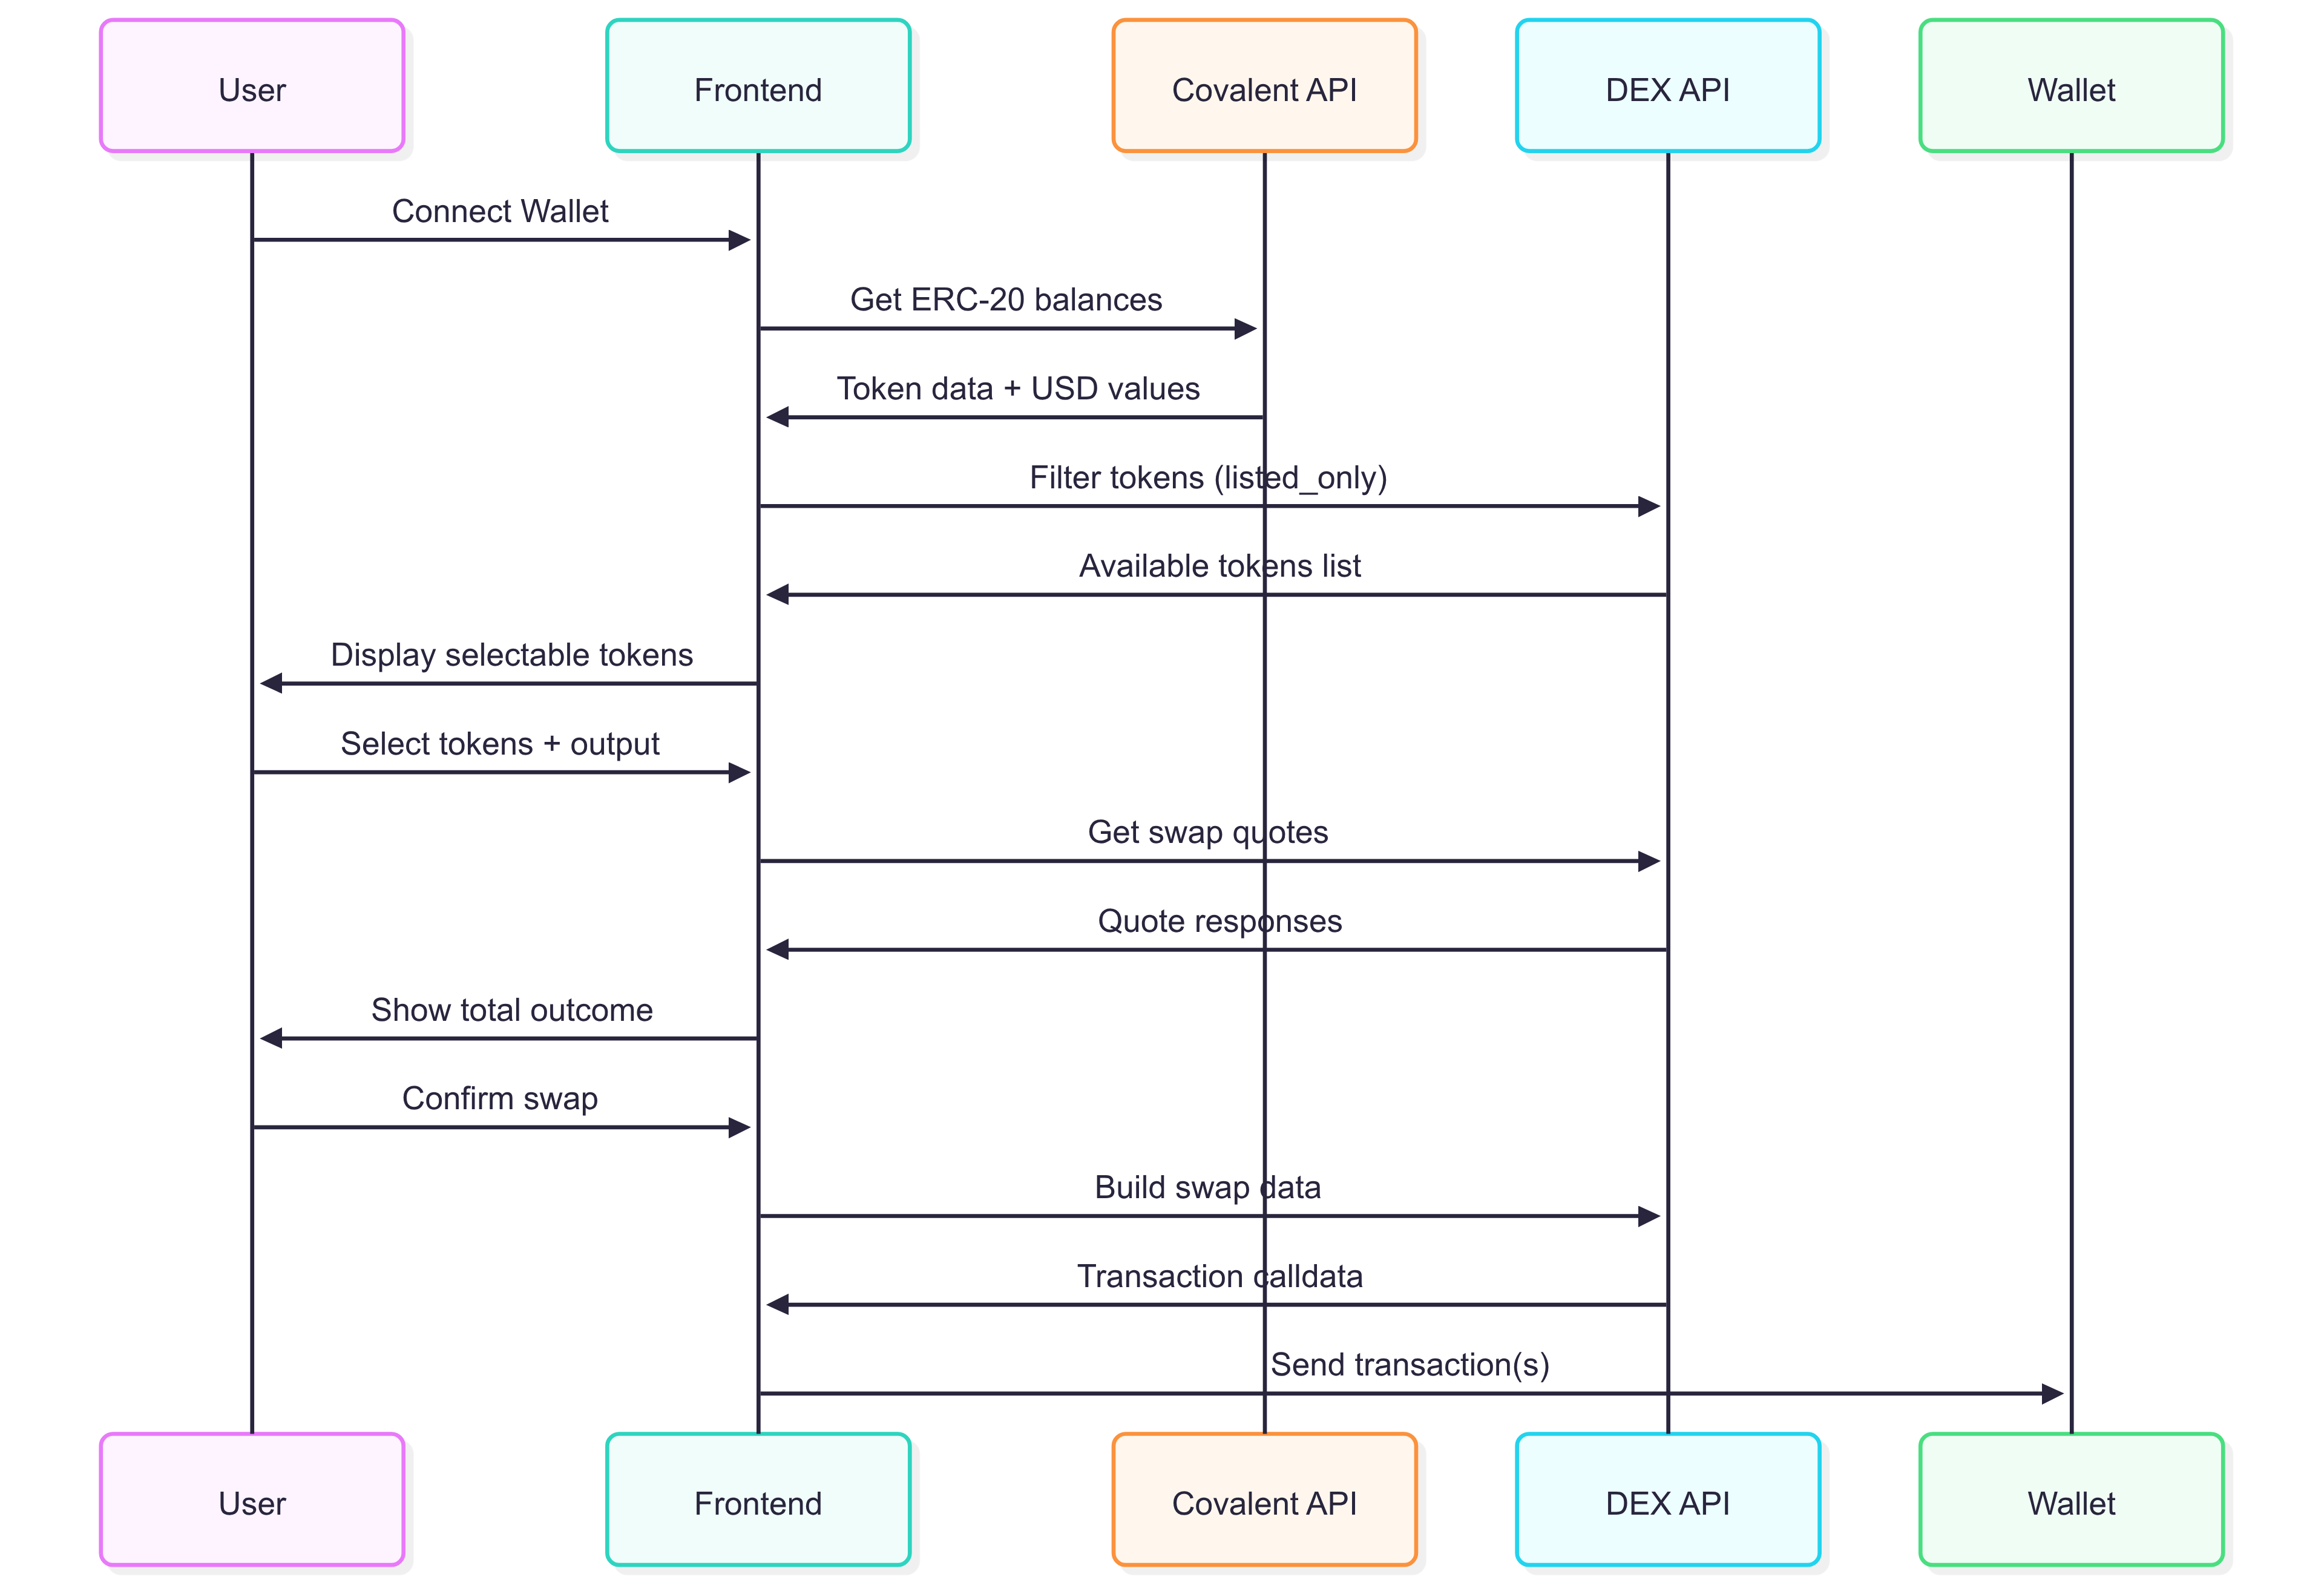
より詳細な技術的な観点から、以下のシーケンス図は、裏側で行われている通信の流れを示しています。
中核技術の解説
Our application's power comes from the combination of EIP-7702 with specialized Quicknode add-ons. Let's break down each component.
EIP-7702がバッチスワップを可能にする仕組み
EIP-7702は、外部所有アカウント(EOA)が単一のトランザクションにおいて一時的にスマートコントラクトのように振る舞えるようにする規格です。これにより、DeFiにおける大きな課題である「複数の操作の実行」が解決されます。
従来、10種類のトークンを交換するには、少なくとも20回の個別の操作が必要でした:10 承認する 取引と10 スワップ トランザクションは、それぞれ署名とガス料金が必要となります。
EIP-7702 streamlines this by introducing a new transaction type that can include a 代表団. This delegation authorizes a specific implementation contract to execute a series of calls on the user's behalf. This enables:
- 一括実行:承認された契約は、1つの取引内で個々のスワップをすべて処理します。
- アトミックな成功:すべての操作が同時に成功するか、同時に失敗するため、部分的な失敗状態が生じるのを防ぎます。
- ガス効率:複数の操作を1つのトランザクションにまとめることで、ガスの総コストを大幅に削減できます。
厳密に言えば、この機能はdAppに対して wallet_sendCalls JSON-RPC メソッド。これは、wagmi を使って簡単にアクセスできます。 useSendCalls フック。
EIP-7702の現状
EIP-7702 is still very new, and wallet support is evolving. As of writing, MetaMaskはすでにEIP-7702をウォレットのUIに組み込んでいます, providing a seamless user experience. When you initiate an EIP-7702 transaction, MetaMask will prompt you to upgrade your wallet to a スマートアカウント. これは、MetaMaskの監査済み実装コントラクトに権限を委譲する、1回限りの可逆的なプロセスであり、 EIP7702 DeleGator.
Due to security concerns, it's likely that major wallets will manage their own delegation contracts rather than allowing dApps to specify arbitrary ones. Thus, wallets development is the primary focus for EIP-7702 adoption. As only a few wallets support EIP-7702, we will suggest using MetaMask for this guide.
トークンの残高を取得する方法
First at the workflow level, you need to know which ERC20 tokens a user has. To do this, we'll use the Covalent Token API add-on. This add-on provides a simple and fast way to fetch token balances, instead of manually querying each token's balance.
アプリでの使い方
ここでは、 getTokenBalancesForWalletAddress endpoint to populate the user's token list.
const response = await client.BalanceService.getTokenBalancesForWalletAddress(
	chainName as any,
	住所
)
APIの応答例
をクエリすると、 getTokenBalancesForWalletAddress endpoint from the Covalent API, you'll receive a detailed JSON object. The most important part is the items array, where each object represents a single token in the user's wallet.
{
	"address": "0x0a417ddb75dc491c90f044ea725e8329a1592d00",
	"quote_currency": "USD",
	"chain_id": 8453,
	"items": [
		{
			"contract_decimals": 6,
			"contract_name": "USD Coin",
			"contract_ticker_symbol": "USDC",
			"contract_address": "0x833589fcd6edb6e08f4c7c32d4f71b54bda02913",
			"supports_erc": ["erc20"],
			"logo_url": "https://logos.covalenthq.com/tokens/8453/0x833589fcd6edb6e08f4c7c32d4f71b54bda02913.png",
			"native_token": false,
			"is_spam": false,
			"balance": "2503277",
			"quote": 2.5007737,
			"pretty_quote": "$2.50"
			// ...
		}
	]
}
この応答に基づき、当社のアプリケーションでは次のような主要フィールドを使用します。 contract_address, バランス, 引用 (米ドル換算額)、そして is_spam トークン・ポートフォリオ一覧を生成するためのフラグ。
In addition to fetching the user's current tokens, our app also needs a list of valid tokens they can swap. For this, we use the Aerodrome/Velodrome Swap API's /v1/tokens endpoint.
{
	"tokens": [
		{
			"address": "0xd9aAEc86B65D86f6A7B5B1b0c42FFA531710b6CA",
			"symbol": "USDbC",
			"decimals": 6,
			"listed": true
		}
		// ...
	]
}
最適なスワップレートを取得する方法
Once a user selects tokens to swap, you need to find the best possible trading route. The Aerodrome Swap API (on Base) and Velodrome Swap API (on Optimism) Swap API add-ons find the optimal price across all available liquidity pools.
APIの応答例
その /v1/quote endpoint takes a source token, destination token, and an amount, then returns the best possible exchange rate. A successful response will look like this:
{
	"input": {
		"token": {
			"address": "0x940181a94A35A4569E4529A3CDfB74e38FD98631",
			"symbol": "AERO",
			"decimals": 18
		},
		"amount": 1,
		"amount_wei": "1000000000000000000",
		"price_usd": 0.8814186513914624,
		"value_usd": 0.8814186513914624
	},
	"output": {
		"token": {
			"address": "0x833589fCD6eDb6E08f4c7C32D4f71b54bdA02913",
			"symbol": "USDC",
			"decimals": 6
		},
		"amount": 0.876388,
		"amount_wei": "876388",
		"min_amount": 0.872007,
		"min_amount_wei": "872007",
		"price_usd": 0.999567128249789,
		"value_usd": 0.876008636392576
	},
	"route": {
		"path": [
			{
				"pool_address": "0x6cDcb1C4A4D1C3C6d054b27AC5B77e89eAFb971d",
				"is_stable": false,
				"is_cl": false,
				"hop_number": 1
			}
		],
		"hops": 1,
		"type": "direct"
	},
	"execution_price": 0.876388,
	"slippage": 0.005
}
その v1/引用 endpoint takes a source token, destination token, and amount, and returns the best possible exchange rate. We'll use this to show users the expected output before they confirm the swap.
アプリでの使い方
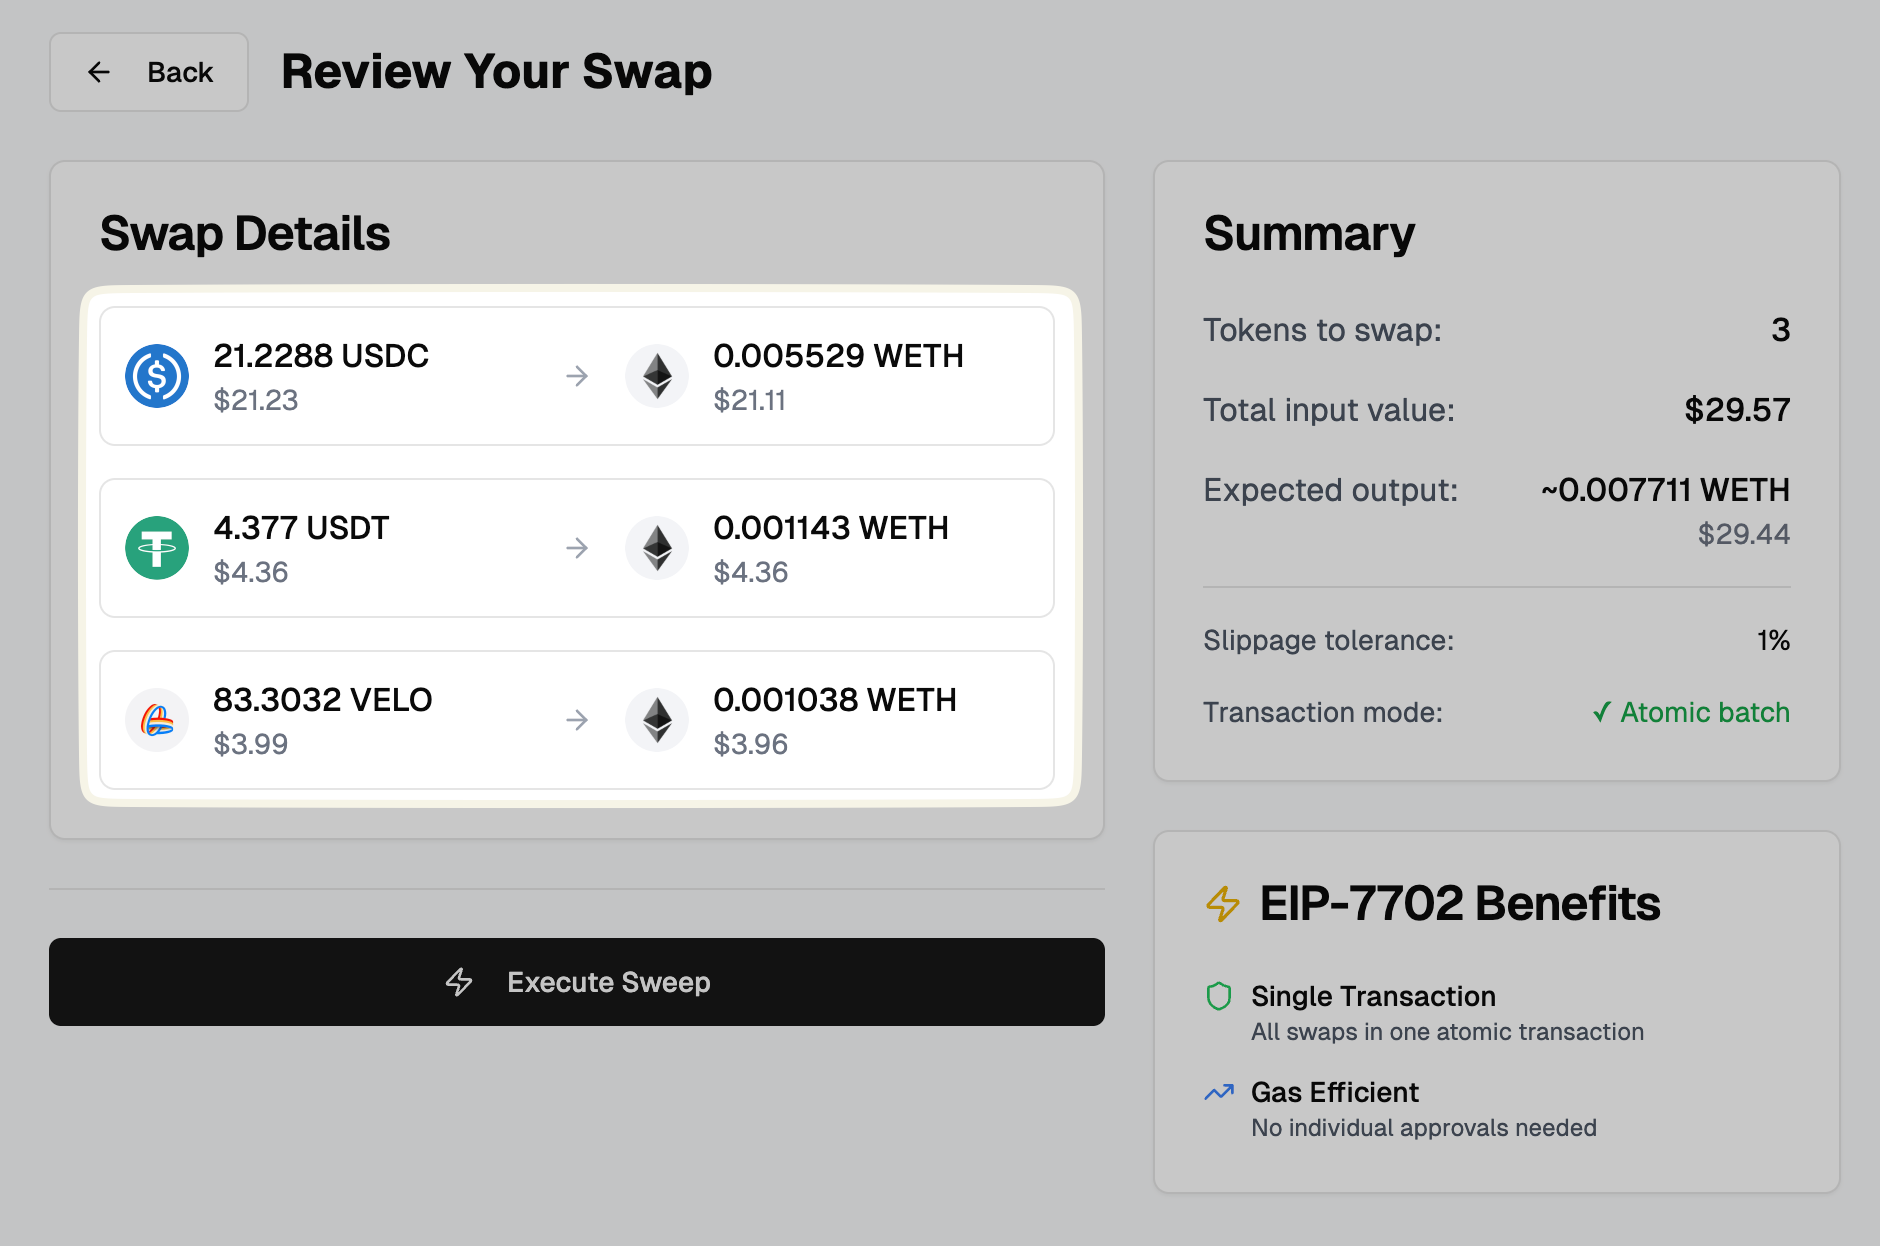
In our frontend, we call our own API route which in turn queries this endpoint. The fetched quote data is then used to populate the confirmation screen.
const tokenBalance = BigInt(token.balance)
// Convert from wei to token units for API call
const tokenAmount = formatUnits(tokenBalance, token.contract_decimals)

const quoteUrl = `/api/swap/quote?chainId=${chainId}&from_token=${tokenAddr}&to_token=${outcomeTokenAddress}&amount=${tokenAmount}&slippage=${APP_CONFIG.SLIPPAGE_TOLERANCE}`

const response = await fetch(quoteUrl)
This allows us to present a clear breakdown of the expected outcomes to the user before they sign the final transaction.
スワップ取引の構築方法
見積もりを受け取った後、 v1/swap/build endpoint returns ready-to-send transaction calldata, which is a JSON object containing everything needed to execute the swap. We primarily need the データ そして ~へ 各取引の項目。
APIの応答例
"transactions": [
    {
      "type": "approval",
      "description": "Approve AERO for swap",
      "transaction": {
        "to": "0x940181a94A35A4569E4529A3CDfB74e38FD98631",
        "data": "0x095ea7b3...", // Truncated for visual clarity
        "value": "0x0",
        "gas": "0x186a0",
        "gasPrice": "0x5c7742",
        "nonce": "0xc",
        "chainId": "0x2105",
        "from": "0x1539F7fBe3C26F5611DD4A449236180990F3e80F"
      }
    },
    {
      "type": "swap",
      "description": "Swap 1.0 AERO to USDC",
      "transaction": {
        "from": "0x1539F7fBe3C26F5611DD4A449236180990F3e80F",
        "to": "0x6Cb442acF35158D5eDa88fe602221b67B400Be3E",
        "value": "0x0",
        "data": "0x24856bc30...", // Truncated for visual clarity
        "nonce": "0xc",
        "chainId": "0x2105",
        "gas": "0x493e0",
        "gasPrice": "0x6af87c"
      }
    }
]
アプリでの使い方
当社の use-swap-builder.ts hook calls this endpoint for every token the user has selected. It then processes each response to assemble the final array of calls.
const tokenAmount = formatUnits(BigInt(token.balance), token.contract_decimals)

const buildParams: SwapBuildParams = {
	from_token: tokenAddr as Address,
	to_token: outcomeTokenAddress as Address,
	amount: tokenAmount, // Convert to token units, not wei
	wallet_address: userWalletAddress as Address, // User's actual wallet address
	slippage: APP_CONFIG.SLIPPAGE_TOLERANCE,
}

const buildUrl = `/api/swap/build?chainId=${chainId}`

const response = await fetch(buildUrl, {
	method: 'POST',
	headers: {
		'Content-Type': 'application/json',
	},
	body: JSON.stringify(buildParams),
})
バッチトランザクションの実行方法
最後のステップは、準備したすべての取引を一度に送信することです。Wagmiの useSendCalls このフックを使えば、これが驚くほど簡単になり、バッチ処理で実行するトランザクションオブジェクトの配列を渡すことができます。
その 呼び出し parameter is an array where each object represents a single transaction we want to perform. We will construct this array by mapping over the user's selected tokens and using the data from the /v1/swap/build endpoint.
また、以下の設定を行います。 experimental_fallback ~するオプション true, which allows the transaction to fall back to a regular transaction if the wallet does not support EIP-7702.
{
	// Build transaction calls for batch execution using Swap APIs
	const calls = await buildSwapCalls(
		selectedTokens,
		tokens,
		outcomeToken,
		chainId,
		住所
	)

	if (calls.length === 0) {
		throw new Error('No valid swap calls could be built')
	}

	// Execute batch transaction using MetaMask EIP-7702, with fallback for non-supporting wallets
	sendCalls({ calls, experimental_fallback: true })
}
バッチスワップアプリの構築
それでは、プロジェクトを設定して、ローカルマシンでアプリケーションを実行してみましょう。
前提条件
Before running the app, you need a Quicknode endpoint and the required add-ons, along with WalletConnect Project ID.
Quicknodeの設定
- Create Endpoints: Log in to your Quicknode account and create a new endpoint for each chain you want to support. For this guide, we will use Base and Optimism.
Since these API add-ons are available on mainnet only, you will need to set up your Quicknode account with a mainnet endpoint.
- アドオンのインストール:
- Once you are in your endpoint's dashboard, navigate to the Add-ons for your endpoint.
- Covalent Token APIアドオンをインストールしてください。
- Install the swap API add-ons for the chains you want to support:
- 対象: Base:Aerodrome Swap APIをインストールする
- 「」について Optimism:Velodrome Swap APIをインストールする
You only need to install the add-on(s) for the chain(s) you plan to support. The free tier is sufficient to get started.
-
Covalent API キーの取得方法:「Covalent Token API」アドオンの横にある「ダッシュボードにサインイン」をクリックします。これにより、Covalent ダッシュボードにリダイレクトされ、そこで API キーを確認できます。
-
Swap APIのURLを取得する: クリック はじめに 「Aerodrome」または「Velodrome Swap API」アドオンの横にあります。これにより、アプリケーションで使用する必要がある基本APIのURLが表示されます。以下のURLの前にあるURLを使用してください。
/v1/...この部分については、コード内で具体的なエンドポイントを追加するため、ここでは割愛します。完成形は次のような感じになるはずです:https://YOUR-QUICKNODE-ENDPOINT-URL/addon/YOUR-ADDON-ID
Reown(旧WalletConnect)の設定
-
Reown(旧WalletConnect)プロジェクトを作成する:Reown Cloudにアクセスし、新しいプロジェクトを作成します。プロジェクト名は自由に設定できます。
-
プロジェクトIDの取得:プロジェクトを作成すると、プロジェクトダッシュボードにリダイレクトされます。ここで、アプリケーションで使用する必要があるプロジェクトIDを確認できます。
プロジェクトの設定
- リポジトリのクローン作成:リポジトリをローカルマシンにクローンします。
git clone https://github.com/quiknode-labs/qn-guide-examples.git
cd qn-guide-examples/sample-dapps/token-sweeper-eip-7702
- 依存関係のインストール:お好みのパッケージマネージャーを使用して、プロジェクトの依存関係をインストールしてください。
npm install
# or
yarn install
# or
pnpm install
- 環境変数の設定: [作成]
.env.localfile in the root of the project by copying the.env.exampleファイル。
cp .env.example .env.local
さあ、開いてください .env.local そして、関連する環境変数を追加します。
# API Keys (Server-side only)
COVALENT_API_KEY=your_covalent_api_key_here

# WalletConnect Project ID (Required for RainbowKit - client-side needed)
NEXT_PUBLIC_WALLETCONNECT_PROJECT_ID=your_walletconnect_project_id_here

# RPC URLs
NEXT_PUBLIC_BASE_RPC_URL=your_base_rpc_url_here
NEXT_PUBLIC_OPTIMISM_RPC_URL=your_optimism_rpc_url_here

# Aerodrome/Velodrome API URLs (Required for real swap functionality)
# Note: These are now server-side only
AERODROME_BASE_API=your_quicknode_aerodrome_base_api_here
VELODROME_OPTIMISM_API=your_quicknode_velodrome_optimism_api_here
- アプリケーションの実行:開発サーバーを起動します。
npm run dev
# or
yarn dev
# or
pnpm dev
ブラウザを開いて、 http://localhost:3000 アプリの実際の動作を確認するには。
- アプリケーションのテスト:アプリで以下の手順を試してみてください。
- ウォレットの接続:MetaMask を使用してアプリに接続する
- Switch Network: Ensure you're on Base or Optimism mainnet
- トークンの表示:このアプリでは、ERC-20トークンの残高が表示されます
- トークンの選択:交換するトークンと出力トークンを選択してください
- 見積もりの取得:スワップの見積もりと総生産量を確認する
- バッチを実行:取引を確認してください(必要に応じて、MetaMaskからスマートアカウントのアップグレードを求めるメッセージが表示されます)
デプロイの準備が整ったら、Vercel や Netlify といったプラットフォームを利用すれば、Next.js アプリケーションとシームレスに連携でき、開発環境から本番環境への移行をスムーズに行うことができます。
結論
You've successfully built a Token Sweeper dApp that demonstrates the power of EIP-7702 for batch transactions. This application showcases how Quicknode's add-ons eliminate the need for complex backend infrastructure while providing enterprise-grade functionality.
The combination of Covalent's comprehensive token data, Aerodrome and Velodrome's optimized DEX routing, and EIP-7702's batch execution creates a seamless user experience that allows users to swap tokens with minimal friction.
If you have any questions, feel free to use our Discord server or share feedback in the feedback section at the end of this page. Stay up to date with the latest by following us on Twitter and our Telegram announcement channel.