Intro to The Graph: Indexed Data for dApps
Intro to The Graph: Indexed Data for dApps
Most Ethereum dApps have two parts to their Infrastructure (Simple version): Front-end (Running in-browser) An Ethereum Node (Interface to the ETH network)

March 5, 2019 — 7 min read
What is The Graph, how to create a subgraph, and how does it help my dApp?
Most Ethereum dApps have two parts to their Infrastructure (Simple version):
Front-end (Running in-browser)
An Ethereum Node (Interface to the ETH network)
When a transaction occurs on Ethereum, it emits events. The Front-end watches for these events and updates the UI accordingly. dApps can do limited types of queries to an Ethereum node to show data on the front-end.
But dApps can’t live with just transactions, events and those minimal queries. To provide a full user experience, a dApp needs to process at least its own data, to show a particular user’s activity, build a user profile, show analytics and enable multiple features… How can we do all that now?
A number of dApp development teams are doing this by building their own custom solutions — scraping blockchain data, tracking events, transactions, and storing them in a traditional centralized database. But we want trust minimization on web3, right?
Summarizing the problem —
“dApps need indexed data to perform large-scale queries to enable a full-featured User Experience in a trust-minimized way”
Enter: The Graph.
The Graph란 무엇인가요?
The Graph team is solving this problem by building a decentralized protocol which will be enabled by Graph Nodes processing Ethereum events and storing them as indexed data which dApps can query through an API endpoint.
Graph Protocol falls into a category we refer to as a layer 2 read-scalability solution. Its purpose is to enable decentralized applications (dApps) to query public blockchain data efficiently and trustlessly via a service that, like blockchains and the Internet itself, operates as a public utility. This is in the interest of minimizing the role of brittle, centralized infrastructure seen in many “decentralized” application architectures today. — Graph Protocol Specification
These Indexes (“subgraphs”) are currently being hosted by The Graph team. But, in the future, these Indexes will live on fully decentralized network of Graph Nodes.
How does The Graph work?
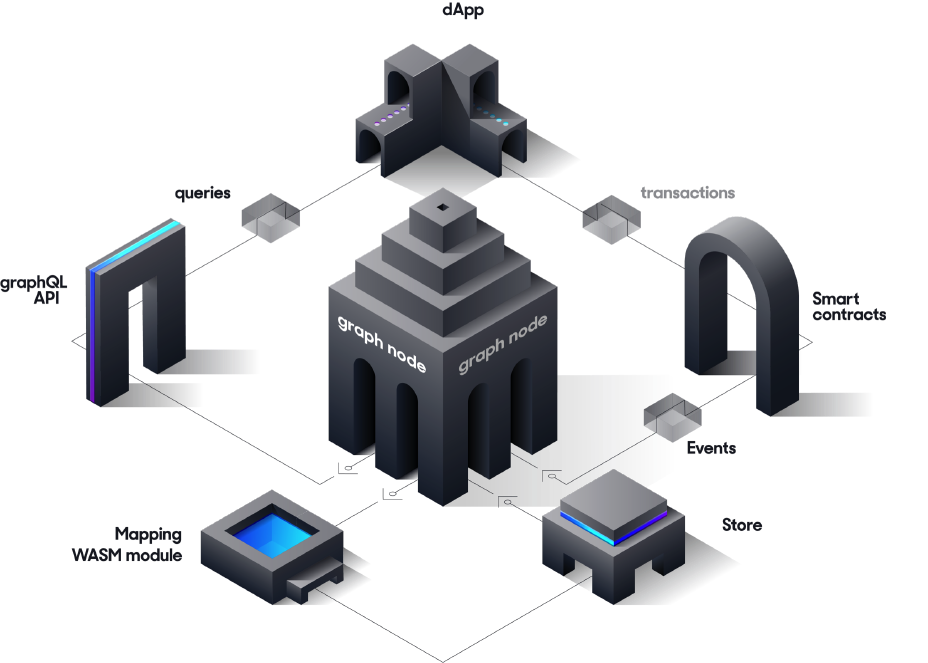
Let's dig deeper and understand how The Graph actually works:
dApps (through their smart contracts) create Ethereum transactions, which emit events.
Graph Nodes scan every Ethereum block looking for events.
Graph Nodes find events for your subgraph in Ethereum blocks and runs the mapping handlers you provided. This mapping decides how data gets stored and updated in Graph Nodes.
Your dApp can query this data through GraphQL APIs, which get translated by Graph Nodes to fetch indexed data.
So, what are we waiting for? Let’s build a Subgraph!
Build a Subgraph
Let’s use a sample smart contract with Truffle project and build a subgraph.
Graph Explorer
Using Graph Explorer you can explore other subgraphs built by the community. We can also query subgraphs using Graph Explorer UI.
We need to create an account on Graph Explorer and get an Access Token, which will be used while deploying our subgraph on Graph Nodes (hosted by The Graph team). So let's create an account on the Graph Explorer.
Create a subgraph using Graph Explorer UI with name “example”.
Now we need to install Graph-CLI in our system (I am using Ubuntu 16.10):
sudo yarn global add @graphprotocol/graph-cli
Let’s create an example-subgraph by using the command below:
graph init buddies2705/example-subgraph example-subgraph// Command Syntax
graph init <GITHUB_USER>/<SUBGRAPH_NAME> <DIRECTORY>
// Here Direcotry is optional, if you don't pass it it will create a directory with SUBGRAPH_NAME
Let’s install dependency and generate mappings:
//Install Dependencies
 yarn
//Generate Mappings
yarn codegen
Let’s establish Auth using Access token (we can get this Access Token from the Graph Explorer dashboard):
graph auth https://api.thegraph.com/deploy/<ACCESS_TOKEN>
Now we can deploy our subgraph on the Graph Explorer using the command below:
graph deploy --debug --node https://api.thegraph.com/deploy/ --ipfs https://api.thegraph.com/ipfs/ buddies2705/example
//You can see we are using buddies/example where "buddies2705" is my //github username and "example" is our subgraph name create using //Graph explorer UI.
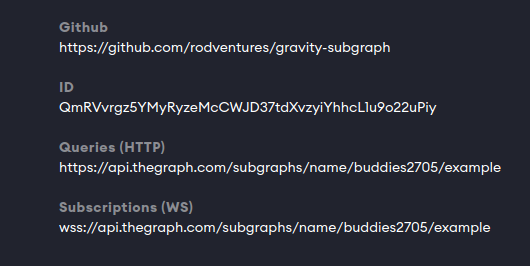
Now open Graph Explorer and you can see your subgraph. You can query your subgraph too using the Graph Explorer UI. You can also see endpoints to interact programmatically with your Subgraph.
Under the Hood
Let’s go deeper and understand what happened “Under the Hood”. We had a Truffle project with a Gravity.sol contract, which is simply creating a Gravatar (your Avatar on the Internet) on Ethereum.
This contract is emitting two events
NewGravatar— When a new Gravatar get createdUpdatedGravatar— When an existing Gravatar gets updated
event NewGravatar(uint id, address owner, string displayName, string imageUrl);
event UpdatedGravatar(uint id, address owner, string displayName, string imageUrl);
If we index these two Data events, we can answer queries like:
How many Gravatars were created last year?
How many Gravatars get updated per day on average?
What is the top 10 image hosts for all our Gravatars? (it will be IPFS 😎)
What are the most common names for Gravatars?
Some of these queries need to run on full contract data from the time the Contract deployed, and this is not possible from the normal web3 queries. You need indexed data.
With The Graph, you can create mappings to index this Data, which will live in the Data-store (currently Postgres). So, let’s see how mappings get created:
Important Files
Let’s first look at the subgraph.yaml, which defines all mappings:
specVersion: 0.0.1
description: Gravatar for Ethereum
repository: https://github.com/rodventures/gravity-subgraph
schema:
  file: ./schema.graphql
dataSources:
  - kind: ethereum/contract
    name: Gravity
    network: mainnet
    source:
      address: '0x2E645469f354BB4F5c8a05B3b30A929361cf77eC'
      abi: Gravity
    mapping:
      kind: ethereum/events
      apiVersion: 0.0.1
      language: wasm/assemblyscript
      entities:
        - Gravatar
      abis:
        - name: Gravity
          file: ./abis/Gravity.json
      eventHandlers:
        - event: NewGravatar(uint256,address,string,string)
          handler: handleNewGravatar
        - event: UpdatedGravatar(uint256,address,string,string)
          handler: handleUpdatedGravatar
      file: ./src/mapping.ts
Let’s take a look at the important fields of this file:
dataSources: Data sources will have all the smart contracts you want to track. (In our case, It’s only 1).
All other fields are self-explanatory, so let's look into eventHandlers field, which is defining our mappings:
eventHandles: in this field, we will define our mappings. We will add events and functions which will handle those events. For example, we are defining handleNewGravatar for our NewGravatar event.
파일: This field will have our Mapping file containing event handler functions, which is mapping.ts in our case.
mapping.ts is where you implement event handlers… these event handlers will execute whenever our Gravatar events get emitted, creating entities and saving them to the store, as we have described in our event handler functions.
import { NewGravatar, UpdatedGravatar } from './types/Gravity/Gravity'
import { Gravatar } from './types/schema'

export function handleNewGravatar(event: NewGravatar): void {
  let gravatar = new Gravatar(event.params.id.toHex())
  gravatar.owner = event.params.owner
  gravatar.displayName = event.params.displayName
  gravatar.imageUrl = event.params.imageUrl
  gravatar.save()
}

export function handleUpdatedGravatar(event: UpdatedGravatar): void {
  let id = event.params.id.toHex()
  let gravatar = Gravatar.load(id)
  if (gravatar == null) {
    gravatar = new Gravatar(id)
  }
  gravatar.owner = event.params.owner
  gravatar.displayName = event.params.displayName
  gravatar.imageUrl = event.params.imageUrl
  gravatar.save()
}
You can see that we are importing two files, Gravity.ts 그리고 Schema.ts— both files get generated when we ran yarn codegen. These files contain 유형, which make working with contracts, events, and entities easy. We also have a schema.graphql,which will contain entities.
type Gravatar @entity {
    id: ID!
    owner: Bytes!
    displayName: String!
    imageUrl: String!
}
Our schema.ts file gets generated using this schema.graphql and our Gravity.ts file gets generated based on smart contract Gravity.sol .
These are a lot of GraphQL concepts. If you don’t know about GraphQL check here, but you can build a basic subgraph with a minimum understanding of GraphQL.
Build a subgraph for you dApp
If you are running a dApp, you’ve probably faced this Data problem.
Below are the steps which you will need to follow for building a custom subgraph for your dApp (as outlined above).
Install Graph-CLI and other dependencies
Create a subgraph.yaml
Create schema.graphql
Generate schema files
Create a Mapping file with the event handlers
Useful Commands
Graph-CLI exposes useful commands you can file them under package.json.
결론
The best property which people still do not still recognize is that Web3 Infrastructure will enable autonomous internet applications, which can sustain for foreseeable future without any maintenance.
Web3 — Build, Deploy, no need to Maintain
Decentralization and trust minimization is a difficult problem to solve. The Graph team is trying to do that and build an important part of dApp infrastructure. If you are building a scalable dApp you should look into The Graph protocol!
프로젝트와 관련해 도움이 필요하거나 궁금한 점이 있으신가요? 이 양식을 통해, 트위터Quicknode 통해, 또는 디스코드에서 저희에게 연락해 주세요!
Quicknode 소개
2017년에 설립된 Quicknode 개발자와 기업을 위해 기관급 블록체인 인프라를 Quicknode . 99.99%의 가동률과 80개 이상의 체인을 지원함으로써, 팀들은 타협 없이 온체인 애플리케이션을 구축하고 확장할 수 있습니다.
최신 소식을 받아보세요
최신 엔지니어링 인사이트, 제품 업데이트, 웹3 뉴스를 여러분의 이메일로 바로 받아보세요.