
11 min read
Overzicht
Managing multiple ERC-20 tokens across various protocols can quickly become a headache. Over time, wallets collect “dust” (tiny, low-value token amounts) and clearing them out often means multiple approvals, swaps, and fees.
EIP-7702 streamlines this process by letting you authorize a smart contract to perform multiple actions in a single atomic transaction.
In this guide, you’ll build a decentralized application (dApp) that batches multiple ERC-20 token swaps into one seamless transaction, converting them into a single asset. You’ll use Quicknode add-ons to fetch token balances, get the best swap quotes, and execute batch swaps on the Base and Optimism networks.
By the end, you’ll have a fully functional dApp that turns tedious wallet cleanup into a fast, one-click operation.
Klaar om aan de slag te gaan?
What You Will Learn
- How to implement EIP-7702 in your dApp for batch transaction execution
- How to fetch wallet balances using the Covalent Token API add-on
- How to get optimized swap quotes using the Aerodrome and Velodrome Swap APIs
- How to combine these technologies to build a production-ready application
Wat je nodig hebt
- A Quicknode account with Base or Optimism endpoints
- De Covalent Token API -add-on (geen gratis pakket beschikbaar) en de Aerodrome- of Velodrome Swap API -add-on (gratis pakket beschikbaar)
- Node.js installed on your machine
- Basic knowledge of JavaScript/TypeScript and React
- A MetaMask wallet with some ERC20 tokens and ETH on Base Mainnet or Optimism Mainnet
Application Flow & Architecture
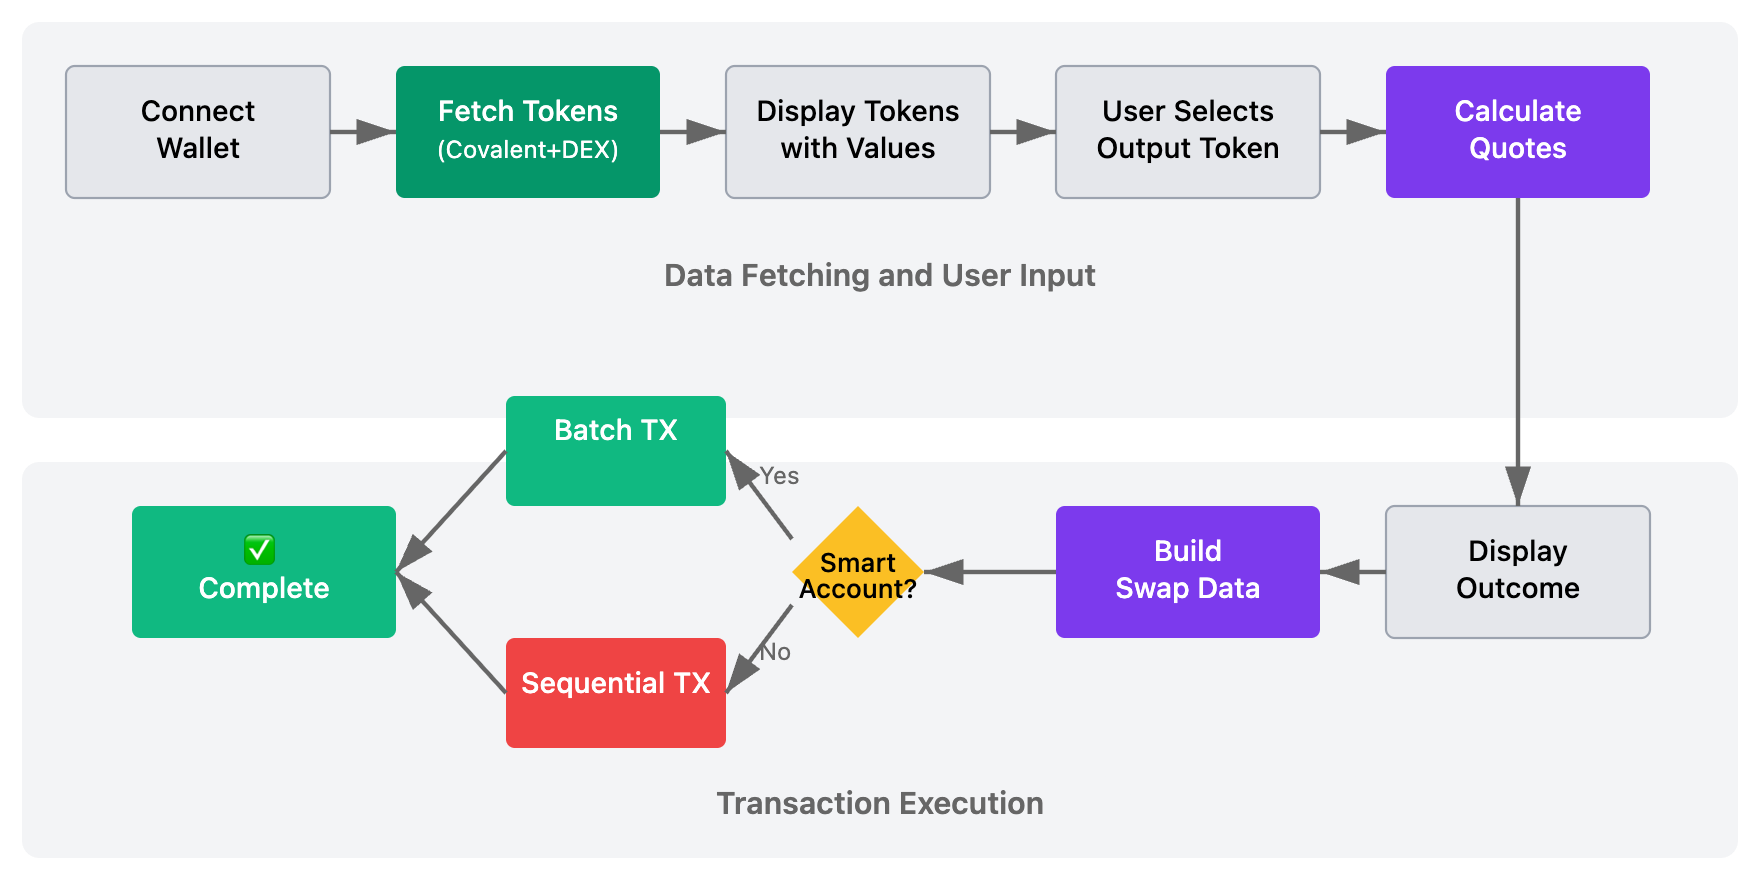
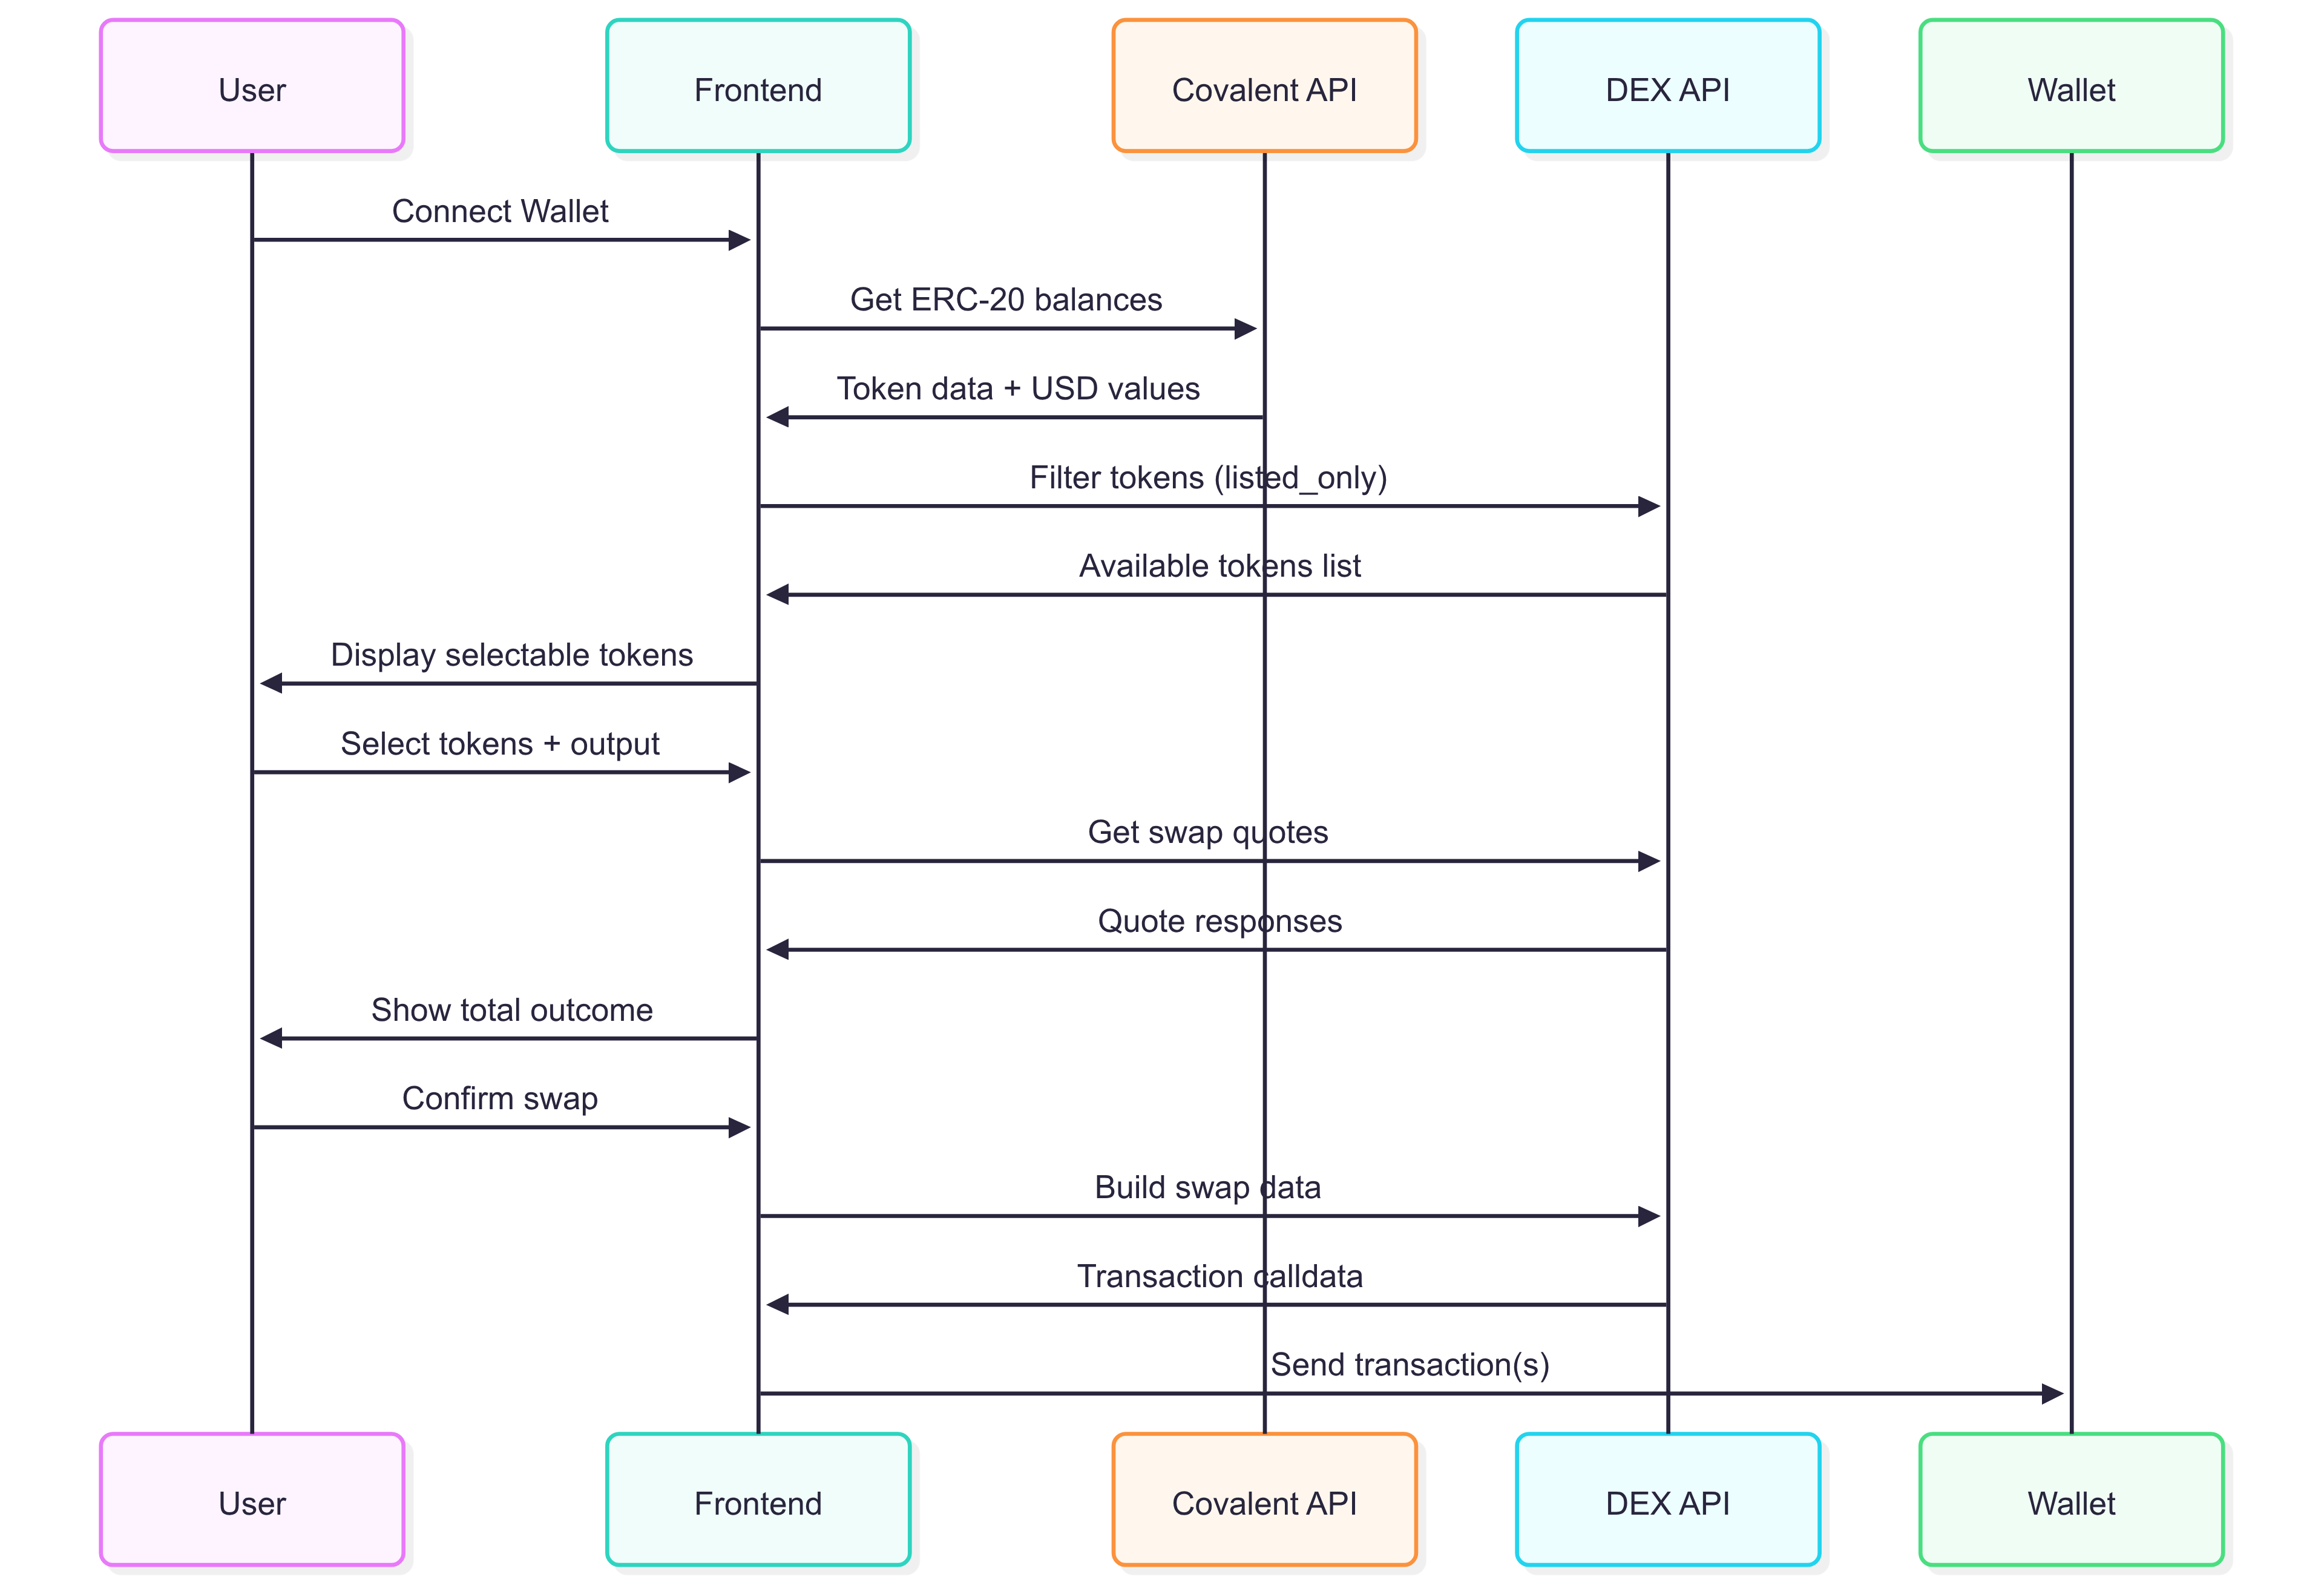
Before diving into the code, let's understand the application's workflow from a high level. This process leverages multiple APIs to create a simple frontend experience.
The flowchart below provides a high-level overview of the application's stages, illustrating the user's journey from connecting their wallet to the final transaction.
For a more detailed technical view, the sequence diagram below illustrates the communication happening behind the scenes.
Core Technologies Explained
Our application's power comes from the combination of EIP-7702 with specialized Quicknode add-ons. Let's break down each component.
How EIP-7702 Enables Batch Swaps
EIP-7702 is a standard that allows an Externally Owned Account (EOA) to temporarily act like a smart contract for a single transaction. This solves a major point of friction in DeFi: executing multiple operations.
Traditionally, swapping ten different tokens would require at least twenty separate actions: ten approve transactions and ten swap transactions, each demanding a signature and a gas fee.
EIP-7702 streamlines this by introducing a new transaction type that can include a delegation. This delegation authorizes a specific implementation contract to execute a series of calls on the user's behalf. This enables:
- Batch Execution: The authorized contract handles all the individual swaps within one transaction.
- Atomic Success: All operations succeed or fail together, preventing partial, failed states.
- Gas Efficiency: Combining operations into a single transaction significantly lowers total gas costs.
Technically, this functionality is exposed to dApps through the wallet_sendCalls JSON-RPC method, which we will access easily using wagmi's useSendCalls hook.
The Current EIP-7702 Landscape
EIP-7702 is still very new, and wallet support is evolving. As of writing, MetaMask has already integrated EIP-7702 into their wallet UI, providing a seamless user experience. When you initiate an EIP-7702 transaction, MetaMask will prompt you to upgrade your wallet to a smart account. This is a one-time, reversible process that delegates authority to MetaMask's audited implementation contract, EIP7702DeleGator.
Due to security concerns, it's likely that major wallets will manage their own delegation contracts rather than allowing dApps to specify arbitrary ones. Thus, wallets development is the primary focus for EIP-7702 adoption. As only a few wallets support EIP-7702, we will suggest using MetaMask for this guide.
How to Fetch Token Balances
First at the workflow level, you need to know which ERC20 tokens a user has. To do this, we'll use the Covalent Token API add-on. This add-on provides a simple and fast way to fetch token balances, instead of manually querying each token's balance.
Usage in the App
We will use the getTokenBalancesForWalletAddress endpoint to populate the user's token list.
const response = await client.BalanceService.getTokenBalancesForWalletAddress(
	chainName as any,
	adres
)
Sample API Responses
When you query the getTokenBalancesForWalletAddress endpoint from the Covalent API, you'll receive a detailed JSON object. The most important part is the items array, where each object represents a single token in the user's wallet.
{
	"address": "0x0a417ddb75dc491c90f044ea725e8329a1592d00",
	"quote_currency": "USD",
	"chain_id": 8453,
	"items": [
		{
			"contract_decimals": 6,
			"contract_name": "USD Coin",
			"contract_ticker_symbol": "USDC",
			"contract_address": "0x833589fcd6edb6e08f4c7c32d4f71b54bda02913",
			"supports_erc": ["erc20"],
			"logo_url": "https://logos.covalenthq.com/tokens/8453/0x833589fcd6edb6e08f4c7c32d4f71b54bda02913.png",
			"native_token": false,
			"is_spam": false,
			"balance": "2503277",
			"quote": 2.5007737,
			"pretty_quote": "$2.50"
			// ...
		}
	]
}
From this response, our application will use key fields like contract_address, saldo, citaat (for its USD value), and the is_spam flag to build the token portfolio list.
In addition to fetching the user's current tokens, our app also needs a list of valid tokens they can swap. For this, we use the Aerodrome/Velodrome Swap API's /v1/tokens endpoint.
{
	"tokens": [
		{
			"address": "0xd9aAEc86B65D86f6A7B5B1b0c42FFA531710b6CA",
			"symbol": "USDbC",
			"decimals": 6,
			"listed": true
		}
		// ...
	]
}
How to Get Optimized Swap Quotes
Once a user selects tokens to swap, you need to find the best possible trading route. The Aerodrome Swap API (on Base) and Velodrome Swap API (on Optimism) Swap API add-ons find the optimal price across all available liquidity pools.
Sample API Responses
De /v1/quote endpoint takes a source token, destination token, and an amount, then returns the best possible exchange rate. A successful response will look like this:
{
	"input": {
		"token": {
			"address": "0x940181a94A35A4569E4529A3CDfB74e38FD98631",
			"symbol": "AERO",
			"decimals": 18
		},
		"amount": 1,
		"amount_wei": "1000000000000000000",
		"price_usd": 0.8814186513914624,
		"value_usd": 0.8814186513914624
	},
	"output": {
		"token": {
			"address": "0x833589fCD6eDb6E08f4c7C32D4f71b54bdA02913",
			"symbol": "USDC",
			"decimals": 6
		},
		"amount": 0.876388,
		"amount_wei": "876388",
		"min_amount": 0.872007,
		"min_amount_wei": "872007",
		"price_usd": 0.999567128249789,
		"value_usd": 0.876008636392576
	},
	"route": {
		"path": [
			{
				"pool_address": "0x6cDcb1C4A4D1C3C6d054b27AC5B77e89eAFb971d",
				"is_stable": false,
				"is_cl": false,
				"hop_number": 1
			}
		],
		"hops": 1,
		"type": "direct"
	},
	"execution_price": 0.876388,
	"slippage": 0.005
}
De v1/quote endpoint takes a source token, destination token, and amount, and returns the best possible exchange rate. We'll use this to show users the expected output before they confirm the swap.
Usage in the App
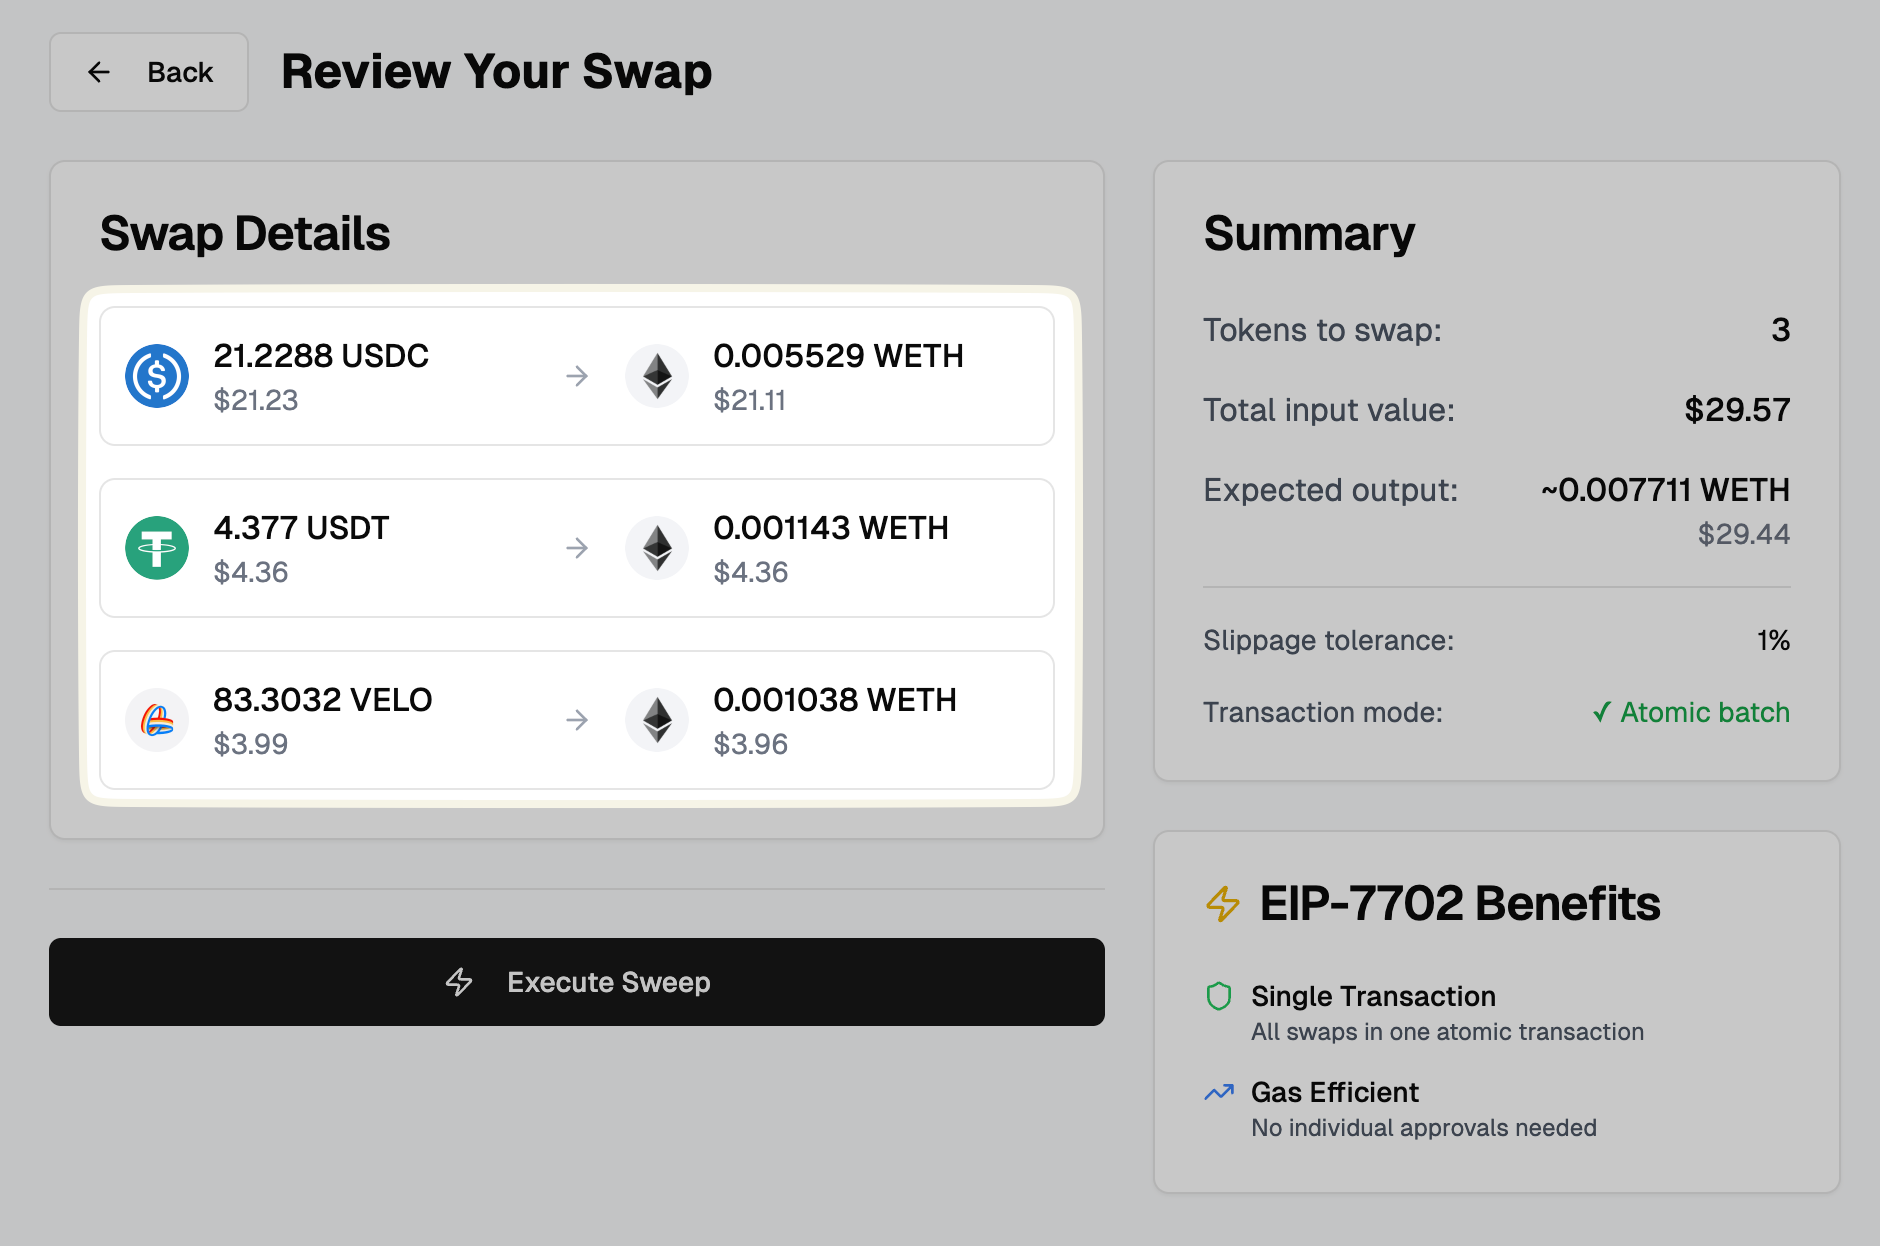
In our frontend, we call our own API route which in turn queries this endpoint. The fetched quote data is then used to populate the confirmation screen.
const tokenBalance = BigInt(token.balance)
// Convert from wei to token units for API call
const tokenAmount = formatUnits(tokenBalance, token.contract_decimals)

const quoteUrl = `/api/swap/quote?chainId=${chainId}&from_token=${tokenAddr}&to_token=${outcomeTokenAddress}&amount=${tokenAmount}&slippage=${APP_CONFIG.SLIPPAGE_TOLERANCE}`

const response = await fetch(quoteUrl)
This allows us to present a clear breakdown of the expected outcomes to the user before they sign the final transaction.
How to Build Swap Transactions
After getting a quote, the v1/swap/build endpoint returns ready-to-send transaction calldata, which is a JSON object containing everything needed to execute the swap. We primarily need the gegevens en naar fields for each transaction.
Sample API Responses
"transactions": [
    {
      "type": "approval",
      "description": "Approve AERO for swap",
      "transaction": {
        "to": "0x940181a94A35A4569E4529A3CDfB74e38FD98631",
        "data": "0x095ea7b3...", // Truncated for visual clarity
        "value": "0x0",
        "gas": "0x186a0",
        "gasPrice": "0x5c7742",
        "nonce": "0xc",
        "chainId": "0x2105",
        "from": "0x1539F7fBe3C26F5611DD4A449236180990F3e80F"
      }
    },
    {
      "type": "swap",
      "description": "Swap 1.0 AERO to USDC",
      "transaction": {
        "from": "0x1539F7fBe3C26F5611DD4A449236180990F3e80F",
        "to": "0x6Cb442acF35158D5eDa88fe602221b67B400Be3E",
        "value": "0x0",
        "data": "0x24856bc30...", // Truncated for visual clarity
        "nonce": "0xc",
        "chainId": "0x2105",
        "gas": "0x493e0",
        "gasPrice": "0x6af87c"
      }
    }
]
Usage in the App
Our use-swap-builder.ts hook calls this endpoint for every token the user has selected. It then processes each response to assemble the final array of calls.
const tokenAmount = formatUnits(BigInt(token.balance), token.contract_decimals)

const buildParams: SwapBuildParams = {
	from_token: tokenAddr as Address,
	to_token: outcomeTokenAddress as Address,
	amount: tokenAmount, // Convert to token units, not wei
	wallet_address: userWalletAddress as Address, // User's actual wallet address
	slippage: APP_CONFIG.SLIPPAGE_TOLERANCE,
}

const buildUrl = `/api/swap/build?chainId=${chainId}`

const response = await fetch(buildUrl, {
	method: 'POST',
	headers: {
		'Content-Type': 'application/json',
	},
	body: JSON.stringify(buildParams),
})
How to Execute Batch Transactions
The final step is to send all the prepared transactions at once. Wagmi's useSendCalls hook makes this incredibly simple and allows you to pass an array of transaction objects to be executed in a batch.
De calls parameter is an array where each object represents a single transaction we want to perform. We will construct this array by mapping over the user's selected tokens and using the data from the /v1/swap/build endpoint.
We will also set the experimental_fallback option to waar, which allows the transaction to fall back to a regular transaction if the wallet does not support EIP-7702.
{
	// Build transaction calls for batch execution using Swap APIs
	const calls = await buildSwapCalls(
		selectedTokens,
		tokens,
		outcomeToken,
		chainId,
		adres
	)

	if (calls.length === 0) {
		throw new Error('No valid swap calls could be built')
	}

	// Execute batch transaction using MetaMask EIP-7702, with fallback for non-supporting wallets
	sendCalls({ calls, experimental_fallback: true })
}
Building the Batch Swap App
Now, let's set up the project and get the application running on your local machine.
Vereisten
Before running the app, you need a Quicknode endpoint and the required add-ons, along with WalletConnect Project ID.
Quicknode instellen
- Eindpunten aanmaken: Log in op je Quicknode en maak een nieuw endpoint aan endpoint elke blockchain die je wilt ondersteunen. In deze handleiding gebruiken we Base Optimism.
Aangezien deze API-uitbreidingen mainnet op mainnet beschikbaar zijn, moet je je Quicknode configureren met een mainnet endpoint.
- Add-ons installeren:
- Zodra je in het dashboard endpoint je endpoint bent, ga je naar de add-ons voor je endpoint.
- Installeer de Covalent Token API -add-on.
- Install the swap API add-ons for the chains you want to support:
- For Base: Install the Aerodrome Swap API
- For Optimism: Install the Velodrome Swap API
You only need to install the add-on(s) for the chain(s) you plan to support. The free tier is sufficient to get started.
-
Een Covalent API-sleutel ophalen: Klik op ‘Aanmelden bij dashboard ’ naast de add-on ‘Covalent Token API’. Je wordt dan doorgestuurd naar het Covalent-dashboard, waar je je API-sleutel kunt vinden.
-
Swap API-URL's ophalen: Klik Aan de slag naast de add-on „Aerodrome of Velodrome Swap API“. Hiermee worden de basis-API-URL’s weergegeven die je in je applicatie moet gebruiken. Gebruik de URL vóór de
/v1/...deel, aangezien we de specifieke eindpunten in onze code zullen toevoegen. Het zou er ongeveer zo uit moeten zien:https://YOUR-QUICKNODE-ENDPOINT-URL/addon/YOUR-ADDON-ID
Reown instellen (voorheen WalletConnect)
-
Een Reown-project (voorheen WalletConnect) aanmaken: Ga naar de Reown Cloud en maak een nieuw project aan. Je kunt het een naam naar keuze geven.
-
Project-ID ophalen: Nadat je het project hebt aangemaakt, word je doorgestuurd naar het projectdashboard. Hier vind je je project-ID, die je in je aanvraag moet vermelden.
Het project opzetten
- Clone the Repository: Clone the repository to your local machine.
git clone https://github.com/quiknode-labs/qn-guide-examples.git
cd qn-guide-examples/sample-dapps/token-sweeper-eip-7702
- Install Dependencies: Use your preferred package manager to install the project dependencies.
npm install
# or
yarn install
# or
pnpm install
- Set Up Environment Variables: Maak een
.env.localfile in the root of the project by copying the.env.voorbeeldbestand.
cp .env.example .env.local
Now, open .env.local and add relevant environment variables.
# API Keys (Server-side only)
COVALENT_API_KEY=your_covalent_api_key_here

# WalletConnect Project ID (Required for RainbowKit - client-side needed)
NEXT_PUBLIC_WALLETCONNECT_PROJECT_ID=your_walletconnect_project_id_here

# RPC URLs
NEXT_PUBLIC_BASE_RPC_URL=your_base_rpc_url_here
NEXT_PUBLIC_OPTIMISM_RPC_URL=your_optimism_rpc_url_here

# Aerodrome/Velodrome API URLs (Required for real swap functionality)
# Note: These are now server-side only
AERODROME_BASE_API=your_quicknode_aerodrome_base_api_here
VELODROME_OPTIMISM_API=your_quicknode_velodrome_optimism_api_here
- Run the Application: Start the development server.
npm run dev
# or
garenontwikkeling
# or
pnpm dev
Open your browser to http://localhost:3000 to see the app in action.
- Test the Application: Try following steps in your app:
- Connect Wallet: Use MetaMask to connect to the app
- Switch Network: Ensure you're on Base or Optimism mainnet
- View Tokens: The app will display your ERC-20 token balances
- Select Tokens: Choose tokens to swap and an output token
- Get Quotes: Review swap estimates and total output
- Execute Batch: Confirm the transaction (MetaMask will prompt for smart account upgrade if needed)
When you're ready to deploy, platforms like Vercel or Netlify offer seamless integration with Next.js applications, providing a simple path from development to production.
Conclusie
You've successfully built a Token Sweeper dApp that demonstrates the power of EIP-7702 for batch transactions. This application showcases how Quicknode's add-ons eliminate the need for complex backend infrastructure while providing enterprise-grade functionality.
The combination of Covalent's comprehensive token data, Aerodrome and Velodrome's optimized DEX routing, and EIP-7702's batch execution creates a seamless user experience that allows users to swap tokens with minimal friction.
If you have any questions, feel free to use our Discord server or share feedback in the feedback section at the end of this page. Stay up to date with the latest by following us on Twitter and our Telegram announcement channel.