
5 min read
What is Subspace?
In this guide, we'll understand a bit about reactive development and how to use Subspace with Quicknode.
JavaScript is the programming language behind most of the internet apps and websites. JavaScript today has become one of the most used programming languages, and one of the big reasons behind javascript's popularity is the javascript frameworks and libraries. There are many frameworks to choose from based on your preference (React, Angular, Vue being the most popular ones).
**What is Subspace?
**Subspace is a tool to develop dApps (Decentralized Applications) in your preferred/favorite javascript framework. Subspace's key feature is that it is based on reactive app development.
Reactive development is becoming more and more popular to make websites run faster. The main goal of reactive web development is to create responsive and fast websites. In reactive development, most of the content is presented and rendered in front-end as a reaction to the user's interaction - hence the name 'Reactive' - unlike the traditional way where the components of the web page/app are rendered server-side where we would typically see increasing the retrieval time. Subspace provides various methods to track and subscribe to events, contract & state balances, and react to changes via observables. Subspace supports many JS frameworks. React, Angular, and nodejs is amongst them. Subspace saves the last state of your dApp to a local database so that your dApp always syncs from the previous known point, even after reload.
**What is RxJS?
**RxJs is a library/framework for reactive programming that uses Observables, making asynchronous coding easy. According to their official documentation, RxJS is an extension to Javascript with better performance, better modularity, better debuggable call stacks, while staying mostly backward compatible, with some breaking changes that reduce the API surface.
**What are observables?
**An Observable is a function that returns the stream of data values whenever there is a change in value synchronously or asynchronously; observables do this with an observer or subscription; the observer is set up and looks for the change in value, the stream of data can be zero to infinite.
The following are some features of Subspace:
- Event Tracking & Event Sourcing - Events can be tracked, and with subspace observables doing event sourcing becomes very easy.
- Tracking State - Changes to contract variables can be tracked.
- Tracking balances - Changes in both ETH and ERC20 token balances can be tracked.
- React integration - Subspace can make any React components compatible with observables.
Prerequisites
- NodeJS installed on your system
- A text editor
- Terminal aka Command Line
Installing Subspace and other dependencies
To install Subspace, we'll need a package manager. We'll use NPM (Node Package Manager) here, which comes with NodeJS. To check if NodeJS is installed on your system, open a terminal/command prompt and run:
$ node -v
if not installed, you can download the LTS version of NodeJS from the official website.
Note: The installed NodeJS version should be higher than 10.17.0
Now to install subspace, type the following in your terminal/command prompt:
$ npm install --save @embarklabs/subspace web3 rxjs
or
$ yarn add @embarklabs/subspace web3 rxjs
We are also installing web3 and rxjs as dependencies along with subspace
The most common issue at this step is an internal failure with `node-gyp.` You can follow node-gyp installation instructions here.
Note: You will need to have your python version match one of the compatible versions listed in the instructions above if you encounter the node-gyp issue.
Another common issue is a stale cache; clear your npm cache by merely typing the below into your terminal:
$ npm cache clean
If everything goes right and Subspace gets installed correctly, and you're halfway there!
Set Up Your Quicknode Ethereum Endpoint
For our purposes today, we could use pretty much any Ethereum client, such as Geth or OpenEthereum (fka Parity). To boot an ethereum node all by ourselves, we'll first need to select a client and configure it; syncing an ethereum node and maintaining it is a challenging task; syncing an ethereum full node can take days.
Since that is a bit too involved for just querying for block height, we'll create a free Quicknode here and easily generate an Ethereum endpoint. After you've created your free Ethereum endpoint, copy your HTTP Provider endpoint:
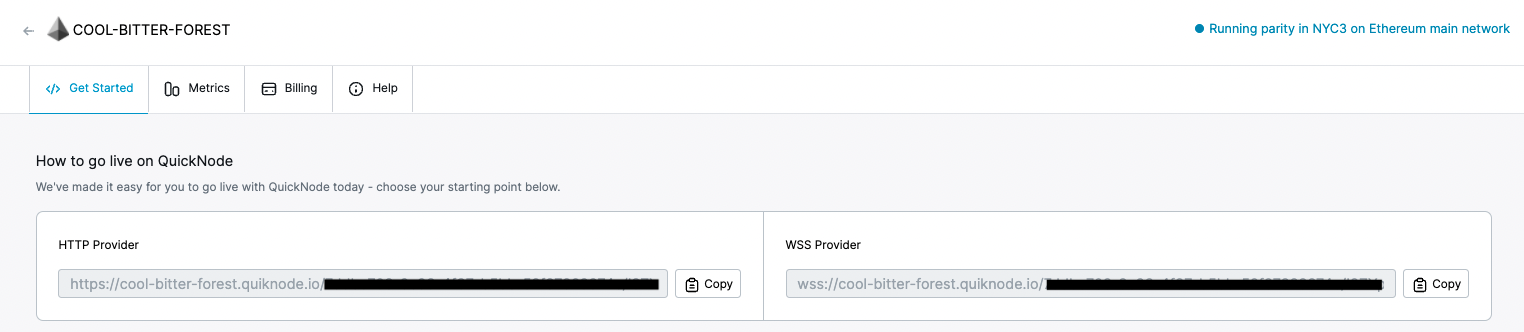
You'll need this later, so copy it and save it.
Using Subspace to subscribe to new blocks
Now let's create a short script, let's call it `index.js,` to fetch the latest block number from our node. You can copy/paste this into your code editor:
var Web3 = require('web3')
var Subspace = require('@embarklabs/subspace');
var url = 'ADD_YOUR_ETHEREUM_NODE_URL'
var web3 = new Web3(url)
var subspace = new Subspace.default(web3);
subspace.init().then(() => {
	subspace.trackBlockNumber().subscribe(blockNumber => {
		console.log("The latest block number is: ", blockNumber);
	});
});
So go ahead and replace `ADD_YOUR_ETHEREUM_NODE_URL` with the HTTP provider from the section above.
Let us try to understand the above code line by line - we are importing Web3.js and Subspace library we installed earlier (lines 1-2), setting our Ethereum node URL (line 3), creating a Web3 instance (line 4), creating a Subspace instance with web3 (line 5), Initiating our Subspace instance (line 6), subscribing to trackBlockNumber method to track the update in block number of Ethereum blockchain from our Quicknode node(line 7), now logging the block number to console (line 8).
As we're subscribing to the trackBlockNumber method it will output a new console line as soon as there is a new Block.
Save this code snippet in a file index.js. We're going to run this in the next section.
Confirm it's working
Run the file using the node command, and you will see the latest Ethereum blockchain:
$ node index.js
You should see the following:
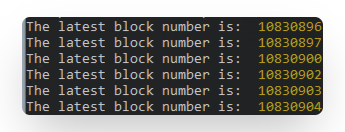
So this is how we can use Subspace with Quicknode. You can refer to their documentation if you wish to play more with Subspace.
Subscribe to our newsletter for more articles and guide on Ethereum. If you have any feedback, please feel free to reach out to us via Twitter, and you can always chat with us if you have a question via our community server on Discord, thanks :)