
閱讀時間 14 分鐘
概覽
Traditional API monetization relies on subscription models and API keys, creating friction for users who want simple, pay-per-use access. The x402 payment protocol solves this by extending HTTP with a payment layer, enabling true pay-per-request access.
This guide shows you how to integrate the x402 protocol into a Rails application using Quicknode's open-source x402-rails and x402-payments gems. You'll learn how to configure your API to require payment, protect specific endpoints, and generate the necessary client-side signatures to consume the API.
您將學到什麼
- What the x402 payment protocol is and how it enables pay-per-use APIs
- How to use the
x402-railsgem to create server-side paywalls - How to configure payment requirements like amount, chain, and settlement mode
- How to use the
x402-paymentsgem to generate client-side payment signatures - The difference between optimistic and non-optimistic settlement
- How to configure multi-chain support (EVM and Solana networks)
您需要準備的物品
- Ruby 3.3.5 or higher installed
- Basic knowledge of Rails and blockchain concepts
- A test wallet with Base Sepolia testnet USDC (Use Circle's faucet to get free test USDC)
What is the x402 Payment Protocol?
x402 is an open standard that extends the HTTP 402 需付款 status code with a payment layer. Instead of managing complex billing systems, you can automatically charge users for each API request they make.
The protocol works in a simple loop. Let’s break it down step by step and then look at it in a visual diagram:
- A client calls your API.
curl -i http://localhost:3000/api/weather/paywalled_info
- Your server responds with HTTP 402 Payment Required and payment instructions.
{
	"x402Version": 2,
	"error": "Payment required to access this resource",
	"resource": {
		"url": "http://localhost:3000/api/weather/paywalled_info",
		"description": "Payment required for /api/weather/paywalled_info",
		"mimeType": "application/json"
	},
	"accepts": [
		{
			"scheme": "exact",
			"network": "eip155:84532", // Base Sepolia CAIP-2 network identifier
			"amount": "1000", // Amount in smallest unit (6 decimals for USDC)
			"asset": "0x036CbD53842c5426634e7929541eC2318f3dCF7e", // USDC contract on Base Sepolia
			"payTo": "YourWalletAddressHere", // The receiving wallet
			"maxTimeoutSeconds": 600,
			"extra": {
				"name": "USDC",
				"version": "2"
			}
		}
	],
	"extensions": {}
}
- The client signs a payment authorization using EIP-712 and encodes it as an
PAYMENT-SIGNATUREheader.
Payment Header (PAYMENT-SIGNATURE):
eyJ4NDAyVmVy... # Payment Authorization
- The client resends the request with that header.
curl -i -H "PAYMENT-SIGNATURE: eyJ4NDAyVmVy..." http://localhost:3000/api/weather/paywalled_info
- Your server validates the payment, settles it on chain, and returns a successful response.
{
	"temperature": 72,
	"condition": "sunny",
	"humidity": 65
}
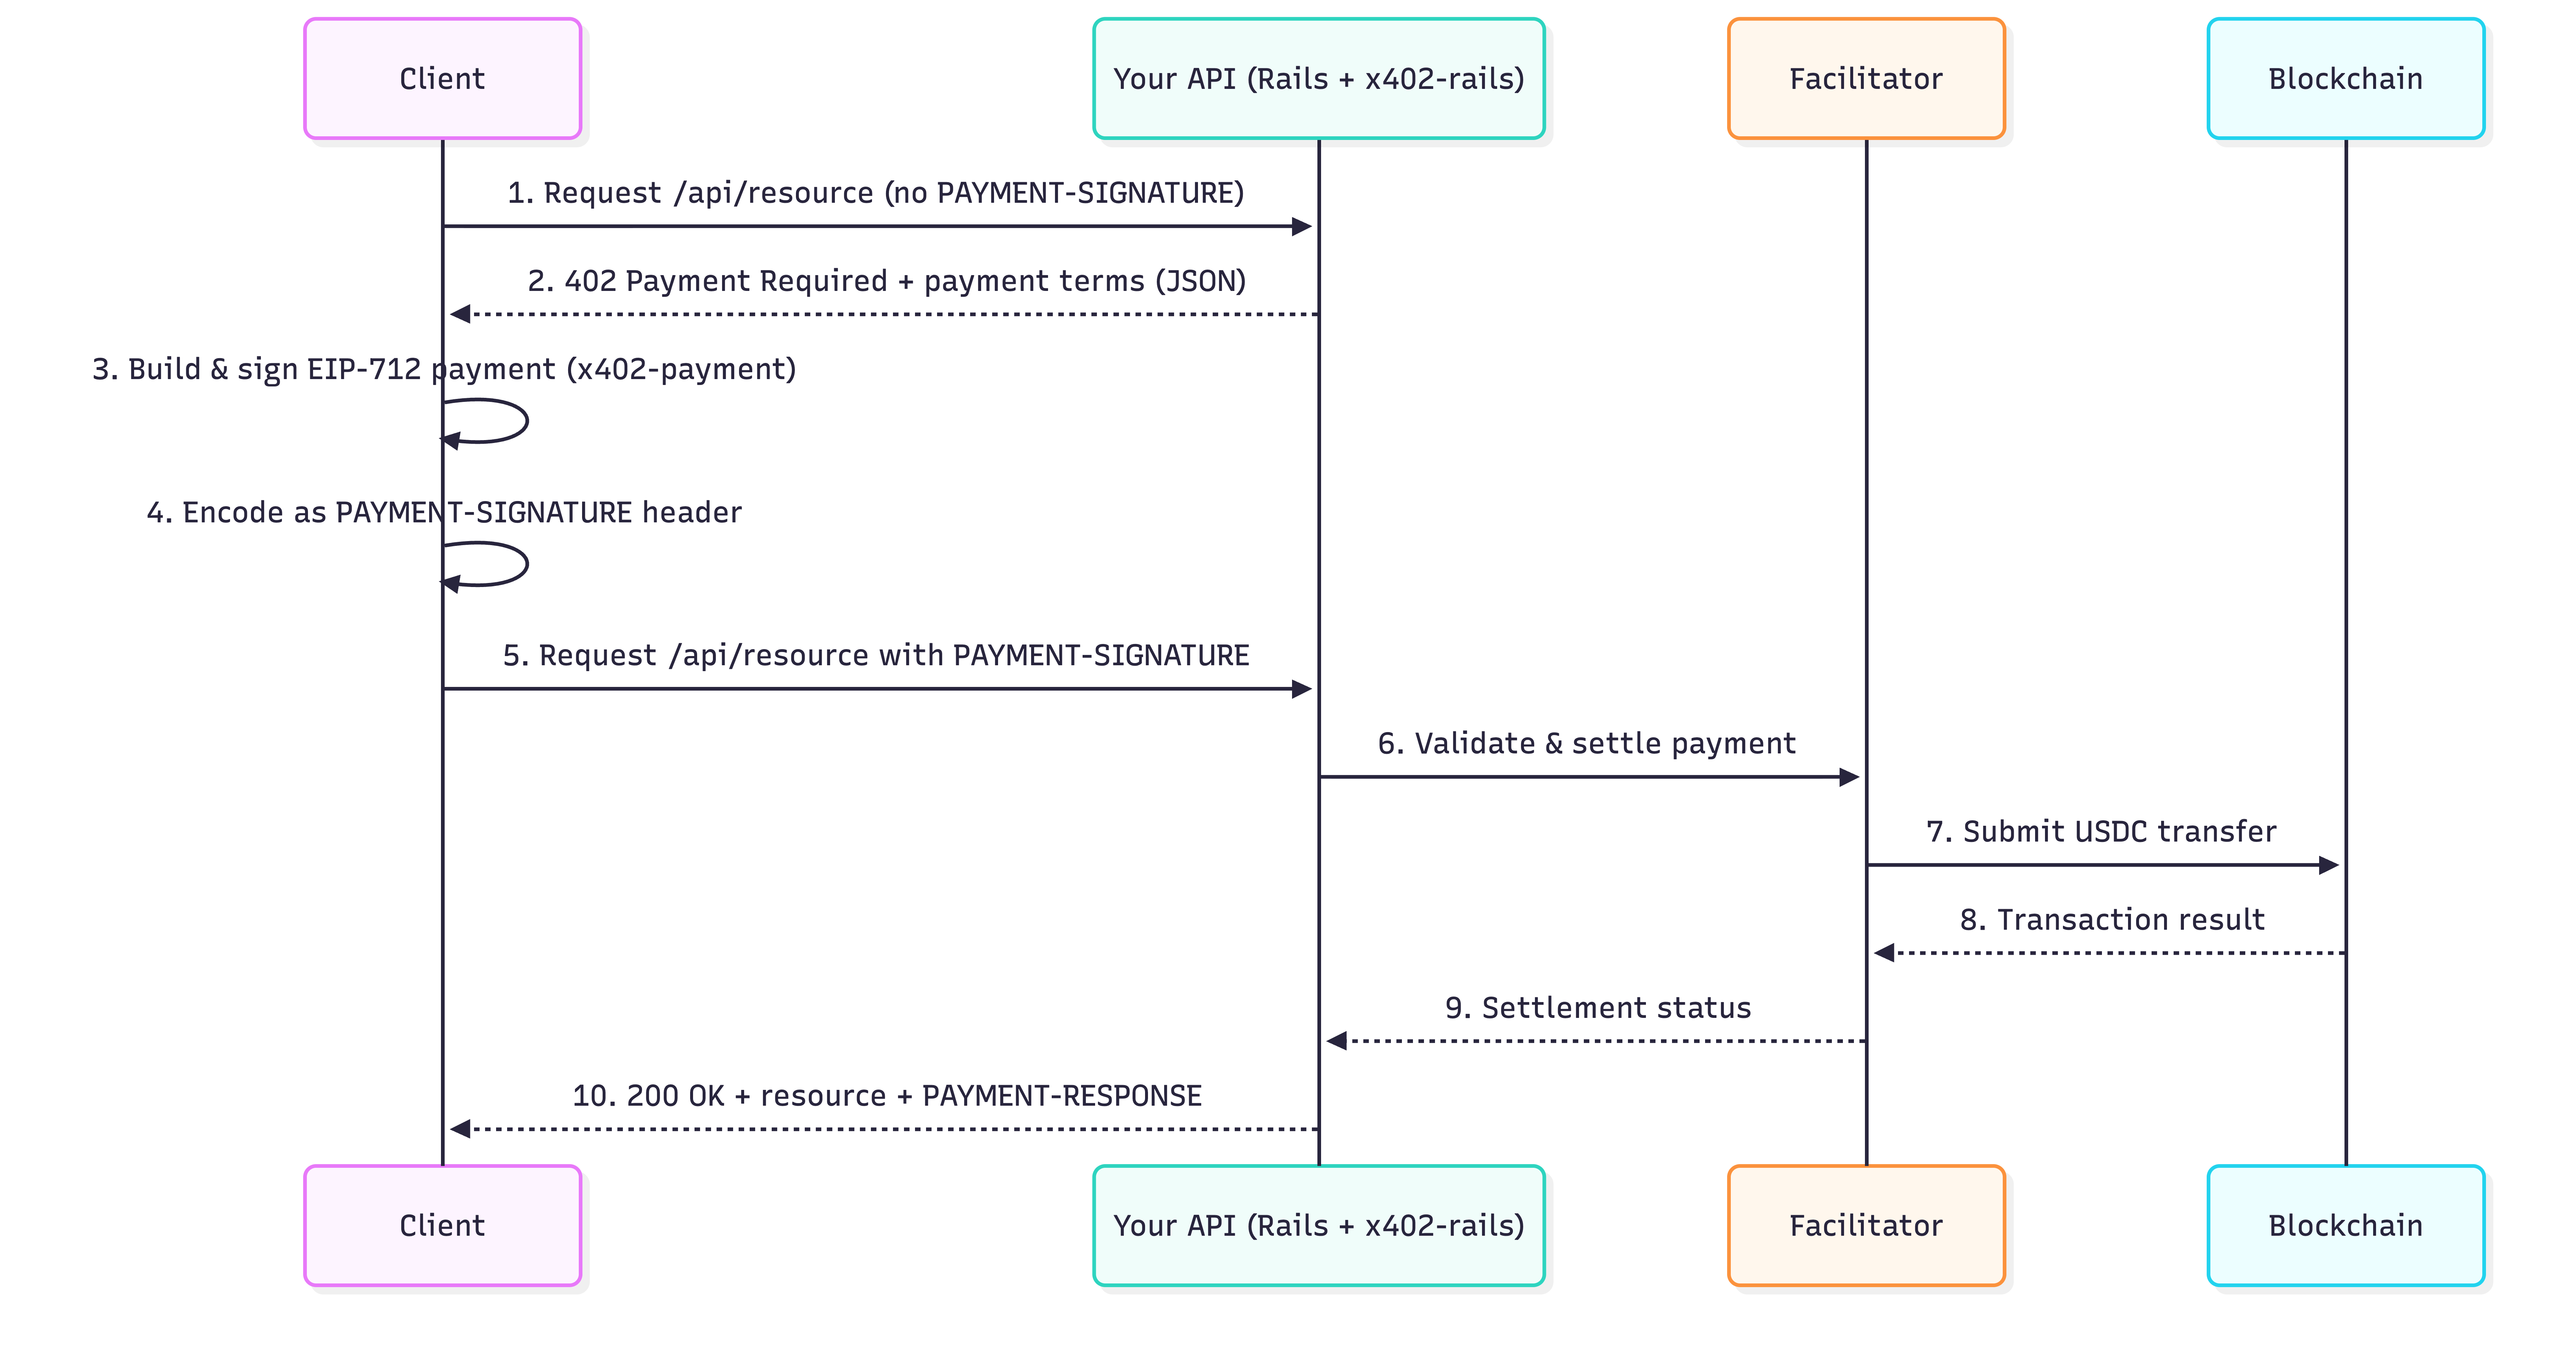
To make this simple in Ruby, Quicknode provides two gems:
-
x402-rails (Server-Side): A Rails engine that provides middleware and controller helpers to easily "paywall" your API endpoints. It handles signature validation and payment settlement.
-
x402-payments (Client-Side): A helper library for generating the complex EIP-712 cryptographic signatures and
PAYMENT-SIGNATUREheaders required to consume an x402-powered API.
Paywalled API with x402 and Ruby on Rails
In this section, we'll use a sample app and explain how to set up and configure x402 in your own Rails application.
This Rails project in Quicknode's qn-guide-examples repository exposes a Weather API and a Premium API that require USDC payments to access weather data. It demonstrates:
- Free endpoints that do not require payment
- Paywalled endpoints that respond with 402 and payment requirements
- Multi-chain support for both EVM and Solana networks
- Different settlement modes for speed or stronger guarantees
Technical Walkthrough
Before diving into the code, let's understand the application's flow from a high level. If you are not interested in the technical details, feel free to go straight to the Quick Start section.
x402 Configuration
該 x402-rails gem is initialized in config/initializers/x402.rb. It reads environment variables for the receiving wallet, facilitator URL, chain, currency, and optimistic mode and set up your global configuration. A typical configuration looks like this:
# config/initializers/x402.rb
X402.configure do |config|
  # Your wallet address (where payments will be received)
  config.wallet_address = ENV.fetch("X402_WALLET_ADDRESS", "0xYourWalletAddressHere")

  # The service that handles on-chain settlement.
  # Use the public facilitator or your own.
  config.facilitator    = ENV.fetch("X402_FACILITATOR_URL", "https://www.x402.org/facilitator")

  # Blockchain network to use
  config.chain = ENV.fetch("X402_CHAIN", "base-sepolia")

  # The payment currency (USDC is the standard)
  config.currency = ENV.fetch("X402_CURRENCY", "USDC")

  # Custom Chain and Token Registration
  config.register_chain(
    name: "polygon-amoy",
    chain_id: 80002,
    standard: "eip155"
  )

  config.register_token(
    chain: "polygon-amoy",
    symbol: "USDC",
    address: "0x41E94Eb019C0762f9Bfcf9Fb1E58725BfB0e7582",
    decimals: 6,
    name: "USDC",
    version: "2"
  )

  # ==========================================
  # Accept Multiple Payment Options
  # ==========================================
  # Use config.accept() to specify which chains/currencies to accept.
  # The 402 response will include all accepted options, allowing clients
  # to pay on any of the supported chains.
  #
  # If no config. accept() calls are made, the default chain/currency is used.

  config.accept(chain: "base-sepolia", currency: "USDC")
  config.accept(chain: "polygon-amoy", currency: "USDC")
  config.accept(chain: "solana-devnet", currency: "USDC")


  # Settlement mode:
  # false (non-optimistic): Waits for onchain confirmation
  # true (optimistic): Responds immediately, settles in background
  config.optimistic     = ENV.fetch("X402_OPTIMISTIC", "true") == "true"
結束
These settings tell x402-rails where to receive USDC payments, which chain to use, and whether to respond optimistically or wait for settlement. You can also override these settings per-endpoint in your controllers, which we will see shortly.
The facilitator is a key part of the x402 payment flow. After a client sends a request with a signed payment authorization, the server passes that authorization to the facilitator. The facilitator then:
- Validates the signed authorization
- Builds the actual USDC transfer transaction
- Pays the gas fee for submitting it
- Sends the transaction to the blockchain
- Returns settlement details back to your API
This design allows clients to pay for API access without submitting blockchain transactions themselves. They only sign a message (no RPC calls, no gas estimation, no wallet connection process).
You can rely on the public facilitator at x402.org, or deploy your own instance if you want custom settlement behavior, logging, or support for additional chains.
Paywall Enforcement in Controllers
Adding a paywall to an API endpoint is as simple as calling x402_paywall helper method. The x402-rails gem injects this helper into your controllers, allowing you to require payment with a single line of code. In the example WeatherController, 該 paywalled_info action charges $0.001 USDC before returning data.
  class WeatherController < ApplicationController
    # Paywalled endpoint (requires payment)
    def paywalled_info

      # 1. REQUIRE PAYMENT: This line protects the endpoint.
      # It will return a 402 response if payment is missing or invalid.
      x402_paywall(amount: 0.001)

      # 2. STOP EXECUTION: If the paywall rendered a 402, stop.
      return if performed?

      # 3. ACCESS DATA: If payment was successful, continue.
      # Payment info is available in the request environment.
      payment_info = request.env["x402.payment"]

      render json: {
        temperature: 72,
        condition: "sunny",
        humidity: 65,
        paid_by: payment_info&.[](:payer),
        payment_amount: payment_info&.[](:amount),
        network: payment_info&.[](:network),
        payment_info: payment_info
      }
    結束

    # Free endpoint (no paywall)
    def public_info
      # This endpoint has no paywall and is free.
      render json: {
        message: "This endpoint is free!",
        location: "San Francisco",
        timezone: "PST"
      }
    結束
  結束
Routes
The sample application's routes are defined in config/routes.rb. This is where each API endpoint, both free and paywalled, is mapped to its corresponding controller action. The Weather API shows direct use of x402_paywall, while the Premium API uses a before_action to apply the paywall across multiple endpoints.
Rails.application.routes.draw do
  # Define your application routes per the DSL in https://guides.rubyonrails.org/routing.html

  # Reveal health status on /up that returns 200 if the app boots with no exceptions, otherwise 500.
  # Can be used by load balancers and uptime monitors to verify that the app is live.
  get "up" => "rails/health#show", as: :rails_health_check

  # x402 Payment Protocol Test Endpoints
  namespace :api do
    # Weather API endpoints (direct x402_paywall usage)
    get "weather/paywalled_info", to: "weather#paywalled_info"
    get "weather/paywalled_info_sol", to: "weather#paywalled_info_sol"
    get "weather/forecast", to: "weather#forecast"
    get "weather/public", to: "weather#public_info"

    # Premium API endpoints (before_action usage)
    resources :premium, only: [ :index, :show ] do
      collection do
        get :free
      結束
    結束
  結束
Alternative Paywalls (Optional)
If several endpoints require the same payment logic, you don’t need to repeat x402_paywall in every action. Instead, you can apply it once using a before_action filter. This is how the Premium API (app/controllers/api/premium_controller.rb) is structured; it applies the same paywall to multiple actions, keeping controllers clean and consistent.
module Api
  class PremiumController < ApplicationController
    # Example of a paywall applied to multiple actions (show and index)
    before_action :require_payment, only: [:show, :index]

    def index
      payment_info = request.env["x402.payment"]

      render json: {
        message: "Premium content list",
        items: ["Item 1", "Item 2", "Item 3"],
        paid_by: payment_info&.[](:payer)
      }
    結束

    def show
      payment_info = request.env["x402.payment"]

      render json: {
        message: "Premium content details",
        id: params[:id],
        content: "This is premium content that requires payment",
        paid_by: payment_info&.[](:payer)
      }
    結束

    def free
      render json: {
        message: "This premium controller endpoint is free",
        sample: "Here's a sample"
      }
    結束

    私人

    def require_payment
      x402_paywall(amount: 0.005, chain: "eip155:84532")
    結束
  結束
結束
Multi-Chain Support (Optional)
The x402 protocol is designed to work across multiple blockchain networks, and each endpoint can specify its own chain settings. This gives you flexibility to accept payments on different networks depending on your use case.
In the sample app, WeatherController's paywalled_info_sol endpoint requires payment on Solana devnet, by overriding the default chain to solana-devnet.
module Api
  class WeatherController < ApplicationController
    def paywalled_info_sol
      x402_paywall(
        amount: 0.001,
        chain: "solana:EtWTRABZaYq6iMfeYKouRu166VU2xqa1", # Solana devnet CAIP-2 identifier
        currency: "USDC",
        solana_fee_payer: "FuzoZt4zXaYLvXRguKw2T6xvKvzZqv6PkmaFjNrEG7jm",
        wallet_address: "EYNQARNg9gZTtj1xMMrHK7dRFAkVjAAMubxaH7Do8d9Y"
      )
      # ...
    結束
  結束
結束
Handling Payment Errors (Optional)
To provide clear error messages, you can rescue the specific exceptions that x402-rails raises. This is already set up in app/controllers/application_controller.rb.
class ApplicationController < ActionController::API
  # Application-wide x402 error handling
  rescue_from X402::InvalidPaymentError, with: :render_payment_error
  rescue_from X402::FacilitatorError, with: :render_facilitator_error
  rescue_from X402::ConfigurationError, with: :render_config_error

  私人

  def render_payment_error(exception)
    render json: {
      error: "Payment Error",
      message: exception.message,
      type: "invalid_payment",
      status: 402
    }, status: :payment_required
  結束

  def render_facilitator_error(exception)
    Rails.logger.error("[x402] Facilitator error: #{exception.message}")

    render json: {
      error: "Payment Service Unavailable",
      message: "Unable to process payment. Please try again.",
      type: "facilitator_error",
      status: 503
    }, status: :service_unavailable
  結束

  def render_config_error(exception)
    Rails.logger.fatal("[x402] Configuration error: #{exception.message}")

    render json: {
      error: "Service Configuration Error",
      message: "Payment system not properly configured",
      status: 500
    }, status: :internal_server_error
  結束
結束
We have covered the key technical aspects of integrating x402 payments into a Ruby on Rails application. Now, let's get you started with the sample project.
快速入門
First, clone the Quicknode sample project:
Step 1: Clone and Install Dependencies
# Clone the repository
git clone https://github.com/quiknode-labs/qn-guide-examples.git
cd qn-guide-examples/rails/x402-micropayments

# Install dependencies
bundle install
Step 2: Configure Environment Variables
Copy the .env.example file to .env and update the following variables. See comments in the file for details.
cp .env.example .env
Step 3: Start the Server
Start the server:
bin/rails server -p 3000
Your API is now live at http://localhost:3000. Now, we need to learn how to generate valid payment signatures to access the paywalled endpoints.
Generating x402 Client Payments
As mentioned earlier, a client needs to generate a valid payment signature (PAYMENT-SIGNATURE header) to access paywalled endpoints. The sample project includes a simple script in different languages to generate payment signatures for different use cases:
- Ruby:
generate-payment.rb - TypeScript:
generate-payment.ts - Python:
generate-payment.py
We will use the Ruby script for this guide, but the process is similar for the other languages and more details are available in the README file of the project.
Using the Ruby Payment Generator
The script uses bundler/inline to automatically install necessary dependencies, so you don't need to set up a separate Gemfile.
Configure and Generate the Header
The script configures the x402-payments gem with the client's private key (from your .env file) and then calls generate_header with the required parameters.
# ... (see full script in the project)

# Load .env file if it exists
require 'dotenv'
Dotenv.load

# Configuration
PRIVATE_KEY = ENV.fetch('X402_TEST_PRIVATE_KEY', '0xYourPrivateKeyHere')
PORT = ENV.fetch('PORT', '3000')
PAY_TO = ENV.fetch('X402_WALLET_ADDRESS', 'YourWalletAddressHere')
CHAIN = ENV.fetch('X402_CHAIN', 'base-sepolia')

# Configure x402-payments gem
X402::Payments.configure do |config|
  config.private_key = PRIVATE_KEY
  config.chain = CHAIN
  config.default_pay_to = PAY_TO
  config.max_timeout_seconds = 600
結束

# Generate payment header
# The gem handles all the EIP-712 signing internally
begin
  payment_header = X402::Payments.generate_header(
    amount: 0.001,  # $0.001 in USD
    resource: "http://localhost:#{PORT}/api/weather/paywalled_info",
    description: "Payment required for /api/weather/paywalled_info"
  )
結束

# ... (see full script in the project)
Run the Script
Now, run the script:
ruby generate_payment.rb
The script will output the payment header, which you can use in your client.
Note: The maximum timeout for payments is set to 600 seconds in the script. You can adjust this value based on your use case. Otherwise, the payment will expire after 600 seconds.
Testing the Paywall
As we have set up both the server and the payment generator, we can now test the complete payment flow and understand how x402 works in practice.
To test payments, you'll need some test USDC on the Base Sepolia testnet. You can get some free test USDC from the Circle USDC faucet.
Paywalled Endpoint
First, try accessing the paywalled endpoint without a payment header:
curl -i http://localhost:3000/api/weather/paywalled_info
You should receive a 402 response with the following JSON payload:
{
	"x402Version": 2,
	"error": "Payment required to access this resource",
	"resource": {
		"url": "http://localhost:3000/api/weather/paywalled_info",
		"description": "Payment required for /api/weather/paywalled_info",
		"mimeType": "application/json"
	},
	"accepts": [
		{
			"scheme": "exact",
			"network": "eip155:84532",
			"amount": "1000",
			"asset": "Asset Contract Address", // e.g., USDC on Base Sepolia
			"payTo": "Recipient Address", // The receiving wallet
			"maxTimeoutSeconds": 600,
			"extra": {
				"name": "USDC",
				"version": "2"
			}
		}
	],
	"extensions": {}
}
Now, use the payment header generated by the Ruby script (or your preferred payment generator) to access the paywalled endpoint:
curl -i -H "PAYMENT-SIGNATURE: eyJ4NDAyVmVy..." http://localhost:3000/api/weather/paywalled_info
You should receive a 200 response with the following JSON payload:
{
	"temperature": 72,
	"condition": "sunny",
	"humidity": 65,
	"paid_by": "0x...",
	"payment_amount": "1000",
	"network": "base-sepolia"
	// ...
}
Congratulations! You have successfully integrated x402 payments into your Ruby on Rails application. You can now use the payment header to access paywalled endpoints and enjoy the benefits of micropayments.
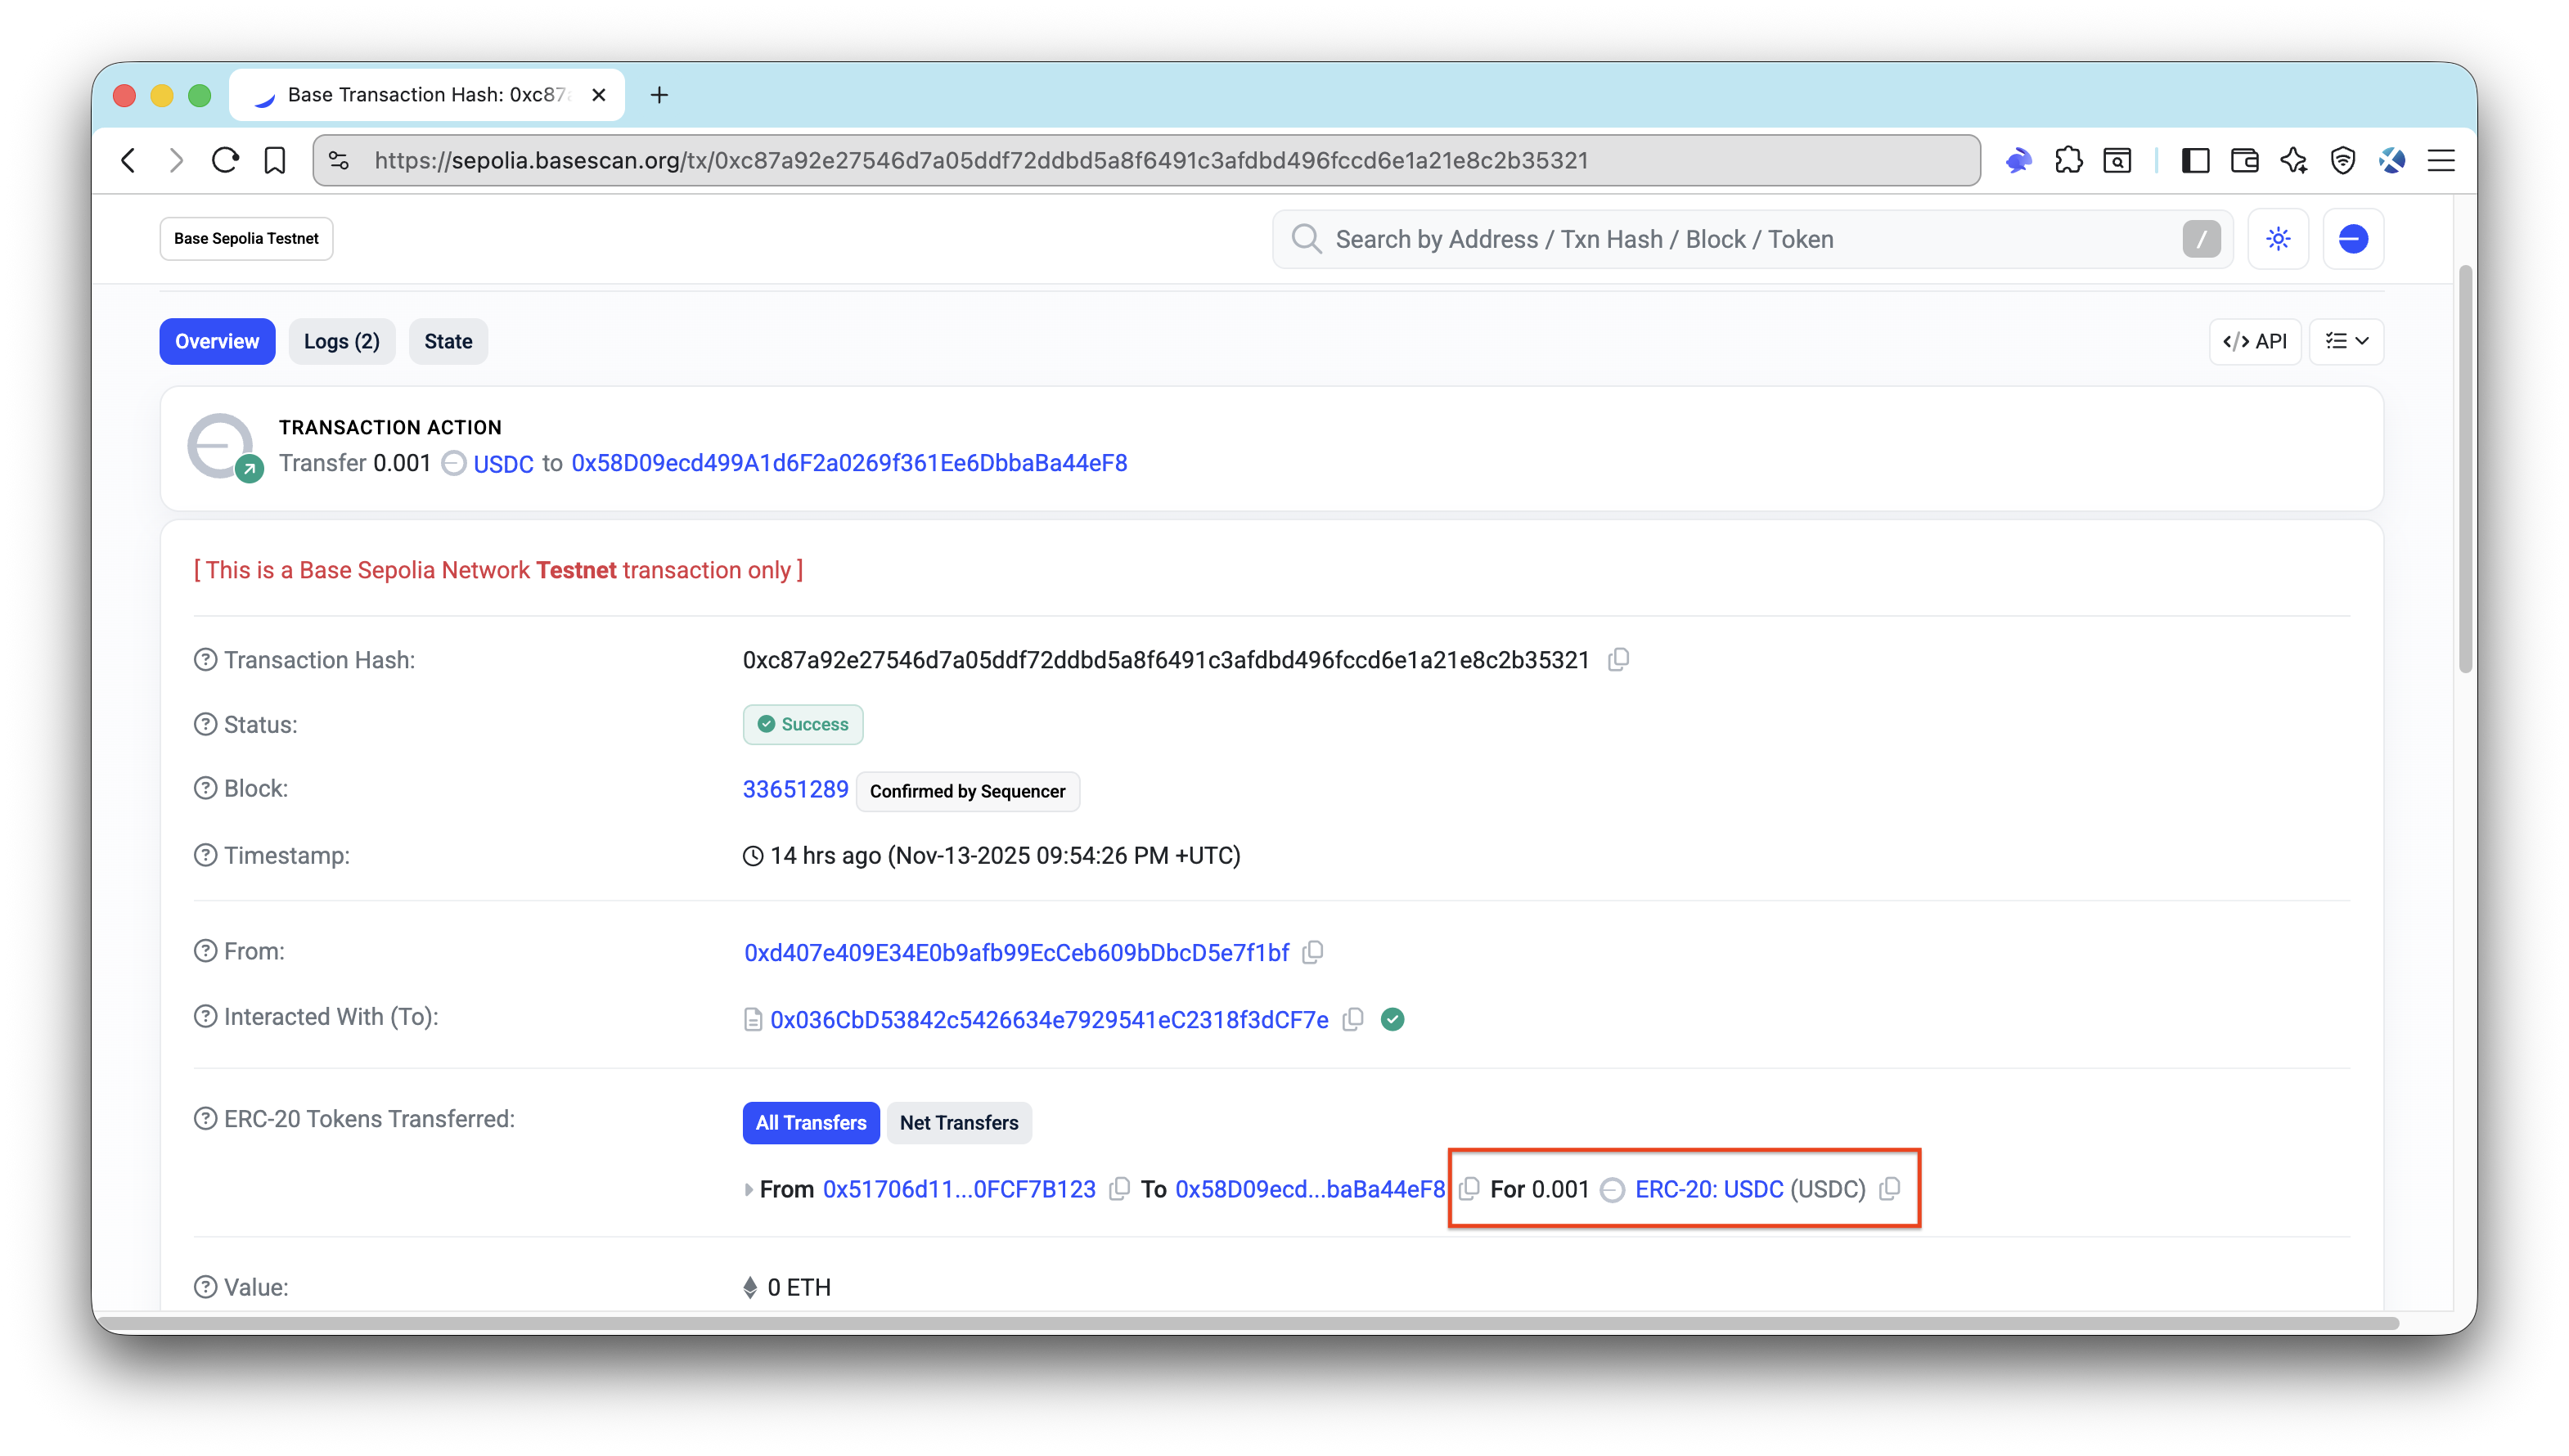
Use a blockchain explorer (e.g., Base Sepolia Explorer) to verify that the payment transaction was successfully settled on the blockchain.
Free Endpoint
You can also try accessing the free endpoint:
curl -i http://localhost:3000/api/weather/public
This endpoint does not require a payment header, so you should receive a 200 response with the following JSON payload:
{
	"message": "This endpoint is free!",
	"location": "San Francisco",
	"timezone": "PST"
}
結論
You now have a working understanding of how x402, x402-rails, and x402-payments come together in a real Rails application.
From here, you can:
- Implement your own business logic
- Introduce different prices per endpoint or per HTTP method
- Switch from testnet to mainnet once you are ready for production
- Explore hosting your own facilitator for more control
- Pay for RPC calls without writing client code using the Quicknode CLI guide
If you are stuck or have questions, drop them in our Discord. Stay up to date with the latest by following us on X (@Quicknode) or our Telegram announcement channel.