
24 min read
Your Quicknode Stream can now deliver to multiple destinations simultaneously from a single pipeline. No duplicate streams, no config drift, and no additional charge per destination. Available destinations per stream vary by plan. Learn more.
概述
Monitoring large token movements on-chain, often referred to as "whale" activity, can provide valuable insights into market sentiment and potential price action.
This guide will walk you through creating a real-time whale alert bot for the HYPE token on the Hyperliquid blockchain. You’ll build a system that not only detects large transfers but also enriches the data with live USD prices from HyperCore and sends instant notifications to a Telegram channel. To achieve this, we'll leverage the power and efficiency of Quicknode Streams.
您将负责的工作内容
- Create a Quicknode Stream that filters HYPE
Transferevents from Hyperliquid EVM - Verify payload authenticity with an HMAC signature before processing
- Read the HYPE spot price from HyperCore via HyperEVM precompiles
- Send tiered whale alerts (fish, dolphin, whale) to a Telegram channel
您需要准备的物品
- A Quicknode account with a Hyperliquid EVM endpoint
- Node.js 20+, npm (or another package manager), and a code editor like VS Code
- A Telegram account (if you wish to build a Telegram bot)
- Basic knowledge of JavaScript
- A tool for exposing your local server to the internet, such as ngrok or localtunnel (if you need to test webhooks locally)
Quicknode Streams operate on a "push" model. Instead of you repeatedly asking the blockchain for new data (polling), Streams monitor the chain for you and push the relevant data to your application the moment an event occurs.
This approach is highly efficient, providing several key benefits:
- Real-Time Data: Receive notifications instantly, without the latency of polling cycles.
- Reduced Overhead: Saves you from managing a complex and resource-intensive polling infrastructure.
- Powerful Filtering: Process and filter data on Quicknode's side, so your server only receives the exact information it needs.
- Cost Efficient: Only pay per event delivered, making it a budget-friendly solution for real-time data monitoring.
Whale Alert Bot Project
The whale alert bot consists of several interconnected components that work together to deliver real-time notifications:
-
Hyperliquid Blockchain: A
Transferevent (Transfer(address,address,uint256)) for the HYPE token is emitted when a transfer occurs. -
Quicknode Streams with Filtering: The Stream is constantly monitoring the chain and captures this event based on the filter function we define.
-
Webhook Delivery: Quicknode sends the filtered payload via a secure POST request to our server endpoint.
-
Node.js Server: Our server receives the data, validates its authenticity using the webhook's security token, and processes it.
-
Price Fetching: The server calls the HyperCore precompile contract on Hyperliquid to get the current USD price of HYPE.
-
Telegram Bot: Finally, the server formats a rich, readable message and uses the Telegram Bot API to send the alert to our designated channel.

This is the end-to-end event flow we will implement. Now, let's start building the Hyperliquid Whale Alert Bot.
Step 1: Create Your Telegram Bot and Channel
First, you'll need a Telegram bot and a channel where it can post alerts.
Create a Bot with BotFather
- Open Telegram and search for the BotFather.
- Start a chat with BotFather and use the command
/newbotto create a new bot. - Follow the prompts to set a name and username for your bot.
- BotFather will provide you with a Bot Token. Save this token securely; you'll need it for your
.envfile.
Create a Channel
- In Telegram, create a new channel. You can make it public or private.
- For a public channel, give it a memorable username (e.g., @hyperliquid_whales). This username is your
TELEGRAM_CHANNEL_ID. - For a private channel, you will need its numeric Chat ID. You can get this by forwarding a message from the channel to a bot like
@JsonDumpCUBot, and checking the chat ID it provides (i.e.,forward_from_chat.id).
Add Your Bot to the Channel
- Open your newly created channel's settings.
- Add your bot and make it an administrator.
You now have your TELEGRAM_BOT_TOKEN and your TELEGRAM_CHANNEL_ID.
Step 2: Create Your Quicknode Hyperliquid EVM Endpoint
Now, create your Quicknode Hyperliquid EVM endpoint that will be used to interact with the Hyperliquid Core to fetch HYPE price data.
First, you'll need a Quicknode account. If you already have one, just log in. Once you're on your Quicknode dashboard:
- Navigate to the Endpoints page
- Click the New Endpoint button
- Select the Hyperliquid EVM Mainnet network
- Create your endpoint
After your endpoint is created, copy your endpoint URL and keep it handy. You'll need to add it to your .env file in a later step.
Step 3: Create Your Quicknode Stream
Now, let's set up the Quicknode Stream that will monitor the Hyperliquid blockchain.
Create the Stream
- Go to the Quicknode Dashboard, and navigate to the Streams section.
- Click Create Stream and select Hyperliquid EVM Mainnet as the blockchain.
- Select Block with Receipts as the dataset
- Click Customize your payload to apply a filter and choose the Write your own filter option
Define Your Filter
For this guide, we'll create a custom JavaScript function to implement our tiered alert logic.
The function we will use inspects every transaction in each new block. It specifically looks for event logs that match the standard ERC20 Transfer signature (0xddf252ad1be2c89b69c2b068fc378daa952ba7f163c4a11628f55a4df523b3ef) and originate from the HYPE token contract. For a Transfer event, the topics array contains the sender and receiver, while log.data holds the amount. Our code decodes this information, checks the amount against our thresholds, and returns a clean data payload only if a transfer is large enough. This pre-processing is incredibly efficient, ensuring our server doesn't waste resources on irrelevant data.
In the function box, paste the following code:
// Quicknode Stream Filter for Tiered Wrapped HYPE Token Transfers
function main(payload) {
  // --- Configuration ---
  // The specific token contract address for Wrapped HYPE
  const WHYPE_ADDRESS = "0x5555555555555555555555555555555555555555";

  // Define the thresholds for each tier (with 18 decimals)
  const TIER_THRESHOLDS = {
    whale: BigInt("10000000000000000000000"), // 10,000 HYPE
    dolphin: BigInt("5000000000000000000000"), // 5,000 HYPE
    small_fish: BigInt("1000000000000000000000"), // 1,000 HYPE
  };

  // --- Static Data ---
  const TRANSFER_SIGNATURE =
    "0xddf252ad1be2c89b69c2b068fc378daa952ba7f163c4a11628f55a4df523b3ef";

  const { data } = payload;
  const block = data[0].block;
  const receipts = data[0].receipts || [];

  const categorizedTransfers = [];

  const blockNumber = parseInt(block.number, 16);
  const blockTimestamp = parseInt(block.timestamp, 16);

  for (const receipt of receipts) {
    for (const log of receipt.logs || []) {
      // Primary filter: Is this a Transfer event from the W-HYPE contract?
      if (
        log.address.toLowerCase() === WHYPE_ADDRESS &&
        log.topics[0] === TRANSFER_SIGNATURE
      ) {
        const transferValue = BigInt(log.data);
        let tier = null;

        // Tiering Logic: Check from the highest threshold down to the lowest.
        if (transferValue >= TIER_THRESHOLDS.whale) {
          tier = "whale";
        } else if (transferValue >= TIER_THRESHOLDS.dolphin) {
          tier = "dolphin";
        } else if (transferValue >= TIER_THRESHOLDS.small_fish) {
          tier = "small_fish";
        }

        // If the transfer meets any of our thresholds, process it.
        if (tier) {
          const fromAddress = "0x" + log.topics[1].slice(26);
          const toAddress = "0x" + log.topics[2].slice(26);

          categorizedTransfers.push({
            tier: tier,
            tokenContract: log.address,
            from: fromAddress,
            to: toAddress,
            value: transferValue.toString(),
            transactionHash: receipt.transactionHash,
            blockNumber: blockNumber,
            timestamp: blockTimestamp,
          });
        }
      }
    }
  }

  if (categorizedTransfers.length > 0) {
    return {
      largeTransfers: categorizedTransfers,
    };
  }

  return null;
}
Test Your Filter
Select a block (such as 12193297) to test your filter conditions and verify that the alerts are triggered correctly. You should see a payload containing the categorized transfers like this:
{
  "largeTransfers": [
    {
      "blockNumber": 12193297,
      "from": "0x7c97cd7b57b736c6ad74fae97c0e21e856251dcf",
      "tier": "small_fish",
      "timestamp": 1756245832,
      "to": "0xaaa2851ec59f335c8c6b4db6738c94fd0305598a",
      "tokenContract": "0x5555555555555555555555555555555555555555",
      "transactionHash": "0xafe522067fca99d4b44030d82885cabb757943255b991b3f2e95564807dbe0f7",
      "value": "2200000000000000000000"
    }
  ]
}
Get Security Token and Set the Webhook URL
Once you proceed to the next step, you'll be asked to select your destination. Choose Webhook as the destination type. Then, Quicknode will automatically generate a Security Token to verify that incoming requests are authentic. Copy this token into your .env file as the value of the WEBHOOK_SECRET variable.
For the Stream's Destination URL, you'll need a publicly accessible endpoint. While developing, you can use ngrok 或 localtunnel to expose your local server. You can run ngrok http 3000 (assuming your server runs on port 3000) and copy the HTTPS forwarding URL once your server is running. Remember to append /webhook to it (e.g., https://your-ngrok-id.ngrok.io/webhook) since this is where you will build your webhook listener.
Since our server is not built yet, we will pause here and come back to test and activate the Stream after building the server.
Step 4: Build the Webhook Server
Now, let's create the Node.js application that will receive and process the data from our webhook.
Project Setup and Dependencies
First, create a directory for your project and install the necessary dependencies. You can use npm or any other package manager (such as yarn, pnpm, bun) to do this. For example:
mkdir hyperliquid-whale-alert-bot && cd hyperliquid-whale-alert-bot
npm init -y
npm i express dotenv node-telegram-bot-api viem
npm i -D nodemon
Then, update your package.json to include the following:
"type": "module",
"scripts": {
  "start": "node index.js",
  "dev": "nodemon index.js"
}
项目结构
Create the following files to have a basic structure for your project:
├── config.js           // Configuration settings
├── index.js            // Main entry point
├── priceService.js     // Price-related logic
├── security.js         // Security-related logic
├── telegramService.js  // Telegram bot integration
└── .env                // Environment variables
└── .gitignore          // Git ignore file
Here is the one-line command you can run in your terminal to create all those files instantly:
touch config.js index.js priceService.js security.js telegramService.js .env .gitignore

# If touch command is not available, you can use:
# (echo > config.js) && (echo > index.js) && (echo > priceService.js) && (echo > security.js) && (echo > telegramService.js) && (echo > .env) && (echo > .gitignore)
环境变量
Update the .env file in the root of your project to store your environment variables. Add the following variables:
# Telegram Configuration
TELEGRAM_BOT_TOKEN=your_telegram_bot_token
TELEGRAM_CHANNEL_ID=your_channel_id

# Server Configuration
PORT=3000

# Streams Webhook Security
WEBHOOK_SECRET=your_optional_webhook_secret

# Quicknode Configuration for Hyperliquid EVM RPC
HYPERLIQUID_RPC=https://your-endpoint.quiknode.pro/your-token/

# Environment
NODE_ENV=development
Code Implementation
.gitignore
It's important to add a .gitignore file to your project to avoid committing sensitive information and unnecessary files. Create a .gitignore file in the root of your project and add the following lines:
node_modules
.env
config.js
This file contains the configuration settings for your application, including environment variables and other constants.
该 spot price precompile lives at 0x...0808, while the oracle price precompile is 0x...0807. You can use either depending on your price source; this guide uses spot. Always confirm addresses in official docs and up-to-date guides.
import dotenv from "dotenv";

// Load environment variables
dotenv.config();

export const TIERS = {
  whale: {
    emoji: "🐋",
    label: "WHALE",
  },
  dolphin: {
    emoji: "🐬",
    label: "DOLPHIN",
  },
  small_fish: {
    emoji: "🐟",
    label: "FISH",
  },
};

export const EXPLORER = {
  tx: "https://hypurrscan.io/tx/",
  address: "https://hypurrscan.io/address/",
  block: "https://hypurrscan.io/block/",
};

export const HYPERCORE = {
  SPOT_PX_PRECOMPILE: "0x0000000000000000000000000000000000000808",
  HYPE_SPOT_INDEX: 107, // Mainnet HYPE spot ID
  RPC_URL: process.env.HYPERLIQUID_RPC || "https://api.hyperliquid.xyz/evm",
};

export const MESSAGE_DELAY_MS = 1000; // Delay between Telegram messages

export const PORT = process.env.PORT || 3000;
priceService.js
This service is responsible for fetching the HYPE price from HyperCore.
We will call the SPOT price precompile directly with a 32-byte ABI-encoded index. The precompile returns a uint64 where decimal scaling depends on the asset’s szDecimals (Hyperliquid’s price system).
// priceService.js
// Fetches HYPE price from HyperCore using precompile

import { createPublicClient, http, encodeAbiParameters, formatUnits } from "viem";
import { HYPERCORE } from "./config.js";

// Create viem client for HyperEVM
const client = createPublicClient({
  transport: http(HYPERCORE.RPC_URL),
});

// Cache price for 30 seconds to avoid excessive RPC calls
let priceCache = {
  price: null,
  timestamp: 0,
};
const CACHE_DURATION = 30000; // 30 seconds

/**
 * Fetches HYPE spot price from HyperCore precompile
 * Price is returned with 6 decimals precision for HYPE
 * Details: To convert to floating point numbers, divide the returned price by 10^(8 - base asset szDecimals) for spot
 * Source: https://hyperliquid.gitbook.io/hyperliquid-docs/for-developers/hyperevm/interacting-with-hypercore
 * @returns {Promise<number|null>} HYPE price in USD
 */
export async function getHypePrice() {
  try {
    // Check cache first
    if (
      priceCache.price &&
      Date.now() - priceCache.timestamp < CACHE_DURATION
    ) {
      console.log("Using cached HYPE price:", priceCache.price);
      return priceCache.price;
    }

    // Encode the spot index as a uint32 parameter
    const encodedIndex = encodeAbiParameters(
      [{ name: "index", type: "uint32" }],
      [HYPERCORE.HYPE_SPOT_INDEX]
    );

    // Call the spot price precompile
    const result = await client.call({
      to: HYPERCORE.SPOT_PX_PRECOMPILE,
      data: encodedIndex,
    });

    // szDecimals for HYPE is 2.
    const szDecimals = 2;

    const priceRaw = BigInt(result.data);
    const price = formatUnits(priceRaw, 8 - szDecimals); // Convert to decimal string

    // Update cache
    priceCache = {
      price,
      timestamp: Date.now(),
    };

    console.log(`Fetched HYPE price from HyperCore: $${price}`);
    return price;
  } catch (error) {
    console.error("Error fetching HYPE price from HyperCore:", error);
    // Return cached price if available, otherwise null
    return priceCache.price || null;
  }
}

/**
 * Formats USD value based on HYPE amount and price
 * @param {string} hypeAmount - HYPE amount as string
 * @param {number} hypePrice - HYPE price in USD
 * @returns {string} Formatted USD value
 */
export function formatUSD(hypeAmount, hypePrice) {
  if (!hypePrice) return "";

  const usdValue = parseFloat(hypeAmount) * hypePrice;
  return `($${usdValue.toLocaleString("en-US", {
    minimumFractionDigits: 0,
    maximumFractionDigits: 0,
  })})`;
}
security.js
This module contains the logic to validate incoming webhooks. Quicknode recommends HMAC verification using headers X-QN-Nonce, X-QN-Timestamp,以及 X-QN-Signature and this module implements that verification.
For more details, refer to the Validating Streams Signatures guide.
// security.js
// Validates incoming webhook signatures from Quicknode

import crypto from "crypto";

/**
 * Validates the webhook signature from Quicknode
 * Based on Quicknode's HMAC-SHA256 signature validation
 *
 * @param {string} secretKey - The webhook secret key
 * @param {string} payload - The request body as string
 * @param {string} nonce - The nonce from headers
 * @param {string} timestamp - The timestamp from headers
 * @param {string} givenSignature - The signature from headers
 * @returns {boolean} Whether the signature is valid
 */
export function validateWebhookSignature(
  secretKey,
  payload,
  nonce,
  timestamp,
  givenSignature
) {
  if (!secretKey || !nonce || !timestamp || !givenSignature) {
    console.warn("⚠️  Missing required parameters for signature validation");
    return false;
  }

  try {
    // Concatenate nonce + timestamp + payload as strings
    const signatureData = nonce + timestamp + payload;

    // Convert to bytes
    const signatureBytes = Buffer.from(signatureData);

    // Create HMAC with secret key converted to bytes
    const hmac = crypto.createHmac("sha256", Buffer.from(secretKey));
    hmac.update(signatureBytes);
    const computedSignature = hmac.digest("hex");

    // Use timing-safe comparison to prevent timing attacks
    const isValid = crypto.timingSafeEqual(
      Buffer.from(computedSignature, "hex"),
      Buffer.from(givenSignature, "hex")
    );

    if (isValid) {
      console.log("✅ Webhook signature validated successfully");
    } else {
      console.error("❌ Invalid webhook signature");
    }

    return isValid;
  } catch (error) {
    console.error("Error validating webhook signature:", error);
    return false;
  }
}

/**
 * Middleware for Express to validate webhook signatures
 * Quicknode sends nonce, timestamp, and signature in headers
 */
export function webhookAuthMiddleware(req, res, next) {
  // Skip validation if no secret is configured
  const secretKey = process.env.WEBHOOK_SECRET;
  if (!secretKey) {
    console.log("ℹ️  Webhook secret not configured, skipping validation");
    return next();
  }

  // Get Quicknode headers
  const nonce = req.headers["x-qn-nonce"];
  const timestamp = req.headers["x-qn-timestamp"];
  const givenSignature = req.headers["x-qn-signature"];

  if (!nonce || !timestamp || !givenSignature) {
    console.error("🚫 Missing required Quicknode headers");
    return res.status(400).json({
      error: "Missing required headers",
      message:
        "x-qn-nonce, x-qn-timestamp, and x-qn-signature headers are required",
    });
  }

  // Get the raw body as string
  // Note: Express's JSON middleware already parsed the body, so we need to stringify it back
  const payloadString = JSON.stringify(req.body);

  // Validate the signature
  const isValid = validateWebhookSignature(
    secretKey,
    payloadString,
    nonce,
    timestamp,
    givenSignature
  );

  if (!isValid) {
    console.error("🚫 Webhook validation failed");
    return res.status(401).json({
      error: "Invalid signature",
      message: "The webhook signature could not be validated",
    });
  }

  next();
}
telegramService.js
This module formats and sends the final message to your Telegram channel.
// telegramService.js
// Handles Telegram bot messaging

import TelegramBot from "node-telegram-bot-api";
import { formatEther } from "viem";
import { TIERS, EXPLORER, MESSAGE_DELAY_MS } from "./config.js";
import { getHypePrice, formatUSD } from "./priceService.js";

// Initialize Telegram bot
const bot = new TelegramBot(process.env.TELEGRAM_BOT_TOKEN, { polling: false });
const CHANNEL_ID = process.env.TELEGRAM_CHANNEL_ID;

/**
 * Format an address for display
 */
function formatAddress(address) {
  return `${address.slice(0, 6)}...${address.slice(-4)}`;
}

/**
 * Format transaction hash for display
 */
function formatTxHash(hash) {
  return `${hash.slice(0, 10)}...`;
}

/**
 * Display time
 */
function getTime(timestamp) {
  const date = new Date(timestamp * 1000);
  return date.toLocaleString("en-US");
}

/**
 * Create formatted Telegram message for a transfer
 */
async function createMessage(transfer) {
  const tierConfig = TIERS[transfer.tier];
  const formattedValue = formatEther(BigInt(transfer.value));
  const hypePrice = await getHypePrice();
  const usdValue = formatUSD(formattedValue, hypePrice);

  // Create message with Markdown formatting
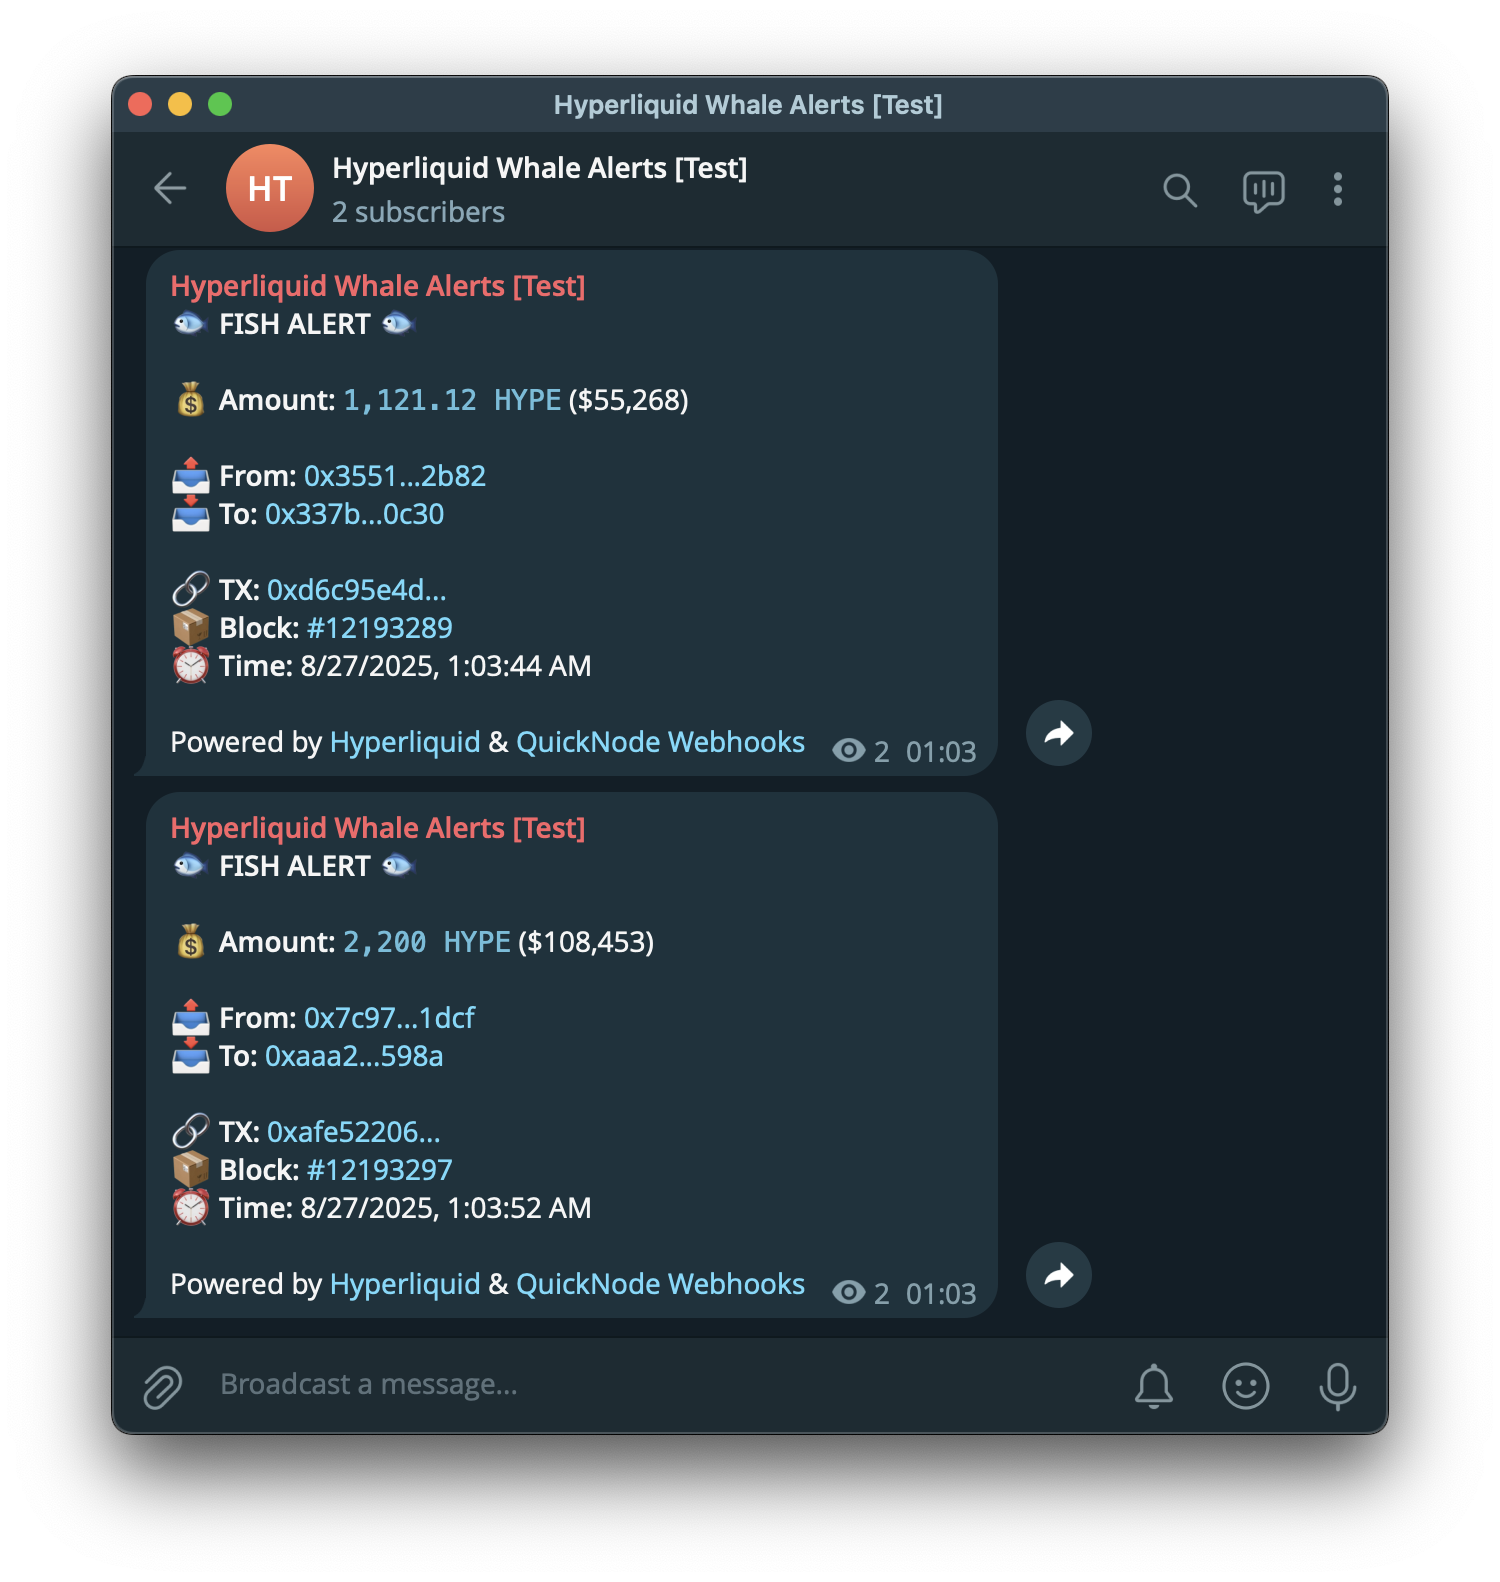
  const message = `
${tierConfig.emoji} *${tierConfig.label} ALERT* ${tierConfig.emoji}

💰 *Amount:* \`${parseFloat(formattedValue).toLocaleString("en-US", {
    maximumFractionDigits: 2,
  })} HYPE\` ${usdValue}

📤 *From:* [${formatAddress(transfer.from)}](${EXPLORER.address}${
    transfer.from
  })
📥 *To:* [${formatAddress(transfer.to)}](${EXPLORER.address}${transfer.to})

🔗 *TX:* [${formatTxHash(transfer.transactionHash)}](${EXPLORER.tx}${
    transfer.transactionHash
  })
📦 *Block:* [#${transfer.blockNumber}](${EXPLORER.block}${transfer.blockNumber})
⏰ *Time:* ${getTime(transfer.timestamp)}

Powered by [Hyperliquid](https://hyperliquid.xyz) & [Quicknode Streams](https://www.quicknode.com/streams)`;

  return message;
}

/**
 * Send message to Telegram with retry logic
 */
export async function sendMessage(message, retries = 3) {
  for (let i = 0; i < retries; i++) {
    try {
      await bot.sendMessage(CHANNEL_ID, message, {
        parse_mode: "Markdown",
        disable_web_page_preview: true,
      });

      console.log("✅ Message sent to Telegram successfully");
      return true;
    } catch (error) {
      console.error(`❌ Telegram send attempt ${i + 1} failed:`, error.message);

      if (i < retries - 1) {
        // Wait before retrying (exponential backoff)
        await new Promise((resolve) =>
          setTimeout(resolve, 1000 * Math.pow(2, i))
        );
      }
    }
  }

  return false;
}

/**
 * Process and send alerts to Telegram
 */
export async function processAlerts(transfers) {
  console.log(`📨 Processing ${transfers.length} transfers for Telegram...`);

  for (const transfer of transfers) {
    const message = await createMessage(transfer);
    const sent = await sendMessage(message);

    if (!sent) {
      console.error(
        "Failed to send message for transfer:",
        transfer.transactionHash
      );
    }

    // Rate limiting between messages
    if (transfers.indexOf(transfer) < transfers.length - 1) {
      await new Promise((resolve) => setTimeout(resolve, MESSAGE_DELAY_MS));
    }
  }

  // Send summary if there are multiple transfers
  if (transfers.length > 3) {
    const summaryMessage = `
📊 *Batch Summary*

Total transfers: ${transfers.length}
🐋 Whales: ${transfers.filter((t) => t.tier === "whale").length}
🐬 Dolphins: ${transfers.filter((t) => t.tier === "dolphin").length}
🐟 Fish: ${transfers.filter((t) => t.tier === "small_fish").length}

Block: #${transfers[0].blockNumber}
`;
    await sendMessage(summaryMessage);
  }
}
index.js
This is the main file that ties everything together.
We use an Express raw body parser before any JSON middleware for the /webhook endpoint to be able to verify signatures. This ensures that the body is available in its original form for HMAC verification.
// server.js
// Main webhook server for Hyperliquid whale alerts

import express from "express";
import dotenv from "dotenv";
import { PORT, HYPERCORE } from "./config.js";
import { processAlerts } from "./telegramService.js";
import { webhookAuthMiddleware } from "./security.js";

// Load environment variables
dotenv.config();

// Initialize Express app
const app = express();

// Custom middleware to capture raw body for signature validation
app.use((req, res, next) => {
  if (req.path === '/webhook' && process.env.WEBHOOK_SECRET) {
    // For webhook endpoint with security enabled, capture raw body
    let rawBody = '';
    req.setEncoding('utf8');

    req.on('data', (chunk) => {
      rawBody += chunk;
    });

    req.on('end', () => {
      req.rawBody = rawBody;

      // Parse JSON body
      try {
        req.body = JSON.parse(rawBody);
      } catch (error) {
        return res.status(400).json({ error: 'Invalid JSON payload' });
      }

      next();
    });
  } else {
    // For other endpoints or when security is disabled, use normal JSON parsing
    express.json()(req, res, next);
  }
});

// Main webhook endpoint with security validation
app.post("/webhook", webhookAuthMiddleware, async (req, res) => {
  try {
    console.log("📨 Webhook received at", new Date().toISOString());

    const { largeTransfers } = req.body;

    if (!largeTransfers || largeTransfers.length === 0) {
      console.log("No large transfers in this webhook");
      return res.json({ success: true, processed: 0 });
    }

    console.log(`Processing ${largeTransfers.length} transfers...`);

    // Send alerts to Telegram
    await processAlerts(largeTransfers);

    console.log(`✅ Processed ${largeTransfers.length} transfers successfully`);

    res.json({
      success: true,
      processed: largeTransfers.length,
    });
  } catch (error) {
    console.error("❌ Webhook processing error:", error);
    res.status(500).json({
      success: false,
      error: error.message,
    });
  }
});

// Health check endpoint
app.get("/health", (req, res) => {
  res.json({
    status: "healthy",
    timestamp: new Date().toISOString(),
    environment: {
      telegramConfigured: !!process.env.TELEGRAM_BOT_TOKEN,
      webhookSecretConfigured: !!process.env.WEBHOOK_SECRET,
    },
  });
});

// Error handling middleware
app.use((error, req, res, next) => {
  console.error("Unhandled error:", error);
  res.status(500).json({
    success: false,
    error: "Internal server error",
  });
});

// Start server
app.listen(PORT, () => {
  console.log(`
╔════════════════════════════════════════════╗
║   Hyperliquid Whale Alert Server Started   ║
╠════════════════════════════════════════════╣
║   Port: ${PORT}                               ║
║   Webhook: http://localhost:${PORT}/webhook   ║
║   Health: http://localhost:${PORT}/health     ║
╚════════════════════════════════════════════╝

Configuration:
- Telegram Bot: ${
    process.env.TELEGRAM_BOT_TOKEN ? "✅ Configured" : "❌ Not configured"
  }
- Telegram Channel: ${process.env.TELEGRAM_CHANNEL_ID || "Not configured"}
- Webhook Secret: ${
    process.env.WEBHOOK_SECRET
      ? "✅ Configured"
      : "⚠️  Not configured (validation disabled)"
  }
- HyperCore RPC: ${HYPERCORE.RPC_URL}

Ready to receive webhooks...
  `);
});

// Graceful shutdown
process.on("SIGTERM", () => {
  console.log("SIGTERM received, shutting down gracefully...");
  process.exit(0);
});

process.on("SIGINT", () => {
  console.log("SIGINT received, shutting down gracefully...");
  process.exit(0);
});
Step 5: Run and Test the System
You're now ready to bring your bot to life.
Start Your Server
Run the following command in your terminal to start the server. nodemon allows the server to restart automatically on file changes.
# Start in development mode with nodemon
npm run dev
Expose Your Localhost
If you haven't already, open a new terminal window and run ngrok http 3000. Copy the HTTPS forwarding URL.
Test Your Stream
- Go back to your webhook's page in the Quicknode dashboard.
- Paste your ngrok URL (e.g.,
https://your-ngrok-id.ngrok.io/webhook) into the Webhook URL field and save. - Now, click the Send sample payload button. Quicknode will send a sample payload to your running server.
- Check your server's console logs and check your Telegram channel for alerts.
Here is an example of what the final alert will look like:
Activate Your Stream
Once you've confirmed everything is working, click Create a Stream button to create your Stream. Your bot is now live and will monitor all new HYPE transfers in real-time.
Troubleshooting
Sometimes, if your server or ngrok doesn't shut down correctly, you might run into an error like address already in use when you try to restart it. Here’s how to quickly fix that.
Step 1: Free Up the Port
First, find the Process ID (PID) using the port, then stop it. The commands below are for macOS/Linux; they may differ depending on your OS.
# Find the Process ID (PID) using port 3004
lsof -i :3004

# Replace <PID> with the number you found and run:
kill -9 <PID>
Step 2: Restart and Update
Restart your server and ngrok. Important: ngrok creates a new URL every time it starts. You must copy this new URL and update it in your Quicknode webhook settings.
结论
Congratulations! You have successfully built a production-ready, real-time whale alert system for the Hyperliquid blockchain. By combining the power of Quicknode Streams for on-chain data, a secure Node.js server for business logic, and the Telegram API for notifications, you've created a valuable tool for monitoring the DeFi ecosystem.
This pattern is flexible, you can extend tiers, enrich with extra onchain context, or swap data sources and destinations as your use case evolves.
Next Steps: Production Deployment
While ngrok is excellent for development, you'll need a more permanent solution for a production environment. Consider deploying your application to:
- A Virtual Private Server (VPS) like DigitalOcean or AWS, using a process manager like PM2 to keep it running
- A containerized service using Docker
- A Platform-as-a-Service (PaaS) like Heroku or Render
Possible Improvements
This project provides a strong foundation that you can expand upon. Here are a few ideas to take your bot to the next level:
-
Multi-Token Support: Modify the code to accept an array of token addresses. This way, you can monitor multiple tokens with different thresholds and send alerts accordingly.
-
Historical Data Dashboard: Quicknode Streams support not only real-time data but also historical data. Store the incoming transfer data in a database (e.g., PostgreSQL, MongoDB). You could then build a web-based dApp to visualize historical trends, track the net flow of specific whale wallets, and perform deeper onchain analysis.
-
Add More Notification Channels: Integrate other notification services like Discord webhooks.
-
Automated Trading Triggers: For a more advanced use case, you could use these alerts to trigger onchain actions. For example, a large transfer could trigger a swap.
Further Resources
- Hyperliquid Documentation
- Quicknode Hyperliquid Guides
- Quicknode Hyperliquid Docs
- Video: What is Hyperliquid HyperEVM and How to Get Started
- Video: How to Build a Hyperliquid Analytics Dashboard
If you are stuck or have questions, drop them in our Discord. Stay up to date with the latest by following us on X (formerly Twitter) (@Quicknode) or our Telegram announcement channel.