
9 min read
Overview
Programs are what Solana calls Smart Contracts--they are the engine that handles information and requests: everything from token transfers and Candy Machine mints to 'hello world' logs and DeFi escrow governance. Solana supports writing on-chain programs using Rust, C, and C++ programming languages. Anchor is a framework that accelerates building secure Rust programs on Solana. Let's build your first Solana Program with Anchor!
What You Will Do
This is the 2nd guide in a 2 part series. In Part 1 we covered creating your first Solana Program on Anchor. The program allows a client-side request to be made to Solana's devnet and get a 'Hello World' log. In this guide, we will build on that Program and implement an increment function to track how many times your program has been used:
- Create a program instruction to initialize a new data account
- Update the hello_world function to update increment a data account on each call
- Create a client-side request to call our updated function
What You Will Need
- Complete Part 1 of this Series. We will build off of the program you build there.
- Basic knowledge of Solana Fundamentals
- Basic knowledge of the JavaScript/TypeScript and Rust programming languages
- A modern web browser (e.g., Google Chrome)
Initiate Your Project
We will be building off of the project from Part 1 of this Series. If you have that project open, go ahead and proceed to the next section.
If you do not already have the 'Hello World' project, you can create catch up by creating a new Anchor project on Solana Playground. Open lib.rs. Delete the existing contents, and paste this code:
use anchor_lang::prelude::*;

declare_id!("11111111111111111111111111111111");

#[program]
mod hello_world {
    use super::*;
    pub fn say_hello(_ctx: Context<SayHello>) -> Result<()> {
        msg!("Hello World!");
        Ok(())
    }
}

#[derive(Accounts)]
pub struct SayHello {}
Create and Connect a Wallet
Since this project is just for demonstration purposes, we can use a "throw-away" wallet. Solana Playground makes it easy to create one. You should see a red dot "Not connected" in the bottom left corner of the browser window. Click it:
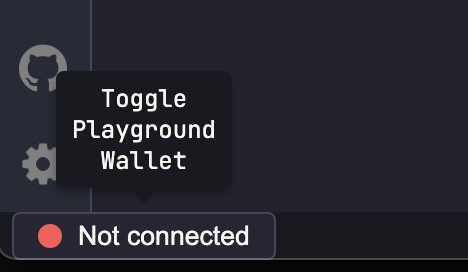
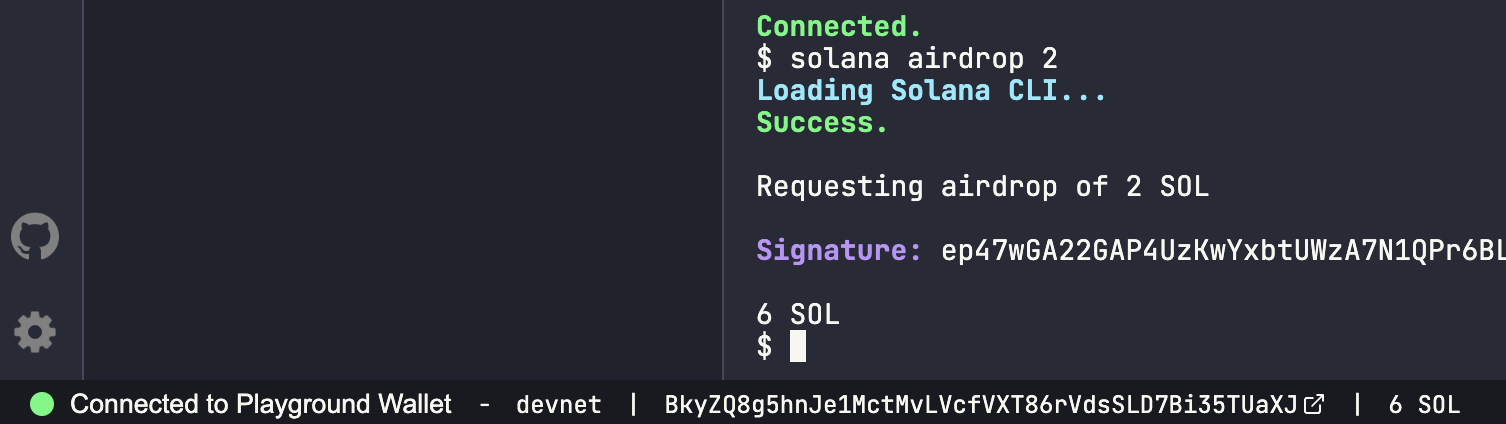
Solana Playground will generate a wallet for you (or you can import your own). Feel free to save it for later use if you like, and click continue when you're ready. A new wallet will be initiated and connected to Solana devnet. Solana Playground airdrops some SOL to your new wallet automatically, but we will request a little extra to ensure we have enough for deploying our program. In the browser terminal, you can use Solana CLI commands. Enter solana airdrop 2 to drop 2 SOL into your wallet. Your wallet should now be connected to devnet with a balance of 6 SOL:
You are ready to go! Let's build!
Create a Counter Account
Create Initialize Structs
To count how many times our "hello_world" function has been called, we will need to create a new data account owned by our program. That data account will need two new structs:
1. an Account struct, Counter that will be used to keep track of our count (this will be an unsigned 64-bit integer, u64). #[account] pulls in some of the muscle of Anchor that does a lot of heavy lifting for us regarding serializing and deserializing our data.
#[account]
pub struct Counter {
    count: u64
}
2. a new Context will be used to create a new counter account. The context, Initialize, will tell our program which Public Keys we will need to provide when sending our transaction instructions from the client. #[derive(Accounts)] is abstracting a lot of content for us--we will cover that in a future guide. For now, know that Anchor is simplifying our code quite a bit!
#[derive(Accounts)]
pub struct Initialize<'info> {
    #[account(init, payer = signer, space = 8 + 8)]
    pub counter: Account<'info, Counter>,
    #[account(mut)]
    pub signer: Signer<'info>,
    pub system_program: Program<'info, System>,
}
Our Initialize struct will require three Public Keys:
- counter, the public key of the new data account we are creating (of type, Counter created above). Note here that we must pass a few arguments to initiate our new account:
- init to tell Anchor that we are initializing a new account.
- defining a public key responsible for paying the rent associated with the new account (payer), which we have set to our signer
- space is used to calculate how many bytes our account will need (more bytes require more rent, so we want to be accurate with our requirements). We will need 8 bytes for our account discriminator (required for every account) and 8 bytes for our u64. See Anchor's Space Reference Guide for space requirements for all types.
- signer, the wallet responsible for signing the initialize transaction (and for paying the fees outlined above).
- system_program, which will own our new account and handle the SOL transfer between accounts
Create Initialize Counter Function
Great! Now that our structs are defined, we need to create an initialize function. Inside of hello_world after the say_hello function, create a new function, initialize_counter:
    pub fn initialize_counter(ctx: Context<Initialize>) -> Result<()> {
        let counter = &mut ctx.accounts.counter;
        counter.count = 0;
        msg!("Initialized new count. Current value: {}!", counter.count);
        Ok(())
    }
Our function will pass a context, ctx, of type Initialize (from our previous step). Because we have included all of the necessary account information in our Initialize struct, Anchor can do most of the heavy lifting for us to create our new account. However, we need to call our counter account and set its initial value to 0. Because we are modifying counter, we must tag the variable as mutable using &mut. Finally, we will add a log show that our counter has been initiated with the correct initial balance. Anchor will make sure our data is serialized correctly!
Great job! Let's create our counter.
Initialize Counter from Client
First, we will need to Build and Update our program:
- Click 🔧 Build on the left side of your screen to compile your code and check for errors. You should see a log like this in your console.
- Click the Tools Icon 🛠 on the left side of the page, and then click "Upgrade." This will upgrade the program that we have already deployed to devnet.
- Note: Solana Playground is still in beta. I had to refresh after deploying for my client-side Types to update with my new function. You may need to do this as well.
While the Program is deploying, head back to your client-side code, client.ts. You can delete the previous code and create a new call initializeCounter():
// 1 - Generate a new Keypair for the Counter Account
const counter = anchor.web3.Keypair.generate();
console.log('creating counter: ', counter.publicKey.toString());

// 2 - Fetch latest blockhash
let latestBlockhash = await pg.connection.getLatestBlockhash('finalized');

// 3 - Call initialize_counter and send the transaction to the network
const tx = await pg.program.methods
  .initializeCounter()
  // 3a - Pass the counter public key into our accounts context
  .accounts({counter: counter.publicKey})
  // 3b - Append the counter keypair's signature to transfer authority to our program
  .signers([counter])
  .transaction();

// 4 - Confirm the transaction
const txId = await web3.sendAndConfirmTransaction(pg.connection, tx, [pg.wallet.keypair, counter]);
console.log(`https://explorer.solana.com/tx/${txId}?cluster=devnet`);
Let's break that down:
- Generate a new keypair that we will use for our new counter account.
- Fetch the latest blockhash.
- Like before, we will use Anchor to call our program's initialize_counter (note here in TypeScript, it is formatted initializeCounter). For this instance, we must pass the accounts we developed in our Initialize struct: counter, signer, and system program. Anchor knows we need to pass the system program and signer, so we do not need to add that here. Finally, since we want our Program to be able to update the data in this account in the future, we must have the counter assign authority to our program. We must append the account's signature to our method to do that.
Alright, let's make some magic. Click "▶️ Run" in the left sidebar to initialize your account. After the transaction processes, you should see a transaction URL in your terminal. Open it and scroll down to the transaction instructions. You should see something like this:
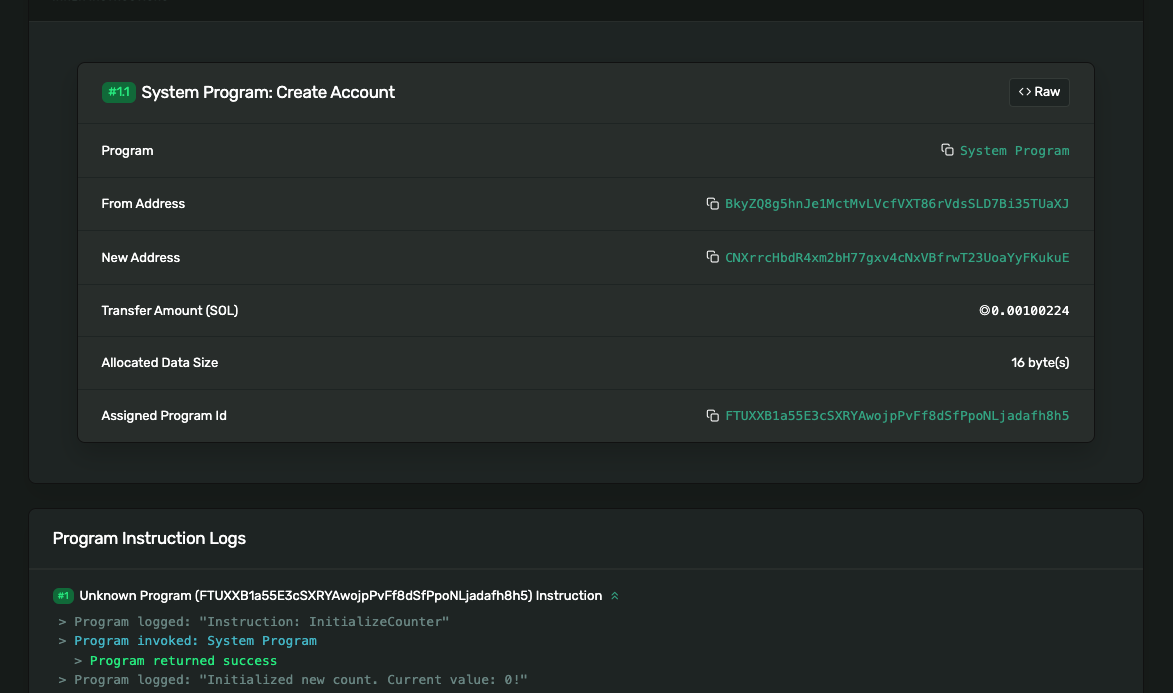
You can see that our Playground wallet created a new account that is assigned to our Program! You'll also notice that the account has been allocated 16 bytes of data. Finally, if you scroll down to our logs, you can see that our account state is 0, as expected. Nice job! Now we need to add our counter to our say_hello function, and we will be tracking devnet hello's forever!
Before moving on, copy your counter public key from your console and replace your client-side code with the public key:
const COUNTER = 'S61VvavzvHtGLEMxxavPdsKydRnwShxfbubGbw1mkPU'; //Replace with your public key
Implement Counter
We should now have a program that can say hello and a data account that can hold an integer value. We need to get those talking to each other. We need to update our say_hello function and the context we pass into, SayHello. Replace your say_hello function with:
    pub fn say_hello(ctx: Context<SayHello>) -> Result<()> {
        let counter = &mut ctx.accounts.counter;
        counter.count += 1;
        msg!("Hello World! - Greeting # {}", counter.count);
        Ok(())
    }
Our updated function first fetches the counter from the accounts object in our context. Since we are going to modify it, we must mark it as mutable, using &mut. We then increment our counter by 1 and log our new value with our greeting using msg!. We are almost ready, but first, we need to update our SayHello struct to pass our counter account. Update SayHello to include counter as a mutable account:
#[derive(Accounts)]
pub struct SayHello<'info> {
    #[account(mut)]
    pub counter: Account<'info, Counter>,
}
Run it! 🏃♂️
Open client.ts. After your COUNTER address and helper function, add the following code:
console.log(pg.wallet.publicKey.toString(), "saying hello:");

//1. Fetch latest blockhash
let latestBlockhash = await pg.connection.getLatestBlockhash('finalized');

//2. Call say_hello and send the transaction to the network
const counter = new anchor.web3.PublicKey(COUNTER);
 const tx = await pg.program.methods
  .sayHello()
  .accounts({counter})
  .transaction();

//3. Confirm the transaction and log the tx URL
const txId = await web3.sendAndConfirmTransaction(pg.connection, tx, [pg.wallet.keypair]);
console.log(`https://explorer.solana.com/tx/${txId}?cluster=devnet`);

//4. Query the chain for our data account and log its value
const data = await pg.program.account.counter.fetch(counter);
console.log('greeted', data.count.toNumber(),' times');
This should look very familiar to Part 1's call to sayHello, with a couple of small but significant differences:
- In Step 2, we must now add the .accounts() method and pass our counter public key so that our program knows which counter to update (in theory, our program could handle any number of different counters).
- Remember when we initialized counter, we needed to sign the transaction with the counter keypair? We do not need to do that here because we previously assigned the authority of the counter account to our program, meaning the program has the authority to change the data!
- Finally, Step 4 is new. Now that we are writing data to the cluster, we must also read it. Anchor makes this easy by letting us call .fetch() on our data account. And then, we log our results.
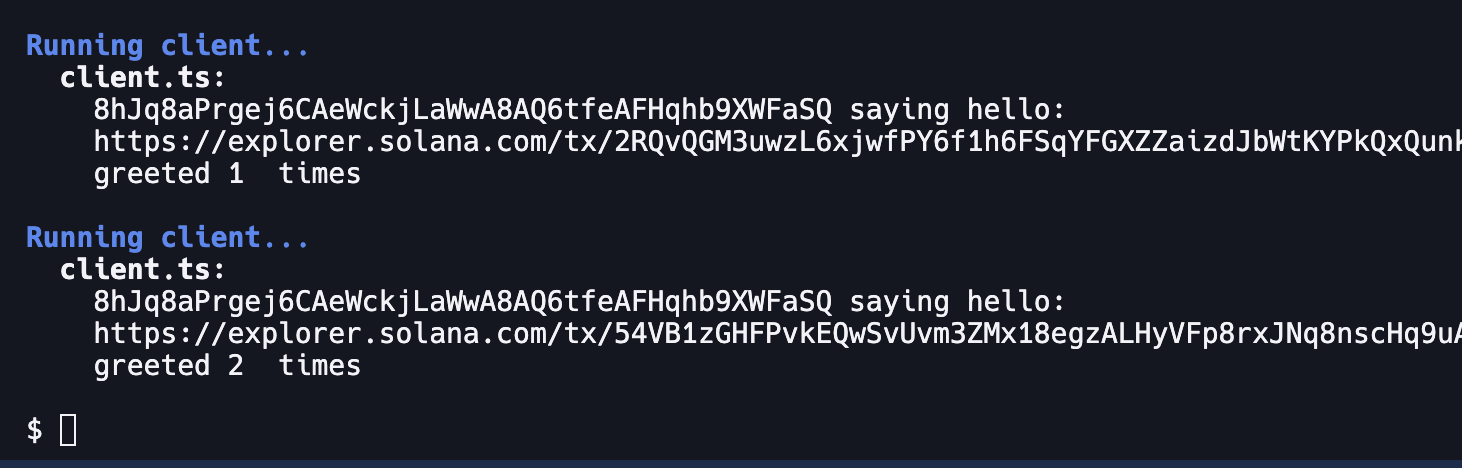
Feel free to click "▶️ Run" a couple of times. You should see that your program is now tracking how many times it has said "Hello World":
Wrap Up
Great job with this! Your Program is starting to get a little more exciting! Understanding how to read and write data accounts through your programs, is really important concept that you will encounter frequently on your path as a Solana Developer.
Want to keep building? Check out our other Solana guides at quicknode.com/guides/tags/solana.
If you're stuck, have questions, or just want to talk about what you're building, drop us a line on Discord or Twitter!