
10 minutos de lectura
Resumen
Solana has a unique feature that allows transactions to expire if not committed to a block in a certain amount of time. This helps ensure that validators do not have to process the same transaction multiple times. Additionally, transaction expiration creates a cleaner user experience by giving users certainty that a transaction has succeeded or failed relatively quickly.
Because Solana allows transaction expiration, in your dApps, you must check to make sure that the transaction has succeeded or failed before handling your user's next steps. In this guide, we will create a tool that monitors a Solana transaction to verify that it has been successfully added to a block or expired.
Lo que necesitarás
- Node.js (versión 16.15 o superior) instalado
- Experiencia en TypeScript y ts-node instalado
- Experience with running basic Solana Transactions. Check out this (Quicknode guide titled How to Send Transactions on Solana using JavaScript for more information.)
Configura tu proyecto
Create a new project directory in your terminal with the following:
mkdir solana-tx-propagation
cd solana-tx-propagation
Crea un archivo para tu aplicación, app.ts:
echo > app.ts
Inicializa tu proyecto con el indicador «yes» para utilizar los valores predeterminados en tu nuevo paquete:
yarn init --yes
#o
npm init --yes
Crea un archivo tsconfig.json con la importación de .json habilitada:
tsc -init --resolveJsonModule true
Instalar la dependencia de Solana Web3
Para este ejercicio tendremos que añadir la biblioteca Solana Web3. En tu terminal, escribe:
yarn add @solana/web3.js@1
#o
npm install @solana/web3.js@1
Crea un monedero y recibe SOL mediante airdrop
You'll need to create a Solana File System Wallet (secret key written to a guideSecret.json file) and airdrop some SOL to it. You can do this using Solana CLI or use this script we have created for you. If you already have a paper wallet and just need some devnet SOL, you can request an airdrop below:
Nota: Enviar solicitudes de airdrop con demasiada frecuencia puede provocar un error 429 (demasiadas solicitudes).
Make sure you save your wallet to your project directory as guideSecret.json.
Importar las dependencias necesarias
Open app.ts, and paste the following imports on lines 1-2:
import { Connection, Keypair, LAMPORTS_PER_SOL, SystemProgram, TransactionInstruction, TransactionMessage, VersionedTransaction } from '@solana/web3.js';
import secret from './guideSecret.json';
Line 1 imports necessary classes and constants from the Solana Web3 library, and line 2 imports the wallet we created in the previous step.
Configura tu punto de acceso de Quicknode
Para desarrollar en Solana, necesitarás un punto final de API para conectarte a la red. Puedes utilizar nodos públicos o implementar y gestionar tu propia infraestructura; sin embargo, si quieres tiempos de respuesta 8 veces más rápidos, puedes dejarnos a nosotros el trabajo pesado.
Descubre por qué más del 50 % de los proyectos de Solana eligen Quicknode y regístrate aquí para crear una cuenta. Vamos a utilizar un nodo de Solana Devnet.
Copia el enlace del proveedor HTTP:
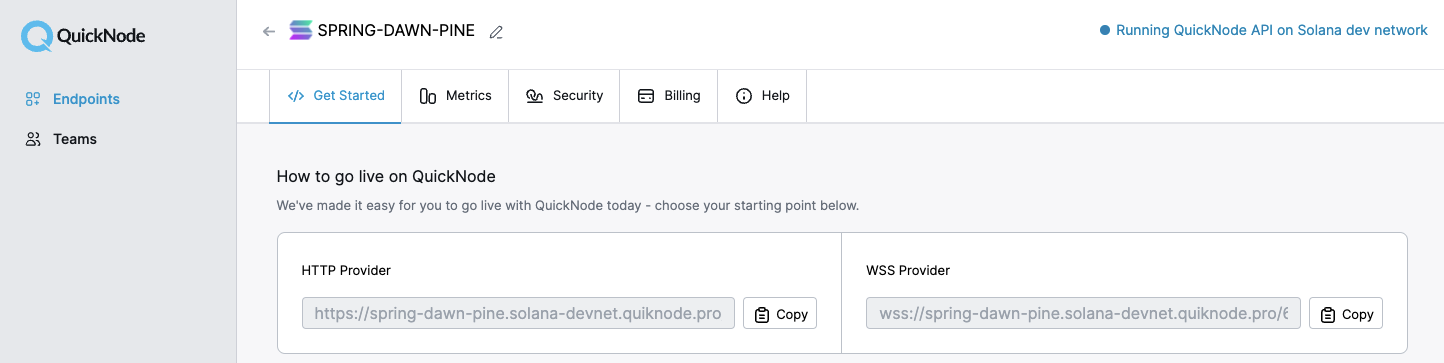
En el archivo app.ts, debajo de las declaraciones de importación, declara tu RPC y establece la conexión con Solana:
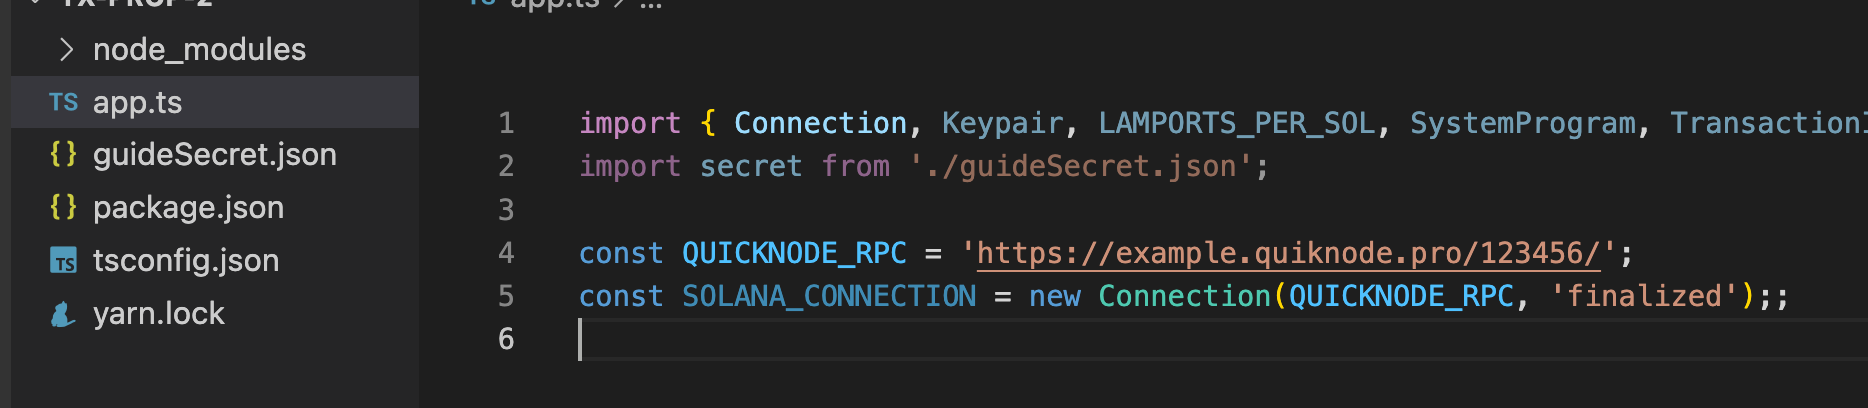
const QUICKNODE_RPC = 'https://example.solana-devnet.quiknode.pro/0123456/';
const SOLANA_CONNECTION = new Connection(QUICKNODE_RPC);
After set up, your environment should look something like this:
Configura tu aplicación
Define Wallets and Transfer Instructions
Create two wallet variables, DESTINATION_WALLET and SIGNER_WALLET, that we will use for our transaction. We will use Keypair.generate() to generate a random wallet to send SOL to, and we will use Keypair.fromSecretKey() to derive our wallet from the imported secret key:
const DESTINATION_WALLET = Keypair.generate();
const SIGNER_WALLET = Keypair.fromSecretKey(new Uint8Array(secret));
Pass those wallets into a new TransactionInstruction that sends 0.1 SOL from SIGNER_WALLET to DESTINATION_WALLET:
const INSTRUCTIONS: TransactionInstruction =
    SystemProgram.transfer({
        fromPubkey: SIGNER_WALLET.publicKey,
        toPubkey: DESTINATION_WALLET.publicKey,
        lamports: 0.01 * LAMPORTS_PER_SOL,
    });
Fetch the Starting Time
Create a new variable START_TIME that gets the time that we start our app (we will use this to calculate how long the process takes):
const START_TIME = new Date();
Create a Sleep Function
We will need to create a delay function, sleep, that will allow us to wait a period of time before re-querying the chain:
const sleep = (ms: number) => {
    return new Promise(resolve => setTimeout(resolve, ms));
}
Alright, we're all set. Let's build out our app!
Check if a Blockhash is Expired
First, let's create a function, isBlockhashExpired, to check if the block has expired. We will need to pass in a Solana network Connection and an initial lastValidBlockHeight to check against:
async function isBlockhashExpired(connection: Connection, lastValidBlockHeight: number) {
    let currentBlockHeight = (await connection.getBlockHeight('finalized'));
    console.log('                           ');
    console.log('Current Block height:             ', currentBlockHeight);
    console.log('Last Valid Block height - 150:     ', lastValidBlockHeight - 150);
    console.log('--------------------------------------------');
    console.log('Difference:                      ',currentBlockHeight - (lastValidBlockHeight-150)); // If Difference is positive, blockhash has expired.
    console.log('                           ');

    return (currentBlockHeight > lastValidBlockHeight - 150);
}
Our function does 3 things:
- Fetches the current block height using getBlockHeight.
- (optional) Prints the blockhash expiration over time. (This is optionally added to help demonstrate how the expirations change)
- Returns a boolean by checking if our current block height is larger than our original block height (less 150).
Why do we subtract 150? Solana requires that a transaction's blockhash is not older than 150 slots.
Create and Send a Transaction
Create an async code block where we will run our script:
(async()=>{

})()
Within your code block, let's create and send a transaction based on the TransactionInstruction we defined earlier:
(async()=>{
    // Step 1 - Get Latest Blockhash
    const blockhashResponse = await SOLANA_CONNECTION.getLatestBlockhashAndContext('finalized');
    const lastValidHeight = blockhashResponse.value.lastValidBlockHeight;

    // Step 2 - Create a SOL Transfer Transaction
    const messageV0 = new TransactionMessage({
        payerKey: SIGNER_WALLET.publicKey,
        recentBlockhash: blockhashResponse.value.blockhash,
        instructions: [INSTRUCTIONS]
    }).compileToV0Message();
    const transaction = new VersionedTransaction(messageV0);
    transaction.sign([SIGNER_WALLET]);

    // Step 3 - Send Transaction to the Network
    const txId = await SOLANA_CONNECTION.sendTransaction(transaction);
})()
Let's break that down:
- Step 1: we fetch the latest blockhash. We need this for our Transaction (and we will pass it into our isBlockhashExpired later).
- Step 2: Create a Transfer Transaction. We're going to use Versioned Transactions. If you have not used these before, check out our Guide: How to Use Versioned Transactions on Solana.
- Step 3: Call sendTransaction to send the transaction to the network. This will give us a transaction signature, txId, that we can query later.
Check if the Transaction Succeeded or if Blockhash has Expired
Alright! We have sent a transaction to the network--now we need to run two checks: First, we want to check if our transaction has been confirmed or finalized by the network, and if it has not, then we will check to see if the blockhash has expired. If neither is true, we will wait for a couple of seconds and then retry until one is true.
Inside of your async code block, add Step 4:
    // Step 4 - Check transaction status and blockhash status until the transaction succeeds or blockhash expires
    let hashExpired = false;
    let txSuccess = false;
    while (!hashExpired && !txSuccess) {
        const { value: statuses } = await SOLANA_CONNECTION.getSignatureStatuses([txId]);

        if (!statuses || statuses.length === 0) {
            throw new Error('Failed to get signature status');
        }

        const status = statuses[0];

        if (status.err) {
            throw new Error(`Transaction failed: ${JSON.stringify(status.err)}`);
        }

        // Break loop if transaction has succeeded
        if (status && ((status.confirmationStatus === 'confirmed' || status.confirmationStatus === 'finalized'))) {
            txSuccess = true;
            const endTime = new Date();
            const elapsed = (endTime.getTime() - START_TIME.getTime())/1000;
            console.log(`Transaction Success. Elapsed time: ${elapsed} seconds.`);
            console.log(`https://explorer.solana.com/tx/${txId}?cluster=devnet`);
            break;
        }

        hashExpired = await isBlockhashExpired(SOLANA_CONNECTION, lastValidHeight);

        // Break loop if blockhash has expired
        if (hashExpired) {
            const endTime = new Date();
            const elapsed = (endTime.getTime() - START_TIME.getTime())/1000;
            console.log(`Blockhash has expired. Elapsed time: ${elapsed} seconds.`);
            // (add your own logic to Fetch a new blockhash and resend the transaction or throw an error)
            break;
        }

        // Check again after 2.5 sec
        await sleep(2500);
    }
There's a lot here--let's break it down:
- First, we define two boolean variables, hashExpired and txSuccess, that we will use to toggle true if either condition is met.
- Create a while loop that will run until either the blockhash has expired or the transaction has succeeded.
- Pass our txId into getSignatureStatuses to check the status of our transaction.
- Check if the returned status is confirmed or finalized. If so, we log the time elapsed and a link to our transaction on Solana Explorer. Then we break the loop.
- If the transaction has not yet succeeded, we check if our hash has expired by passing lastValidHeight into our isBlockhashExpired function.
- If the blockhash has expired, we log the time elapsed. Then we break the loop. You can add your own retry logic to resend the transaction or throw an error if you would like.
- If neither condition is met, we will wait for 2.5 seconds using our sleep function. Then the process will repeat.
Ejecuta tu código
Alright, you are all set. In your terminal, run your app:
Aplicación ts-node
Awesome! More likely than not, you will see one or two iterations of the blockhash loop and a successful transaction:
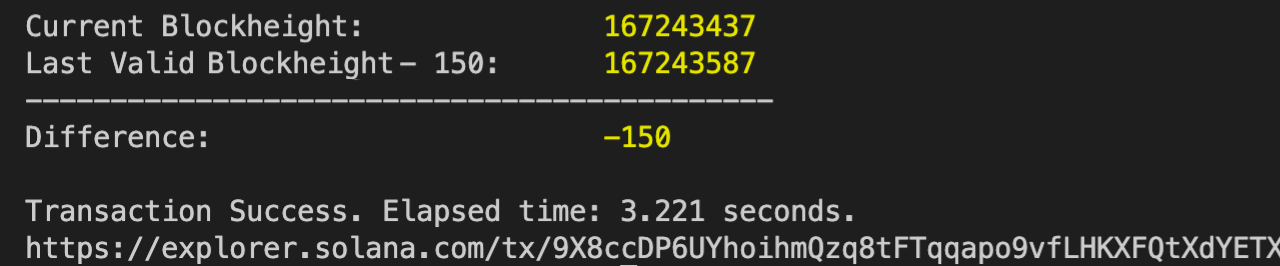
Nice job. We have found it helpful to rerun this script without sending the transaction to the network to observe the blockhash expiration. We can do this by commenting out a few lines of code (our sendTransaction call and our transaction status check):
//const txId = await SOLANA_CONNECTION.sendTransaction(transaction);
y
        /* const { value: statuses } = await SOLANA_CONNECTION.getSignatureStatuses([txId]);

        if (!statuses || statuses.length === 0) {
            throw new Error('Failed to get signature status');
        }

        const status = statuses[0];

        if (status.err) {
            throw new Error(`Transaction failed: ${JSON.stringify(status.err)}`);
        } */

        // Break loop if the transaction has succeeded
        /*if (status && ((status.confirmationStatus === 'confirmed' || status.confirmationStatus === 'finalized'))) {
            txSuccess = true;
            const endTime = new Date();
            const elapsed = (endTime.getTime() - START_TIME.getTime())/1000;
            console.log(`Transaction Success. Elapsed time: ${elapsed} seconds.`);
            console.log(`https://explorer.solana.com/tx/${txId}?cluster=devnet`);
            break;
        } */
Now, go ahead and rerun your code:
Aplicación ts-node
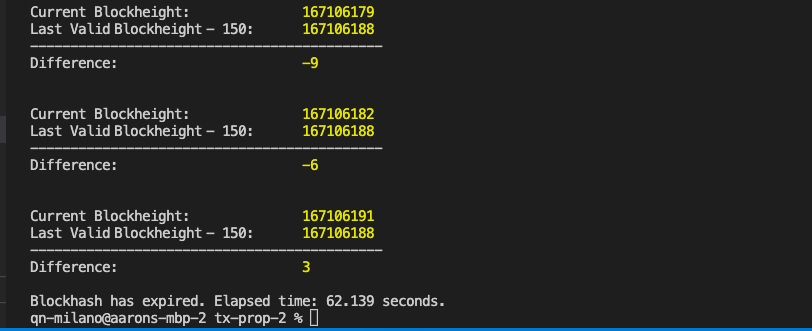
You should see the console log every few slots and the difference between slots progressing from -150 to 0. The process should take about a minute, and you should see something like this:
Conclusión
That's it! You're now on your way to providing a better user experience. As the Solana ecosystem continues to mature, expect processes around transaction handling to evolve. To put these concepts into practice, check out some of our other Solana tutorials here.
To stay up to date on the latest Solana news and information, subscribe to our newsletter or follow us on Twitter. If you have any questions or want to discuss your project, drop us a line on Discord.
¡Nos encanta recibir comentarios!
Si tienes algún comentario o pregunta sobre esta guía, háznoslo saber. ¡Nos encantaría saber tu opinión!