Volver a las aplicaciones de ejemplo
Generador de Solana
La aplicación Solana Minter te permite crear tokens fungibles en la Solana y cuenta con soporte integrado para la subida IPFS .
Autor



Marco de trabajo/biblioteca de front-end:
React/Next.js
Idioma:
TypeScript
Herramienta de compilación/servidor de desarrollo:
Next.js
Resumen
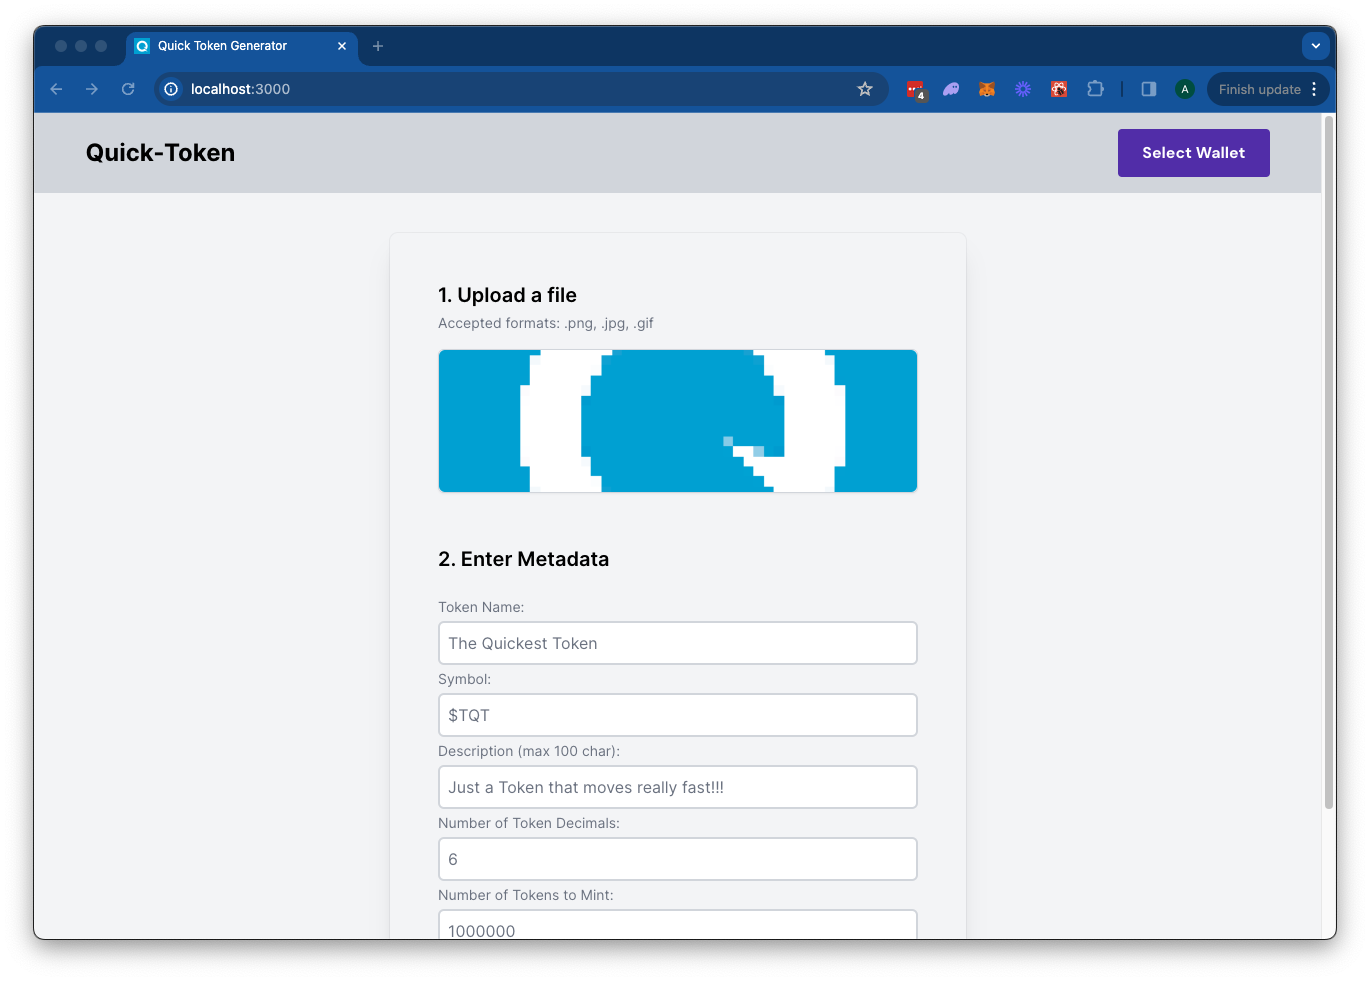
La aplicación Solana Minter te permite crear tokens fungibles en la Solana , con compatibilidad integrada para la subida IPFS mediante IPFS Quicknode. Solo tienes que subir una imagen para los metadatos de tu token, rellenar los datos del token y conectar tu monedero. Haz clic en «Acuñar» para subir tus metadatos a IPFS acuñar tu token sin complicaciones.Esta aplicación utiliza Next.js 14 proyecto puesto en marcha con create-next-app.
Primeros pasos
Instalar las dependencias
Abre el directorio del proyecto:
cdsolana
A continuación, instala las dependencias:
npm instalar
# o
yarn
# o
pnpm instalar
# o
bun install
Configurar variables de entorno
Asegúrate de tener a mano unendpoint Quicknode endpoint conseguir uno gratis aquí.
- Cambiar nombre
.env.examplea.env.localy actualízalo con tu Endpoint Solana Quicknode Endpoint IPFS de Quicknode . - Asegúrate de actualizar el clúster para garantizar que las URL de tus transacciones apunten al explorador correcto (utiliza únicamente los valores de la enumeración proporcionados en el
.env.examplearchivo). - Puedes utilizar la URL pública de IPFS Quicknode o sustituirla por la tuya propia.
QN_IPFS_API=QN_abc123456789xyz_REPLACE_THIS
QN_ENDPOINT=mainnet
mainnet# mainnet| devnet | testnet  local
NEXT_PUBLIC_GipfsEWAY_URLipfs
En primer lugar, ejecuta el servidor de desarrollo:
npm ejecutar dev
# o
yarn dev
# o
pnpm dev
# o
bun dev
Abre http://localhost:3000 en tu navegador para ver el resultado.
Cómo utilizar la Dapp
- Sube una imagen (se utilizará para los metadatos de tu token)
- Rellena el formulario con los datos del token
- Conecta tu monedero
- Asegúrate de tener unos 0,04 SOL en tu monedero para cubrir las comisiones de la nueva cuenta.
- Si utilizas Devnet, puedes conseguir SOL gratis en el Solana .
- ¡Haz clic en «Mint» para subir tu imagen y los metadatos a IPFS acuñar tu token!
Arquitectura
src/
├── app/
│   ├── page.tsx
│   └── layout.tsx
│   └── api/
│       └── solana
│           └── createMintTx/route.ts   # Crear una nueva transacción de acuñación
│           └── sendAndConfirm/route.ts # Enviar y confirmar la transacción
│       └── upload/
│           └── image/route.ts  # Subida de IPFS
│           └── json/route.ts   # Subida de IPFS
└── componentes/
    ├── SolanaProviders.tsx     # Proveedores de contexto del adaptador de monedero
    ├── Minter.tsx              # Componente principal
    └── [componentes de apoyo]
Implementar en Vercel
Documentación de Next.js
Para obtener más información sobre Next.js, echa un vistazo a los siguientes recursos:
- Documentación de Next.js: descubre las funciones y la API de Next.js.
- Aprende Next.js: un tutorial interactivo sobre Next.js.
Puedes echar un vistazo al repositorio de Next.js en GitHub: ¡tus comentarios y aportaciones son bienvenidos!
Aportaciones y comentarios
¡Nos encantaría conocer tu opinión y agradecemos cualquier aportación a esta aplicación de ejemplo!
Para informar de problemas o enviar comentarios, abre una incidencia en GitHub en el qn-guide-ejemplos repositorio.
Para colaborar, sigue estos pasos:
- Hacer un fork del repositorio
- Crear una rama de características:git checkout -b feature/amazing-feature
- Guarda los cambios:git commit -m "Añadir una función increíble"
- Envía tu rama:git push origin feature/amazing-feature
- Abre una solicitud de incorporación de cambios.
Descubre más aplicaciones de ejemplo