
5 min read
概要
If you are building on Localnet, you may have noticed that some of your favorite programs are unavailable (e.g., perhaps you have been unable to mint an NFT on localnet). This is because Localnet is a private network that does not have access to the same programs as Mainnet. One of the powerful features of the Solana CLI is the ability to export programs and accounts from Mainnet. This is extremely useful when building composable programs and testing on localhost.
This guide will teach you how to use Solana CLI to clone accounts and programs from Mainnet and deploy them to Localnet.
主な業務内容
In this guide, you will:
- Clone Metaplex Metadata program
- Clone an NFT minted on Mainnet
- Start a local validator with the cloned NFT and Metaplex Metadata program
必要なもの
Please make sure you have installed the required dependencies before proceeding:
- Solana CLI latest version installed
- A modern web browser (e.g., Chrome, Firefox, Brave)
| 依存関係 | バージョン |
|---|---|
| solana-cli | 1.15.2 |
Set Up Your Project
You'll need a local directory for this project to store your cloned accounts and programs. Create a new directory and navigate to it in your terminal.
mkdir solana-clones
cd solana-clones
さあ、始めましょう!
Clone Metaplex Token Metadata Program
To interact with NFTs on Solana, you need the Metaplex Token Metadata program. This is not a program native to Solana, so if we want to use it on our localnet, we will need to clone it from Mainnet. We can use a dump command in Solana CLI to do this. The dump command will export the program account's executable byte code to a file, which we can then deploy to our localnet. To do this, we will need the program ID. For Metaplex Token Metadata, the program ID is metaqbxxUerdq28cj1RbAWkYQm3ybzjb6a8bt518x1s.
In your terminal, enter the following command to dump the program to a file:
solana program dump -u m metaqbxxUerdq28cj1RbAWkYQm3ybzjb6a8bt518x1s metadata.so
- その
-uflag specifies the cluster to dump the program from. In this case, we are dumping from Mainnet Beta. - The first argument is the program ID.
- The second argument is the file name to dump the program to.
That's it. It's that easy to download program byte code from Mainnet. Now, let's get an NFT to test with.
Clone an NFT Minted on Mainnet
Similar to the dump command, we can use the アカウント command to clone an account from Mainnet. The アカウント command fetches an account's contents from the network. The command includes an --output-file flag, which allows us to write the account to a file. Let's try it out with our NFT minted on Mainnet (I will use one of my NFTs: 7FTdQdMqkk5Xc2oFsYR88BuJt2yyCPReTpqr3viH6b6C).
solana account -u m 7FTdQdMqkk5Xc2oFsYR88BuJt2yyCPReTpqr3viH6b6C --output-file nft.json --output json-compact
Similar to the previous step, we define our fetching cluster via -u m (Mainnet Beta), and we specify the account ID as the first argument. Additionally, we use the --output-file そして --output flags to write the account to a file that can be used by Solana CLI when we start our validator.
We will need 1 more account in order to get our NFT onto our localnet: the metadata account.
To get the NFT's metadata, however, we will also need the metadata account. My metadata PDA is 4tSgNWeqtgp2kwRgjTqgpenP4wxfPaVCvganMR2gnd8W, so that's what I'll be using.
If you do not know your Metadata PDA and want to learn how to fetch it, click here.
The Metaplex Metadata Account is a program-derived account (PDA), seeded by: the word "metadata," the program id, and the token mint address. You can derive it in JavaScript using the PublicKey.findProgramAddressSync method:
import { PublicKey } from "@solana/web3.js";

let NFT_MINT = new PublicKey("7FTdQdMqkk5Xc2oFsYR88BuJt2yyCPReTpqr3viH6b6C"); // 👈 Replace with your NFT Mint Address
let METADATA_PROGRAM = new PublicKey('metaqbxxUerdq28cj1RbAWkYQm3ybzjb6a8bt518x1s');

const getMetadataAddress = async (mint) => {
    return PublicKey.findProgramAddressSync(
        [Buffer.from("metadata"), METADATA_PROGRAM.toBuffer(),mint.toBuffer()  ],
        METADATA_PROGRAM
    )
}

getMetadataAddress(NFT_MINT).then(([metadata, bump]) => {
    console.log(metadata.toBase58());
}).catch(console.error);
To learn more about Solana NFT Metadata, check out our Solana NFT Metadata Deep Dive.
solana account -u m 4tSgNWeqtgp2kwRgjTqgpenP4wxfPaVCvganMR2gnd8W --output-file metadata.json --output json-compact
These two accounts will be adequate to see our NFT on chain, which will be sufficient for this demo, but if you would like additional interactivity with the NFT on localnet, you may need to clone additional accounts (e.g., the owner account, the owner's associated token account, etc.). This holds true for any program you want to clone from Mainnet--you will need to understand how the program works, what accounts are required, and how they are used to replicate the functionality on localnet.
Initiate a Local Solana Validator with Cloned Accounts & Programs
Let's go ahead and start our local validator. To do so with our cloned accounts and program, we will need to use the --bpf-program そして --account flags. The --bpf-program flag specifies the program to deploy to the localnet, and the --account flag specifies the accounts to deploy to the localnet.
solana-test-validator -r --bpf-program metaqbxxUerdq28cj1RbAWkYQm3ybzjb6a8bt518x1s metadata.so --account 7FTdQdMqkk5Xc2oFsYR88BuJt2yyCPReTpqr3viH6b6C nft.json --account 4tSgNWeqtgp2kwRgjTqgpenP4wxfPaVCvganMR2gnd8W metadata.json
We had to use the -r tag to reset the local validator. The -bpf-program そして --account flags are ignored if the validator is not reset.
You should see the validator initializing in your terminal:
Ledger location: test-ledger
Log: test-ledger/validator.log
⠄ Initializing...                                                                                              Waiting for fees to stabilize 1...
Identity: ...
Genesis Hash: ...
Nice job! Now let's find our NFT on chain.
Find Your NFT on Localnet
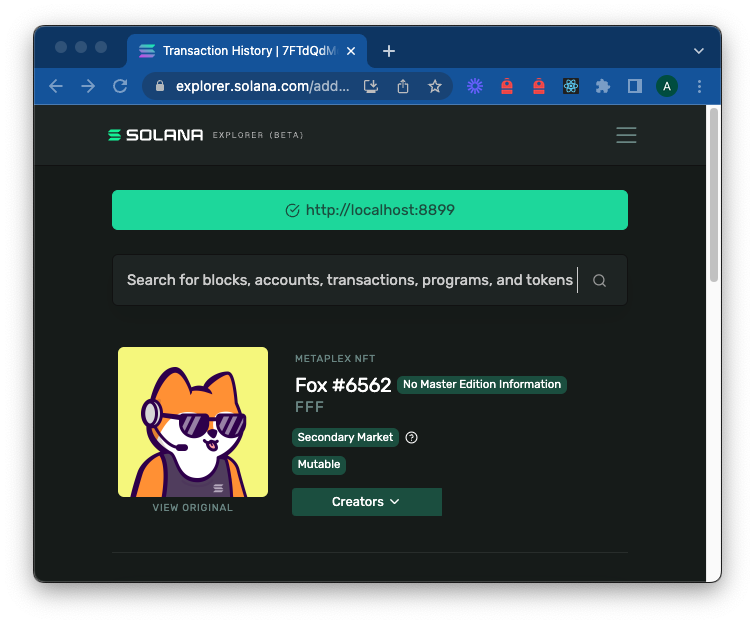
Head over to Solana Explorer and make sure you're on the correct cluster (localnet). Enter your Mint Address in the search bar (for me, that's 7FTdQdMqkk5Xc2oFsYR88BuJt2yyCPReTpqr3viH6b6C). You should see your NFT on localnet!
Anchor Testing Configuration
If you are building a project using Anchor, you can use the cloned accounts and programs when you run anchor test. Just point your Anchor.toml to the cloned program and accounts by adding the following to your Anchor.toml file (make sure to update the file paths and names to match your cloned accounts and programs):
[[test.genesis]]
address = "metaqbxxUerdq28cj1RbAWkYQm3ybzjb6a8bt518x1s"
program = "genesis/accounts/metadata.so"

[[test.validator.account]]
address = "7FTdQdMqkk5Xc2oFsYR88BuJt2yyCPReTpqr3viH6b6C"
filename = "genesis/accounts/nft.json"
For more information on how to configure your local test validator for Anchor tests, check out the following resources:
まとめ
That's it! You've successfully cloned a program and account from Mainnet and deployed it to localnet. This can become extremely useful when building composable programs (or building on top of existing programs) on Solana.
We would love to hear more about what you are building. Drop us a line in Discord, or give us a follow on Twitter to stay up to date on all the latest information!