
7 min read
概述
On October 10, 2022 (Epoch 358), Solana added support for new transaction version types through a concept known as "Versioned Transactions". After this change, the Solana runtime now supports two types of transactions: "legacy" (older transactions) and "0" (transactions that include Address Lookup Tables). Versioned Transactions will allow you to utilize Address Lookup Tables today and could have additional functionality in the future.
In this guide, you will create and execute a Version 0 (V0) Transaction.
If you need help with ensuring your existing client-side apps can support Versioned Transactions, check out our Guide: How to Update Your Solana Client to Handle Versioned Transactions.
您需要准备的物品
- Nodejs (version 16.15 or higher) installed
- Typescript experience and ts-node installed
- Experience with running basic Solana Transactions (Guide: How to Send Transactions on Solana using Javascript)
Set Up Your Project
Create a new project directory in your terminal with:
mkdir solana-versioned-tx
cd solana-versioned-tx
Create a file for your app, app.ts:
echo > app.ts
Initialize your project with the "yes" flag to use default values for your new package:
yarn init --yes
#or
npm init --yes
Create a tsconfig.json with .json importing enabled:
tsc -init --resolveJsonModule true
Install Solana Web3 Dependency
We will need to add the Solana Web3 library for this exercise. In your terminal, type:
yarn add @solana/web3.js@1
#or
npm install @solana/web3.js@1
Let's get started.
Set Up Your App
Import Necessary Dependencies
Open app.ts, and paste the following imports on line 1 to get a few essential methods and classes from the Solana Web3 library:
import { Connection, Keypair, LAMPORTS_PER_SOL, SystemProgram, TransactionInstruction, TransactionMessage, VersionedTransaction } from '@solana/web3.js';
Create a Wallet and Airdrop SOL
The first task we'll need to accomplish is creating an account with a wallet and funding it. We'll be using the handy tool below to automatically generate a new wallet and airdrop 1 SOL to it. (You can also achieve this with the Keypair.generate() 和 requestAirdrop() functions if you prefer a more manual approach).
Note: Sending airdrop requests too frequently may trigger a 429 (Too Many Requests) error.
Once you've successfully generated your keypair, you'll notice two new constants: secret 和 SIGNER_WALLET, a Keypair. The secret is a 32-byte array that is used to generate the public and private keys. The SIGNER_WALLET is a Keypair instance that is used to sign transactions (we've airdropped some devnet SOL to cover the gas fees). Make sure to add it to your code below your other constants if you haven't yet.
Below your imports, paste your new secret, and add:
const secret = [0,...,0]; // 👈 Replace with your secret
const SIGNER_WALLET = Keypair.fromSecretKey(new Uint8Array(secret));
const DESTINATION_WALLET = Keypair.generate();
We have defined two wallets: SIGNER_WALLET will send SOL to our DESTINATION_WALLET. We have also added a constant, LOOKUP_TABLE_ADDRESS, which we will update later to reference our Lookup Table's on-chain account ID.
Set Up Your Quicknode Endpoint
To build on Solana, you'll need an API endpoint to connect with the network. You're welcome to use public nodes or deploy and manage your own infrastructure; however, if you'd like 8x faster response times, you can leave the heavy lifting to us.
See why over 50% of projects on Solana choose Quicknode and sign up for an account here. We're going to use a Solana Devnet node.
Copy the HTTP Provider link:
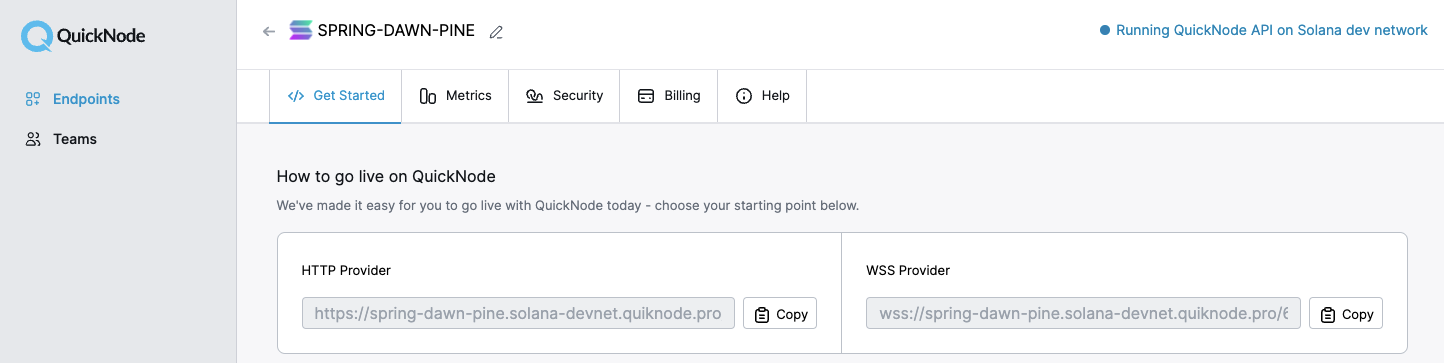
Inside app.ts under your import statements, declare your RPC and establish your Connection to Solana:
const QUICKNODE_RPC = 'https://example.solana-devnet.quiknode.pro/0123456/';
const SOLANA_CONNECTION = new Connection(QUICKNODE_RPC);
Your environment should look like this:

Alright, let's BUILD!
Create a Version 0 Transaction
Version 0 Transactions require us to use a new class, VersionedTransaction, which requires us to pass a VersionedMessage as a parameter. A VersionedMessage accepts either a Message or MessageV0. Though very similar, MessageV0 allows the use of Address Lookup Tables!
Let's start by creating a new transfer TransactionInstruction that sends 0.1 SOL from our SIGNER_WALLET to our DESTINATION_WALLET. Since our transaction message is going to need an array of Transaction Instructions, go ahead and wrap the instruction in an array:
const instructions: TransactionInstruction[] = [
    SystemProgram.transfer({
        fromPubkey: SIGNER_WALLET.publicKey,
        toPubkey: DESTINATION_WALLET.publicKey,
        lamports: 0.01 * LAMPORTS_PER_SOL,
    }),
];
Now let's build a new function, createAndSendV0Tx, that will accept our TransactionInstruction array:
async function createAndSendV0Tx(txInstructions: TransactionInstruction[]) {

}
Let's define a confirmTransaction function we will call in our createAndSendV0Tx function. Add the following code to your app.ts file:
async function confirmTransaction(
    connection: Connection,
    signature: TransactionSignature,
    desiredConfirmationStatus: TransactionConfirmationStatus = 'confirmed',
    timeout: number = 30000,
    pollInterval: number = 1000,
    searchTransactionHistory: boolean = false
): Promise<SignatureStatus> {
    const start = Date.now();

    while (Date.now() - start < timeout) {
        const { value: statuses } = await connection.getSignatureStatuses([signature], { searchTransactionHistory });

        if (!statuses || statuses.length === 0) {
            throw new Error('Failed to get signature status');
        }

        const status = statuses[0];

        if (status === null) {
            // If status is null, the transaction is not yet known
            await new Promise(resolve => setTimeout(resolve, pollInterval));
            continue;
        }

        if (status.err) {
            throw new Error(`Transaction failed: ${JSON.stringify(status.err)}`);
        }

        if (status.confirmationStatus && status.confirmationStatus === desiredConfirmationStatus) {
            return status;
        }

        if (status.confirmationStatus === 'finalized') {
            return status;
        }

        await new Promise(resolve => setTimeout(resolve, pollInterval));
    }

    throw new Error(`Transaction confirmation timeout after ${timeout}ms`);
}
This will simply poll the Solana network for the transaction status until it is either confirmed or the timeout is reached. We have included some default values for the timeout and poll interval, but you can adjust them as needed.
Let's assemble our function. Add these 5 steps to the body of your createAndSendV0Tx function.
Step 1: Fetch the latest blockhash from the network using getLatestBlockhash:
    // Step 1 - Fetch Latest Blockhash
    let latestBlockhash = await SOLANA_CONNECTION.getLatestBlockhash('confirmed');
    console.log("   ✅ - Fetched latest blockhash. Last Valid Height:", latestBlockhash.lastValidBlockHeight);
Note: We pass the parameter, 'confirmed,' to make it unlikely that the hash belongs to a dropped fork.
Step 2: Using our txInstructions parameter and the latestBlockhash, we can create a new MessageV0 by constructing a new Message and executing the .compileToV0Message() method:
    // Step 2 - Generate Transaction Message
    const messageV0 = new TransactionMessage({
        payerKey: SIGNER_WALLET.publicKey,
        recentBlockhash: latestBlockhash.blockhash,
        instructions: txInstructions
    }).compileToV0Message();
    console.log("   ✅ - Compiled Transaction Message");
    const transaction = new VersionedTransaction(messageV0);
We then pass our message into a new instance of VersionedTransaction. Congrats! You have created a versioned transaction!
Step 3: Sign the transaction with an array of signers. In this case, it is just our SIGNER_WALLET.
    // Step 3 - Sign your transaction with the required `Signers`
    transaction.sign([SIGNER_WALLET]);
    console.log("   ✅ - Transaction Signed");
NOTE: When sending a VersionedTransaction to the cluster, it must be signed BEFORE calling the sendAndConfirmTransaction method. Source: edge.docs.solana.com.
Step 4: Send the transaction to the cluster using sendTransaction, which will return a transaction signature/id:
    // Step 4 - Send our v0 transaction to the cluster
    const txid = await SOLANA_CONNECTION.sendTransaction(transaction, { maxRetries: 5 });
    console.log("   ✅ - Transaction sent to network");
Note: We pass the parameter, 'maxRetries,' to allow the RPC to retry sending the transaction to the leader if necessary.
Step 5: Finally, wait for the cluster to confirm the transaction has succeeded:
    // Step 5 - Confirm Transaction
    const confirmation = await confirmTransaction(SOLANA_CONNECTION, txid);
    if (confirmation.err) { throw new Error("   ❌ - Transaction not confirmed.") }
    console.log('🎉 Transaction Succesfully Confirmed!', '\n', `https://explorer.solana.com/tx/${txid}?cluster=devnet`);
If it succeeds, we log the successful transaction's explorer URL.
Alright! We're ready to try it out!
运行您的代码
To execute our function, call createAndSendV0Tx at the bottom of the file, passing in instructions as the argument:
createAndSendV0Tx(instructions);
Our final code is available on GitHub, here.
And then, in your terminal, call:
ts-node app.ts
Do you see something like this?
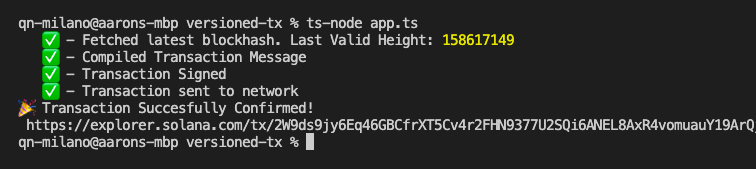
Nice job! If you'd like to check your code against ours, we've provided it on GitHub, here.
Next Steps
Now that you can build and execute versioned transactions, it's time to see what V0 Transactions can do. Check out our Guide: How to Use Lookup Tables on Solana (coming soon) to learn more about Solana's new lookup table feature and how to use them.
If you're stuck, have questions, or just want to talk shop, drop us a line on Discord or Twitter!