Zurück zu den Beispiel-Apps
Solana Token Minter
The Solana Token Minter app allows you to create fungible tokens on the Solana blockchain with built-in support for IPFS image uploads.
Autor



Frontend-Framework/Bibliothek:
React/Next.js
Sprache:
TypeScript
Build-Tool/Entwicklungsserver:
Next.js
Übersicht
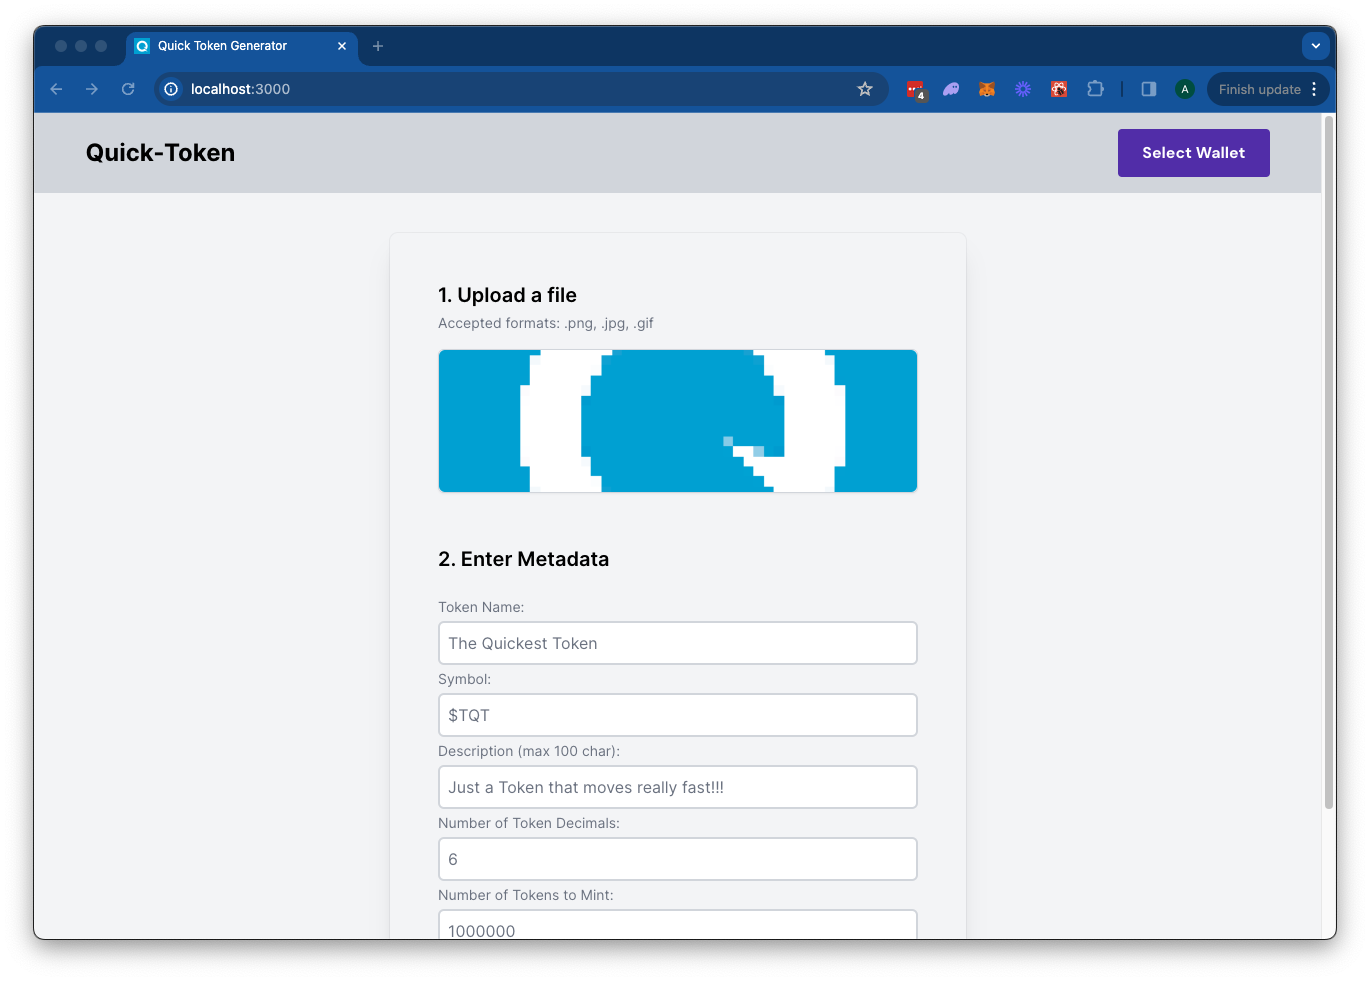
The Solana Token Minter app allows you to create fungible tokens on the Solana blockchain with built-in support for IPFS image uploads using Quicknode's IPFS API. Simply upload an image for your token metadata, fill out the token details, and connect your wallet. Click "Mint" to upload your metadata to IPFS and mint your token seamlessly.This app uses Next.js 14 Projekt, das mit create-next-app.
Erste Schritte
Abhängigkeiten installieren
Öffnen Sie das Projektverzeichnis:
cd sample-dapps/solana-token-maker
Installieren Sie anschließend die Abhängigkeiten:
npm install
# oder
yarn
# oder
pnpm install
# oder
bun install
Umgebungsvariablen festlegen
Stellen Sie sicher, dass Sie einenendpoint zur Hand haben – hier könnenendpoint kostenlos einen erhalten.
- Umbenennen
.env.examplezu.env.localand update with your Quicknode Solana Node Endpoint and Quicknode IPFS key. - Stellen Sie sicher, dass Sie den Cluster aktualisieren, damit Ihre Transaktions-URLs auf den richtigen Explorer verweisen (verwenden Sie ausschließlich die in der
.env.exampleDatei). - You can use Quicknode's public IPFS Gateway URL or replace it with your own.
QN_IPFS_API=QN_abc123456789xyz_REPLACE_THIS
QN_ENDPOINT=https://example.solana-mainnet.quiknode.pro/123456
NEXT_PUBLIC_CLUSTER=mainnet-beta # mainnet-beta | devnet | testnet | local
NEXT_PUBLIC_GATEWAY_URL=https://quicknode.quicknode-ipfs.com/ipfs/
Starten Sie zunächst den Entwicklungsserver:
npm run dev
# oder
yarn dev
# oder
pnpm dev
# oder
bun dev
Öffnen Sie http://localhost:3000 in Ihrem Browser, um das Ergebnis anzuzeigen.
Nutzung der Dapp
- Upload an Image (this will be used for your token metadata)
- Fill out the form with the token details
- Connect your wallet
- Make sure you have ~0.04 SOL in your wallet to cover the new account fees
- If you are using Devnet, you can get free SOL from the Solana Faucet
- Click "Mint" to upload your image and metadata to IPFS and mint your token!
Architektur
src/
├── app/
│   ├── page.tsx
│   └── layout.tsx
│   └── api/
│       └── solana/
│           └── createMintTx/route.ts   # Create New Mint Transaction
│           └── sendAndConfirm/route.ts # Send and Confirm Transaction
│       └── upload/
│           └── image/route.ts  # IPFS Image Upload
│           └── json/route.ts   # IPFS JSON Upload
└── components/
    ├── SolanaProviders.tsx     # Wallet Adapter Context providers
    ├── Minter.tsx              # Main component
    └── [supporting components]
Auf Vercel bereitstellen
Next.js-Dokumentation
Wenn Sie mehr über Next.js erfahren möchten, sehen Sie sich die folgenden Ressourcen an:
- Next.js-Dokumentation – Erfahren Sie mehr über die Funktionen und die API von Next.js.
- Next.js lernen – ein interaktives Next.js-Tutorial.
Schaut euch doch mal das Next.js-GitHub-Repository an – wir freuen uns über euer Feedback und eure Beiträge!
Beiträge & Feedback
Wir würden uns sehr über Ihr Feedback freuen und begrüßen jeden Beitrag zu dieser Beispiel-App!
Um Probleme zu melden oder Feedback zu geben, eröffnen Sie ein GitHub-Issue im qn-Anleitung-Beispiele Repository.
Um einen Beitrag zu leisten, gehen Sie bitte wie folgt vor:
- Das Repository forken
- Erstelle einen Feature-Branch:git checkout -b feature/amazing-feature
- Speichere deine Änderungen:git commit -m "Tolle Funktion hinzufügen"
- Deinen Branch pushen:git push origin feature/amazing-feature
- Erstelle einen Pull Request.
Entdecken Sie weitere Beispiel-Apps