
閱讀時間 14 分鐘
概覽
Are you running a batch process that has many transactions? Perhaps an airdrop to your community's NFT holders or a token distribution to early users of your dApp. Solana transaction composition and concurrent method calls can increase the speed and effectiveness of your script!
您將負責的工作內容
- You will write a script to send $SOL to many wallets.
- You will assemble batch transactions that include multiple Solana transfer instructions.
- You will create a staging function that allows your transactions to process concurrently without overwhelming network validators.
Collectively this will empower you to run batch jobs that minimize your transaction costs and reduce your processing time!
您需要準備的物品
- Nodejs installed (version 16.15 or higher)
- npm or yarn installed (We will be using yarn to initialize our project and install the necessary packages. Feel free to use npm instead if that’s your preferred package manager)
- Typescript experience and ts-node installed
- Solana Web3
Set Up Your Environment
Create a new project directory in your terminal with:
mkdir bulk-send-sol
cd bulk-send-sol
Initialize your project with the "yes" flag to use the default values for your new package:
yarn init --yes
#or
npm init --yes
Initialize your tsconfig with .json importing enabled:
tsc -init --resolveJsonModule true
Install Solana Web3 Dependency:
We will need to add the Solana Web3 library for this exercise. In your terminal type:
yarn add @solana/web3.js@1
#or
npm install @solana/web3.js@1
Create a Wallet and Airdrop SOL:
You'll need to create a Solana File System Wallet (keypair written to a guideSecret.json file) and airdrop some SOL to it. You can do this using Solana CLI or use this script we have created for you. If you already have a wallet and just need some devnet SOL, you can request some here:
Note: Sending airdrop requests too frequently may trigger a 429 (Too Many Requests) error.
Make sure you save your wallet to your project directory as guideSecret.json.
Create Necessary Files
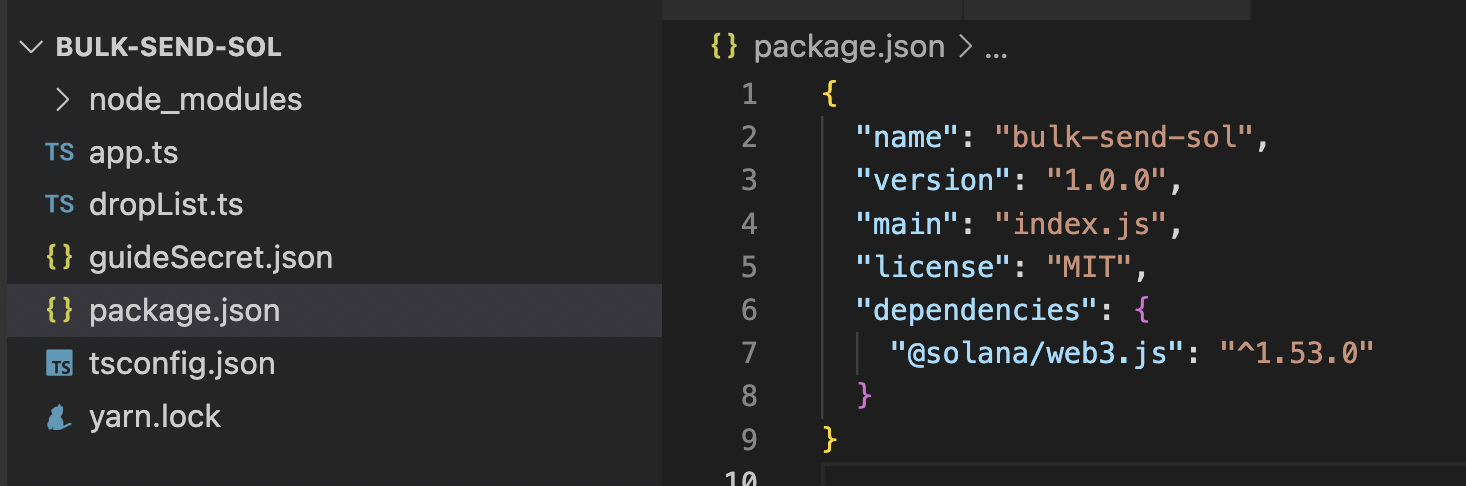
Create two files, app.ts and dropList.ts. We will use app.ts as our primary code for assembling and executing our transactions. We will use dropList.ts to store the addresses and amounts of tokens we'd like to airdrop.
echo > app.ts && echo > dropList.ts
Your environment should look like this:
Alright! We're all ready to go.
Create a Drop List
Let's start by creating a list of wallets that we want to send SOL to. We will use TypeScript to make our life a little easier. In dropList.ts, create a new interface called Drop that will include the wallet we are sending to and the number of lamports to send. Also, create an new empty Array of Drops called DropList:
export interface Drop {
    walletAddress: string,
    numLamports: number
}
export const dropList:Drop[] = [];
This will be a list of wallets and lamports we will use for our example. Feel free to generate your own dropList, but we have also made one available in this Github file that you are free to use. We'd recommend your dropList array have at least 30 Drop elements for this exercise so that you can test some of the bulk features of your program. In our sample file, we have included 50 drops, which we will refer to throughout the guide.
Set Up Your App
Import Necessary Dependencies
Open app.ts, and paste the following imports on line 1:
import { Connection, Keypair, PublicKey, sendAndConfirmTransaction, SystemProgram, Transaction, TransactionInstruction } from "@solana/web3.js";
import { Drop, dropList } from "./dropList";
import secret from './guideSecret.json';
In addition to the Wallet and DropList we created in the previous step, we are also importing a few essential methods and classes from the Solana Web3 library.
Set Up Your Quicknode Endpoint
To build on Solana, you'll need an API endpoint to connect with the network. You're welcome to use public nodes or deploy and manage your own infrastructure; however, if you'd like 8x faster response times, you can leave the heavy lifting to us.
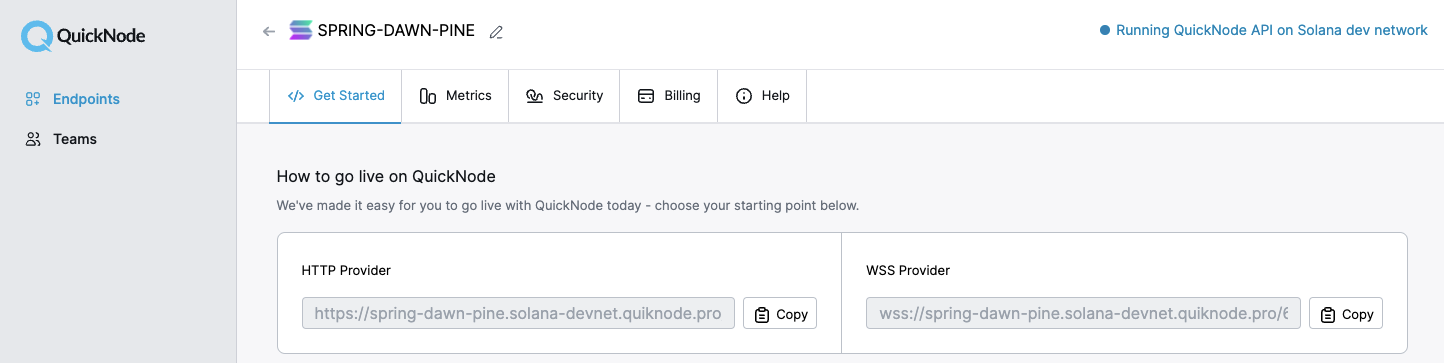
See why over 50% of projects on Solana choose Quicknode and sign up for an account here. We're going to use a Solana Devnet node. Because this excercise uses the transfer of SOL, using a mainnet node would result in the transfer of real SOL.
Copy the HTTP Provider link:
Inside app.ts under your import statements, declare your RPC and establish your Connection to Solana:
const QUICKNODE_RPC = 'https://example.solana-devnet.quiknode.pro/0123456/';
const SOLANA_CONNECTION = new Connection(QUICKNODE_RPC);
Declare Key Variables
Let's define three key variables important for our transaction assembly. Below SOLANA_CONNECTION add:
const FROM_KEY_PAIR = Keypair.fromSecretKey(new Uint8Array(secret));
const NUM_DROPS_PER_TX = 10;
const TX_INTERVAL = 1000;
FROM_KEY_PAIR will generate a keypair from our guideSecret.json, which will be used as the funding source ("Payer") for our transactions. We have added two additional constants:
- NUM_DROPS_PER_TX, which will be used to define how many transaction instructions we will include in each transaction and
- TX_INTERVAL, the time we will wait between sending each transaction to the Solana network.
We will cover both in more detail down below.
Our app will need two main functions: a function to generate our transactions and a function to execute our transactions. We will use the former to generate Solana Transactions out of our dropList, and we will use the latter to create and call Promises that will send the Transactions to the Solana network. At a high level, the process will look something like this:
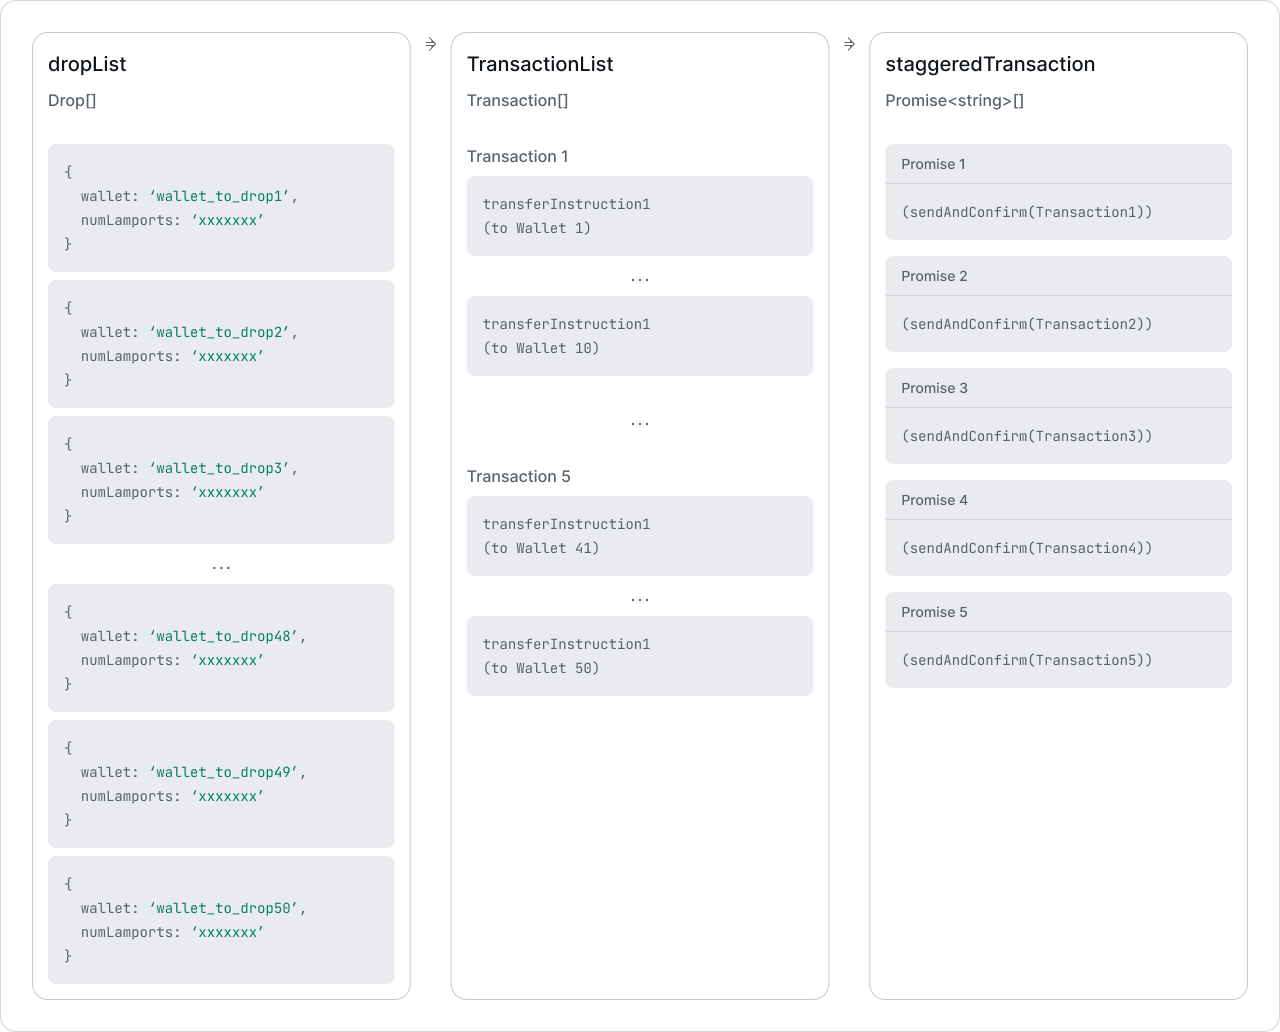
Note that there are many ways to accomplish this result--we're just providing one solution that you can use and modify for your own needs. Get creative with it, and make it your own!
Let's start building!
Generate Solana Transactions
If you're new to Solana or web3, you might be excited to discover that Solana Transactions are actually a combination of one or more instructions--meaning we can accomplish multiple tasks with a single call to the Solana network! For our purposes, that means we can include multiple "Transfer SOL" instructions in a single transaction. Be careful, though! Solana does limit our transaction sizes; a transaction's maximum size is 1,232 bytes. The takeaway? We need to batch our Transactions to include a finite number of instructions; for this exercise, anything less than 20 instructions per transaction should suffice--we have set our NUM_DROPS_PER_TX to 10, so we should be okay. For more information on calculating transaction size, check out the bonus at the end of this guide. As we go through this guide, be careful not to confuse a Transaction with a Transaction Instruction. They may seem similar but they actually are very different! A Transaction Instruction tells the program specifically what to do. A Transaction will include one or more Transaction Instructions and additional context necessary to process the Transaction on chain (e.g., signatures, fee payer, and the recent blockhash).
More on transaction sizes: Messages transmitted to Solana validators must not exceed the Internet Protocol v6 Maximum Transmission Unit size to ensure fast and reliable network transmission of cluster info. Solana's networking stack uses a conservative MTU size of 1,280 bytes which, after accounting for headers, leaves 1,232 bytes for packet data like serialized transactions. Source: Solana Github Labs (Code, Ref)
Let's start by creating a function called generateTransactions that accepts three parameters:
- batchSize (a number for telling our function how many transaction instructions to include per transaction),
- dropList (an array of Drops)
- fromWallet (the PublicKey of the Wallet that will be sending out SOL).
Let's have the function return an array of Transactions:
function generateTransactions(batchSize:number, dropList: Drop[], fromWallet: PublicKey):Transaction[] {
    let result: Transaction[] = [];
// Add your code here
    return result;
}
The first thing we want to do here is to convert our dropList into a list of transaction instructions (TransactionInstruction[]). You can do this by using .map. Convert each drop in your drop list to a SystemProgram.transfer by adding this code to your generateTransactions function:
    let txInstructions: TransactionInstruction[] = dropList.map(drop => {return SystemProgram.transfer({
        fromPubkey: fromWallet,
        toPubkey: new PublicKey(drop.walletAddress),
        lamports: drop.numLamports
    })})
Each new TransactionInstruction is going to tell the Solana System program to transfer lamports from fromPubkey to toPubkey. Awesome! You have now taken our boring dropList and converted it into an array of useful Solana transaction instructions. Now you need to add those instructions to some Transactions.
Now you can use the batchSize parameter to chunk our transaction instructions into multiple transactions. After txInstructions, add this loop to your code:
    const numTransactions = Math.ceil(txInstructions.length / batchSize);
    for (let i = 0; i < numTransactions; i++){
        let bulkTransaction = new Transaction();
        let lowerIndex = i * batchSize;
        let upperIndex = (i+1) * batchSize;
        for (let j = lowerIndex; j < upperIndex; j++){
            if (txInstructions[j]) bulkTransaction.add(txInstructions[j]);
        }
        result.push(bulkTransaction);
    }
Let's talk through what's going on here.
- First, we calculate the total number of transactions by dividing txInstructions.length by batchSize and rounding up to the nearest integer using Math.ceil.
- We create our Solana Transactions using a for loop, called bulkTransaction inside the loop.
- We use our batchSize to create upper and lower bounds of an inner loop (upperIndex and lowerIndex, respectively) that will be used to add unique transaction instructions to a given Transaction.
- We push each assembled Transaction to our result variable.
Your final function should look like this:
function generateTransactions(batchSize:number, dropList: Drop[], fromWallet: PublicKey):Transaction[] {
    let result: Transaction[] = [];
    let txInstructions: TransactionInstruction[] = dropList.map(drop => {return SystemProgram.transfer({
        fromPubkey: fromWallet,
        toPubkey: new PublicKey(drop.walletAddress),
        lamports: drop.numLamports
    })})
    const numTransactions = Math.ceil(txInstructions.length / batchSize);
    for (let i = 0; i < numTransactions; i++){
        let bulkTransaction = new Transaction();
        let lowerIndex = i * batchSize;
        let upperIndex = (i+1) * batchSize;
        for (let j = lowerIndex; j < upperIndex; j++){
            if (txInstructions[j]) bulkTransaction.add(txInstructions[j]);
        }
        result.push(bulkTransaction);
    }
    return result;
}
This is an excellent example of how TypeScript is a handy tool as you're learning to interact with Solana. You can quickly see how the different types work with the various methods and correct your code quickly if you make a mistake!
At its core, our function is manipulating your input data into useful Transaction data that the Solana network will understand. In the future, you can modify this function to accommodate your own input data OR different types of Transaction instructions.
Execute Transactions
Alright! You have an array of Solana Transactions. Now, what do we need to do with it? Create a new function executeTransactions that will accept solanaConnection, a Solana Connection, an array of Solana Transactions (transactionList), and our payer Keypair. We will use a fun JS method called Promise.allSettled, so we will need a little typescript magic to capture our return properly. We will be expecting a Promise that returns an array of PromiseSettledResult (an object that looks like this: {status: 'fulfilled', value: string } 或 {status: 'rejected', reason: Error}).
Never heard of Promise.allSettled? We could alternatively use Promise.all or evaluate each in series, but there are some drawbacks. Using Promise.all, if any of our promises returns an error, we will receive a single error response in return even if our other Promises succeeded. We'd lose all the information about our successfully completed transaction IDs. No thanks! We could also evaluate our transactions in series, but waiting for each transaction to return a response from the network could add a lot of unnecessary run time to our query. Promise.allSettled will allow us to initiate many transactions concurrently and then return us a result of what happened to each promise with their result or error after all of the promises have been completed (or failed).
async function executeTransactions(solanaConnection: Connection, transactionList: Transaction[], payer: Keypair):Promise<PromiseSettledResult<string>[]> {
    let result:PromiseSettledResult<string>[] = [];

    return result;
}
Now, we need to map each transaction into a Promise that will return our transaction id. Sometimes when the Solana network is congested, transaction propagation can get a little tricky (we covered that in a previous Guide: Solana Transaction Propagation: Handling Dropped Transactions). Solana's web3 SDK has a handy function that will handle much of that for us sendAndConfirmTransaction. This method will send the transaction to the network, subscribe to the transaction for changes in status, and report back to us when the Transaction has succeeded or failed. Finally, to reduce the likelihood of a failed transaction, we will fetch the latest blockhash before calling each Transaction using .getLatestBlockhash().
There's one more thing we need to do here: build a "staggered" timeout using our index and setTimeout. This will allow us to control the cadence at which we send requests to the network. Why's this important? For intermittent batch processes like these, blasts of unexpected large requests can overwhelm network validators. Providing a slight delay between each transaction can help ensure your requests are received without error and reduce the likelihood of receiving a HTTP429/Too Many Requests Error.
If you have planned or systematic high-volume batch processes like these, please get in touch with our solutions team to ensure your operations run as smoothly as possible.
Create a variable, staggeredTransactions that maps our translationList into setTimeouts that callback sendAndConfirmTransaction for each transaction:
    let staggeredTransactions:Promise<string>[] = transactionList.map((transaction, i, allTx) => {
        return (new Promise((resolve) => {
            setTimeout(() => {
                console.log(`Requesting Transaction ${i+1}/${allTx.length}`);
                solanaConnection.getLatestBlockhash()
                    .then(recentHash=>transaction.recentBlockhash = recentHash.blockhash)
                    .then(()=>sendAndConfirmTransaction(solanaConnection,transaction,[payer])).then(resolve);
            }, i * TX_INTERVAL);
         })
    )})
Pretty nifty, right? We now have an array of Promises that can be called simultaneously but will be sent to the network in a staggered formation! We added a console log in our callback to see when our code is getting executed (which should happen sequentially on our TX_INTERVAL).
Now all you need to do is call await Promise.allSettled(staggeredTransactions)! This will wait for all of our transactions to execute, and then it will return a result or error from the Solana network for every transaction. Our function in its entirety looks like this:
async function executeTransactions(solanaConnection: Connection, transactionList: Transaction[], payer: Keypair):Promise<PromiseSettledResult<string>[]> {
    let result:PromiseSettledResult<string>[] = [];
    let staggeredTransactions:Promise<string>[] = transactionList.map((transaction, i, allTx) => {
        return (new Promise((resolve) => {
            setTimeout(() => {
                console.log(`Requesting Transaction ${i+1}/${allTx.length}`);
                solanaConnection.getLatestBlockhash()
                    .then(recentHash=>transaction.recentBlockhash = recentHash.blockhash)
                    .then(()=>sendAndConfirmTransaction(solanaConnection,transaction,[payer])).then(resolve);
            }, i * TX_INTERVAL);
         })
    )})
    result = await Promise.allSettled(staggeredTransactions);
    return result;
}
Make it Rain! 🚀
Let's call our functions and send our SOL (make sure you have got enough in your guideSecret.json wallet)! Add this async code block to the bottom of app.ts to build your transaction list, execute your transactions, and return the results of all of the transactions!
(async () => {
    console.log(`Initiating SOL drop from ${FROM_KEY_PAIR.publicKey.toString()}`);
    const transactionList = generateTransactions(NUM_DROPS_PER_TX,dropList,FROM_KEY_PAIR.publicKey);
    const txResults = await executeTransactions(SOLANA_CONNECTION,transactionList,FROM_KEY_PAIR);
    console.log(await txResults);
})()
You're done! If you want to double check your code, our source code is available on Github, here.
Are you ready for this...? In your console, SEND IT!
ts-node app.ts
Boom! Are you seeing this?
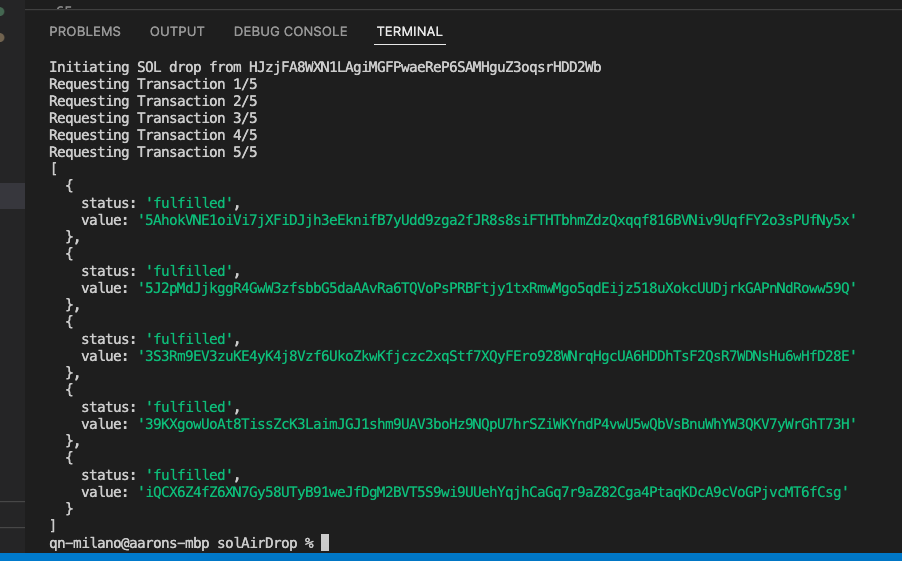
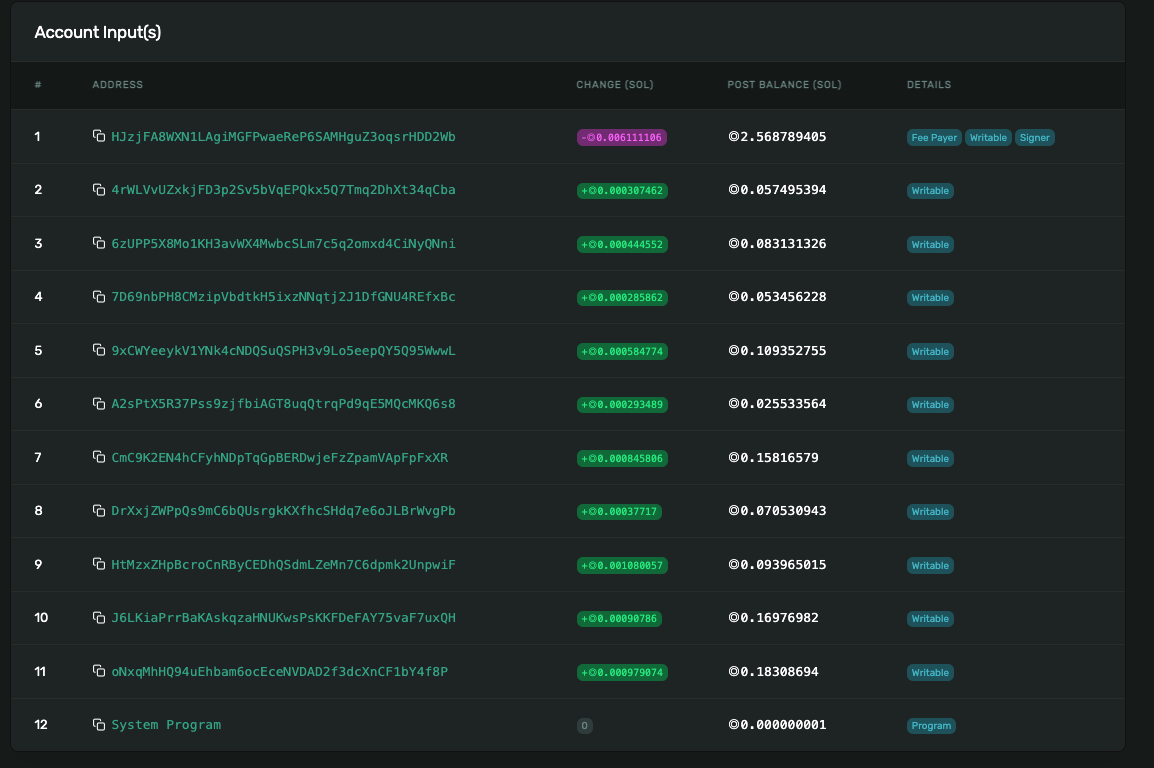
You should be able to check out any one of your transactions on Solana Explorer and see all of the transfers that you added to that single transaction:
Bonus Points! Calculate Transaction Size
So, our simple example above uses a bunch of transaction instructions that are all the same size. What if you want to create a program that runs different types and/or a dynamic quantity of transaction instructions? You would need to calculate the Transaction size before sending the transaction. You can do so by running serialize().length on an instance of the Transaction class:
transaction.serialize().length;
This will return the size of your Transaction, a number in bytes! This can be a handy tool. Want to try it out? How might you modify your executeTransactions function to estimate the Transaction sizes instead of sending the Transactions? Can you calculate the maximum number of transfer SOL instructions you can include in a Transaction without exceeding the 1,232-byte limit?
That's It!
Congrats! You just sent SOL to 50 wallets in less than a minute! If we didn't bundle our transaction instructions and execute our transactions in series, we'd probably still be waiting. As we mentioned above, think about this exercise as a tool or framework that you can use as you think about assembling and sending other large sets of transactions.
We'd love to hear about your batch processes and how you're using tools like this - jump in the conversation on Discord or reach out on Twitter! To learn more, check out some of our other Solana tutorials here.