
9 min read
Overview
Are you upgrading traits to your NFT collection? Changing royalties/creators to reflect changes in your team? Enhancing the art of your PFP collection? Regardless of the reason, updating metadata for NFTs you created is a handy tool any NFT developer should have in their toolbelt.
What You Will Do
In this guide, you will update the metadata of an NFT on Solana's devnet from your terminal using the Solana Web3 library and Metaplex JS SDKs. We will cover three steps to update your NFT's metadata:
- Fetch the existing NFT
- Upload new metadata
- Update the NFT
What You Will Need
- Nodejs (version 16.15 or higher) installed
- Typescript experience and the latest version of ts-node installed (you can update to the latest by entering npm update -g typescript ts-node in terminal)
Ensure that you have minted an NFT on Solana's devnet and have access to the authority wallet. You can create one by following this Guide: How to Mint an NFT on Solana using Typescript (Source Code).
🚨 Make sure to select mutable: true in your NFT's Config. Only mutable NFT metadata can be updated.
Set Up Your Project
Create a new project directory in your terminal with:
mkdir update-metadata
cd update-metadata
Create a file for your app, app.ts:
echo > app.ts
Initialize your project with the "yes" flag to use default values for your new package:
yarn init --yes
#or
npm init --yes
Create a tsconfig.json with .json importing enabled:
tsc -init --resolveJsonModule true
Install Solana Web3 Dependency
We will need to add the Solana Web3 and SPL Token libraries for this exercise. Additionally, we will use Metaplex's JS SDK. In your terminal, type:
yarn add @solana/web3.js@1 @metaplex-foundation/js
#or
npm install @solana/web3.js@1 @metaplex-foundation/js
Add Your Wallet and Airdrop SOL
To follow this guide, you will need the same Solana File System Wallet (keypair written to a guideSecret.json file) that is the authority of your NFT. If you do not already have an NFT or an NFT's authority wallet, create one by following our Guide: How to Mint an NFT on Solana using Typescript (Source Code).
Make sure you save your wallet to your project directory as guideSecret.json (you can just copy this directly from your mint-nft project directory from the Mint NFT Guide). If you need devnet SOL, request some by entering your wallet address below:
Note: Sending airdrop requests too frequently may trigger a 429 (Too Many Requests) error.
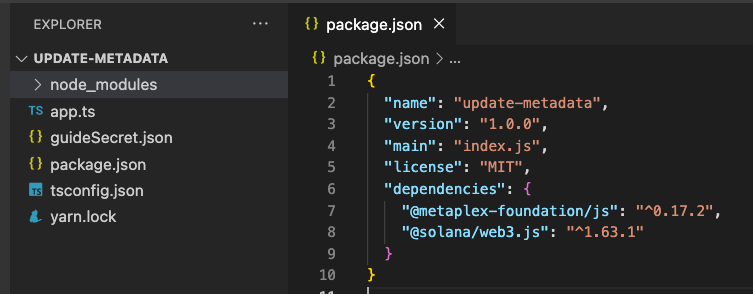
After set up, your environment should look something like this:
Set Up Your App
Import Necessary Dependencies
Open app.ts, and paste the following imports on line 1:
import { Connection, Keypair, PublicKey } from "@solana/web3.js";
import { Metaplex, keypairIdentity, bundlrStorage, Nft, Sft } from "@metaplex-foundation/js";
import secret from './guideSecret.json';
In addition to the wallet we created in the previous step, we are also importing a few essential methods and classes from the Solana Web3 and Metaplex JS libraries.
Set Up Your Quicknode Endpoint
To build on Solana, you'll need an API endpoint to connect with the network. You're welcome to use public nodes or deploy and manage your own infrastructure; however, if you'd like 8x faster response times, you can leave the heavy lifting to us.
See why over 50% of projects on Solana choose Quicknode and sign up for an account here. We're going to use a Solana Devnet node.
Copy the HTTP Provider link:
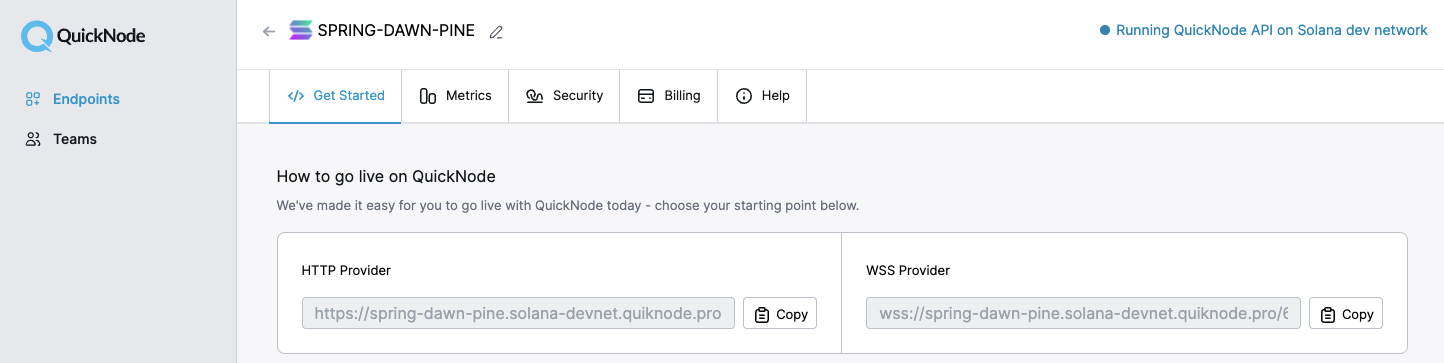
Inside app.ts under your import statements, declare your RPC and establish your Connection to Solana:
const QUICKNODE_RPC = 'https://example.solana-devnet.quiknode.pro/0123456/';
const SOLANA_CONNECTION = new Connection(QUICKNODE_RPC);
Declare Variables
You will need to declare a few variables to run your script:
- Your source wallet (a keypair derived from your secret key).
- The mint address of the NFT that you would like to update.
- A Metaplex instance.
- Your new metadata.
Add the following declarations below SOLANA_CONNECTION to establish the wallet we will be using and the NFT we will be updating:
const WALLET = Keypair.fromSecretKey(new Uint8Array(secret));
const MINT_ADDRESS = '6cuiqk2VubzAgtUvFjBvosjCJUWG81EvW1F28qtX4EDn';
Make sure the NFT you're including has the authority set to your WALLET and that the NFT is mutable.
Establish a new Metaplex instance by calling our SOLANA_CONNECTION in Metaplex.make(). Our instance will use the Keypair we just created and bundlrStorage (an option for uploading files to Arweave using Solana):
const METAPLEX = Metaplex.make(SOLANA_CONNECTION)
    .use(keypairIdentity(WALLET))
    .use(bundlrStorage({
        address: 'https://devnet.bundlr.network',
        providerUrl: QUICKNODE_RPC,
        timeout: 60000,
    }));
By including our network connection, wallet, and storage route, the API will make it easy for us to submit transactions to the Solana network.
Define NFT Metadata
We will create a NEW_METADATA object containing the new metadata. Create a new const, NEW_METADATA, and include the following attributes:
const NEW_METADATA = {
    imgType: 'image/png',
    imgName: 'QuickPix New MetaName',
    description: 'New description!',
    attributes: [
        {trait_type: 'Speed', value: 'Quicker'},
        {trait_type: 'Type', value: 'Pixelated'},
        {trait_type: 'Background', value: 'Quicknode Blue 2'}
    ]
};
Feel free to replace the name, description, and attributes with your own values.
NOTE: You must include all of the traits here (even if some are unchanged) as these will all be uploaded to replace the existing metadata (e.g., note that we include image type here -- even though it will not be changed, we have to include it again in our upload).
Create and Call the Main Function
Create an async function, main, that we will use to execute all of the steps of our code and invoke it on the following line:
async function main() {
    console.log(`Updating Metadata of NFT: ${MINT_ADDRESS}}`);
}

main();
This won't do much, but you should be able to run your code to make sure there are no errors at this point:
ts-node app
You should see a log in your console that you're about to update the metadata of our NFT--so let's do it already! If you're getting an error or have questions, shoot us a line on Discord, and we will be happy to help.
Fetch NFT
Before we can edit our NFT, we must first fetch it. Metaplex's JS SDK makes this easy for us with nfts().findByMint(). Inside of your main() function, add:
    //Step 1 - Fetch existing NFT
    console.log(`Step 1 - Fetching existing NFT`);
    const nft = await METAPLEX.nfts().findByMint({ mintAddress: new PublicKey(MINT_ADDRESS) });
    if (!nft || !nft.json?.image) {throw new Error("Unable to find existing nft or image uri!")}
    console.log(`   NFT Found!`)
The findByMint() method should return an Nft type object. If the query does not return a value or an associated image, we will throw an Error and abort the script. Otherwise, we will log that the NFT has been found.
Upload Metadata
Next, we need to upload our new metadata to Arweave to get a URI with which we can associate our NFT. We are going to use the same uploadMetadata() function that we created in our Guide: How to Mint an NFT on Solana using Typescript. Create a new function, uploadMetadata that accepts 5 parameters: imgUri, imgType, nftName, description, and attributes:
async function uploadMetadata(imgUri: string, imgType: string, nftName: string, description: string, attributes: {trait_type: string, value: string}[]) {
    console.log(`Step 2 - Uploading MetaData`);

}
Next, call nfts().uploadMetadata(). We will need to pass our parameters as follows:
    const { uri } = await METAPLEX
        .nfts()
        .uploadMetadata({
            name: nftName,
            description: description,
            image: imgUri,
            attributes: attributes,
            properties: {
                files: [
                    {
                        type: imgType,
                        uri: imgUri,
                    },
                ]
            }
        });
    console.log('   Metadata URI:',uri);
    return uri;
Let's go ahead and call our function in main(). After uploadImage, call uploadMetadata using our NEW_METADATA to populate the parameters:
    //Step 2 - Upload Metadata
    const newUri = await uploadMetadata(nft.json.image,NEW_METADATA.imgType,NEW_METADATA.imgName, NEW_METADATA.description, NEW_METADATA.attributes);
If you want to test your function, you can log newUri and then run ts-node app. Whenever you're ready, let's update this NFT's metadata!
Update NFT Metadata
Like our previous functions, the Metaplex API simplifies this process and allows us to mint our NFT with a single method, nfts().update(). To run this method, we must pass the nft object we fetched in our first step, along with our newUri.
After your uploadMetadata() function and before main(), create a new async function, updateNft():
async function updateNft(nft:Nft|Sft, metadataUri: string, newName: string) {
    console.log(`Step 3 - Updating NFT`);
}
Finally, inside of our function, call nfts().update() passing our metadataUri and other function parameters and log the results:
    await METAPLEX
        .nfts()
        .update({
            name: newName,
            nftOrSft: nft,
            uri: metadataUri
        }, { commitment: 'finalized' });
    console.log(`   Success!🎉`);
    console.log(`   Updated NFT: https://explorer.solana.com/address/${nft.address}?cluster=devnet`);
This function update the token's on-chain metadata using the Metaplex Metadata Program. Note that unlike the create() method, the update() method does not return any values.
If you need to use the new NFT object, you'll need to run const updatedNft = await metaplex.nfts().refresh(nft); (we will not need this for our purposes, so we will not be using it right now).
Now all you need to do is call this function inside of main(), passing parameters from CONFIG:
    //Step 3 - Update NFT
    updateNft(nft, newUri, NEW_METADATA.imgName);
🚀 Run your code!
You're all set! If you would like to double-check your code against ours, our entire workbook is available on GitHub here.
When you're ready, in terminal type:
ts-node app
YES! Do you see something like this?
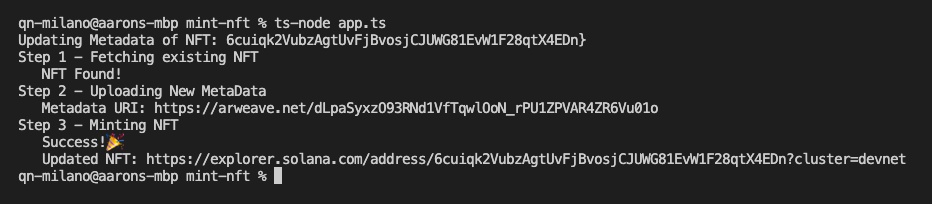
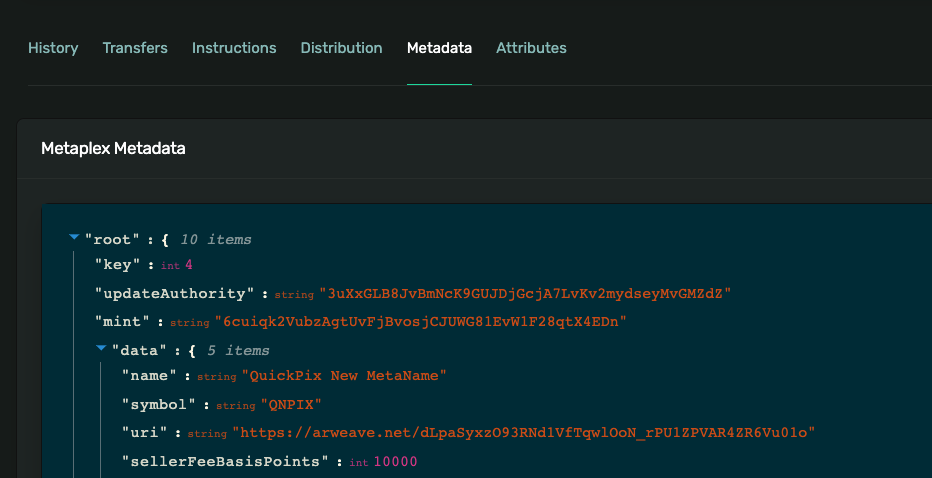
Go ahead and follow the link in your console to Solana Explorer. If you scroll down, you should be able to see the on-chain metadata with the new name and a link to our uploaded metadata:
Great job.
Next Steps and Wrap Up
You now have a handy and reusable script to update NFT metdata right from your terminal! We would love to hear how you plan to use this and what NFT projects you are working on. Hop on Discord or Twitter and share your projects!