12 min read
Overview
DeFi trading bots are powerful tools for easing user experience, but they face significant challenges, including front-running attacks, transaction failures due to inaccurate gas pricing, and inefficient routing across decentralized exchanges (DEXs). Building a secure, user-friendly, and high-performance Telegram trading bot for DeFi requires robust infrastructure to handle these issues effectively.
Quicknode’s Base DeFi Power Bundle provides a powerful set of add-ons to address key pain points in DeFi development on Base Mainnet. These add-ons enable developers to create a Telegram trading bot with advanced features like MEV protection, optimized gas estimation, and seamless cross-DEX trading. The bundle includes:
- Real-Time Gas Prediction: Accurate gas fee estimates using the Sentio Gas Price API to prevent transaction failures.
- MEV Protection and Gas Refund: Safeguards against front-running and sandwich attacks while recovering unused gas for cost efficiency.
- Cross-DEX Swap Aggregation: OpenOcean API for optimal swap paths across Base Mainnet DEXs like Uniswap, SushiSwap, and Aerodrome.
- Aerodrome Swap API: Provides access to Aerodrome’s liquidity pools for efficient token swaps.
In this guide, you'll learn how to build a Telegram trading bot that uses these add-ons to safely and efficiently trade ERC-20 tokens on the Base mainnet. The bot offers the following features:
- Wallet Management: Create or import a wallet securely within Telegram, with encrypted private key storage.
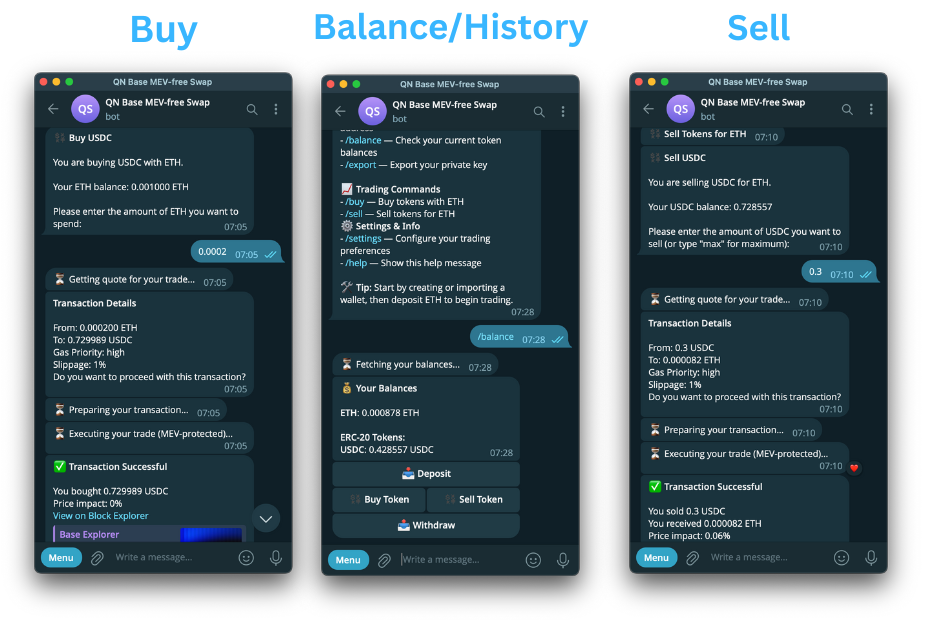
- Token Trading: Buy and sell ERC-20 tokens with ETH using MEV-protected transactions for fair execution.
- ETH Deposits and Withdrawals: Deposit ETH to the bot’s wallet or withdraw to external addresses.
- Balance: View real-time ETH and ERC-20 token balances.
- Customizable Settings: Adjust slippage tolerance and gas priority (low, medium, high) to optimize trading costs and speed.
- Private Key Export: Safely export private keys with user confirmation for full control.
The end product should look something like this:

We’ll walk you through how the app works, how each add-on is used, and how to set up and test it yourself.
Prefer a video walkthrough? Follow this video to learn how to build a Telegram trading bot in 24 minutes.
What You Will Do
- Build a production-ready Telegram trading bot on Base
- Store encrypted user wallet data securely with SQLite
- Test and interact with the bot locally or in Telegram
What You Will Need
- A Quicknode account with an enabled Base DeFi Power Bundle
- A Telegram bot token from BotFather
- Node.js (v20.x or higher) and a package manager (pnpm or npm)
- Experience with Viem (or similar libraries like ethers.js) and Telegram bot development
- A funded wallet on Base mainnet
Bot Architecture and Key Components
Before diving into the code, let’s explore how this Telegram bot is architected and how it leverages Quicknode’s Base DeFi Bundle along with local storage to deliver secure, real-time trading functionality.
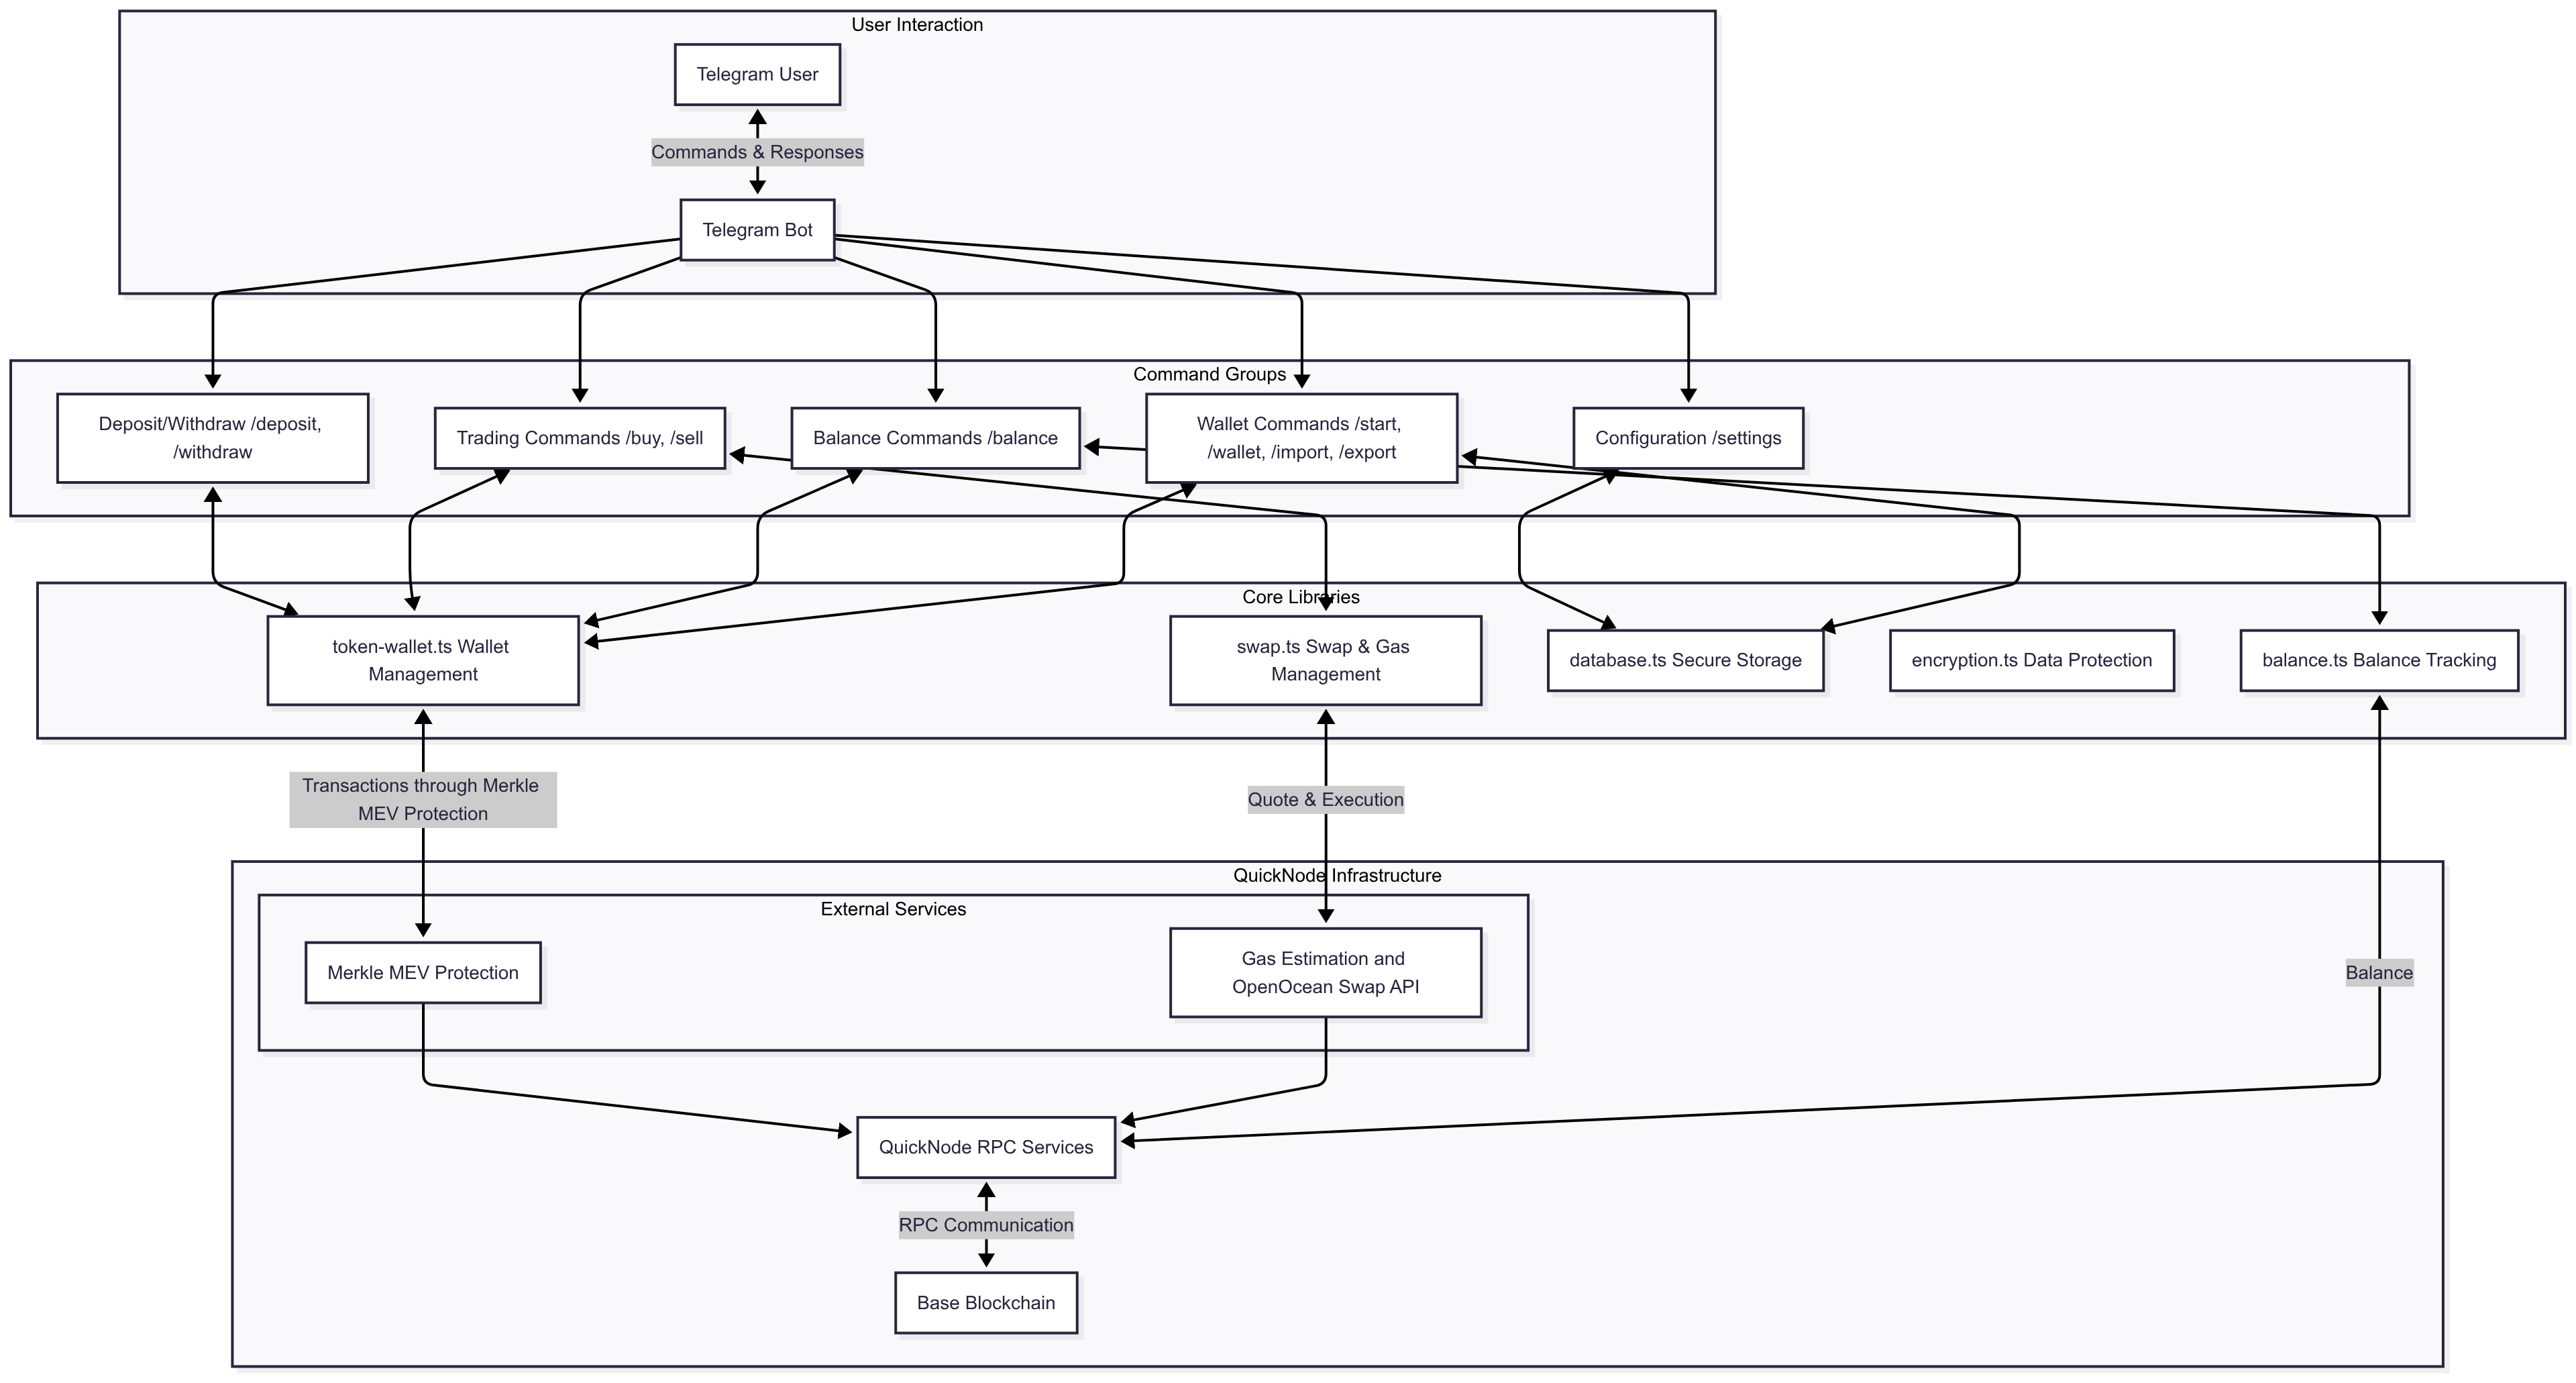
This diagram shows how the user interacts with the bot, and how the bot uses both local services (like SQLite for secure storage) and external APIs to fulfill commands.

Click to see the detailed diagram

Database
The bot uses a local SQLite database (via better-sqlite3) to store user data securely and ensure persistence across sessions. It's lightweight but powerful—giving the bot instant access to user settings, wallet info, and swap history.
Here’s what it tracks:
| Table | Purpose |
|---|---|
users | Stores Telegram user metadata (ID, username, name, timestamp) |
wallets | Stores encrypted private keys and addresses |
settings | Tracks user preferences like slippage and gas priority |
transactions | Records swap history: from/to token, gas used, status, etc. |
Each private key is encrypted with AES-256-CBC using a secret defined in the .env file, ensuring strong security for stored wallets. Users can create, import, and export wallets, and their configuration is persisted across sessions.
The schema and logic live in src/lib/database.ts, and the tables are initialized automatically on the first run.
Command Groups
Commands are organized into functional categories:
- Wallet Commands: Handles wallet creation, management, and key import/export
- Balance Commands: Provides token balance information
- Trading Commands: Facilitates buying and selling tokens through swaps
- Deposit/Withdraw: Manages on/off-ramping of funds
- Configuration: Controls user settings and preferences
Core Libraries
The application logic is encapsulated in specialized libraries:
- token-wallet.ts: Manages wallet creation, key storage, and transaction signing
- database.ts: Provides secure storage for user data and settings
- encryption.ts: Handles secure encryption of sensitive wallet information
- swap.ts: Integrates with exchange services and handles gas estimation
Base DeFi Power Bundle Add-ons
Gas Estimation API
The Sentio's Gas Estimation API provides real-time gas fee predictions based on mempool simulations, offering greater accuracy than standard eth_gasPrice calls. This API returns confidence-based fee estimates, enabling the bot to suggest low, medium, or high gas options to users, similar to wallets like MetaMask.
How It Works
The API call (sentio_gasPrice) returns a JSON response with gas price estimates at different confidence levels (e.g., 90%, 95%, 99%).
The bot maps these to user-friendly options:
- Low: 90% confidence (cheaper, slower).
- Medium: 95% confidence (balanced).
- High: 99% confidence (faster, more expensive).
When a user initiates a trade (e.g., /buy), the bot fetches the gas price based on the configured priority (low, medium, or high) and includes it in the swap quote. This ensures users have predictable fees, especially during network congestion.
Implementation
In src/lib/swap.ts, the bot queries the API to fetch gas prices:
export async function getGasEstimates(): Promise<BlockPrices> {
  try {
    const response = await axios.post(
      QUICKNODE_RPC_URL,
      {
        jsonrpc: "2.0",
        method: "sentio_gasPrice",
        params: { chainId: BASE_CHAIN_ID },
        id: 1,
      },
      {
        headers: { "Content-Type": "application/json" },
      }
    );

    const data = response.data;

    if (data.error) {
      throw new Error(`Error fetching gas price: ${data.error.message}`);
    }

    return data as BlockPrices;
  } catch (error) {
    console.error("Error fetching gas price:", error);
    return { blockPrices: [] };
  }
}
OpenOcean v4 Lightning Swap API
The OpenOcean v4 Lightning Swap API enables fast and accurate token swaps on Base Mainnet by aggregating liquidity across multiple decentralized exchanges (DEXs) such as Uniswap, SushiSwap, and Aerodrome.
How It Works
- Quote Retrieval: The
/quoteendpoint provides a swap preview, including the optimal swap path, expected output amount, and estimated gas costs. This is displayed to the user for confirmation. - Swap Execution: Upon user confirmation, the
/swapendpoint returns a pre-signed transaction payload, which the bot signs and submits to the blockchain. - Slippage Protection: The API includes built-in slippage protection, configurable via the slippage parameter, to ensure trades execute within acceptable price bounds.
When a user initiates a trade (e.g., /buy or /sell):
- The bot calls
getQuoteto fetch a quote for the specified token pair and amount, using the current gas price. - The quote is presented to the user, showing the expected output amount.
- The user confirms the trade, and the bot calls
getSwapto execute the swap, using the quote and user-provided gas price. - The bot signs and submits the transaction to the blockchain using the MEV protection RPC.
This integration simplifies liquidity aggregation and ensures efficient, user-friendly trading.
Implementation
In src/lib/swap.ts, the bot uses the OpenOcean API to fetch swap quotes and execute trades:
- Quote
- Swap
export async function getQuote(
  inTokenAddress: string,
  outTokenAddress: string,
  amount: string,
  gasPrice: string
): Promise<QuoteResponse> {
  try {
    // Construct URL - QUICKNODE_RPC_URL has `/` at the end in default
    let url = `${QUICKNODE_RPC_URL}addon/${ADDON_ID}/v4/${CHAIN}/quote?inTokenAddress=${inTokenAddress}&outTokenAddress=${outTokenAddress}&amount=${amount}`;

    if (gasPrice) {
      url += `&gasPrice=${gasPrice}`;
    }

    // Fetch quote
    const response = await axios.get(url);

    const data = response.data;

    if (isErrorResponse(data)) {
      throw new Error(`OpenOcean API error: ${data.error}`);
    }

    return data;
  } catch (error) {
    console.error(
      "Failed to get quote:",
      error instanceof Error ? error.message : String(error)
    );
    throw error;
  }
}
export async function getSwap(
  inTokenAddress: Address,
  outTokenAddress: Address,
  amount: string,
  gasPrice: string,
  slippage: string,
  account: Address
): Promise<SwapResponse> {
  try {
    // Construct URL
    let url =
      `${QUICKNODE_RPC_URL}addon/${ADDON_ID}/v4/${CHAIN}/swap` +
      `?inTokenAddress=${inTokenAddress}` +
      `&outTokenAddress=${outTokenAddress}` +
      `&amount=${amount}` +
      `&gasPrice=${gasPrice}` +
      `&slippage=${slippage}` +
      `&account=${account}`;

    // Optionally add referrer
    // url += `&referrer=0x...`;

    const response = await axios.get<SwapResponse | OpenOceanErrorResponse>(
      url
    );

    const data = response.data;

    if (isErrorResponse(data)) {
      throw new Error(`OpenOcean API error: ${data.error}`);
    }

    return data;
  } catch (error) {
    if (axios.isAxiosError(error)) {
      console.error(
        "Axios error in getSwap:",
        error.response?.data || error.message
      );
    } else {
      console.error("Unexpected error in getSwap:", error);
    }
    throw error;
  }
}
MEV Protection & Gas Recovery
The MEV Protection & Gas Recovery add-on by Merkle safeguards transactions from front-running and sandwich attacks while optimizing gas usage by recovering unused gas if a swap fails or consumes less gas than estimated.
When the bot calls sendTransaction via viem, it uses eth_sendRawTransaction under the hood. With the add-on enabled, these transactions are automatically routed to Merkle’s private relay, shielding them from front-running and sandwich attacks. No additional configuration is needed beyond using the Quicknode RPC endpoint.
/**
 * Create a wallet client for the given private key
 */
function createClient(account: Account): WalletClient {
  return createWalletClient({
    account,
    chain: base,
    transport: http(QUICKNODE_RPC_URL),
  });
}
Project Setup
To start building the Telegram trading bot on Base Mainnet, you need to configure your development environment and install the required dependencies. This section guides you through cloning the repository, setting up environment variables, and preparing the necessary credentials for Quicknode and Telegram.
The code provided in this guide is for educational purposes only and has not been audited. They should not be used in production environments without thorough testing, auditing, and security reviews.
Step 1: Clone the Repository
git clone https://github.com/quiknode-labs/qn-guide-examples.git
cd qn-guide-examples/base/telegram-trading-bot
Step 2: Install Dependencies
Choose your preferred package manager to install the project dependencies:
npm install
# or
yarn install
# or
pnpm install
# or
bun install
This command installs all required packages listed in package.json.
Step 3: Configure Telegram Bot
You’ll need a Telegram bot token to interact with users. Follow these steps to create a new bot:
- Open Telegram and search for @BotFather.
- Send the
/newbotcommand and follow the prompts to name your bot. - Save the bot token provided by BotFather.
Step 4: Set Up a Quicknode Base Mainnet Endpoint
- Sign up at Quicknode and create a Base Mainnet endpoint.
- Enable the Base DeFi Power Bundle add-on bundle in your endpoint. This enables all the add-ons needed (Gas Estimation API, Lightning - OpenOcean v4 Swap API, MEV Protection & Gas Recovery) for the bot.
- Save your endpoint URL.
Step 5: Generate a Wallet Encryption Key
The bot securely stores encrypted user wallets using AES-256-CBC encryption. You must provide a 32-character key in your environment variables. You can use any method to generate a random string, such as:
openssl rand -base64 32
Important: This key is used to encrypt and decrypt users' private keys. Without it, or if it's lost, it's impossible to decrypt stored wallets. Store it securely and never share it with anyone.
Step 6: Configure Environment Variables
Copy the example environment file to create your own:
cp .env.example .env
Then, edit the .env file with your credentials and settings:
TELEGRAM_BOT_TOKEN=your_telegram_bot_token
QUICKNODE_RPC=your_quicknode_endpoint
WALLET_ENCRYPTION_KEY=your_random_32_char_string
DB_PATH=./db.sqlite
CHAIN_ID=8453
DEFAULT_SLIPPAGE=1
DEFAULT_GAS_PRIORITY=medium
Replace your_telegram_bot_token, your_quicknode_endpoint, and your_random_32_char_string with the appropriate values that you obtained from the previous steps. Also, you can modify the default values if you want to customize the bot's behavior.
Test and Run the Telegram Trading Bot
After setting up your environment and installing dependencies, you’re ready to launch the Telegram trading bot locally and test its functionality on Base Mainnet.
Starting the Bot
Run the following command to start the bot in development mode:
npm run dev
# or
pnpm dev
# or
yarn dev
# or
bun dev
Expected Output:
🤖 Starting Base MEV-Protected Telegram Trading Bot...
✅ Bot started successfully!
ℹ️  Press Ctrl+C to stop the bot
If you see this output, the bot is running and ready to accept Telegram commands. If the bot fails to start, check your .env file for missing or incorrect values and verify that dependencies are installed.
If you encounter the Error: Could not locate the bindings file. error when starting the bot, see the following section for possible solutions.
Click to expand the possible solutions
This indicates that better-sqlite3 native bindings failed to build correctly, often due to mismatched Node.js versions or incomplete dependency compilation.
Recommended Fix: Manual Rebuild
Rebuild the native bindings from source:
cd node_modules/better-sqlite3
npm run build-release
# or
pnpm run build-release
ls build  # Verify that a .node file (e.g., better_sqlite3.node) appears
cd ../..
This command compiles the bindings for your system’s Node.js version, resolving the error.
Alternative Fixes:
Clean and Reinstall Dependencies: If the rebuild fails, clear the node_modules directory and reinstall:
rm -rf node_modules package-lock.json
npm install

# Or, if using pnpm:
rm -rf node_modules pnpm-lock.yaml
pnpm install
Check Node.js Version: Ensure you’re using Node.js 20.x or higher, as better-sqlite3 may not support older versions.
Testing in Telegram
With the bot running locally, you can interact with it via Telegram to test its core features.
Locate Your Bot:
Open Telegram and search for your bot using the username set via @BotFather (e.g., @YourTradingBot).
Start a conversation by clicking "Start" or sending /start.

Test Commands
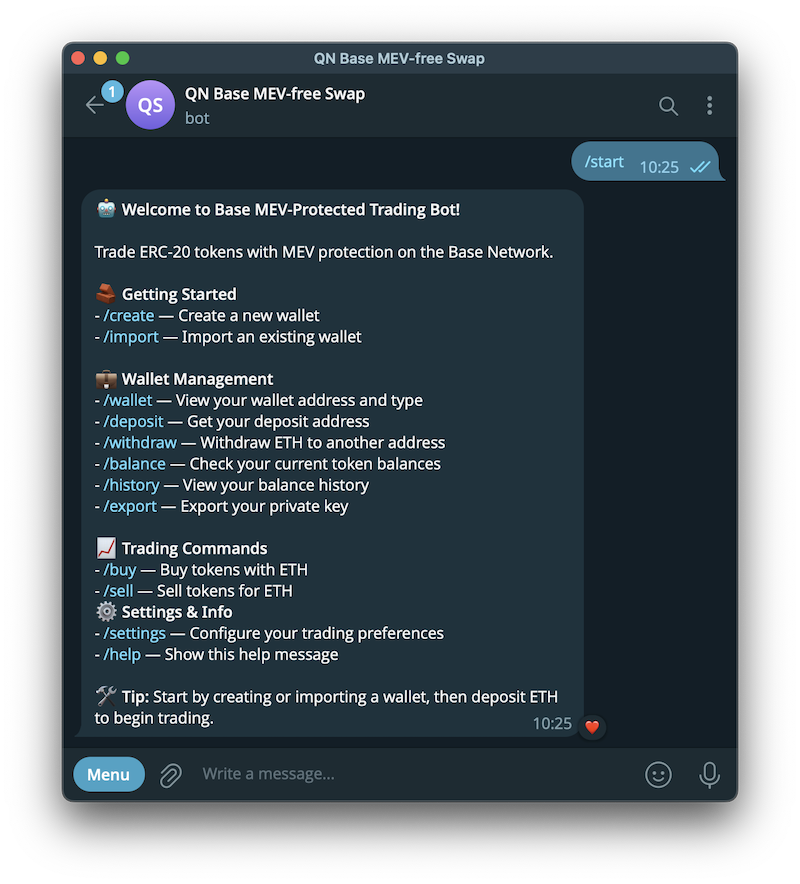
/start: Displays a welcome message and prompts wallet creation or import./create: Generates a new wallet and shows the address and private key./import: Imports an existing wallet using a provided private key./wallet: Displays the current wallet’s address./balance: Shows ETH and ERC-20 token balances using./buy: Initiates a token purchase with ETH, fetching a quote from OpenOcean./sell: Sells a token for ETH, with user confirmation./settings: Adjusts gas priority (low, medium, high) or slippage tolerance.
Expected Behavior:
- The bot responds promptly to commands, guiding users through wallet setup, balance checks, and trades.
- Swap commands (
/buy,/sell) display quotes and require confirmation before execution. - Transactions are submitted via Quicknode’s MEV-protected endpoint.
- Balance commands provide clear, formatted outputs.
Tips for Testing:��
- Use a test wallet with a small amount of Base Mainnet ETH for safety.
- Test during different network conditions to observe gas estimation accuracy.
- Try different token addresses to observe swap behavior.
If the bot responds as expected, congratulations! 🎉 You’ve successfully deployed a secure, MEV-protected trading assistant on Base Mainnet.
Next Steps
With the bot successfully running and tested locally, you can enhance its functionality, deploy it for broader use, and contribute to its development:
Explore Quicknode Add-Ons and Products
- Dive deeper into the Base DeFi Power Bundle’s components.
- Experiment with other Quicknode Products, like Streams, or other marketplace add-ons. For example, Streams can enable copy-trading features by tracking top traders’ transactions on Base Mainnet.
Enhance Bot Features
- Implement multi-wallet management, allowing users to switch between multiple wallets within the bot.
- Add a
/tradecommand for advanced trading options, such as limit orders or batch swaps. - Integrate real-time price tracking using OpenOcean’s quote API to display token prices.
- Support popular Base Mainnet tokens by curating a list for
/buyand/sellsuggestions.
Deploy to Production
- Host the bot on a cloud platform like Fly.io, Railway, or Render for 24/7 availability.
- Secure the .env file and database in production, using environment variable management and encrypted storage.
- Use a process manager like pm2 to ensure the bot runs reliably.
Contribute to the Open-Source Repository
The bot’s code is part of an open-source project at Quicknode's Guide Examples repository. Contribute by:
- Submitting pull requests for bug fixes, new features, or documentation improvements.
- Reporting issues or suggesting enhancements via GitHub Issues.
- Sharing your custom features, such as new commands or integrations, to benefit the community.
- Engaging with the repository helps improve the bot and fosters collaboration among DeFi developers.
Optimize and Monitor
- Use Quicknode’s dashboard to track RPC usage and optimize add-on performance.
- Log transaction outcomes to analyze swap success rates, gas efficiency, and user behavior.
- Adjust default settings (e.g., DEFAULT_GAS_PRIORITY, DEFAULT_SLIPPAGE) based on network conditions and user preferences.
By exploring Quicknode’s ecosystem, contributing to the open-source community, and adding advanced features, you can transform this bot into a powerful DeFi tool tailored to your needs.
Conclusion
This project demonstrates the power of Quicknode’s Base DeFi Power Bundle, enabling you to build a secure, feature-rich DeFi application with minimal infrastructure setup. By combining OpenOcean swaps, Sentio gas estimates, and MEV protection, the bot offers a robust trading experience directly in Telegram.
If you have any questions, feel free to use our Discord server or provide feedback using the form below. Stay up to date with the latest by following us on Twitter and our Telegram announcement channel.
We ❤️ Feedback!
Let us know if you have any feedback or requests for new topics. We'd love to hear from you.