20 min read
Due to recent updates in the Next.js and NextAuth.js libraries, this guide may not be compatible with certain versions. The versions used in this guide are as follows, using other versions may lead to errors.
| Dependency | Version |
|---|---|
| Next.js | 13.3.0 |
| NextAuth.js | 4.22.0 |
| @solana/wallet-adapter-base | ^0.9.22 |
| @solana/wallet-adapter-react | ^0.15.32 |
| @solana/web3.js | ^1.75.0 |
Overview
Web3 wallet authentication offers a unique approach to user authentication by allowing users to control their own data. This method eliminates the need for traditional email login and provides a secure and private way for developers to authenticate users on their platform. As a developer, incorporating web3 wallets into your authentication process can open up new opportunities for decentralized applications and create a more user-empowering experience. In this guide, we will use the Solana Wallet Adapter to authenticate users on your dApp (Web3 SSO)!
What You Will Do
In this guide, you will create a simple React app using Next.js and NextAuth.js that allows you to authenticate your users (shout out to Blocksmith Labs for this great sample repository). Specifically, you will:
- Fork the NextAuth.js example repo
- Integrate the Solana Wallet Adapter
- Create a sign-in verification with the user's wallet (see demo below 👇)
What You Will Need
To follow along with this guide, you will need the following:
- Basic experience with the Solana Wallet Adapter
- Basic knowledge of the JavaScript, TypeScript, and React programming languages
- Nodejs installed (version 16.15 or higher)
- npm or yarn installed (We will be using yarn to initialize our project and install the necessary packages. Feel free to use npm instead if that is your preferred package manager)
- TypeScript experience and ts-node installed
- Basic knowledge of Authentication or NextAuth.js will be helpful but is not required.
- A modern browser with a Solana Wallet extension installed (e.g., Phantom)
Set Up Your Project
Create a new project directory in your terminal with the following:
mkdir solana-auth
cd solana-auth
Clone NextAuthJS Example Repo
NextAuth.js is an open-source authentication and authorization library for Next.js, a popular React-based framework for building web applications. It provides a simple and secure way for developers to handle user authentication and authorization in their Next.js apps. NextAuth.js is commonly used by developers to easily integrate multiple authentication providers, such as email/password, Google, and Facebook.
Clone the NextAuth.js example repository into your project folder. In your terminal, enter:
git clone https://github.com/nextauthjs/next-auth-example.git .
Install the dependencies that are in the repo by entering the following in your terminal:
yarn
#or
npm install
Install Solana and Wallet Adapter Dependencies
We will need to add the Solana Web3 library and some other key dependencies for this exercise. The Solana Wallet Adapter is a library for integrating Solana wallets into web applications. It provides a unified API for interacting with different Solana wallets, making it easier to build dApps that can be used with any Solana wallet.
In your terminal, enter:
yarn add @solana/web3.js@1 @solana-mobile/wallet-adapter-mobile @solana/wallet-adapter-base @solana/wallet-adapter-react @solana/wallet-adapter-react-ui @solana/wallet-adapter-wallets bs58 tweetnacl
#or
npm install @solana/web3.js@1 @solana-mobile/wallet-adapter-mobile @solana/wallet-adapter-base @solana/wallet-adapter-react @solana/wallet-adapter-react-ui @solana/wallet-adapter-wallets bs58 tweetnacl
In addition to the Solana-Web3.js library and Solana Wallet Adapter dependencies, we added:
- bs58 is a Base58 encoding scheme. Base58 is a way to encode data, such as a Bitcoin address, in a shorter and more user-friendly format than the more common Base64 encoding. It uses a set of 58 characters that includes the digits 0-9 but omits characters that are easily confused with each other (such as the letter "O" and the number "0"). This makes it useful for encoding data that will be manually input or read by humans, such as Bitcoin addresses.
- tweetnacl is a library for a specific set of cryptographic operations, including public-key encryption and digital signature functions and symmetric-key encryption and authentication.
Create a Secret for Authentication
NextAuth uses a .env variable, NEXTAUTH_SECRET, to secure the communication between the client (web browser) and the server in the NextAuth.js library. It is a string that acts as a secret key used to encrypt and decrypt the JSON Web Tokens (JWT) that are exchanged between the client and server. The JWT contains the authentication information, such as the user's ID and session data. Without a valid NEXTAUTH_SECRET, the client cannot decrypt the JWT and authenticate the user. It's essential to keep the value of NEXTAUTH_SECRET private and never share it with anyone else. We will do that using .env.
Open your project directory in an IDE of choice and find a file named .env.local.example. Rename it to .env.local and replace its contents with this:
NEXTAUTH_URL=http://localhost:3000
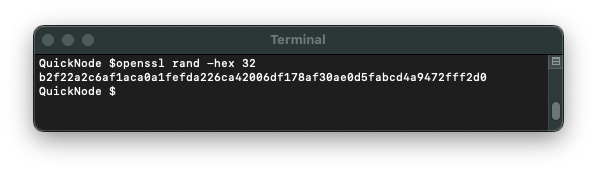
NEXTAUTH_SECRET=ENTER_A_SECRET_KEY
You can use any string for your secret--you can generate a secure secret by typing openssl rand -hex 32 in your terminal (or you can even use solana-keygen grind --starts-with x:1 and use the value of the public key returned). Make sure to update NEXTAUTH_SECRET with that value.
Create a Sign In Message Class
From your main project directory, create a utils folder:
mkdir utils
And create a new file, SigninMessage.ts, in that directory:
cd utils
echo > SigninMessage.ts
Inside SigninMessage.ts paste this code:
import bs58 from "bs58";
import nacl from "tweetnacl";
type SignMessage = {
  domain: string;
  publicKey: string;
  nonce: string;
  statement: string;
};

export class SigninMessage {
  domain: any;
  publicKey: any;
  nonce: any;
  statement: any;

  constructor({ domain, publicKey, nonce, statement }: SignMessage) {
    this.domain = domain;
    this.publicKey = publicKey;
    this.nonce = nonce;
    this.statement = statement;
  }

  prepare() {
    return `${this.statement}${this.nonce}`;
  }

  async validate(signature: string) {
    const msg = this.prepare();
    const signatureUint8 = bs58.decode(signature);
    const msgUint8 = new TextEncoder().encode(msg);
    const pubKeyUint8 = bs58.decode(this.publicKey);

    return nacl.sign.detached.verify(msgUint8, signatureUint8, pubKeyUint8);
  }
}
This code defines a class called "SigninMessage," which is used to validate a signature for a message.
The class has four properties:
- domain
- publicKey
- nonce
- statement
Note: A nonce (short for "number used once") is a unique value that is generated and used once to prevent replay attacks. A replay attack is a network attack in which a hacker intercepts and resends a valid data transmission, tricking the system into accepting the same data multiple times.
The prepare() function concatenates the statement and nonce properties, returning the result.
The validate() function accepts a signature as an input, uses the prepare() function to get the message, decodes the signature and the publicKey using the bs58 library, and then uses the nacl library to verify if the signature is valid using the nacl.sign.detached.verify method. The function returns a boolean indicating whether the signature is valid or not.
We will use this class in our authentication API.
Add the Solana Wallet Adapter
To use the Solana Wallet Adapter, we will need to add three wrappers to our app:
- ConnectionProvider to share our Solana Connection across the app
- WalletProvider to share our wallet context across the app
- WalletModalProvider to enable us to use the modal UI for the wallet adapter across the app
To do this, open pages/_app.tsx and replace the imports with:
import { SessionProvider } from "next-auth/react";
import React, { useMemo } from "react";
import { ConnectionProvider, WalletProvider, } from "@solana/wallet-adapter-react";
import { WalletAdapterNetwork } from "@solana/wallet-adapter-base";
import { PhantomWalletAdapter } from "@solana/wallet-adapter-wallets";
import { WalletModalProvider } from "@solana/wallet-adapter-react-ui";
import { clusterApiUrl } from "@solana/web3.js";
import type { AppProps } from "next/app";

require("@solana/wallet-adapter-react-ui/styles.css");
import "./styles.css";
And update your App function with:
export default function App({ Component, pageProps }: AppProps) {
  const network = WalletAdapterNetwork.Devnet;
  const endpoint = useMemo(() => clusterApiUrl(network), [network]);

  const wallets = useMemo(
    () => [
      new PhantomWalletAdapter(),
    ],
    []
  );

  return (
    <ConnectionProvider endpoint={endpoint}>
      <WalletProvider wallets={wallets} autoConnect>
        <WalletModalProvider>
          <SessionProvider session={pageProps.session} refetchInterval={0}>
            <Component {...pageProps} />
          </SessionProvider>
        </WalletModalProvider>
      </WalletProvider>
    </ConnectionProvider>
  );
}
Note: We are just using Phantom for simplicity for this demo. Feel free to add any other Adapters you choose.
All we are doing here is wrapping our SessionProvider in our Wallet and Connection wrappers. We can use the default devnet and public RPC for this example because we will not actually make any network requests.
Now that our wallet adapter is set up, let's update our front end to connect our wallet and backend to authenticate it!
Update Front End
We will leave the body of the template alone for this example, but we need to update our Header to add functionality with our Wallet Adapter. Open components/header.tsx.
Go ahead and replace the contents of the entire file with the following:
import Link from "next/link";
import { getCsrfToken, signIn, signOut, useSession } from "next-auth/react";
import styles from "./header.module.css";
import { useWalletModal } from "@solana/wallet-adapter-react-ui";
import { useWallet } from "@solana/wallet-adapter-react";
import { SigninMessage } from "../utils/SigninMessage";
import bs58 from "bs58";
import { useEffect } from "react";

export default function Header() {
  const { data: session, status } = useSession();
  const loading = status === "loading";

  const wallet = useWallet();
  const walletModal = useWalletModal();

  const handleSignIn = async () => {
    try {
      if (!wallet.connected) {
        walletModal.setVisible(true);
      }

      const csrf = await getCsrfToken();
      if (!wallet.publicKey || !csrf || !wallet.signMessage) return;

      const message = new SigninMessage({
        domain: window.location.host,
        publicKey: wallet.publicKey?.toBase58(),
        statement: `Sign this message to sign in to the app.`,
        nonce: csrf,
      });

      const data = new TextEncoder().encode(message.prepare());
      const signature = await wallet.signMessage(data);
      const serializedSignature = bs58.encode(signature);

      signIn("credentials", {
        message: JSON.stringify(message),
        redirect: false,
        signature: serializedSignature,
      });
    } catch (error) {
      console.log(error);
    }
  };

  useEffect(() => {
    if (wallet.connected && status === "unauthenticated") {
      handleSignIn();
    }
  }, [wallet.connected]);

  return (
    <header>
      <noscript>
        <style>{`.nojs-show { opacity: 1; top: 0; }`}</style>
      </noscript>
      <div className={styles.signedInStatus}>
        <p
          className={`nojs-show ${
            !session && loading ? styles.loading : styles.loaded
          }`}
        >
          {!session && (
            <>
              <span className={styles.notSignedInText}>
                You are not signed in
              </span>
              <span className={styles.buttonPrimary} onClick={handleSignIn}>
                Sign in
              </span>
            </>
          )}
          {session?.user && (
            <>
              {session.user.image && (
                <span
                  style={{ backgroundImage: `url('${session.user.image}')` }}
                  className={styles.avatar}
                />
              )}
              <span className={styles.signedInText}>
                <small>Signed in as</small>
                <br />
                <strong>{session.user.email ?? session.user.name}</strong>
              </span>
              <a
                href={`/api/auth/signout`}
                className={styles.button}
                onClick={(e) => {
                  e.preventDefault();
                  signOut();
                }}
              >
                Sign out
              </a>
            </>
          )}
        </p>
      </div>
      <nav>
        <ul className={styles.navItems}>
          <li className={styles.navItem}>
            <Link legacyBehavior href="/">
              <a>Home</a>
            </Link>
          </li>
          <li className={styles.navItem}>
            <Link legacyBehavior href="/api/examples/protected">
              <a>Protected API Route</a>
            </Link>
          </li>
          <li className={styles.navItem}>
            <Link legacyBehavior href="/me">
              <a>Me</a>
            </Link>
          </li>
        </ul>
      </nav>
    </header>
  );
}
Let's break this down. This code exports a React component, Header, that renders a header element with a navigation bar. The component uses the useSession hook from the next-auth/react library to get the current session data and status, and the useWallet and useWalletModal hooks from the @solana/wallet-adapter-react and @solana/wallet-adapter-react-ui libraries, respectively, to interact with a Solana wallet.
The component has a sign-in button that, when clicked, initiates a sign-in process, handleSignIn:
- When called, it first checks if the wallet is connected. If it is not, it displays the wallet modal so the user can select their wallet.
- Next, it calls getCsrfToken() which returns a promise that resolves with a Cross-Site Request Forgery token (a cryptographically secure random value). This token is used as a nonce to help protect against cross-site request forgery attacks.
- After that, the code checks if the wallet has a public key and that both the csrf token and wallet's sign message function are defined. If any of these conditions are not met, the function exits.
- Then, it creates a new SigninMessage object which we defined earlier in this guide.
- Once the
messageis created, it is encoded to bytes and signed by the user. - The
signatureis then encoded using bs58 and passed along with the signin message and the csrf token to the signIn function. - The
signInfunction is provided by the next-auth package and handles the server-side authentication process. It takes a session type (in this case, "credentials") and an options object containing themessage,signature, and a redirect option (in this case, redirect is set tofalse, meaning the user will stay on the current page after signing in).
Great job--almost done. Let's update our API!
Implement Backend API
So far, we have built a sign-in function and connected our app to the Solana Wallet Adapter. Now we need to implement our backend verification. We need to update two files in our API directory: pages/api:
pages/api/auth/[...nextauth].ts, which allows us to define custom routes for our authentication and authorization logic, andpages/api/examples/protected.ts, which we will use as an example route to alert the user if they have been authenticated or not
Open pages/api/auth/[...nextauth].ts and replace the contents of the file with:
import { NextApiRequest, NextApiResponse } from "next";
import NextAuth from "next-auth";
import CredentialsProvider from "next-auth/providers/credentials";
import { getCsrfToken } from "next-auth/react";
import { SigninMessage } from "../../../utils/SigninMessage";

export default async function auth(req: NextApiRequest, res: NextApiResponse) {
  const providers = [
    CredentialsProvider({
      name: "Solana",
      credentials: {
        message: {
          label: "Message",
          type: "text",
        },
        signature: {
          label: "Signature",
          type: "text",
        },
      },
      async authorize(credentials, req) {
        try {
          const signinMessage = new SigninMessage(
            JSON.parse(credentials?.message || "{}")
          );
          const nextAuthUrl = new URL(process.env.NEXTAUTH_URL);
          if (signinMessage.domain !== nextAuthUrl.host) {
            return null;
          }

          const csrfToken = await getCsrfToken({ req: { ...req, body: null } });

          if (signinMessage.nonce !== csrfToken) {
            return null;
          }

          const validationResult = await signinMessage.validate(
            credentials?.signature || ""
          );

          if (!validationResult)
            throw new Error("Could not validate the signed message");

          return {
            id: signinMessage.publicKey,
          };
        } catch (e) {
          return null;
        }
      },
    }),
  ];

  const isDefaultSigninPage =
    req.method === "GET" && req.query.nextauth?.includes("signin");

  // Hides Sign-In with Solana from the default sign page
  if (isDefaultSigninPage) {
    providers.pop();
  }

  return await NextAuth(req, res, {
    providers,
    session: {
      strategy: "jwt",
    },
    secret: process.env.NEXTAUTH_SECRET,
    callbacks: {
      async session({ session, token }) {
        // @ts-ignore
        session.publicKey = token.sub;
        if (session.user) {
          session.user.name = token.sub;
          session.user.image = `https://ui-avatars.com/api/?name=${token.sub}&background=random`;
        }
        return session;
      },
    },
  });
}
Let's step through the code.
- First, we define an auth function that takes in a NextApiRequest and a NextApiResponse as its arguments.
- The function creates an array of authentication providers, in this case just one provider called "Solana" that uses the CredentialsProvider from
next-auth(you could use other providers like Google, Facebook, etc. like the original example file as well, but would require some modifications from this code example). - The CredentialsProvider is configured with
messageandsignaturefields used as the authentication credentials. - The authorize function of the CredentialsProvider validates the provided credentials by:
- Creating a new SigninMessage object from the JSON parsed
credentials.message - Verifying the
domainof the message matches the domain of the NextAuth URL - Verifying the nonce of the message matches the nonce generated by the
getCsrfTokenfunction - Validating the signature of the
messageusing the validate method of the SigninMessage
- Creating a new SigninMessage object from the JSON parsed
- If the validation is successful, the function will return an object containing the user's public key as the ID.
- A check is done to see if the request is a GET request with a nextauth parameter that includes "signin"; if it is, the Solana provider is removed from the providers array. This is just included in the example because we are not building any sign-in redirects for this example. You can experiment with leaving this code off to see how it affects the
/mepage when you are not signed in. - NextAuth is then invoked with the providers array, session strategy of "jwt," and a session callback that sets the publicKey and image URL of the user in the session
All we need now is to create a protected page that only our authorized users can see. Let's modify the default pages/api/examples/protected.ts. Open the file and replace its contents with this:
import type { NextApiRequest, NextApiResponse } from "next";
import { getToken } from "next-auth/jwt";

const secret = process.env.NEXTAUTH_SECRET;

export default async function handler(
  req: NextApiRequest,
  res: NextApiResponse
) {
  const token = await getToken({ req, secret });

  if (!token || !token.sub)
    return res.send({
      error: "User wallet not authenticated",
    });

  if (token) {
    return res.send({
      content:
        "This is protected content. You can access this content because you are signed in with your Solana Wallet.",
    });
  }

  res.send({
    error: "You must be signed in with your Solana Wallet to view the protected content on this page.",
  });
}
This is a Next.js API endpoint that is used to protect a specific page or resource, such that only authenticated users can access it.
- The
getTokenfunction from thenext-auth/jwtpackage is imported and used to extract the JWT from the request. - The JWT is then verified using the secret, which is read from the
process.env.NEXTAUTH_SECRETenvironment variable. TheNEXTAUTH_SECRETis used to sign and verify JWT tokens that are sent between the client and server. The client uses this secret to sign the token, and the server uses the same secret to verify it. It's essential to keep it secret because if an attacker gets access to it, they could use it to forge JWT tokens and impersonate any user. - If the token is not present or does not contain a subfield, then the user is not authenticated, and the API endpoint returns an error.
- If the token is present and contains a subfield, then the user is authenticated, and the API endpoint returns a message saying that the user can access the protected content.
- If neither of the above conditions is met, the API endpoint returns another error message.
Whew! That was a lot. We should be ready to give it a shot.
Run Your dApp
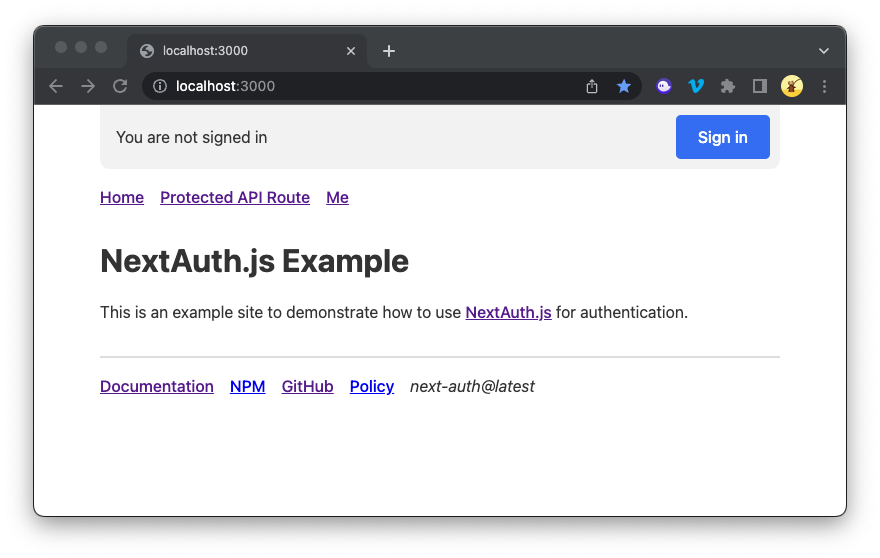
Alright, let's do this! Open your terminal and enter:
yarn dev
You should see a page like this:
Click Protected API Route. You should see an error:
{"error":"User wallet not authenticated"}
Return back to the homepage, and click Sign in. You'll be prompted to connect your wallet and sign a message.
Now try again--Click Protected API Route. You should see a protected message:
{"content":"This is protected content. You can access this content because you are signed in with your Solana Wallet."}
EPIC! Congrats, and great work!
Wrap Up
NextAuth is a powerful library that allows you to easily add authentication and authorization functionality to your Next.js application. By implementing the Solana Wallet Adapter, you can easily authenticate and authorize users, protect pages and routes, and even customize the user experience...all with their Solana Wallet!
It is exciting to think about how you might utilize this tech. We'd love to hear what you're up to. Drop us a line on Discord to share your project, or follow us on Twitter to stay up to date with the latest information.
We ❤️ Feedback!
If you have any feedback on this guide, let us know. We’d love to hear from you.