
17 min read
Overview
In this guide, you will learn how to deploy a smart contract using Solidity on the Solana blockchain thanks to Neon EVM, which is a Solana runtime for Ethereum Virtual Machine (EVM) smart contracts. It allows developers to deploy and execute Solidity smart contracts on Solana.
We will cover the basics of Solana development with Neon, including setting up your environment, creating a Solidity smart contract, and performing tests to ensure it functions as intended. By the end of this guide, you'll have the knowledge and skills to deploy your own smart contracts on the Solana blockchain with Solidity.
What You Will Do
- Learn some basics about building with Neon
- Set up a development environment
- Create and deploy a Scoreboard smart contract using Solidity and Neon
- Run tests to make sure the program works as expected
- Verify the deployed smart contract
What You Will Need
- Basic understanding of Solidity development
- Basic understanding of Solana fundamentals
- Node.js installed
- Hardhat installed (we will cover it as well during the guide)
- EVM-compatible browser extension wallet (e.g., Metamask)
| Dependency | Version |
|---|---|
| node.js | >8.9.4 |
Solana Basics
Before we dive into Neon EVM, here is a quick recap of some important Solana concepts:
-
Accounts Everywhere: In Solana, most elements, including user wallets, programs, data logs, and system programs, are represented as accounts. These accounts function similarly to files in a traditional operating system, as they can be created, modified, and deleted, and can either hold or process data.
-
Programs, not Smart Contracts: Solana refers to smart contracts as "programs." These programs are essentially accounts that store executable code responsible for processing transactions and updating the blockchain's state.
-
Statelessness of Solana Programs: Unlike Ethereum's EVM contracts, which are stateful, Solana programs do not store their state internally. Instead, Solana programs utilize accounts to store and manage state data.
-
Generous Account Storage: Solana accounts have the capacity to store up to 10 MB of data, providing ample storage for various types of information.
For a more comprehensive exploration of Solana, refer to the Reference Guide.
Neon EVM Basics
Neon EVM is an Ethereum Virtual Machine integrated within a Solana executable account, essentially constituting the entire EVM execution layer within Solana's smart contracts. It allows developers to deploy and execute Solidity smart contracts on Solana, with the scalability and low transaction costs of Solana. Unlike L2 solutions or sidechains, Neon EVM stands as a complete EVM implementation seamlessly operating on the Solana network.
Neon EVM empowers dApps developed in Solidity and Vyper to leverage Solana's advantages, such as low fees, rapid transaction processing, and parallel transaction execution capabilities. This solution ensures compatibility with essential Ethereum dApp tools like Vyper, Solidity, MetaMask, Hardhat, Truffle, and Remix, facilitating the effortless migration of Ethereum applications to Solana.
Development
Set Up Environment
First, you need to add Neon EVM DevNet as a network into your wallet. In this guide, we use MetaMask as a wallet.
- Visit Neon's Chainlist page
- Click Connect Wallet
- Click Add to MetaMask under the Neon EVM DevNet
- Follow the instructions
On Neon EVM, there are proxy operators who are responsible for settling Neon transactions on Solana. Although it is changeable, we will use the default proxy operator that Chainlist will assign. For more details, see the page.

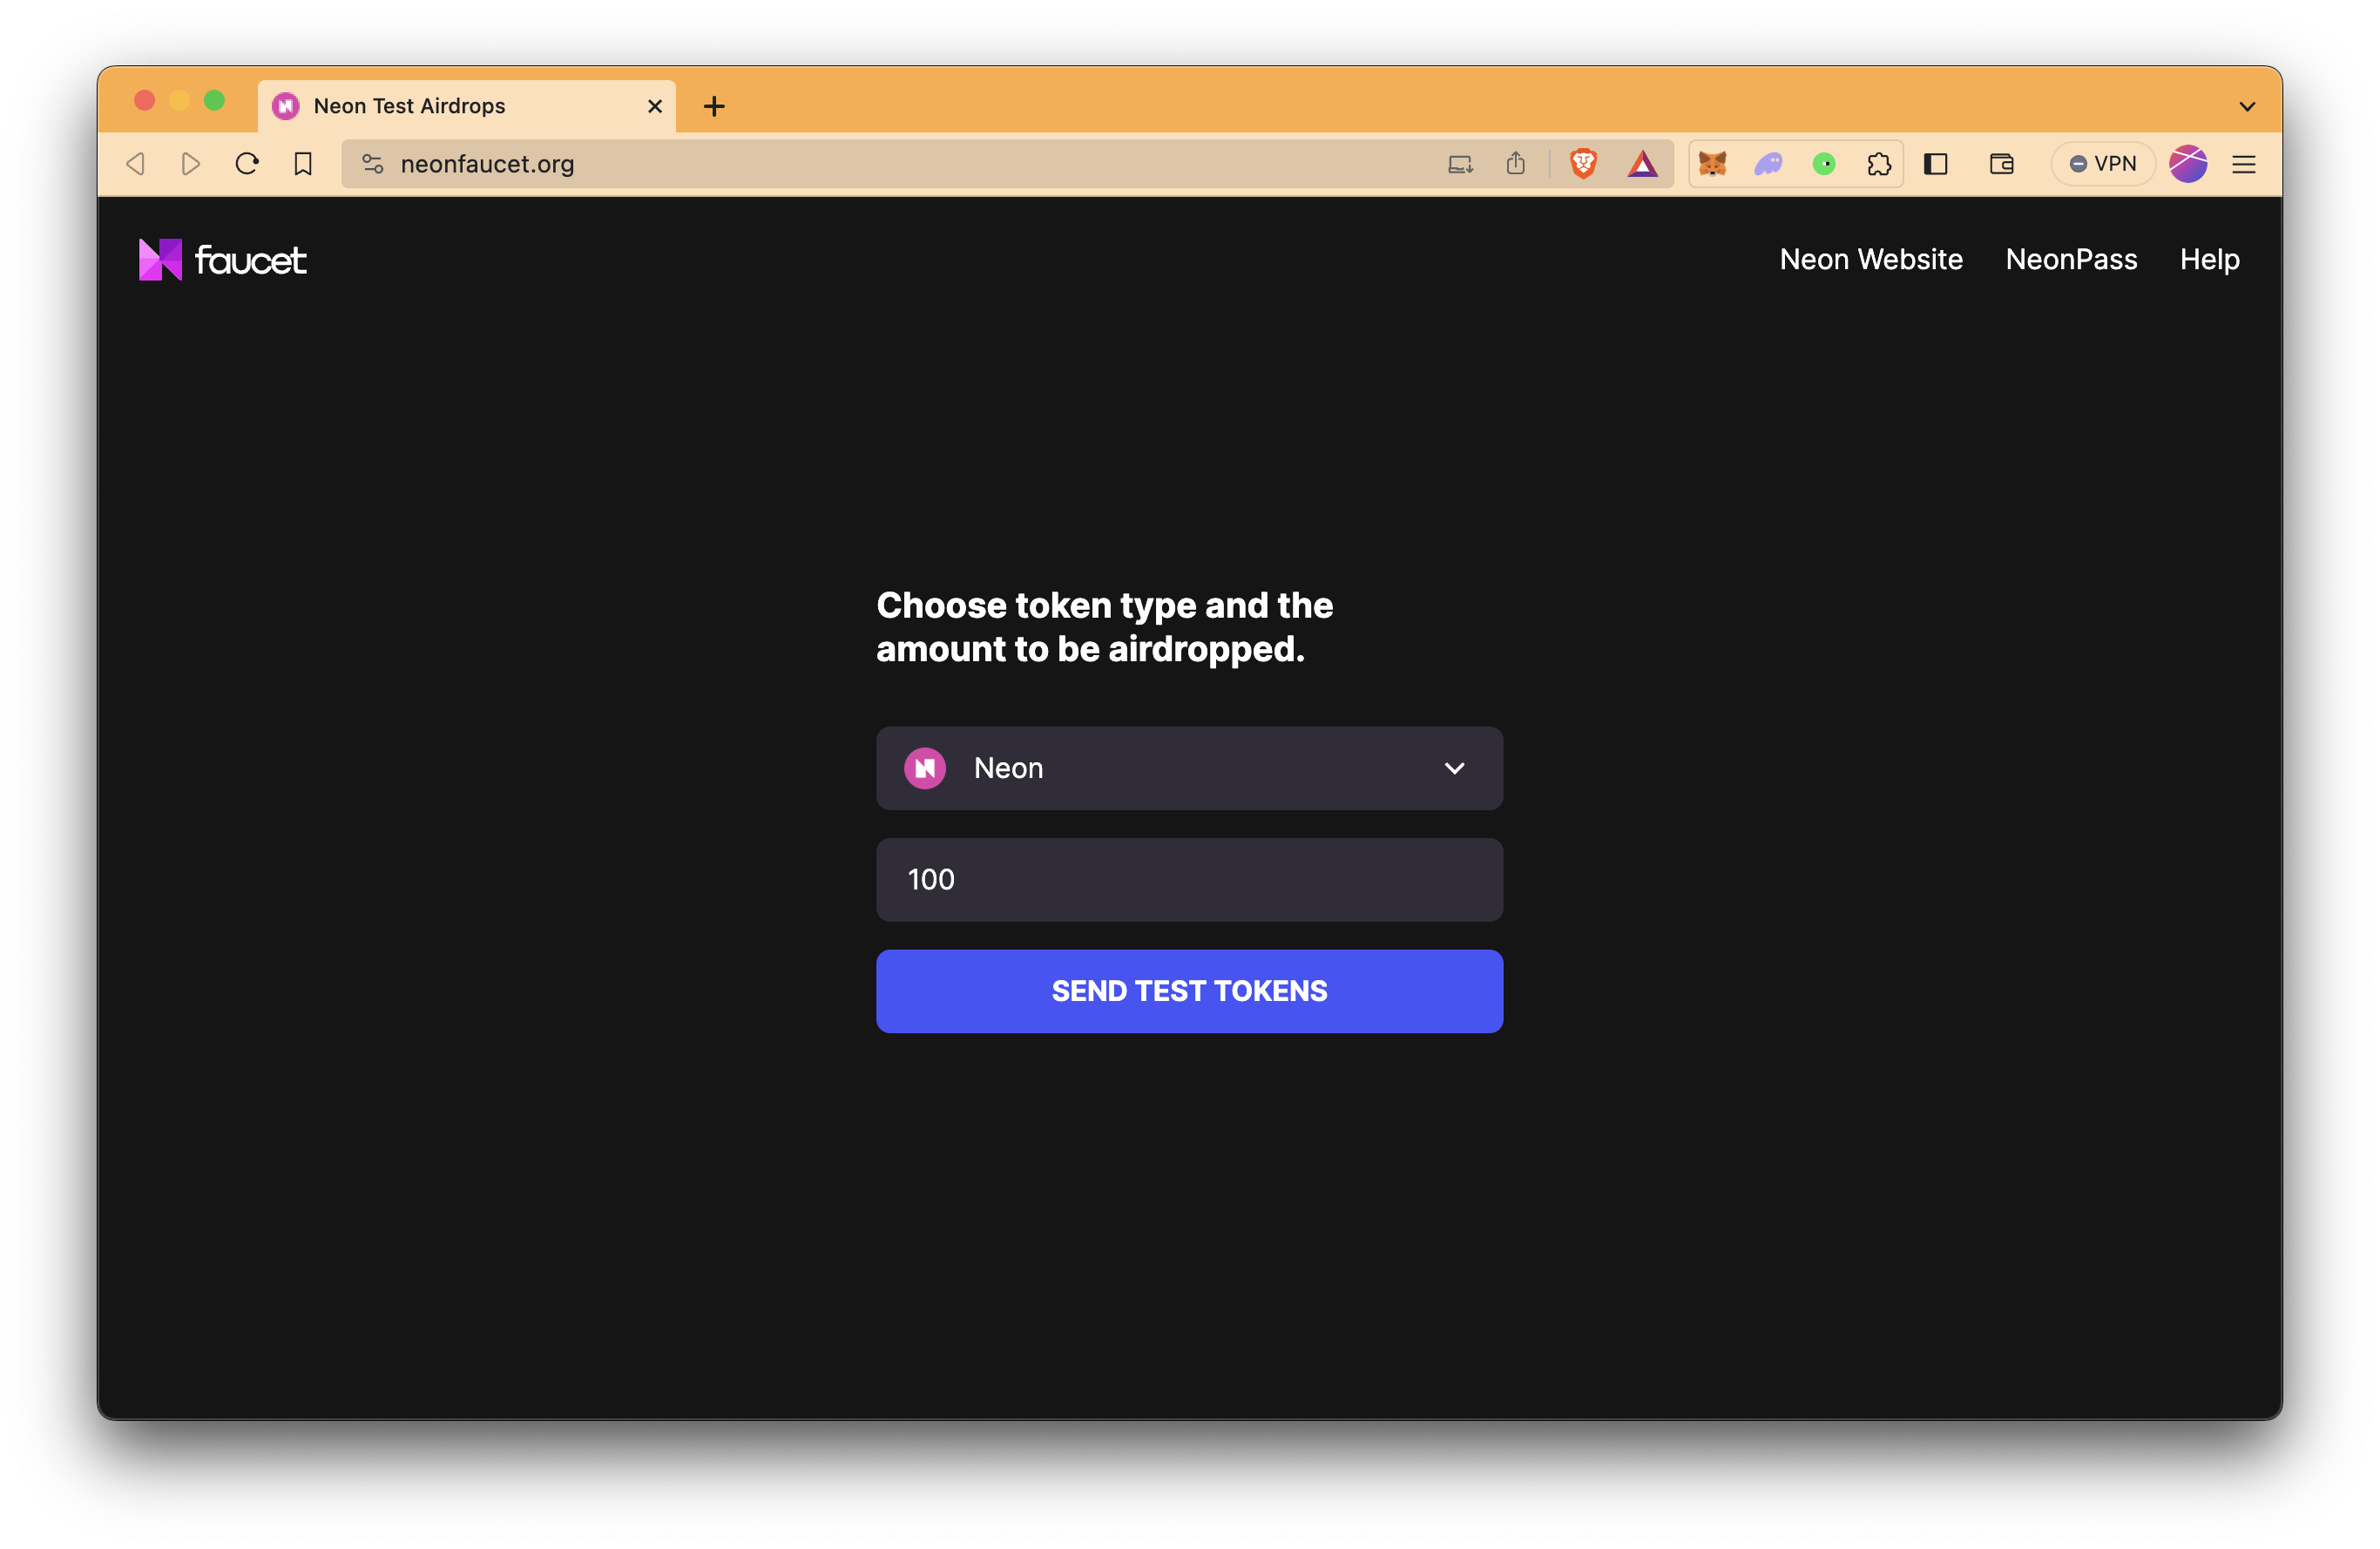
Then, you need to get some NEON test tokens for test and development purposes on devnet.
- Go to the Neon's faucet
- Connect your wallet while it is connected to Neon EVM DevNet
- Select NEON as token
- Type the amount you want (the maximum limit is 100 NEON at the time of this writing)
- Click SEND TEST TOKENS
After a short time, your wallet will be funded with NEON test token.
Hardhat Configuration
Hardhat is a development environment used to compile, deploy, test, and debug Ethereum software. For this guide, we will use Hardhat to compile, deploy, and test smart contracts.
Let's start with project creation.
Open your terminal in any directory you want and run the following code.
This code creates a folder named neon-scoreboard, initializes a project, installs Hardhat, and then runs Hardhat, respectively.
mkdir neon-scoreboard && cd neon-scoreboard
npm init --yes
npm install --save-dev hardhat
npx hardhat init
Then, select either JavaScript or TypeScript based on your preferences and go through the following steps.
Make sure that type “y” for the latest question since we install specific versions of packages.
A sample console output of running Hardhat is like the one below.
888 888 888 888 888
888 888 888 888 888
888 888 888 888 888
8888888888 8888b. 888d888 .d88888 88888b. 8888b. 888888
888 888 "88b 888P" d88" 888 888 "88b "88b 888
888 888 .d888888 888 888 888 888 888 .d888888 888
888 888 888 888 888 Y88b 888 888 888 888 888 Y88b.
888 888 "Y888888 888 "Y88888 888 888 "Y888888 "Y888
👷 Welcome to Hardhat v2.17.4 👷
✔ What do you want to do? · Create a JavaScript project
✔ Hardhat project root: ·
✔ Do you want to add a .gitignore? (Y/n) · y
✔ Do you want to install this sample project's dependencies with npm (@nomicfoundation/hardhat-toolbox)? (Y/n) · y
Then, install these packages.
npm install --save-dev chai@^4.3.6
After these steps, the folder structure should be seen like the one below.
├── README.md           // The project's documentation and information.
├── contracts           // Directory for Solidity smart contracts.
├── hardhat.config.js   // Configuration file for the Hardhat development environment.
├── node_modules        // Directory containing project dependencies (installed packages).
├── package-lock.json   // Lockfile specifying the exact version of each dependency.
├── package.json        // JSON file containing project metadata and dependency information.
├── scripts             // Directory for custom scripts or automation code.
└── test                // Directory for test files and test-related code.
Open the hardhat.config.js file with your favorite code editor and modify it the way below.
This Hardhat configuration file allows developers to deploy and test smart contracts on the Neon Devnet and local hardhat network using the Hardhat development framework.
require("@nomicfoundation/hardhat-toolbox");

const proxy_url = "https://devnet.neonevm.org";
const network_id = 245022926;

// Private key for the test account
// NOTE: Replace the private key by your own and make sure it has non-zero NEON balance
const privateKeys = [
  "PRIVATE_KEY",
];

module.exports = {
  solidity: "0.8.4",
  defaultNetwork: "hardhat",
  networks: {
    hardhat: {},
    neonlabs: {
      url: proxy_url,
      accounts: privateKeys,
      network_id: network_id,
      chainId: network_id,
      allowUnlimitedContractSize: false,
      timeout: 1000000,
      isFork: true,
    },
  },
};
Replace the PRIVATE_KEY with your account’s private key. If your private key doesn’t start with 0x be sure to add it at the beginning of the private key.
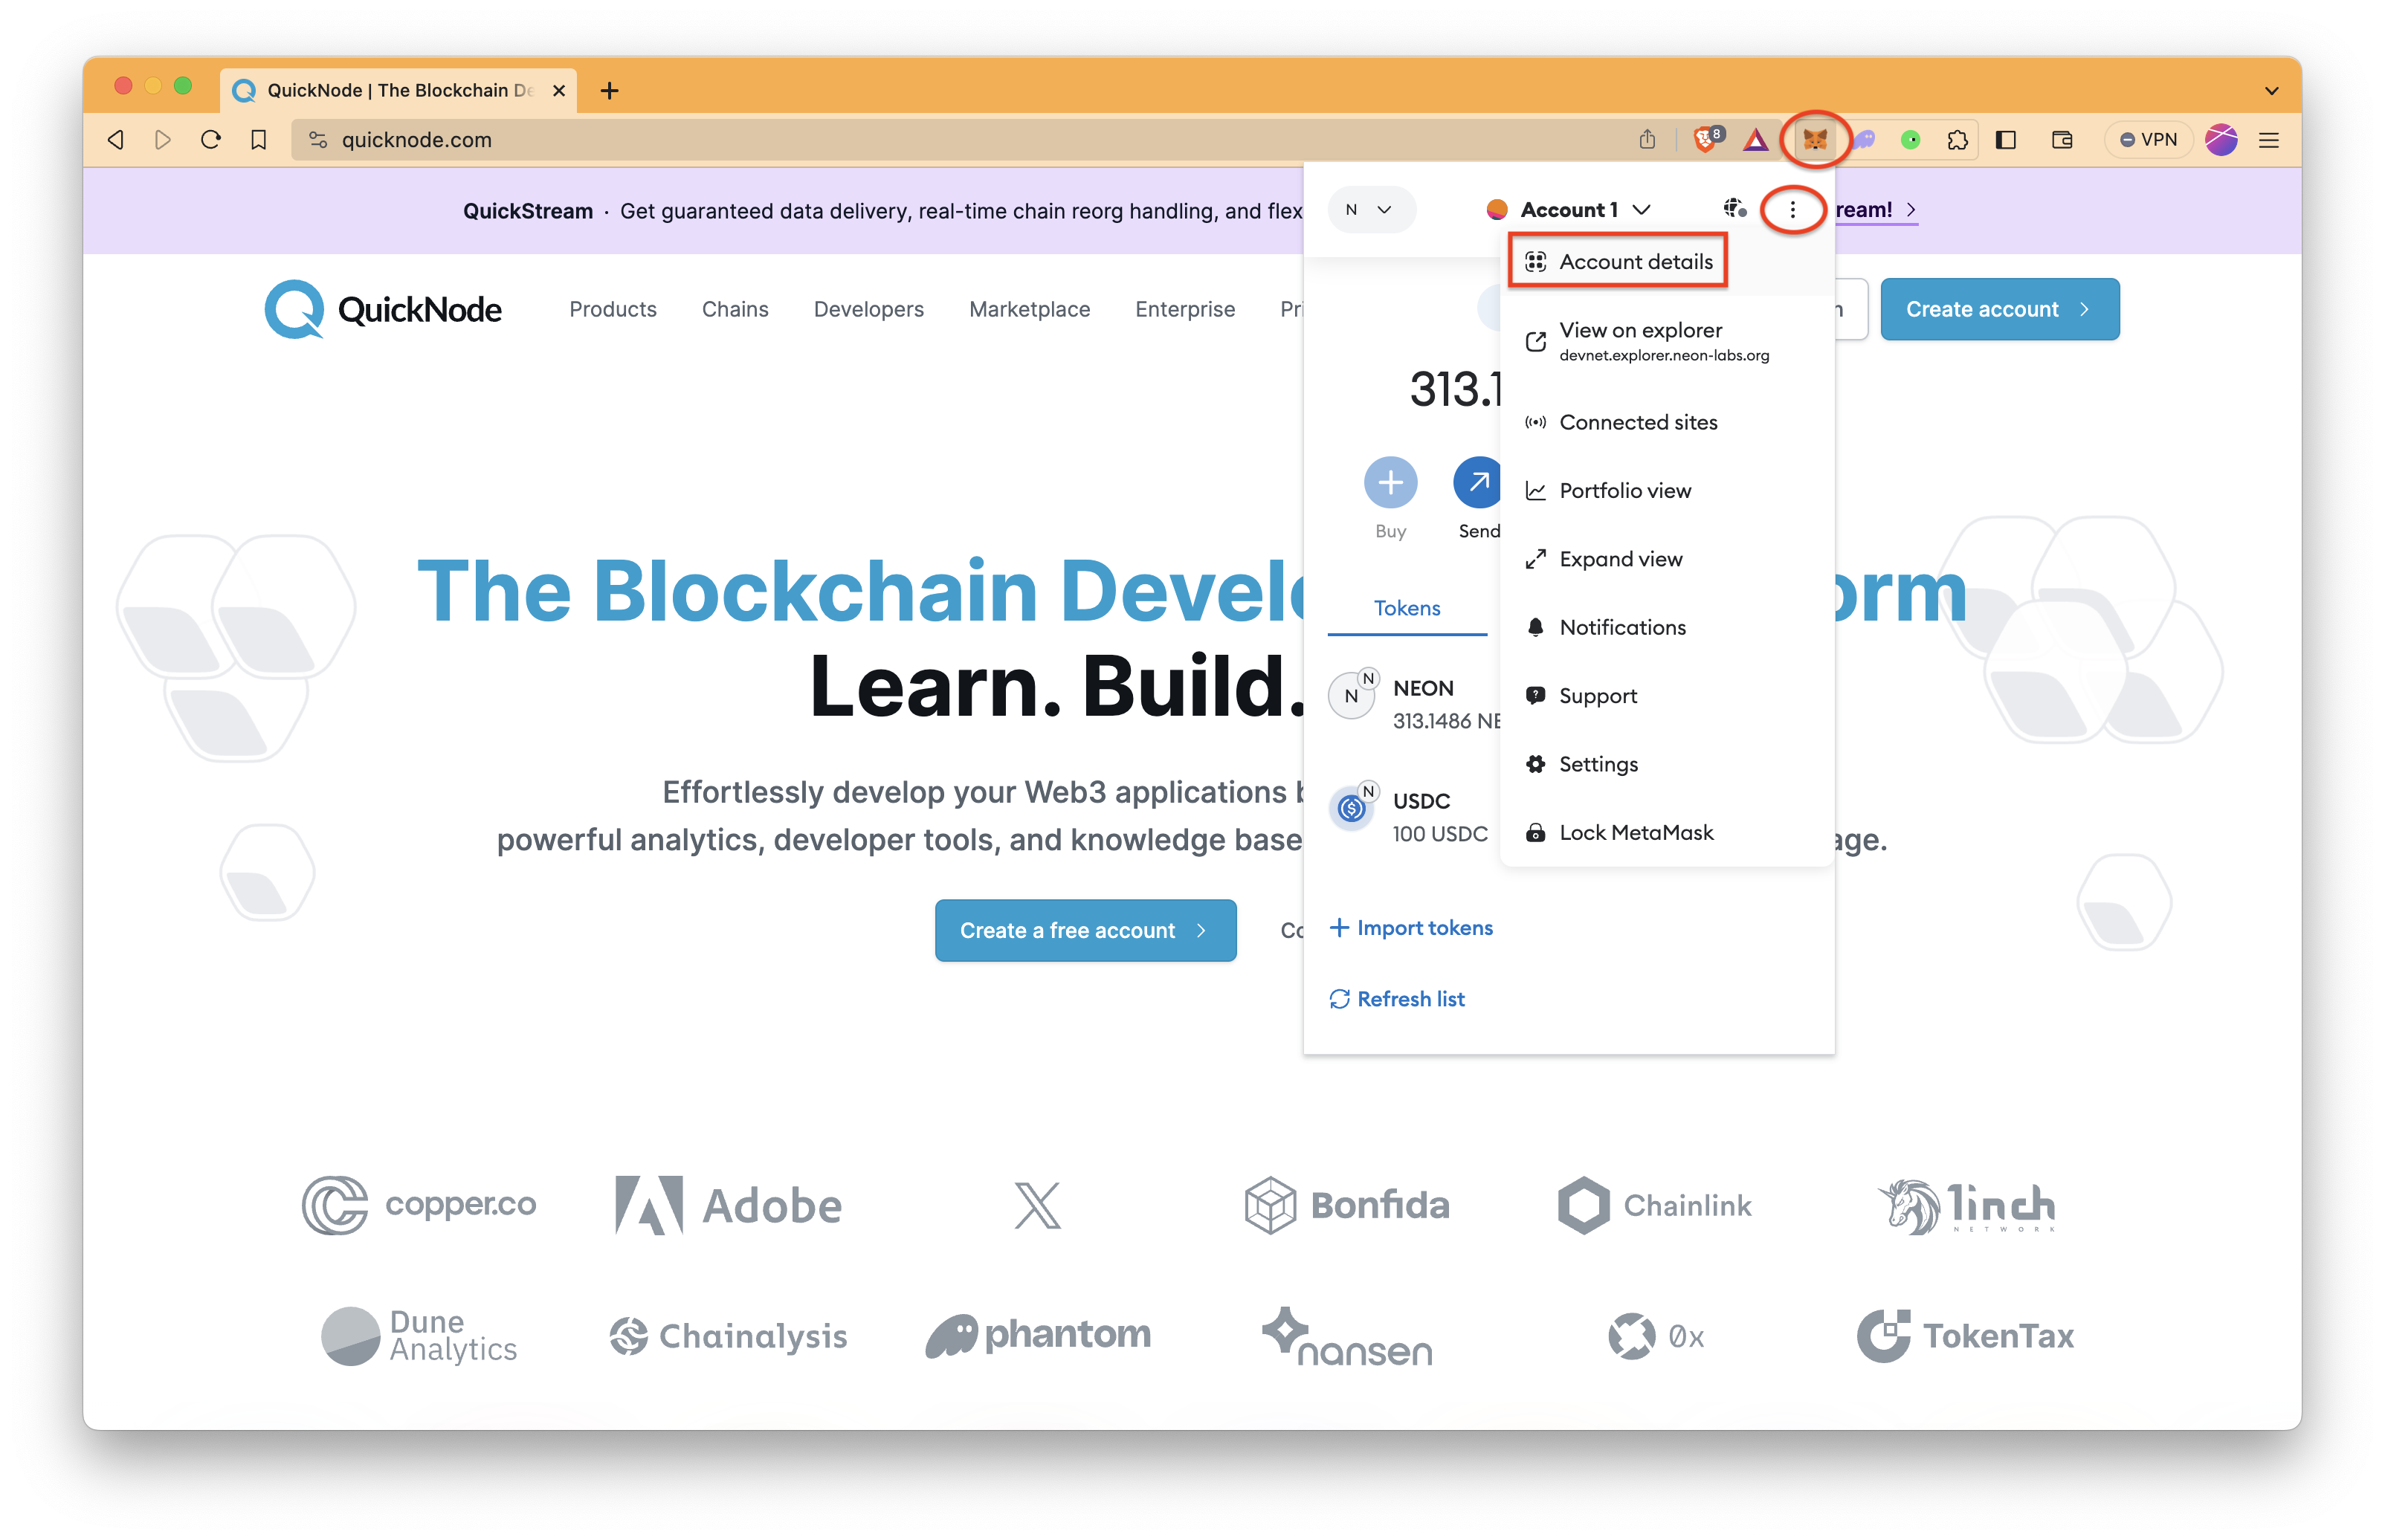
To get your private key;
- Click MetaMask icon, a stylized fox head, on your browser. If it is not seen, check Extensions page of your browser.
- Click ⋮ symbol and then Account details.
- Then, click Show private key and follow instructions.
Now, we are ready to write our smart contracts.
Smart Contract
Create a Solidity file under the contracts folder by running the command below.
Feel free to delete the pre-written
Lock.solfile.
echo > ./contracts/Scoreboard.sol
Copy the content below into the Scoreboard.sol file.
This is a Scoreboard smart contract that allows users to manage and track their game scores. Users can create an account, add points to their current score, reset their current score, and retrieve their current and highest scores. The smart contract uses a struct to store user data, an array to manage user accounts, and a mapping to track user indices for efficient access. It also emits events to log score updates.
// SPDX-License-Identifier: UNLICENSED
pragma solidity ^0.8.4;

contract Scoreboard {

    // Define a struct to represent the user's score data
    struct UserScore {
        address player;
        uint8 currentScore;
        uint8 highestScore;
    }

    // Array to store user score data
    UserScore[] public accountData;

    // Mapping to track the index of users in the array
    mapping(address => uint256) public userIndex;

    // Event to log score updates
    event ScoreUpdated(
        address indexed player,
        uint8 currentScore,
        uint8 highestScore
    );

    // Function to create a new user element in the array
    function createUser() public {

        // Ensure that the user doesn't already exist in the array
        require(userIndex[msg.sender] == 0, "User already exists");

        // Create a new UserScore struct and initialize it
        UserScore memory newUser = UserScore({
            player: msg.sender,
            currentScore: 0,
            highestScore: 0
        });

        // Add the new user to the array and update their index
        accountData.push(newUser);
        userIndex[msg.sender] = accountData.length;
    }

    // Function to add points to the user's current score
    function addPoints(uint8 numPoints) public {
        // Ensure that the numPoints is valid
        require(numPoints > 0 && numPoints < 100, "Invalid points");

        // Get the user's index in the array
        uint256 index = userIndex[msg.sender];

        // Ensure that the user exists in the array
        require(index != 0, "User does not exist");

        // Update the user's current score and highest score if needed
        accountData[index - 1].currentScore += numPoints;
        if (
            accountData[index - 1].currentScore >
            accountData[index - 1].highestScore
        ) {
            accountData[index - 1].highestScore = accountData[index - 1]
                .currentScore;
        }

        // Emit an event to log the score update
        emit ScoreUpdated(
            msg.sender,
            accountData[index - 1].currentScore,
            accountData[index - 1].highestScore
        );
    }

    // Function to reset the user's current score to zero
    function resetScore() public {
        // Get the user's index in the array
        uint256 index = userIndex[msg.sender];

        // Ensure that the user exists in the array
        require(index != 0, "User does not exist");

        // Reset the user's current score to zero
        accountData[index - 1].currentScore = 0;

        // Emit an event to log the score reset
        emit ScoreUpdated(
            msg.sender,
            accountData[index - 1].currentScore,
            accountData[index - 1].highestScore
        );
    }

    // Function to get the current score of a user
    function getCurrentScore() public view returns (uint8) {
        // Get the user's index in the array
        uint256 index = userIndex[msg.sender];

        // Ensure that the user exists in the array
        require(index != 0, "User does not exist");

        // Return the user's current score
        return accountData[index - 1].currentScore;
    }

    // Function to get the highest score of a user
    function getHighScore() public view returns (uint8) {
        // Get the user's index in the array
        uint256 index = userIndex[msg.sender];

        // Ensure that the user exists in the array
        require(index != 0, "User does not exist");

        // Return the user's highest score
        return accountData[index - 1].highestScore;
    }
}
Testing
Before the deployment, the smart contract should be tested to check if it works as intended.
Create a Javascript file under the test folder by running the command below.
echo > ./test/Scoreboard.js
Add the content below to the file.
// Import Chai assertion library for testing and Hardhat's ethers library for Ethereum interaction
const { expect } = require("chai");
const { ethers } = require("hardhat");

// Define a test suite for the "Scoreboard Contract.
describe("Scoreboard Contract", function () {
  let Scoreboard;
  let scoreboard;
  let owner;

  // Set up a common configuration before each test case
  beforeEach(async function () {
    // Get Ethereum signers (accounts) for testing.
    [owner] = await ethers.getSigners();
    // Deploy the Scoreboard contract using the ContractFactory
    Scoreboard = await ethers.getContractFactory("Scoreboard");
    // Ensure the contract is deployed and ready for testing
    scoreboard = await Scoreboard.deploy();
    await scoreboard.waitForDeployment();
  });

  // Test case: Should create a new user
  it("Should create a new user", async function () {
    // Call the createUser function to create a new user
    await scoreboard.createUser();
    // Get the user's index from the contract
    const userIndex = await scoreboard.userIndex(owner.address);
    // Expect the user's index to be 1 (indicating a new user)
    expect(userIndex).to.equal(1);
  });

  // Test case: Should add points to the user's score
  it("Should add points", async function () {
    // Create a new user
    await scoreboard.createUser();
    // Add 50 points to the user's score
    await scoreboard.addPoints(50);
    // Retrieve the current and highest scores
    const currentScore = await scoreboard.getCurrentScore();
    const highestScore = await scoreboard.getHighScore();
    // Expect the current score and highest score to be 50
    expect(currentScore).to.equal(50);
    expect(highestScore).to.equal(50);
  });

  // Test case: Should reset the user's current score while maintaining the high score
  it("Should reset the user's current score and maintain the high score", async function () {
    await scoreboard.createUser();
    await scoreboard.addPoints(50);
    // Reset the user's current score
    await scoreboard.resetScore();
    // Retrieve the current and highest scores
    const currentScore = await scoreboard.getCurrentScore();
    const highestScore = await scoreboard.getHighScore();
    // Expect the current score to be 0 and the highest score to remain at 50
    expect(currentScore).to.equal(0);
    expect(highestScore).to.equal(50);
  });
});
Now, perform the testing with the following code.
npx hardhat test
The output console should be similar to the one below.
    Scoreboard Contract
    ✔ Should create a new user
    ✔ Should add points
    ✔ Should reset the user's current score and maintain the high score


    3 passing (947ms)
Deployment
Since the testing process is completed successfully, we can proceed to the deployment.
Open the deploy.js file under the scripts folder and modify it like the one below.
// Import the Hardhat Runtime Environment (HRE) module
const hre = require("hardhat");

// Define an asynchronous function named "main" for contract deployment
async function main() {
  // Get the deployer account from the list of signers
  const [deployer] = await ethers.getSigners();
  console.log("Deploying contracts with the account:", deployer.address);

  // Get the ContractFactory for the "Scoreboard" contract using Hardhat's ethers library
  const Scoreboard = await hre.ethers.getContractFactory("Scoreboard");

  // Deploy the "Scoreboard" contract to the Ethereum network
  const scoreboard = await Scoreboard.deploy({ gasLimit: "0x10000000" });

  // Ensure that the contract deployment is completed
  await scoreboard.waitForDeployment();
  console.log("Deployed contract address is: ", scoreboard.target);
}

// Execute the "main" function, catching and handling any errors
main().catch((error) => {
  console.error(error);
  // Set the process exit code to 1 to indicate an error occurred
  process.exitCode = 1;
});
Run the deployment script on the neonlabs network, which is configured on the configuration file, hardhat.config.js.
npx hardhat run scripts/deploy.js --network neonlabs
The expected output is like the one below. Of course, your account address and your deployed smart contract address will be different.
Deploying contracts with the account: 0x58D09ecd499A1d6F2a0269f361Ee6DbbaBa44eF8
Deployed contract address is:  0x244BDb09C3B6B4c9faF2a71D5E876c73085559d2
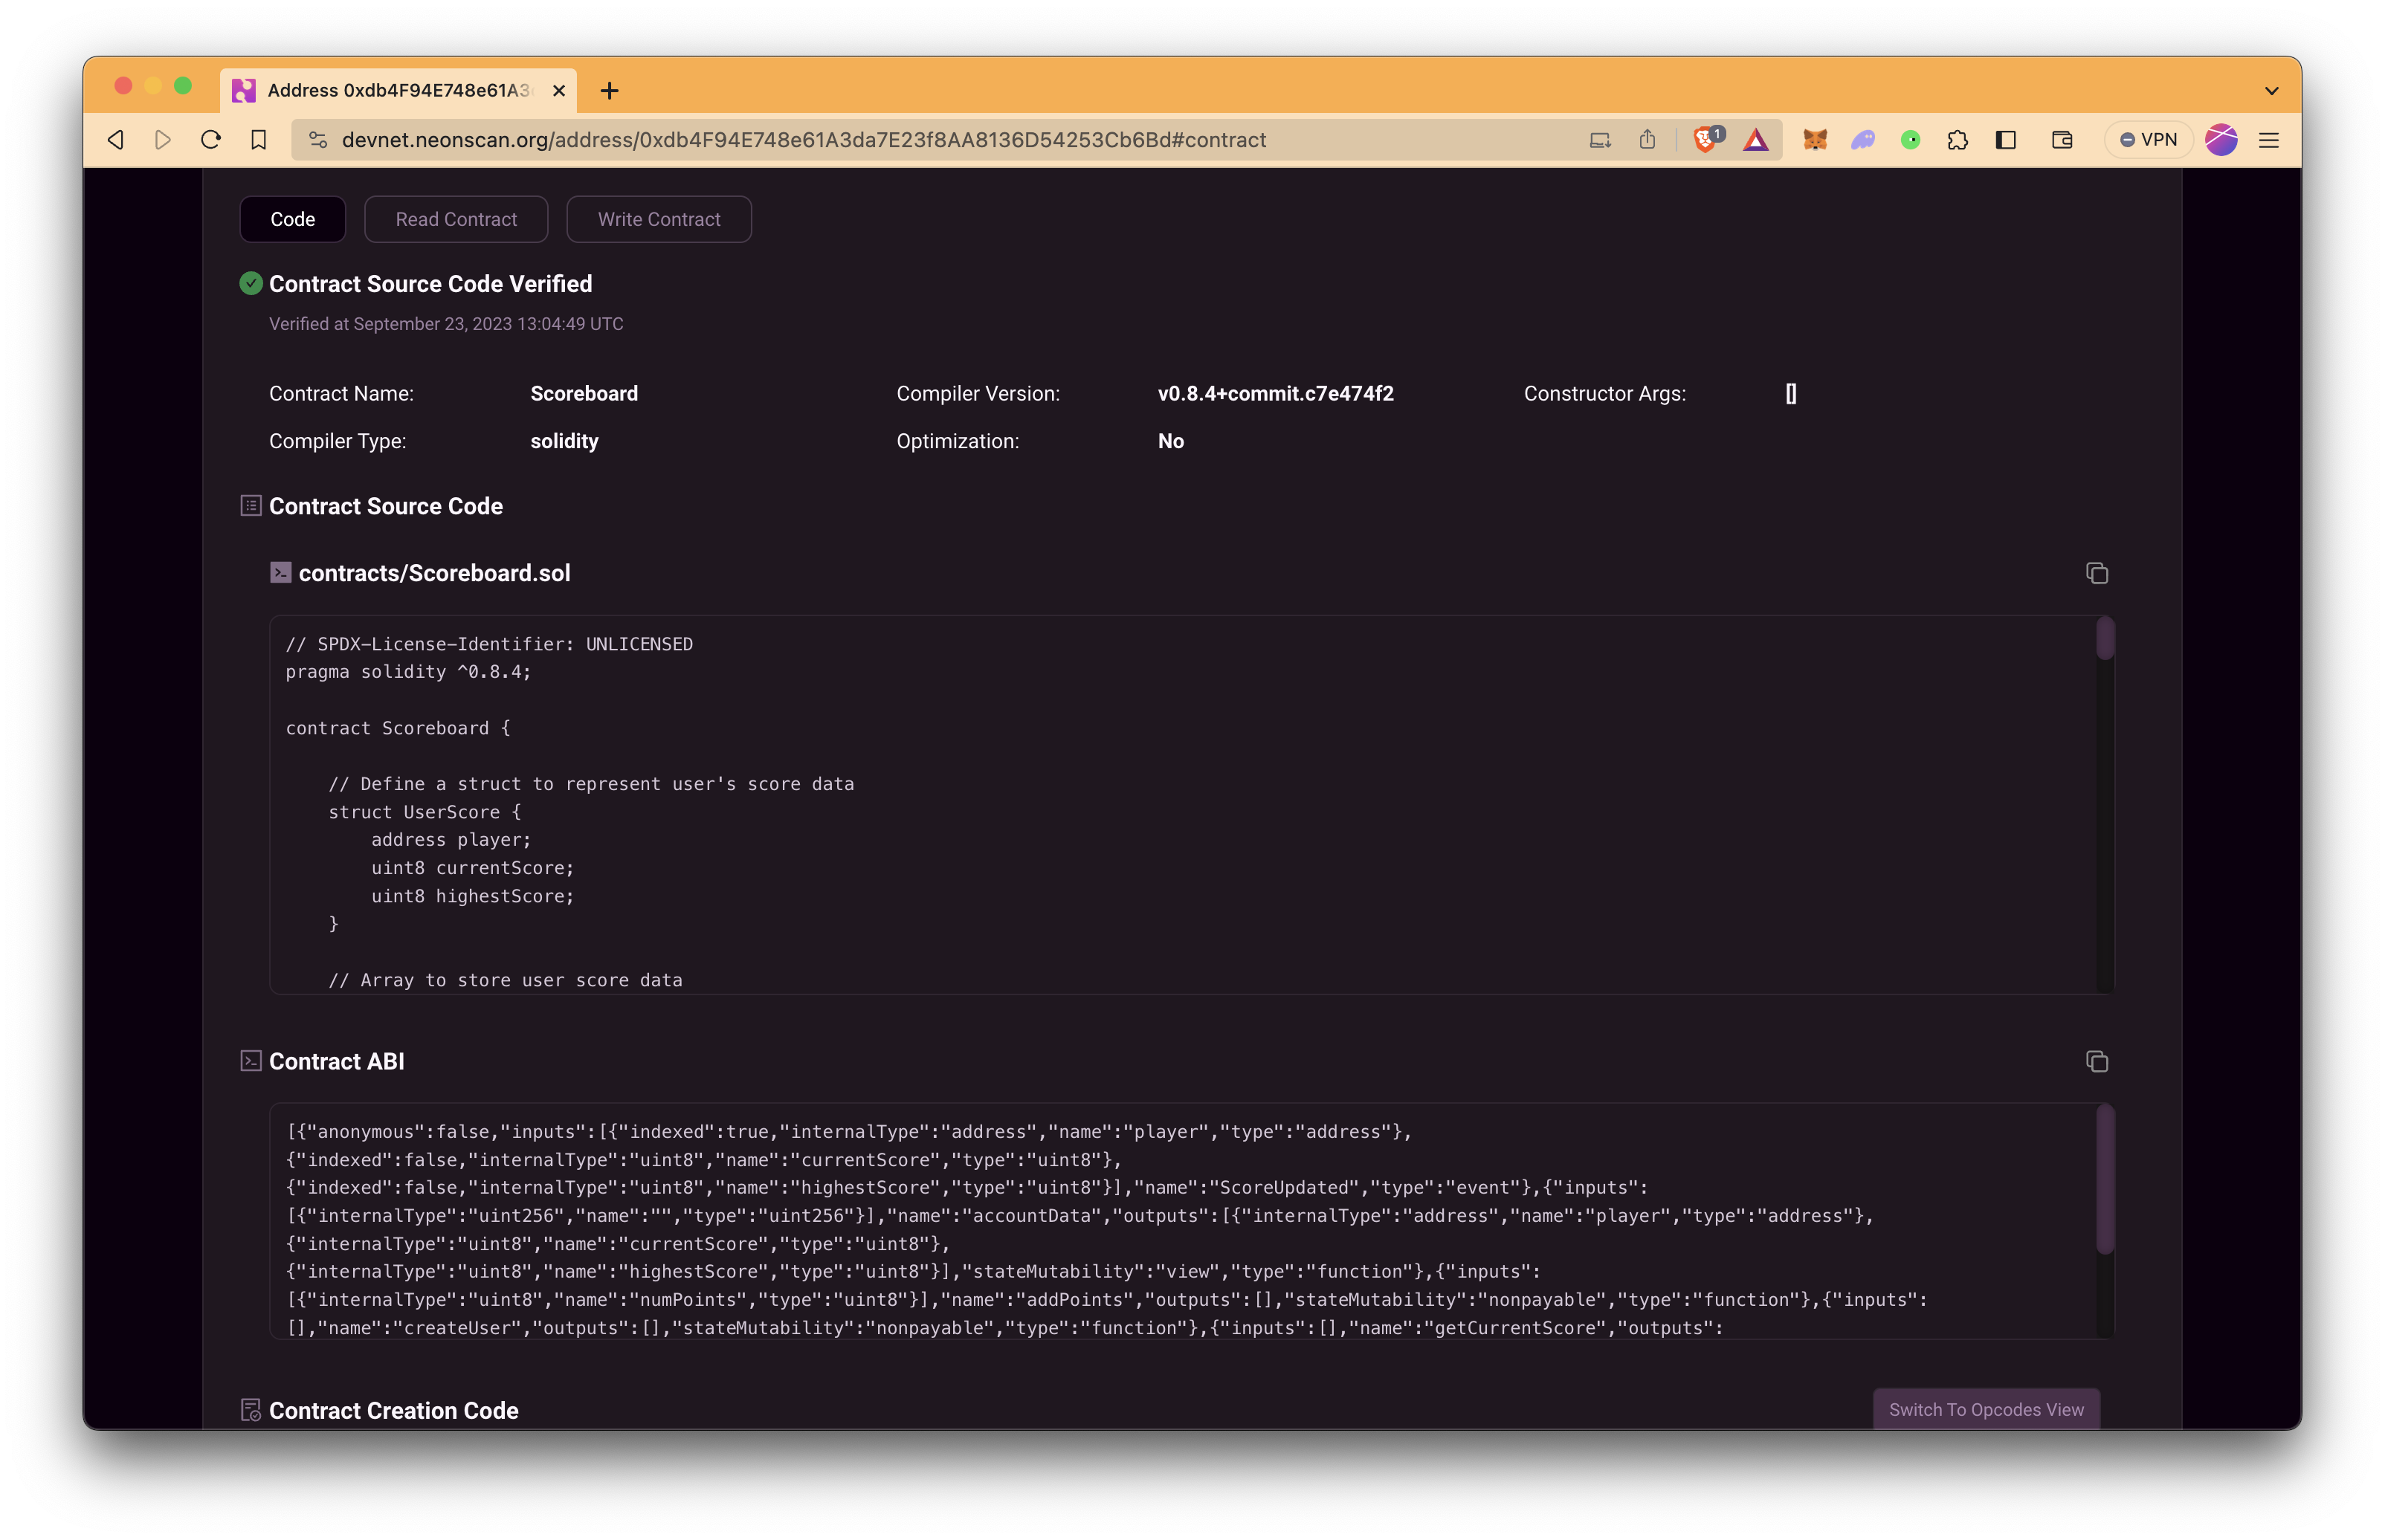
Now, your smart contract is deployed! 🎉 You can check from the Neon's explorer by searching smart contract's address.
Lastly, you may verify the deployed contract on a blockchain explorer for transparency and security. Thus, everyone can see the code of your deployed smart contract.
Verifying the Smart Contract
For verifying smart contracts, you need to modify Hardhat's configuration file. Open the hardhat.config.js again.
Add the code below just after the networks object definition.
etherscan: {
    apiKey: {
      neonevm: "test",
    },
    customChains: [
      {
        network: "neonevm",
        chainId: network_id,
        urls: {
          apiURL: "https://devnet-api.neonscan.org/hardhat/verify",
          browserURL: "https://devnet.neonscan.org",
        },
      },
    ],
  },
If you are confused, check the code below for the full coverage of the updated hardhat.config.js file.
require("@nomicfoundation/hardhat-toolbox");

const proxy_url = "https://devnet.neonevm.org";
const network_id = 245022926;

// Private key for the test account
// NOTE: Replace the private key by your own and make sure it has non-zero NEON balance
const privateKeys = [
  "PRIVATE_KEY",
];

module.exports = {
  solidity: "0.8.4",
  defaultNetwork: "hardhat",
  networks: {
    hardhat: {},
    neonlabs: {
      url: proxy_url,
      accounts: privateKeys,
      network_id: network_id,
      chainId: network_id,
      allowUnlimitedContractSize: false,
      timeout: 1000000,
      isFork: true,
    },
  },
  etherscan: {
    apiKey: {
      neonevm: "test",
    },
    customChains: [
      {
        network: "neonevm",
        chainId: network_id,
        urls: {
          apiURL: "https://devnet-api.neonscan.org/hardhat/verify",
          browserURL: "https://devnet.neonscan.org",
        },
      },
    ],
  },
};
When your configuration file is done, run the following code to verify your smart contract.
Replace
DEPLOYED_SMART_CONTRACT_ADDRESSwith the address of your deployed smart contract.
npx hardhat verify DEPLOYED_SMART_CONTRACT_ADDRESS --network neonlabs
The output should be like the one following.
Successfully submitted source code for contract
contracts/Scoreboard.sol:Scoreboard at 0x244BDb09C3B6B4c9faF2a71D5E876c73085559d2
for verification on the block explorer. Waiting for verification result...

Successfully verified contract Scoreboard on the block explorer.
https://devnet.neonscan.org/address/0x244BDb09C3B6B4c9faF2a71D5E876c73085559d2#code
After the verification process, everyone can see the code of the deployed smart contract and interact with the smart contract directly on the explorer.
Conclusion
That's it! You've now learned how to deploy a smart contract using Solidity on the Solana blockchain. With this knowledge, you can start building decentralized applications on one of the fastest and most efficient blockchain platforms available. Happy coding!
If you have any questions, feel free to use our dedicated channel on Discord or provide feedback using the form below. Stay up to date with the latest by following us on Twitter and our Telegram announcement channel.
Want to learn more about building on Solana with Solidity? Check out our Solang guide.
We ❤️ Feedback!
Let us know if you have any feedback or requests for new topics. We'd love to hear from you.