
8 min read
Overview
Aave, previously known as ETHLender, has catapulted to the forefront of the DeFi space. Aave was the first in the space to come up with the idea of a Flash Loan. Before flash loans, you would have to stake an over-collateralized asset to loan another asset. For example, if I wanted to borrow one DAI, I would have to deposit another cryptocurrency that exceeded that value. In other words, you had to have money to borrow money. Flash Loans demolished this idea. And they opened up doors for a new loaning system. They did this by allowing users to borrow without putting up anything as collateral. In this tutorial, you will learn how to deploy an Aave V3 Flash loan smart contract!
Prefer a video walkthrough? Follow along with Sahil and learn how to make a flash loan using Aave in 19 minutes.
About Aave
Taken from the Aave website.
Aave is a decentralised non-custodial liquidity market protocol where users can participate as depositors or borrowers. Depositors provide liquidity to the market to earn a passive income, while borrowers are able to borrow in an over collateralized (perpetually) or undercollateralized (one-block liquidity) fashion.
While that is entirely correct, it may not make much sense to you if you aren’t already familiar with all of the DeFi industry jargon. You could think of Aave as being a decentralized pseudo-bank. Instead of a central bank that validates all of the transactions, Aave has smart contracts that do all of this work in an automated fashion. Depositors put their tokens into Aave, and begin earning interest on their deposit. Borrowers on the other hand will do the opposite. They will take money out of Aave and will begin accruing interest on the amount borrowed. In order to do this, they must be overcollateralized.
There is another method for those that don’t want to deposit money into Aave, and just want to borrow. This is the Flash Loan we mentioned earlier.
About Flash Loans
The previously mentioned Flash Loan is a new way of borrowing assets on the blockchain. Initially implemented by Aave, other trending DeFi protocols such as dYdX quickly followed suit in adding this new feature. There is a property that all Ethereum transactions share that enable Flash Loans to be possible. And this key feature is atomicity.
A transaction is atomic whenever the series of its operations are indivisible and irreducible. Or in plain english— either all or none of the transaction occurs. No halfsies! The Flash Loan leverages atomicity to allow a user to borrow without posting collateral.There are two caveats to mention. First of all, whenever you borrow an asset in a Flash Loan you have to pay a fee of 0.09% of the amount loaned. Secondly, you must pay back the loan in the same transaction in which you borrowed. While this ability is great, it is somewhat limited in its use. Flash Loans are primarily used for arbitrage between assets.
Remix Setup
For the sake of simplicity, we will be using the Remix IDE. This is a browser-based IDE. Also known as an Integrated Development Environment.
Remix comes with the ability to write, debug, deploy, and otherwise manipulate EVM Smart Contracts. In this guide, we will deploy a smart contract on Polygon Mumbai Testnet. When you load up Remix in your browser, you will be greeted by this menu.
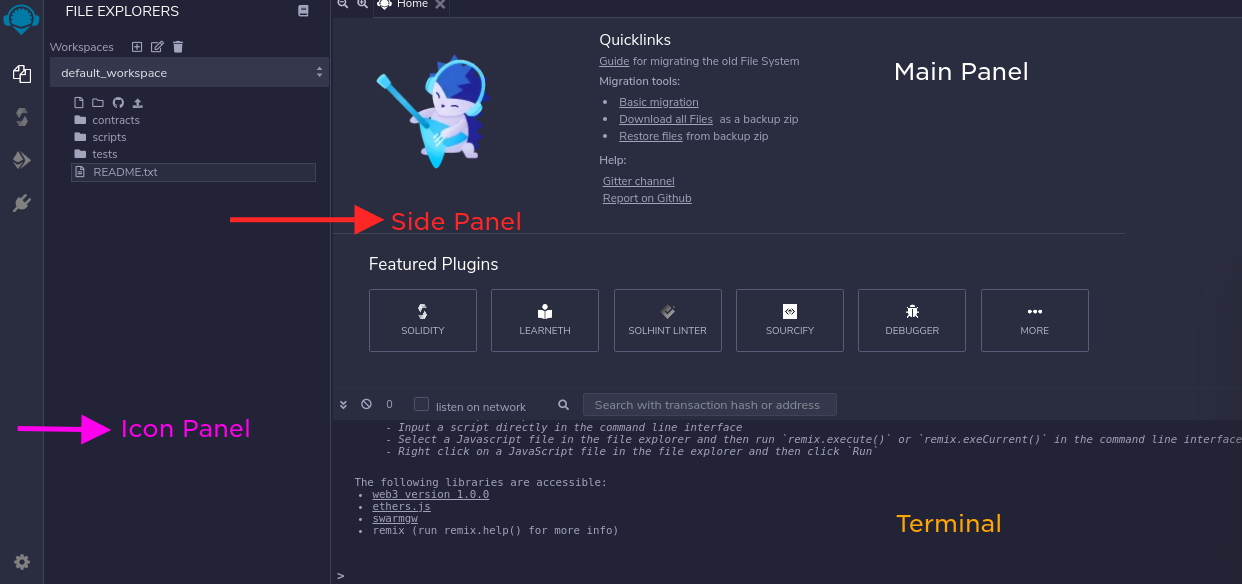
We won’t be doing a deep dive on the IDE, as the focus of this tutorial is on the Flash Loan. However, you will want to become familiar with the four sections highlighted: main panel, side panel, icon panel, and terminal.
Before we start writing our smart contracts we will want to download a browser extension that allows us to interface with the Ethereum blockchain. There are several tools out there that unlock such functionality, but the most popular one is MetaMask.
Creating A Polygon Mumbai Endpoint
We will use Quicknode as a custom RPC in our MetaMask wallet to propagate transactions faster. This doesn't guarantee faster transaction confirmation but increases the chances of getting the transaction in front of a validator. Sign up for a free Quicknode Polygon Mumbai RPC here.
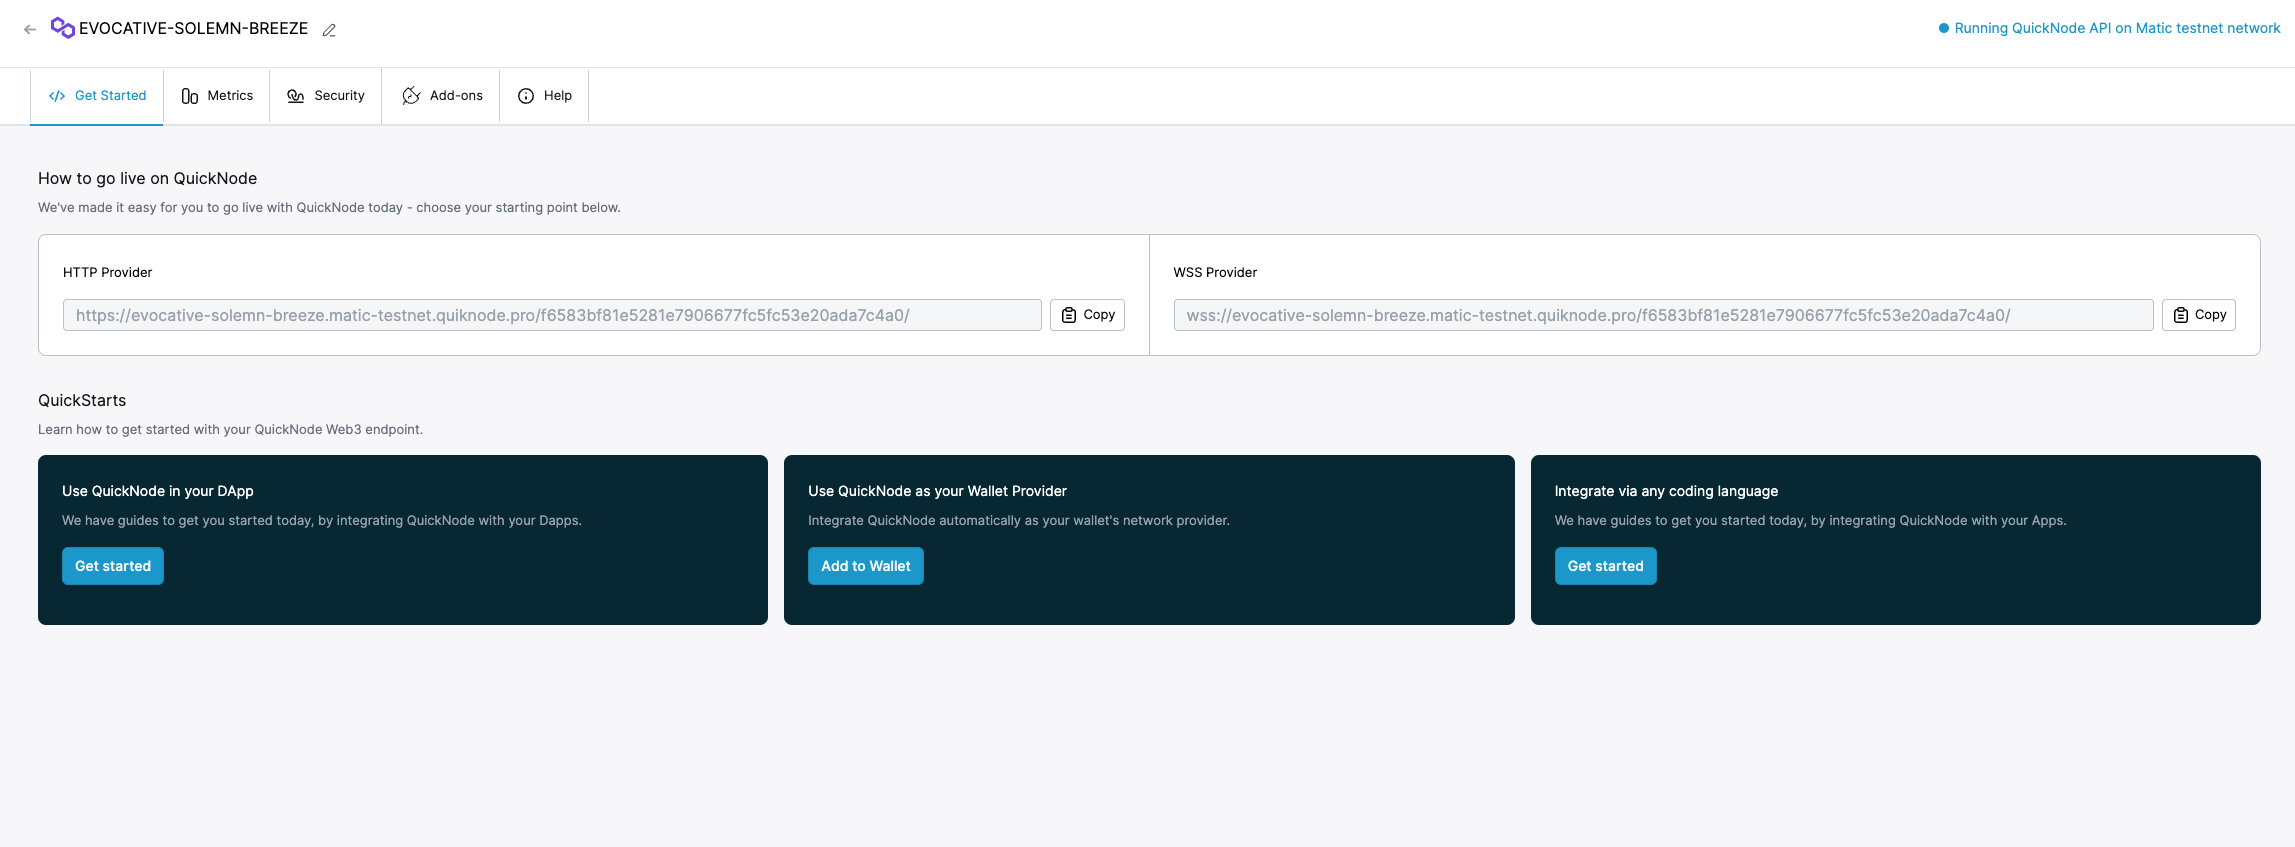
Copy the HTTPS URL. We will need it in the next step.
MetaMask Setup
A step-by-step breakdown of how to install MetaMask.
- You will start by downloading the extension off of the website above.
- Click on your newly installed extension and agree to the terms and conditions.
- Create a secure password!
- Write down the mnemonic seed phrase. This should be in the physical world, and shouldn’t be kept anywhere on your computer.
- Add the Quicknode Polygon Mumbai Testnet RPC we got in the previous step to MetaMask as a custom RPC. Learn how to add a custom RPC in MetaMask.
- Get some Polygon Mumbai Testnet MATIC; you can use Quicknode Multi-chain Faucet.
If the six steps outlined above are completed, you can start writing your first smart contract!
The Flash Loan Smart Contract
Smart contracts allow us to read and write data to the blockchain by executing deterministic programs. Polygon is EVM based chain, so we can use Solidity to write smart contracts on Polygon Mumbai Testnet. Solidity files end in the .sol extension.
We will take a Flash loan for USDC on Polygon Mumbai Testnet.
Create a new file, SimpleFlashLoan.sol, and copy-paste the following code into it.
// SPDX-License-Identifier: MIT
pragma solidity 0.8.10;

import "https://github.com/aave/aave-v3-core/blob/master/contracts/flashloan/base/FlashLoanSimpleReceiverBase.sol";
import "https://github.com/aave/aave-v3-core/blob/master/contracts/interfaces/IPoolAddressesProvider.sol";
import "https://github.com/aave/aave-v3-core/blob/master/contracts/dependencies/openzeppelin/contracts/IERC20.sol";

contract SimpleFlashLoan is FlashLoanSimpleReceiverBase {
    address payable owner;

    constructor(address _addressProvider)
        FlashLoanSimpleReceiverBase(IPoolAddressesProvider(_addressProvider))
    {
    }

    function fn_RequestFlashLoan(address _token, uint256 _amount) public {
        address receiverAddress = address(this);
        address asset = _token;
        uint256 amount = _amount;
        bytes memory params = "";
        uint16 referralCode = 0;

        POOL.flashLoanSimple(
            receiverAddress,
            asset,
            amount,
            params,
            referralCode
        );
    }

        //This function is called after your contract has received the flash loaned amount

    function  executeOperation(
        address asset,
        uint256 amount,
        uint256 premium,
        address initiator,
        bytes calldata params
    )  external override returns (bool) {

        //Logic goes here

        uint256 totalAmount = amount + premium;
        IERC20(asset).approve(address(POOL), totalAmount);

        return true;
    }

    receive() external payable {}
}
The above smart contract is for Aave V3.
Explanation of the code above:
- Line 1: Specifying SPDX license type, which is an addition after Solidity ^0.6.8. Whenever the source code of a smart contract is made available to the public, these licenses can help resolve/avoid copyright issues. If you do not wish to specify any license type, you can use a special value UNLICENSED or simply skip the whole comment (it won't result in an error, just a warning).
- Line 2: Declaring the solidity version.
- Line 4-6: Importing the necessary Aave V3 smart contract, Aave's lending pool manager contract, and ERC20 OpenZepplin contract from Aave's V3 contract repository.
- Line 8-9: Starting the SimpleFlashLoan contract by interfacing Aave's FlashLoanSimpleReceiverBase contract, creating a variable owner of type address, and making it payable.
- Line 11-12: Initializing the constructor with _addressProvider as a parameter will be the address of Aave's lending pool.
- Line 16-21: Creating a function to borrow loan along with necessary parameters like receiverAddress, which will be the address of our smart contract once deployed, asset will be the address of the token we want to borrow (USDC in this case), amount is the amount of tokens we will be borrowing, and two other parameters which we won't be using but are required for Aave's contract.
- Line 23-29: Interacting with Aave's pool to get the loan using the parameters from the previous function.
- Line 34-50: Executing the Flash loan by calculating the premium (Interest fee), which is 0.09% of the borrowed amount, approving the ERC20 token with Aave's lending pool, and returning the loan amount.
Deploying The Flash Loan Contract
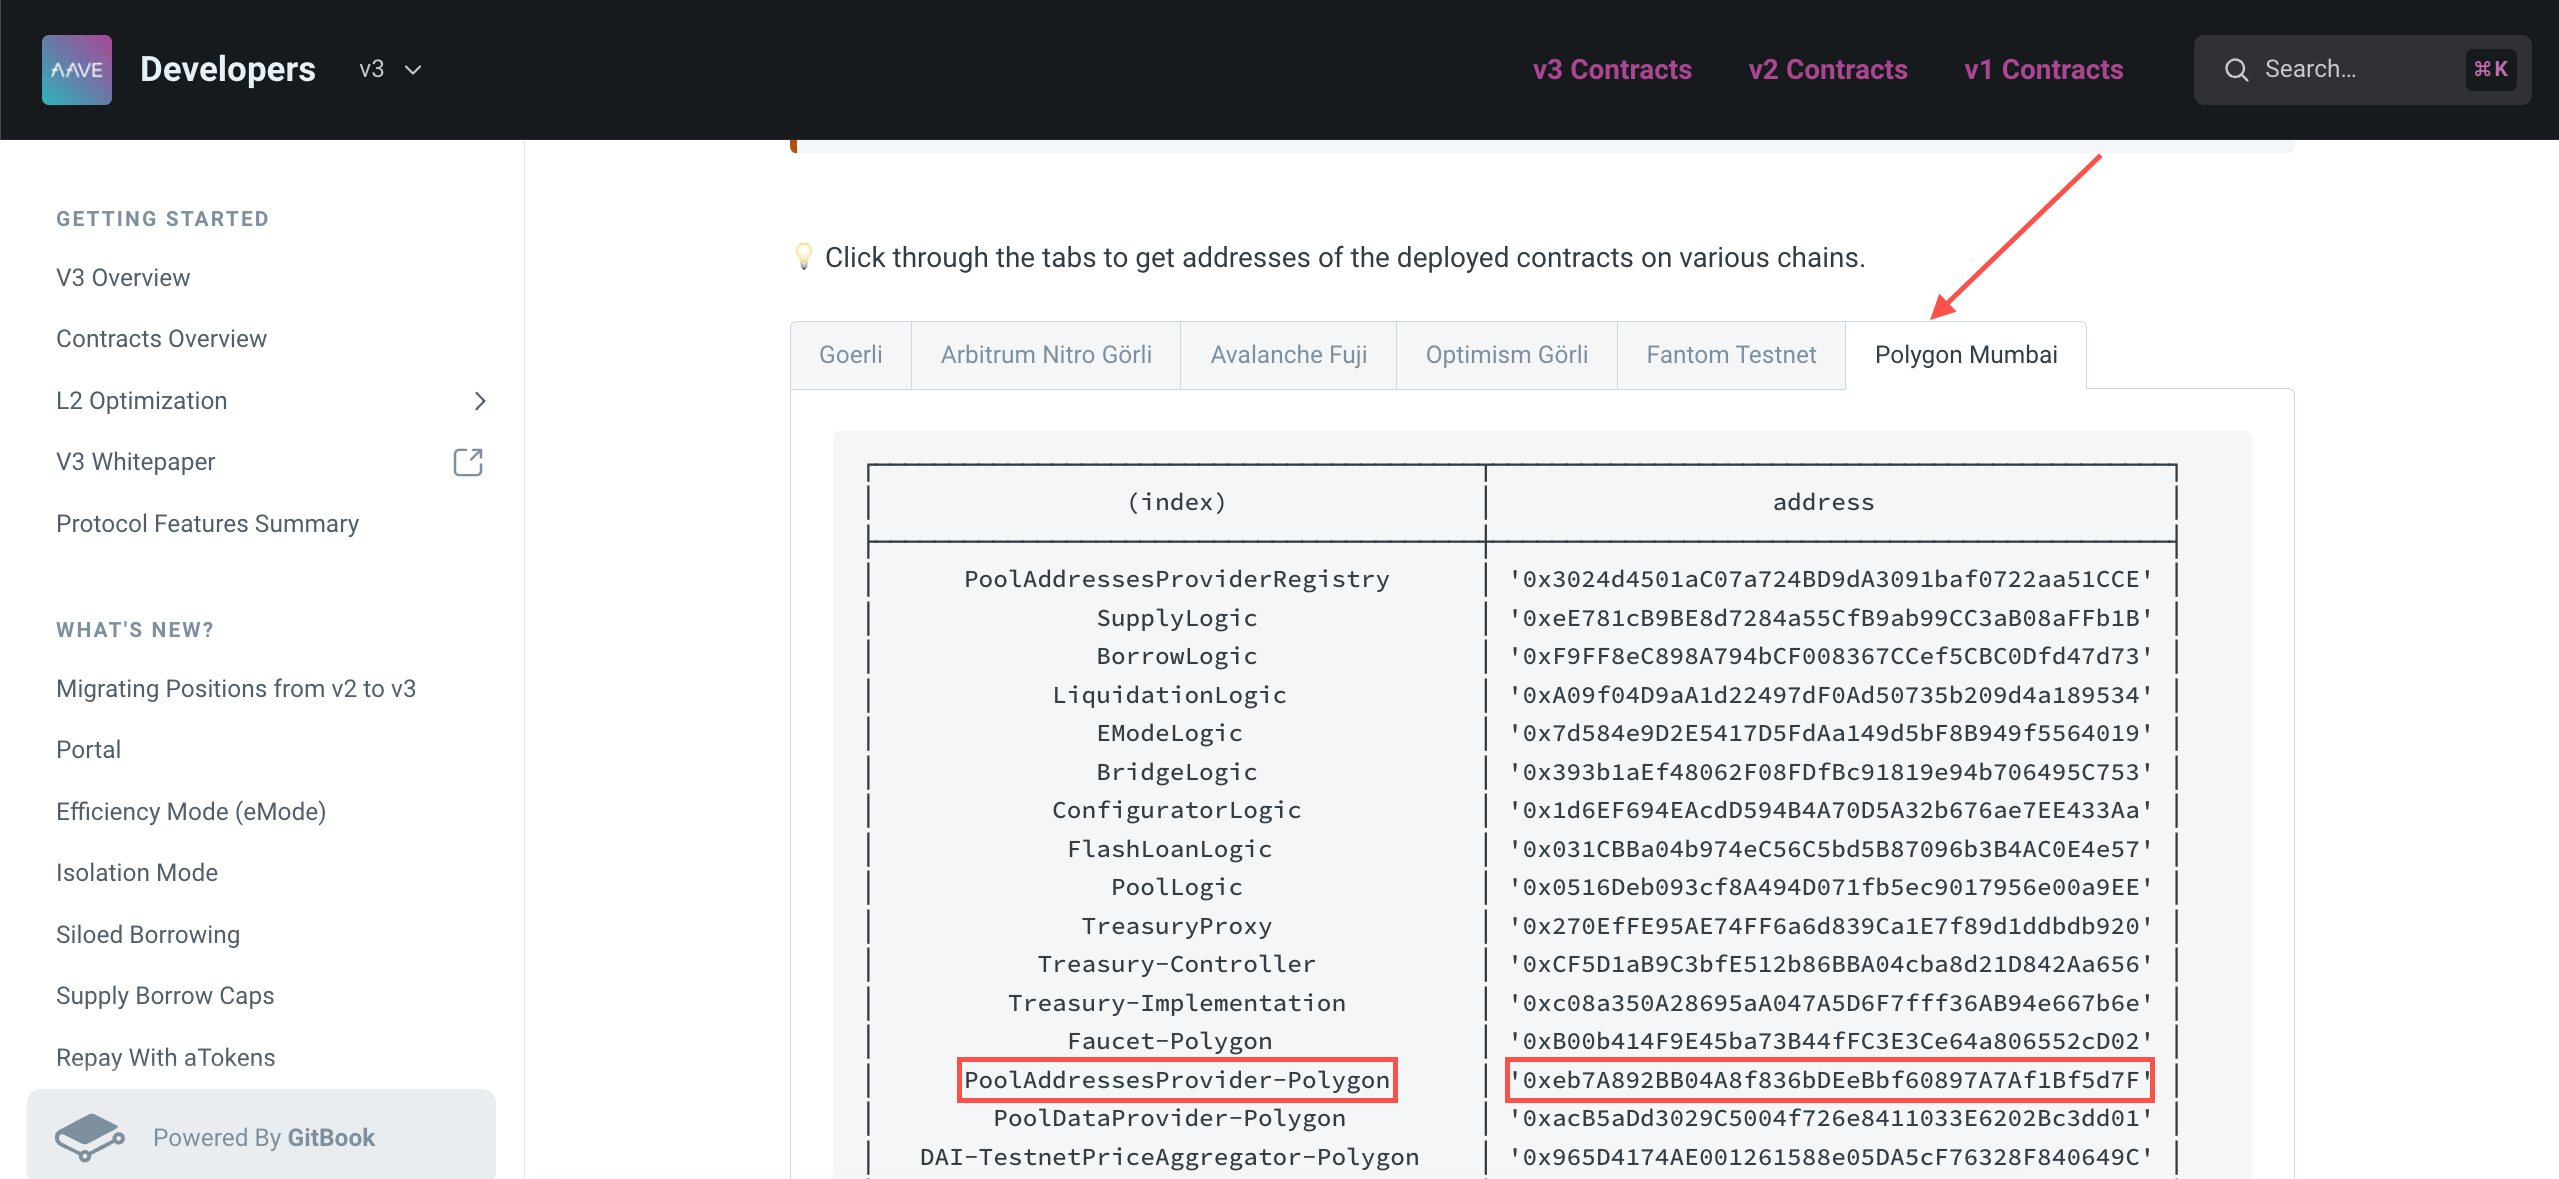
Compile the contract and ignore the warning you get after compiling the smart contract. Make sure to select 0.8.10 as the Solidity compiler version. Now that our contract is compiled, let's deploy it. We will need Aave's pool provider address to be deployed with the contract. Go to Aave V3 doc's Testnet Addresses page, select Polygon Mumbai, and copy the address of PoolAddressesProvider-Polygon.
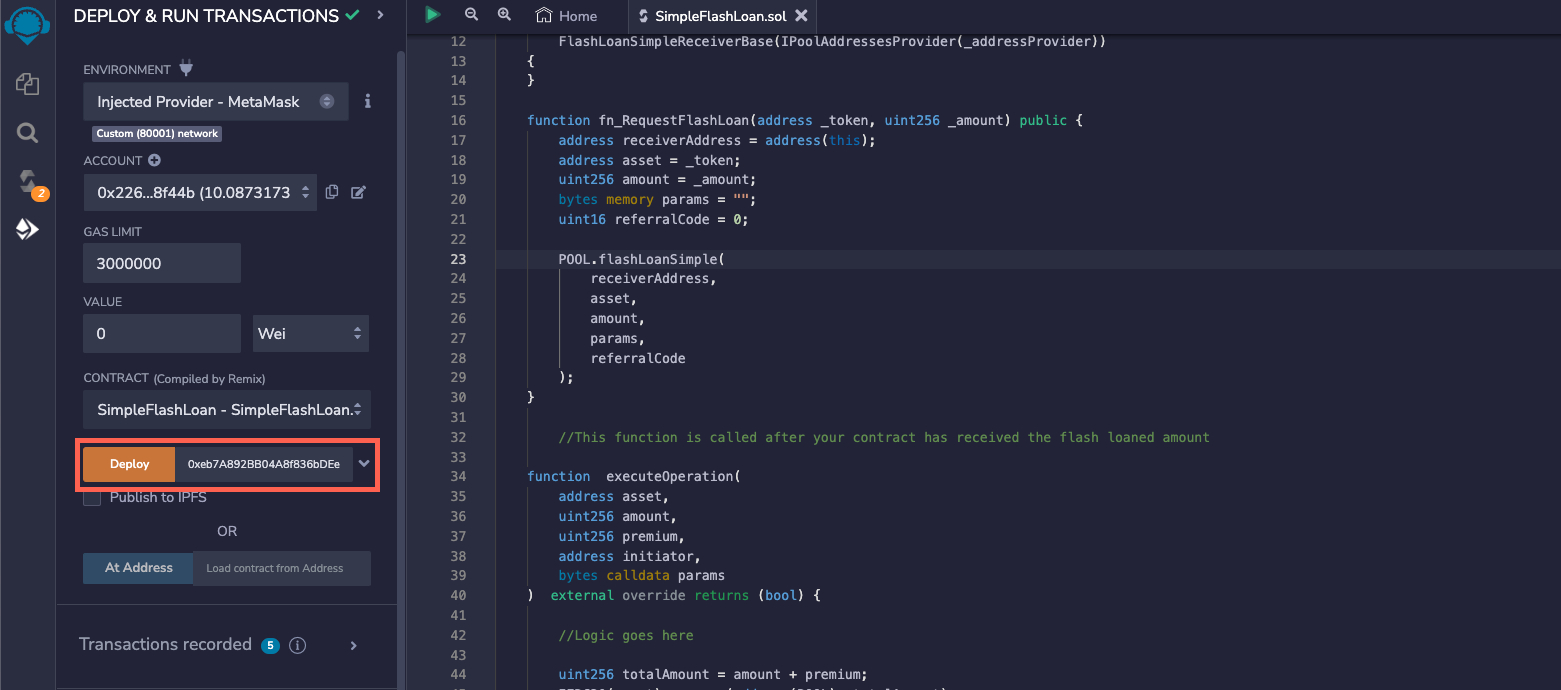
Paste the address near the Deploy button, select Injected Provider in the REMIX ENVIRONMENT, and deploy the contract. Once Deploy is clicked, approve the transaction from the MetaMask pop-up.
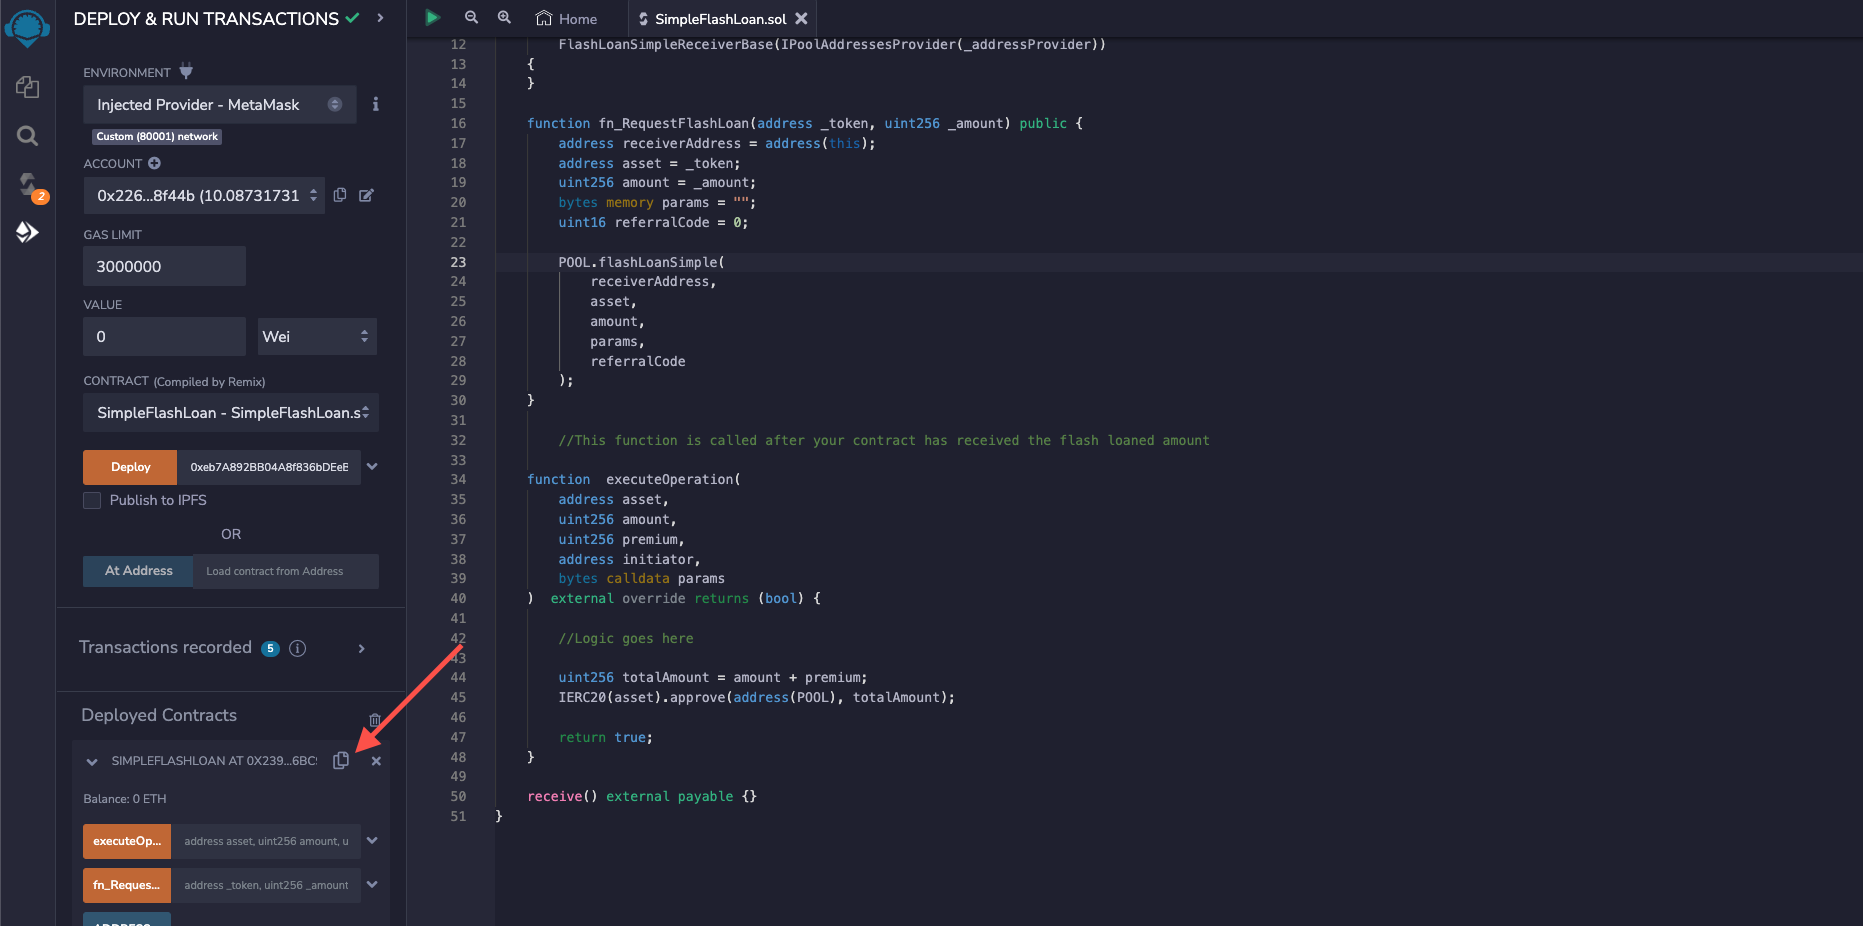
Once deployed, the contract will appear under the Deployed Contracts section, copy the contract address and save it.
Funding The Flash Loan
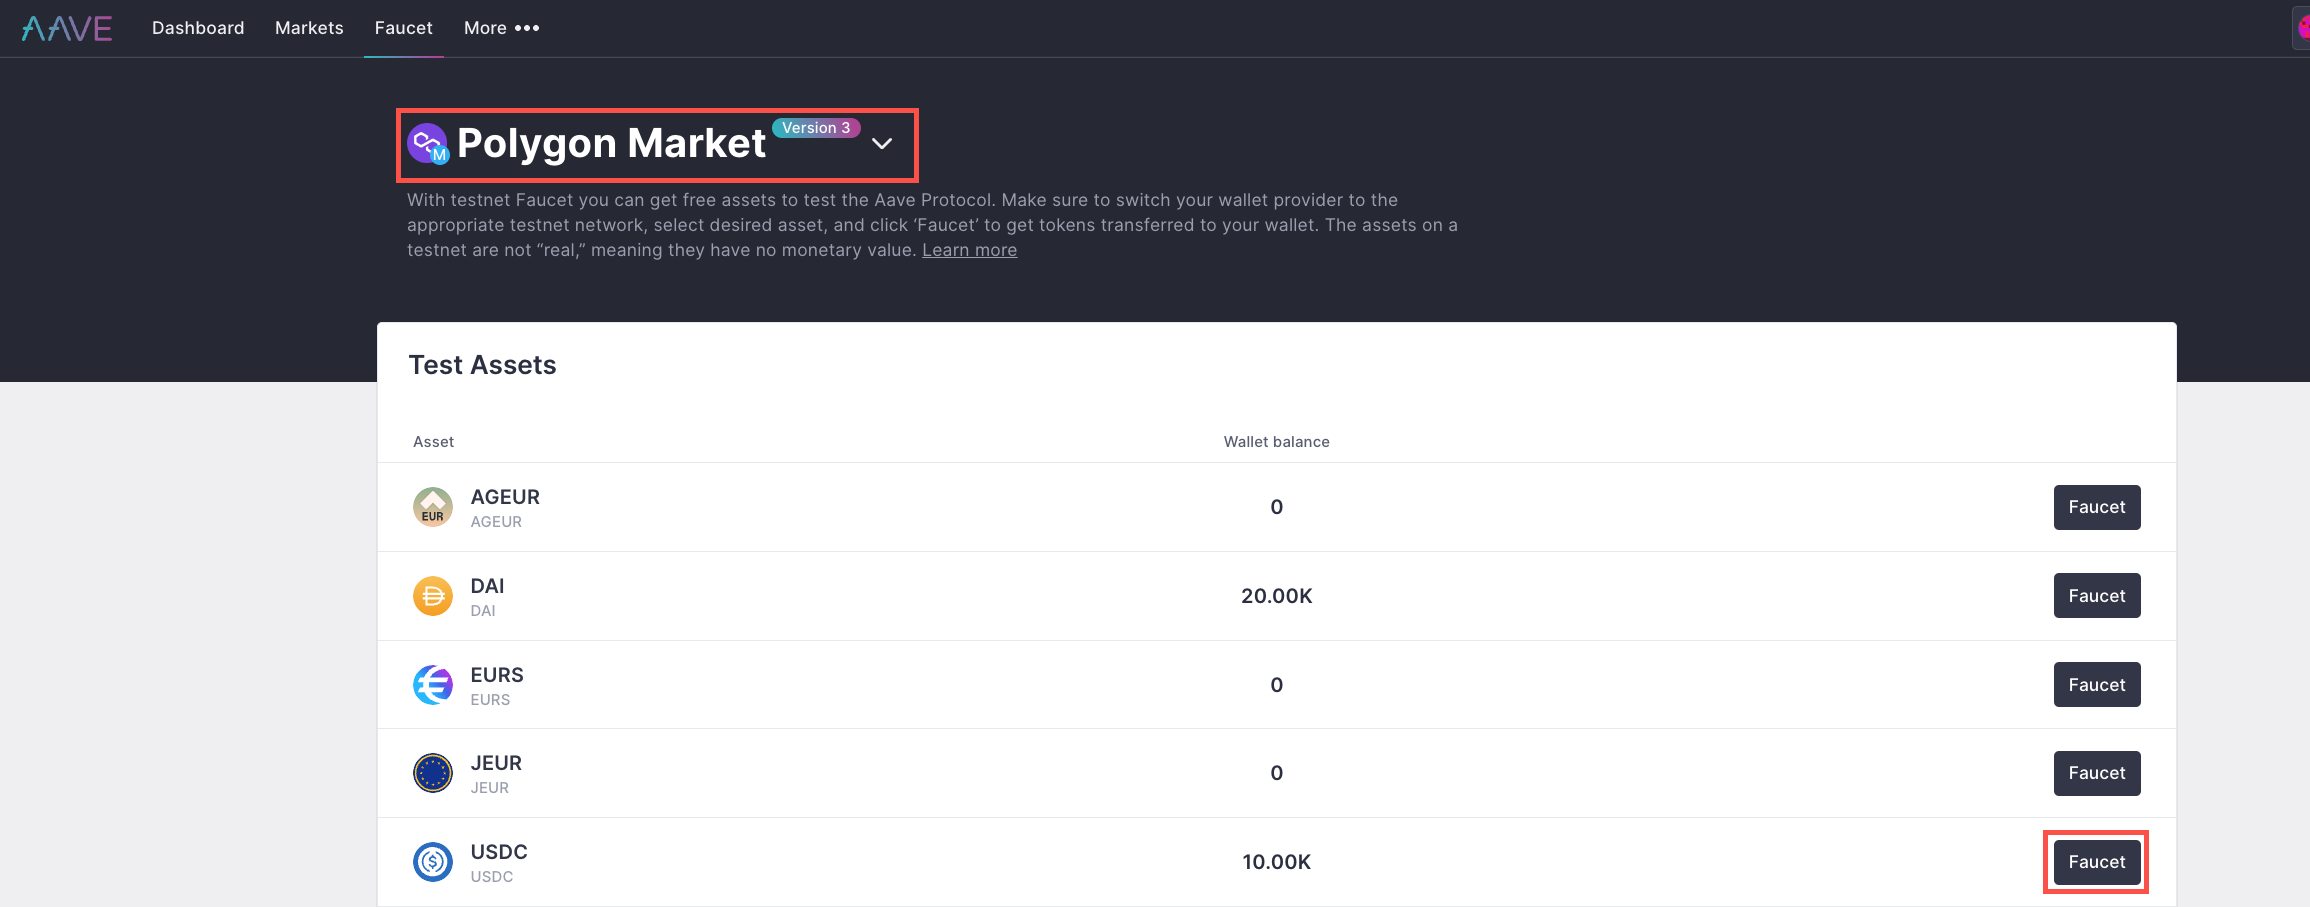
We will need some Polygon Mumbai Testnet USDC in our smart contract to pay our Flash loan's interest fee. Go to Aave's faucet, select Polygon Market, connect MetaMask, and get the USDC by clicking Faucet near USDC.
Then send some USDC (1 in this case) to the smart contract we deployed in the previous step. Copy the smart contract address and send the USDC to the smart contract.
Executing The Flash Loan
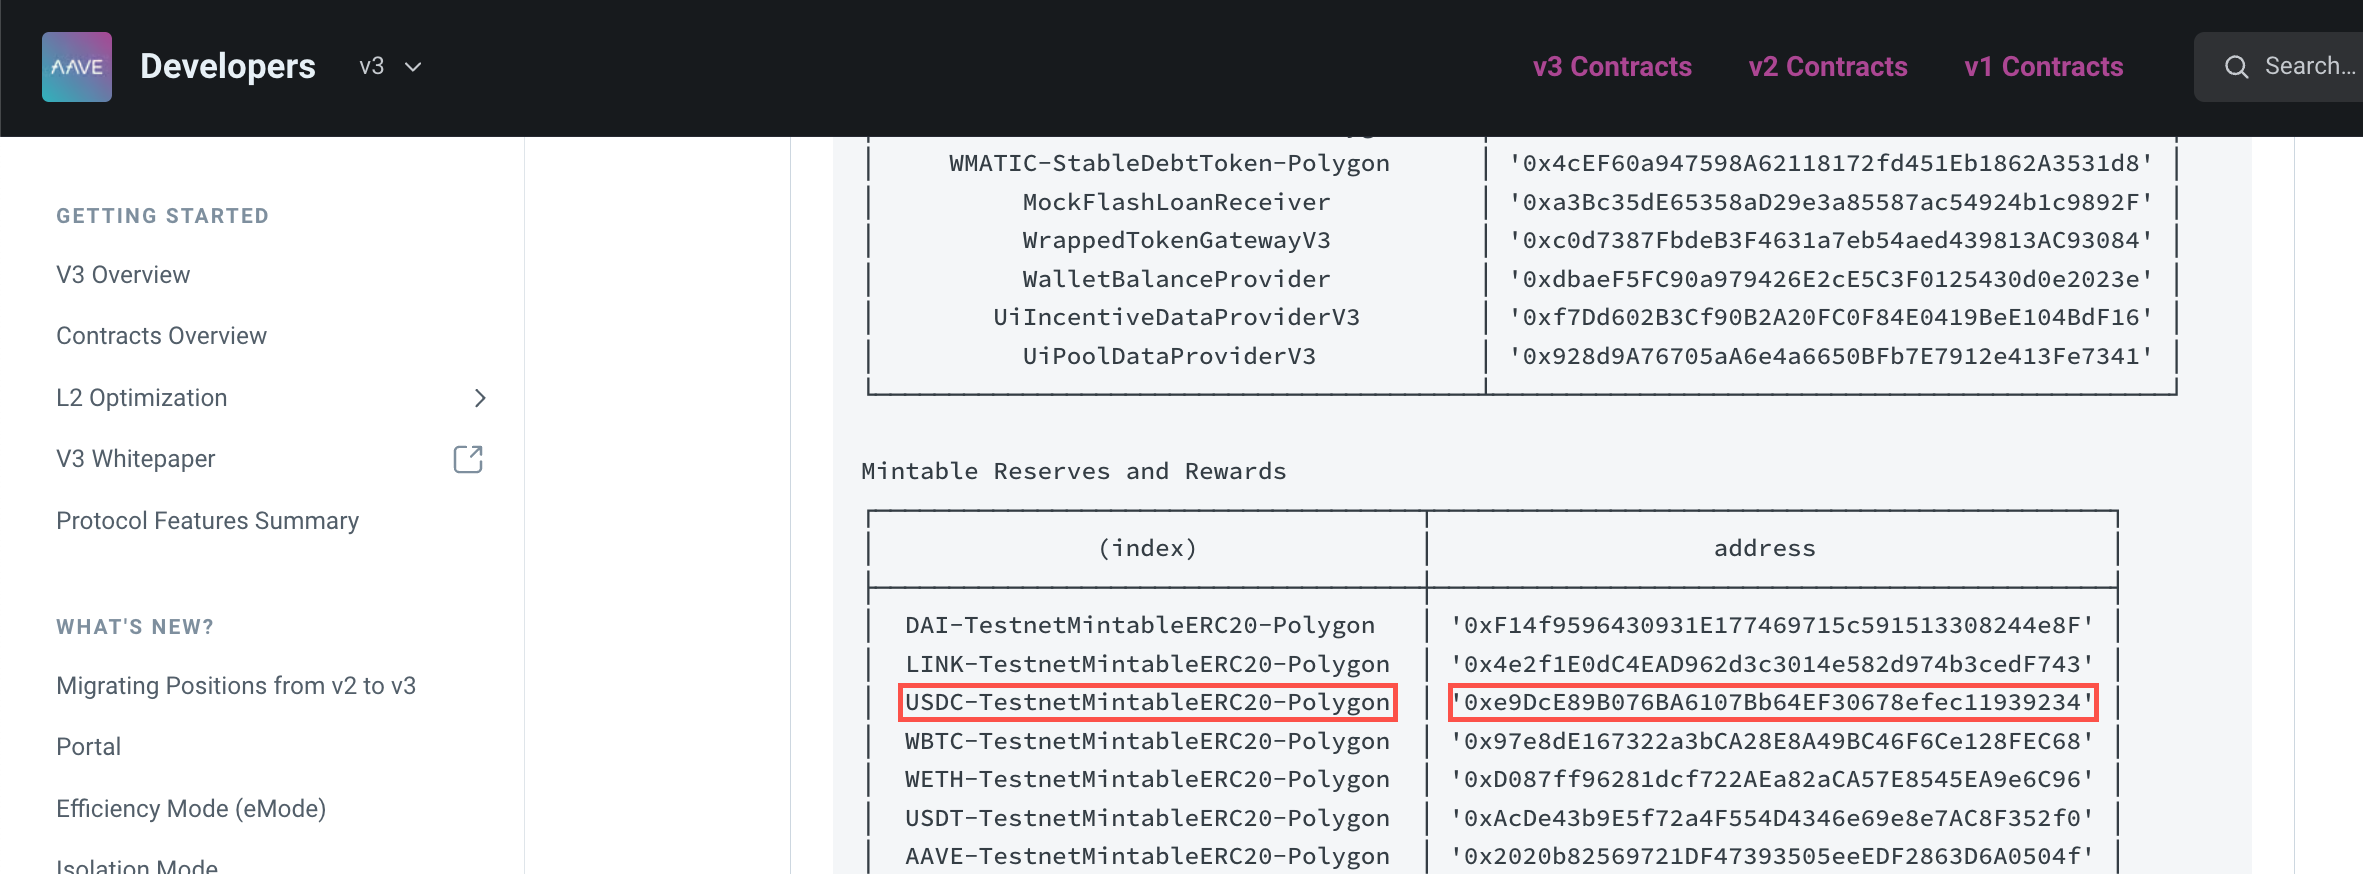
Go to Aave V3 doc's Testnet Addresses page, select Polygon Mumbai, and copy the address of USDC reserve.
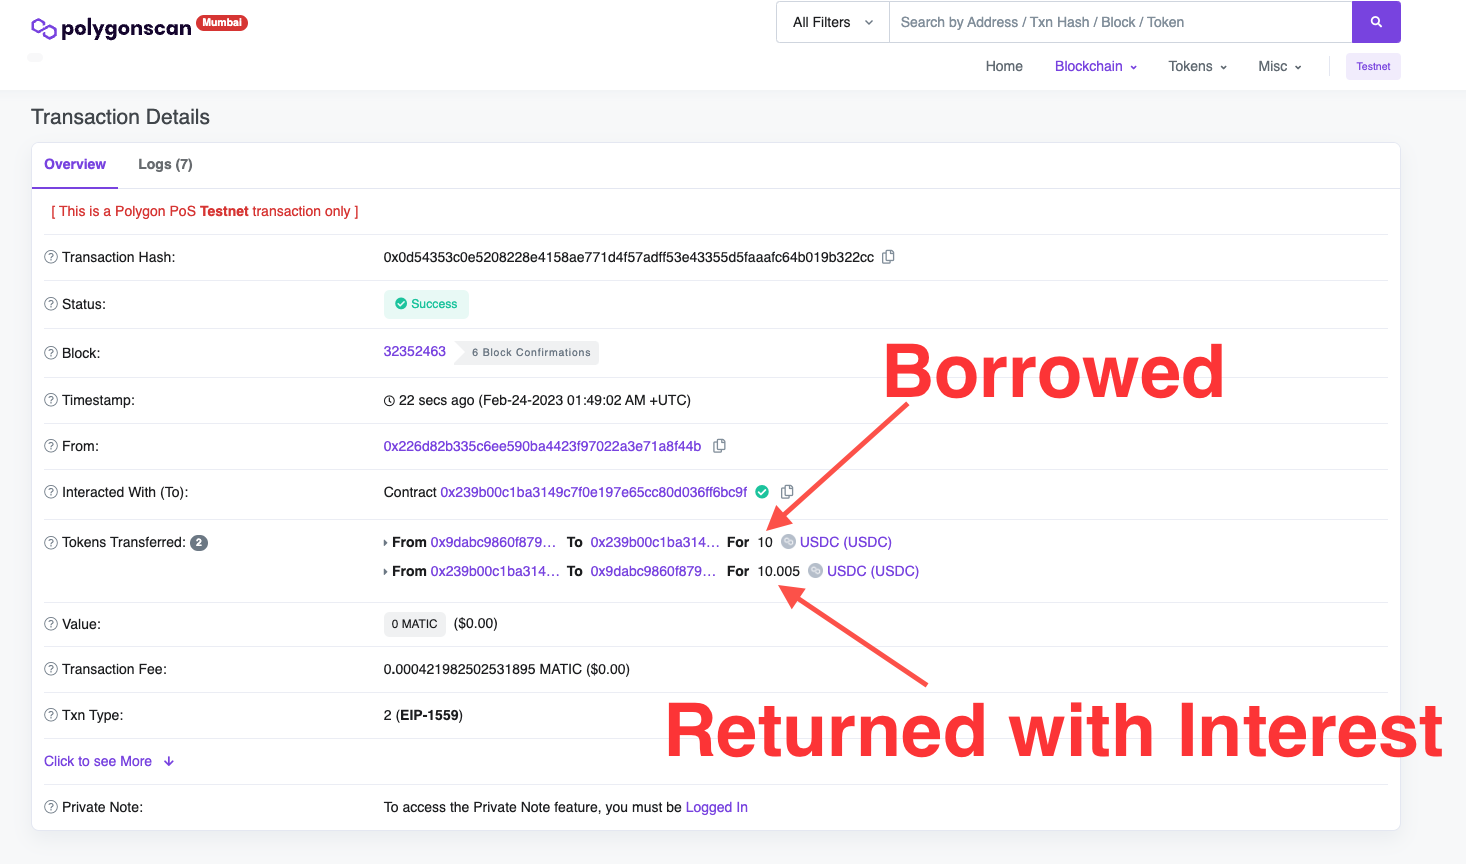
Expand the smart contract under the Deployed Contracts section and expand the fn_RequestFlashLoan function button. Paste the USDC reserve’s address in the _token field and enter the amount of USDC to be borrowed (10 in this case) in the _amount field. When entering the number of ERC20 tokens in Solidity, we also need to mention the decimals of that ERC20 token. The decimals of USDC is six, so 10 USDC will be 10000000.
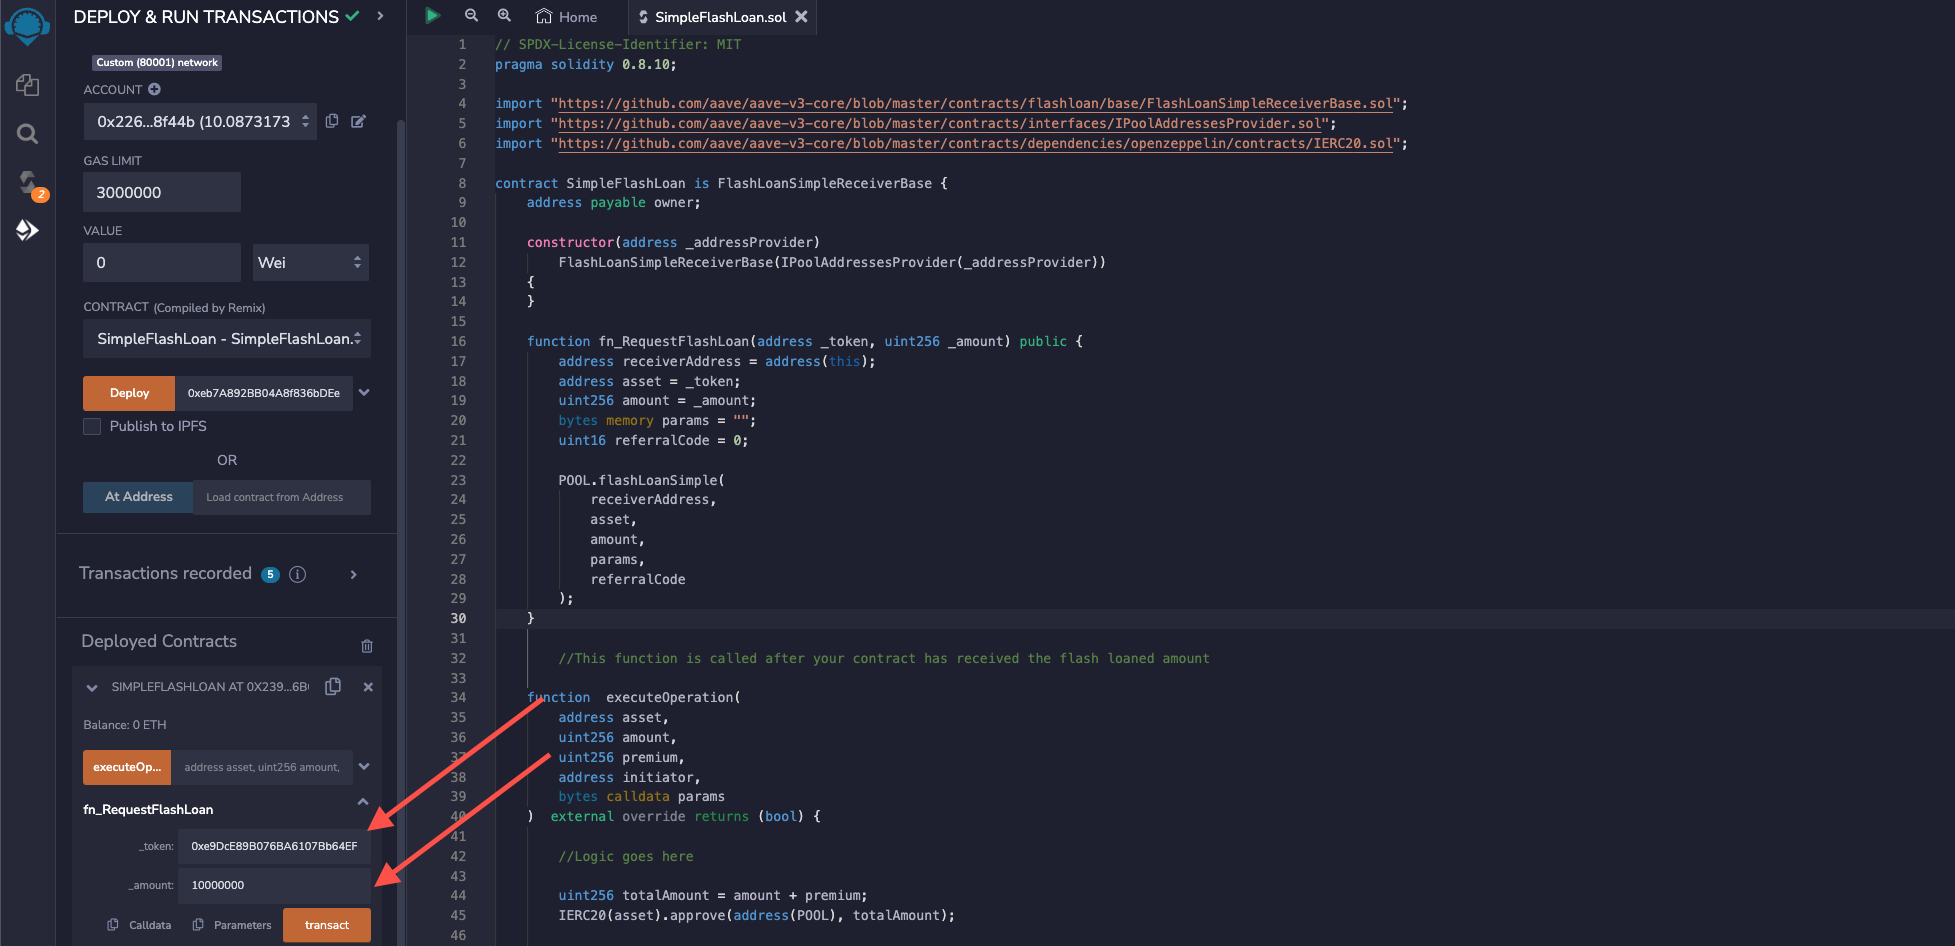
Click the transact button, then approve the transaction from MetaMask. Copy the transaction hash and search for the transaction on Mumbai Polygonscan. You can see a Flash loan transaction with information about the borrowed and returned amount + interest.
This is how you do a Flash loan on Aave V3!
Frequently Asked Questions
What is a flash loan?
A flash loan allows you to borrow assets without putting up any collateral, as long as the borrowed amount plus a fee is repaid within the same transaction.
Why don't flash loans on Aave require collateral?
Flash loans leverage the atomicity of Ethereum transactions, meaning either all operations in the transaction occur or none do. If the loan isn't repaid, the entire transaction reverts as if it never happened.
What is the fee for an Aave flash loan?
The flash loan fee is 0.09% of the amount borrowed, which must be paid when returning the loan in the same transaction.
What happens if I can't repay a flash loan?
The entire transaction reverts atomically, meaning it's as if the loan never occurred, though you will still have paid gas fees for the failed transaction.
Do I need funds in my smart contract to execute a flash loan?
You need to fund your smart contract with enough tokens to cover the 0.09% interest fee, even though you don't need collateral for the loan itself.
What are flash loans commonly used for?
Flash loans are primarily used for arbitrage between assets, allowing traders to profit from price differences without needing initial capital.
Conclusion
Congratulations on performing a flash loan; you borrowed a loan without collateral. In this guide, we learned about flash loans, created and deployed an Aave V3 flash loan contract, borrowed some tokens without collateral, and returned it with an interest fee. Join our Discord if you have any questions, or reach out to us via Twitter.
We ❤️ Feedback!
If you have any feedback or questions on this guide, let us know. We'd love to hear from you!