
19 min read
Overview
In today’s digital finance landscape, the clarity and compliance of Bitcoin transaction reporting are crucial for businesses navigating the complexities of blockchain technology. This guide demonstrates the process of creating detailed Bitcoin transaction reports, utilizing the power of Quicknode's Blockbook RPC add-on. Aimed at developers and financial analysts alike, this step-by-step tutorial will equip you with the tools to build a reporting tool capable of fetching, analyzing, and presenting Bitcoin transactions in a comprehensive, regulatory-friendly format.
What You Will Do
- Use BTC Blockbook JSON-RPC Add-On's rich feature set to query Bitcoin transactions
- Generate comprehensive Bitcoin transaction reports through coding
What You Will Need
- A Quicknode account with the Blockbook RPC add-on enabled
- Node.js (version 18.16 or higher) installed
- Typescript and ts-node - installation instructions are indicated in the guide
- Experience with either JavaScript or TypeScript
| Dependency | Version |
|---|---|
| node.js | >18.16 |
| typescript | latest |
| ts-node | latest |
Overview of the BTC Blockbook JSON-RPC Add-on
The BTC Blockbook JSON-RPC Add-On from Quicknode is a powerful tool for tracking Bitcoin transactions, providing easy access to balances, transactions, and UTXOs for addresses or xpubs through a simple JSON-RPC interface. With Blockbook, users get:
- Fast and efficient querying for transactions, addresses, and blocks.
- Detailed information about transaction histories, including inputs, outputs, and fees.
- Real-time data synchronization with the Bitcoin blockchain.
Leveraging Blockbook for blockchain data not only facilitates precise and compliant reporting but also ignites creative solutions for transaction monitoring, asset management, and beyond.
The Blockbook add-on includes 10 powerful RPC methods as of the time of this writing. We will be leveraging two of them in this guide:
bb_getAddress: Returns balances and transactions of an address.bb_getTickers: Returns currency rate for the specified currency and date. If the currency is not available for that specific timestamp, the next closest rate will be returned.
Setting Up a Bitcoin Endpoint
Before you begin, please note that the Blockbook RPC is a paid add-on. Please check the details here and compare plans based on your needs.
Setting up your Bitcoin endpoint with the Blockbook RPC is quite easy. If you haven't signed up already, you can create an account here.
Once you have logged in, navigate to the Endpoints page and click Create an endpoint. Select Bitcoin mainnet, then click Next. Then, you'll be prompted to configure the add-on. Activate Blockbook RPC. Afterward, simply click Create Endpoint.
If you already have a Bitcoin endpoint without the add-on, go to the Add-ons page within your Bitcoin endpoint, select the Blockbook RPC, and activate it.
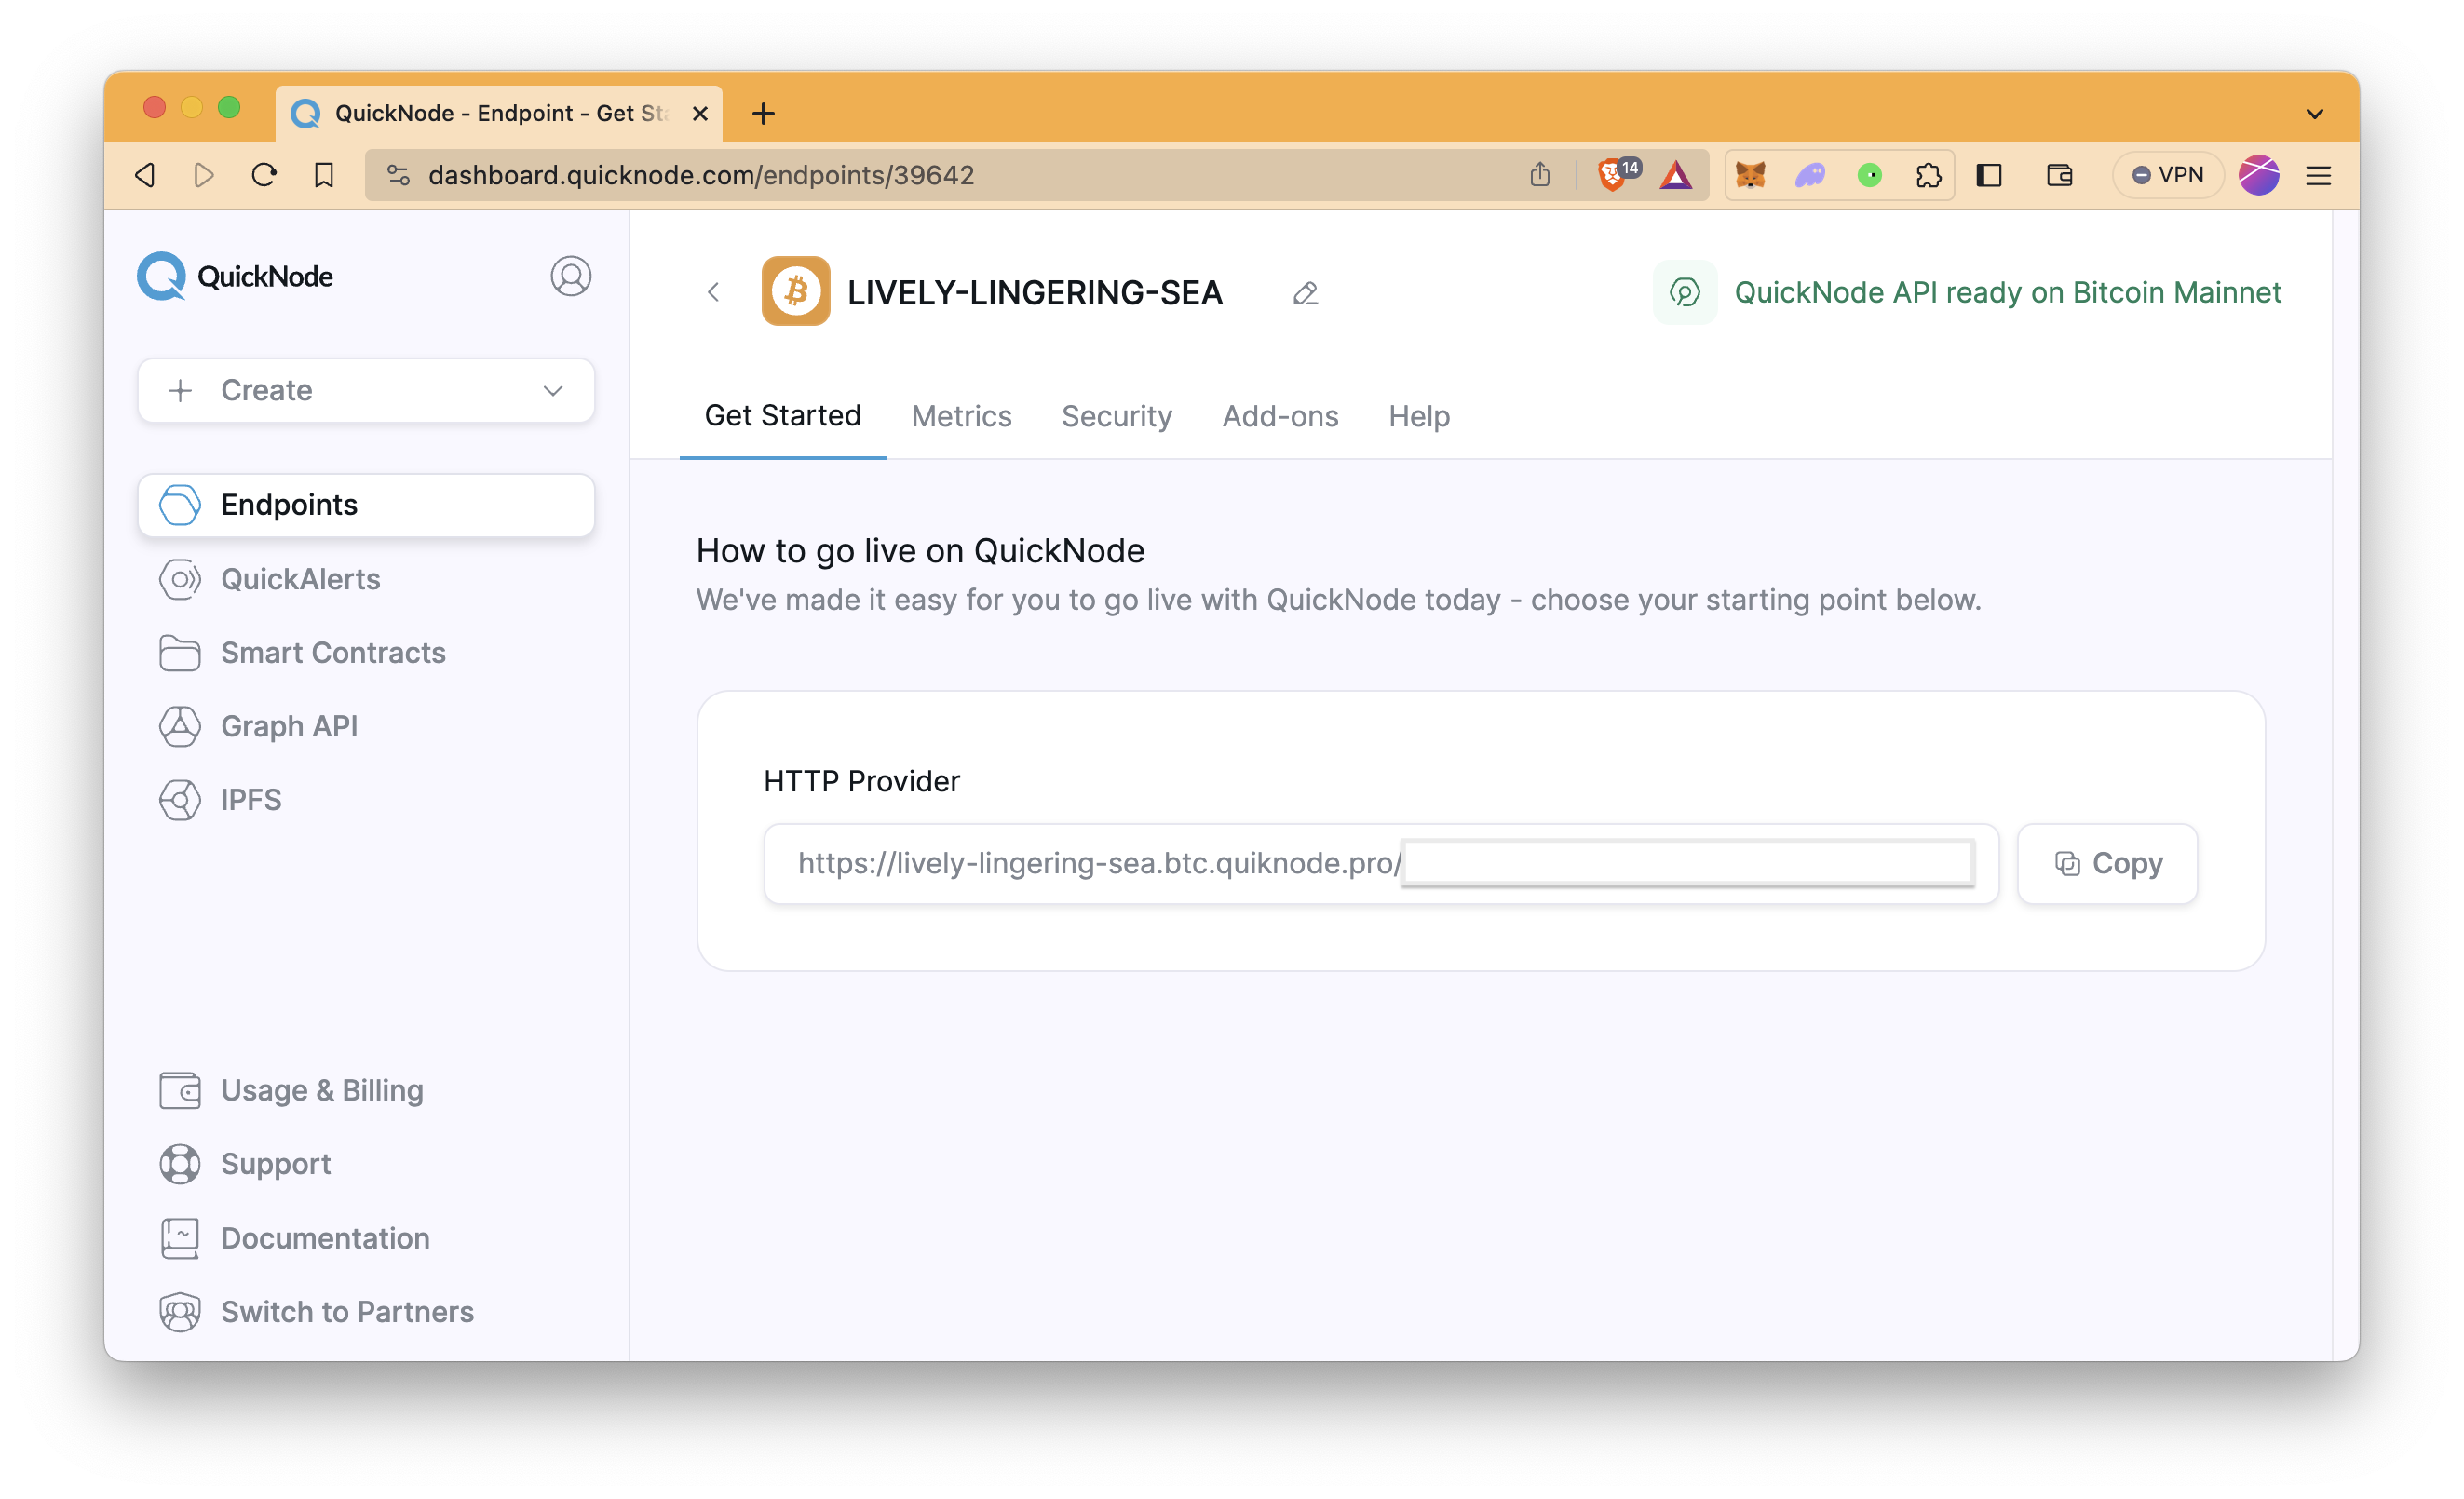
Once your endpoint is ready, copy the HTTP Provider link and keep it handy, as you'll need it in the next section.
Building a Bitcoin Transaction Report Generator with Blockbook
First and foremost, ensure Node.js is installed on your computer. Node.js will serve as the foundation for running your application, while npm, which is the default package manager and comes with Node.js installation, will efficiently manage all dependencies. See their official page for installation instructions.
Also, if you haven't installed TypeScript before, install TypeScript and ts-node globally to have TypeScript available across all projects by running the commands below.
npm install -g typescript
npm install -g ts-node
Setting Up the Project
Step 1: Initialize a new Node.js project
Create a project folder and initialize a new Node.js project in the folder:
mkdir bitcoin-transaction-reports
cd bitcoin-transaction-reports
npm init -y
tsc -init --resolveJsonModule true
Step 2: Install Necessary Packages
Install necessary packages:
npm install axios date-fns dotenv fs-extra
npm i --save-dev @types/fs-extra
- axios: A promise-based HTTP client for making requests to external services, ideal for fetching data from APIs.
- date-fns: A lightweight library providing comprehensive tools for manipulating and formatting dates.
- dotenv: A zero-dependency module that loads environment variables from a .env file into process.env, ensuring sensitive information is kept secure.
- fs-extra: A module for interacting with the file system, such as writing files and reading files.
Building the Project
Before we dive into coding our Bitcoin transaction reports tool, let's take a moment to understand its operational flow. This prelude will ensure we're not just coding blindly but moving forward with a clear understanding of how each piece fits together to achieve our goal. Here is the summary of the flow:
-
Import Dependencies: Each script file begins by importing the necessary libraries and modules. For example, app.ts might import fs-extra for file operations, along with specific functions from blockbookMethods.ts and generateReport.ts for data retrieval and report generation.
-
Fetch Transaction Data: Within app.ts, the bb_getaddress function from blockbookMethods.ts is invoked, passing in a Bitcoin address to collect its transaction history from Blockbook.
-
Process Data: After fetching the data, calculateVariables function from calculateVariables.ts processes the data.
-
Generate Report: After processing the data, app.ts calls generateReportForAddress from generateReport.ts, which then formats this data into a comprehensive report.
-
Save Report to CSV: Finally, app.ts uses fs.writeFileSync from the fs-extra module to save the formatted report to a CSV file.
Now, let's start coding.
Step 1: Creating Necessary Files
Create necessary files in your project's directory (i.e., bitcoin-transaction-reports):
echo > .env
echo > app.ts
echo > blockbookMethods.ts
echo > calculateVariables.ts
echo > generateReport.ts
echo > interfaces.ts
-
.env: Stores environment variables such as your Quicknode endpoint URL, ensuring sensitive information is securely managed and easily configurable.
-
app.ts: Acts as the entry point of your application, orchestrating the flow by calling functions to fetch data, generate reports, and manage outputs based on user-defined parameters.
-
blockbookMethods.ts: Contains functions that interface with the Blockbook API, including fetching transaction data for a given Bitcoin address.
-
calculateVariables.ts: Handles the logic for processing blockchain data fetched by blockbookMethods.ts.
-
generateReport.ts: Formats the processed blockchain data into a structured report, typically in CSV format, for easy analysis and sharing.
-
interfaces.ts: Defines TypeScript interfaces to ensure type safety and clarity across the application, particularly for the data structures returned by Blockbook API calls and used throughout the report generation process.
Step 2: Configuring Environment Variables
Store Quicknode endpoint and other sensitive information, if you have them, in a .env file.
Open the .env file and modify it as follows. Do not forget to replace the YOUR_BITCOIN_QUICKNODE_ENDPOINT placeholder with your Quicknode Bitcoin HTTP provider URL.
QUICKNODE_ENDPOINT = "YOUR_BITCOIN_QUICKNODE_ENDPOINT"
Step 3: Fetching Data with Blockbook
The blockbookMethods.ts file includes two essential functions, bb_getaddress and bb_gettickers, designed to interact with a Quicknode endpoint using the Blockbook API. These functions facilitate fetching detailed transaction data for a specific Bitcoin address and obtaining currency conversion rates at a given timestamp, respectively.
Open the blockbookMethods.ts file with your code editor and modify the file as follows.
// Import necessary types and libraries
import { Result, PriceData } from "./interfaces";
import axios from "axios";
import dotenv from "dotenv";
dotenv.config(); // Initialize dotenv to use environment variables

// Retrieve the Quicknode endpoint URL from environment variables
const QUICKNODE_ENDPOINT = process.env.QUICKNODE_ENDPOINT as string;

// Fetches detailed transaction data for a specified Bitcoin address
export async function bb_getaddress(address: string): Promise<Result> {
  try {
    // Prepare the request payload for the bb_getaddress method
    const postData = {
      method: "bb_getaddress",
      params: [
        address,
        { page: "1", size: "1000", fromHeight: "0", details: "txs" }, // Query parameters
      ],
      id: 1,
      jsonrpc: "2.0",
    };

    // Make the POST request to the Quicknode endpoint
    const response = await axios.post(QUICKNODE_ENDPOINT, postData, {
      headers: { "Content-Type": "application/json" },
      maxBodyLength: Infinity,
    });

    // Check for a successful response and return the data
    if (response.status === 200 && response.data) {
      return response.data.result;
    } else {
      throw new Error("Failed to fetch transactions");
    }
  } catch (error) {
    console.error(error);
    throw error;
  }
}

// Fetches currency conversion rates for a given timestamp
export async function bb_gettickers(timestamp: number): Promise<PriceData> {
  try {
    // Prepare the request payload for the bb_gettickers method
    const postData = {
      method: "bb_gettickers",
      params: [{ timestamp: timestamp }], // Query parameter
      id: 1,
      jsonrpc: "2.0",
    };

    // Make the POST request to the Quicknode endpoint
    const response = await axios.post(QUICKNODE_ENDPOINT, postData, {
      headers: { "Content-Type": "application/json" },
      maxBodyLength: Infinity,
    });

    // Check for a successful response and extract the needed data
    if (response.status === 200 && response.data) {
      return {
        ts: response.data.result.ts, // Timestamp
        rates: { usd: response.data.result.rates.usd }, // Conversion rate
      };
    } else {
      throw new Error("Failed to fetch tickers");
    }
  } catch (error) {
    console.error(error);
    throw error;
  }
}
Step 4: Processing Blockchain Data
The calculateVariables.ts file fine-tunes transaction data for a specific Bitcoin address by calculating the BTC balance pre-transaction and post-transaction, identifying each transaction's day and direction, and computing the USD equivalent of BTC transfer. It smartly filters transactions to include only those relevant to the specified address, disregarding multi-address transactions not directly involving our address.
Open the calculateVariables.ts file with your code editor and modify the file as follows. The code snippet includes comments for better understanding.
// Import necessary types and libraries
import { format, startOfDay, endOfDay, isWithinInterval } from "date-fns";
import { Result, ExtendedTransaction, ExtendedResult } from "./interfaces";
import { bb_gettickers } from "./blockbookMethods";

export async function calculateVariables(
  result: Result,
  startDate: Date = new Date(), // Default to current date if not provided
  endDate: Date = new Date() // Default to current date if not provided
): Promise<ExtendedResult> {
  let extendedTransactions = [];

  // Convert start and end dates to the beginning and end of their respective days
  const startOfPeriod = startOfDay(startDate);
  const endOfPeriod = endOfDay(endDate);

  // Conversion rate from Satoshi to BTC
  const btcToSatoshi = 100000000;

  // Convert the string currentBalance to a number for calculations, then back to string for storage.
  let currentBalance = parseFloat(result.balance) / btcToSatoshi;

  let direction;
  let balanceBeforeTx = 0,
    balanceAfterTx = 0,
    cumulativeDiff = 0;

  // Iterate through each transaction associated with the address
  for (const transaction of result.transactions) {
    const blockTime = new Date(transaction.blockTime * 1000); // Convert timestamp to Date object

    // Check if the transaction date is within the specified date range
    const withinInterval = isWithinInterval(blockTime, {
      start: startOfPeriod,
      end: endOfPeriod,
    })
      ? true
      : false;

    // Format the date and timestamp for the report
    const day = format(blockTime, "yyyy-MM-dd");
    const timestamp = blockTime.toISOString();

    // Determine if the address is the sender in any of the transaction inputs
    const vinIsSender = transaction.vin.some((vin) =>
      vin.addresses.includes(result.address)
    );

    // Determine if the transaction is confirmed
    const type = transaction.confirmations === 0 ? "Unconfirmed" : "Confirmed";

    // Assign transaction direction based on the address's role
    direction = vinIsSender ? "Outgoing" : "Incoming";

    let fromAddresses = "";
    let toAddresses = "";
    let btcAmount = 0,
      usdAmount = 0,
      btcFees = 0,
      usdFees = 0;

    // Logic for when the address is the sender
    if (vinIsSender) {
      // Filter the transaction inputs (vin) to find those that include the data address
      // indicating transactions where our address sent Bitcoin
      const vinSelfRecipient = transaction.vin.filter((vin) =>
        vin.addresses.includes(result.address)
      );

      // Check if there's a "sent-back" transaction by looking for outputs (vout) that include the data address
      const isSentBack = transaction.vout.some(
        (vout) => vout.addresses && vout.addresses.includes(result.address)
      );

      // Filter the transaction outputs (vout) to exclude those that are sent back to the sender's address,
      // focusing on the actual transaction outputs to other addresses
      const voutRecipient = transaction.vout.filter(
        (vout) => !vout.addresses.includes(result.address)
      );

      // Filter the transaction outputs (vout) to find those that include the data address
      // indicating transactions with our address
      const voutSelfRecipient = transaction.vout.filter((vout) =>
        vout.addresses.includes(result.address)
      );

      // This calculation determines the actual amount which is associated with the data address
      if (isSentBack) {
        const btcAmountIn = vinSelfRecipient.reduce(
          (acc, vin) => acc + parseFloat(vin.value),
          0
        );

        const btcAmountOut = voutSelfRecipient.reduce(
          (acc, vout) => acc + parseFloat(vout.value),
          0
        );

        btcAmount = (btcAmountIn - btcAmountOut) / btcToSatoshi;
      } else {
        btcAmount =
          vinSelfRecipient.reduce(
            (acc, vin) => acc + parseFloat(vin.value),
            0
          ) / btcToSatoshi;
      }

      fromAddresses = result.address; // The sender address
      toAddresses = voutRecipient
        .map((vout) => vout.addresses.join(", "))
        .join(", "); // Concatenate recipient addresses
    } else {
      // Logic for when the address is the recipient
      btcAmount =
        transaction.vout
          .filter((vout) => vout.addresses.includes(result.address))
          .reduce((acc, vout) => acc + parseFloat(vout.value), 0) /
        btcToSatoshi;

      fromAddresses = transaction.vin
        .map((vin) => vin.addresses.join(", "))
        .join(", "); // Concatenate sender addresses
      toAddresses = result.address; // The recipient address
    }

    if (withinInterval) {
      // Fetch the current price data for accurate USD conversion
      const priceData = await bb_gettickers(transaction.blockTime);

      // Calculate fees and amounts in USD
      btcFees = parseFloat(transaction.fees) / btcToSatoshi;
      usdFees = btcFees * priceData.rates.usd;
      usdAmount = btcAmount * priceData.rates.usd;
    }

    if (direction === "Outgoing") {
      cumulativeDiff -= btcAmount;
    } else {
      cumulativeDiff += btcAmount;
    }

    balanceBeforeTx = currentBalance - cumulativeDiff;

    if (direction === "Outgoing") {
      balanceAfterTx = balanceBeforeTx - btcAmount;
    } else {
      balanceAfterTx = balanceBeforeTx + btcAmount;
    }

    let extendedTransaction: ExtendedTransaction = {
      ...transaction,
      day,
      timestamp,
      direction,
      fromAddresses,
      toAddresses,
      btcAmount,
      usdAmount,
      btcFees,
      usdFees,
      type,
      balanceBeforeTx,
      balanceAfterTx,
      withinInterval,
    };

    extendedTransactions.push(extendedTransaction);
  }

  // Filter transactions which are in the time interval
  const filteredTransactions = extendedTransactions.filter(
    (transaction) => transaction.withinInterval
  );

  // Destructure the original result to exclude the transactions property
  const { transactions, ...rest } = result;

  // Use the rest of the properties and add the extendedTransactions
  const extendedResult: ExtendedResult = {
    ...rest,
    extendedTransactions: filteredTransactions,
    startDate: startOfPeriod,
    endDate: endOfPeriod,
  };

  return extendedResult;
}
Step 5: Generating the Report
The generateReport.ts file is designed to generate a comprehensive report for Bitcoin transactions with the processed and filtered data.
Open the generateReport.ts file with your code editor and modify the file as follows. The code snippet includes comments for better understanding.
import { ExtendedResult } from "./interfaces";
import { format } from "date-fns";

// Function to generate a report based on a Bitcoin address and a date range
export function generateReportForAddress(
  extendedData: ExtendedResult
): [string, string] {
  // Logging the report generation process
  console.log(
    `Generating transaction report for Bitcoin address (${
      extendedData.address
    }) from ${format(extendedData.startDate, "yyyy-MMMM-dd")} to ${format(
      extendedData.endDate,
      "yyyy-MMMM-dd"
    )}`
  );

  // Preparing the CSV header
  let reportLines: string[] = [
    "Day;Timestamp;Tx;Type;Direction;From;To;Amount [BTC];Amount [USD];Fees [BTC];Fees [USD];Pre Balance;Post Balance",
  ];

  // Data rows
  for (const item of extendedData.extendedTransactions) {
    // Add the transaction details to the report
    reportLines.push(
      `${item.day};${item.timestamp};${item.txid};${item.type};${
        item.direction
      };${item.fromAddresses};${item.toAddresses};${item.btcAmount.toFixed(
        8
      )};${item.usdAmount.toFixed(2)};${item.btcFees.toFixed(
        8
      )};${item.usdFees.toFixed(2)};${item.balanceBeforeTx.toFixed(8)};${
        item.balanceAfterTx.toFixed(
        8
      )
      }`
    );
  }

  const fileName = `transaction_report_${extendedData.address}_${format(
    extendedData.startDate,
    "yyyy-MMMM-dd"
  )}_${format(extendedData.endDate, "yyyy-MMMM-dd")}.csv`;

  // Join all lines to form the CSV content
  return [reportLines.join("\n"), fileName];
}
Step 6: Creating Interfaces for TypeScript
The interfaces.ts file defines a set of TypeScript interfaces that structure the data retrieved from the Bitcoin blockchain and related financial information, facilitating type-safe development and interaction with blockchain data.
Open the interfaces.ts file with your code editor and modify the file as follows.
// Defines the structure for the overall result of a blockchain query,
export interface Result {
  page: number;
  totalPages: number;
  itemsOnPage: number;
  address: string;
  balance: string;
  totalReceived: string;
  totalSent: string;
  unconfirmedBalance: string;
  unconfirmedTxs: number;
  txs: number;
  transactions: Transaction[];
}

// Represents the details of a single Bitcoin transaction.
export interface Transaction {
  txid: string;
  version: number;
  vin: Vin[];
  vout: Vout[];
  blockHash: string;
  blockHeight: number;
  confirmations: number;
  blockTime: number;
  size: number;
  vsize: number;
  value: string;
  valueIn: string;
  fees: string;
  hex?: string;
}

export interface ExtendedTransaction extends Transaction {
  day: string;
  timestamp: string;
  direction: string;
  fromAddresses: string;
  toAddresses: string;
  btcAmount: number;
  usdAmount: number;
  btcFees: number;
  usdFees: number;
  type: string;
  balanceBeforeTx: number;
  balanceAfterTx: number;
  withinInterval: boolean;
}

export interface ExtendedResult {
  page: number;
  totalPages: number;
  itemsOnPage: number;
  address: string;
  balance: string;
  totalReceived: string;
  totalSent: string;
  unconfirmedBalance: string;
  unconfirmedTxs: number;
  txs: number;
  extendedTransactions: ExtendedTransaction[];
  startDate: Date;
  endDate: Date;
}

// Represents an input in a Bitcoin transaction.
export interface Vin {
  txid: string;
  vout?: number;
  sequence: number;
  n: number;
  addresses: string[];
  isAddress: boolean;
  value: string;
  hex: string;
  isOwn?: boolean;
}

// Represents an output in a Bitcoin transaction.
export interface Vout {
  value: string;
  n: number;
  hex: string;
  addresses: string[];
  isAddress: boolean;
  spent?: boolean;
  isOwn?: boolean;
}

// Represents price data, including a timestamp and currency rates.
export interface PriceData {
  ts: number;
  rates: Rates;
}

// Contains currency conversion rates, e.g., from Bitcoin to USD.
export interface Rates {
  usd: number;
}
Step 7: Main File - App.ts
The app.ts file interacts with the blockchain to extract meaningful data and present it in a user-friendly format, making it a valuable tool for anyone needing detailed insights into Bitcoin transactions associated with a specific address.
Open the app.ts file with your code editor and modify the file as follows.
Do not forget to replace the THE_BITCOIN_ADDRESS placeholder with the Bitcoin address for which the report will be generated. In this guide, we will use one of Coinbase's hot wallets (3MqUP6G1daVS5YTD8fz3QgwjZortWwxXFd).
If you do not specify any time period, by default, a report will be created only for the current day.
// Import necessary modules and functions
import * as fs from "fs-extra"; // Import the fs-extra module for file system operations
import { bb_getaddress } from "./blockbookMethods"; // Import the function to fetch address data
import { calculateVariables } from "./calculateVariables";
import { generateReportForAddress } from "./generateReport"; // Import the function to generate a report

// Define the Bitcoin address for which the report will be generated
const address = "3MqUP6G1daVS5YTD8fz3QgwjZortWwxXFd";

// Optional date range for the report (commented out by default)
// const startDate = new Date(2024, 2, 1); // March 1, 2024
// const endDate = new Date(2024, 2, 12); // March 12, 2024

(async () => {
  // Fetch transaction data for the specified address
  const data = await bb_getaddress(address);

  const extendedData = await calculateVariables(data);
  // Optional date range (commented out by default)
  // const extendedData = await calculateVariables(data, startDate, endDate);

  // Generate a report based on the fetched data
  const [report, fileName] = generateReportForAddress(extendedData);

  // Write the generated report to a CSV file
  fs.writeFileSync(fileName, report);
  // Log a confirmation message indicating where the report has been saved
  console.log(`Report saved to ${fileName}`);
})();
When specifying dates using the Date constructor in JavaScript/TypeScript, remember that months are zero-indexed. This means January is 0, February is 1, and so on, up to December being 11. For example, new Date(2024, 2, 1) corresponds to March 1, 2024, not February. Please adjust the month numbers accordingly to represent the intended dates accurately.
Step 8: Run the Script
Run the script by running the command below.
ts-node app.ts
If everything goes well, the processed data is written into a readable report format, CSV, for easy analysis and sharing.
> ts-node app.ts
Generating transaction report for Bitcoin address (3MqUP6G1daVS5YTD8fz3QgwjZortWwxXFd) from 2024-March-13 to 2024-March-13
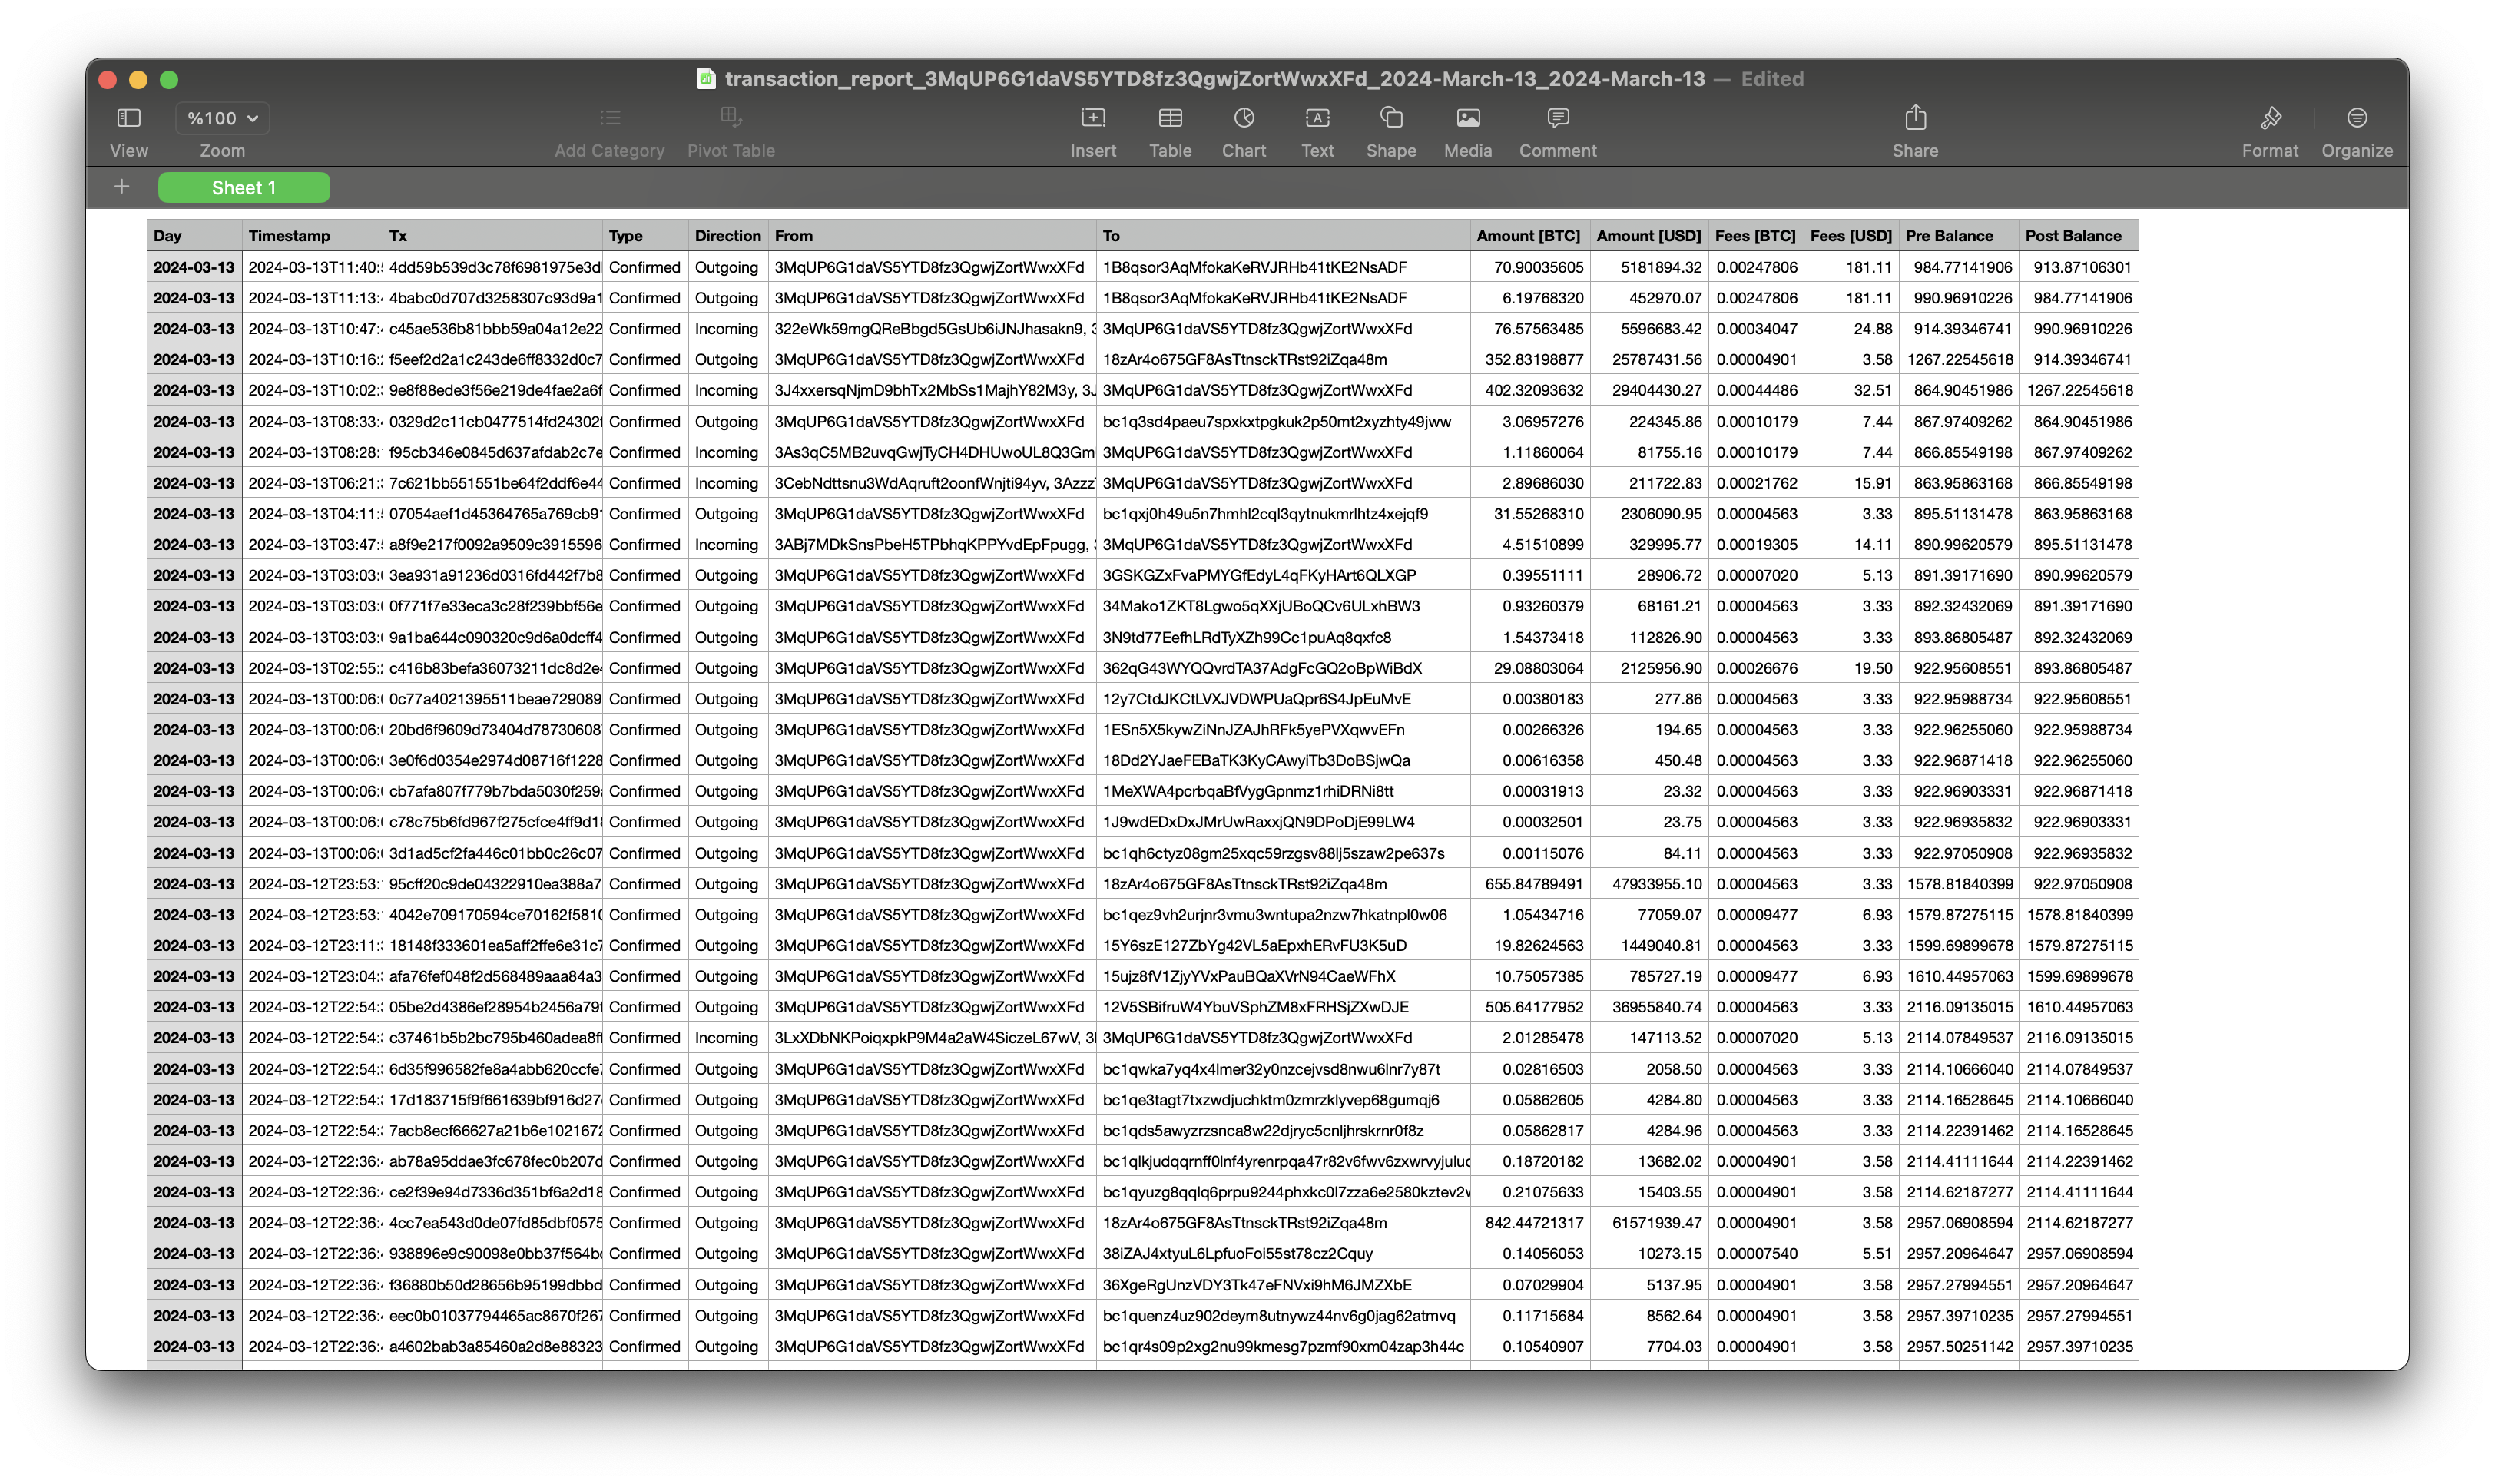
Report saved to transaction_report_3MqUP6G1daVS5YTD8fz3QgwjZortWwxXFd_2024-March-13_2024-March-13.csv
The transaction report is saved in the current project directory. The format of the transaction report is like the one below.
Conclusion
Quicknode's Blockbook add-on makes it easier for developers and businesses to create detailed Bitcoin transaction reports. This guide introduces the basics, but there's more you can do. Whether it's for audits, helping with regulatory tasks, or market analysis, the Blockbook add-on simplifies the blockchain data extraction process.
To learn more about how Quicknode is helping auditing firms to pull this type of data from blockchains, please feel free to reach out to us; we would love to talk to you!
Subscribe to our newsletter for more articles and guides on Web3 and blockchain. If you have any questions or need further assistance, feel free to join our Discord server or provide feedback using the form below. Stay up to date with the latest by following us on Twitter (@Quicknode) and our Telegram announcement channel.
We ❤️ Feedback!
Let us know if you have any feedback or requests for new topics. We'd love to hear from you.