
18 min read
Overview
Farcaster is an open-source social network built on Ethereum that aims to be decentralized and allows users to create profiles, post (this is called Cast), reply to, and organize communities (referred to as Channels). Anyone can create an account on Farcaster and it's an alternative to other social networks like X (aka Twitter) and Threads (by Meta).
This guide will show you how to get up and running quickly with developing on Farcaster, and more specifically, you will accomplish the following tasks:
What You Will Do
- Learn about Farcaster and how it operates as an open-source, decentralized social network
- Learn about Farcaster Frames and its technical specification
- Run a Farcaster node or get access to the Neynar API (paid) in order to read/write to the Farcaster network
- Build a Farcaster Frame using TypeScript and Express.js; More specifically, the Frame will calculate the borrowing power of a Farcaster user's wallet address against a lending protocol (i.e., Compound.finance) upon the click of a button
What You Will Need
- Previous programming experience with JavaScript or TypeScript
- An Ethereum mainnet node endpoint (sign up here) with the Token API enabled + Optimism mainnet node endpoint (required for Hubble node)
- Node.js installed
- Run a Farcaster node or get access to a Neynar API Key
- An account on Farcaster
- A code editor (e.g., VSCode)
| Dependency | Version |
|---|---|
| node.js | 18.14> |
| cors | ^2.8.5 |
| ethers | ^6.11.1 |
| express | ^4.17.1 |
What is Farcaster?
Let's dive into how the Farcaster social protocol functions. Farcaster stores user identity on-chain and data like posts and replies off-chain. The main data stored on-chain is - account creation, publishing data (posts, replies, etc.), and adding additional account keys to apps (which we'll get into). Farcaster's off-chain architecture utilizes nodes that let users/developers read/write from Farcaster. The majority of Farcaster data is stored on this network. See the current Farcaster architecture overview for more details. Here is a diagram visually showcasing the architecture:
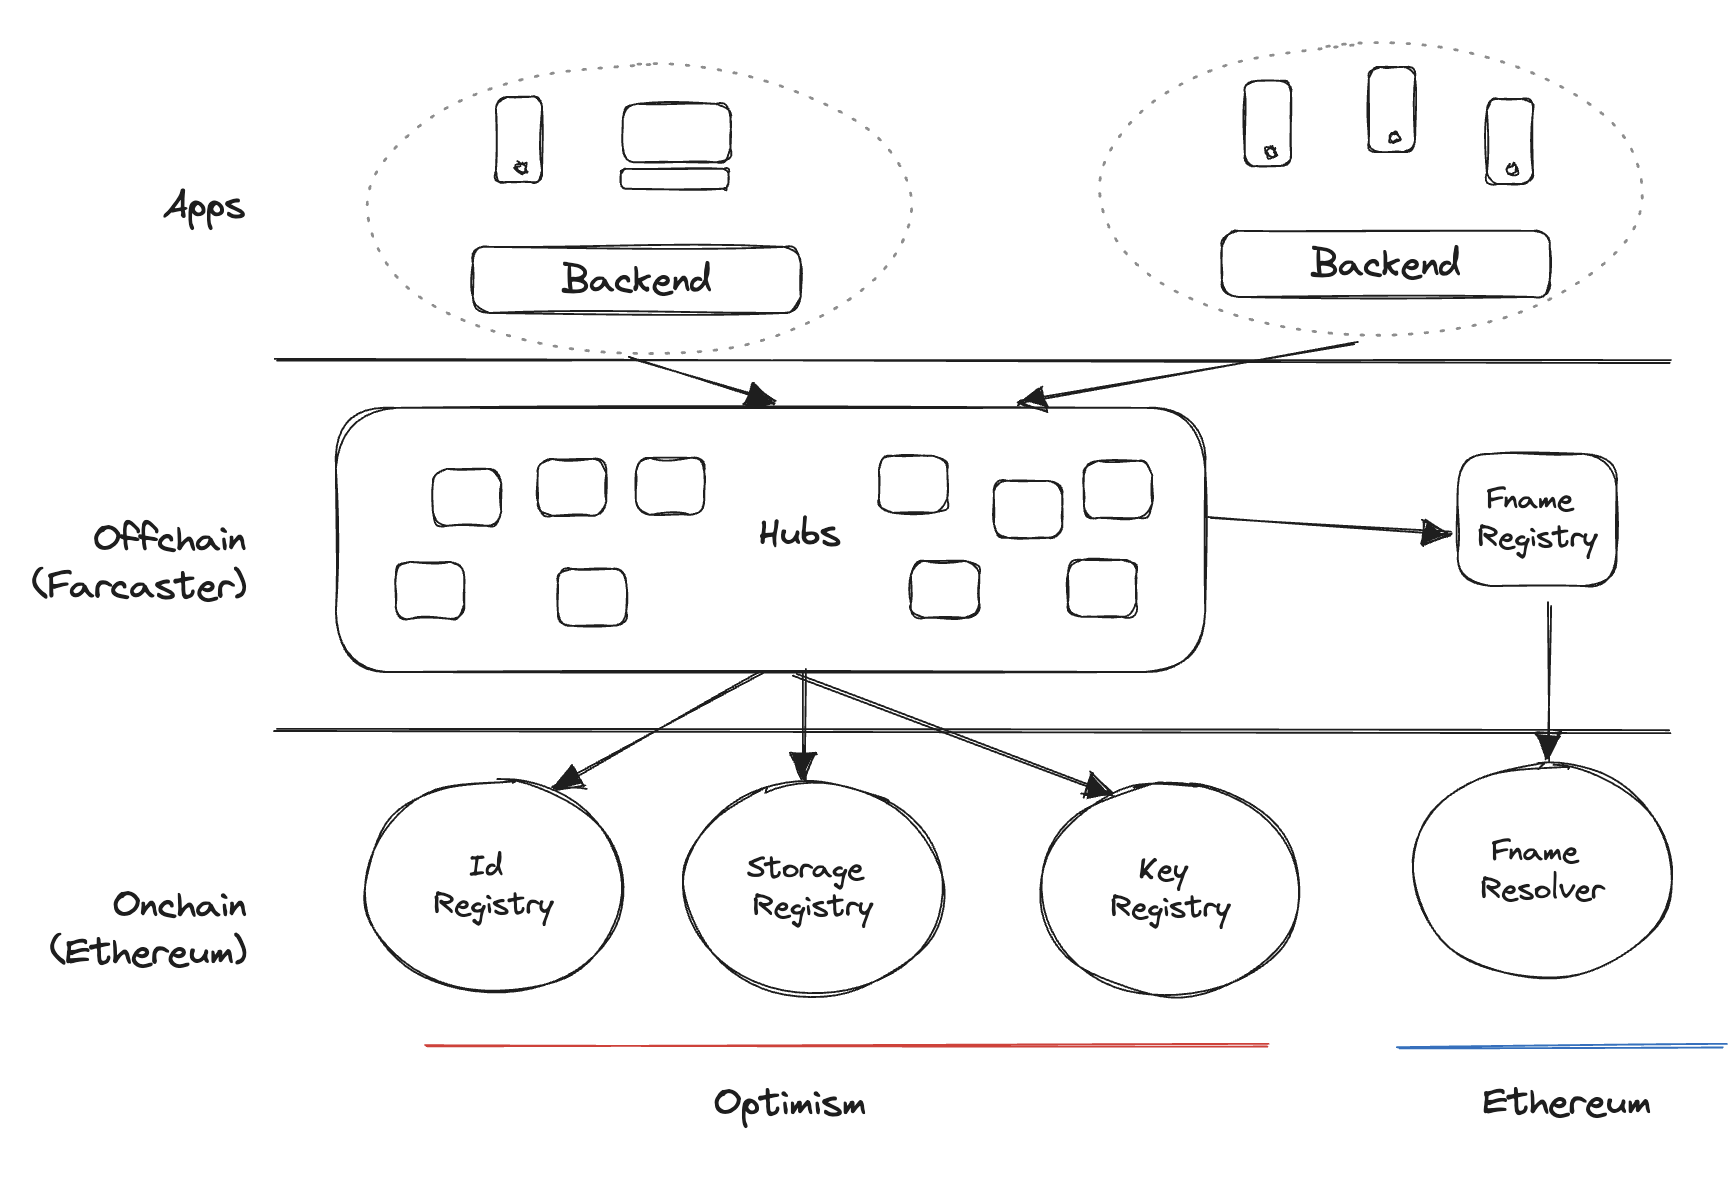
Source: https://docs.farcaster.xyz/learn/architecture/overview
The current registration steps require an Ethereum wallet to register your account and paying "rent" (in order to cast, reply, etc.). This rent cost of the time of this writing is $7 USD and is for 1-year. More information on limitations can be found here.
The main components of Farcaster include:
- Accounts on Farcaster lets you post (i.e., Cast), reply, and set up your profile. Accounts are created and managed via Farcaster's three main contracts (currently deployed on Optimism mainnet): Id Registry, Storage Registry and Key Registry.
- Messages on Farcaster are published when an account signs it with their Key (managed by the KeyRegistry contract).
- Usernames on Farcaster are set up with ENS (Ethereum Domain Service), which is what other users reference when mentioning you. There are two types of usernames: off-chain ENS Names, which are free to create and are controlled (can be revoked) by Farcaster (e.g., @alice). Then, on-chain names, which cost money to create and are controlled by the individual who created them (can't be revoked by Farcaster).
- Apps: There are two types of apps: Wallet apps and Connected apps. Wallet apps are needed in order to create an account on Farcaster and interact. The wallet app you use has access to your connected Ethereum address and can take actions from your wallet on your behalf. Connected apps allow use only when a user grants them and can only perform off-chain actions.
- Frames allow you to turn your Casts (posts) into interactive apps. Some popular Frames already built are @cookie, which streamlined the cookie buying process and lets you pay with crypto (via Coinbase commerce). Now, there is a long list of awesome frame resources.
- Clients like Warpcast allow users to interact with Farcaster through a UI. There are multiple clients users can choose from, but currently, Warpcast is the most popular.
With that being said, let's dive a bit more into one client for Farcaster, Warpcast.
What is Warpcast?
Warpcast is a client built to run apps and networks like Farcaster. It's simply the app that Farcaster runs on. Users initially may confuse the two, but Warpcast is only a client meant to run Farcaster (it doesn't have other capabilities). There are alternative clients such as Supercast and more.
What is Farcaster Frames?
A Frame allows a Cast (aka post) the ability to be its own interactive app. A Frame is composed of an HTML web application that is hosted at a URL (e.g., myapp.com). The Frame specification extends the Open Graph protocol standard, allowing interactive actions between your Frame and users. Let's cover at a high level what they are composed of and how they work.
Frames are composed of <head> and <body> tags and can include HTML tags like <button> so users can interact with your Frame. A Frame utilizes OpenGraph tags to render different views. OpenGraph tags are simply metadata that control how your URL is displayed. For example, the tags below render a frame with an image (specified with the fc:frame:image property), and four buttons (identified with the fc:frame:button: property).
<html lang="en">
  <head>
    <meta property="fc:frame" content="vNext" />
    <meta property="fc:frame:image:aspect_ratio" content="1.91:1" />
    <meta property="fc:frame:image" content="http://...image-question.png" />
    <meta property="og:image" content="http://...image-question.png" />
    <meta property="fc:frame:button:1" content="Green" />
    <meta property="fc:frame:button:2" content="Purple" />
    <meta property="fc:frame:button:3" content="Red" />
    <meta property="fc:frame:button:4" content="Blue" />
  </head>
</html>
Required properties of a frame include:
fc:frame: A valid version string orvNextmetadata property (refers to versioning). Currently, this is the only valid version of the tag.fc:frame:image: An image that should have an aspect ratio of 1.91:1 or 1:1.og:image: An image that should have an aspect ratio of 1.91:1. Its a fallback for clients that do not support frames.
Some other general pointers:
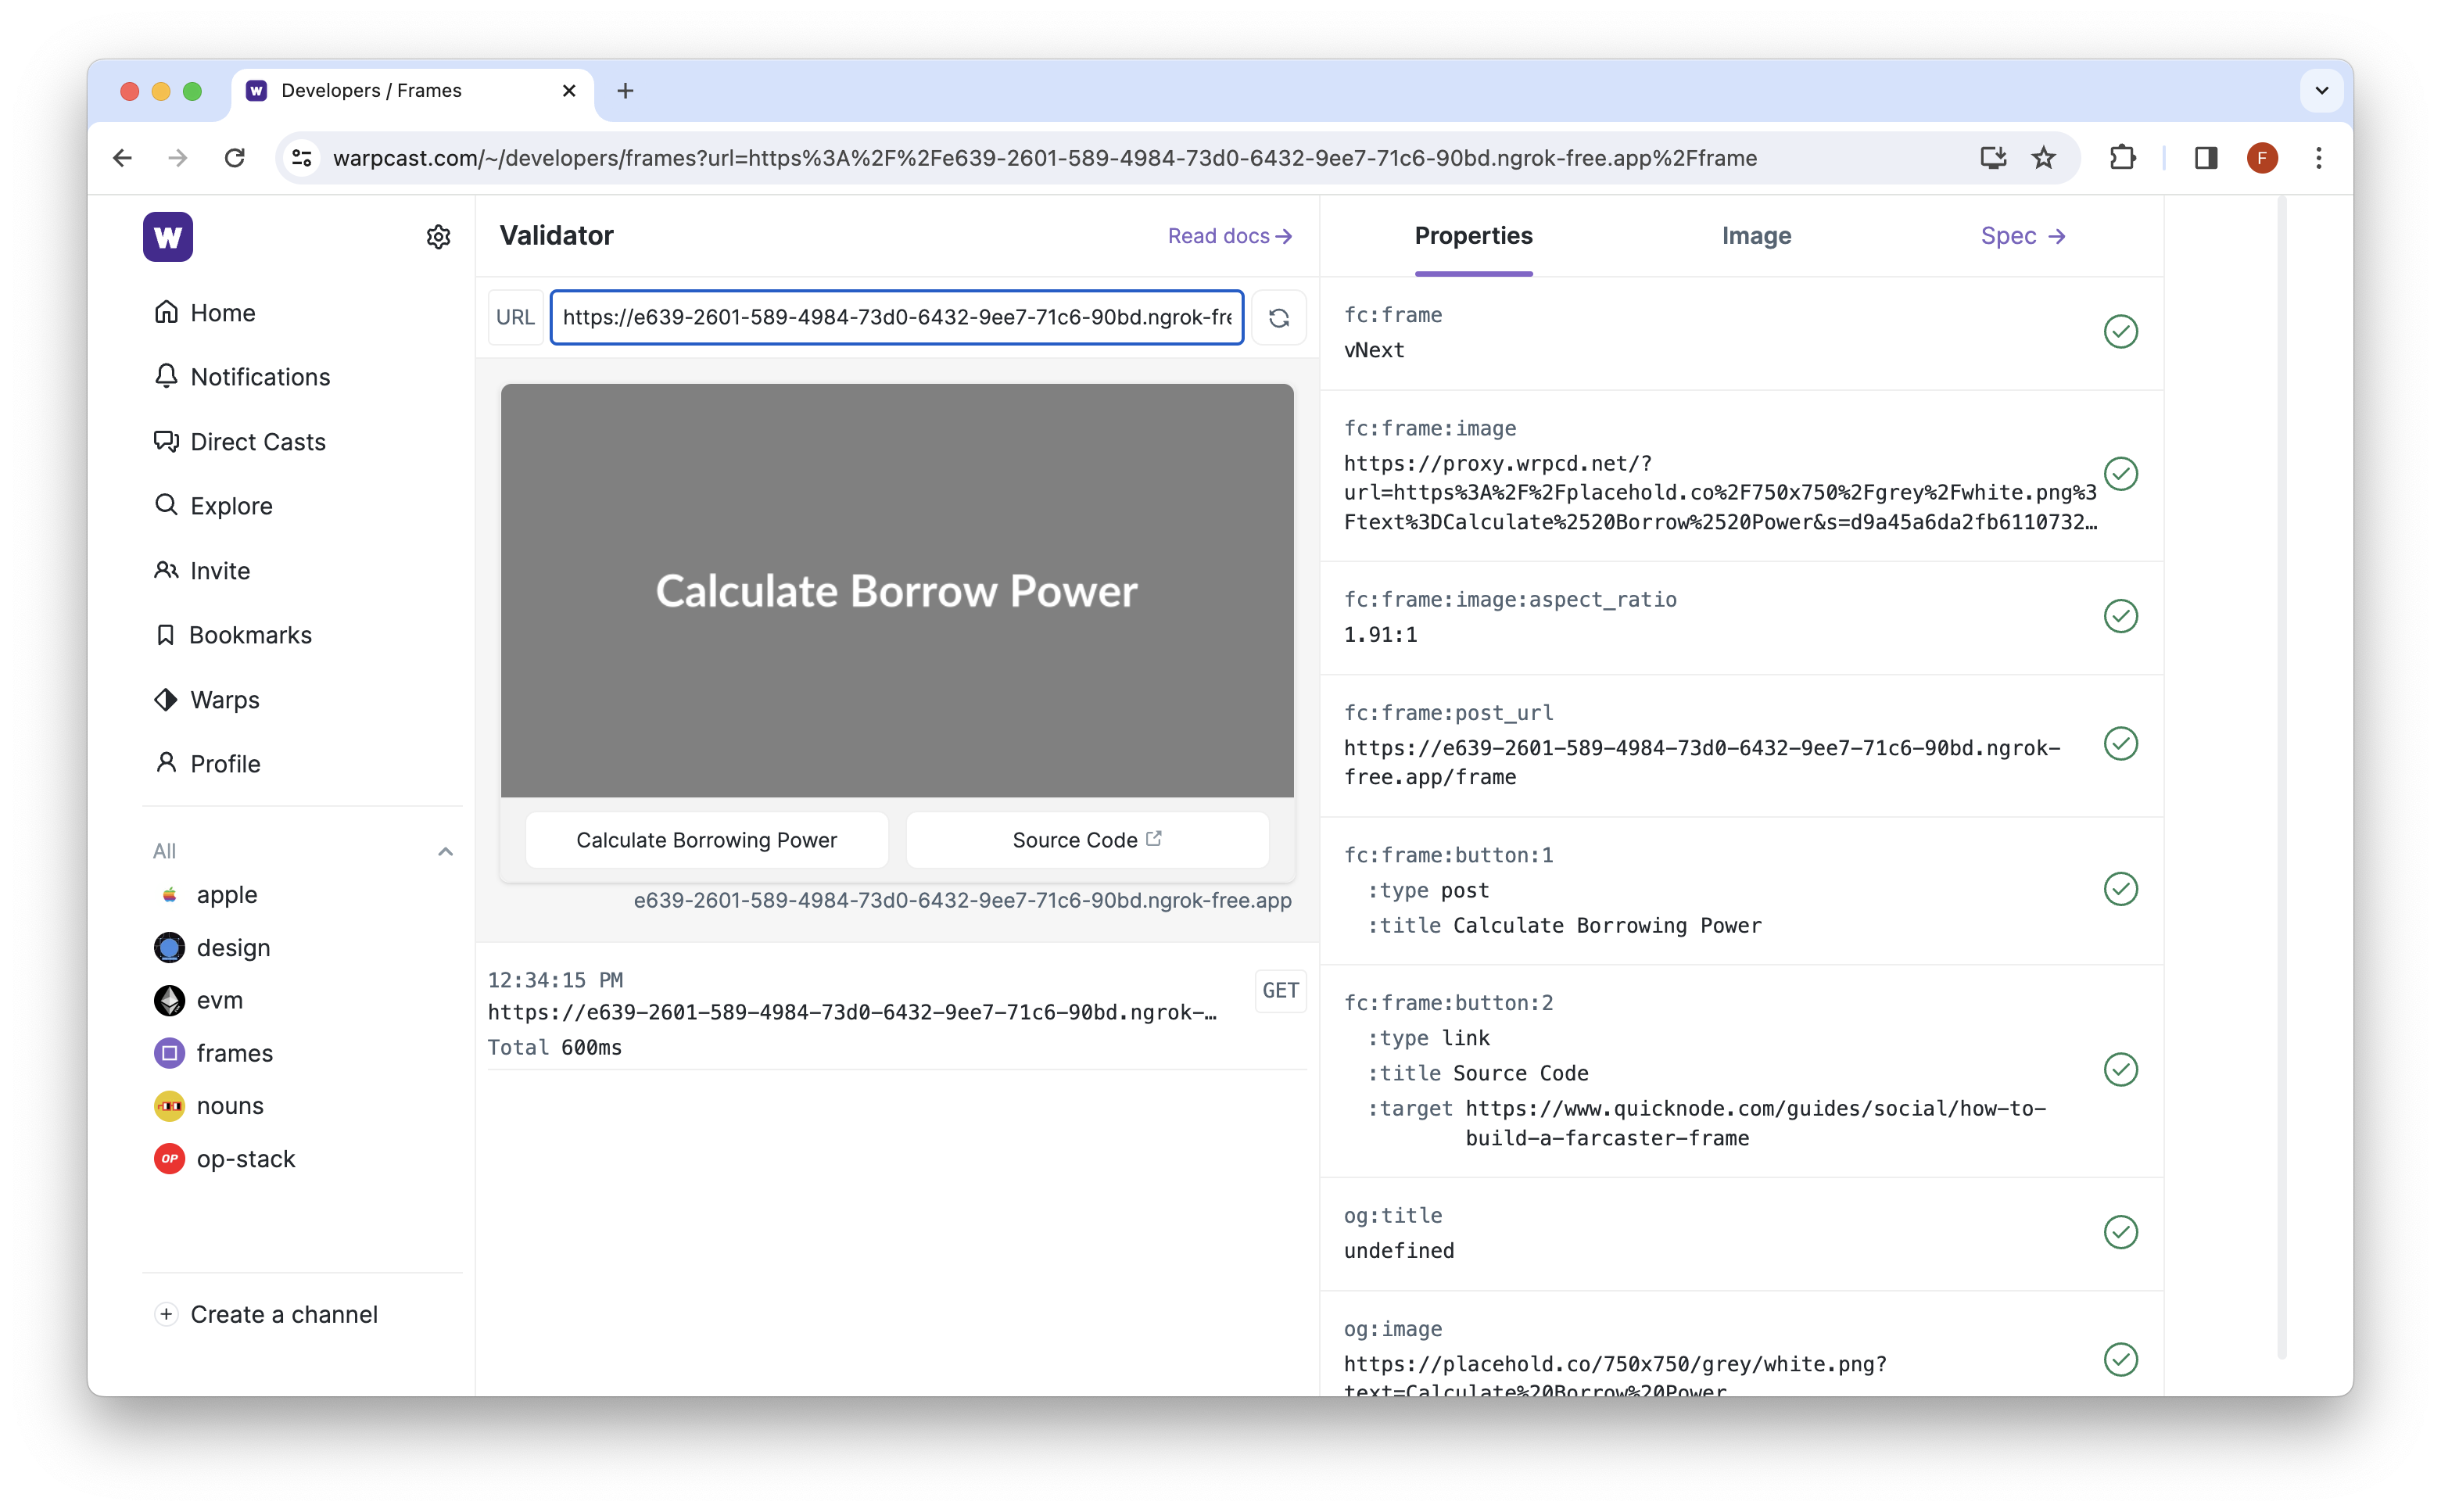
- Casting (i.e., posting) the URL (e.g., https://yourappurl.com) where your Frame is hosted is how Frames get rendered as a post. The Frame you're building can be previewed without needing to Cast on Farcaster using Warpcast Frame Tools.
- Clicking a Frame button sends a
POSTrequest to the Frame server, which can re-render new frames and execute other arbitrary logic. - In order to read/write from Farcaster, you will need to interact with a Farcaster node or API provider and use APIs such as Casts, Fids, Storage, On Chain, and Events. For a current query example, see the Farcaster docs on fetching casts.
- At the time of writing this guide, when your Frame makes a POST request, it must respond within 5 seconds (or it will give a 400 error code). One option is to include a refresh button in case your Frame takes longer than 5 seconds to respond.
Now that you understand more about Frames, let's get our development environment and start development.
Here is what the next steps for building the Frame will be:
- Get access to Ethereum mainnet node endpoint with Quicknode + if you're going to run a Hubble node, you need an Optimism mainnet endpoint as well
- Create a Frame that includes two buttons (e.g.,
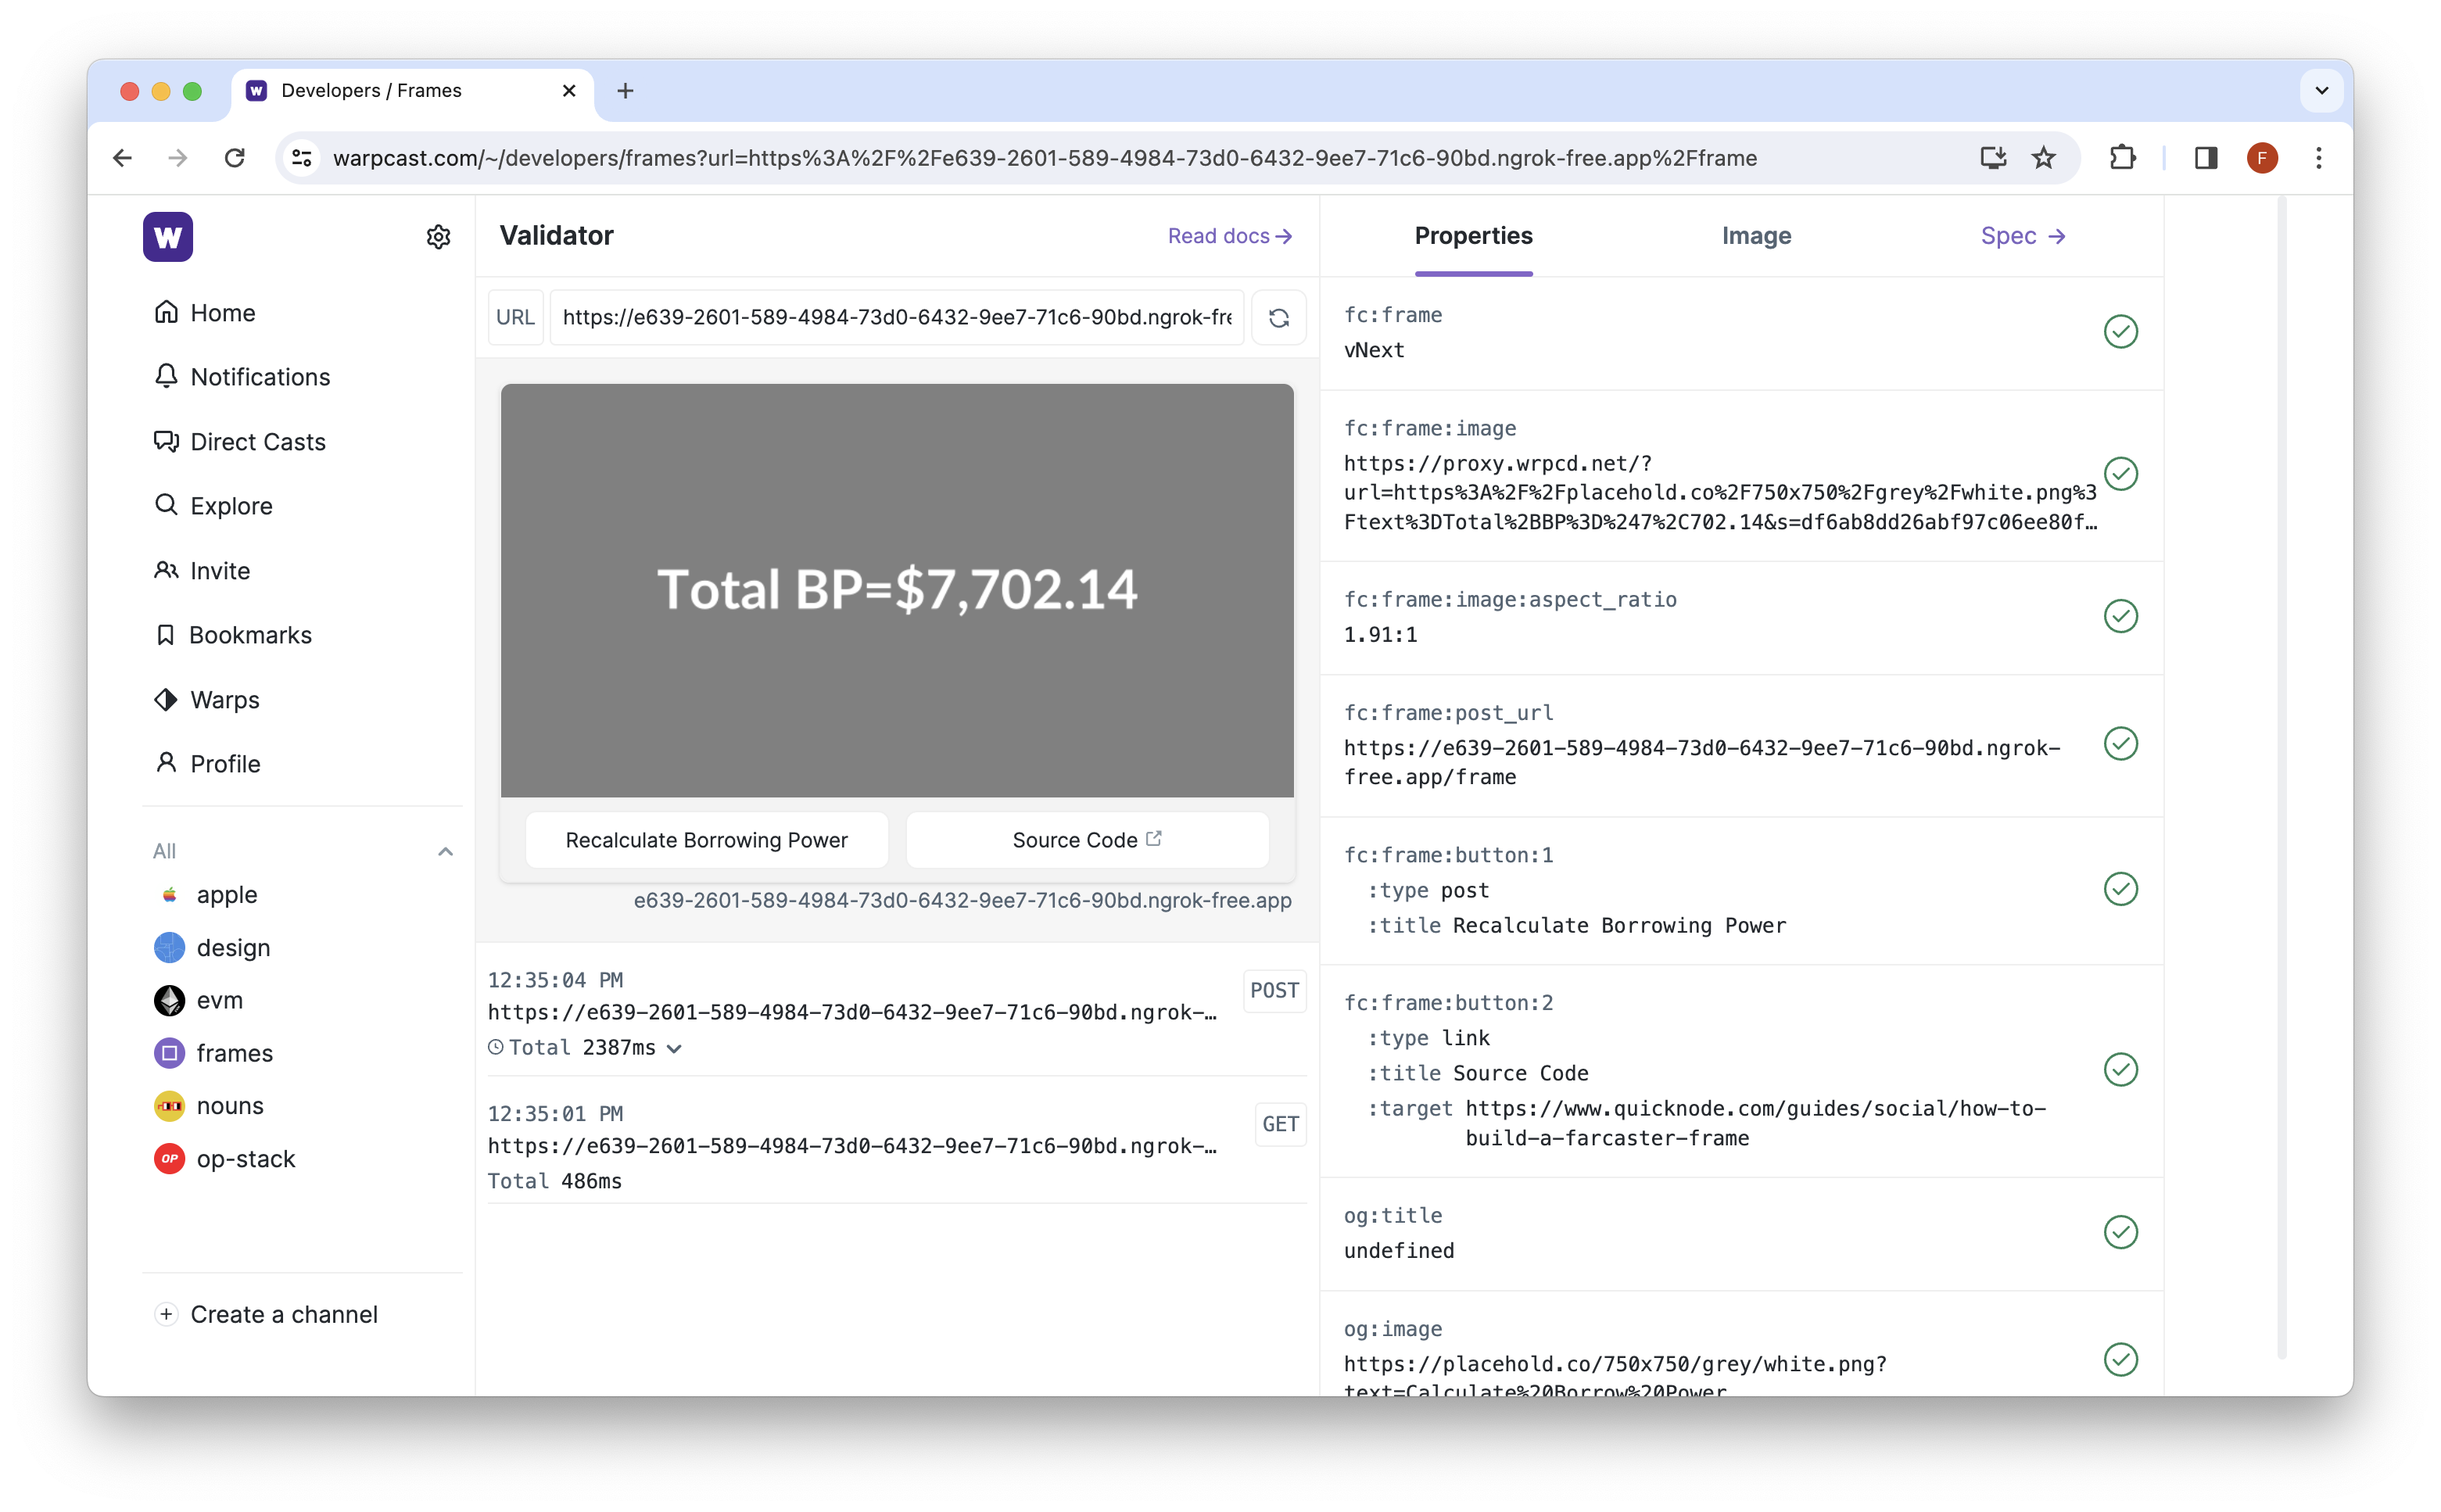
Calculate Borrow PowerandSource Code), one for triggering our Frame server logic and the other to link to our source code (i.e., this guide) - When the button is clicked, it will retrieve the users Ethereum wallet address (based on the incoming
fID) and then make a JSON-RPC request to an Ethereum mainnet node endpoint to fetch the wallet balances of a user using the Token API from Quicknode (with theqn_getWalletTokenBalancemethod) - We will make another API call to the Coingecko API to fetch the current market prices of tokens found in the user wallet (which are also eligible to be borrowed against on Compound.finance)
- Lastly, we will calculate the borrowing power given the users token balances, their USD values and the collateral ratios on Compound.finance. Finally, we render a new Frame view with the results (i.e., total borrowing power)
Project Prerequisite: Create an Ethereum and Optimism Node Endpoint
If you are planning to run your own Farcaster node, you will need to create a Ethereum mainnet and Optimism mainnet node endpoint. Otherwise, if you plan to use a paid API to get access to Farcaster data (such as Neynar), you only need to create an Ethereum mainnet node endpoint.
You're welcome to use public Ethereum nodes or deploy and manage your own infrastructure to complete this guide; however, if you'd like 8x faster response times, you can leave the heavy lifting to us. Sign up for an account Quicknode account here.
Once logged into Quicknode, click the Create an endpoint button, then select the Ethereum chain and mainnet network. After creating your endpoint, copy the HTTP Provider URL link and keep it handy, as you'll need it in the programming section. You will also need to have the Token and NFT API v2 bundle add-on enabled on your endpoint.
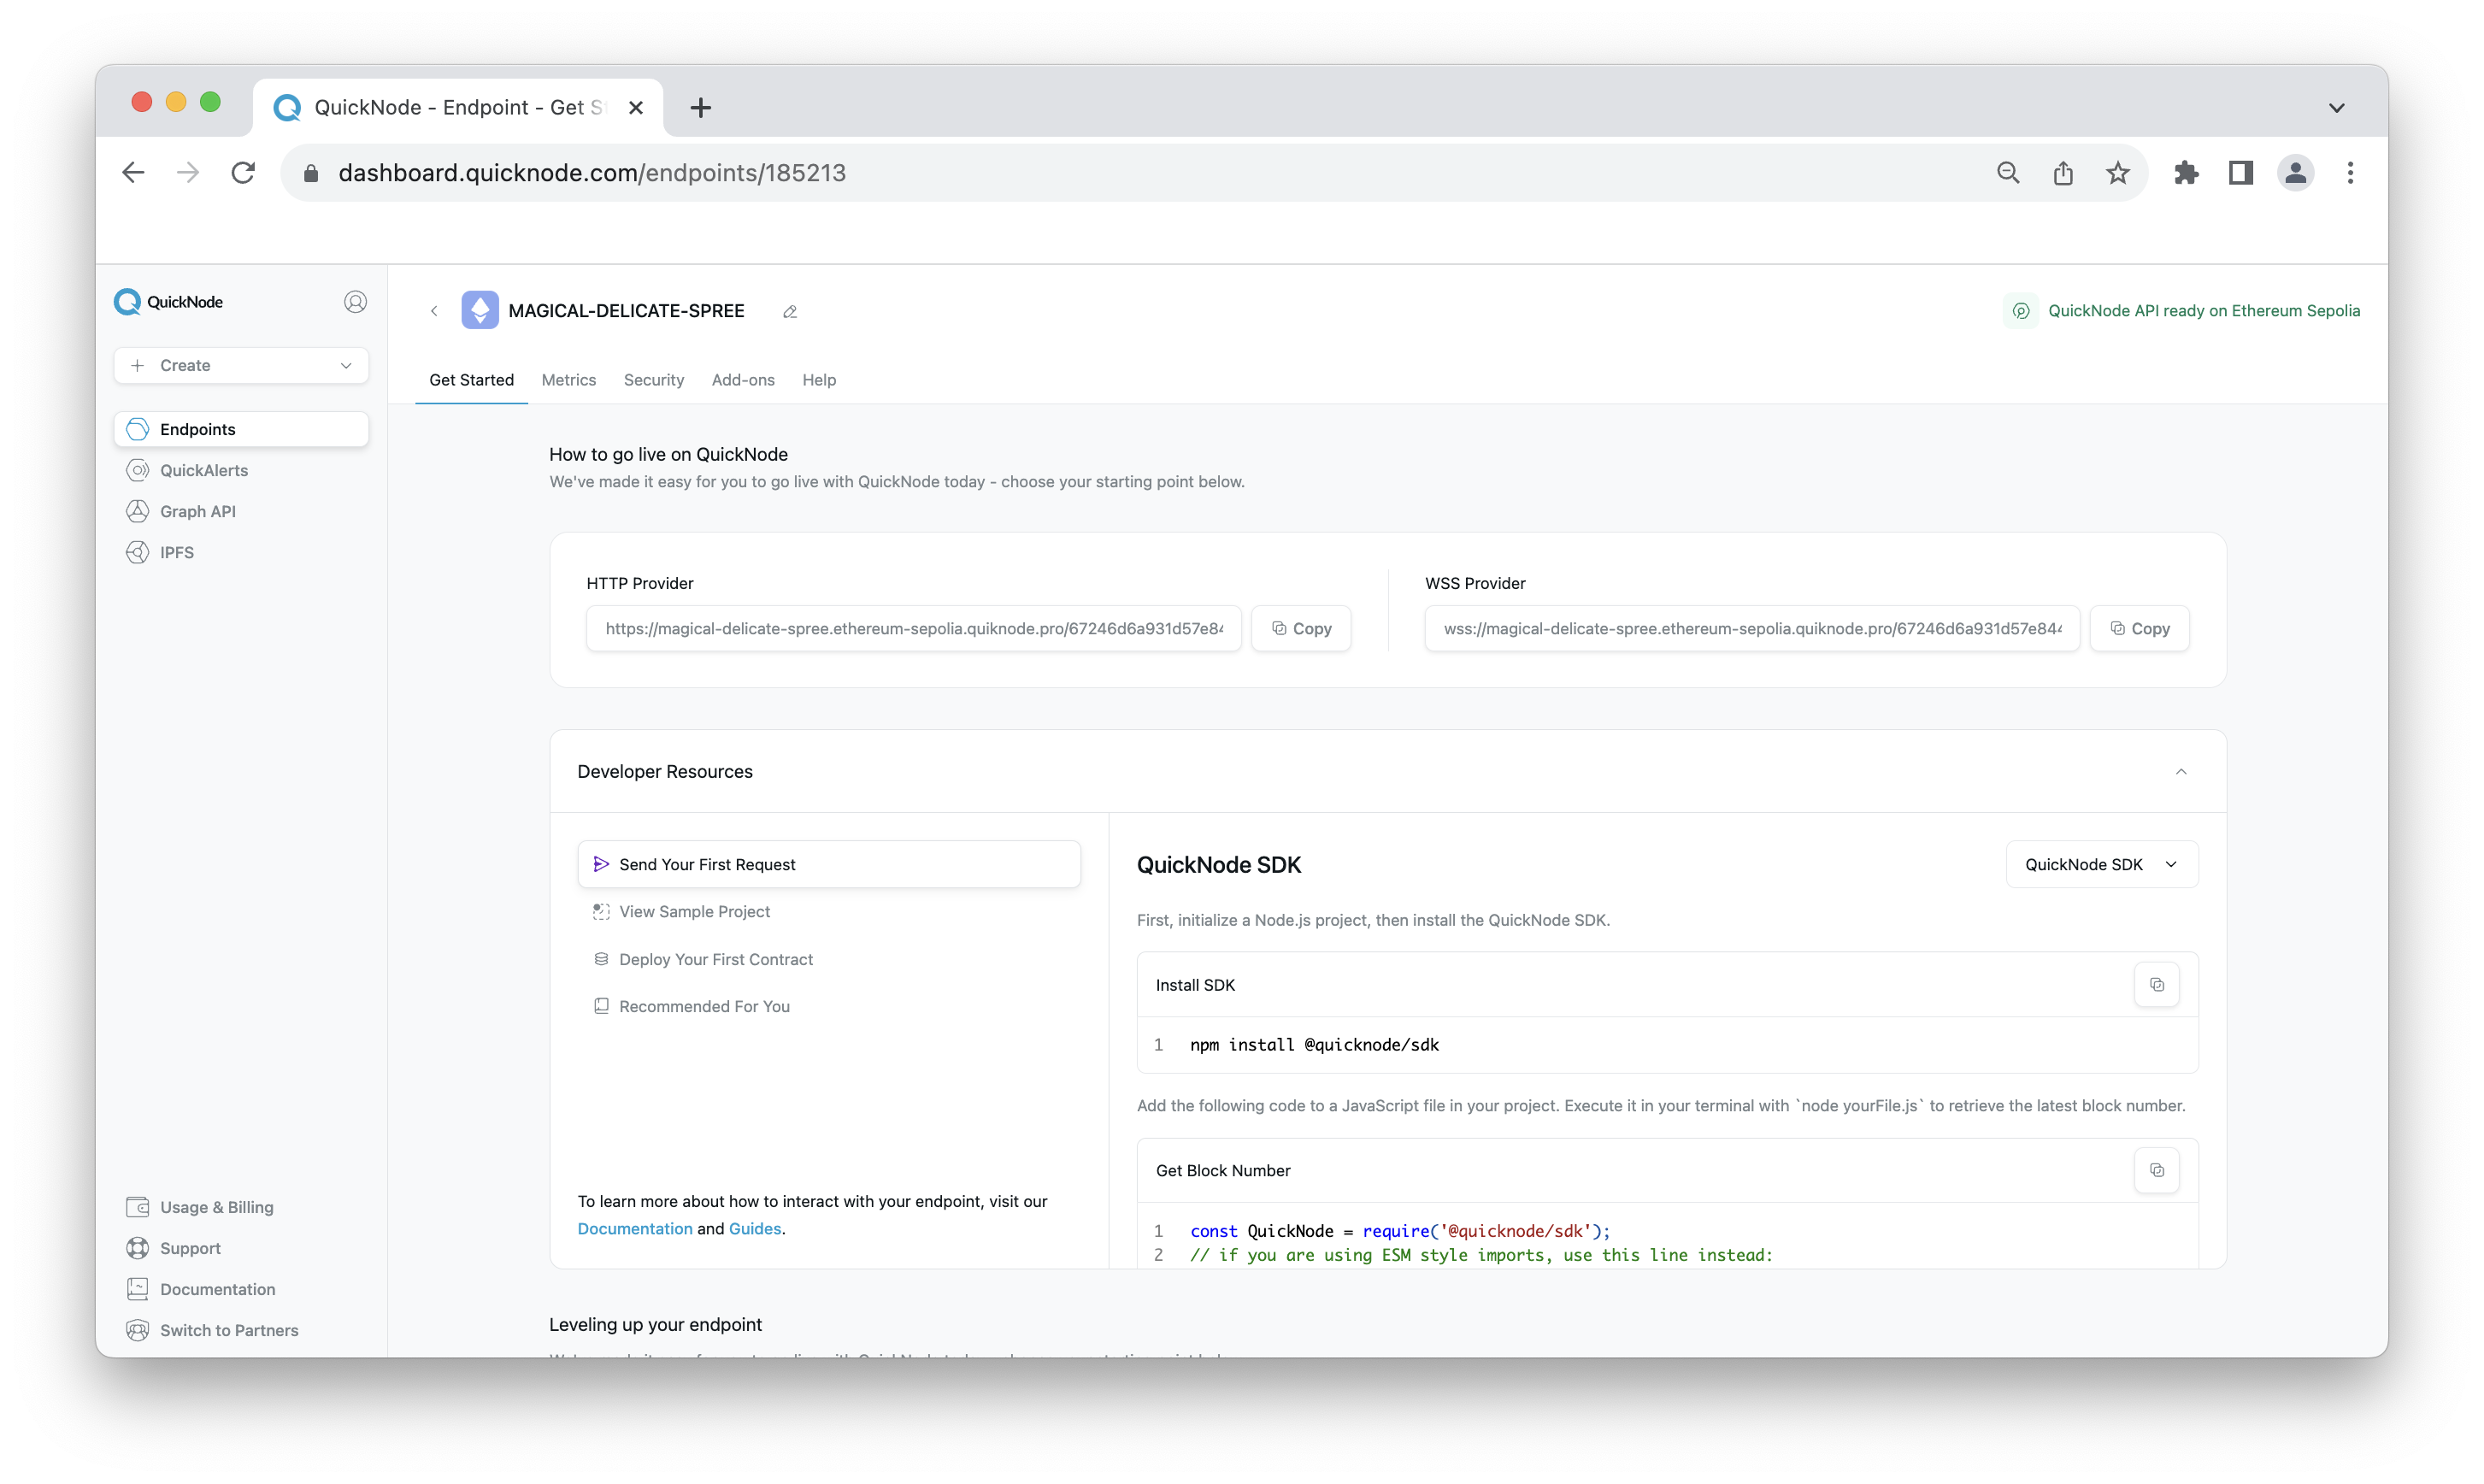
Keep the URL(s) handy as you'll need it during development.
Project Prerequisite: Run a Hubble node or get access to Neynar
Hubble Node
Running a Farcaster node is free but requires access to RPC for Ethereum and Optimism. I personally used a DigitalOcean droplet (spec'd at 16 GB Memory / 4 AMD vCPUs / 200 GB Disk; which wasn't free) to run a node and then served the Farcaster HTTP API via ngrok.
To run the Hubble node, ensure you have Docker installed and running, then run this cURL command to install Hubble:
curl -sSL https://download.thehubble.xyz/bootstrap.sh | bash
Follow the prompts and input your RPC endpoints and Farcaster username and you'll eventually see the docker image for the Hub running and downloading data. In my experience, it took an ~1 hour to sync plus some time to setup your VPS environment (e.g., get Docker installed and running)
The Hubble node serves an HTTP API on port 2281 by default, so we can test it by running the following test cURL command:
curl http://127.0.0.1:2281/v1/castsByFid?fid=2
You should see a response like:
{"messages":[{"data":{"type":"MESSAGE_TYPE_USER_DATA_ADD","fid":2,"timestamp":70245646,"network":"FARCASTER_NETWORK_MAINNET","userDataBody":{"type":"USER_DATA_TYPE_PFP","value":"https://i.seadn.io/gae/sYAr036bd0bRpj7OX6B-F-MqLGznVkK3--DSneL_BT5GX4NZJ3Zu91PgjpD9-xuVJtHq0qirJfPZeMKrahz8Us2Tj_X8qdNPYC-imqs?w=500&auto=format"}},"hash":"0xa4c14683abdba1ec07862e96dac3e70f119d18a6","hashScheme":"HASH_SCHEME_BLAKE3","signature":"HPgTmDbeh1pRM2n4jlvfVegVuQrSULq/C0bPwfTXOTK8H0FmGyAXfodsUgslbSpJ1gKARvTi5HzkS8vUEOXsAQ==","signatureScheme":"SIGNATURE_SCHEME_ED25519","signer":"0x78ff9a768cf1fbb13caaf5159a9623dd2499b01592a0ee672eca647b6d62558c"},{"data":{"type":"MESSAGE_TYPE_USER_DATA_ADD","fid":2,"timestamp":85794966,"network":"FARCASTER_NETWORK_MAINNET","userDataBody":{"type":"USER_DATA_TYPE_USERNAME","value":"v"}},"hash":"0xfba4c9de4962a1b157a6887159102d3f8ef35f50","hashScheme":"HASH_SCHEME_BLAKE3","signature":"CnTMeHaaj2/4gM+3MI4TlNRvonycLx4XKgJ3TQHQj1VZc6Ene3hp9dZDPLOCBV/T9kmp4KIlAzwaypTof0naDw==","signatureScheme":"SIGNATURE_SCHEME_ED25519","signer":"0x78ff9a768cf1fbb13caaf5159a9623dd2499b01592a0ee672eca647b6d62558c"},{"data":{"type":"MESSAGE_TYPE_USER_DATA_ADD","fid":2,"timestamp":90565002,"network":"FARCASTER_NETWORK_MAINNET","userDataBody":{"type":"USER_DATA_TYPE_DISPLAY","value":"Varun Srinivasan"}},"hash":"0x22fd1ae248d955ae981c139ff76b9931084a62a5","hashScheme":"HASH_SCHEME_BLAKE3","signature":"K21PqA7rUZBCNrXQyQZblo5yU/22YRJjcoaAuqU83FV7EOjC4brUa1083PpDGu0hwNLkzq64NAsu05N0gsd1Bw==","signatureScheme":"SIGNATURE_SCHEME_ED25519","signer":"0x78ff9a768cf1fbb13caaf5159a9623dd2499b01592a0ee672eca647b6d62558c"},{"data":{"type":"MESSAGE_TYPE_USER_DATA_ADD","fid":2,"timestamp":90565002,"network":"FARCASTER_NETWORK_MAINNET","userDataBody":{"type":"USER_DATA_TYPE_BIO","value":"Technowatermelon. Elder Millenial. Building Farcaster. \n\nnf.td/varun"}},"hash":"0x2e5f2025b81b95edad8cc770d13941f6267dcb8b","hashScheme":"HASH_SCHEME_BLAKE3","signature":"oIPPjX2aohL0q4IBUOpPuraHq2RiGrVZuNR3Rdibg/OiHwawSRxXMMp4vcw697JY/3fz4S5oCG5fsk3L21ZlDA==","signatureScheme":"SIGNATURE_SCHEME_ED25519","signer":"0x78ff9a768cf1fbb13caaf5159a9623dd2499b01592a0ee672eca647b6d62558c"}],"nextPageToken":""}%
Next, you can serve your API via ngrok with the following command:
ngrok http 2281
NOTE: If using a VPS, you may need to set your Firewall and enable incoming requests to your 2281 port (using a tool like
ufw)
Ideally, you should be able to make the same cURL request to your ngrok forwarding URL (e.g., curl 'https://7f38-174-138-84-0.ngrok-free.app/v1/castsByFid?fid=2').
Next, we'll show the steps via Neynar, a paid API service to read/write to Farcaster if you don't want to run your own Hubble node.
Neynar API
This section documents the steps to access the Neynar API, assuming you don't run your own Hubble node.
Sign up with Neynar here. At the time of this writing, there is no free version.
Once your account is created, keep the API key handy as you will use it in the following section when building your Frames project. At this point, you should have one of the two options (Hubble node or paid API) above completed in order to get access to Farcaster user data. Next, we'll get into Frames development.
How to Build a Farcaster Frame
In this section, you will build a Farcaster frame that fetches the ERC-20 token balances of a wallet and then calculate its total borrowing power given the Compound.finance collateral rate. We'll be using TypeScript and Express.js (along with some other SDKs like Ethers.js and dotenv) to build our Frames project.
The main tech in our project consists of:
- Express.js: A framework for building RESTful APIs with Node.js
- Quicknode Token API: Quickly fetch ERC-20 token balances without having to build and manage your own scripts
- Coingecko API: Fetch the current market price of an ERC-20 token in USD terms
- Hubble node with HTTP API running or Neynar API Key in order to interact with fetch user data on Farcaster when someone interacts with the Frame
Now, to the technical coding portion. Make sure to have a terminal window and code editor (e.g. VSCode) ready.
Set Up the Project
First, clone the following repo to the directory of choice:
git clone git@github.com:quiknode-labs/qn-guide-examples.git
cd ethereum/farcaster-frames
Exploring the directory, we can see it's set up as follows:
.
├── node_modules
├── package-lock.json
├── package.json
├── readme.md
├── .env.example
├── src
│   ├── config.ts
│   ├── index.ts
│   ├── types.ts
│   └── utils
│       ├── ethers.ts
│       └── frame.ts
└── tsconfig.json
Before running the following commands to install dependencies, ensure your Node.js version is 18.18>:
npm i
Next, open a code editor and then open the .env.example file to configure our environment variables. Rename this file to .env and input your environment variables accordingly:
QUICKNODE_HTTP_ENDPOINT="https:/quiknode.pro/12345/"
HUBBLE_URL="https://7f38-174-138-84-0.ngrok-example-url.app" ## POINTS TO PORT 2281
NGROK_URL="https://85e4-2601-589-4984-73d0.ngrok-example-url.app" # POINTS TO PORT 8080
NEYNAR_API_KEY="API_KEY" # IF NOT RUNNING HUBBLE NODE SERVING HTTP
In the next step, we'll show you how to retrieve the NGROK_URL.
Start the remote ngrok server within your projects root directory (ethereum/farcaster-frames):
ngrok http 8080
Take this URL (e.g., https://85e4-2601-589-4984-73d0.ngrok-example-url.app) and add it to your .env file as the NGROK_URL variable value. Remember to save the file.
Then, open another terminal window in the same project directory. To start the local server, run the npm run dev command. This will start a local server (e.g., http://localhost:8080) and you can access the API endpoint by adding /frame to the end.
Let's walk through all the important code logic.
Diving into the Code
We'll be covering the code logic throughout the src folder.
src/utils/ethers.ts - Fetch ERC-20 Token Balances
This file contains three functions that is related to Ethereum interactions.
The getWalletTokenBalances function makes a RPC call to the Token API via the qn_getWalletTokenBalance method. This returns the ERC-20 tokens of a wallet, optionally allowing to filter for specific tokens which we utilize. With the response, we will organize the balances of each eligible ERC-20 toke found into a structured list. This list includes details such as the name, address, totalBalance, and decimal precision of each token.
export async function getWalletTokenBalances(walletAddress: string) {
    const tokenAddresses = Object.values(contractsInfo).map(info => info.address);
    const response = await fetch(providerURL, {
       method: 'POST',
       headers: {
          'Content-Type': 'application/json'
       },
       body: JSON.stringify({
          id: 1,
          jsonrpc: "2.0",
          method: "qn_getWalletTokenBalance",
          params: [{
             wallet: walletAddress,
             contracts: tokenAddresses
          }]
       })
    });

    if (!response.ok) {
       throw new Error(`Network response was not ok: ${response.status}`);
    }
    const data = await response.json();
    const tokens = data?.result?.result ?? [];
    const tokenBalances: TokenBalance[] = tokens.map((token: any) => ({
       name: token.name,
       address: token.address,
       totalBalance: token.totalBalance,
       decimals: token.decimals,
    }));

    return tokenBalances
}
The getBorrowPower function calculates the borrowing power of eligible tokens returned from the getWalletTokenBalances function.
export async function getBorrowPower(tokenArray: TokenBalance[]): Promise<number> {
    let totalBorrowPower = 0;

    const borrowPowerPromises = tokenArray.map(async (token) => {
      const tokenInfo = tokensAvailabletoBorrow[token.name as keyof typeof tokensAvailabletoBorrow];
      if (!tokenInfo) return 0;

      try {
        const tokenBalance = await ethers.formatUnits(token.totalBalance, ethers.toNumber(token.decimals));
        const response = await fetch(`https://api.coingecko.com/api/v3/simple/price?ids=${tokenInfo.id}&vs_currencies=usd`);
        const data = await response.json();
        const tokenPrice = data[tokenInfo.id].usd || 1;
        const borrowPower = ((parseFloat(tokenBalance) * tokenPrice) * tokenInfo.collateralFactor);
        return borrowPower;
      } catch (error) {
        console.error('Error fetching token price:', error);
        return 0;
      }
    });

    const results = await Promise.all(borrowPowerPromises);
    totalBorrowPower = results.reduce((acc, curr) => acc + curr, 0);

    return totalBorrowPower;
}
The getUserfromfId has two configurations. The first option is to call your local (or remote) Hubble node's HTTP API server and get a user's Ethereum address based on their fID (Farcaster user ID). Alternatively, you can use the Neynar API to fetch the same information. Note that the API endpoints are different, and you will need to keep one commented out in order to work.
export async function getUserfromfId(fid: number) {
    // Method 1: Using Hubble node with HTTP API
    const hubbleHTTPapi = process.env.HUBBLE_URL as string;
    try {
        const userDataByFid = await fetch(`${hubbleHTTPapi}/v1/userDataByFid?fid=${fid}&user_data_type=6`, {
            method: 'GET',
        });
        const fetchUser = await userDataByFid.json();
        const username = fetchUser.data.userDataBody.value;
        const userDataByName = await fetch(`${hubbleHTTPapi}/v1/userNameProofByName?name=${username}&user_data_type=6`, {
            method: 'GET',
        });
        const fetchAddress = await userDataByName.json()
        let custodyAddress = fetchAddress?.owner;
        if (!custodyAddress) {
            custodyAddress = "0x0"
            console.log('Custody address not found in response');
        }
        return custodyAddress;
    } catch (error) {
        console.error('Error with Local API:', error);
        throw error;
    }
    // Method 2: Using Neynar API
    /*
    const url = 'https://api.neynar.com/v1/farcaster/user';
    const apiKey = process.env.NEYNAR_API_KEY as string;
    try {
      const response = await fetch(`${url}?fid=${fid}`, {
        method: 'GET',
        headers: {
          'accept': 'application/json',
          'api_key': apiKey,
        },
      });

      if (!response.ok) {
        throw new Error(`HTTP error! Status: ${response.status}`);
      }

      const userData = await response.json();
      const custodyAddress = userData?.result?.user?.custodyAddress;

      if (!custodyAddress) {
        throw new Error('Custody address not found in response');
      }

      return custodyAddress;
    } catch (error) {
      console.error('Error:', error);
      throw error;
    }
    */
}
src/utils/frame.ts - Generate Farcaster Frames
This file contains the logic to render the Frame metadata (OpenGraph tags). It does so with two functions, generateFarcasterFrameMetaTag and frameGenerator.
The generateFarcasterFrameMetaTag function creates meta tags based on provided frame properties, including images, URLs, and interactive buttons.
export function generateFarcasterFrameMetaTag({ frame, imageUrl, postUrl, buttons, aspectRatio, action, target }: IFrameProps): string {
    let metaTag = `<meta property="fc:frame" content="${frame || "vNext"}" />\n`;
    metaTag += `<meta property="og:image:image:aspect_ratio" content="${aspectRatio || "1.91:1"}" />\n`;
    metaTag += `<meta property="og:image" content="${imageUrl}" />\n`;
    metaTag += `<meta property="fc:frame:image:aspect_ratio" content="${aspectRatio || "1.91:1"}" />\n`;
    metaTag += `<meta property="fc:frame:image" content="${imageUrl}" />\n`;

    if (postUrl) {
        metaTag += `<meta property="fc:frame:post_url" content="${postUrl}" />\n`;
    }

    if (buttons) {
        buttons.forEach((button, index) => {
            metaTag += `<meta property="fc:frame:button:${index + 1}" content="${button}" />\n`;
            if (action && target && index === 1) {
                metaTag += `<meta property="fc:frame:button:${index + 1}:action" content="${action}" />\n`;
                metaTag += `<meta property="fc:frame:button:${index + 1}:target" content="${target}" />\n`;
            }
        });
    }

    return metaTag;
}
The frameGenerator function dynamically wraps the generated meta tags into an HTML format.
export function frameGenerator(frameProps: IFrameProps): string {
    const metaTag = generateFarcasterFrameMetaTag(frameProps);

    return `<!DOCTYPE html>
    <html lang="en">
        <head>
            <title>${frameProps.frame}</title>
            ${metaTag}
        </head>
    </html>`;
}
src/index.ts - Express.js API Routes
This file contains our GET and POST routes with Express in order to serve Frames.
The /frame GET endpoint generates a frame with preset content as specified in its IFrameProps, while the POST endpoint first retrieves and calculates borrowing power based on the user's Ethereum address using the functions we created in the utils/ethers.ts file, then serves this content by specifying the frame props and sending a 200 (OK) request back.
Other files in this project directory should be self-explanatory; however, if you'd like something to be explained further or have any questions, please leave feedback at the end of the guide!
Deploy to Production
Since Frames are built with APIs, you'll need to serve them somewhere such as Vercel. If you do so, make sure you initialize a git repository (i.e., .git) in your project root folder and ensure your .env file is not committed to your repository. Then, login, import your repository, configure your environment variables by pasting the .env file in the proper section, and then deploy!
With your public URL, you'll be able to test your Frame again on the Developer Frames testing tool and cast (post) the URL to make your Frame public. Keep in mind that your Frames server will need to stay live for as long as you want your Frame to work.
Next steps
This guide has shown you the possibilities with Frames. If you want to build on top of this Frame, some ideas include:
- Add a text field with the
fc:frame:input:textmetadata so users can paste in addresses to check their borrowing power - Enable a whitelist to only allow certain users (e.g., users with a balance over x) to mint an NFT. You can deploy an NFT yourself to mint from. After, you could create a Webhook to be notified whenever an NFT has been minted
- Add other lending protocols (e.g., Aave) which may offer more tokens or different collateral ratios
- Utilize the
marketsfunction on the Comptroller smart contract from Compound.finance to retrieve the full list of cToken assets and check their collateral ratios - Use additional blockchains (e.g., Optimism, Arbitrum, Polygon, etc.) and/or lending protocols (e.g., Aave) to get optimized borrowing values based on the current supply/demand for that asset on a specific chain
Bonus tip: The Frames.js library has a helpful Frame tool you can use to debug while building (it helped me!)
Final Thoughts
You have been red-pilled on Farcaster and how to build your own Farcaster frame. Share your custom Frames on X and tag us @Quicknode!
If you have questions, check out our Discord server or provide feedback using the form below for help. Stay up to date with the latest by following us on Twitter (@Quicknode) and our Telegram announcement channel.
We ❤️ Feedback!
Let us know if you have any feedback or requests for new topics. We'd love to hear from you.