
11 min read
Overview
Looking to create a token on Solana? Metaplex’s Token Metadata Standard and Umi make it easier and more secure than ever. In this guide, we’ll walk you through how to create a fungible SPL token on Solana using this modern framework—in just 6 steps.
Prefer a video walkthrough? Follow along with Sahil and learn how to create a fungible token on Solana.
What You Will Do
In this guide, you’ll learn how to create a Solana SPL token using Metaplex’s Token Standard and the Umi client. You will create a wallet (and airdrop some SOL), upload token metadata to IPFS, and mint your token—all using best practices for a Solana dev environment.
What You Will Need
- A free Quicknode account with a Solana devnet endpoint
- Nodejs installed (version 16.15 or higher)
- npm or yarn installed (We will be using yarn to initialize our project and install the necessary packages. Feel free to use npm instead if that’s your preferred package manager)
- TypeScript experience and ts-node installed
- Solana Web3.js installed
- Metaplex Foundation Umi JS client
- Metaplex Foundation Umi default plugins bundle
- Metaplex Foundation MPL Token Metadata Library
Step 1: Set Up Your Environment
Before you can create an SPL token, you need to set up your environment. To start, create a new project directory in your terminal with:
mkdir mint-fungible-spl
cd mint-fungible-spl
Create two files, wallet.ts and mint.ts. We will use wallet.ts to create a new dev wallet and airdrop some Solana for testing. We'll use mint.ts to mint a new SPL token and upload our token metadata.
echo > {wallet,mint}.ts
Initialize your project with the "yes" flag to use default values for your new package:
yarn init --yes
#or
npm init --yes
Create a tsconfig.json file:
tsc --init
Open tsconfig.json and uncomment (or add) this to your file:
"resolveJsonModule": true
This will allow us to import .json files into our repository, which will be important later when we want to generate a Keypair from a PrivateKey.
Also double check that esModuleInterop is set to true to allow for us to use imports.
Install Solana Web3 dependencies:
yarn add @solana/web3.js@1 @metaplex-foundation/umi @metaplex-foundation/mpl-token-metadata @metaplex-foundation/umi-bundle-defaults bs58
#or
npm i @solana/web3.js@1 @metaplex-foundation/umi @metaplex-foundation/mpl-token-metadata @metaplex-foundation/umi-bundle-defaults bs58
Your environment should look something like this:
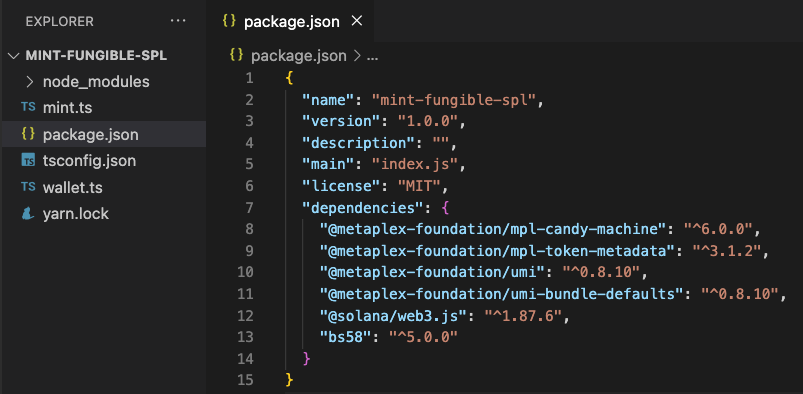
Alright! We're all ready to go.
Step 2: Set Up a Solana Devnet Endpoint on Quicknode
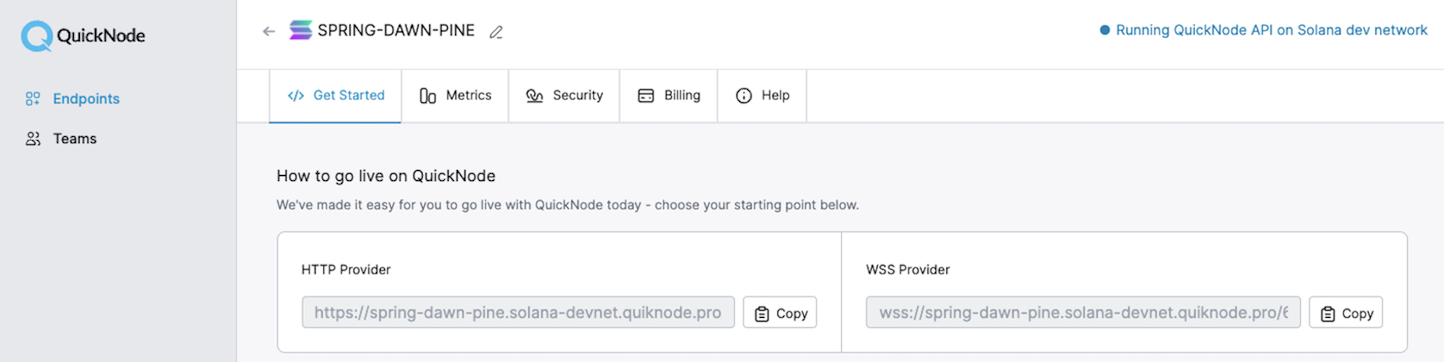
To build on Solana, you'll need an API endpoint to connect with the network. You're welcome to use public nodes or deploy and manage your own infrastructure; however, if you'd like 8x faster response times, you can leave the heavy lifting to us. Sign up for an account here.
Once you’ve created your account, deploy a Solana Devnet node. From there, copy the HTTP Provider link:
Step 3: Create a Wallet and Airdrop SOL
In order to mint a fungible SPL token, we'll first want to create a Devnet wallet and airdrop SOL into it. If you already have a paper wallet, save it to your project directory as guideSecret.json. If it needs some devnet SOL, you can request some with the form below or from Quicknode's Solana faucet:
Note: Sending airdrop requests too frequently may trigger a 429 (Too Many Requests) error.
If you don't have a paper wallet, we'll programmatically generate a new one. Open wallet.ts and paste the following code in. We'll break it down in the next section.
import { Keypair, LAMPORTS_PER_SOL, Connection } from "@solana/web3.js";
import * as fs from 'fs';
import bs58 from 'bs58';

//STEP 1 - Connect to Solana Network
const endpoint = 'https://example.solana-devnet.quiknode.pro/000000/'; //Replace with your Quicknode RPC Endpoint
const solanaConnection = new Connection(endpoint);

//STEP 2 - Generate a New Solana Wallet
const keypair = Keypair.generate();
console.log(`Generated new KeyPair. Wallet PublicKey: `, keypair.publicKey.toString());

//STEP 3 - Convert Private key to Base58
const privateKey = bs58.encode(keypair.secretKey);
console.log(`Wallet PrivateKey:`, privateKey);

//STEP 4 - Write Wallet Secret Key to a .JSON
const secret_array = keypair.secretKey
    .toString() //convert secret key to string
    .split(',') //delimit string by commas and convert to an array of strings
    .map(value=>Number(value)); //convert string values to numbers inside the array

const secret = JSON.stringify(secret_array); //Covert to JSON string

fs.writeFile('guideSecret.json', secret, 'utf8', function(err) {
    if (err) throw err;
    console.log('Wrote secret key to guideSecret.json.');
});

//STEP 5 - Airdrop 1 SOL to new wallet
(async()=>{
    const airdropSignature = solanaConnection.requestAirdrop(
        keypair.publicKey,
        LAMPORTS_PER_SOL,
    );
    try{
        const txId = await airdropSignature;
        console.log(`Airdrop Transaction Id: ${txId}`);
        console.log(`https://explorer.solana.com/tx/${txId}?cluster=devnet`)
    }
    catch(err){
        console.log(err);
    }
})()
This script will perform 5 tasks:
- Connect to the Solana Network (Make sure you replace the example URL on Line 6 with your actual Quicknode Endpoint URL that you saved in the previous step).
- Generate a new Wallet Keypair.
- Convert the Private key to Base58 and print it to the console.
- Write the Secret Key to a .json file that we'll use in the next step. Lines 16-22 are necessary to format the key as an array of numbers. Lines 24-27 use fs to export the array to a .json file.
- Airdrop 1 SOL to the new Wallet.
Go ahead and run this script to create a new wallet and airdrop it 1 SOL:
ts-node wallet.ts
You should see a new file, guideSecret.json in your project folder and a terminal log like this:
Generated new KeyPair. Wallet PublicKey:  G7ugoBpckgiL13KZMzWgQ751G27moDR9yVckQERrNnvj
Wallet PrivateKey: 3A4b34ob9hqUaTjR52eBLjQCLova1jqAG1zT59ypXSJvjh1cQzEExpBBbQLWT7gfbcS4KuYddBDiAaYrFCPE55Tu
Wrote secret key to guideSecret.json.
Airdrop Transaction Id: 58uYUd8PeimjWxf12dZRdqmURoMg1Q15SaaWwEET8U4VXU2pystyUsL9s2sq3cp2JTsUugPY7SUwW82S71SUo6Sj
https://explorer.solana.com/tx/58uYUd8PeimjWxf12dZRdqmURoMg1Q15SaaWwEET8U4VXU2pystyUsL9s2sq3cp2JTsUugPY7SUwW82S71SUo6Sj?cluster=devnet
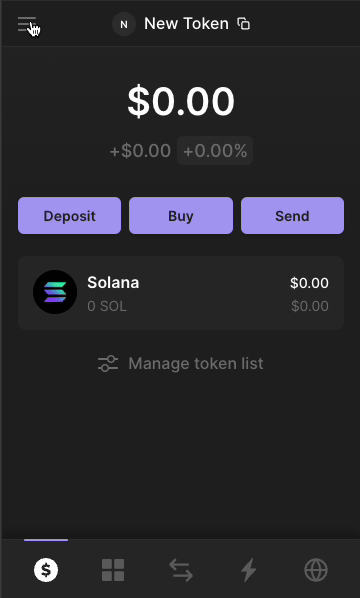
Now, let's add the private key to the wallet of our choice (Phantom in this case):
We are printing the private keys just so that we can add the new wallet in Phantom. Never share your private keys with anyone; always store them securely and in environment files (.env) when using them in code, and make sure to add the environment files to .gitignore before publishing them on GitHub.
Let's upload the Token icon and metadata.
Step 4: Upload the Token Icon and Metadata using the Metaplex Token Standard
We will need a token icon (image) and metadata (JSON file) that are publicly accessible so that our token metadata can be properly displayed on block explorers, wallets, and exchanges.
To stay true to the ethos of decentralization, we will use IPFS to upload our token icon and metadata.
Although we recommend using Quicknode's IPFS tool to pin and serve data, we'll demonstrate both methods below:
- Using Quicknode's managed IPFS service
- Running a local IPFS node
- Quicknode IPFS
- Local IPFS Node
To use IPFS on Quicknode, a Build plan or higher is required. View our feature breakdown by plan on our pricing page.
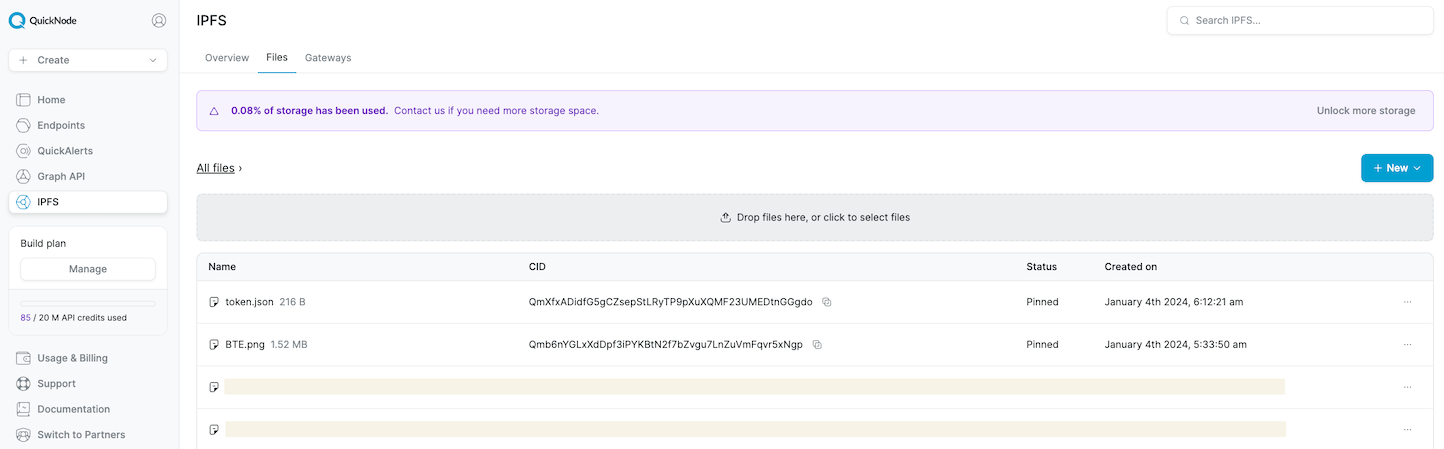
Navigate to the Quicknode Dashboard and click the IPFS tab on the left-sidebar.
Then, click on the Files tab and either click the New button and select Upload a file or simply drag the file you want to pin. We'll first upload the image below and then the metadata JSON file.

Once the image is uploaded, click on the ellipses menu next to the file then click on Copy IPFS URL. We'll need to add this in the metadata file.
Now let's define our metadata using Metaplex's Fungible Token Standard, which requires a name, symbol, description, and image (all are string values). Using the standard with your token mint will enable major platforms like Phantom Wallet or Solana Explorer to easily recognize your token and make it viewable by their users. Create a new metadata JSON file (token.json in this case).
{
    "name": "Best Token Ever",
    "symbol": "BTE",
    "description": "This is the best token ever!",
    "image": "IPFS_URL_OF_IMAGE"
}
Update IPFS_URL_OF_IMAGE with the IPFS URL of the image we got earlier, save the file and upload it. Once pinned, you'll see the file's name, along with other data such as the files CID, whether they're pinned, and the date they were pinned. Copy the IPFS URL of the metadata file too. We will need this URL later while minting our token.
That was easy! Plus, we don't have to worry about running and managing our own IPFS node. You can click the ellipses next to the file and click Copy IPFS URL to get the URL where your file is hosted. Additionally, you can re-download or view your files details under this ellipses menu. Take a moment to try it.
Now that we have our files pinned on IPFS via Quicknode. Let's mint our token!
Our first step here would be to install IPFS and publish our files to IPFS. You can download and install IPFS CLI based on your Operating system by following the installation guide in IPFS docs, creating a project directory, and changing the directory.
Open your terminal/cmd and Initialize the IPFS repo.
$ ipfs init
Now, open another window for your terminal/cmd and start the IPFS daemon. This will act as your local IPFS node.
$ ipfs daemon
You can use your own image or metadata, or use the example image below.
Move your desired image into the project directory (BTE.png here) and go back to the previous terminal/cmd window, and publish the image to IPFS using the following command:
$ ipfs add BTE.png
On successful upload, you'll see an output similiar to this:
![]()
Save the generated hash, and add https://ipfs.io/ipfs/ suffix to the hash. The complete URL will look like this https://ipfs.io/ipfs/Qmb6nYGLxXdDpf3iPYKBtN2f7bZvgu7LnZuVmFqvr5xNgp
Now let's define our metadata. Solana has recently adopted Metaplex's Fungible Token Standard, which requires a name, symbol, description, and image (all are string values). Using the standard with your token mint will enable major platforms like Phantom Wallet or Solana Explorer to easily recognize your token and make it viewable by their users. Create a new metadata JSON file (token.json in this case).
{
    "name": "Best Token Ever",
    "symbol": "BTE",
    "description": "This is the best token ever!",
    "image": "IPFS_URL_OF_IMAGE"
}
Update IPFS_URL_OF_IMAGE with the complete URL of the image we got earlier, save the file and upload it. Once uploaded, you'll see the output similar to this:
![]()
Add https://ipfs.io/ipfs/ suffix to the hash of token.json file so that the complete URL looks like this https://ipfs.io/ipfs/QmVjvWQHWpdzkSuvLuaPjJkHoL8p9cfNrFuzpep1SUr3zk. We will need this URL later while minting our token.
Now that we have our files uploaded on IPFS. Let's mint our token!
Step 5: Build a Token Minting Tool
To mint your SPL token, you’ll first need to build a mint tool. Here’s how:
Import Dependencies
Open up mint.ts and import the following dependencies on line 1:
import { percentAmount, generateSigner, signerIdentity, createSignerFromKeypair } from '@metaplex-foundation/umi'
import { TokenStandard, createAndMint, mplTokenMetadata } from '@metaplex-foundation/mpl-token-metadata'
import { createUmi } from '@metaplex-foundation/umi-bundle-defaults';
import secret from './guideSecret.json';
We'll cover these as we get to them in the guide, but we do want to note that final import, secret, which is importing the .json we created in early steps.
Establish Solana Connection
Create a Connection to the Solana network by replacing the example URL with your Quicknode Endpoint URL in the code below and pasting it just below your imports:
const umi = createUmi('https://example.solana-devnet.quiknode.pro/000000/'); //Replace with your Quicknode RPC Endpoint
Initialize the Signer wallet
We are initializing the wallet from the secret and making it the signer for transactions.
const userWallet = umi.eddsa.createKeypairFromSecretKey(new Uint8Array(secret));
const userWalletSigner = createSignerFromKeypair(umi, userWallet);
*Note: setting numDecimals to 0 results in a token that cannot be subdivided. This might be relevant for something like a membership or whitelist mint token.
Create the Metadata variable
Create a metadata variable like below and fill in your token details. Replace IPFS_URL_OF_METADATA with the actual IPFS URL of your metadata (token.json) file.
const metadata = {
    name: "Best Token Ever",
    symbol: "BTE",
    uri: "IPFS_URL_OF_METADATA",
};
Creating the Mint PDA
We'll need to create a Mint Program Derived Address for our token. Learn about what are PDAs in Solana and what is Mint PDA for Tokens on Solana.
Below, we are creating a new Mint PDA and asking the umi client to use our wallet initialized earlier from secret as a signer and use the MPL Token Metadata to mint token metadata.
const mint = generateSigner(umi);
umi.use(signerIdentity(userWalletSigner));
umi.use(mplTokenMetadata())
Deploy Mint PDA and Mint Tokens
In the below function, we send a transaction to deploy the Mint PDA and mint 1 million of our tokens. You can change the amount of tokens and console message according to whatever suits best for you.
createAndMint(umi, {
    mint,
    authority: umi.identity,
    name: metadata.name,
    symbol: metadata.symbol,
    uri: metadata.uri,
    sellerFeeBasisPoints: percentAmount(0),
    decimals: 8,
    amount: 1000000_00000000,
    tokenOwner: userWallet.publicKey,
    tokenStandard: TokenStandard.Fungible,
}).sendAndConfirm(umi)
    .then(() => {
        console.log("Successfully minted 1 million tokens (", mint.publicKey, ")");
    })
    .catch((err) => {
        console.error("Error minting tokens:", err);
    });
Decimals are added to tokens to make them divisible to the smallest parts for simpler transactions and better liquidity. For example, in the above example, we are saying that our token's decimal would be 8, which means that our one token will be divisible to the 8th decimal value. Thus, while minting 1 million tokens, we have to add eight zeros ahead of the 1 million number (1000000_00000000).
Pull it All Together
Alright, the complete mint.ts should look like this:
import { percentAmount, generateSigner, signerIdentity, createSignerFromKeypair } from '@metaplex-foundation/umi'
import { TokenStandard, createAndMint, mplTokenMetadata } from '@metaplex-foundation/mpl-token-metadata'
import { createUmi } from '@metaplex-foundation/umi-bundle-defaults';
import secret from './guideSecret.json';

const umi = createUmi('https://example.solana-devnet.quiknode.pro/000000/'); //Replace with your Quicknode RPC Endpoint

const userWallet = umi.eddsa.createKeypairFromSecretKey(new Uint8Array(secret));
const userWalletSigner = createSignerFromKeypair(umi, userWallet);

const metadata = {
    name: "Best Token Ever",
    symbol: "BTE",
    uri: "IPFS_URL_OF_METADATA",
};

const mint = generateSigner(umi);
umi.use(signerIdentity(userWalletSigner));
umi.use(mplTokenMetadata())

createAndMint(umi, {
    mint,
    authority: umi.identity,
    name: metadata.name,
    symbol: metadata.symbol,
    uri: metadata.uri,
    sellerFeeBasisPoints: percentAmount(0),
    decimals: 8,
    amount: 1000000_00000000,
    tokenOwner: userWallet.publicKey,
    tokenStandard: TokenStandard.Fungible,
}).sendAndConfirm(umi)
    .then(() => {
        console.log("Successfully minted 1 million tokens (", mint.publicKey, ")");
    })
    .catch((err) => {
        console.error("Error minting tokens:", err);
    });
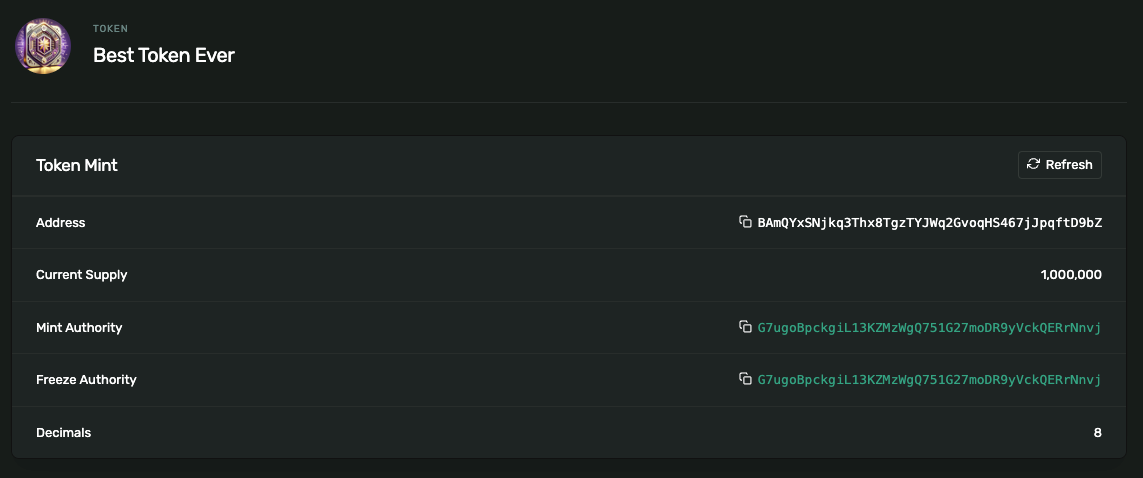
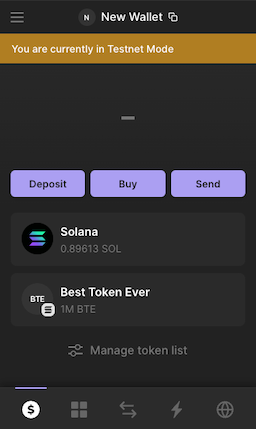
Step 6: Create Your Solana Token
In your Terminal, type:
ts-node mint.ts
Upon successful execution you should see an output like this:
![]()
You have now successfully created your Solana token. You can view it on the Solana Devnet Explorer as well as in your Phantom wallet:
Note: If you've minted a fungible token in the past, you've probably submitted your token to the Solana Token Program Registry. That registry is now deprecated and no longer a necessary step. You've already uploaded the metadata on chain, so you're good to go!
Party Time! 🎉
Congrats! You just minted your own token on Solana using the Metaplex fungible token standard and Umi. Have some fun with this--we're excited to see what tokens you're creating! To learn more, check out some of our other Solana tutorials here.
We ❤️ Feedback!
Let us know if you have any feedback or requests for new topics. We'd love to hear from you.