
11 min read
Overview
Liquid Staking is a Web3 concept allowing users to stake their tokens but still have liquidity to engage in decentralized finance (DeFi). By putting SOL into a liquid staking pool, it gets distributed across a screened group of validators by the pool manager. In exchange, you get a representative token (or liquid staking token) that mirrors your staked SOL. Unlike the staked SOL, this new token is fluid and can be exchanged, sold, moved, and utilized in DeFi platforms.
Liquid Staking has grown in popularity as a way to help secure a network while maintaining liquidity for participation in decentralized finance (DeFi). Solana has a native Program for creating liquid staking pools and tokens. This guide will cover how to create a liquid staking pool on Solana using the Solana Stake Pool Program.
What You Will Do
- Create a Liquid Staking Pool on Solana
- Add Validators to the Pool
- Deposit SOL in the Pool in exchange for Liquid Staking Tokens
- Allocate staked SOL to Validators
What You Will Need
- A basic knowledge of Liquid Staking (Guide: What is Liquid Staking and How to Liquid Stake SOL)
- Solana CLI latest version installed
- SPL-Stake-Tool CLI latest version installed (latest version of Rust will be required to install the CLI)
- Devnet SOL (5-10 SOL): You may request some at the Solana Faucet
- A Solana Devnet endpoint
| Dependency | Version |
|---|---|
| solana-cli | 1.16.10 |
| spl-stake-pool | 0.6.4 |
| rustc | 1.69.0 |
Set Up Your Local Environment
For our demo, we will use Solana CLI to manage two wallets: a Pool Authority wallet and a User wallet. The Pool Authority wallet will be used to create the pool and add validators. The User wallet will deposit SOL into the pool and receive liquid staking tokens.
After you have installed Solana CLI and SPL-Stake-Tool CLI. Create a new directory for your project and navigate to it in your terminal:
mkdir solana-liquid && cd solana-liquid
Let's create the two wallets that we will use for this demo. We will use the solana-keygen command to create two new wallets: AUTHORIY.json and USER.json. In your terminal, enter:
solana-keygen new --no-bip39-passphrase -s -o AUTHORITY.json && solana-keygen new --no-bip39-passphrase -s -o USER.json
Update your Solana config to point to the AUTHORITY.json wallet and Solana's devnet by entering the following command in your terminal:
solana config set -ud -k ./AUTHORITY.json
You should be able to enter solana config get and see your endpoint and confirm that your wallet is configured appropriately.
Depsoit Devnet SOL to Your Wallets
Get the wallet addresses of the new wallets you have created by using the solana address command:
solana address -k AUTHORITY.json && solana address -k USER.json
This will log both wallet addresses to your terminal. You will need about 5 SOL in each wallet for this demo. You can request SOL from the Solana Faucet. For other ways to get Devnet SOL, check out our Complete Guide to Airdropping Test SOL on Solana.
Before moving to the next step, verify you have SOL in both wallets by using the solana balance command:
solana balance -k AUTHORITY.json && solana balance -k USER.json
You should see a response in your terminal like this:
5 SOL
5 SOL
Let's move on to creating our liquid staking pool.
Solana Stake Pool Program
The Solana Stake Pool Program is a Solana program for pooling together SOL to be staked across a set of pool-defined validators. In short the program (ID: SPoo1Ku8WFXoNDMHPsrGSTSG1Y47rzgn41SLUNakuHy) creates a standard for teams to stand up staking pools, implement validator allocation strategies, collect fees, and deposit/withdrawal funds from the pool. Solana's Stake Pool CLI makes it easy for teams to create and manage their own liquid staking pools. Let's cover a few elements of the program before we create our pool.
Stake Pool Accounts
Each stake pool contains two data accounts:
- the stake pool: details about the pool (fees, liquid staking token mint information, amount of stake, etc.)
- the validator list: an array of validator stake accounts and balances that are part of the pool
The stake pool contains overall information about the pool, including fees, pool token mint, amount under management, etc.
Because stake pools can have a large number of validators and because Solana has strict transaction size limitations, updating the total value of the stake pool may require multiple transactions (this is handled by the Stake Pool CLI).
Stake Accounts
Much like traditional staking, stake pools have three types of stake accounts (or stake state):
- Validator stake: Stake accounts that are active/delegated to validators
- Transient stake: Stake accounts that are activating or deactivating (merging to the reserve or validator stake)
- Reserve stake: Stake accounts that are not delegated to validators (to be used by the stake authority to rebalance the pool)
Fees
The stake pool program allows authorities to implement different types of fees for the pool:
| Fee Type | Description |
|---|---|
| SOL Deposit | % charged to users when a user deposits SOL into the pool |
| Stake Deposit | % charged to users when user delegates a stake account to the pool |
| SOL Withdrawal | % charged to users when a user withdrawals SOL from the pool |
| Stake Withdrawal | % charged to users when a user withdrawals SOL to an activated stake account |
| Epoch (Stake Reward) | % of the pool's staking rewards that are charged to the pool at the end of each epoch |
| Referral | % of the pool's deposit fee that is allocated to a partner application or wallet |
Understanding stake pool fees is critical to avoid certain economic attacks on stake pools
In the simplest attack, right before the end of every epoch, the malicious pool token holder finds the highest performing validator in the pool for that epoch, withdraws an active stake worth all of their pool tokens, waits until the epoch rolls over, earns the maximum stake rewards, and then deposits right back into the stake pool. Practically speaking, the malicious depositor is always delegated to the best performing validator in the stake pool, without ever actually committing a stake to that validator. On top of that, the malicious depositor goes around any epoch fees. To render this attack unviable, the stake pool manager can set a deposit or withdraw fee. If the stake pool has an overall performance of 6% APY / ~3.3 basis points per epoch, and the best validator has a performance of 6.15% APY / ~3.37 basis points per epoch, then the minimum stake deposit / withdrawal fee would be 0.07 basis points.
Source: Solana Stake Pool Docs
Let's create our liquid staking pool.
Create a Liquid Staking Pool
Look at the spl-stake-pool command options in your terminal by entering spl-stake-pool -h. You should see a list of options. You should see create-pool as an option. Let's explore its options as well and then use it to create our pool. In your terminal, run spl-stake-pool create-pool -h to see the options for creating a pool. You should see that we are going to need to specify our epoch fees and the maximum number of validators. We also have the option to specify other fees and authorities. Let's create a liquid staking pool that collects a 0.1% fee on withdrawals and 5% of the epoch (staking) rewards.
In your terminal, enter the following command to create a new liquid staking pool:
spl-stake-pool create-pool \
    --epoch-fee-numerator 5 \
    --epoch-fee-denominator 100 \
    --max-validators 10 \
    --withdrawal-fee-denominator 1000 \
    --withdrawal-fee-numerator 1
You should see something like this in your terminal:
Creating reserve stake FW97PaKCuUEws2hcwgFojXtcs886KcWtcNZkBDqgA3PY
Creating mint 9rb1D5DKpGRChr8wpvbwgiTC324GFnkx9o85c2LKX5Uf
Creating associated token account 2moXNUzN5zuk2qake7TWBsypU99cWjDdbEnVDAVZfVRM to receive stake pool tokens of mint 9rb1D5DKpGRChr8wpvbwgiTC324GFnkx9o85c2LKX5Uf, owned by EST7AuMSjdoPG1UvpJRKpWzirzrPbBJGhiTzUh8gjJRk
Creating pool fee collection account 2moXNUzN5zuk2qake7TWBsypU99cWjDdbEnVDAVZfVRM
Signature: 4e5gymVC9JfWWKims2mLzeytjuxrDjggQ6ZTMsSovfv3nhxT4W9KLgPyryhps6ihTR13McVH4j2B3TtJ6K7iUo7
Creating stake pool Co6uQcNnMq9i5NgFvtehDv8Yo83TStNwBMGhgWkKXCU7 with validator list HVmBDKny4X8t77X3UKWfB2KvU7cNzr4VsSkF1PgUiZmW
Signature: LuCzBhesbsUEti4qZtAiaQgieEGySRJLCi5MGyarjG67bVmjv1KxQEg2mdxPDHfLzefnSrF7F9fnVgQMgHZTZ8Y
Congrats! You just created your first liquid staking pool. Here's a summary of the created accounts and how they will be used:
- Reserve Stake Account: This account will hold SOL that is not delegated to validators. This account will be used to rebalance the pool.
- Mint: This account is the SPL token mint unique for your new liquid staking toking (this is equivalent to mSOL or any other Liquid Staking Token).
- Associated Token Account: This account is the SPL token account that will hold your (the
AUTHORITY.jsonwallet) liquid staking tokens. - Pool Fee Collection Account: This account will hold the fees collected by the pool.
- Stake Pool Account: This account contains the pool details.
You can now see details about your pool by entering the following command in your terminal (make sure to include the stake pool address from the step above):
spl-stake-pool list -v <YOUR_STAKE_POOL_ADDRESS>
You should see information about your stake pool and its relevant accounts and stake:

Though users are immediately able to deposit SOL into the pool, the pool still needs validators. Let's add some validators to the pool.
Add Validators to the Pool
To add validators to your new pool, you will need to know the validator's vote account public key. If you are doing this on mainnet, you might already know specific validators that you wish to stake with through your own research. You can find a validator's vote account key by looking it up on various explorers or on a community validator tracker:
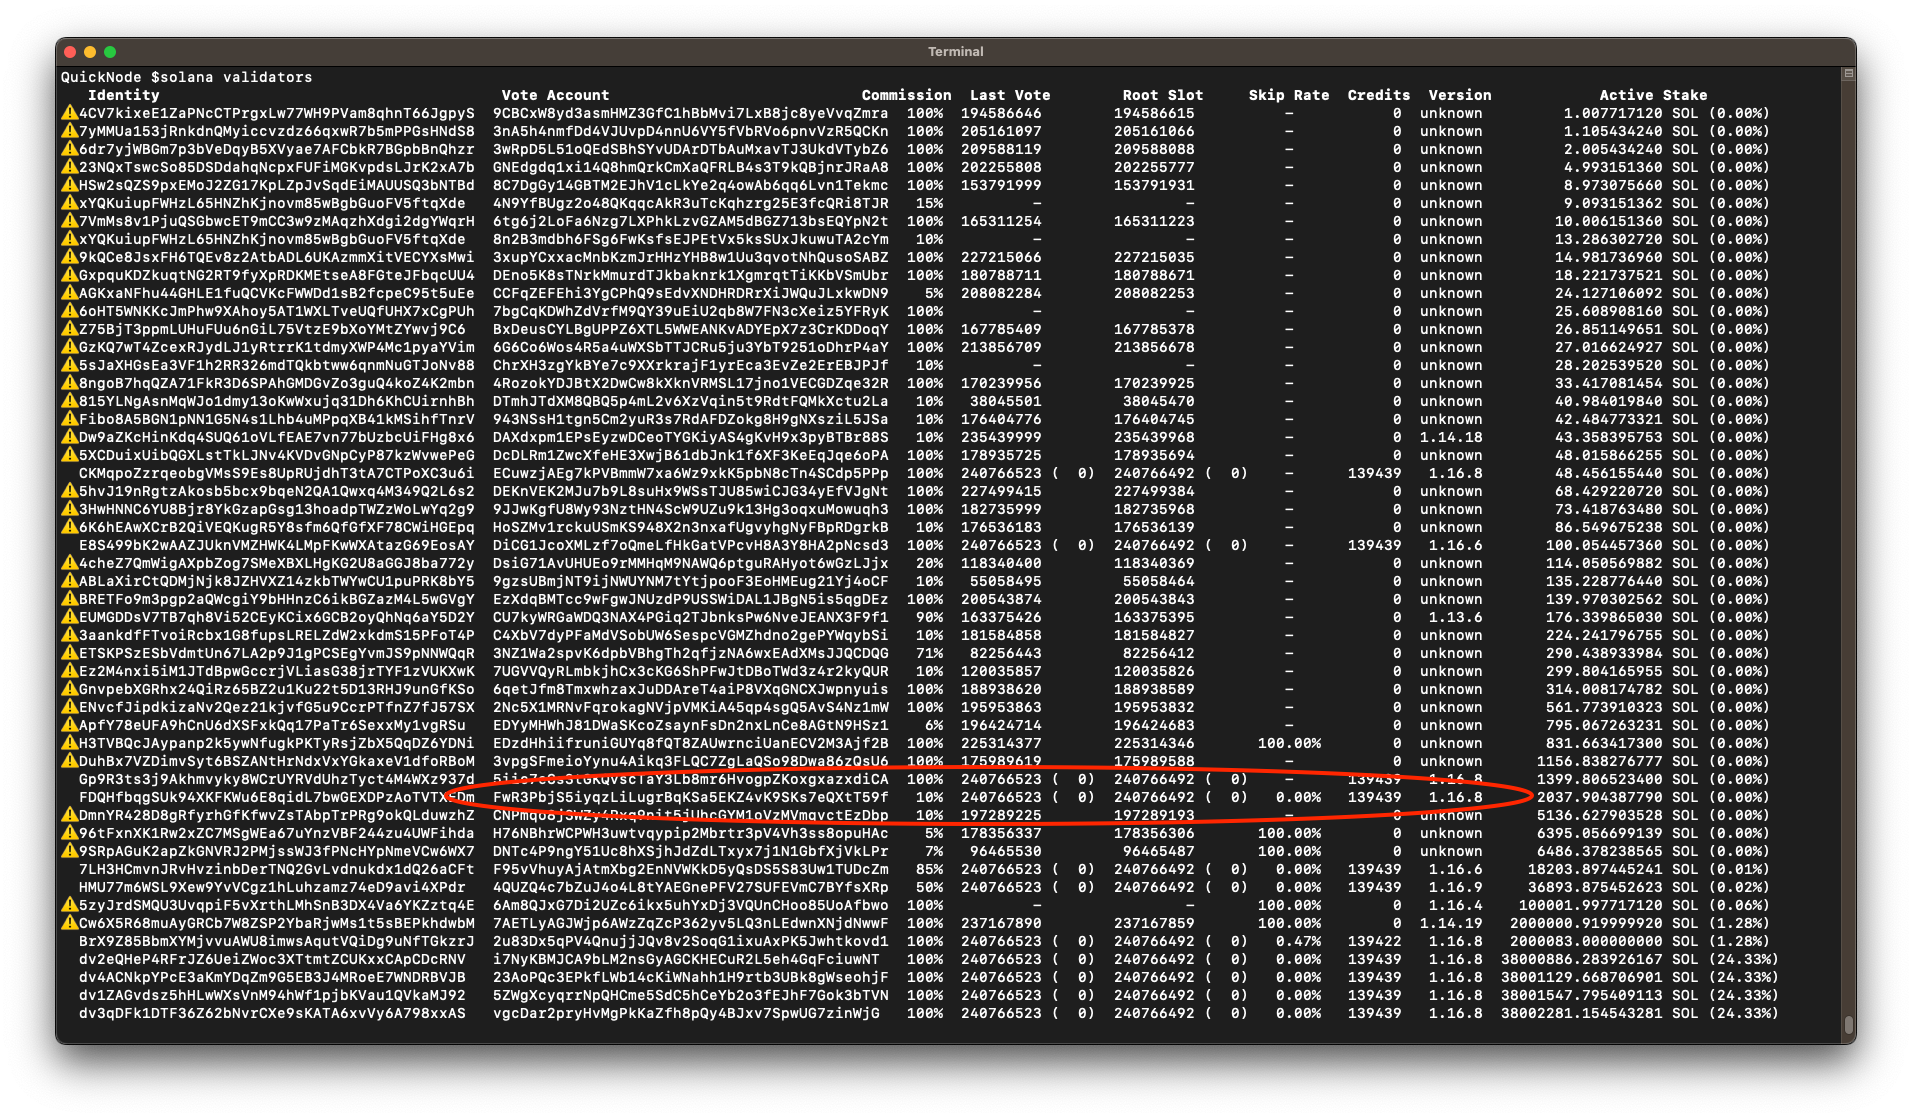
Since operating on devnet, we will just fetch the validator list from the CLI. In your terminal, enter the following command to fetch the validator list:
solana validators
You should see a list of validators and their vote account keys. I will look for a vaidator with a low commission that uses Solana's latest version. I'm going to choose FwR3PbjS5iyqzLiLugrBqKSa5EKZ4vK9SKs7eQXtT59f as my first validator. Feel free to grab one that you like--we will be able to add more or remove this one later.
In your terminal, use the add-validator command to add the validator to your pool (you can run spl-stake-pool add-validator -h to see all of the flags and options available for this command). Make sure to include the validator's vote account key and your pool's address:
spl-stake-pool add-validator <YOUR_STAKE_POOL_ADDRESS> <VOTE_ACCOUNT_ADDRESS>
Great work. Effectively, you now have a liquid staking pool with a single validator but no stake (you can rerun spl-stake-pool list -v <YOUR_STAKE_POOL_ADDRESS> to see the updated details). Feel free to repeat this step to add multiple validators to your stake pool.
Let's deposit some SOL into the pool and receive our liquid staking tokens.
Deposit and Withdrawal SOL to/from the Pool
To deposit SOL into the pool, you will need to use the deposit-sol command. Though we can do this with any wallet (including our authority), let's keep our accounts/roles separate and use the USER.json wallet to deposit SOL into the pool. Use the solana config set command to set your wallet to the USER.json wallet:
solana config set -k ./USER.json
You will need to specify the amount of SOL you wish to deposit and the wallet you want to use to deposit the SOL. In your terminal, enter the following command to deposit 2 SOL into the pool:
spl-stake-pool deposit-sol <YOUR_STAKE_POOL_ADDRESS> 2
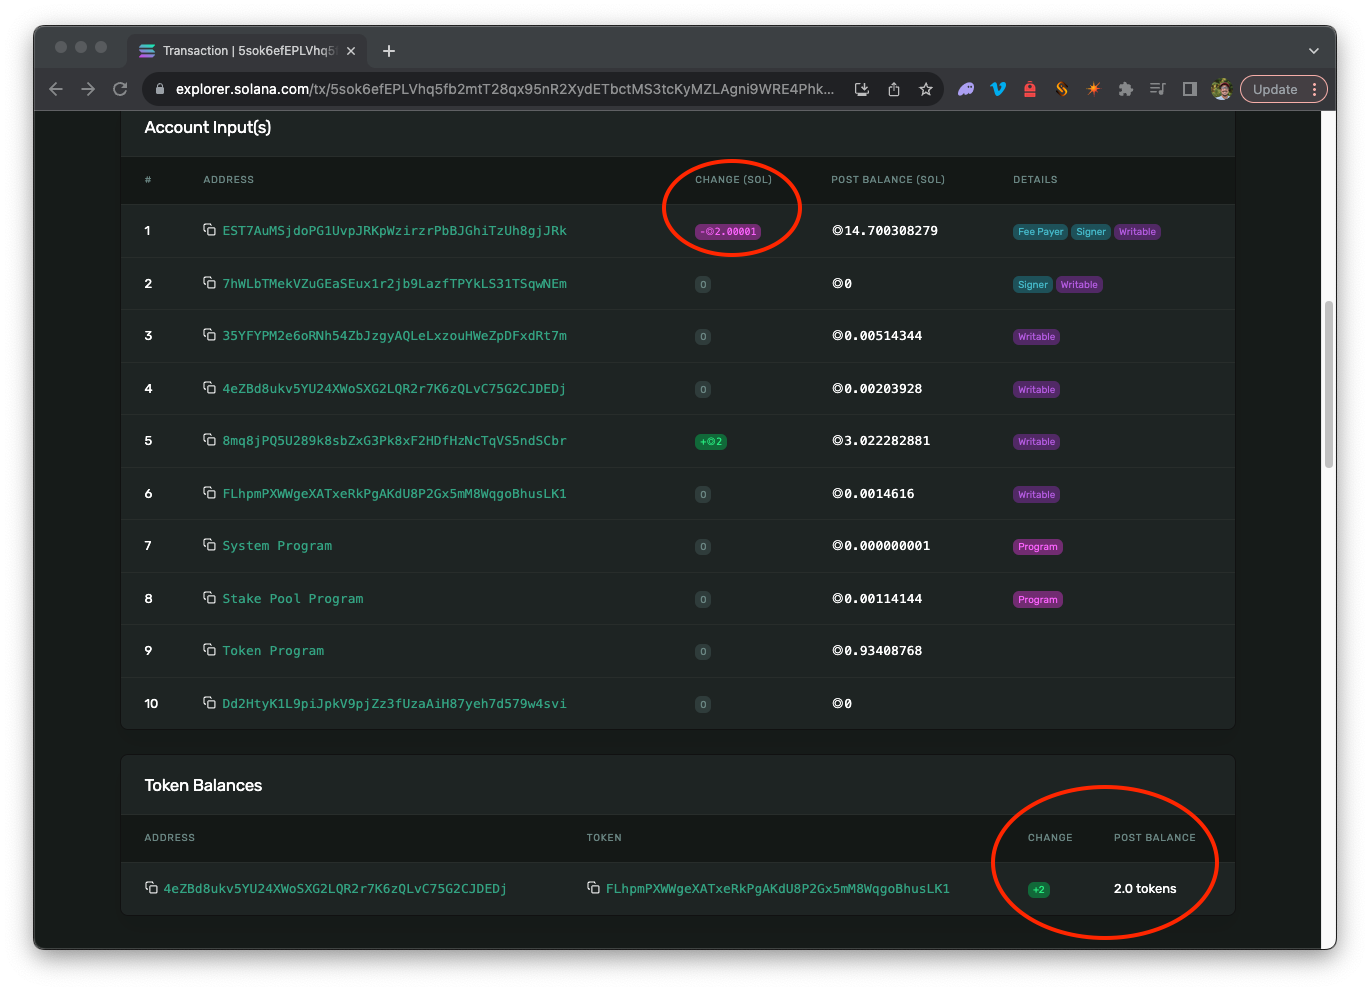
You should be able to check the transaction returned in your terminal to ensure the deposit succeeded. Copy and paste the transaction ID into Solana Explorer to see the transaction details (make sure you select Devnet). You should see your SOL balance reduced by 2 SOL and your liquid staking token balance increased by 2:
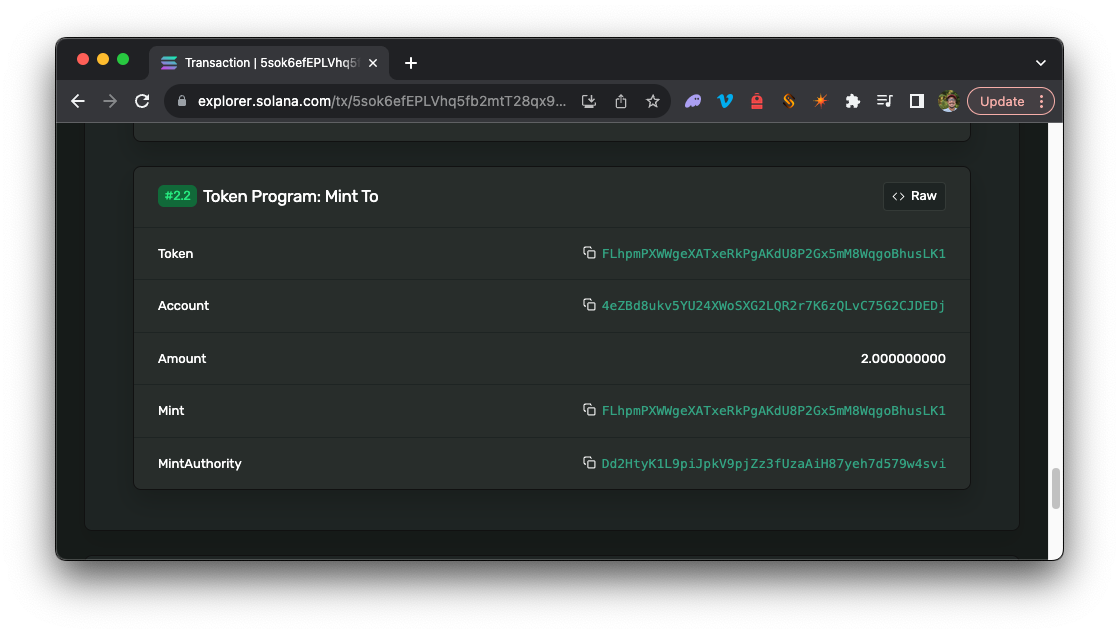
If you scroll down in the Explorer, you should see the mint_to instruction that created your liquid staking tokens:
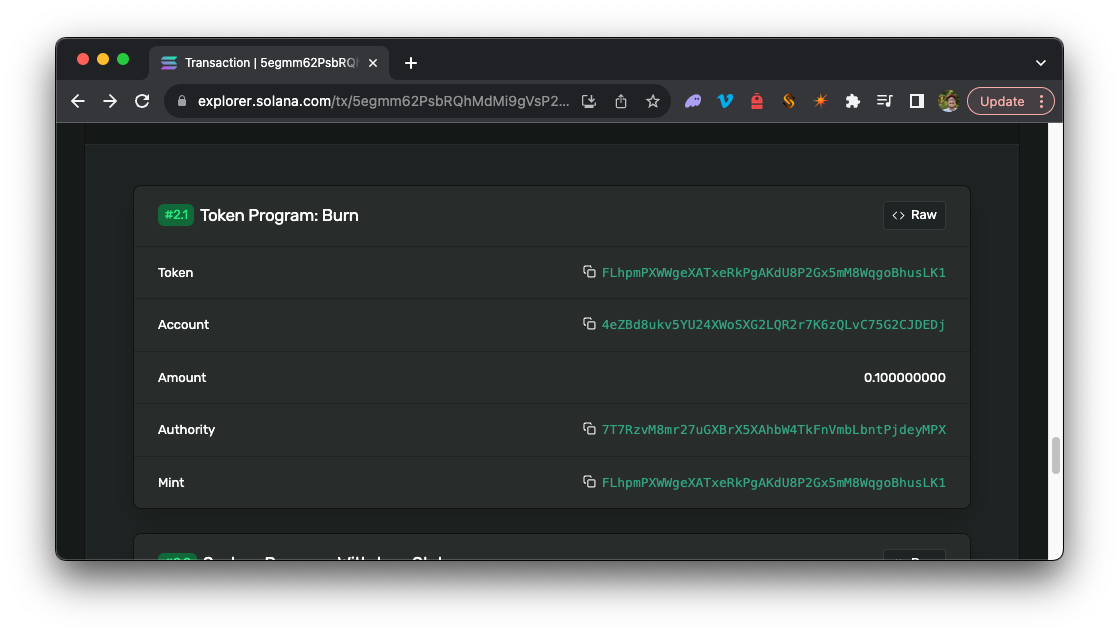
Let's withdraw some of the SOL from the pool to familiarize yourself with the functionality. This is possible because the SOL is not yet delegated to a validator (our pool has a balance in its reserve account). Let's withdraw 0.1 SOL from the pool. In your terminal, enter the following command:
spl-stake-pool withdraw-sol <YOUR_STAKE_POOL_ADDRESS> ./USER.json 0.1
Note that the withdraw-sol function requires us to pass a destination for the funds (which we have passed our ./USER.json wallet).
You should see a similar transaction confirmation in your terminal. If you review this transaction in Solana Explorer, you should see that your SOL balance has increased by 0.1 SOL, and your liquid staking token balance has decreased by 0.1. You will also see that the LST has been burned (or destroyed) by the Stake Pool Program:
Let's move on to delegating our SOL to the validator.
Delegate SOL to the Validator
Before we can delegate our SOL, we must first set our wallet back to the AUTHORITY.json wallet. In your terminal, enter the following command:
solana config set -k ./AUTHORITY.json
If you have followed along exactly, your reserve account should have 1.9 SOL available for staking. You can confirm your reserve balance by entering the following command in your terminal:
spl-stake-pool list -v <YOUR_STAKE_POOL_ADDRESS>
You should see something like this in your terminal:
Stake Pool Info
===============
Stake Pool: 35YFYPM2e6oRNh54ZbJzgyAQLeLxzouHWeZpDFxdRt7m
//...
Stake Accounts
--------------
Reserve Account: 8mq8jPQ5U289k8sbZxG3Pk8xF2HDfHzNcTqVS5ndSCbr   Available Balance: ◎1.900000000
//...
Vote Account: FwR3PbjS5iyqzLiLugrBqKSa5EKZ4vK9SKs7eQXtT59f  Stake Account: H5j8BLLDqU1zrdjRb9jkoZDXAo5Gom3h6PUZVDAY13oH Active Balance: ◎0.000000000    Transient Stake Account: 5L7DdJvD9Y9WZqriD2inPh526syCZJkH4knWqLHTwFnn   Transient Balance: ◎0.000000000 Last Update Epoch: 557
Let's delegate 1 SOL to the validator using the increase-validator-stake (remember, you can use the -h flag to see all options associated with this command). You will need the STAKE_POOL_ADDRESS and the VOTE_ACCOUNT_ADDRESS for the validator from the previous step. In your terminal, enter the following:
spl-stake-pool increase-validator-stake <YOUR_STAKE_POOL_ADDRESS> <VOTE_ACCOUNT_ADDRESS> [AMOUNT]
You should receive a transaction confirmation. Feel free to browse that transaction in your Solana Explorer and then rerun the spl-stake-pool list -v <YOUR_STAKE_POOL_ADDRESS> command to see the updated details of your pool. You should see that your reserve balance has decreased by 1 SOL, and your validator transient stake has increased by 1 SOL:
//...
Stake Accounts
--------------
Reserve Account: 8mq8jPQ5U289k8sbZxG3Pk8xF2HDfHzNcTqVS5ndSCbr   Available Balance: ◎0.900000000
//...
Vote Account: FwR3PbjS5iyqzLiLugrBqKSa5EKZ4vK9SKs7eQXtT59f  Stake Account: H5j8BLLDqU1zrdjRb9jkoZDXAo5Gom3h6PUZVDAY13oH Active Balance: ◎0.000000000    Transient Stake Account: 5L7DdJvD9Y9WZqriD2inPh526syCZJkH4knWqLHTwFnn   Transient Balance: ◎1.000000000 Last Update Epoch: 557
The SOL will be staked at the beginning of the next epoch. You can check the status of the stake by rerunning the list command. You can check the status of the current epoch by entering the following command in your terminal:
solana epoch-info
Keep Building
Explore Your Stake Pool
Great work getting to this point. You now have your own stake pool where you can manage stake allocation, and users can easily deposit and withdraw SOL. We encourage you to explore the other commands available in the Stake Pool CLI (accessible via spl-stake-pool -h) and also explore the Stake Pool Program documentation to learn more about the program and its functionality. Here are some suggestions for things to try:
- Add more validators to your pool
- Transfer an existing stake account to your pool (using the
deposit-stakecommand) - After the next epoch:
- check the status of your stake pool and the validator stake
- run
spl-stake-pool updateto calculate the proper value of the stake pool tokens - remove stake from a validator (using the
decrease-validator-stakecommand) - remove active stake from the stake pool in exchange for pool tokens (using the
withdraw-stakecommand)
- Remove a validator from the pool (using the
remove-validatorcommand) - Modify fees
- Explore Solana's sample scripts for rebalancing the validator pool
- Add metadata (icon, name, and description for your liquid staking token) (Check our Guide: How to Mint Fungible Tokens on Solana for some inspiration)
You may notice that you can only withdraw-sol from the reserve account and only withdraw-stake from an active validator stake account. This means that transient funds (pending stake activation or deactivation) will not be available to your users. As you explore your stake pool demonstration, you may see that managing liquidity, user experience, and user expectations regarding liquidity are important considerations for liquid staking pools.
Reach Out
If you're stuck, have questions, or just want to talk about what you're building, drop us a line on Discord or Twitter!
We ❤️ Feedback!
Let us know if you have any feedback or requests for new topics. We'd love to hear from you.