15 min read
Overview
Hello reader! Today we will be diving into details about making a bot that buys newly minted tokens on the PancakeSwap DEX. Today may be your first time making a trading bot or using the BSC network, and that is okay! By the time you have read through and completed this entire guide, you will have a BNB Smart Chain node with a connected wallet and trading bot to initiate trades on the PancakeSwap DEX!
Prerequisites:
- WBNB to spend
- BNB to pay for gas fees on BSC
- MetaMask installed on your browser of choice
- NodeJS installed on your machine
- A text editor
- Familiarity with the command line
What is PancakeSwap?
PancakeSwap is a Decentralized Exchange or DEX. If you were to think in traditional finance terms, PancakeSwap would be a marketplace where you can buy and exchange goods. PancakeSwap builds on top of the BNB Smart Chain, which means that transactions happen a bit faster, and gas fees are a bit lower when compared to an Ethereum DEX. Other DEXs you could compare PancakeSwap to are SushiSwap or UniSwap, although those are both on Ethereum.
How to Listen For Newly Minted Tokens
Enough with the history lesson. You came here to buy some tokens hot off the press, right? First and foremost, I would like to warn you that this bot we are coding to purchase new tokens is only functional as a proof of concept. While you could theoretically make money off of it, I would highly recommend making your custom changes to this to suit your risk appetite. This is to give you the tools to build your own more intelligent bot.
The core of this bot relies on listening for specific events emitted on the blockchain. In this case, we are listening for new tokens to be created on PancakeSwap.
Before you get too excited, we need to get our tools configured to work with PancakeSwap. The tools, in this case, are our wallet and a node that is connected to the BSC network. For today's guide, I am using a MetaMask wallet paired with a BSC node powered by QuickNode.
Setting Up a Node
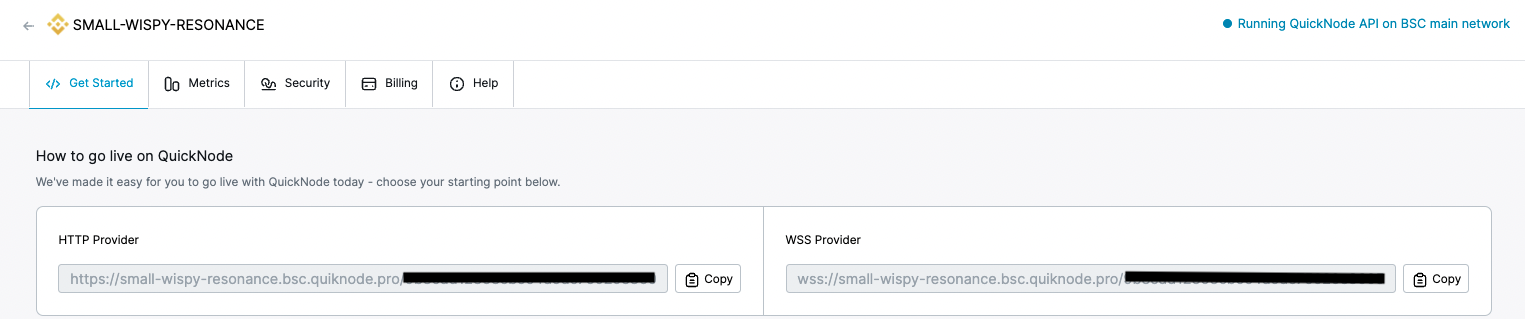
While this goal could be accomplished by any node connection on the BSC network, here at QuickNode, we make it quick and easy to set up a BSC node with WebSocket capabilities. This will come in handy later in the tutorial, as we want to be listening to a stream of information.
You can register for whatever plan best suits your needs and then make sure to launch your node under the BSC Mainnet.
You can sign up and register for a free account here
You will need both the HTTPS and WSS endpoints for this tutorial. It should look something like this:
Setting up MetaMask
With the node successfully set up, we now need to connect our MetaMask to this new network. With the extension open, you will expand the networks tab and click on "Custom RPC." You will fill it out exactly like this picture, except you will copy your HTTPS endpoint from QuickNode under the "New RPC URL" field.
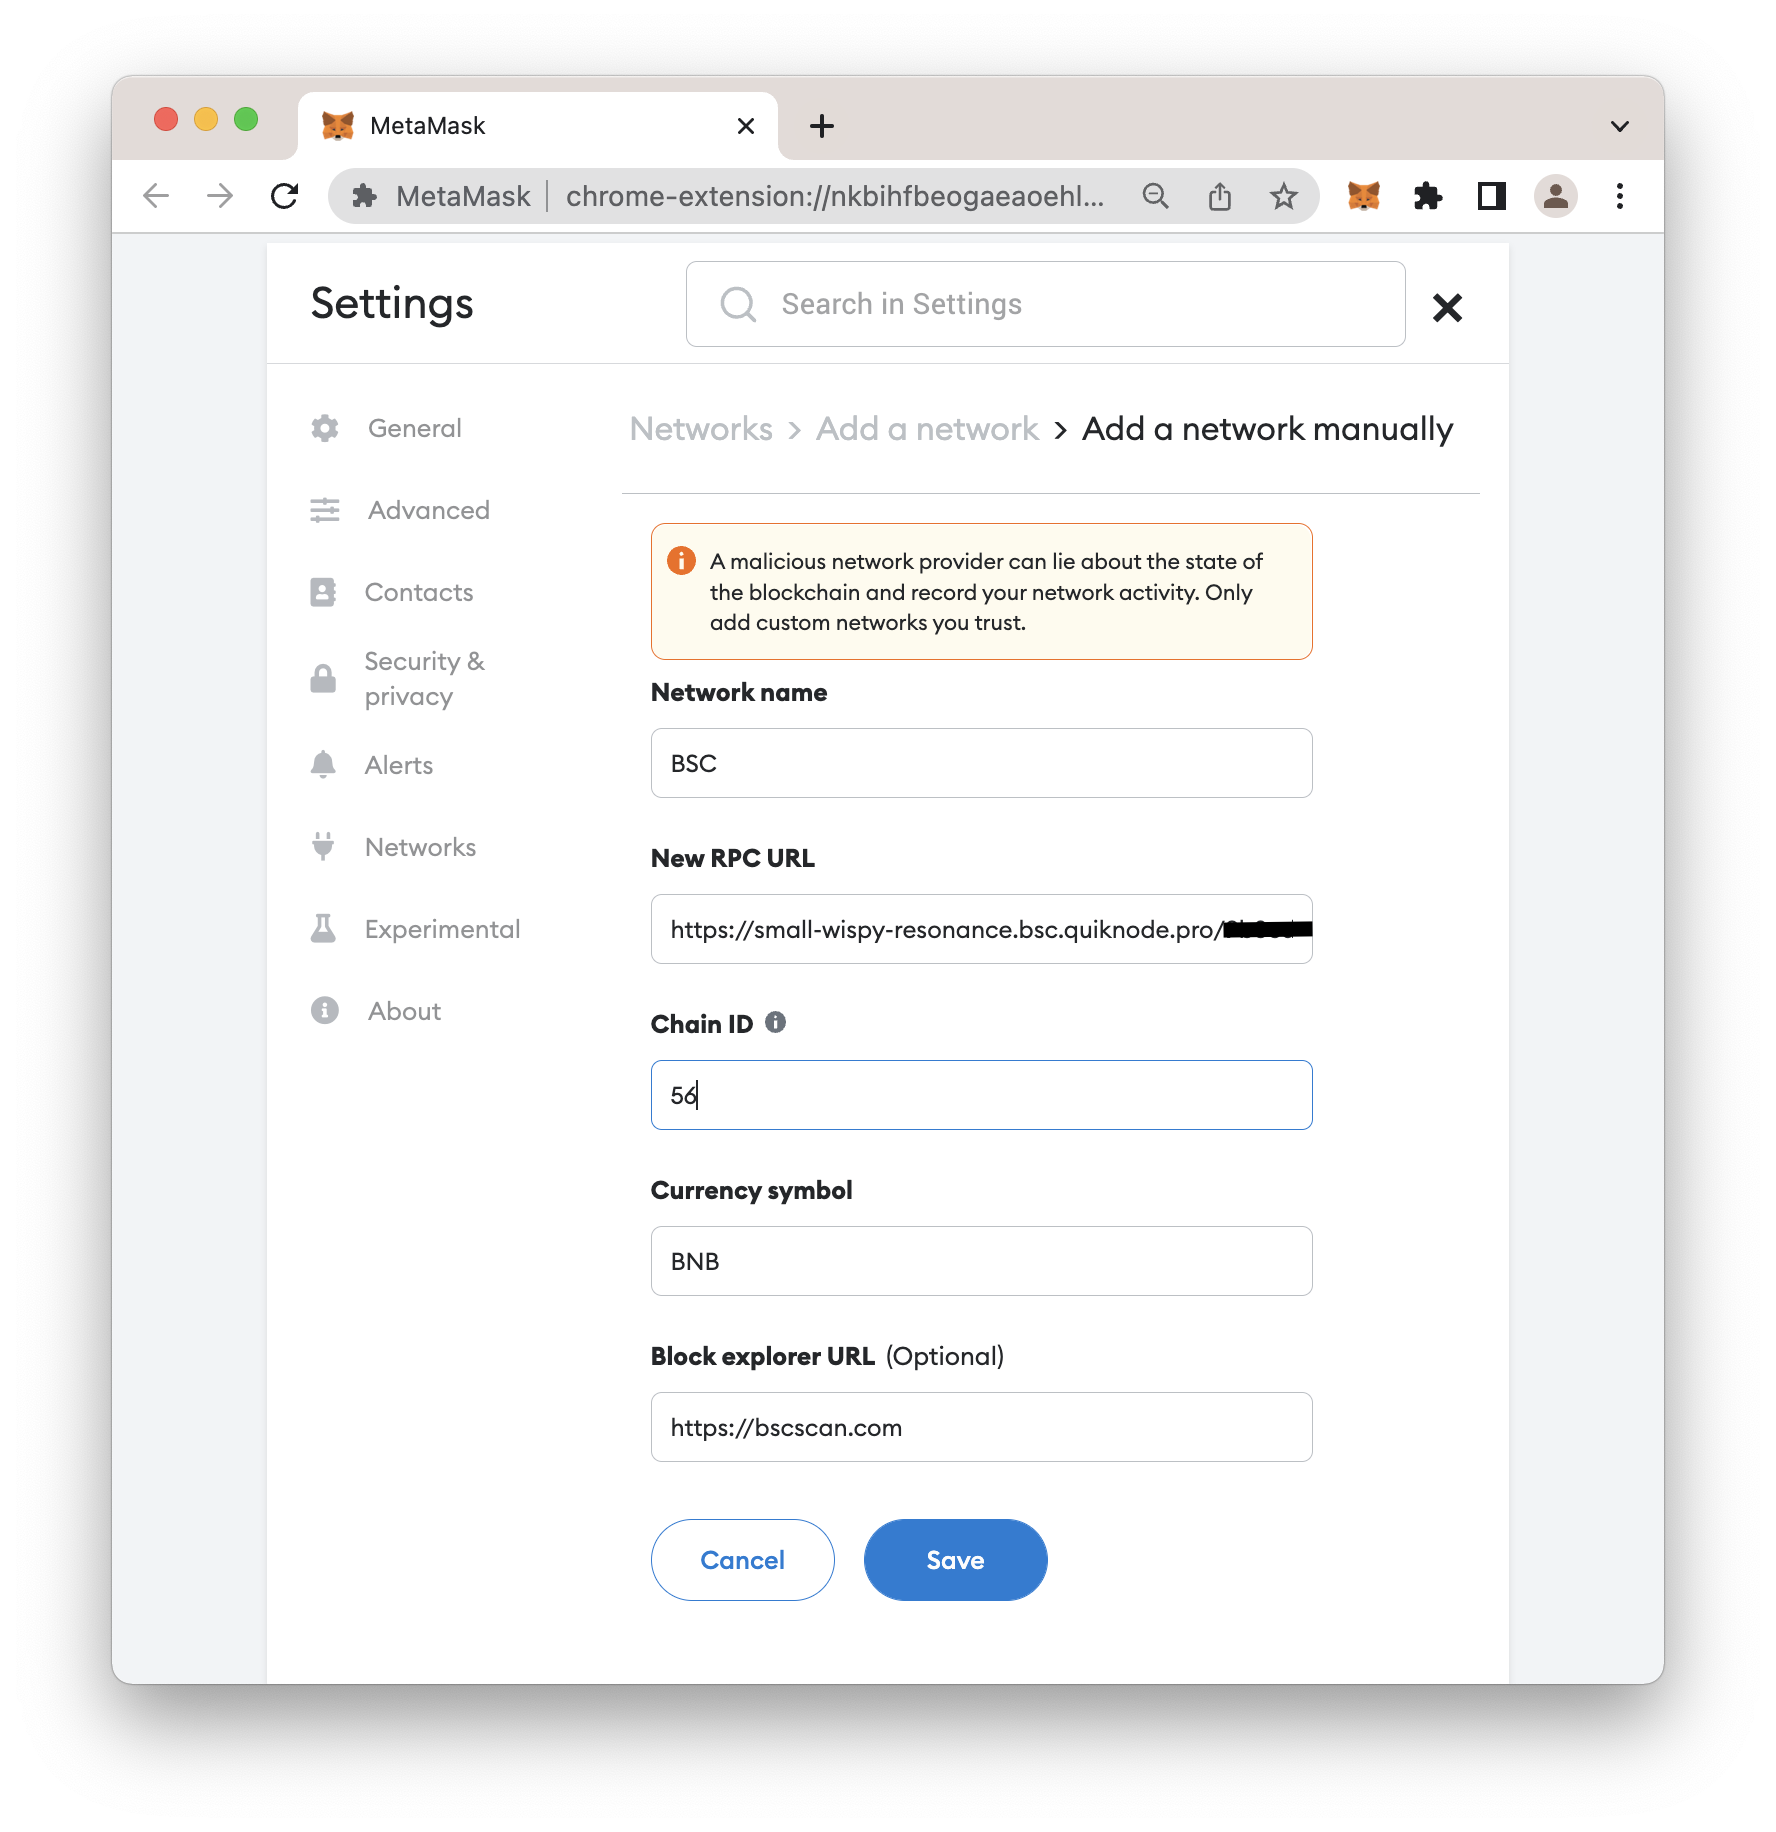
Great job! You are now able to use your wallet on the BSC network. With everything now correctly set up, we can start coding the bot!
Coding the Bot
Project Setup
First things first, you need to set up a directory for the bot's code to live.
mkdir PancakeSwapBot
cd PancakeSwapBot
With that done, make a bot.js file inside your directory.
Installing Dependencies
Before we start coding, we need to add the ethers package. This library allows us to interact with the blockchain using javascript. Make sure you are installing version 5.7. To install it, run the command in the root of your project directory:
npm i ethers@5.7
The Code
The Boilerplate
Go ahead and open up your bot.js file with your text editor of choice. Then add this bit of code at the top:
const ethers = require('ethers');

const addresses = {
    WBNB: "0xbb4CdB9CBd36B01bD1cBaEBF2De08d9173bc095c",
    router: "0x10ED43C718714eb63d5aA57B78B54704E256024E",
    factory: "0xcA143Ce32Fe78f1f7019d7d551a6402fC5350c73",
    me: "YOUR_WALLET_ADDRESS"
}

const mnemonic = "orange banana apple bravo charlie delta gamma ........."

const provider = new ethers.providers.WebSocketProvider("QUICKNODE_WSS_PROVIDER_HERE")
const wallet = ethers.Wallet.fromMnemonic(mnemonic);
const account = wallet.connect(provider)
You can now access Logs for your RPC endpoints, helping you troubleshoot issues more effectively. If you encounter an issue with your RPC calls, simply check the logs in your QuickNode dashboard to identify and resolve problems quickly. Learn more about log history limits on our pricing page.
To break this down, we will go through it line by line.
-
Line 1: importing the ether's library we installed earlier
-
Lines 3-8: listing all of the addresses we will need to complete our script.
- WBNB is the address of WBNB token. WBNB, also known as Wrapped BNB, is a BEP20 token with a 1-to-1 trading value with BSC's native token BNB. We will need WBNB to buy the newly minted tokens.
- router is the address of PancakeSwap's router smart contract. You can find it here
- factory is the address of PancakeSwap's factory contract. You can find it here
- me is your wallet's address!
-
Line 10: mnemonic is your wallet's mnemonic. You can get this from MetaMask. Be sure not to share this with anyone or put this on a public-facing repository. Anyone with this mnemonic can access and control your wallet!
-
Lines 12-14: provider, wallet, and account are the variables that allow you to connect from your program to your QuickNode Websocket provider and then hook up your wallet everything else. This section is the glue of your project.
The Contracts
With all of the addresses out of the way, the next thing we need to do is define the two contracts that we will be using.
const factory = new ethers.Contract(
    addresses.factory,
    ['event PairCreated(address indexed token0, address indexed token1, address pair, uint)'],
    account
);
const router = new ethers.Contract(
    addresses.router,
    [
        'function getAmountsOut(uint amountIn, address[] calldata path) external view returns (uint[] memory amounts)',
        'function swapExactTokensForTokens( uint amountIn, uint amountOutMin, address[] calldata path, address to, uint deadline)',
    ],
    account
);
Here we initialize two different contracts using ether's Contract method. To make a new Contract, you need to pass it the smart contract's address, the portion of the ABI you want to use in the form of an array, and a wallet. To learn more about ABI's, you can read our guide on the subject.
I will only break down factory, as the format is the same for both.
-
Line 1: Calling the ethers.Contract method.
-
Line 2: Passing in the address of PancakeSwap's Factory contract.
-
Line 3: Passing the ABI for the PairCreated event that emits whenever a new pair is created on PancakeSwap. You can find the entire contract's ABI here.
-
Line 4: passing in the account variable, which is what allows the contract access to our wallet.
If you would like to check out the ABI for the router, you can find it here. This is a great way to familiarize yourself with Solidity code. It may even give you ideas that you would not have had otherwise!
With these two contracts initialized, we can now use the functionality defined in the ABI in our JavaScript code. This next step is where the magic happens!
Putting It All Together
Before we hop into the code, it pays off to think through what we need to do. We have the event that gets emitted whenever a new token releases on PancakeSwap. In our case, we want to buy a bit of our token. With that in mind, our plan will look something like this:
-
Listen for the event
-
Find out which token is which
-
Use our WBNB to buy some amount of the new token
-
make sure the exchange rate is close to what we were quoted
-
Send the new tokens to our wallet
With this road map, you should be able to follow what is going on a bit more. Time to jump into the code!
factory.on("PairCreated", async (token0, token1, addressPair) => {
    console.log(`
    ~~~~~~~~~~~~~~~~~~
    New pair detected
    ~~~~~~~~~~~~~~~~~~
    token0: ${token0}
    token1: ${token1}
    addressPair: ${addressPair}
    `);

    // This block ensures we pay with WBNB
    let buyToken, sellToken;
    if(token0 === addresses.WBNB) {
        buyToken = token0;
        sellToken = token1;
    }
    if (token1 === addresses.WBNB) {
        buyToken = token1;
        sellToken = token0;
    }
    // Neither token is WBNB and we cannot purchase
    if(typeof buyToken === "undefined") {
        return
    }
    const amountIn = ethers.utils.parseUnits('0.1', 'ether'); //ether is the measurement, not the coin
    const amounts = await router.getAmountsOut(amountIn, [buyToken, sellToken]);

    const amountOutMin = amounts[1].sub(amounts[1].div(10)); // math for Big numbers in JS
    console.log(`
    ~~~~~~~~~~~~~~~~~~~~
    Buying new token
    ~~~~~~~~~~~~~~~~~~~~
    buyToken: ${amountIn.toString()} ${buyToken} (WBNB)
    sellToken: ${amountOutMin.toString()} ${sellToken}
    `);
    const tx = await router.swapExactTokensForTokens(
        amountIn,
        amountOutMin,
        [buyToken, sellToken],
        addresses.me,
        Date.now() + 1000 * 60 * 5 //5 minutes
    );
    const receipt = await tx.wait();
    console.log('Transaction receipt');
    console.log(receipt);
    }
)
This code block is a bit large, so we will break it down into smaller portions, starting from the top.
factory.on("PairCreated", async (token0, token1, addressPair) => {
    console.log(`
    ~~~~~~~~~~~~~~~~~~
    New pair detected
    ~~~~~~~~~~~~~~~~~~
    token0: ${token0}
    token1: ${token1}
    addressPair: ${addressPair}
    `);
-
Line 1: putting a listener on the factory's method PairCreated that will call back to this async lambda function every time it is triggered.
-
line 2-9: Printing out the token0, token1, and addressPair that map to the parameters given in the factory's ABI of PairCreated.
// This block ensures we pay with WBNB
    let buyToken, sellToken;
    if(token0 === addresses.WBNB) {
        buyToken = token0;
        sellToken = token1;
    }
    if (token1 === addresses.WBNB) {
        buyToken = token1;
        sellToken = token0;
    }
    // Neither token is WBNB and we cannot purchase
    if(typeof buyToken === "undefined") {
        return
    }
    const amountIn = ethers.utils.parseUnits('0.1', 'ether'); //ether is the measurement, not the coin
    const amounts = await router.getAmountsOut(amountIn, [buyToken, sellToken]);

    const amountOutMin = amounts[1].sub(amounts[1].div(10)); // math for Big numbers in JS
    console.log(`
    ~~~~~~~~~~~~~~~~~~~~
    Buying new token
    ~~~~~~~~~~~~~~~~~~~~
    buyToken: ${amountIn.toString()} ${buyToken} (WBNB)
    sellToken: ${amountOutMin.toString()} ${sellToken}
    `);
- Lines 2-14: This series of if statements ensure that the correct variables are assigned from token0 and token1 that we get from the PairCreated event. We need logic around this because PancakeSwap's algorithm does not guarantee that WBNB is token0 and the new token is token1. This ensures that the token we are buying with is WBNB, and the token sold to us is the new token.
- Line 15: amountIn is where we decide how much to spend. In our case, we are spending 0.1 BNB. You can see the "ether" used in the parseUnits method. In this context, "ether" is not a currency but a measurement.
- Lines 16-18: amounts uses the getAmountsOut method from PancakeSwap's ABI that we defined earlier. It takes the quantity you would like to purchase in BNB and an array containing the two contract addresses. It then returns an array of numbers. We use amountOutMin to add a bit of flexibility to our purchase. The number at index 1 in the amounts array is the number of tokens we will get in exchange for our 0.1 WBNB that we are putting in. The math performed on this number may seem a bit strange at first glance. That is because these numbers that are returned to use are in wei, which is 1e-18 digits long. Numbers this large cannot be mathematically manipulated in JavaScript natively. Ethereum libraries use another library called Big Number under the hood to perform these operations on large numbers. The output from amountOutMin ends up being 90% of whatever the original number was. This gives us some needed flexibility in our code because the price changes so frequently. If we didn't have this, we would have difficulty finding trades that matched our algorithm.
- Line 19+: This console.log() prints out the addresses for the token we are buying and selling. It also prints out how much we are buying and selling.
That's everything for that block of code. On to the last one!
const tx = await router.swapExactTokensForTokens(
        amountIn,
        amountOutMin,
        [buyToken, sellToken],
        addresses.me,
        Date.now() + 1000 * 60 * 5 //5 minutes
    );
    const receipt = await tx.wait();
    console.log('Transaction receipt');
    console.log(receipt);
    }
)
We call the second contract defined in router, swapExactTokensForTokens.
swapExactTokensForTokens takes 5 arguments.
1. How many tokens we want to sell - amountIn
2. How many tokens we expect back - amountOutMin
3. An array of the two tokens addresses - [ buyToken, sellToken ]
4. The address of the buyer's wallet - addresses .me
5. an expiration date on the transaction. - Date.now() + 1000 * 60 * 5 // 5 minutes
Note: This will only work if you have both WBNB to purchase the token and BNB to pay the gas fees!
After invoking the method, all that's left is to print a receipt upon successful purchase!
That is everything for our bot! In case you got lost anywhere along the way, here's a full copy of the script:
const ethers = require('ethers');

const addresses = {
    WBNB: "0xbb4CdB9CBd36B01bD1cBaEBF2De08d9173bc095c",
    router: "0x10ED43C718714eb63d5aA57B78B54704E256024E",
    factory: "0xcA143Ce32Fe78f1f7019d7d551a6402fC5350c73",
    me: "YOUR_WALLET_GOES_HERE"
}

const mnemonic = "your mnemonic goes here just like this .. .. .. .."

const provider = new ethers.providers.WebSocketProvider("__WEB_SOCKET_PROVIDER_FROM_QUICKNODE__")
const wallet = ethers.Wallet.fromMnemonic(mnemonic);
const account = wallet.connect(provider)

const factory = new ethers.Contract(
    addresses.factory,
    ['event PairCreated(address indexed token0, address indexed token1, address pair, uint)'],
    account
);
const router = new ethers.Contract(
    addresses.router,
    [
        'function getAmountsOut(uint amountIn, address[] calldata path) external view returns (uint[] memory amounts)',
        'function swapExactTokensForTokens( uint amountIn, uint amountOutMin, address[] calldata path, address to, uint deadline)',
    ],
    account
);

factory.on("PairCreated", async (token0, token1, addressPair) => {
    console.log(`
    ~~~~~~~~~~~~~~~~~~
    New pair detected
    ~~~~~~~~~~~~~~~~~~
    token0: ${token0}
    token1: ${token1}
    addressPair: ${addressPair}
    `);

    // This block ensures we pay with WBNB
    let buyToken, sellToken;
    if(token0 === addresses.WBNB) {
        buyToken = token0;
        sellToken = token1;
    }
    if (token1 === addresses.WBNB) {
        buyToken = token1;
        sellToken = token0;
    }
    // Neither token is WBNB and we cannot purchase
    if(typeof buyToken === "undefined") {
        return
    }
    const amountIn = ethers.utils.parseUnits('0.1', 'ether'); //ether is the measurement, not the coin
    const amounts = await router.getAmountsOut(amountIn, [buyToken, sellToken]);

    const amountOutMin = amounts[1].sub(amounts[1].div(10)); // math for Big numbers in JS
    console.log(`
    ~~~~~~~~~~~~~~~~~~~~
    Buying new token
    ~~~~~~~~~~~~~~~~~~~~
    buyToken: ${amountIn.toString()} ${buyToken} (WBNB)
    sellToken: ${amountOutMin.toString()} ${sellToken}
    `);
    const tx = await router.swapExactTokensForTokens(
        amountIn,
        amountOutMin,
        [buyToken, sellToken],
        addresses.me,
        Date.now() + 1000 * 60 * 5 //5 minutes
    );
    const receipt = await tx.wait();
    console.log('Transaction receipt');
    console.log(receipt);
    }
)
If you did everything correctly, you could run:
node bot.js
And see the bot start to buy any new tokens that open up on PancakeSwap! You may see errors such as "Insufficient Liquidity" or "Can not estimate gas price." Rest assured that these are problems with the new tokens are being created and not on your end. If you let the script run its course, you will eventually be greeted with a receipt in your logs from one of your purchases!
Conclusion
Congratulations on making a fully automated purchase on a DEX! You are well on your way to becoming a bonified DeFi market maker. I will again reiterate that this is purely a proof of concept and while you could, in theory, make money off of a strategy like this. You probably would not. I can not recommend putting a lot of money into your wallet while running a script like this. This guide is to educate you on how these bots work, not to make you money. It also gives you an excellent place to jump off of on your own! Ways that you could modify or improve this are endless.
You could:
-
Instead of buying the tokens outright, send an email or text upon hearing the signal. That would allow you to do your due diligence on your purchases instead of buying blind.
-
Make the selling process automated; that way you, aren't exposing yourself to risk for extended periods.
-
Add more parameters around when you buy something. Instead of only listening for when tokens spawn into existence, you could make sure it hits an arbitrary threshold of your choice before purchasing.
The possibilities are many and only limited by your imagination and determination.
Subscribe to our newsletter for more articles and guides on Ethereum. If you have any feedback, please reach out to us via Twitter. You can always chat with us on our Discord community server, featuring some of the most fantastic developers you will ever meet 😃