11 min read
This guide will give you an in-depth walkthrough of how to create and deploy a custom Subgraph with The Graph using their Hosted Service. If you’d like to accomplish this task quicker, we recommend the Hosted Subgraphs add-on. By using this add-on, you'll save development time and be able to create, deploy and host a Subgraph in minutes. Don't forget to look at the full here: How to Run a Hosted Subgraph with Zeeve
Overview
One of the key aspects of Web3 is the need for efficient and reliable access to on-chain data. Ethereum, a popular smart contract platform, provides access to its blockchain data through JSON-RPC, a remote procedure call (RPC) protocol that encodes data in JSON format.
While JSON-RPC is an effective way to interact with Ethereum data, it may not always be the most efficient or user-friendly method for developers who want to build scalable dApps. That's where The Graph comes in. The Graph is a decentralized protocol meant for indexing and querying blockchain data that is difficult to query directly.
What You Will Do
- Learn about The Graph
- Create and publish a custom Subgraph using The Graph Studio
- Interact with your deployed Subgraph using The Graph Playground
What You Will Need
- Basic understanding of Ethereum development and programming fundamentals
- A web3 wallet (e.g., MetaMask, Phantom, WalletConnect compatible) with ETH on Ethereum mainnet
- The Graph CLI and Node.js installed
- A code editor (e.g., VSCode, Atom)
| Dependency | Version |
|---|---|
| node.js | 18.13.0 |
| graph-cli | 0.49.0 |
What is The Graph?
The Graph is a decentralized protocol designed to simplify access to blockchain data for developers. It provides a reliable and efficient way to query data from Ethereum, IPFS, and other supported networks using GraphQL, an open-source query language developed by Facebook. The Graph allows developers to build and publish custom "Subgraphs" that define how to index and fetch data from the blockchain, making it easy to create scalable and performant dApps.
What is GraphQL?
GraphQL is a query language and runtime for APIs that enable developers to request only the data they need while receiving a predictable response. It allows developers to create more efficient and flexible applications by enabling them to specify the structure of the response data. This reduces the amount of over-fetching and under-fetching, which can lead to unnecessary data transfers and slower applications.
Compared to traditional REST APIs, GraphQL provides a more powerful and flexible way to interact with data, making it an excellent choice for building dApps on top of blockchain platforms like Ethereum.
What is a Subgraph?
A Subgraph is a collection of blockchain data that has been indexed in a way to efficiently support queries over that data. Subgraphs are queried with the GraphQL programming language.
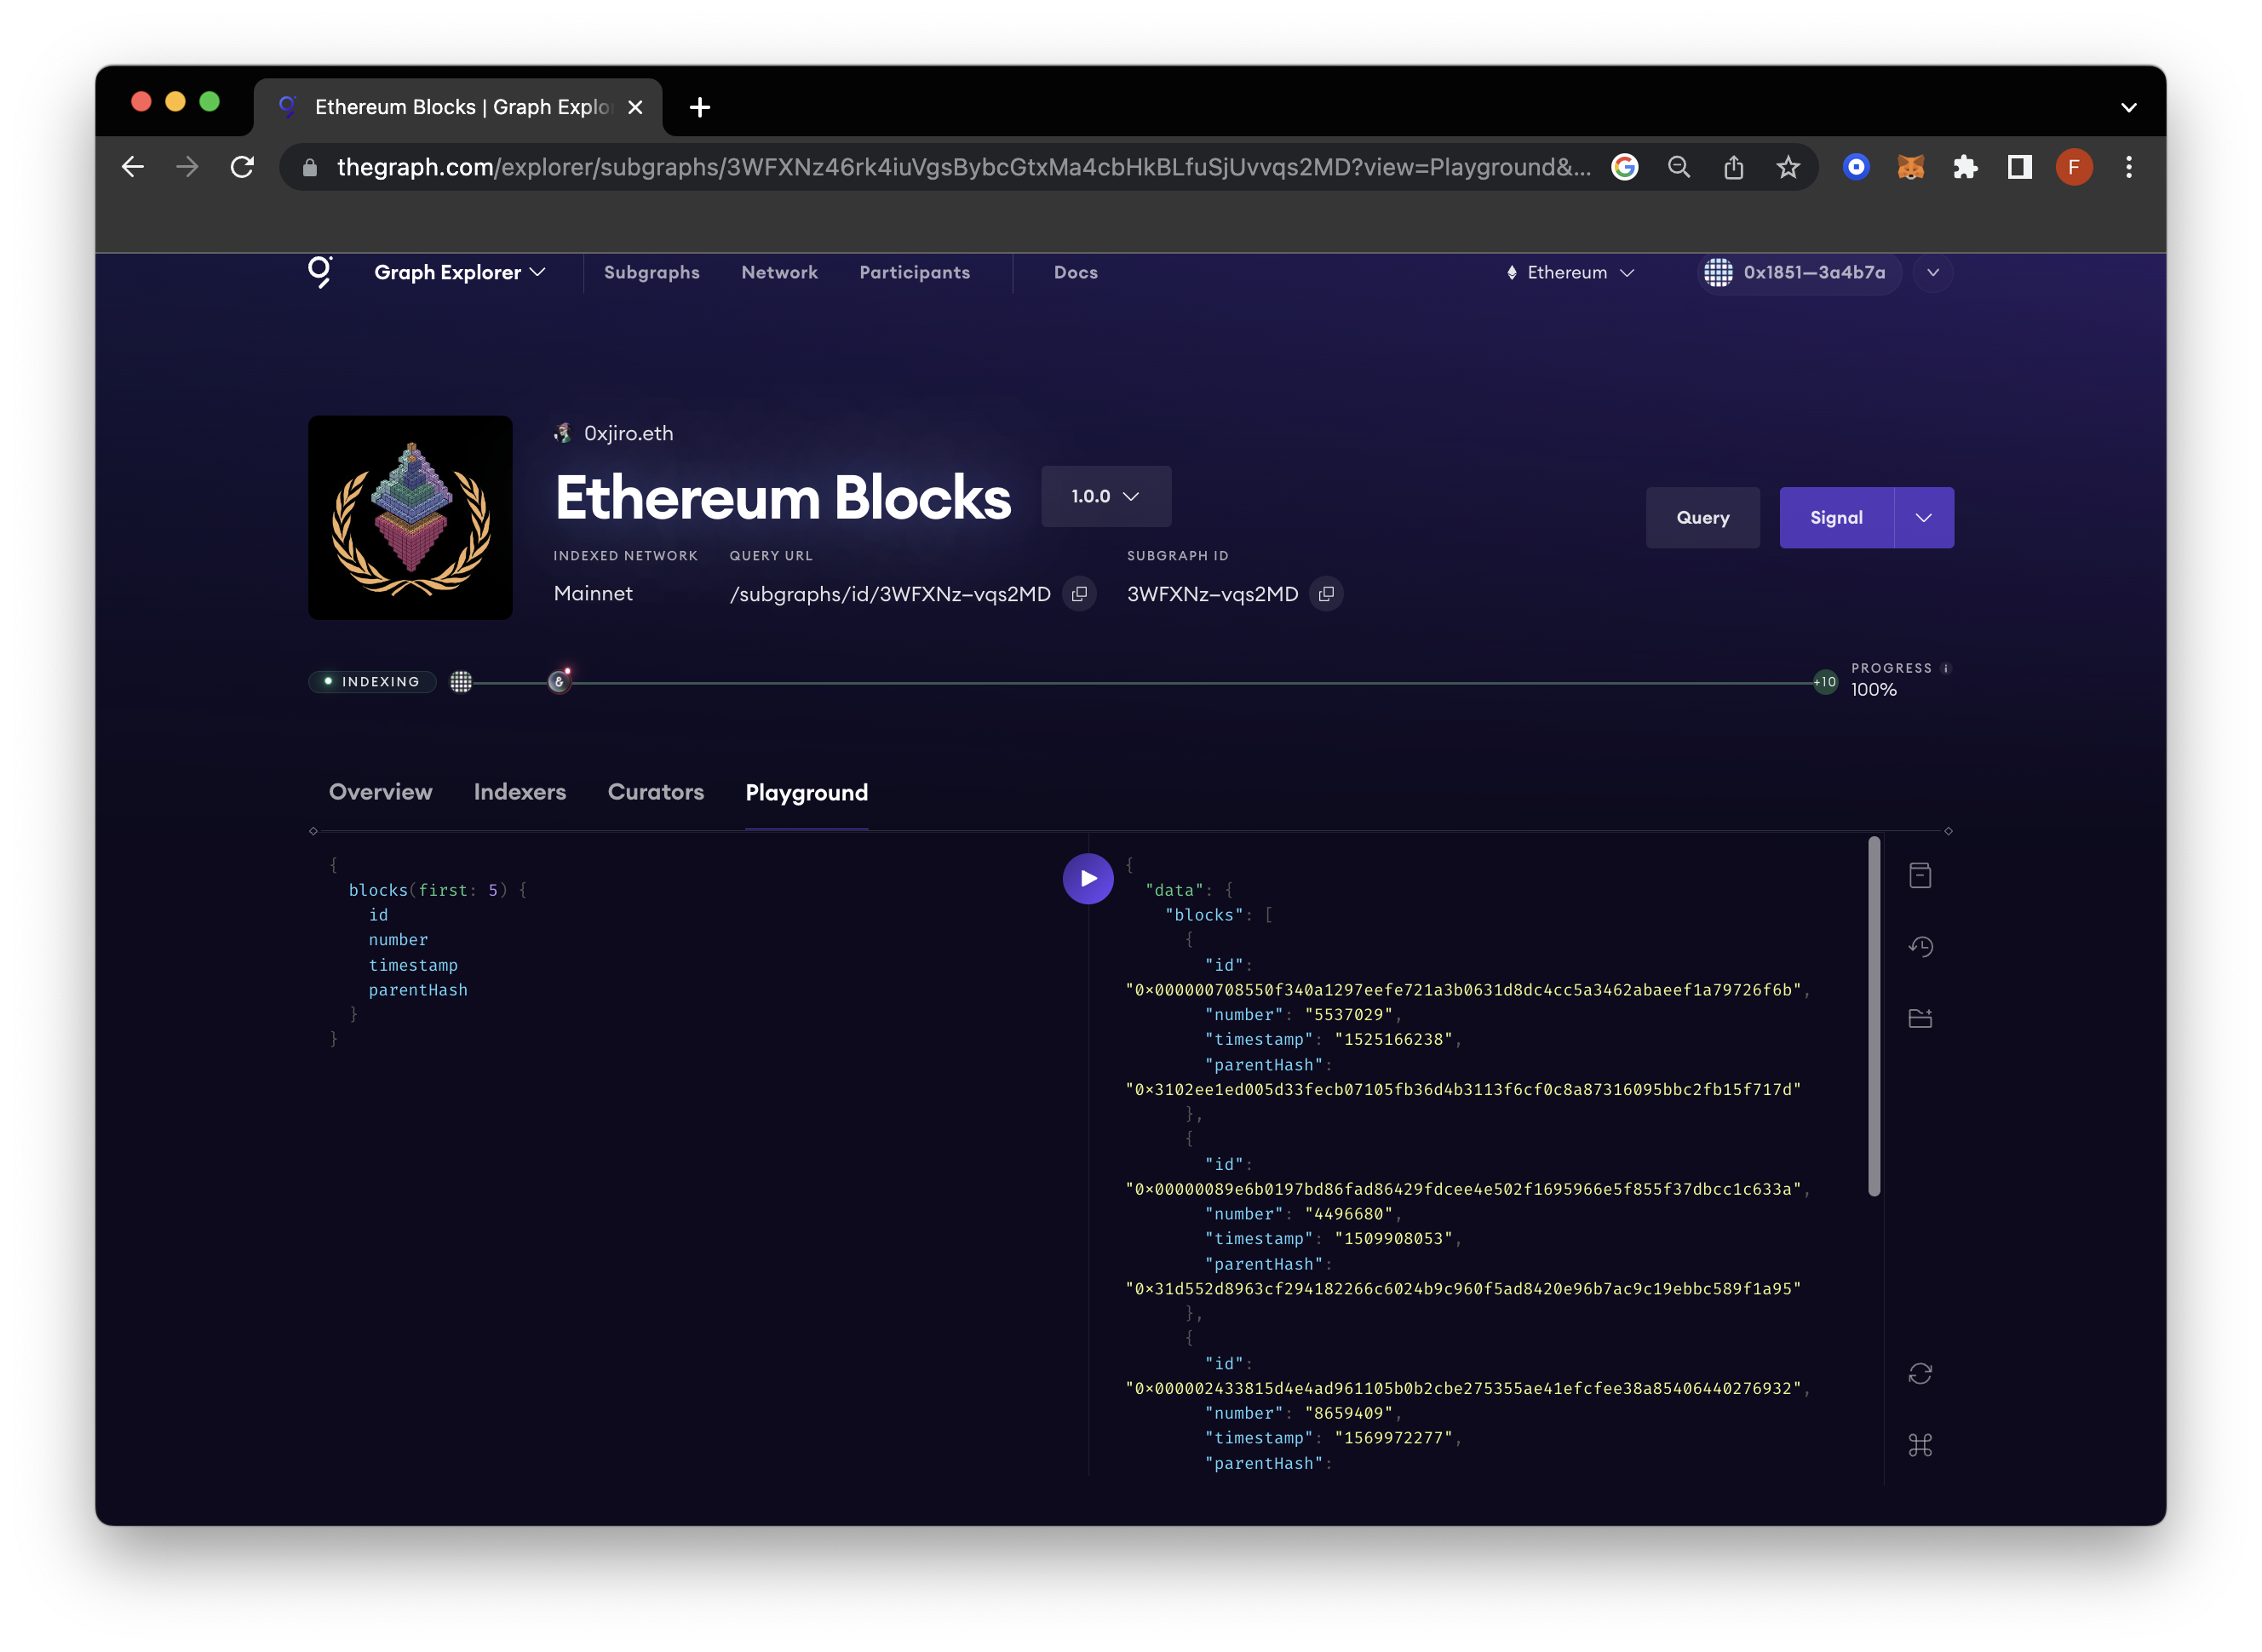
Let's quickly review a published Subgraph so you have a better understanding of how they work. Navigate to this link, and you'll see the following query within The Graph Playground:
{
  blocks(first: 5) {
    id
    number
    timestamp
    parentHash
  }
}
This query is written in the GraphQL language and calls the Ethereum Blocks subgraph on Ethereum mainnet. The GraphQL query requests data for the first five blocks in a blockchain. For each block, it retrieves the unique identifier (id), the block number (number), the time the block was created (timestamp), and the hash of the block's parent parentHash. You can click the play button to make a query. Take a moment to do that. You should see output similar to the following:
Some alternative queries for this Subgraph include:
Example: Order the response by gasUsed and return the fields timestamp, gasUsed, and totalDifficulty.
{
  blocks(orderBy: gasUsed) {
    timestamp
    gasUsed
    totalDifficulty
  }
}
Try copying and pasting the query above into the Playground and make a request. To build your own queries via the Playground, click on the folder icon on the right side, and you can view a dictionary of your Subgraph and select/de-select fields. This is helpful because it shows all the possible fields and formats you can query the Subgraph by.
The Graph Architecture & Products
Before we create a custom subgraph, let's go over the architecture of The Graph to better understand how it operates. We'll also cover the different products The Graph offers.
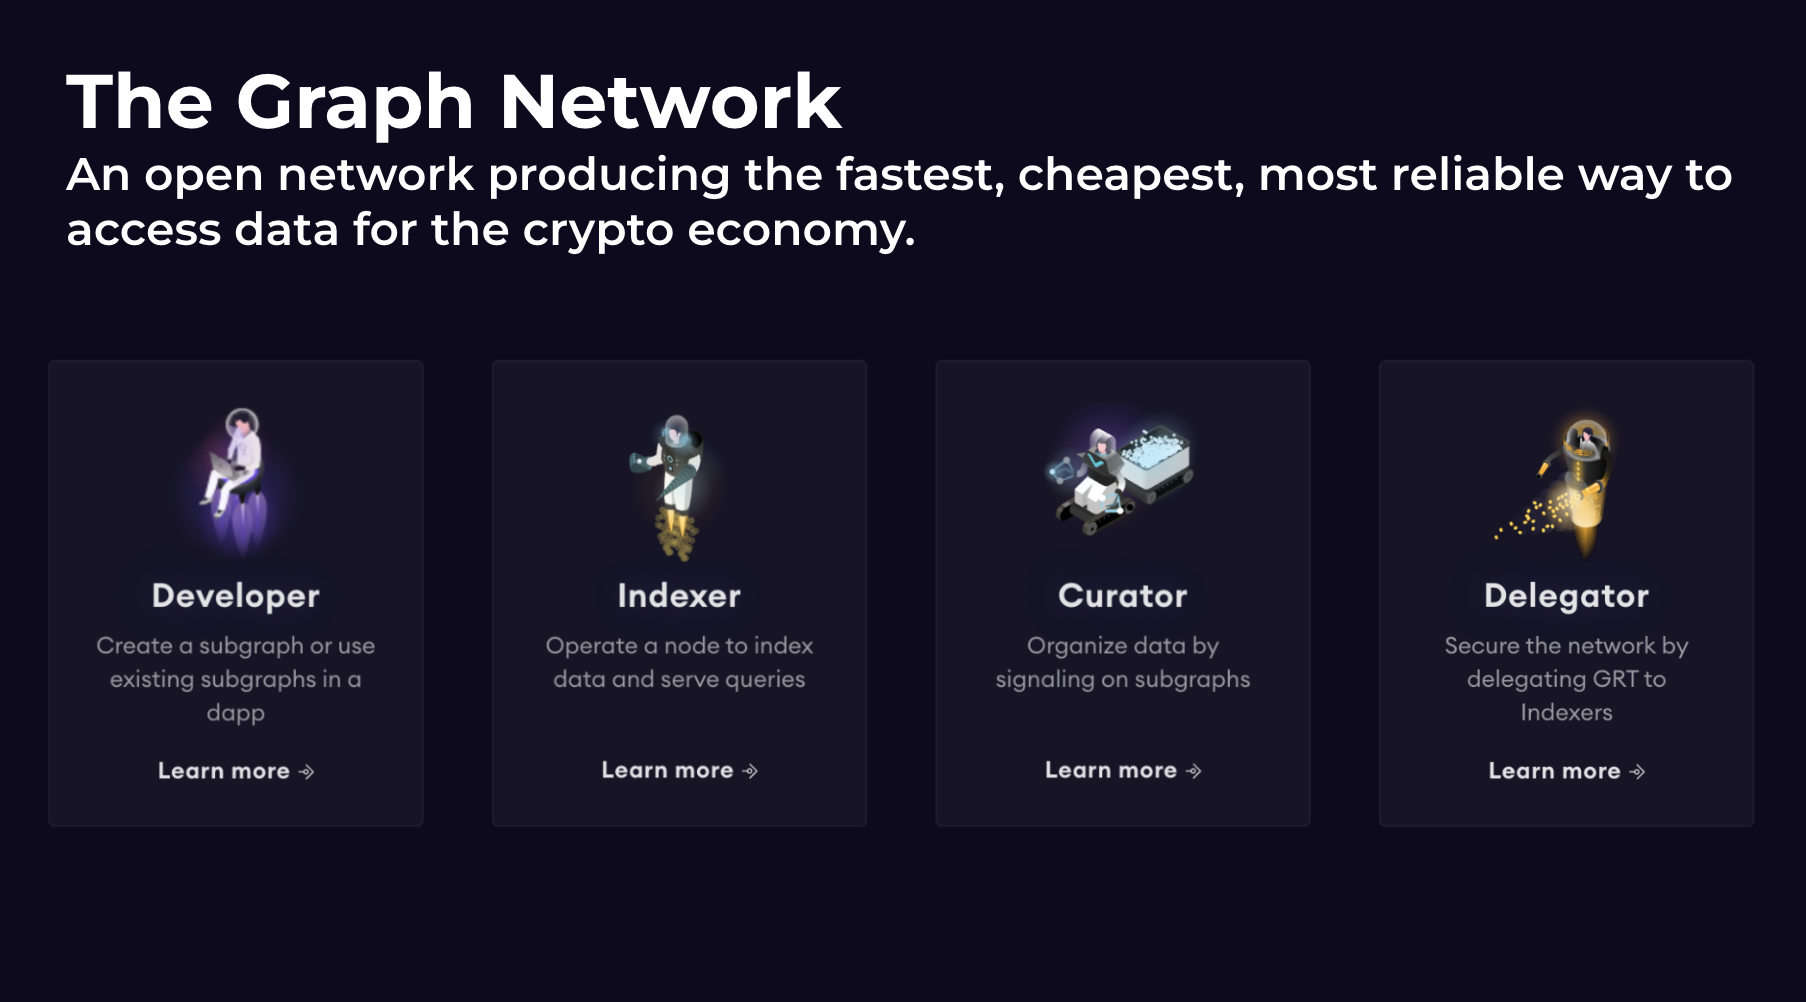
Developer: In the context of The Graph, a developer refers to an individual or entity that builds and deploys decentralized applications (dApps) or services that require access to blockchain data. Developers utilize The Graph to efficiently query and retrieve data from various blockchains, making building powerful applications on top of blockchain networks easier.
Indexer: An indexer participates in The Graph protocol and indexes and organizes data from different blockchains. Indexers operate and maintain Index Nodes, which are responsible for processing and storing data in a format optimized for querying.
Curator: A curator is an individual or entity that identifies valuable subgraphs and helps to curate the data available in The Graph's decentralized data marketplace.
Delegator: A delegator is an individual who participates in The Graph protocol by delegating their Graph Tokens (GRT) to specific indexers. Delegators do not operate their own infrastructure but instead support indexers by allocating their GRT holdings to them.
The different products The Graph offers include:
The Graph Explorer
The Graph Explorer is a portal to interact with published subgraphs and see other market participants like indexers, curators, and delegators. Take a few minutes to check out the web page.
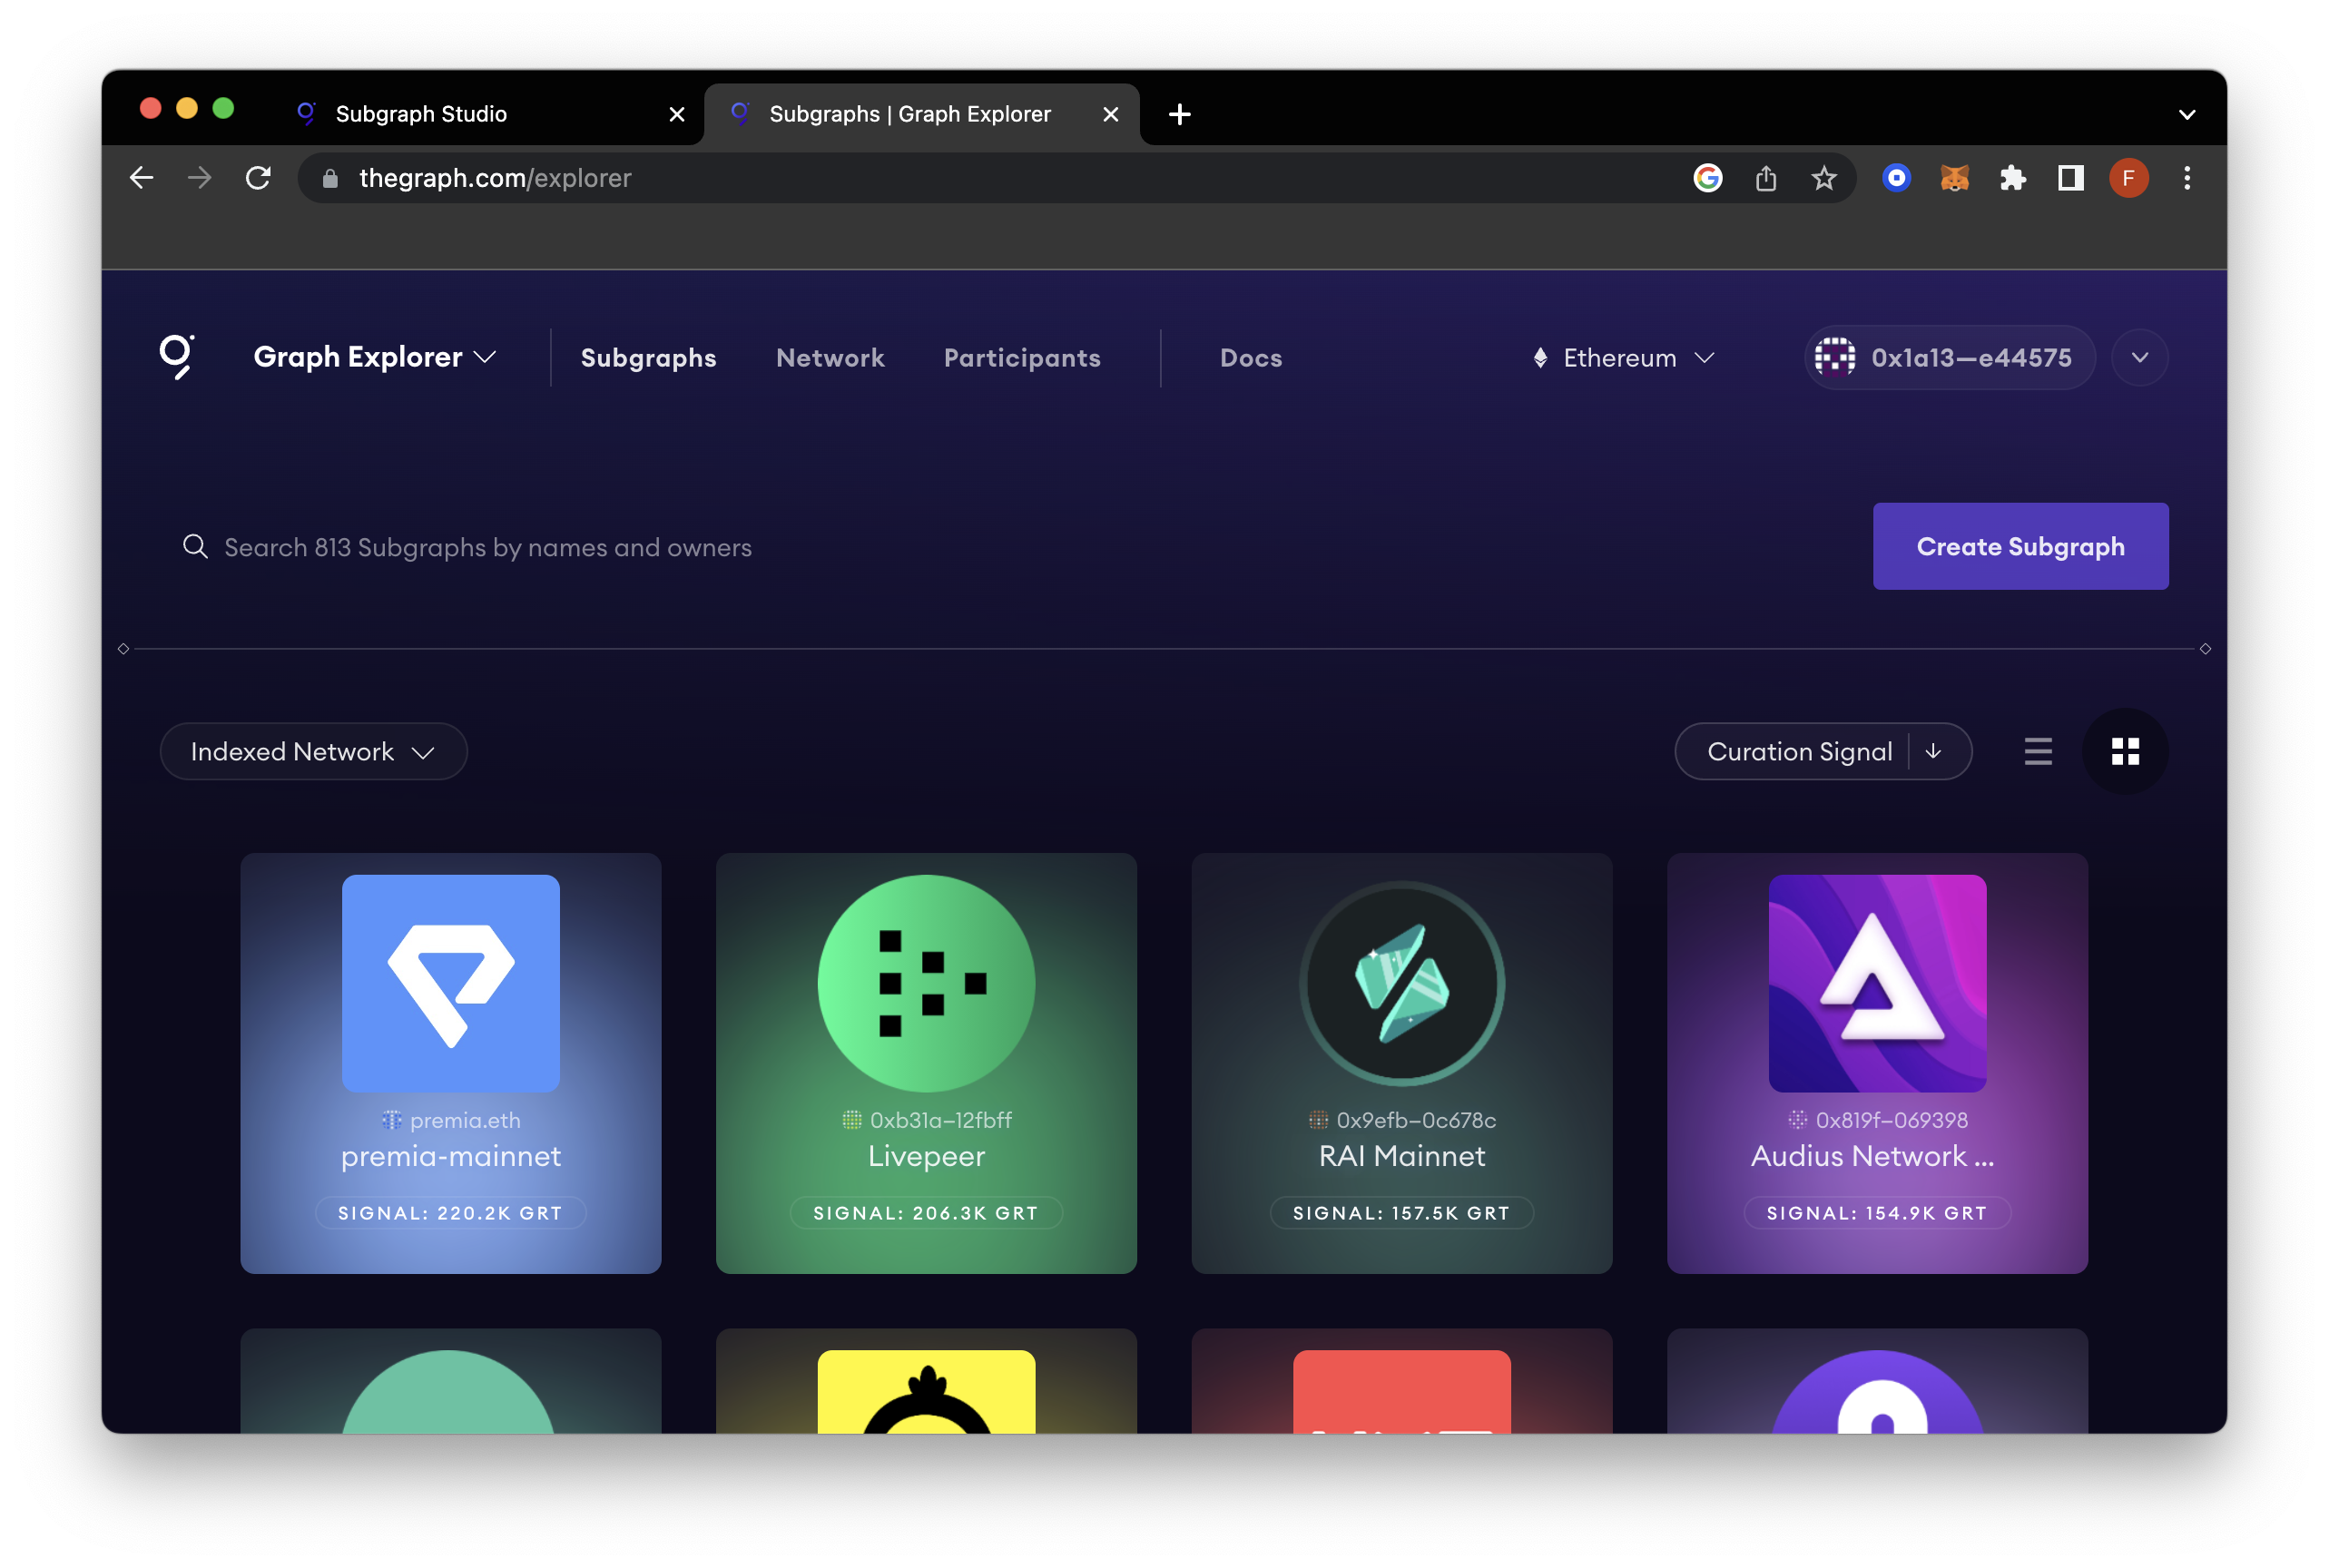
You can also utilize the GraphQL playground located in the "Playground" tab of The Graph Explorer for querying a subgraph.
The Graph Studio
The Subgraph Studio serves as a dedicated space where you can create and manage subgraphs, integrate metadata, and deploy them to The Graph Explorer.
In the following section, we'll walk through the steps for creating a custom subgraph with BAYC on Ethereum mainnet.
The Graph Hosted Service
The Graph Hosted Service functions as a free Graph Node Indexer. It was originally created for greater adopter of The Graph but now has been sunset, however, note it still remains available to networks that are not supported on the The Graph decentralized network.
Create and Deploy a Custom Subgraph
NOTE: Before getting started, make sure you have a funded Web3 wallet (with enough ETH to pay for gas fees) like MetaMask or any other WalletConnect-compatible wallet.
Now, to get started with creating your own custom subgraph, you'll need to follow these steps:
Step 1: Install the Graph CLI
First, install the Graph CLI by running one of the following commands in your terminal:
npm:
npm install -g @graphprotocol/graph-cli
Or via yarn:
yarn global add @graphprotocol/graph-cli
Step 2: Initialize a New Subgraph
Next, we will create a new subgraph. Navigate to The Graph Studio, connect your wallet, and click Create a subgraph. For our tutorial, we'll be analyzing a BAYC NFT contract deployed on Ethereum mainnet, so we'll name our Subgraph, bayc. You can fill in the other fields, but it's not required to continue. Finally, click Save.
Now, in your terminal, run the following command:
graph init bayc
You'll be prompted with several questions. You can follow the format of the answers below:
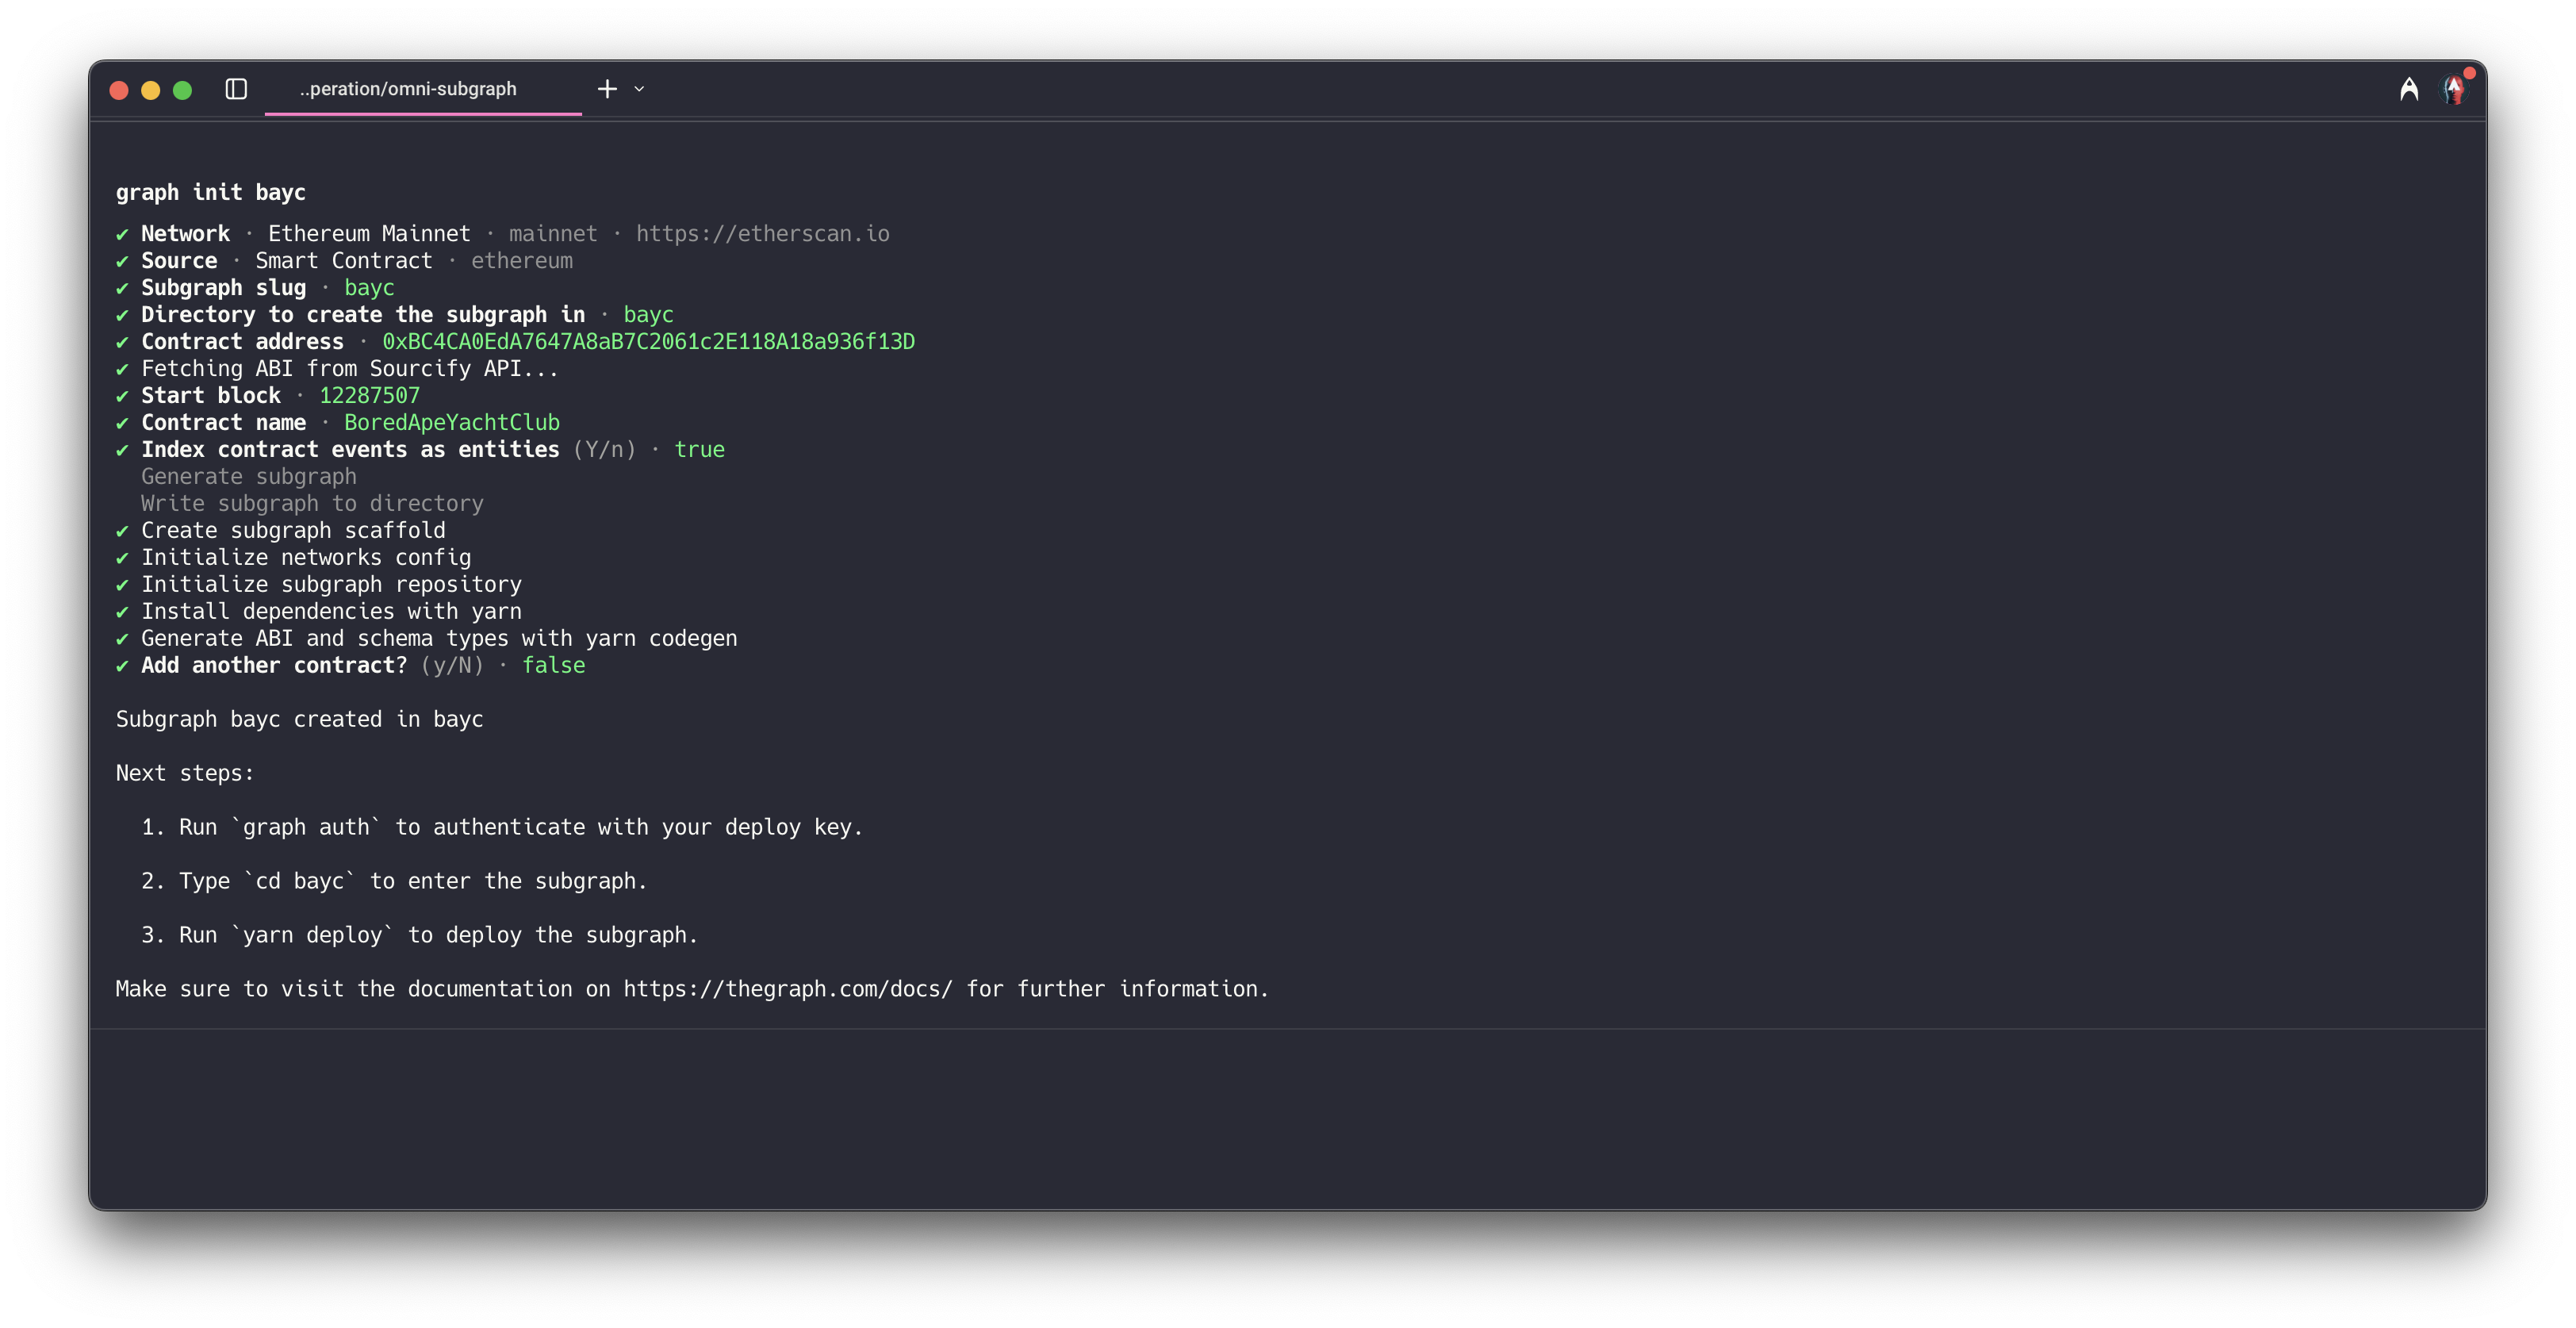
Note that during this process, the ABI fetch may fail (like above). In this scenario, you'll need to go to Etherscan and figure out what block the contract was deployed. You can do this by navigating to the Transfers tab and going to the last page, which will almost always be the contract creation transaction.
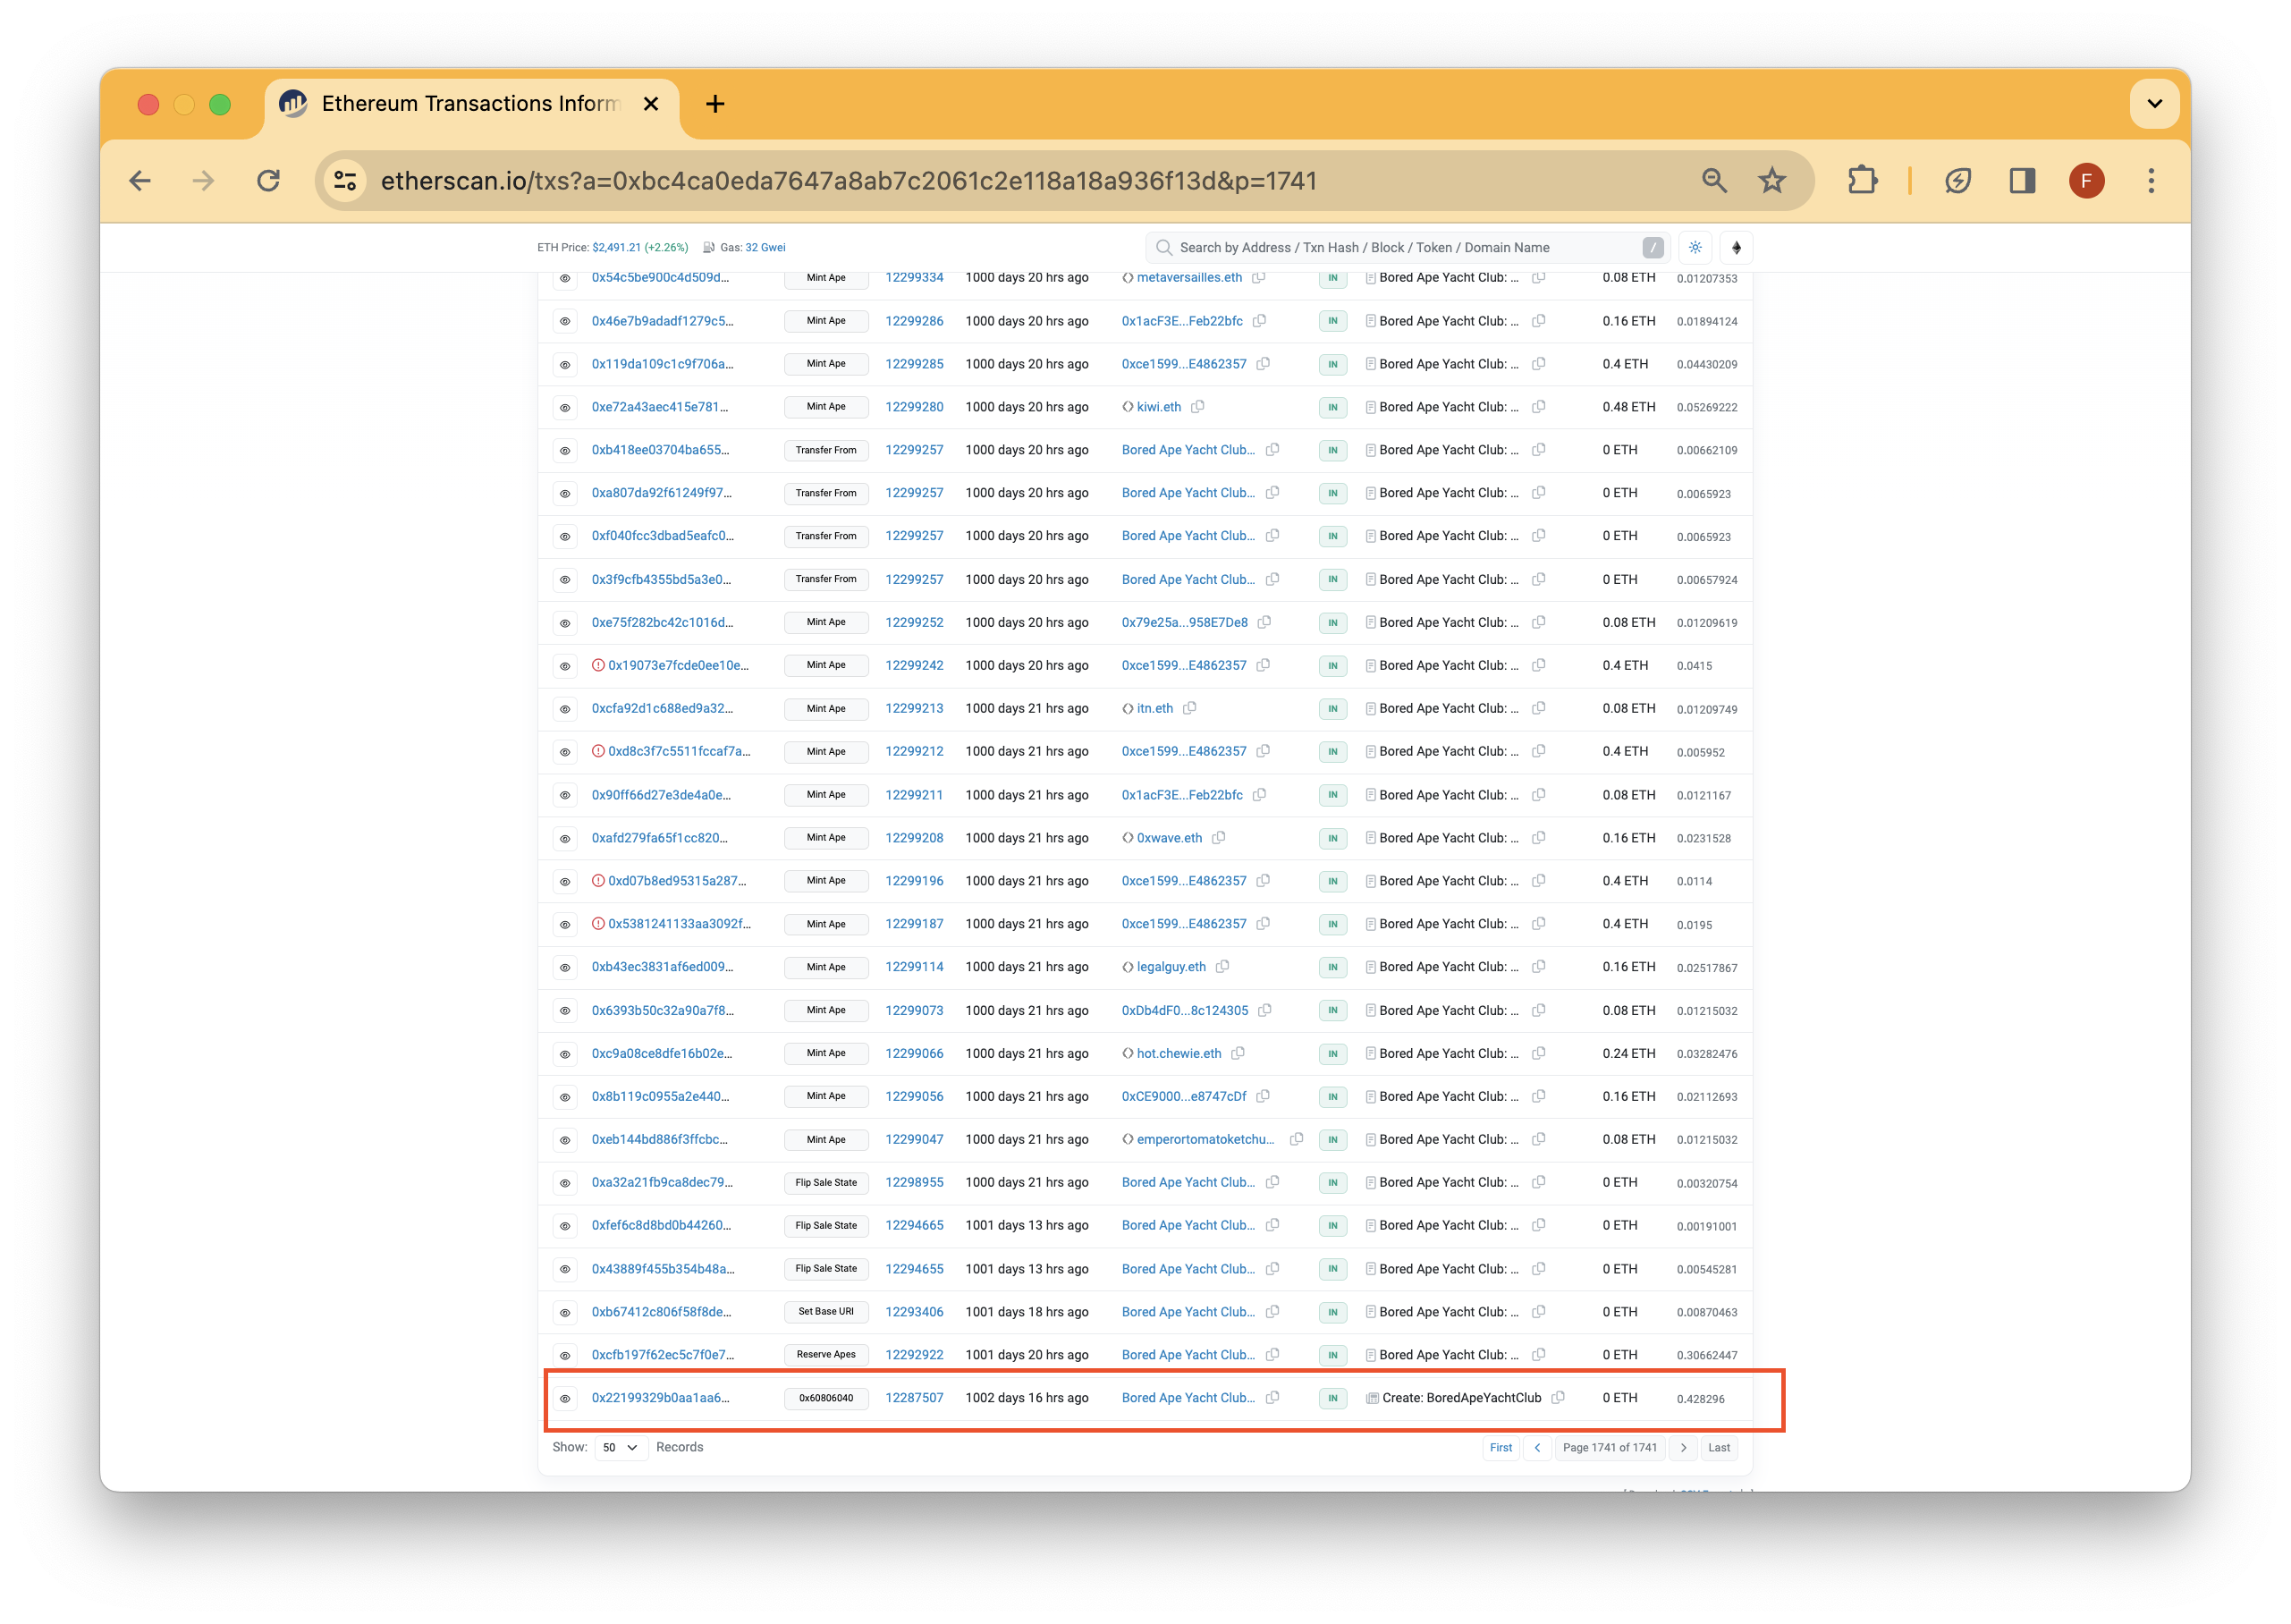
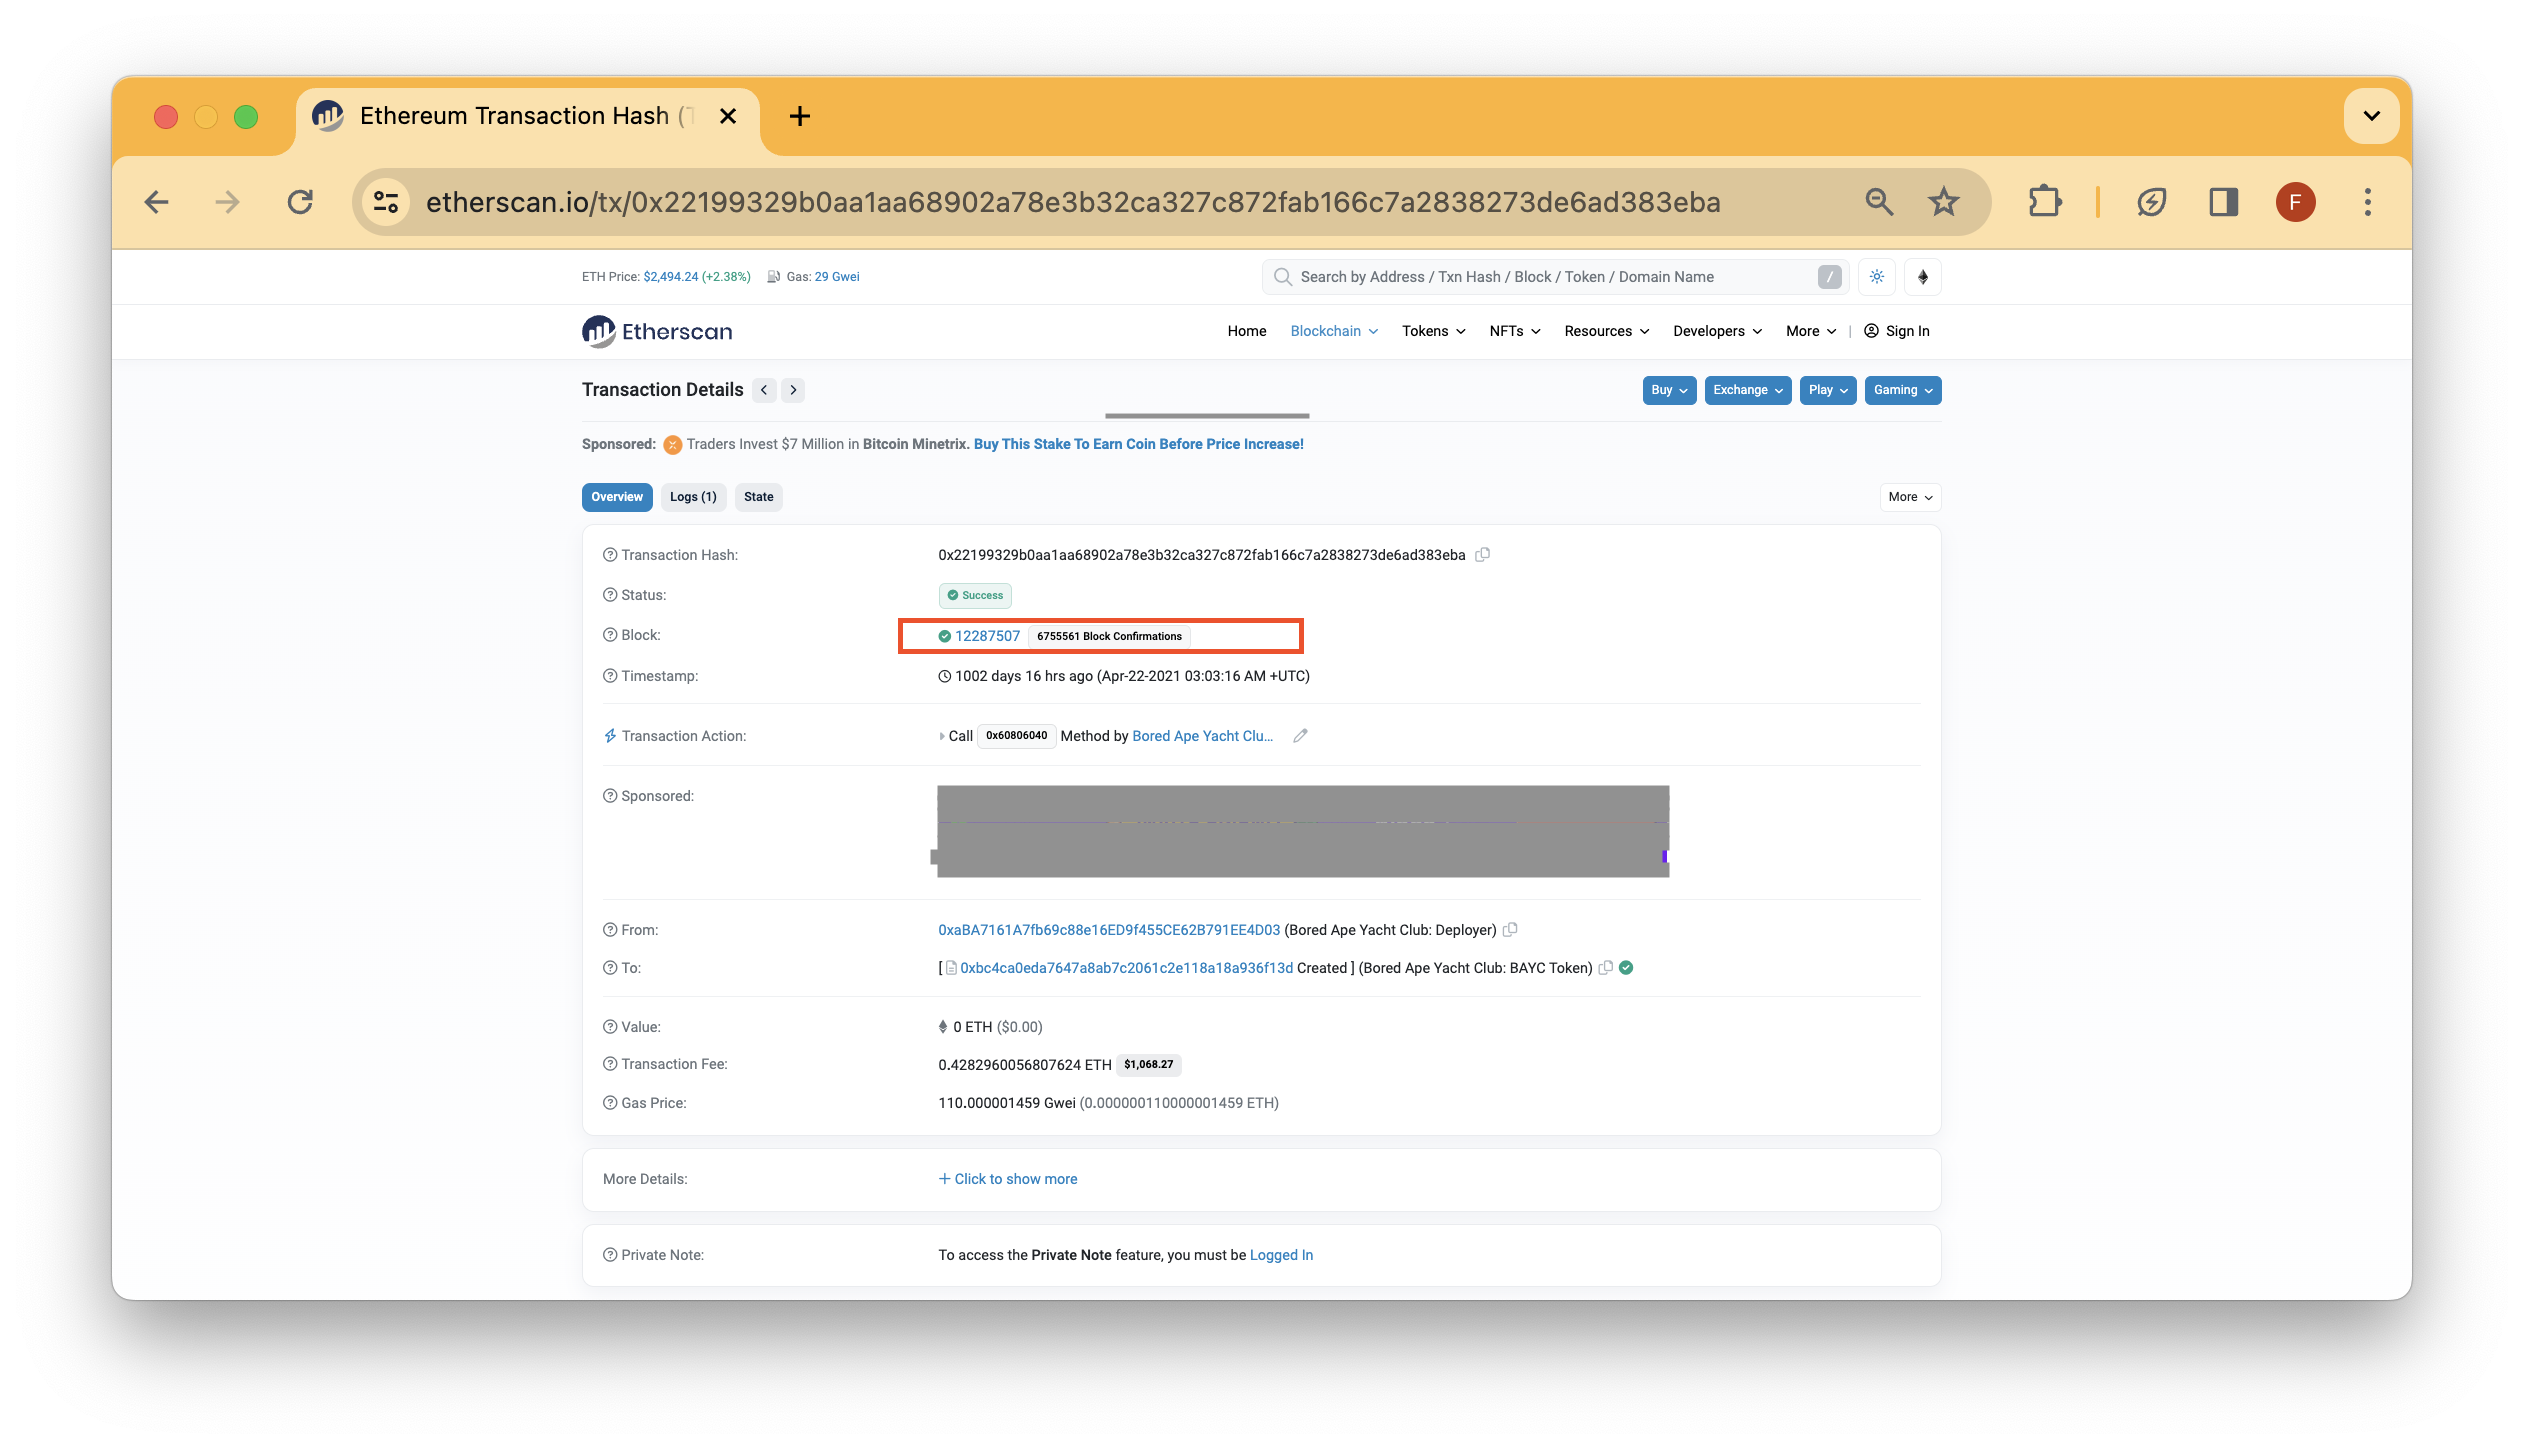
If you are following along with the same BAYC smart contract on mainnet, use the 12287507 block number. In the end, you'll have a project directory in the following format:
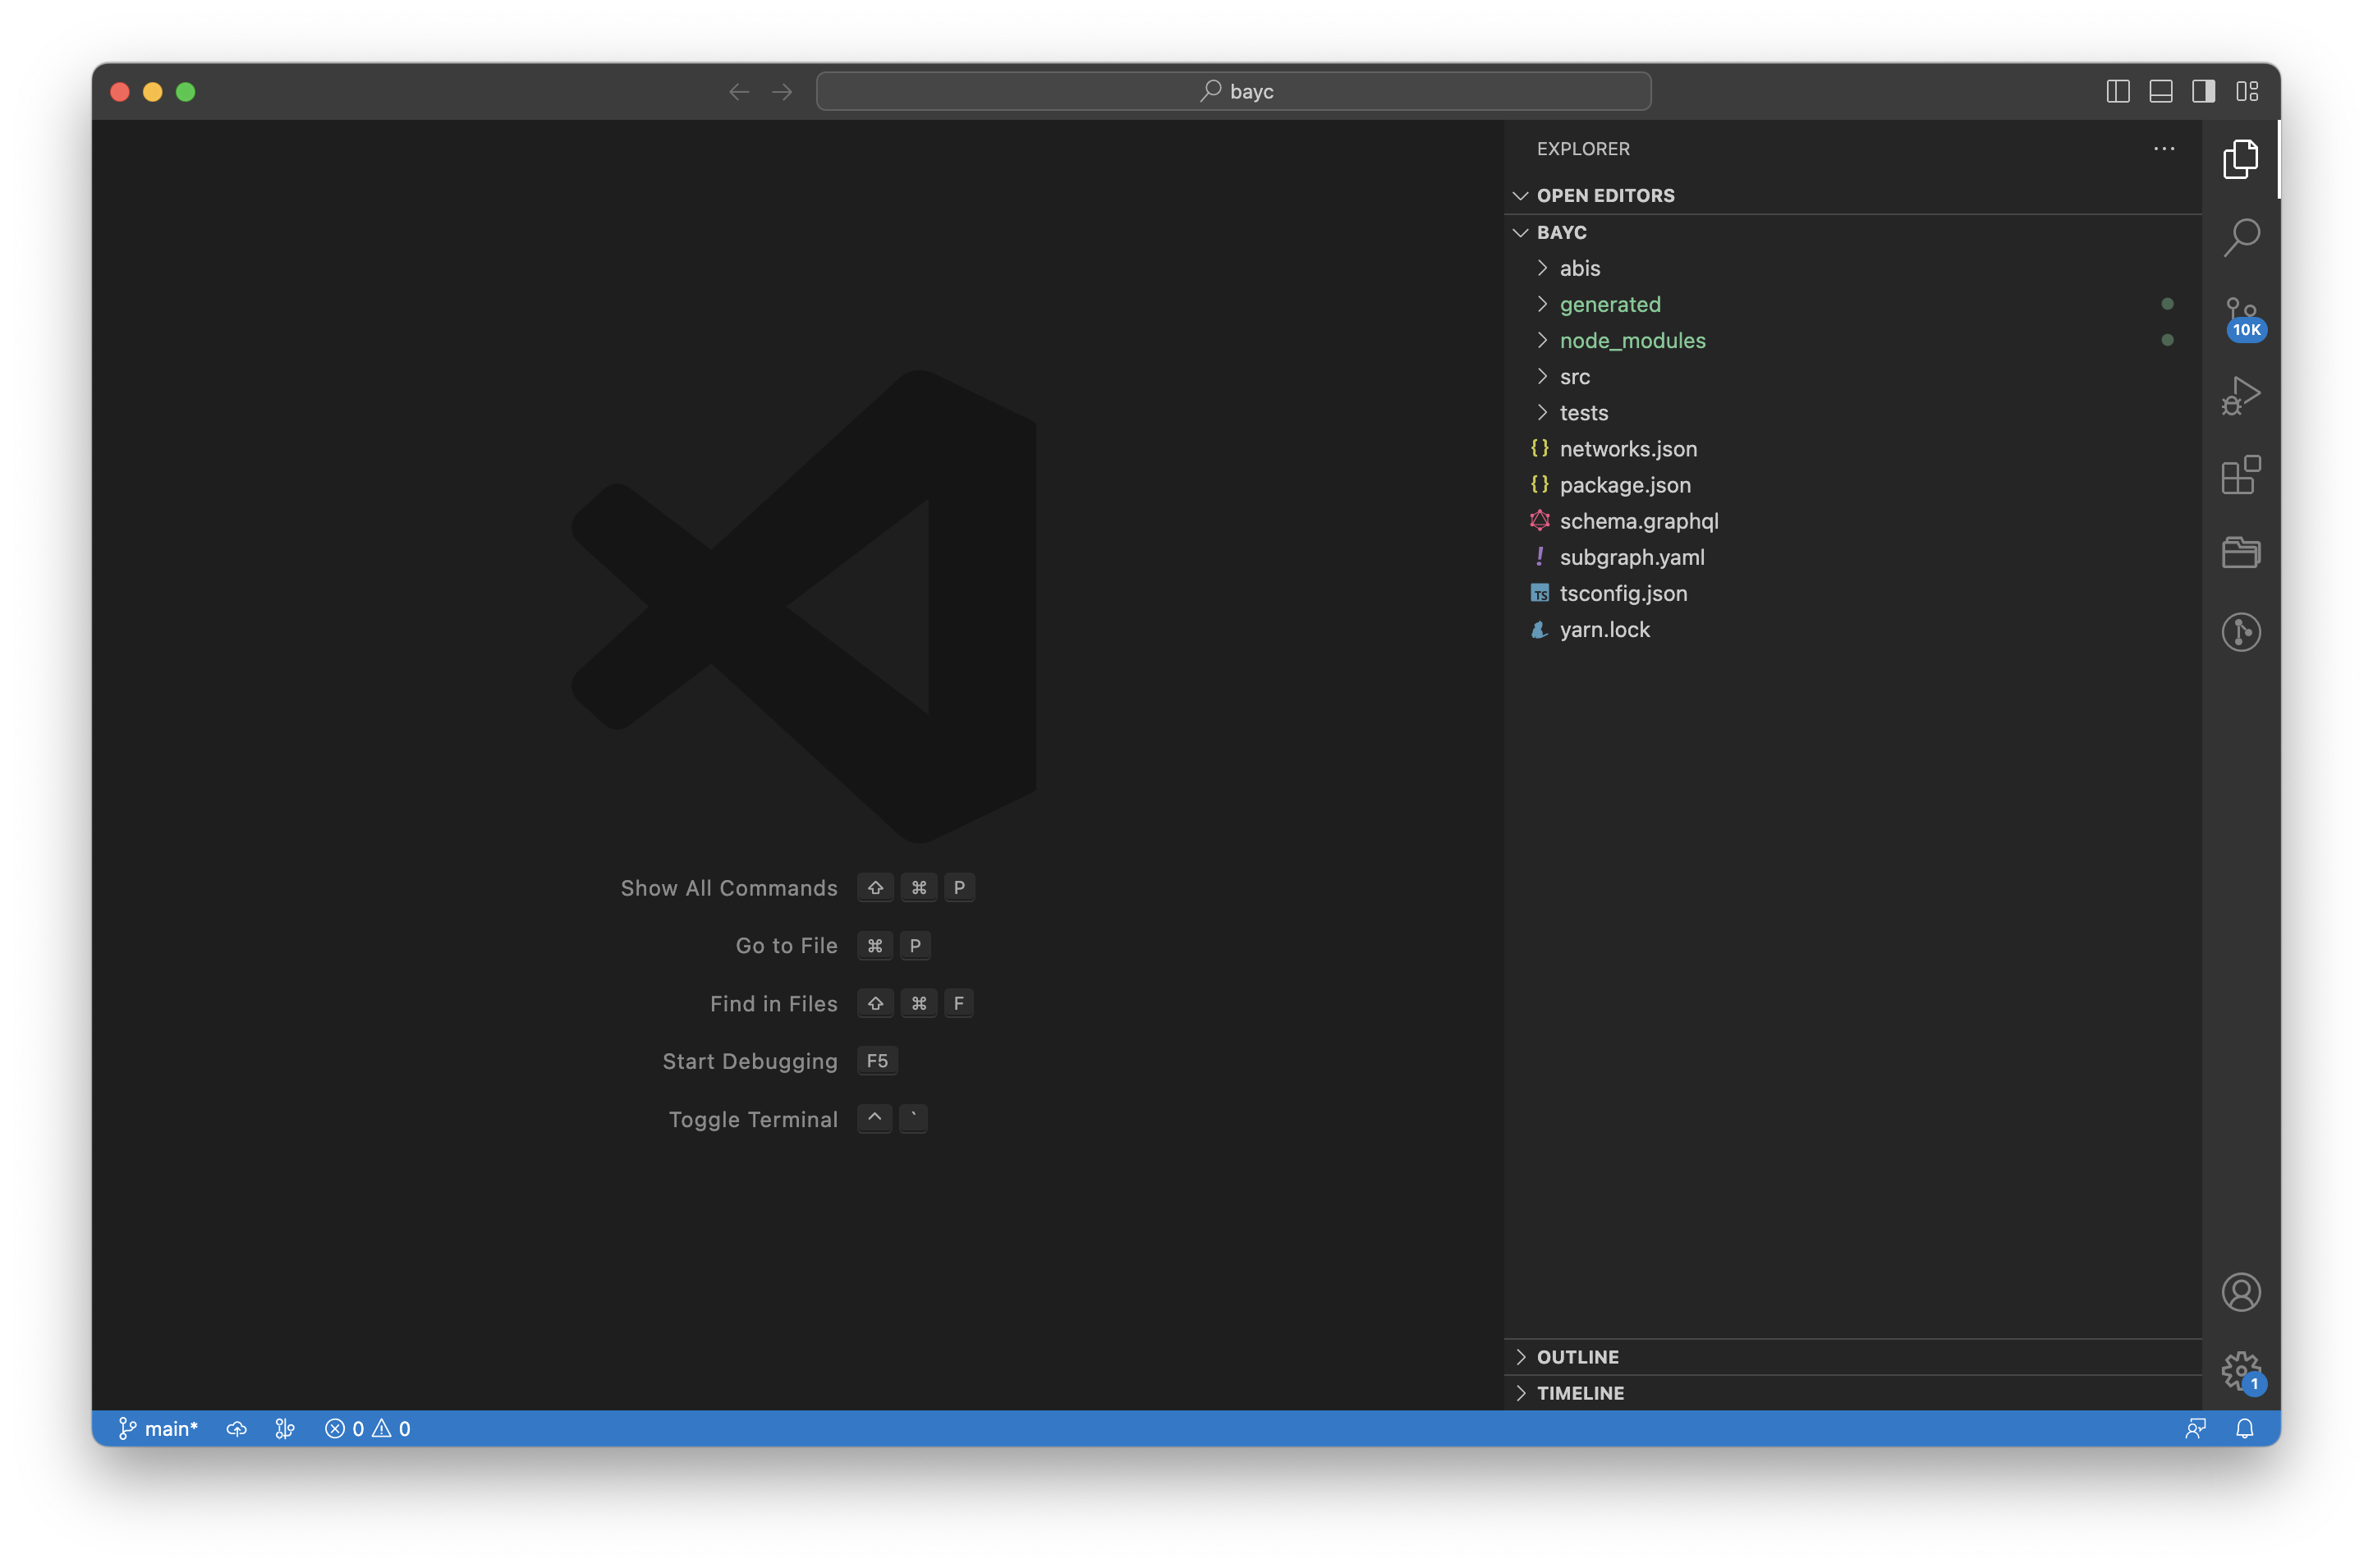
Let's now dive into each important file in the project folder (e.g., bayc):
Step 3: Define the Subgraph Schema
The schema.graphql is like the blueprint of a building. It defines the data structure that The Graph will index and make queryable. It uses the GraphQL schema definition language (SDL), a human-readable syntax for describing the shape of your data. In our case, it describes the types of data that the Subgraph will process from the blockchain and how they will relate to each other.
Step 4: Define the Data Sources
The subgraph.yaml file is like the project manager who coordinates between the blueprint and the construction crew. It ties together the schema.graphql and the src/mappings by specifying which blockchain events should trigger which handler functions.
In this file, you define the smart contracts you want to track on the blockchain, the events in those contracts that you're interested in, and the handler functions that should be called when those events are emitted. You also specify the starting block for the Subgraph, which is the block from which it should start processing data. In essence, subgraph.yaml serves as a configuration file that guides the Graph node about what data it should be looking for, where to find that data, and how to process it.
Step 5: Implement the Mapping Functions
If schema.graphql is the blueprint, the src/mappings directory is like the construction crew that follows the blueprint to build the structure. This directory contains the logic for processing blockchain data and turning it into the structured data defined by the schema.graphql.
This logic is written in AssemblyScript (a variant of TypeScript), and it reacts to blockchain events. Each event you want to track will have a corresponding handler function in this directory. For instance, when a new "Transaction" occurs in the blockchain, the handler function will process the raw transaction data, create a new "Transaction" entity as defined in the schema.graphql, and save it to the Graph's database.
In this tutorial, we won't be customizing these files; however, take a few minutes to review the code before moving on.
Next, let's go over the deployment process.
Step 6: Deploy the Subgraph
Deploying your Subgraph will cost some ETH because you will be publishing it on Ethereum itself (this will require a transaction). Since we're deploying on Ethereum mainnet, we'll just need some test ETH. Now, who's paying to host your Subgraph? Good question. The Graph currently runs a Hosted Service, which is centralized and was built initially for more adoption (it will eventually be sunset). We'll be using this Hosted Service so we don't need to worry about staking GRT to signal our Subgraph.
We'll need the deployer key shown in your Subgraph's draft (e.g., https://thegraph.com/studio/subgraph/bayc; replace bayc with your subgraph name) on Subgraph Studio to deploy it.
Once you have the key, run the following commands in your terminal:
Authenticate with your access token:
graph auth --studio <DEPLOY_KEY>
Then, navigate inside the bayc directory and compile the subgraph:
cd bayc
graph codegen && graph build
Deploy the Subgraph:
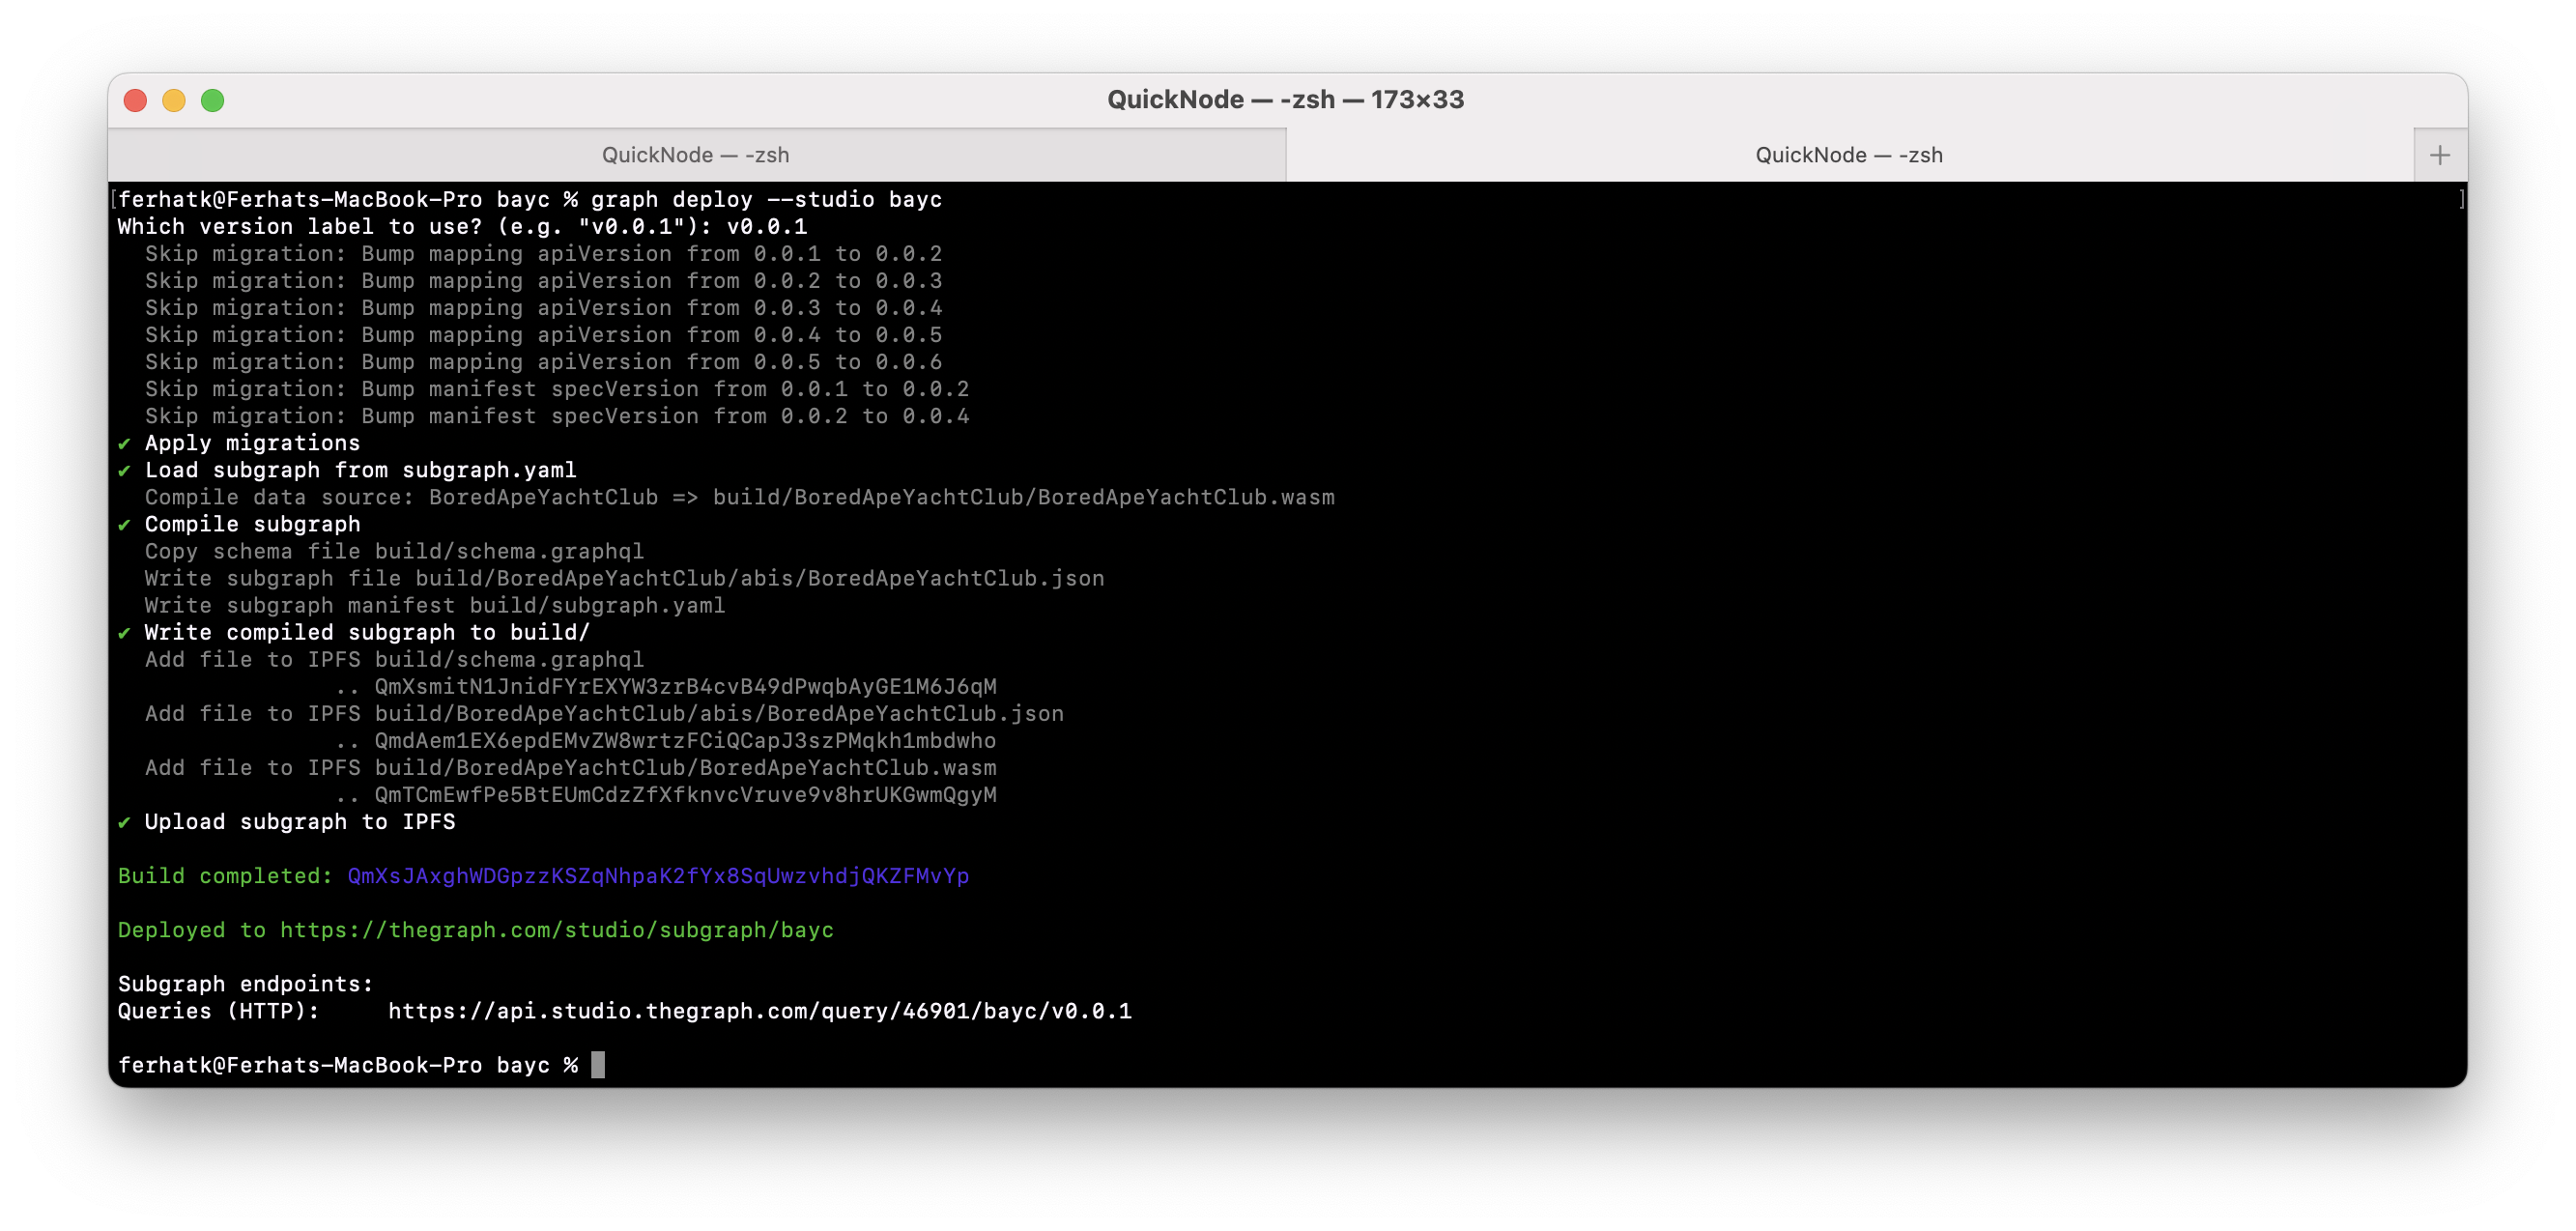
graph deploy --studio bayc
Choose the default version or your own version.
You'll see an output similar to the below:
If you run into issues during deployment such as - Error: Failed to deploy to Graph node https://api.studio.thegraph.com/deploy/: Could not deploy subgraph on graph-node: subgraph validation error: [the specified block must exist on the Ethereum network] - Try to rerun the deploy command again.
Interact with the Deployed Subgraph
After deploying your Subgraph, it will start indexing the data and be available for querying through The Graph's hosted service or a decentralized network of Graph Node operators. Depending on how big your Subgraph is, it can take from minutes to days. In our example, it could take ~1 hour. Once synced, navigate to the Playground tab on your Subgraph and click the Play button to make a query. Here are some example queries:
Return the from, to, and tokenId field on transfers where the from field is a specific address:
query MyQuery {
  transfers(where: {from: "0x00774750C8017f3cF313BDA8a0780e98781f4330"}) {
    from
    to
    id
  }
}
Return the transactionHash, from, to, and tokenId field on transfers where the block number is 9020247, and order by tokenId.
query MyQuery {
  transfers(where: {blockNumber: "18536882"}, orderBy: tokenId) {
    transactionHash
    from
    to
    tokenId
  }
}
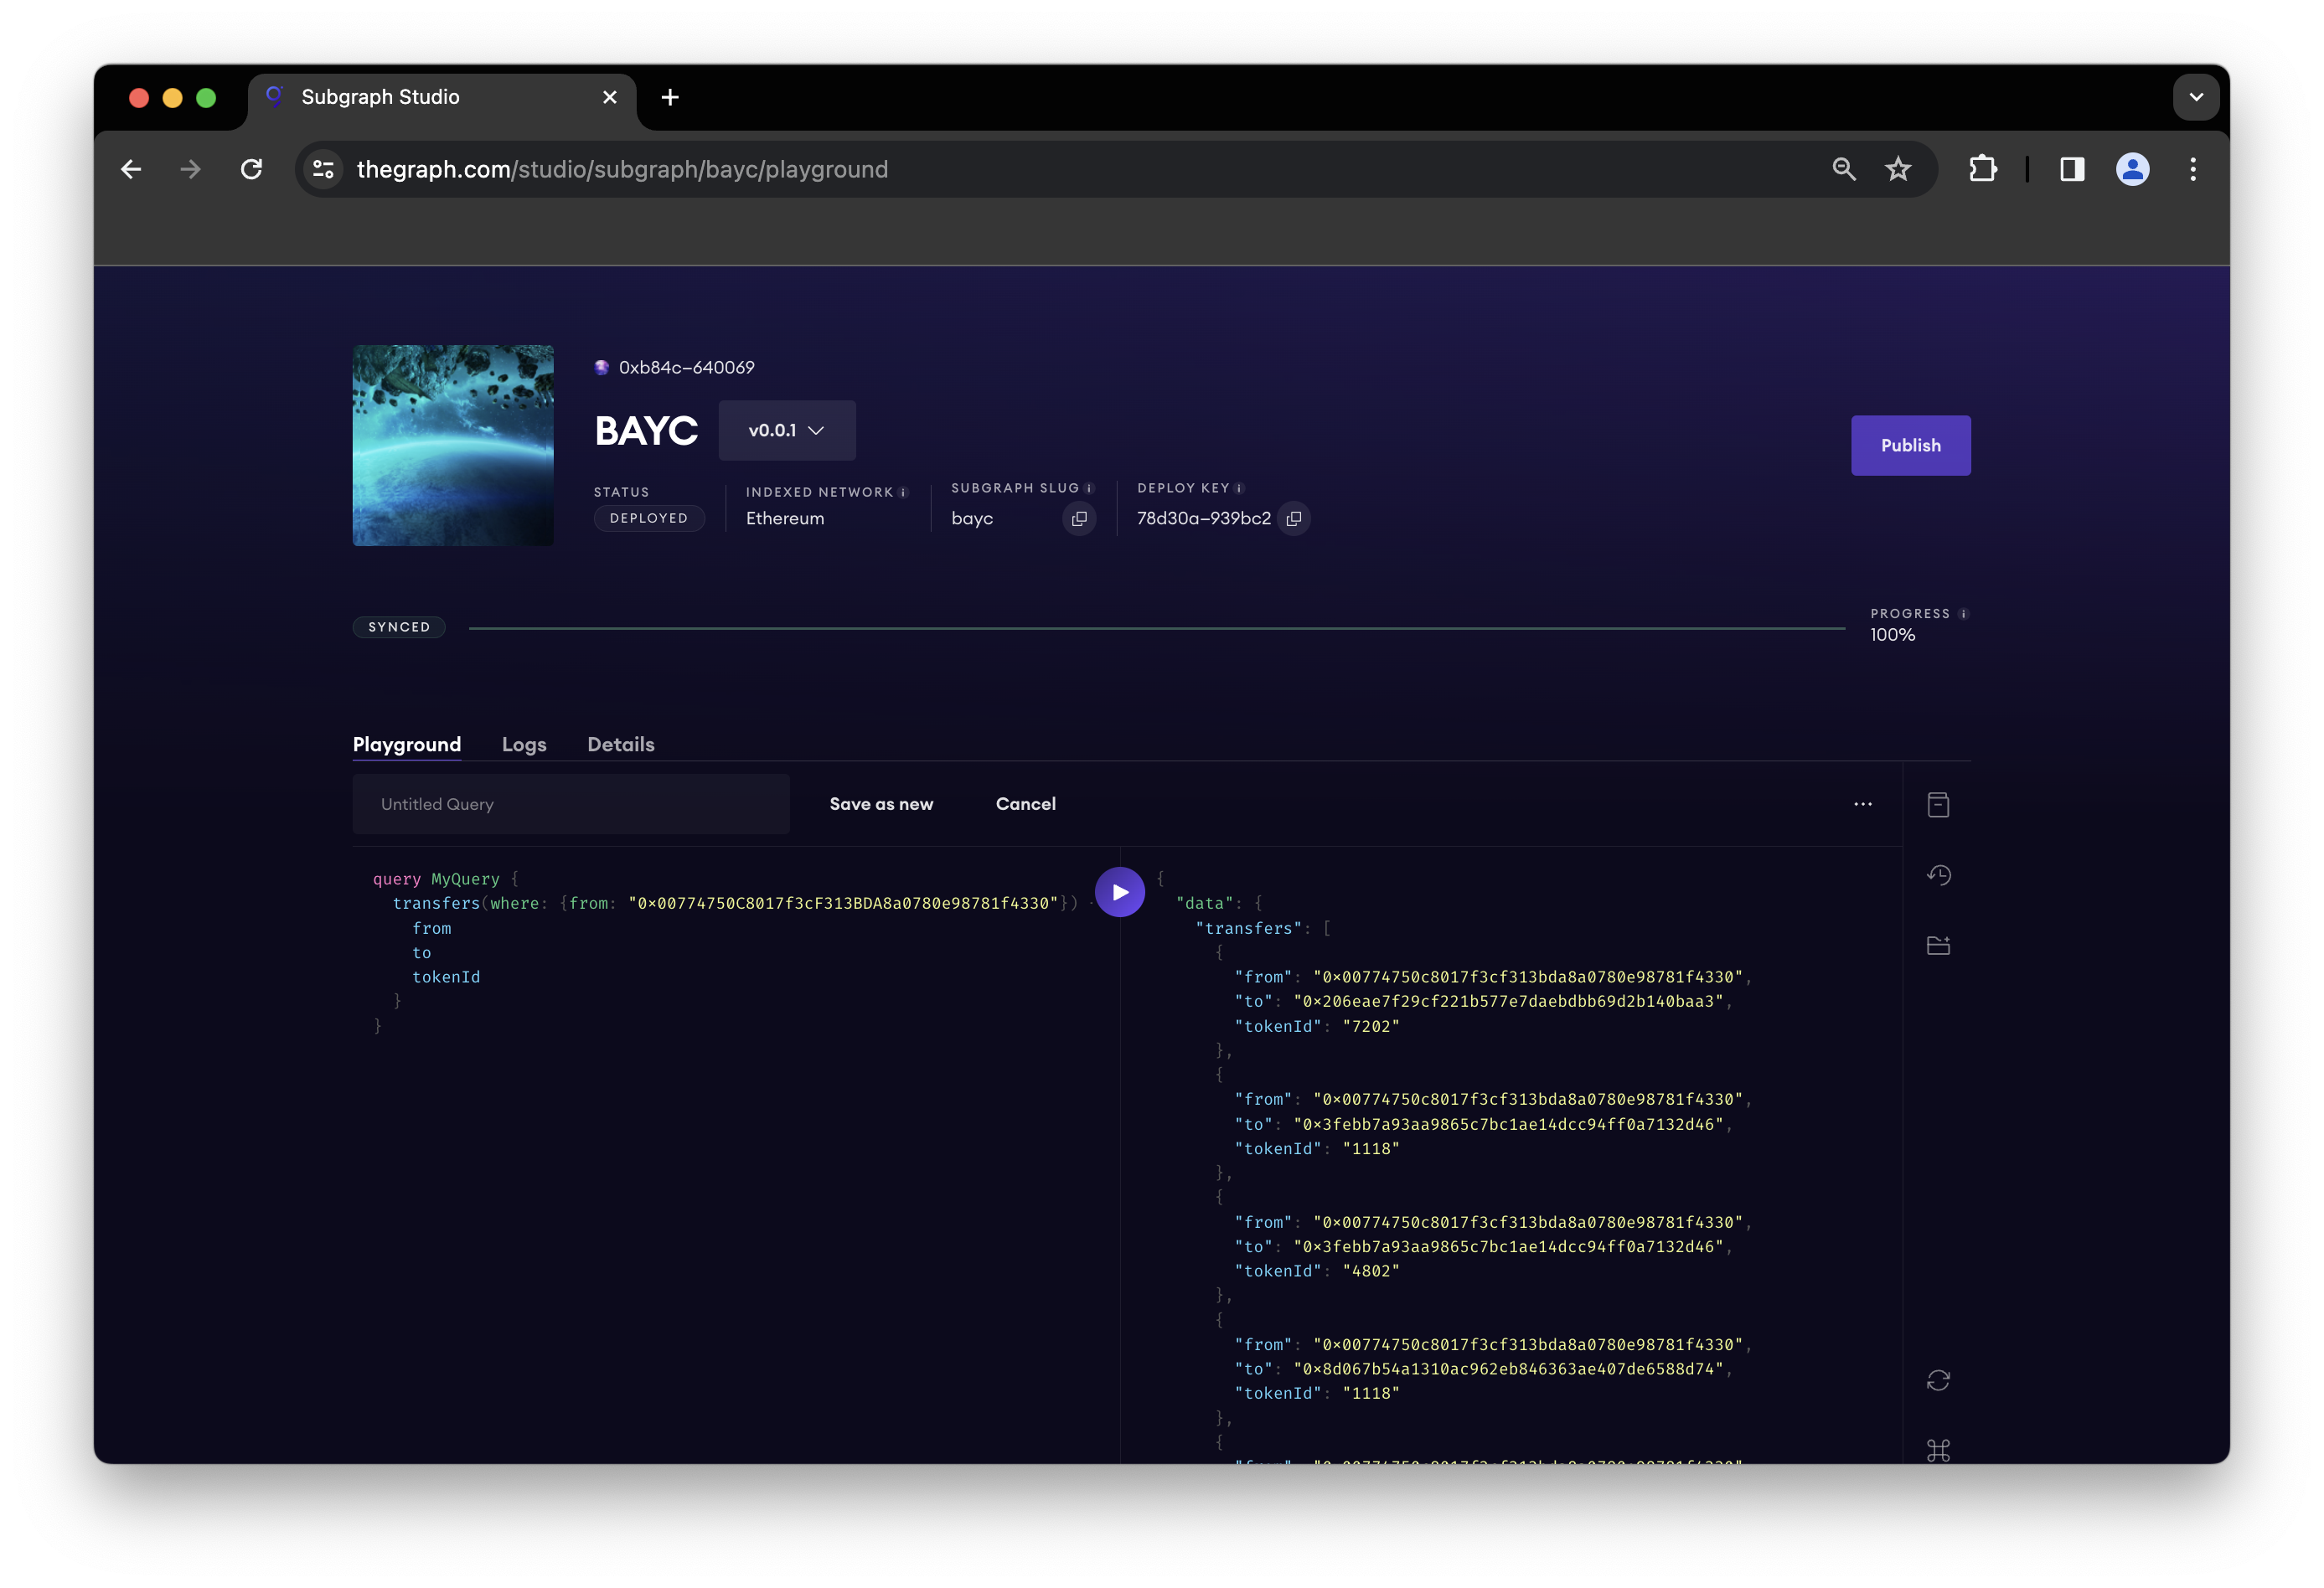
The screenshot above queries tranfers from a wallet address, returning the
from,toandtokenIdvalues.
Publish Subgraph to The Graph
After deploying your subgraph to the Subgraph Studio and thoroughly testing it, you can proceed to launch it into production by publishing it on the The Graph's decentralized network. This action makes the subgraph accessible for Curators to start their curation activities and for Indexers to initiate the indexing process.
To do this, click the Publish button, select the network, in our case its Ethereum mainnet and submit the transaction in your Web3 wallet.

Once published, you or others can query your subgraph. You can also signal your subgraph by depositing GRT into a bonding curve to indicate to Indexers that the subgraph should be indexed.
That's it! You now know how to create, deploy, interact and publish your own custom Subgraph on The Graph.
Additionally, if you want to build on top of this guide, consider the following ideas:
-
Ownership History: Track the ownership history of each NFT in the collection. This could include information about each time an NFT was transferred or sold, including the parties involved, the sale price (if applicable), and the transaction date.
-
Price History: Similar to ownership history, you could track the price history of each NFT. This could be especially interesting for collections where NFTs are frequently traded, as it could help to identify trends in the value of the NFTs over time.
-
Metadata Analysis: Many NFTs include metadata about the artwork, such as the artist's name, the date of creation, and sometimes even more complex information like color schemes or themes. You could index this metadata and make it searchable, allowing users to find NFTs based on these attributes.
-
Most Active Traders: By keeping track of who buys and sells NFTs, you could identify the most active traders in the collection. This could be interesting for potential buyers or sellers who want to know who the key players are in the market for these NFTs.
Additional Resources
Want to learn more? Check out the following list of resources:
- QuickNode Guide - How to Run a Hosted Subgraph with Zeeve
- The Graph Docs
- The Graph Learn Page
- The Graph Academy
- The Graph Podcast
Final Thoughts
The Graph provides a powerful, decentralized, and efficient way to access blockchain data using GraphQL. By creating custom subgraphs, developers can easily build scalable and high-performance dApps on Ethereum and other supported networks.
We would love to hear more about what you are building. Drop us a line in Discord, or give us a follow on Twitter to stay up to date on all the latest information!
We ❤️ Feedback!
If you have any feedback on this guide, let us know. We'd love to hear from you.