
8 min read
Overview
You can only make decisions as fast as your data, and having a reliable, persistent connection is crucial for blockchain applications. This comprehensive guide will walk you through the basics of WebSockets (WSS), contrast it with traditional HTTP (Hypertext Transfer Protocol), and teach you best practices for managing your WebSocket connections like a pro. Whether you're a programming newbie or a seasoned developer, this guide has everything you need to create and manage your WebSocket connections using Quicknode and Ethers.js.
What You Will Do
- Learn the fundamentals of WebSockets (WSS) and its difference from HTTP
- Set up an Ethereum node endpoint on Quicknode to get a WebSocket URL (sign up for free here)
- Develop a script that creates a WSS connection and manages it
What You Will Need
- A Quicknode Account
- Basic understanding of programming concepts
- Recommended: Basic understanding of Ethereum
- Node.js installed (v18.13.0>)
| Dependency | Version |
|---|---|
| ethers | ^6.9.2 |
What are WebSockets (WSS)?
A WebSocket connection is a communication protocol enabling real-time, two-way interactions between a client and a server. Unlike traditional HTTP requests, WebSockets maintain a persistent connection, enabling uninterrupted data exchange, essential for applications requiring real-time updates like financial trading exchanges, chat applications, and more. While HTTP is designed for one-off, request-response interactions, WebSockets thrive in scenarios demanding ongoing communication.
Handling WebSocket Connections
Handling connection issues is crucial when dealing with WebSockets in a blockchain context like Ethereum. The persistent nature of WebSockets means that any interruption can cause missed data or a breakdown in communication.
The primary reasons why a WebSocket connection may drop include:
- Sync failure: If the node you are using lags behind from the tip of the chain.
- Overload: If the node you are using crashes or is low on resources, it may stop responding to requests, causing the connection to drop.
- Middleware restart: Connections may drop during patches or upgrades to the blockchain client.
Some best practices to implement to mitigate these issues include:
- Detecting Disconnects: Unlike HTTP, WebSocket connections can drop silently, so monitoring the connection status is vital. This can be implemented via a heartbeat mechanism, which involves sending pings to your node at a certain interval to ensure it is still functioning.
- Automatic Reconnections: Implement a strategy to reestablish connections automatically after they drop. This can be implemented via reconnect logic, so once your script detects a disconnect, it tries to reconnect.
- Error Handling: Knowing the potential errors while properly responding and logging them to understand and rectify the underlying issues.
Create an Ethereum node endpoint using Quicknode
You're welcome to use public nodes or deploy and manage your own infrastructure; however, if you'd like 8x faster response times, you can leave the heavy lifting to us. Sign up for an account here.
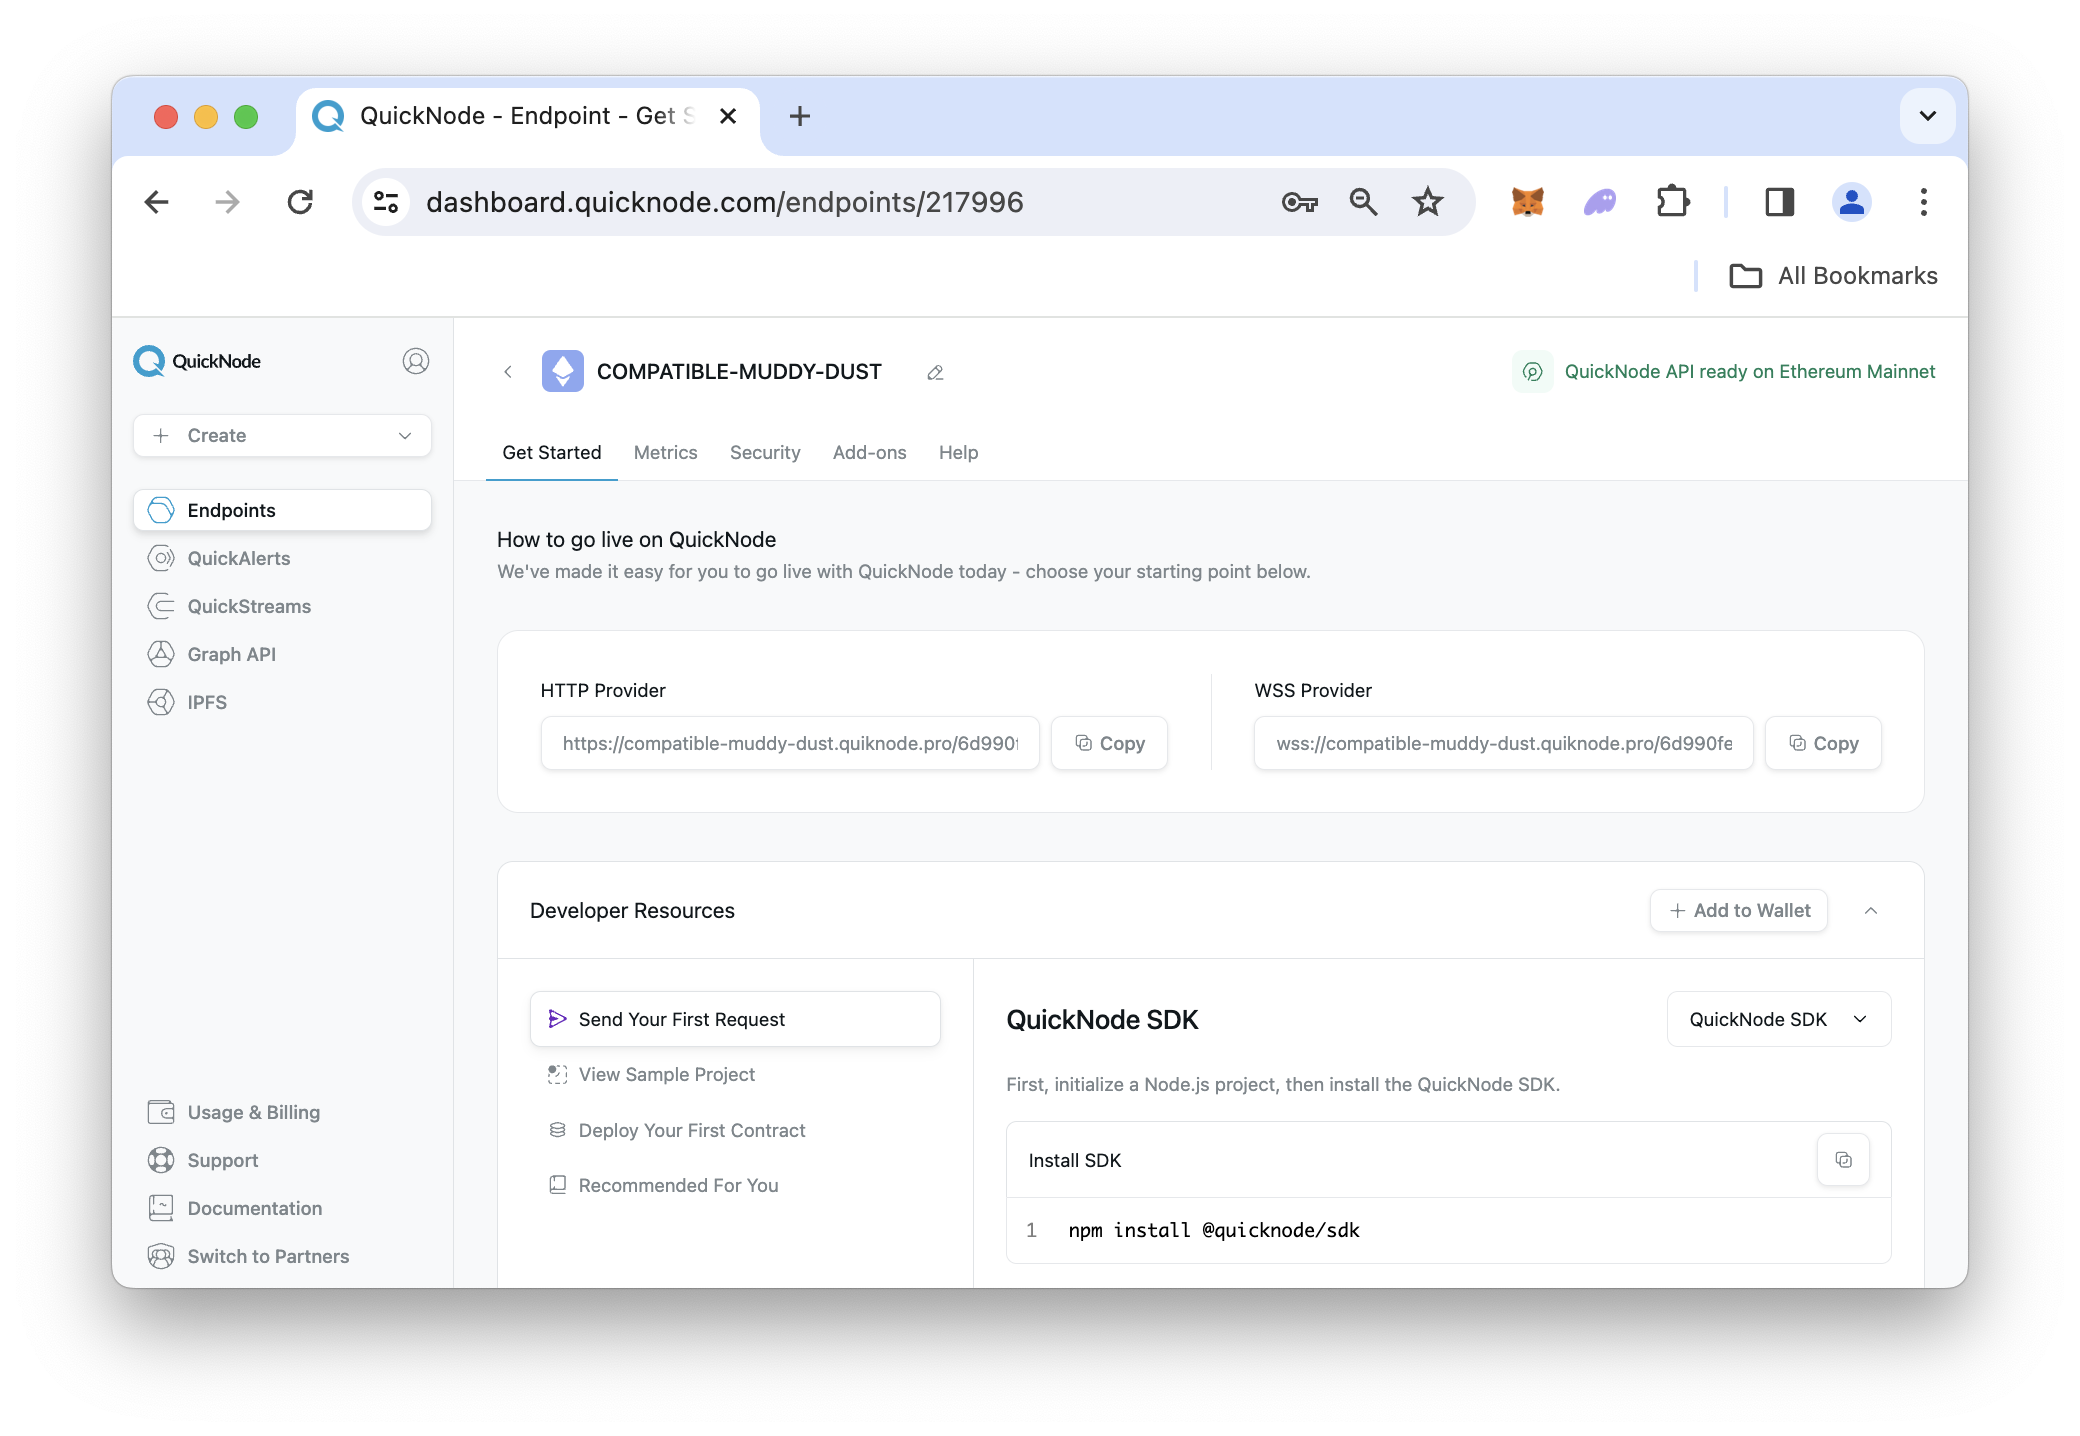
Once logged in, click the Create endpoint button, then select the blockchain and network you want to deploy on. For the purpose of this guide, we'll choose the Ethereum Mainnet blockchain. After creating your endpoint, keep the WSS Provider URL handy, as we'll need it in the programming portion of this guide.
Although we use Ethereum Mainnet to demonstrate a WebSocket connection in this guide, Quicknode also supports WebSockets on other blockchains like Base, Solana, Polygon, Arbitrum, and many more.
With our Ethereum node endpoint created, let's now move on to the programming portion.
Exercise: Implement and Manage a WebSocket Connection
In this section, we'll show you how to create and manage your WebSocket connection with Ethers.js. We'll be using Node.js and a Quicknode Ethereum node endpoint to communicate with the Ethereum blockchain.
Step 1. First, open a terminal or command prompt window and then navigate to the directory where you want to create your project. Run the command below to initiate a new package.json file. This file will manage the project's dependencies and other configurations.
npm init -y
Step 2. Your code requires the ethers library. Install it by running:
npm install ethers
Step 3.
Create a new JavaScript file in your project directory, for example, index.js. After, copy the provided code below into this file:
// Importing ethers library from Ethers.js
const { ethers } = require('ethers');

// Configuration for the Ethereum node WebSocket URL
const config = { ETH_NODE_WSS: 'WSS_URL' };
// Using console for logging
const logger = console;

// Constants for WebSocket connection management
const EXPECTED_PONG_BACK = 15000; // Time to wait for a pong response in milliseconds
const KEEP_ALIVE_CHECK_INTERVAL = 7500; // Interval for sending ping messages in milliseconds
const MAX_RECONNECT_ATTEMPTS = 5; // Maximum number of reconnection attempts
const RECONNECT_INTERVAL_BASE = 1000; // Base delay in milliseconds for reconnections
const SIMULATE_DISCONNECT_INTERVAL = 30000; // Interval to simulate disconnection (e.g., 30 seconds)

// Toggle for the disconnect simulation feature
const simulateDisconnect = true; // Set to false to disable disconnect simulation

// Variable to track the number of reconnection attempts
let reconnectAttempts = 0;

// Function to simulate a broken connection
function simulateBrokenConnection(provider) {
    logger.warn('Simulating broken WebSocket connection');
    provider.websocket.close();
}

// Function to start and manage the WebSocket connection
function startConnection() {
    // Initializing WebSocket provider with the Ethereum node URL
    let provider = new ethers.WebSocketProvider(config.ETH_NODE_WSS);

    // Variables for managing keep-alive mechanism
    let pingTimeout = null;
    let keepAliveInterval = null;

    // Function to schedule a reconnection attempt
    function scheduleReconnection() {
        // Check if maximum reconnection attempts haven't been reached
        if (reconnectAttempts < MAX_RECONNECT_ATTEMPTS) {
            // Calculate delay for reconnection based on the number of attempts
            let delay = RECONNECT_INTERVAL_BASE * Math.pow(2, reconnectAttempts);
            // Schedule next reconnection attempt
            setTimeout(startConnection, delay);
            reconnectAttempts++;
            logger.log(`Scheduled reconnection attempt ${reconnectAttempts} in ${delay} ms`);
        } else {
            logger.error('Maximum reconnection attempts reached. Aborting.');
        }
    }

    // Event listener for 'open' event on WebSocket connection
    provider.websocket.on('open', () => {
        reconnectAttempts = 0;
        keepAliveInterval = setInterval(() => {
            logger.debug('Checking if the connection is alive, sending a ping');
            provider.websocket.ping();

            pingTimeout = setTimeout(() => {
                logger.error('No pong received, terminating WebSocket connection');
                provider.websocket.terminate();
            }, EXPECTED_PONG_BACK);
        }, KEEP_ALIVE_CHECK_INTERVAL);

        // Schedule a simulated disconnect if the feature is enabled
        if (simulateDisconnect) {
            setTimeout(() => simulateBrokenConnection(provider), SIMULATE_DISCONNECT_INTERVAL);
        }
    });

    // Event listener for 'close' event on WebSocket connection
    provider.websocket.on('close', () => {
        logger.error('The websocket connection was closed');
        clearInterval(keepAliveInterval);
        clearTimeout(pingTimeout);
        scheduleReconnection();
    });

    // Event listener for 'pong' response to ping
    provider.websocket.on('pong', () => {
        logger.debug('Received pong, connection is alive');
        clearTimeout(pingTimeout);
    });

    // Event listener for new blocks on the Ethereum blockchain
    provider.on('block', (blockNumber) => {
        logger.log(`New Block: ${blockNumber}`);
    });

    // Event listener for errors on WebSocket connection
    provider.on('error', (error) => {
        logger.error('WebSocket error:', error);
        scheduleReconnection();
    });
}

// Initiate the connection
startConnection();
NOTE: Remember to replace the
QUICKNODE_WSS_URLplaceholder in your code with your actual Quicknode WebSocket URL.
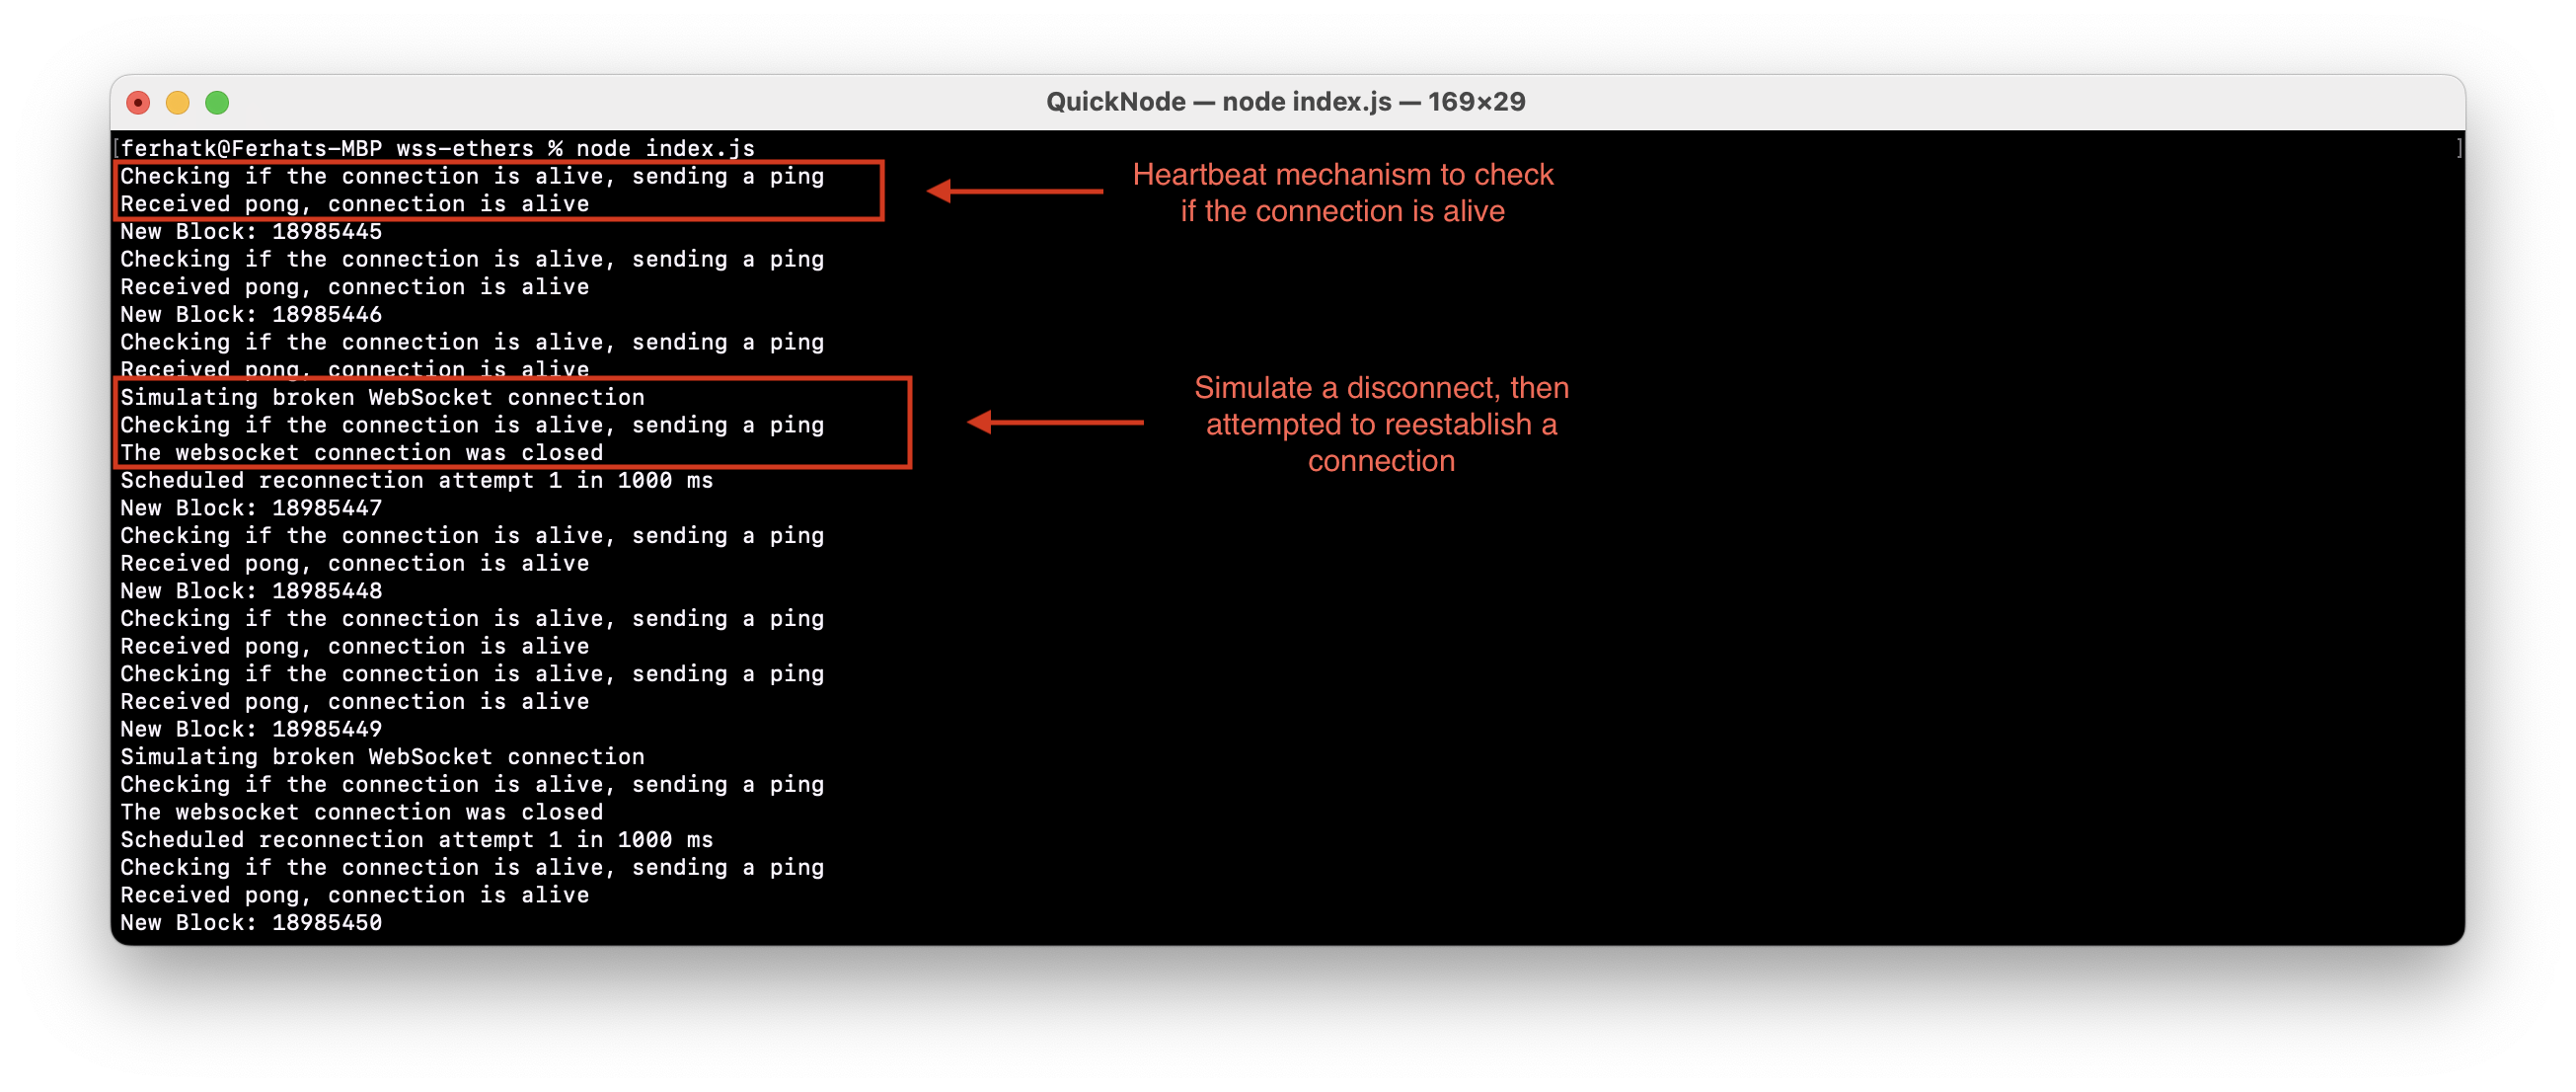
In this script above, we are listening for new blocks on the Ethereum blockchain using Ethers.js and its WebSocket class (docs), logging them as they are detected, and handling any errors by initiating a reconnection attempt.
The script uses the startConnection() function to establish and manage a WebSocket connection to an Ethereum node. The connection employs a keep-alive mechanism, periodically sending ping messages at intervals defined in KEEP_ALIVE_CHECK_INTERVAL. If a pong response is not received within the timeframe specified by EXPECTED_PONG_BACK, the script determines that the connection is inactive, terminating it and triggering the scheduleReconnection() function. This function attempts to re-establish the connection, adhering to the configured number of maximum reconnect attempts (MAX_RECONNECT_ATTEMPTS) and implementing an exponential back-off strategy for the delay between attempts, determined by RECONNECT_INTERVAL_BASE. Additionally, the script includes a boolean flag to trigger a disconnection by forcibly closing the WebSocket connection at regular intervals, as specified by SIMULATE_DISCONNECT_INTERVAL and simulateDisconnect. This simulated disconnection is intended for testing purposes and can be toggled to false for production usage.
By incorporating these practices, you can create a more resilient and responsive system that maintains a stable connection to the Ethereum network, handling any disruptions intelligently. For detailed guides on methods supporting WebSocket connections, including Ethereum and Solana, visit our Quicknode Documentation: Ethereum Docs and Solana Docs. Additional WebSocket support is also available on other blockchains. Alternatively, if you need a reliable solution to track real-time events on different blockchains without managing your own scripts and infrastructure, check out Webhooks with the following resource: Webhooks Documentation.
Step 4. Now, execute your script by running the command below in your terminal:
node index.js
This will execute the code in your index.js file, essentially connecting to the Ethereum network via Quicknode and listening for new blocks.
Additional Resources
If you want to learn more about WebSockets and keeping your endpoint secure, check out these resources below:
Final Thoughts
That's it! I hope this guide has taught you more about WebSockets and maintaining a stable connection with your Ethereum node endpoint.
If you have questions, check out our Discord server or provide feedback using the form below for help. Stay up to date with the latest by following us on Twitter (@Quicknode) and Telegram announcement channel.
We ❤️ Feedback!
Let us know if you have any feedback or requests for new topics. We'd love to hear from you.