
12 min read
Overview
TRON is a public blockchain platform that is open source and enables smart contracts. With its key features and innovative approach, TRON provides a high-performance infrastructure for executing smart contracts and handling transactions at high TPS levels.
The term "transactions per second" (TPS) describes how many transactions a network can handle in a single second.
Developers familiar with Ethereum can effortlessly build decentralized applications (dApps) on the TRON blockchain due to its compatibility with Ethereum. Transitioning from Ethereum to TRON is smooth and streamlined, allowing for seamless integration of dApps onto the TRON network.
In this guide, you will learn how to deploy and interact with a smart contract on the TRON blockchain using Solidity, JavaScript, and Tron's developer tools.
What You Will Do
- Learn about the TRON blockchain
- Create and deploy a smart contract on the TRON blockchain using TronBox
- Interact with smart contracts using the TronWeb JS library
What You Will Need
- A basic understanding of blockchain concepts
- Knowledge of JavaScript and Solidity
- Node.js installed (version 18.16 or higher)
- TronBox installed (version 3.3 or higher)
- TronWeb (version 5.2 or higher) - installing instructions will be explained during the guide.
- dotenv (version 16.2 or higher) - installing instructions will be explained during the guide.
- prompt-sync (version 4.2 or higher) - installing instructions will be explained during the guide.
- A code editor (e.g. Visual Studio Code)
- A TRON compatible self-custody Web3 wallet (e.g. TronLink)
You can download and install each dependency by clicking the links above and following their instructions.
Dependencies Used in this Guide
| Dependency | Version |
|---|---|
| node.js | 18.16.0 |
| tronbox | 3.3.0 |
| tronweb | 5.2.0 |
| dotenv | 16.2.0 |
| prompt-sync | 4.2.0 |
Unique Features of TRON
While TRON maintains compatibility with Ethereum, it also boasts distinctive features that set it apart. These unique attributes contribute to TRON's appeal and expand the possibilities for developers and users. Some of these special features include:
-
DPoS Consensus Mechanism: To validate blocks and transactions, TRON uses a Delegated Proof-of-Stake (DPoS) system in which 27 Super Representatives alternate every six hours.
-
Energy Efficiency: The Delegated Proof-of-Stake (DPoS) reduces the amount of energy needed for network upkeep and transaction validation due to its Super Representatives approach.
-
Resource Model: Transactions on the TRON network are subject to bandwidth and energy charges, where bandwidth refers to the number of bytes in a transaction and energy refers to a unit of measurement for the amount of computation necessary for TVM (TRON Virtual Machine) to conduct specified activities on the TRON network.
In the TRON network, block producers are referred to as super representatives. They are chosen through a voting process. The top 27 candidates with the highest number of votes are ultimately selected as super representatives.
Developer Set Up
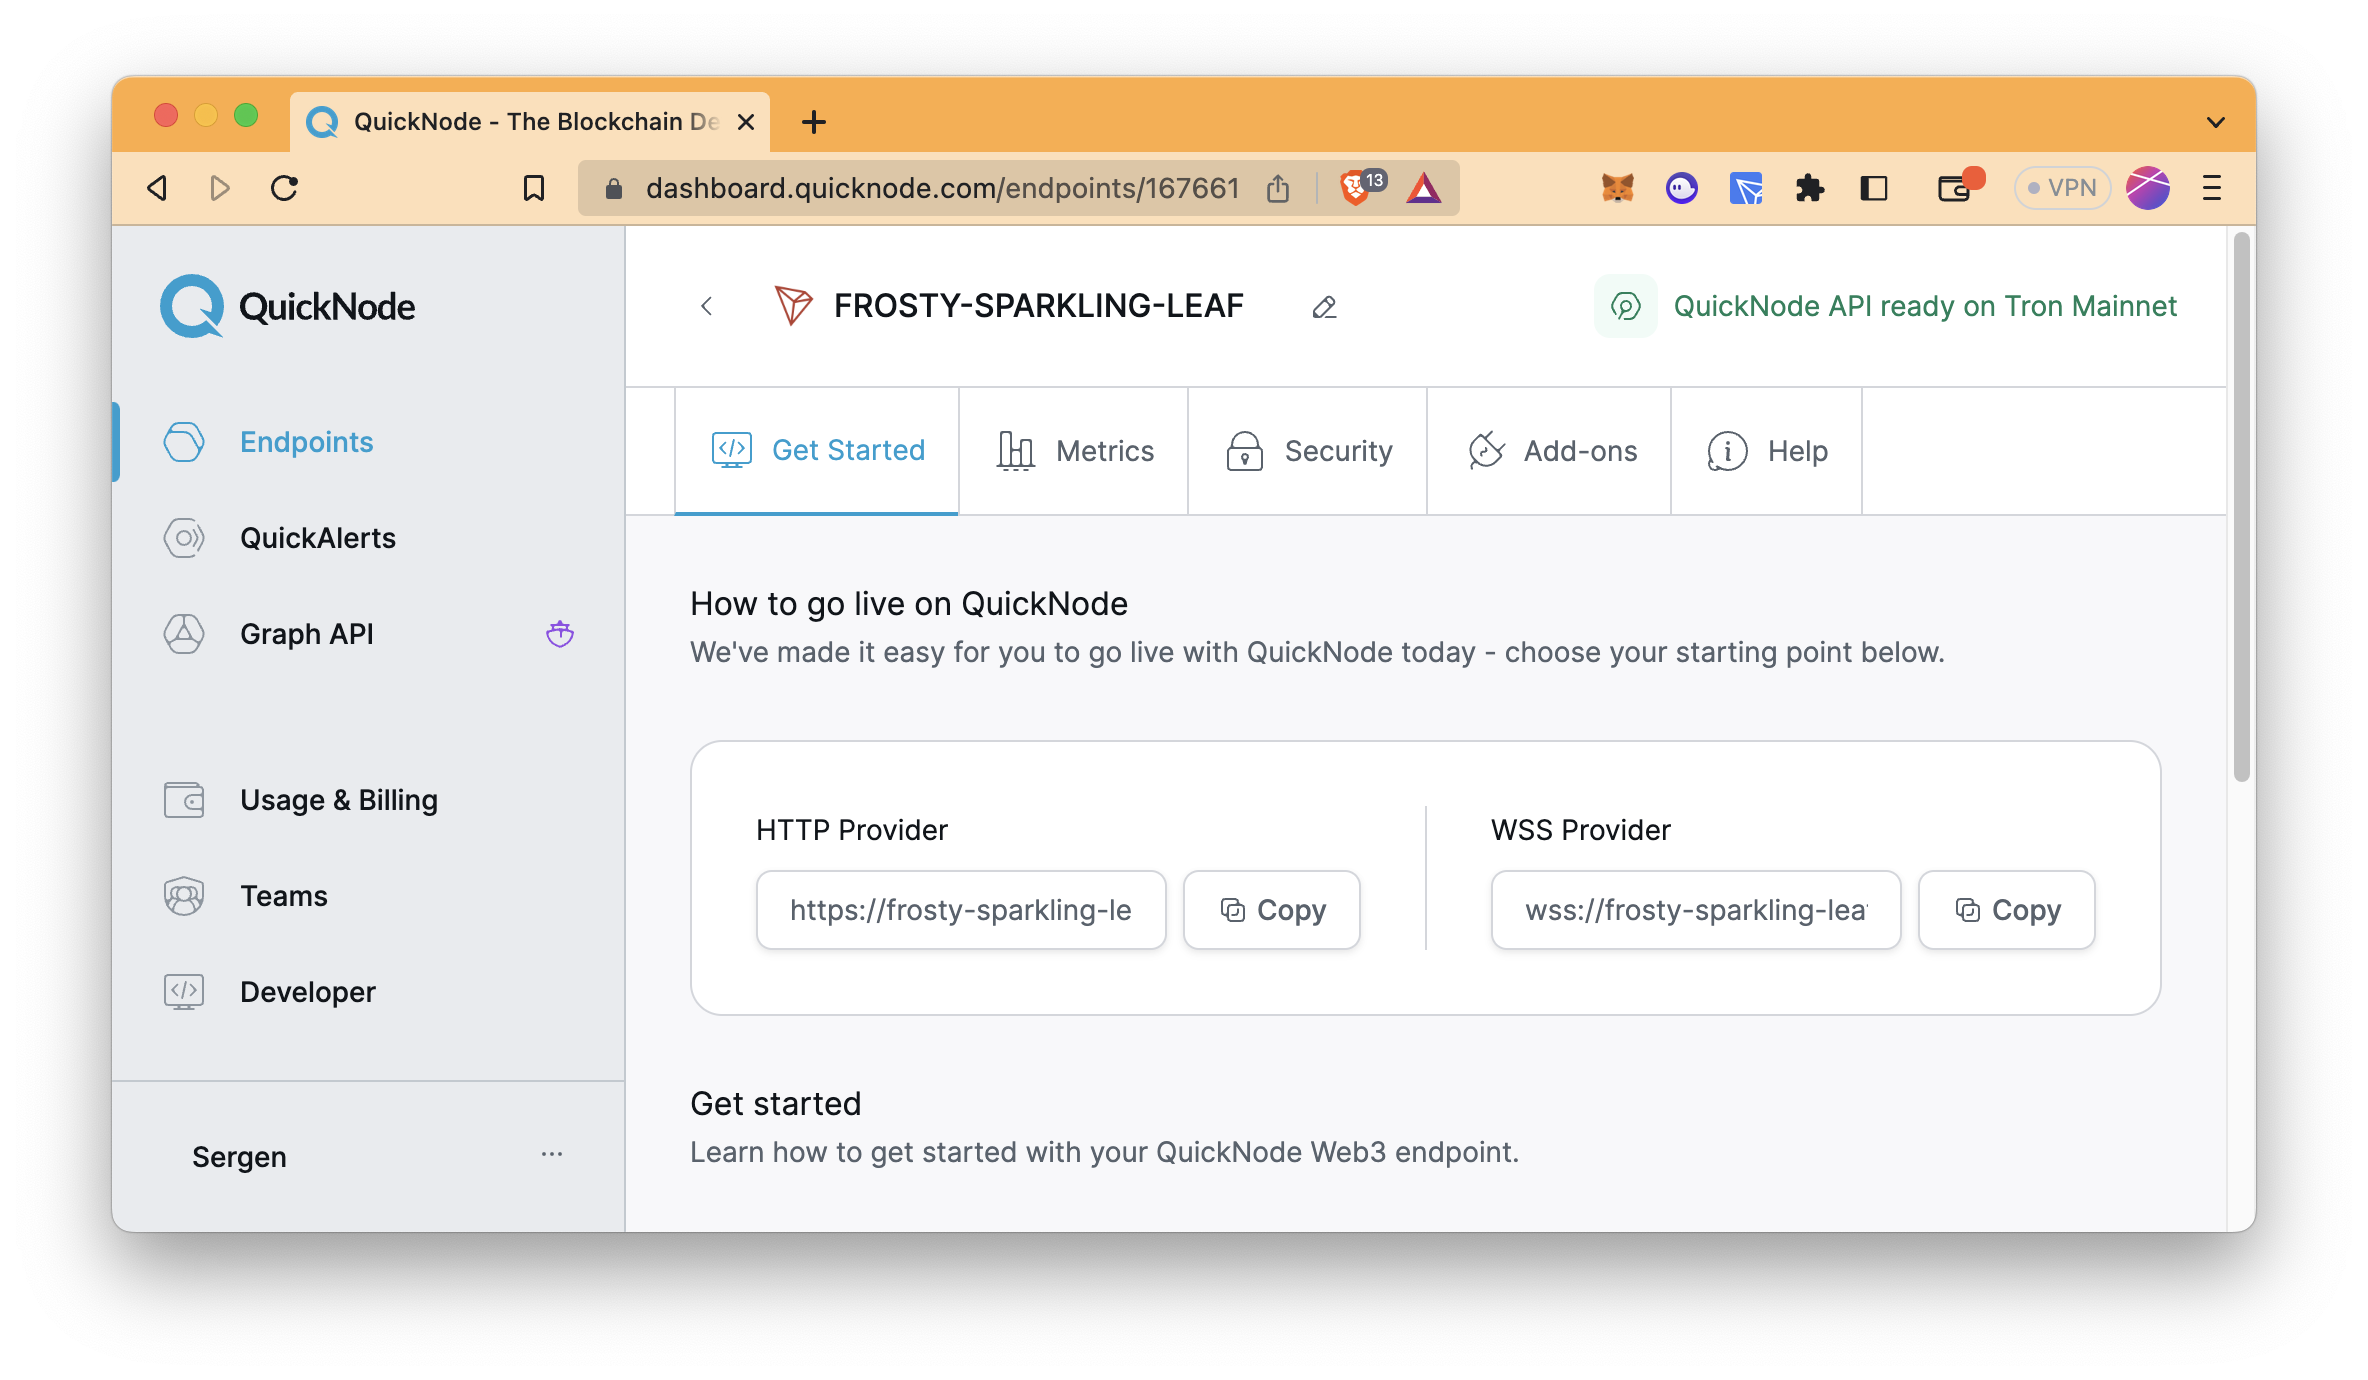
Accessing TRON with Quicknode
To build on TRON, you'll need an API endpoint to connect with the network. You're welcome to use public nodes or deploy and manage your own infrastructure; however, if you'd like 8x faster response times, you can leave the heavy lifting to us. Sign up for an account here.
In this guide, we will use the TRON Nile Testnet for convenience. Consequently, we will utilize public endpoints for our development. However, we advise to utilize Quicknode's endpoints when working on the TRON mainnet. Quicknode's endpoints provide enhanced reliability and performance, ensuring a smoother experience during the development process.
Funding the Wallet
Let's fund the wallet via the faucet that shared by the TRON team. The faucet gives free TRX on TRON Nile Testnet.
We assumed you already setup a wallet to fund, if you haven't already, do so by installing a TRON compatible self-custody Web3 wallet (e.g. TronLink).
- Get your wallet address via TronLink Extension
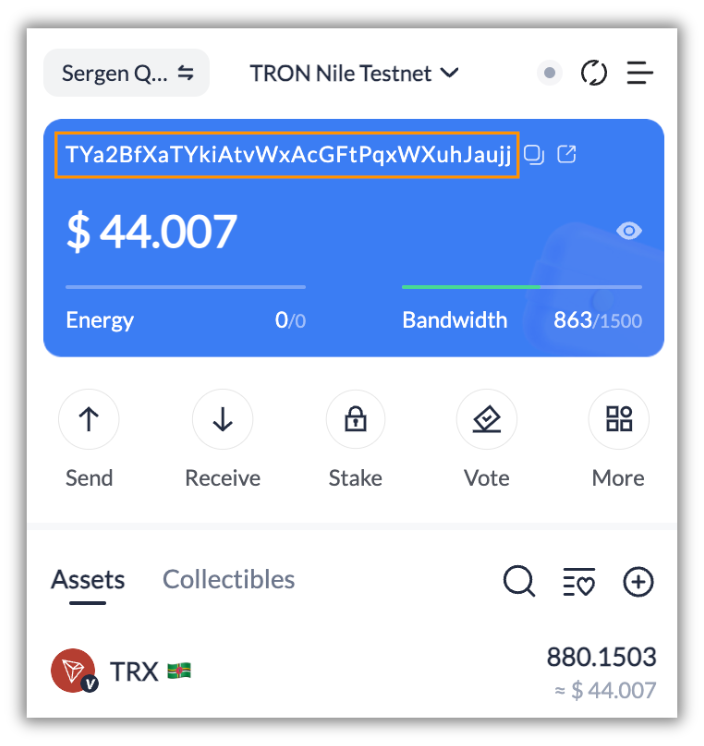
- Go to the faucet
- Type your wallet address into the box under the
Get 2000 test coins. - Solve the captcha and click the
Obtainbutton
Setting Up the Project
You need a terminal window (i.e., Terminal, Windows PowerShell) and code editor (i.e., Visual Studio Code) to set up the project.
Run the following code in your terminal to create the required folders:
mkdir send-message
cd send-message

mkdir tronbox
cd tronbox
Then, create a simple project using the command below.
tronbox init
It creates some folders and files that are useful in deployment. The file structure in the tronbox folder should look like this:
├── contracts
│   └── Migrations.sol
├── migrations
│   ├── 1_initial_migration.js
│   └── 2_deploy_contracts.js
├── sample-env
├── test
├── tronbox-config.js
└── tronbox.js
- contracts: Solidity smart contracts should be in this folder.
- contracts/Migrations.sol: A pre-written Solidity file for managing and upgrading smart contracts. It is required in every project and usually is kept the same.
- migrations: Deployment scripts should be located in this folder.
- migrations/1_initial_migration.js: This script is used to deploy the
Migrationscontract. - migrations/2_deploy_contracts.js: A deployment script for deploying other contracts. We will modify it in the following sections.
- migrations/1_initial_migration.js: This script is used to deploy the
- test: All scripts for testing smart contracts should be in here. Testing is out of scope in this guide.
- sample-env: Sample .env file. It's useful for securely handling environment variables. We will cover it in the following sections.
- tronbox.js: The TronBox configuration file, which is used to configure network information and other project-related parameters. We can leave it as is.
Smart Contract Deployment
Creating the Smart Contract
Now, by running these commands, let's create the SendMessage.sol file in the contracts folder.
cd contracts
echo > SendMessage.sol
Then, open the file with your code editor. Copy the code below and paste it into the file.
// SPDX-License-Identifier: MIT

pragma solidity ^0.8.6;

contract SendMessage {
    uint256 totalMessages; // Counter for total number of messages
    string lastMessage; // Variable to store the last message

    event NewMessage(address indexed from, string message, uint256 timestamp); // Event to emit when a new message is set

    constructor(string memory _message) {
        setMessage(_message); // Set the initial message when the contract is deployed
    }

    // Function to set a new message
    function setMessage(string memory _message) public {
        require(
            (keccak256(abi.encodePacked(lastMessage)) !=
                keccak256(abi.encodePacked(_message))),
            "Same message" // Check if the new message is different from the last message
        );

        totalMessages += 1; // Increment the total message count
        lastMessage = _message; // Update the last message variable

        emit NewMessage(msg.sender, _message, block.timestamp); // Emit an event for the new message
    }

    // Function to retrieve the last message
    function getLastMessage() public view returns (string memory) {
        return lastMessage; // Get the last message
    }

    // Function to retrieve the total number of messages
    function getTotalMessages() public view returns (uint256) {
        return totalMessages; // Get the total number of messages
    }
}
Smart Contract Logic
The smart contract SendMessage is designed to facilitate messaging functionality on the blockchain. It allows users to set and retrieve messages while keeping track of the total number of messages sent. The smart contract includes the following key elements:
-
Variables:
totalMessagesis a counter that keeps track of the total number of messages sent through the contract.lastMessageis a string variable that stores the content of the last message sent.
-
Event:
NewMessageis an event that is emitted whenever a new message is set. It includes the address of the sender, the message content, and the timestamp.
-
Constructor:
- The constructor function is executed when the smart contract is deployed and takes an initial message as a parameter. It calls the
setMessagefunction to set the initial message.
- The constructor function is executed when the smart contract is deployed and takes an initial message as a parameter. It calls the
-
setMessageFunction:- This function allows users to set a new message by providing a string parameter
_message. - It first checks if the new message is different from the last message by comparing their hash values. If they are the same, an error message is thrown.
- If the new message is different, it increments the
totalMessagescounter, updates thelastMessagevariable, and emits theNewMessageevent.
- This function allows users to set a new message by providing a string parameter
-
getLastMessageFunction:- This function retrieves the content of the last message by returning the value of the
lastMessagevariable.
- This function retrieves the content of the last message by returning the value of the
-
getTotalMessagesFunction:- This function retrieves the total number of messages sent by returning the value of the
totalMessagescounter.
- This function retrieves the total number of messages sent by returning the value of the
The smart contract provides a simple messaging system where users can set and retrieve messages while ensuring that duplicate messages are not stored. It also provides transparency through the use of events to track and monitor message updates on the blockchain.
Preparing for Deployment
Modify Config file
In this section, you will set up the configuration file and compile the smart contracts.
Navigate up one directory to change the directory.
cd ..
Then, open the tronbox.js file that defines all networks (mainnet, testnets, etc.) and compiler settings.
More detailed information about the config file is explained here.
You may notice the variables like process.env.PRIVATE_KEY_MAINNET, process.env.PRIVATE_KEY_SHASTA, and process.env.PRIVATE_KEY_NILE. It is necessary to provide the private key of your wallet, which should be provided securely since the private key must not be shared publicly. Thus, the dotenv package should be installed in the tronbox directory by running this code.
npm install dotenv --save
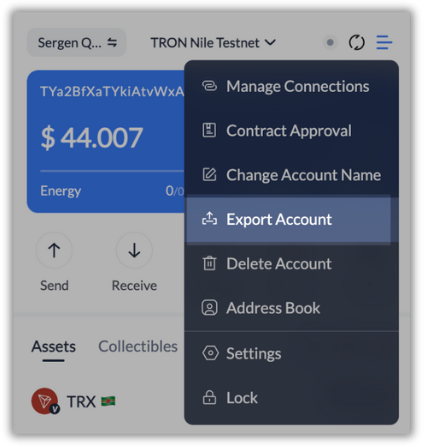
To get your private key;
- Open TronLink wallet extension
- Open the
Wallet Managementmenu - Select
Export Account - Select
Private Key - Enter your password
- Copy your private key
Then, create a .env file and write your private key by running the code below. Do not forget to replace YOUR_PRIVATE_KEY with your wallet's private key.
echo "export PRIVATE_KEY_NILE=YOUR_PRIVATE_KEY" > .env
The tronbox folder structure should be like the one below for now.
Note that
.env,.gitignore, and.git-folder-keeperare hidden files.
├── .env
├── .gitignore
├── contracts
│   ├── Migrations.sol
│   └── SendMessage.sol
├── migrations
│   ├── 1_initial_migration.js
│   └── 2_deploy_contracts.js
├── sample-env
├── test
│   └── .git-folder-keeper
├── tronbox-config.js
└── tronbox.js
Make sure that
.gitignorefile contains.env. This way, it will be ensured that the.envfile is not tracked by Git.
Compiling
Then, compile the smart contracts.
tronbox compile
That is how the console output will look.
Compiling ./contracts/Migrations.sol...
Compiling ./contracts/SendMessage.sol...
Writing artifacts to ./build/contracts
Deployment
It is time to deploy smart contracts to the testnet. Contract deployments (migrations) are handled by the script files in the migrations folder.
The 1_initial_migration.js file is pre-written, so you don't need to edit the file. However, it is a good practice to check the content by opening it with a code editor. The content should be like the one below.
var Migrations = artifacts.require("./Migrations.sol");

module.exports = function(deployer) {
  deployer.deploy(Migrations);
};
Now, open the 2_deploy_contracts.js file with your code editor and modify it corresponding to the below content.
var MyContract = artifacts.require("./SendMessage.sol");

module.exports = function(deployer) {
  deployer.deploy(MyContract, "Hi Quicknode!");
};
SendMessage smart contract takes one parameter (_message) in the constructor function, so, "Hi Quicknode!" indicates this parameter. You can change it to whatever you want.
Run the command to deploy smart contracts to the Nile Testnet.
Make sure that directory of the terminal is
tronbox.
source .env && tronbox migrate --network nile
The output should be like that. Addresses (in base58 and hex) of the deployed smart contracts will differ when you deploy.
Using network 'nile'.

Running migration: 1_initial_migration.js
  Deploying Migrations...
  Migrations:
    (base58) TLp71KNc3bZah88Pwo8MuHma9pKUsCP4hK
    (hex) 4176f0a2987d97a3dbb376807558697a339fee0fe6
Saving successful migration to network...
Saving artifacts...
Running migration: 2_deploy_contracts.js
  Deploying SendMessage...
  SendMessage:
    (base58) TPDnWBU9mD4VSYmGbXVrKsocvuqBFJuFPk
    (hex) 41915b6cc017b44eba2c7af7ddb94885ab3c34e1c5
Saving successful migration to network...
Saving artifacts...
Congratulations! You just deployed your first smart contracts on TRON Nile Testnet!
It is possible to check these smart contracts on the TRON Nile Testnet Explorer.
- Go to the TRON Nile Testnet Explorer
- Paste the base58 address of SendMessage smart contract (TPDnWBU9mD4VSYmGbXVrKsocvuqBFJuFPk for me) into the search bar and press
Enter
It may take a few minutes for smart contracts to be indexed in the explorer.
Interact with the Smart Contract
This guide explains how to interact with smart contracts via script files. However, remember that there are several ways to interact with them.
Interact via Script Files
Create a new folder (tronweb) in the main project directory (send-message) to write a basic script file.
cd ..

mkdir tronweb
cd tronweb
For now, the folder structure should be seen like the one below.
├── tronbox
│   ├── .env
│   ├── .gitignore
│   ├── build
│   │   └── contracts
│   │       ├── Migrations.json
│   │       └── SendMessage.json
│   ├── contracts
│   │   ├── Migrations.sol
│   │   └── SendMessage.sol
│   ├── migrations
│   │   ├── 1_initial_migration.js
│   │   └── 2_deploy_contracts.js
│   ├── sample-env
│   ├── test
│   │   └── .git-folder-keeper
│   ├── tronbox-config.js
│   └── tronbox.js
└── tronweb
By running these commands, create an empty npm project and install the tronweb, dotenv, and prompt-sync packages.
npm init --yes
npm install tronweb
npm install dotenv
npm install prompt-sync
Then, create an empty JavaScript file.
echo > sendMessage.js
Then, open the file with your code editor and paste the code below into your file. Do not forget to change BASE58_SENDMESSAGE_CONTRACT_ADDRESS to the contract address (base58) of your deployed SendMessage smart contract.
This script file performs getting the current message, asking if the user wants to change the message, sending a transaction to change the message, and getting the new current message respectively.
const TronWeb = require("tronweb");
const prompt = require("prompt-sync")();
require("dotenv").config();

const tronWeb = new TronWeb({
  fullHost: "https://nile.trongrid.io",
  privateKey: process.env.PRIVATE_KEY_NILE,
});

async function sendMessage() {
  contractAddress = "BASE58_SENDMESSAGE_CONTRACT_ADDRESS";
  let contract = await tronWeb.contract().at(contractAddress);
  let lastMessage = await contract.getLastMessage().call();
  console.log(`The current message is: ${lastMessage}`);

  let input = prompt("Do you want to send a new message? ([1]: Yes, [2]: No) ");

  if (input == 1) {
    let newMessage = prompt("Type your new message: ");
    let txId = await contract.setMessage(newMessage).send();
    console.log(
      `Check tx on the explorer: https://nile.tronscan.org/#/transaction/${txId}`
    );

    lastMessage = await contract.getLastMessage().call();
    console.log(`The current message is: ${lastMessage}`);
  }
}

sendMessage();
In the script file, you may notice the variable
process.env.PRIVATE_KEY_NILE. A private key is needed in order to send a transaction to the blockchain. So, we'll use thedotenvpackage as we used in the smart contract deployment.
Create a .env file and write your private key by running the code below. Do not forget to replace YOUR_PRIVATE_KEY with your wallet's private key.
echo "export PRIVATE_KEY_NILE=YOUR_PRIVATE_KEY" > .env
Now, you are ready to run the script!
node sendMessage.js
The console shows the current message and then asks if you want to send a new message.
- Type
1and pressEnterif you want to send a new message. - Then, the console asks for the new message.
- Type anything you want and press
Enter.
The transaction to change the message will be sent to the blockchain. Then, the link to check the transaction on the explorer and the current message will be shown in the terminal.
The current message is: Hi Quicknode!
> Do you want to send a new message? ([1]: Yes, [2]: No) 1
> Type your new message: Quicknode ❤️
Check tx on the explorer: https://nile.tronscan.org/#/transaction/87119e102111de7a2d062feb005662e9fdf62170442d93b1f43853aeddabbfcd
The last message is: Quicknode ❤️
Conclusion
Congratulations on your achievement! Throughout this learning journey, we have been there to guide you at every step. From funding your wallet to setting up a Quicknode endpoint and establishing a development environment with TronBox, you have gained the necessary skills to create and deploy smart contracts onto the TRON Testnet and to interact with them.
Once you have mastered development on testnet and are ready to take your skills to mainnet, you can sign up with a free Quicknode account here and create a TRON mainnet endpoint.
If you encounter any problems or have any questions, we'd love to help you! Find us on Discord or Twitter.
We ❤️ Feedback!
Let us know if you have any feedback or requests for new topics. We'd love to hear from you.