
16 min read
Overview
Most blockchains today require users to stake their tokens or run a validator in order to earn native yields from the protocol. Blast is a Layer 2 (L2) blockchain project renowned for its innovative approach to providing native yield for deposited ETHs and stablecoins. In this guide, you will learn more about Blast and then learn how to create, deploy, and interact with an auto-yielding vault contract on Blast using Hardhat.
What You Will Need
- Basic understanding of TypeScript (or JavaScript)
- A web3 wallet with access to your private key (e.g., MetaMask)
- Node.js & npm installed
- Hardhat installed
- A free Quicknode account
What You Will Do
- Gain an understanding of the Blast blockchain
- Build an auto-yielding vault smart contract
- Deploy the smart contract on the Blast blockchain
- Interact with your deployed vault contract
What is Blast?
Blast is an EVM-compatible, optimistic rollup L2 blockchain. It distinguishes itself by natively incorporating yield from ETH staking and real-world asset (RWA) protocols, offering a baseline yield of 4% for ETH and 5% for stablecoins. This yield integration is designed to counteract inflationary losses and support new business models for DApps that are not feasible on other L2s.
Let's dive into the specifics of how Blast functions and what makes it a go-to choice for developers and investors.
Unique Features of Blast
-
Auto Rebasing: Blast has a distinctive auto rebasing feature for ETH, WETH (Wrapped ETH), and USDB (Blast’s native stablecoin) on its L2 platform. This rebasing allows these assets to benefit from yield generation seamlessly for both externally owned accounts (EOAs) and smart contracts. In contrast to ETH, where contracts by default have yield disabled, both WETH and USDB accounts automatically generate yield for EOAs and smart contracts by default.
-
L1 Staking Yield: Following the Ethereum Shanghai upgrade, Blast leverages ETH yield from L1 staking (initially through Lido) and transfers it to users via rebasing ETH on L2.
-
T-Bill Yield for Stablecoins: Stablecoins bridged to Blast are converted to USDB, which earns yield from MakerDAO’s T-Bill protocol. This mechanism allows for stablecoin yield generation.
-
Gas Revenue Sharing: Unlike other L2s, Blast shares net gas revenue with DApp developers, providing an additional revenue stream or the option to subsidize user gas fees.
Developer Set Up
You'll need an API endpoint to communicate with the Blast blockchain. For this, services like Quicknode offer faster and more reliable RPC connections than public API endpoints. Sign up here for free and create an endpoint for the Blast Sepolia Testnet.
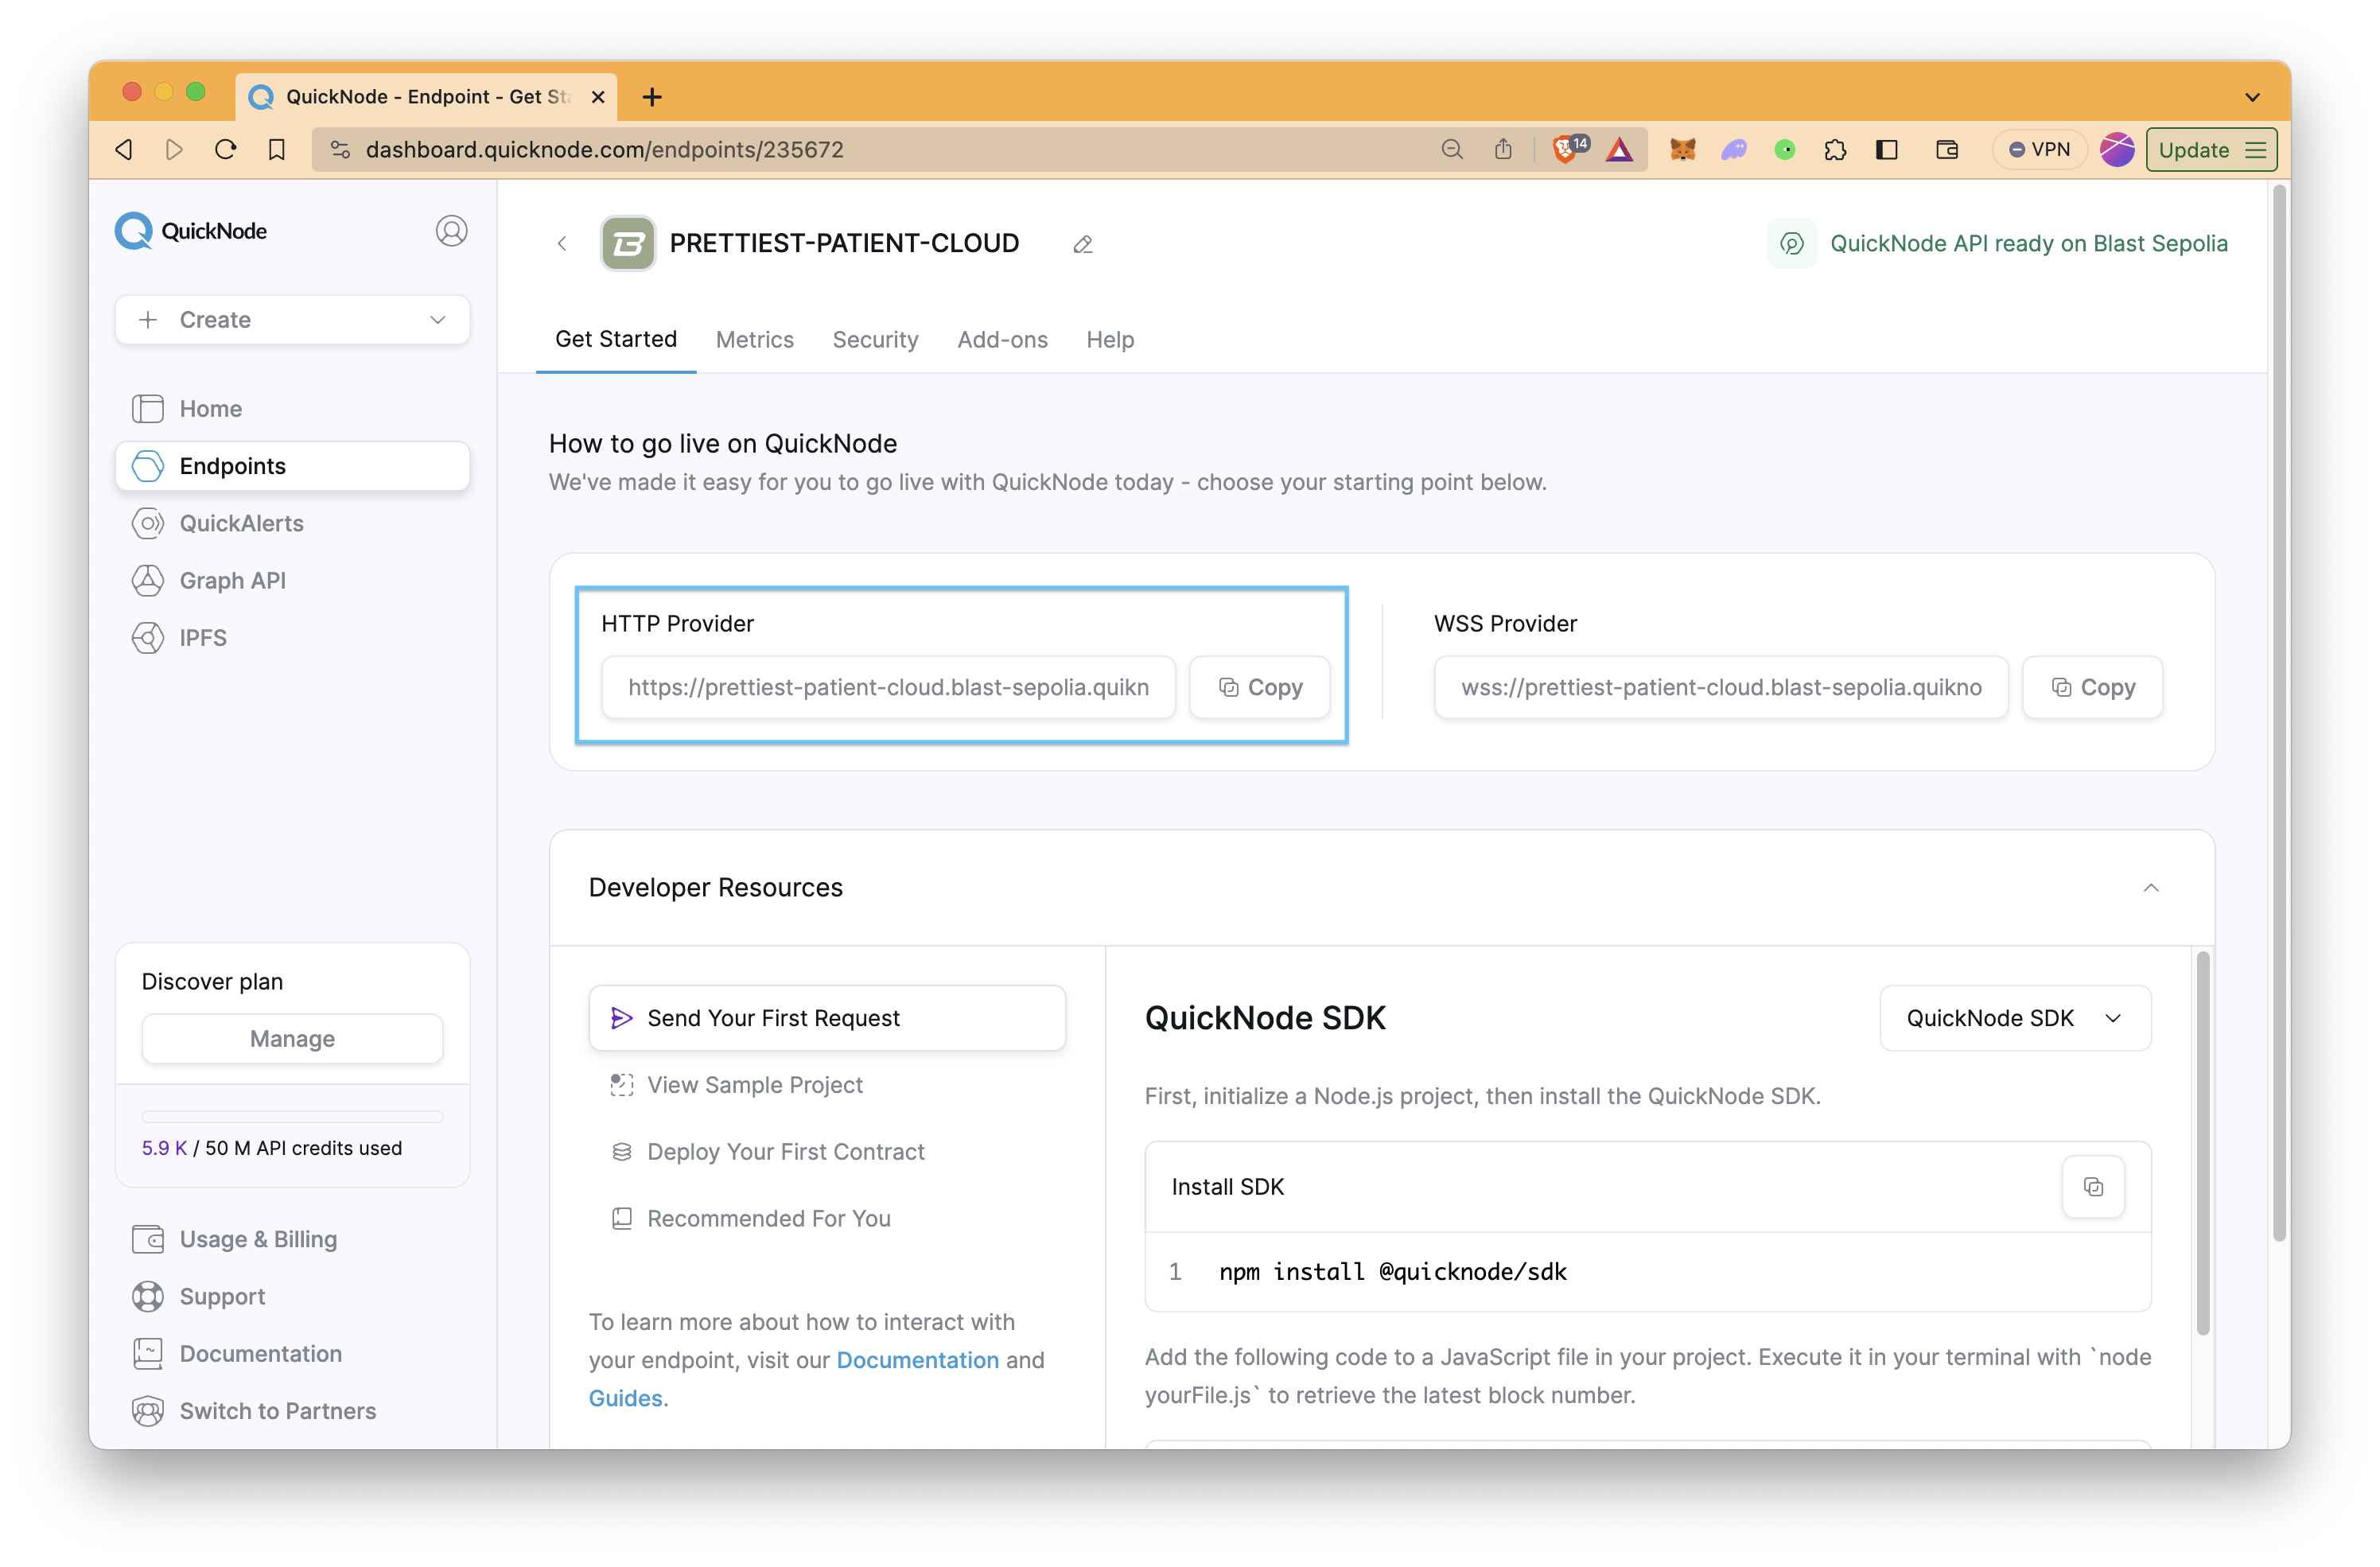
Keep the HTTP Provider URL for later use in contract deployment.
Quicknode Multi-Chain Faucet
In this guide, we will use Blast Sepolia Testnet. Thus, you need to get some test ETH.
- Go to the Quicknode Blast Sepolia Faucet
- Type your wallet address or connect your wallet
- Click Continue and follow the instructions
You can get bonus ETH if you login with your Quicknode account or send a tweet.
In the next section, we'll start developing our auto-yielding vault contract using Hardhat.
Smart Contract Development
Project Set Up
Create a directory named Vault and install the required dependencies:
mkdir Vault && cd Vault
npm init -y
npm install --save-dev hardhat
npm install dotenv @nomicfoundation/hardhat-verify
npx hardhat init
Select Create a TypeScript project when prompted by Hardhat. Also, say Yes when it is asked to install @nomicfoundation/hardhat-toolbox.
Create a .env file in your project directory.
Environment variables are used to store sensitive data such as passwords, API credentials, and other information that should not be written directly in code.
echo > .env
Modify your .env file as below.
Replace YOUR_PRIVATE_KEY and YOUR_QUICKNODE_BLAST_SEPOLIA_ENDPOINT_URL placeholders with your wallet's private key and your Quicknode Blast Sepolia endpoint HTTP URL.
PRIVATE_KEY="YOUR_PRIVATE_KEY"
QUICKNODE_ENDPOINT="YOUR_QUICKNODE_BLAST_SEPOLIA_ENDPOINT_URL"
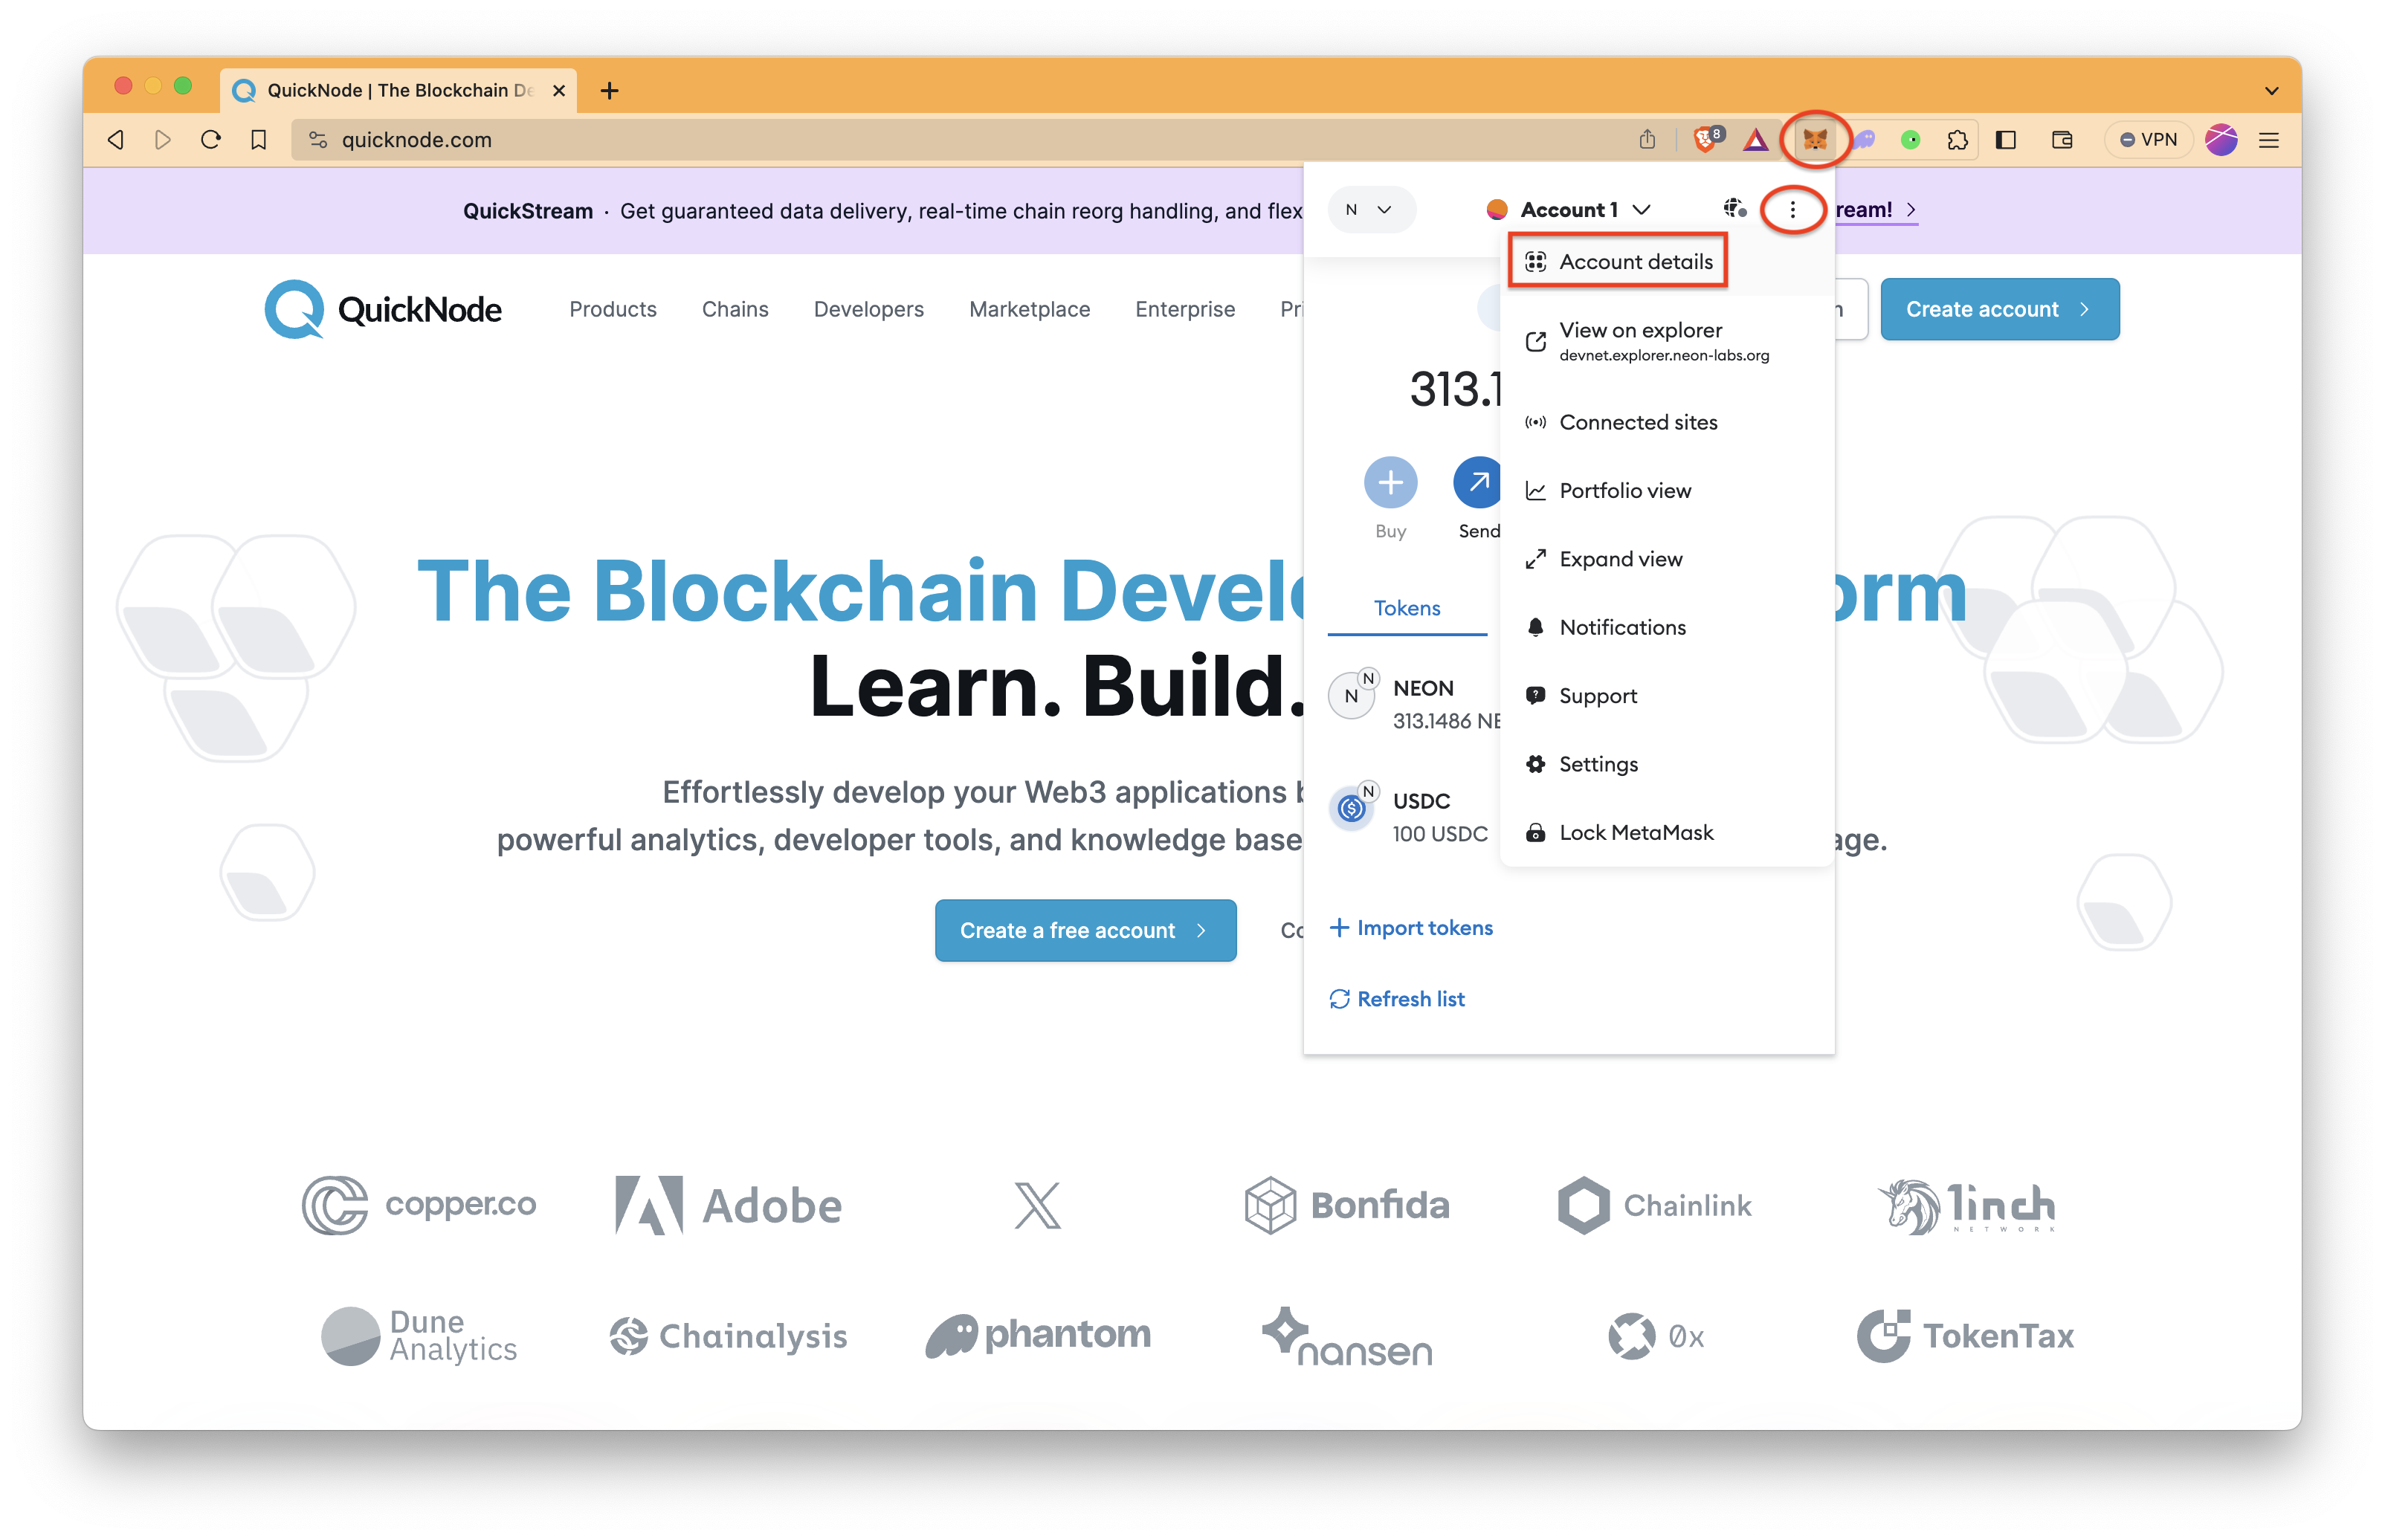
If you do not know how to get your private key, click here.
This instruction is prepared for MetaMask.
To get your private key;
- Click MetaMask icon, a stylized fox head, on your browser. If it is not seen, check the Extensions page of your browser.
- Click ⋮ symbol and then Account details.
- Then, click Show private key and follow instructions.
Then, configure your hardhat.config.ts file as below. Any Hardhat-related settings, such as networks, accounts, and Solidity versions, are defined in this file.
To read the explanation of the code (highly recommended), click here
This code is a configuration setup for a Hardhat project tailored for the Blast blockchain.
-
Network Configuration: The networks property defines two environments - blast_sepolia for the Sepolia testnet, and hardhat for a local development environment using forking. The Sepolia configuration includes the Quicknode endpoint URL and private key for transactions, along with a specified gas price. The local environment configuration (hardhat) sets up forking from a specific block number using the same Quicknode endpoint.
-
Etherscan Integration: Under etherscan, although a unique API key is not required, it must have a value. Thus, an API key for the blast_sepolia network is set as a placeholder. The customChains array includes a custom configuration for the blast_sepolia network, specifying its chain ID and URLs for the API and block explorer. Specifically, the apiURL within customChains specifies the endpoint for an API service (in this case, https://api.routescan.io) that Hardhat can use to interact with the specified network (here, the blast_sepolia testnet). This allows for seamless interaction with the blockchain and verifying contracts on the Blast testnet via Hardhat.
import { HardhatUserConfig } from 'hardhat/config'
import '@nomicfoundation/hardhat-toolbox'
import '@nomicfoundation/hardhat-verify'
require('dotenv').config()

const config: HardhatUserConfig = {
	solidity: '0.8.20',
	networks: {
		// for Sepolia testnet
		blast_sepolia: {
			url: process.env.QUICKNODE_ENDPOINT as string,
			accounts: [process.env.PRIVATE_KEY as string],
			gasPrice: 1000000000,
		},
		// for local dev environment
		hardhat: {
			forking: {
				enabled: true,
				url: process.env.QUICKNODE_ENDPOINT as string,
				blockNumber: 423000,
			},
		},
	},
	etherscan: {
		apiKey: {
			blast_sepolia: 'blast_sepolia', // although a unique API key is not required, it must have a value, so just set a placeholder
		},
		customChains: [
			{
				network: 'blast_sepolia',
				chainId: 168587773,
				urls: {
					apiURL:
						'https://api.routescan.io/v2/network/testnet/evm/168587773/etherscan',
					browserURL: 'https://testnet.blastscan.io',
				},
			},
		],
	},
}

export default config
Building a Smart Contract on Blast
Now that we're equipped with the basics let's start building our auto-yielding vault smart contract for the Blast blockchain. If you're new to Solidity, check our comprehensive beginner-friendly Solidity guide.
While the user's ETH balance gets ETH yield automatically, smart contracts have three yield modes for rebasing.
- Void (DEFAULT): ETH balance never changes; no yield is earned
- Automatic: native ETH balance rebases (increasing only)
- Claimable: ETH balance never changes; yield accumulates separately
In this guide, we will select the yield mode as automatic. Thus, since the yield will be automatically added, the ETH balance of the contract will automatically increase.
Smart contracts must interact with the Blast yield contract located at 0x4300000000000000000000000000000000000002 to change their yield mode [source]. Since we interact with the Blast smart contract, we need to define the functions of the Blast smart contract as an interface. To do so, let's create a folder, interfaces, in the contracts directory and a file, IBlast.sol, in it.
In Solidity, I prefix is used to identify the Solidity file as an interface. So, the IBlast file is an interface file of the Blast contract.
mkdir contracts/interfaces
echo > contracts/interfaces/IBlast.sol
Open the IBlast.sol file and modify it as below.
// SPDX-License-Identifier: MIT
pragma solidity 0.8.20;

enum YieldMode {
    AUTOMATIC,
    VOID,
    CLAIMABLE
}

enum GasMode {
    VOID,
    CLAIMABLE
}

interface IBlast{
    // configure
    function configureContract(address contractAddress, YieldMode _yield, GasMode gasMode, address governor) external;
    function configure(YieldMode _yield, GasMode gasMode, address governor) external;

    // base configuration options
    function configureClaimableYield() external;
    function configureClaimableYieldOnBehalf(address contractAddress) external;
    function configureAutomaticYield() external;
    function configureAutomaticYieldOnBehalf(address contractAddress) external;
    function configureVoidYield() external;
    function configureVoidYieldOnBehalf(address contractAddress) external;
    function configureClaimableGas() external;
    function configureClaimableGasOnBehalf(address contractAddress) external;
    function configureVoidGas() external;
    function configureVoidGasOnBehalf(address contractAddress) external;
    function configureGovernor(address _governor) external;
    function configureGovernorOnBehalf(address _newGovernor, address contractAddress) external;

    // claim yield
    function claimYield(address contractAddress, address recipientOfYield, uint256 amount) external returns (uint256);
    function claimAllYield(address contractAddress, address recipientOfYield) external returns (uint256);

    // claim gas
    function claimAllGas(address contractAddress, address recipientOfGas) external returns (uint256);
    function claimGasAtMinClaimRate(address contractAddress, address recipientOfGas, uint256 minClaimRateBips) external returns (uint256);
    function claimMaxGas(address contractAddress, address recipientOfGas) external returns (uint256);
    function claimGas(address contractAddress, address recipientOfGas, uint256 gasToClaim, uint256 gasSecondsToConsume) external returns (uint256);

    // read functions
    function readClaimableYield(address contractAddress) external view returns (uint256);
    function readYieldConfiguration(address contractAddress) external view returns (uint8);
    function readGasParams(address contractAddress) external view returns (uint256 etherSeconds, uint256 etherBalance, uint256 lastUpdated, GasMode);
}
Create one file in your contracts folder named Vault.sol:
echo > contracts/Vault.sol
There may be other files that are generated automatically in the contracts folder; feel free to delete them.
Open the Vault.sol file and modify it as below.
To read the explanation of the code (highly recommended), click here
This code defines a smart contract named Vault, which is designed to manage ETH deposits and withdrawals while leveraging Blast's auto-yielding features.
-
Contract Initialization: The constructor takes an address of the Blast contract (_blast) and initializes it. It uses the IBlast interface to configure automatic yield.
-
Minting and Burning Shares: The _mint and _burn internal functions manage the contract's share tokens. When a user deposits ETH, shares are minted, and when they withdraw, shares are burned. This mechanism helps track each user's share in the contract's total ETH pool.
-
ETH Deposit and Withdrawal: The deposit function allows users to send ETH to the contract in exchange for shares based on the current ETH balance and total supply of shares. Conversely, the withdraw function lets users redeem their shares for a proportional amount of ETH, reducing their share in the total pool.
-
Checking Balances and Fallback Mechanism: getBalance provides the balance of a specific address in terms of shares. The contract also includes a fallback function (receive) to handle direct ETH transfers, automatically invoking the deposit function when ETH is sent directly to the contract's address.
This contract is a fundamental part of the Blast ecosystem, enabling users to deposit ETH, earn yields automatically, and withdraw their funds with an equitable share of the total assets.
// SPDX-License-Identifier: MIT
pragma solidity 0.8.20;

import "./interfaces/IBlast.sol";

// Custom errors for better readability and debugging
error InsufficientShares();
error AmountMustBePositive();
error FailedToSendEther();
error InvalidYieldMode();

contract Vault {
    uint256 public totalSupply;
    mapping(address => uint256) public balanceOf;

    // IBlast interface for enabling automatic yield collection
    constructor(address _blast) {
        // Initialize the IBlast contract
        IBlast blast = IBlast(_blast);
		// The contract balance will grow automatically over time due to yield collection
        blast.configureAutomaticYield();
    }

    // Internal function to mint shares
    function _mint(address _to, uint256 _shares) private {
        totalSupply += _shares;
        balanceOf[_to] += _shares;
    }

    // Internal function to burn shares
    function _burn(address _from, uint256 _shares) private {
        totalSupply -= _shares;
        balanceOf[_from] -= _shares;
    }

    // Function to deposit ETH into the contract
    function deposit() public payable {
        if (msg.value == 0) {
            revert AmountMustBePositive();
        }

        uint256 shares;
        if (totalSupply == 0) {
            shares = msg.value;
        } else {
            shares = (msg.value * totalSupply) / address(this).balance;
        }

        _mint(msg.sender, shares);
    }

    // Function to withdraw ETH from the contract
    function withdraw(uint256 _shares) public {
        if (balanceOf[msg.sender] < _shares) {
            revert InsufficientShares();
        }

        uint256 amount = (_shares * address(this).balance) / totalSupply;
        _burn(msg.sender, _shares);

        (bool sent,) = payable(msg.sender).call{value: amount}("");
        if (!sent) {
            revert FailedToSendEther();
        }
    }

    // Function to get the balance of a specific address
    function getBalance(address _address) public view returns (uint256) {
        return balanceOf[_address];
    }

    // Fallback function to allow direct ETH transfers to the contract
    receive() external payable {
        deposit();
    }
}
Deploying the Smart Contract on Blast
Now, let's deploy our contract to the Blast Sepolia Testnet.
Create a file named deploy.ts in your scripts folder:
echo > scripts/deploy.ts
Modify it as below.
To read the explanation of the code (highly recommended), click here
This TypeScript script is designed for deploying and verifying a Vault smart contract using the Hardhat framework.
-
Deployment of Vault Contract: The script begins by defining the Blast contract address. It then deploys the Vault contract, passing the Blast contract address as a constructor argument. The
await vault.waitForDeployment()call ensures that the deployment process is completed before proceeding. -
Console Logging and Contract Verification: After deployment, the script logs the address of the deployed Vault contract. It then proceeds to verify the contract on the blockchain using Hardhat's run function and the verify:verify task, ensuring that the contract's source code and deployment parameters are publicly accessible and verifiable.
-
Reading and Logging Yield Configuration: The script interacts with the deployed Blast contract by fetching the yield configuration for the newly deployed Vault contract. This step is crucial to confirm that the Vault contract is appropriately set up to interact with the Blast protocol's yield-generating features.
-
Error Handling: The script includes a catch block for error handling, ensuring that any exceptions thrown during the execution are logged and the process exits with an appropriate error code.
Overall, this script automates the deployment and verification process of the Vault contract on the Blast blockchain, along with confirming its integration with Blast's yield configuration. This automation streamlines the development workflow and ensures transparency and reliability in smart contract deployment.
import { ethers, run } from "hardhat";

async function main() {
  const blastAddress: string = "0x4300000000000000000000000000000000000002";

  const vault = await ethers.deployContract("Vault", [
    blastAddress,
  ]);

  await vault.waitForDeployment();

  console.log(`Vault contract deployed to ${vault.target}`);

  await run("verify:verify", {
    address: vault.target,
    constructorArguments: [blastAddress],
  });

  const blast = await ethers.getContractAt("IBlast", blastAddress);

  const configuration = await blast.readYieldConfiguration(
    vault.target
  );

  console.log(`Yield Configuration for Vault (${vault.target})`);
  console.log(configuration);
}

// We recommend this pattern to be able to use async/await everywhere
// and properly handle errors.
main().catch((error) => {
  console.error(error);
  process.exitCode = 1;
});
Deploy the contract by running this command:
npx hardhat run --network blast_sepolia scripts/deploy.ts
To note that, we use blast_sepolia since we define Blast Sepolia Testnet as blast_sepolia in the networks settings of
hardhat.config.ts.
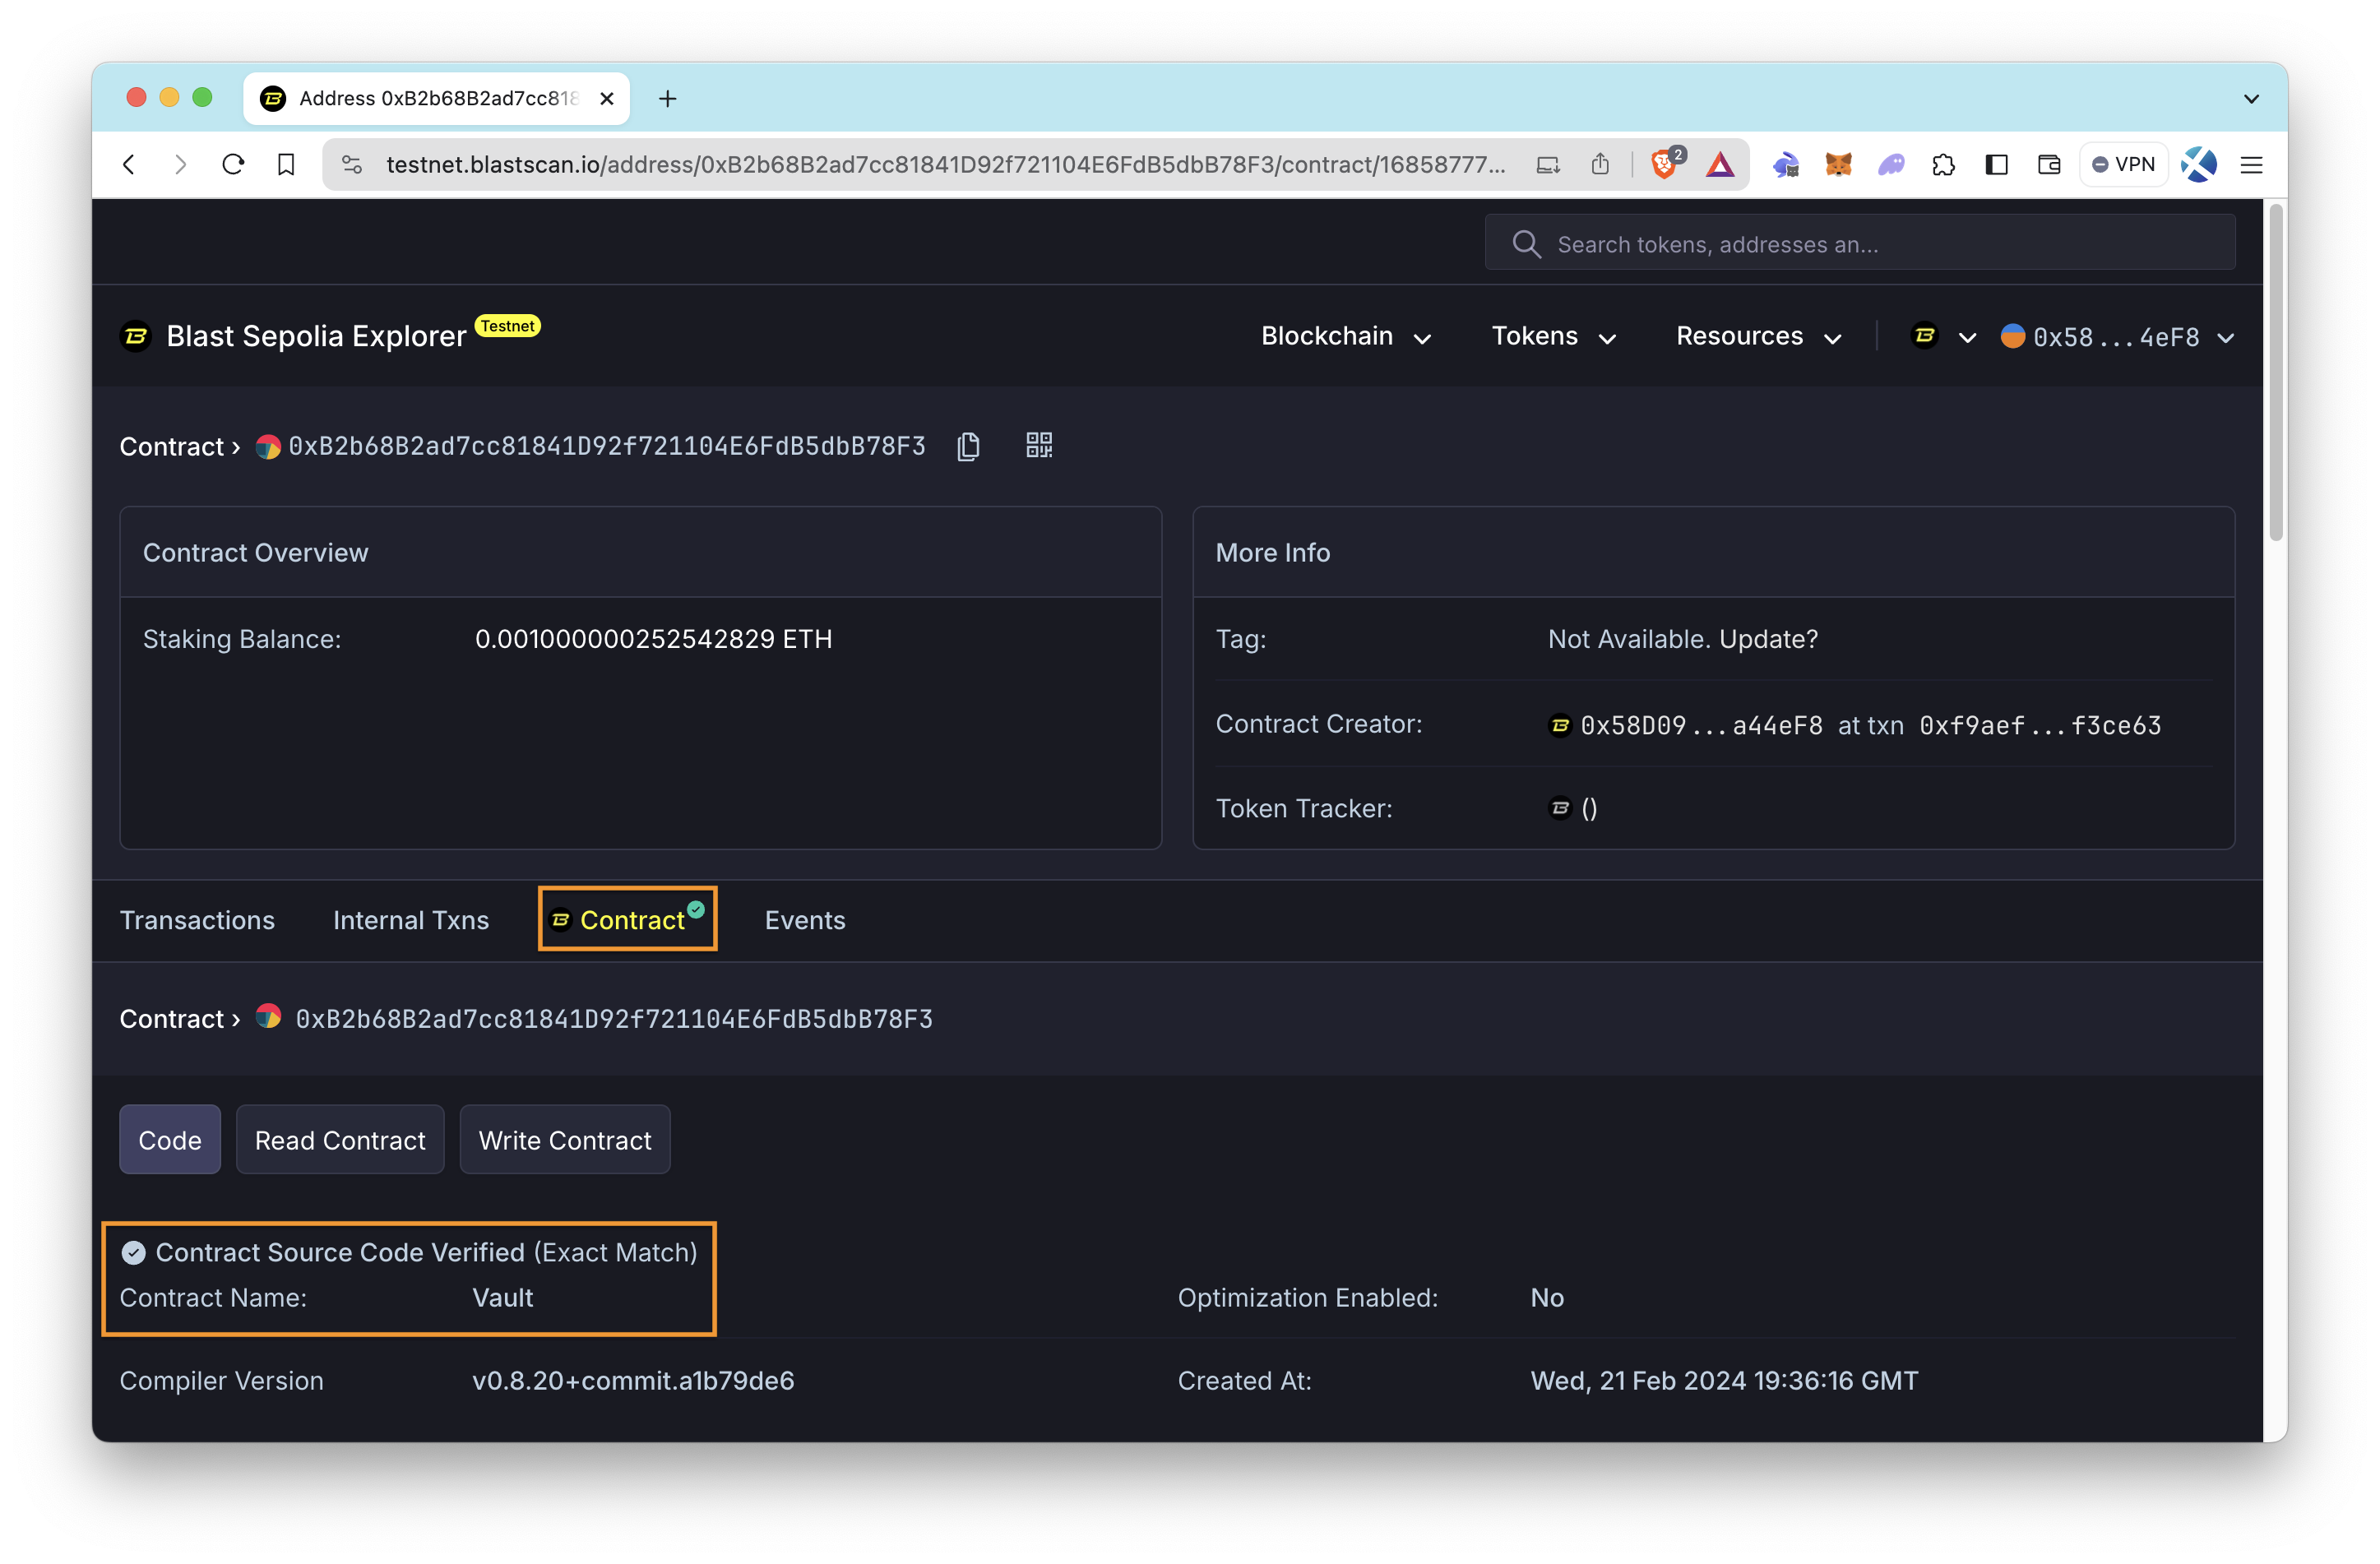
After successful deployment, you'll see your contract's address in the output.
Vault contract deployed to 0xB2b68B2ad7cc81841D92f721104E6FdB5dbB78F3
Successfully submitted source code for contract
contracts/Vault.sol:Vault at 0xB2b68B2ad7cc81841D92f721104E6FdB5dbB78F3
for verification on the block explorer. Waiting for verification result...

Successfully verified contract Vault on the block explorer.
https://testnet.blastscan.io/address/0xB2b68B2ad7cc81841D92f721104E6FdB5dbB78F3#code

Yield Configuration for Vault (0xB2b68B2ad7cc81841D92f721104E6FdB5dbB78F3)
0n
A yield configuration value of 0 for the Vault contract indicates an "AUTOMATIC" mode because YieldMode is defined in the contract as follows, signifying automated native yield generation without requiring manual intervention.
enum YieldMode {
    AUTOMATIC, // 0
    VOID, // 1
    CLAIMABLE // 2
}
Navigate to Blast Sepolia Testnet's block explorer to verify that the smart contract was deployed by putting in the address returned from the deployment script above.
Notice that the smart contract is already verified on the block explorer due to the verification step in the deployment script.
Interacting with the Smart Contract on Blast
To interact with the contract, create an additional script within your scripts directory called depositEth.ts:
echo > scripts/depositEth.ts
Then, open the file and input the following code.
Remember to update YOUR_VAULT_CONTRACT_ADDRESS placeholder by your Vault contract address.
Also, this script file is for depositing 0.001 ETH to the Vault contract. If you want to change the amount of ETH to deposit, change the amount in the highlighted line.
To read the explanation of the code (highly recommended), click here
This TypeScript script is developed for the purpose of depositing ETH into a Vault smart contract on the Blast blockchain, utilizing the Hardhat framework.
-
Setting up Contract Interaction: The script starts by specifying the address of the deployed Vault contract. The user needs to replace 'YOUR_VAULT_CONTRACT_ADDRESS' with the actual contract address.
-
Defining Deposit Amount: The ethAmountToDeposit variable is set to a specific ETH amount using ethers.parseEther('0.001'). This converts the string representation of the ETH amount into a format that the Ethereum blockchain can understand, in this case, 0.001 ETH.
-
Contract Interaction for Deposit: The script fetches the Vault contract instance using getContractAt with the specified contract address. It then calls the deposit function of the Vault contract, passing the ETH amount to be deposited. This transaction triggers the deposit operation in the smart contract.
-
Transaction Confirmation and Logging: After sending the transaction, the script waits for it to be mined using
tx.wait(). Once mined, it logs a message with the transaction hash, providing a link to view the transaction status on the Blast blockchain explorer. -
Error Handling: A standard error handling pattern is used to catch any exceptions during the script's execution, log the error, and set an exit code to indicate failure.
This script is a practical tool for users or developers to interact with the Vault contract, enabling them to easily deposit ETH and participate in the yield-generating mechanisms of the Blast blockchain.
import { ethers } from 'hardhat'

async function main() {
	const vaultAddress: string = 'YOUR_VAULT_CONTRACT_ADDRESS' // 👈 UPDATE HERE

	const ethAmountToDeposit: bigint = ethers.parseEther('0.001')

	const vault = await ethers.getContractAt(
    "Vault",
    vaultAddress
  );

  const tx = await vault.deposit({ value: ethAmountToDeposit });

  tx.wait();

  console.log(
    `Transaction to deposit ETH is sent to the blockchain. Check your transaction status: https://testnet.blastscan.io/tx/${tx.hash}`
  );
}

// We recommend this pattern to be able to use async/await everywhere
// and properly handle errors.
main().catch((error) => {
  console.error(error);
  process.exitCode = 1;
});
To run the script, use the following hardhat command:
npx hardhat run scripts/depositEth.ts --network blast_sepolia
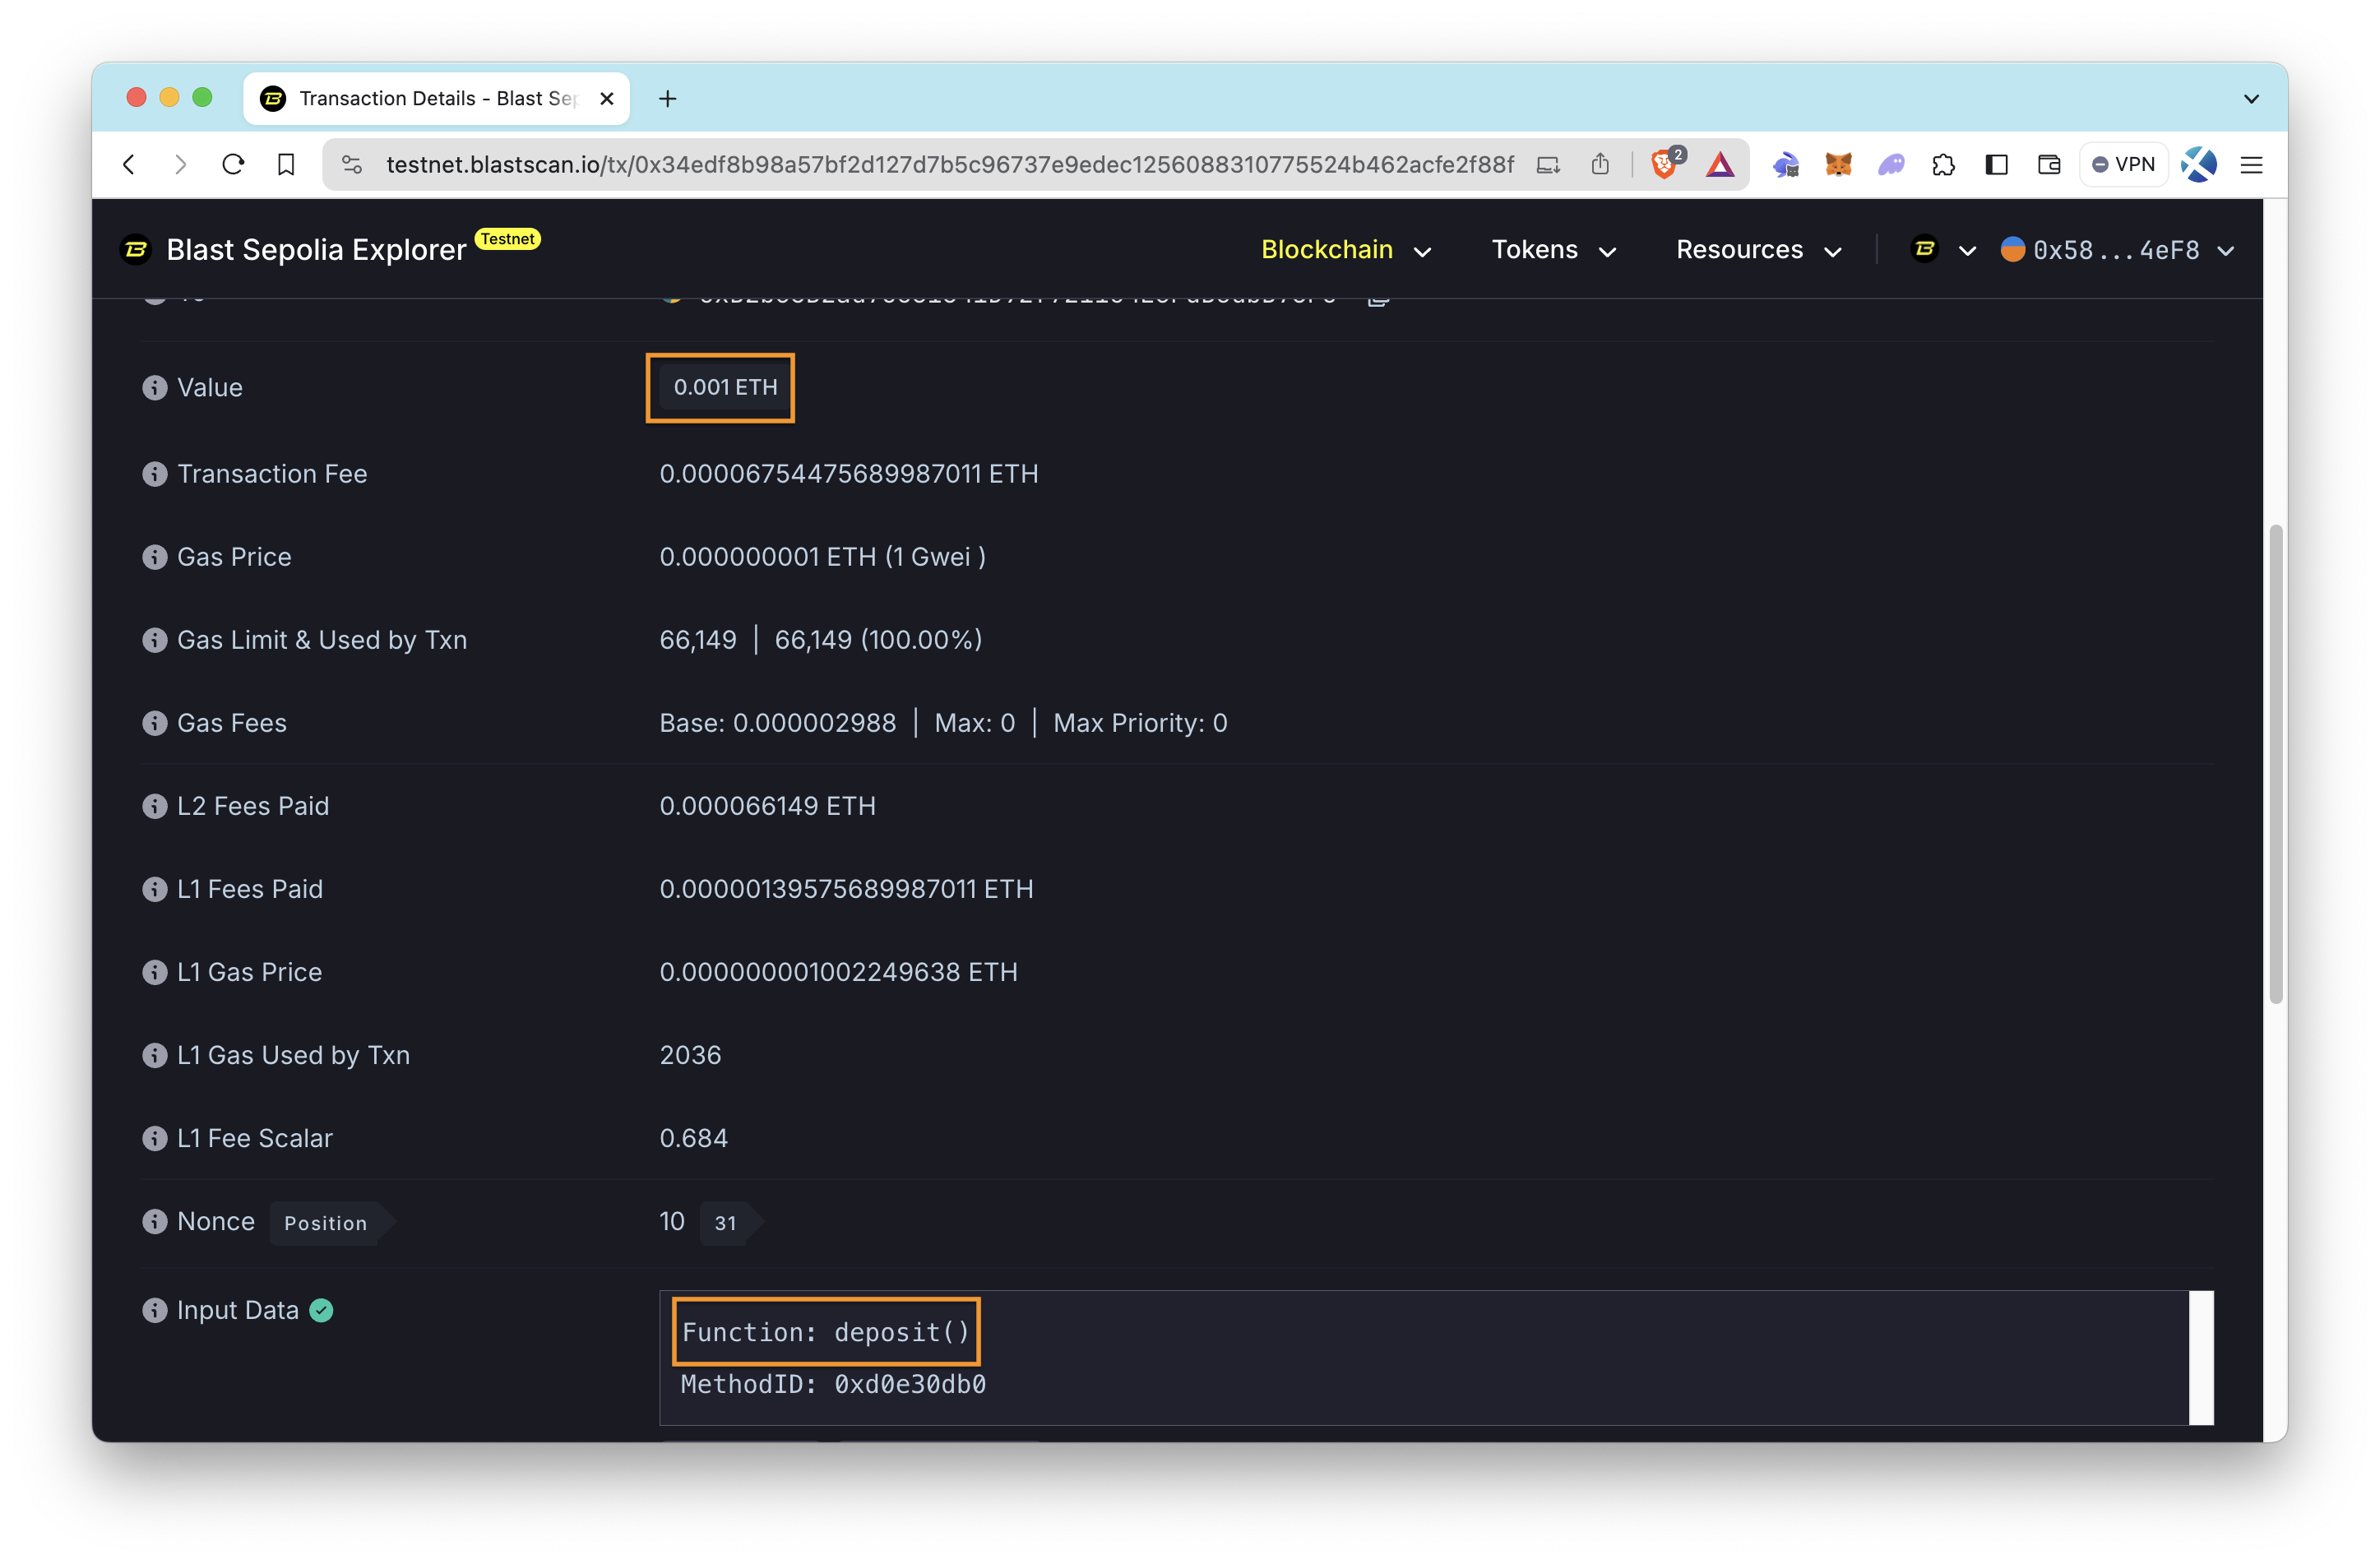
The console output should be like the one below.
Transaction to deposit ETH is sent to the blockchain. Check your transaction status: https://testnet.blastscan.io/tx/0x34edf8b98a57bf2d127d7b5c96737e9edec1256088310775524b462acfe2f88f
You can check transaction details by clicking the link.
Interacting with the Smart Contract via Explorer
As an alternative method, since our contract is approved, it can be interacted with through the explorer.
- Go to the Blast Sepolia Explorer.
- Search your Vault contract's address and go to its page.
- Click Contract tab and select either Read Contract or Write Contract tab.
- After connecting your wallet, you will be able to call these functions.
That's it! You have just created a vault smart contract on Blast Sepolia Testnet using Hardhat and Quicknode. Also, you set the yield earning mode and run a script to deposit some ETH.
Checking the Auto Yield Mechanism
To verify the auto yield mechanism, we can monitor the contract's ETH balance over time. An increase in balance without additional deposits indicates successful autonomous native yield generation. This validation ensures the functionality of the auto yield mechanism.
The simplest way is to check the balance from the contract page on the Blast Sepolia Explorer. As you can see, although the total deposited amount is 0.001 ETH, the ETH balance of the Vault contract is slightly higher than that.

On mainnet, ETH balances will update approximately daily. On testnet, ETH balances will update hourly at a rate of ~0.01% per day.
Source: Blast Documentation
Additional Resources
If you want to continue learning about Blast and smart contracts, check out these resources:
- Quicknode's Blast Developer Documentation
- Quicknode's Solidity Guides
- Blast Docs
- Blast Sepolia Testnet Block Explorer
Conclusion
🎉 Congratulations! In this journey, you've learned about Blast, deployed a smart contract, and created scripts to interact with the smart contract.
If you have any questions or need further assistance, feel free to join our Discord server or provide feedback using the form below. Stay up to date with the latest by following us on Twitter (@Quicknode) and Telegram announcement channel.
We ❤️ Feedback!
Let us know if you have any feedback or requests for new topics. We'd love to hear from you.