
14 min read
Overview
Monad is a high-performance, EVM-compatible Layer 1 blockchain designed to deliver fast transactions, low fees, and scalability. Now, combine this with Blinks, which are embedable links tied to on-chain interactions and you have a powerful combo for onboarding the masses.
In this guide, we’ll walk you through creating an NFT interface with Blinks on the Monad testnet. First, we'll cover the architecture of how Blinks are set up, then later show you how to update the Monad scaffold repository to include your NFT minting interface (shareable on your website or socials). Let’s dive in!
What You Will Do
- Learn about Monad and Blinks
- Create a Monad testnet node endpoint with Quicknode
- Fund your wallet with testnet MON tokens
- Clone a sample repository and configure it to create a Blink on Monad testnet that can mint NFTs from a ERC-721 smart contract
What You Will Need
- Basic understanding of EVM blockchains and smart contracts
- A MetaMask or WalletConnect compatible wallet
- An existing ERC-721 compatible NFT contract (check out this guide to learn how to create one)
- Node.js and Git installed on your machine
- A web browser (e.g., Chrome)
What is Monad?
Monad was launched in 2022 by Monad Labs and was designed for high throughput (up to 10,000 transactions per second) and low-cost transactions (under a cent). It leverages parallel execution and an optimized consensus mechanism to enhance scalability while maintaining compatibility with Ethereum tools popular in the ecosystem. This makes it an ideal platform for different types of applications utilizing the blockchain like NFTs and DeFi.
What are Blinks?
Blinks, developed by Dialect Labs, stands for Blockchain Links. Blinks are shareable URLs that bundle on-chain actions such as minting an NFT into a single, clickable link. This eliminates the need for complex integrations, allowing developers to embed blockchain interactions anywhere URLs are supported (e.g., social media, websites). For users, Blinks simplify interacting with the blockchain with a single click, presenting a signable transaction directly in their wallet. Blinks are available on Monad’s testnet as of February 2025.
Blinks Deep Dive
Blinks operate through a provider-client architecture with the following:
- Blink Provider (Backend): Your server that hosts the API endpoints that power the Blink experience
- Blink Client: The software that introspects/interprets Blink URLs and renders the Blink UI
- URL Schema: The standardized format that connects providers and clients
- Advanced Use Cases: Forms: Build blinks with multiple inputs and advanced input types
- Advanced Use Cases: Action Chaining: For example: Swapping back and forth between tokens with the UI managing the state changes
- Advanced Use Cases: Forms: Track the conversion of transactions by adding a reference key to your API call
At its core, Blinks functions through a two-part API system:
1. GET Route
When a Blink URL is first accessed, the client sends a GET request to the provider. The provider returns metadata about the Blink, such as:
- Title and description
- Icon URL
- Available actions
- UI parameters (like input forms)
This metadata allows clients to render a consistent interface for your Blink without requiring any custom integration.
2. POST Route
When a user interacts with a Blink (such as clicking a "Mint NFT" button):
- The client sends a
POSTrequest to the provider with user inputs and wallet address - The provider constructs a blockchain transaction
- The transaction is returned to the client, which presents it to the user's wallet
- The user signs the transaction, which is then broadcast to the blockchain
This separation of concerns allows the transaction logic to remain on your server while the client handles wallet interaction and UI rendering.
Note that the information provided in this guide is based on the current state of the Blinks specification. As the technology evolves, new features and capabilities may be introduced. Check back here or the official specification for the most up-to-date information.
Now, with a better understanding of Blinks architecture, let's move on to the project prerequisites.
Project Prerequisites
Get MON from Quicknode Multi-Chain Faucet
In order to conduct activity on-chain, users interacting with a Blink need to pay for gas fees (in this case the native MON token). Since we're using the Monad testnet, we can get some test MON from the Multi-Chain Quicknode Faucet.
Navigate to the Multi-Chain Quicknode Faucet and connect your wallet (e.g., MetaMask, Coinbase Wallet) or paste in your wallet address to retrieve test MON. Note that there is a mainnet balance requirement of 0.001 ETH on Ethereum Mainnet to use the EVM faucets. You can also tweet or log in with your Quicknode account to get a bonus!
Create a Monad Endpoint
To communicate with Monad, you’ll need access to a node. While public nodes are available, a private endpoint from Quicknode offers faster and more stable performance.
- Sign up for an account at Quicknode.
- Go to the Endpoints page and click Create Endpoint.
- Select Monad as the chain and Testnet as the network.
- Copy the HTTP Provider URL (e.g.,
https://monad-testnet-xxx.quicknode.com/) and keep it handy as you'll need it later.
Deploy an NFT Contract (ERC-721)
If you don't have a NFT contract deployed yet, check out this guide: How to Create and Deploy an ERC-721 NFT.
Before continuing, ensure your NFT contract can do the following to be fully compatible with our Blink, otherwise some slight changes to the SDK code will need to be made.
- Has a
safeMintfunction that takes in 2 arguments (toaddress,amount(# tokens)) - It is deployed on Monad testnet
- Anyone can mint
- (Recommended) Metadata is stored on IPFS + a function that returns the metadata URI for a given token ID (i.e.,
tokenURI) - You have the NFT contract address to later input in your Blink scaffold
You can see the full source code example here.
Next, we'll configure our Monad scaffold project.
Set Up Project
For this project, we'll be using the Monad Blinks Scaffold template.
First, open your terminal and navigate to the location you want to save your project. Next, run the command to clone the repo:
git clone https://github.com/dialectlabs/blink-starter-monad.git
Next, navigate inside the project folder and install dependencies:
cd blink-starter-monad && npm install
Now, let's update the .env file. Open it and update it to include the Quicknode RPC URL you created in the previous step.
MONAD_ENDPOINT_URL=https://api.quicknode.com/YOUR-KEY
Now, let's update the scaffold code, and align it with the NFT minting logic.
Monad Blinks Scaffold
The Monad Blinks scaffold is a pre-built project that provides all the necessary components, configurations, and boilerplate code to quickly start building Blinks on Monad. Using this project locally, allows us to see in a playground environment how our Blink will behave before we launch. This introspection is super helpful as it lets developers test and refine their application's behavior in a controlled setting before deploying it to production.
We'll need to update a handful of files in the scaffold project to align with the NFT minting interface. First, we'll take care of some simple updates such as the frontend content and adding images to the project.
- Update your file (
src/app/page.tsx) to match the code here. - Add an image (
nft-mint.png) to yourpublicfolder that will show on your Blink (you can use the example here) interface.
Next, let's update the core logic in the API route to include the minting process. In the src/app/actions/tip-mon folder, rename the folder from tip-mon to mint-nft. Then, in the route.ts file, we'll delete all the existing code and include each code snippet below sequentially.
1. Imports and Basic Setup
import { ActionGetResponse, ActionPostResponse, ActionError } from "@solana/actions";
import { serialize, http } from "wagmi";
import { parseEther, encodeFunctionData, createPublicClient } from "viem";
import { monad } from "@/monad";

const blockchain = "eip155:10143";
const NFT_CONTRACT_ADDRESS = "YOUR_NFT_ADDRESS"; // Input your NFT contract address
const MINT_PRICE_MON = "YOUR_NFT_MINT_PRICE"; // Price per NFT in MON (adjust as configured by your smart contract)

const client = createPublicClient({
  chain: monad,
  transport: http(process.env.MONAD_ENDPOINT_URL),
});
First, we import the necessary libraries and set up our constants. We're using the CAIP-2 format for the blockchain ID (i.e., a more structured way to represent chain IDs), specifying our NFT contract address, and setting up a publicClent instance so we can later fetch network gas fees when generating our transaction.
Before moving on: Ensure you have updated the NFT_CONTRACT_ADDRESS and MINT_PRICE_MON variables with the proper values.
2. Contract ABI and Headers
Here, we define the ABI (Application Binary Interface) for our NFT contract's safeMint function, which accepts a recipient address. We also set up the CORS headers needed for the Blink to function properly. The OPTIONS endpoint is required for CORS preflight requests. Without this, the Blink won't render properly.
Put the code below in the same file under your imports and client set up.
const nftAbi = [
  {
    inputs: [
      { internalType: "address", name: "to", type: "address" },
      { internalType: "uint256", name: "amount", type: "uint256" }
    ],
    name: "safeMint",
    outputs: [{ internalType: "uint256[]", name: "", type: "uint256[]" }],
    stateMutability: "payable",
    type: "function",
  },
] as const;

const headers = {
  "Access-Control-Allow-Origin": "*",
  "Access-Control-Allow-Methods": "GET, POST, OPTIONS",
  "Access-Control-Allow-Headers":
    "Content-Type, x-blockchain-ids, x-action-version",
  "Access-Control-Expose-Headers": "x-blockchain-ids, x-action-version",
  "Content-Type": "application/json",
  "x-blockchain-ids": blockchain,
  "x-action-version": "2.4",
};

export const OPTIONS = async () => {
  return new Response(null, { headers });
};
Here, we define the ABI (Application Binary Interface) for our NFT contract's safeMint function, which accepts a recipient address. We also set up the CORS headers needed for the Blink to function properly. The OPTIONS endpoint is required for CORS preflight requests. Without this, the Blink won't render properly.
3. Estimate Gas
Estimating gas is important, or users could be overpaying for their transaction, so we'll need to create a helper function that checks the network gas fees and recommends a gas fee we use for priority fees.
Add this code below the previous code (ABI and Headers) snippet in your route.ts file.
async function estimateGasFees() {
  const feeData = await client.estimateFeesPerGas();

  if (!feeData.maxFeePerGas || !feeData.maxPriorityFeePerGas) {
    throw new Error("Failed to retrieve gas fee data from the network");
  }

  return {
    maxFeePerGas: feeData.maxFeePerGas.toString(),
    maxPriorityFeePerGas: feeData.maxPriorityFeePerGas.toString(),
  };
}
4. GET Endpoint - Fetch User Details
The GET endpoint defines the UI for our Blink--this is what a client (e.g., social media site) would use to introspect and render buttons that trigger specified actions. The response from the GET endpoint is structured using the ActionGetResponse type from @solana/actions. This type ensures that the metadata returned includes all necessary fields for the Blink client to render the UI correctly, such as the icon, title, description, and the actions available to the user. In this case, we've simplified it to show a single "Mint NFT" button.
Add this code below the previous code (estimateGasFees) snippet in your route.ts file.
export const GET = async (req: Request) => {
  try {
    const response: ActionGetResponse = {
      type: "action",
      icon: `${new URL("/nft-mint.png", req.url).toString()}`,
      label: "",
      title: "",
      description: `1 ProtoMON = 0.0069420 MON`,
      links: {
        actions: [
          {
            type: "transaction",
            href: `/api/actions/mint-nft?amount={amount}`,
            label: "Mint NFT",
            parameters: [
              {
                name: "amount",
                label: `Enter MON amount in wei`,
                type: "number",
              },
            ],
          }
        ],
      },
    };

    return new Response(JSON.stringify(response), {
      status: 200,
      headers,
    });
  } catch (error) {
    console.error("Error in GET request:", error);
    const actionError: ActionError = {
      message: error instanceof Error ? error.message : "An unknown error occurred"
    };
    return Response.json(actionError, {
      status: 400,
      headers,
    });
  }
};
Error Handling with ActionError
If an error occurs during the GET request, it’s caught and returned using the ActionError type. This type is a simple object with a message property, ensuring that errors are communicated to the client in a standardized format.
5. POST Endpoint - Transaction Creation
The POST endpoint contains the logic for interpreting the users inputted amount, transaction generation, and response back to the user. The response from the POST endpoint is structured using the ActionPostResponse type. This type includes the serialized transaction data and a message, which are then presented to the user's wallet for signing.
Add the POST code below to your route.ts file under the GET endpoint logic.
export const POST = async (req: Request) => {
  try {
    const requestBody = await req.json();
    const userAddress = requestBody.account;

    const url = new URL(req.url);
    const monAmount = url.searchParams.get("amount");

    if (!userAddress) {
      throw new Error("User address is required");
    }

    if (!monAmount) {
      throw new Error("MON amount is required");
    }

    const monValue = parseFloat(monAmount.replace(',', '.'));

    if (isNaN(monValue) || monValue <= 0) {
      throw new Error(`Invalid MON amount: ${monAmount}`);
    }

    const pricePerNFT = parseFloat(MINT_PRICE_MON);
    const numNFTs = Math.floor(monValue / pricePerNFT);

    if (numNFTs < 1) {
      throw new Error(`Amount too small. Minimum is ${MINT_PRICE_MON} MON for 1 NFT.`);
    }

    const actualMonAmount = (numNFTs * pricePerNFT).toFixed(8);
    console.log(`User entered ${monValue} MON, buying ${numNFTs} NFTs for ${actualMonAmount} MON`);

    const weiValue = parseEther(actualMonAmount);

    const data = encodeFunctionData({
      abi: nftAbi,
      functionName: "safeMint",
      args: [userAddress, BigInt(numNFTs)],
    });

    const gasEstimate = await estimateGasFees();

    const transaction = {
      to: NFT_CONTRACT_ADDRESS,
      data,
      value: weiValue.toString(),
      chainId: "10143", // Monad testnet
      type: "0x2",
      maxFeePerGas: gasEstimate.maxFeePerGas,
      maxPriorityFeePerGas: gasEstimate.maxPriorityFeePerGas,
    };

    const transactionJson = serialize(transaction);

    const response: ActionPostResponse = {
      type: "transaction",
      transaction: transactionJson,
      message: `Minting ${numNFTs} NFT${numNFTs > 1 ? 's' : ''} for ${actualMonAmount} MON!`,
    };

    return new Response(JSON.stringify(response), {
      status: 200,
      headers,
    });
  } catch (error) {
    console.error("Error processing request:", error);
    const actionError: ActionError = {
      message: error instanceof Error ? error.message : "An unknown error occurred"
    };
    return Response.json(actionError, {
      status: 400,
      headers,
    });
  }
};
Error Handling with ActionError
Similar to the GET endpoint, errors in the POST endpoint are handled using the ActionError type. This ensures that any issues—such as invalid user inputs or gas estimation failures—are returned with a clear message, allowing the client to display meaningful feedback to the user.
A summary of how the POST request works:
- Gets user address (
userAddress) and input amount (inputAmount) from request body - Confirm both user address and amount exist (
if statements) - Build a transaction (
data) by encoding a NFT minting function call, estimating gas fees, and constructing a complete transaction object - Serialize the transaction (
transactionJson) for wallet compatibility - Return a success message or detailed error (
response)
Run the Blink Locally
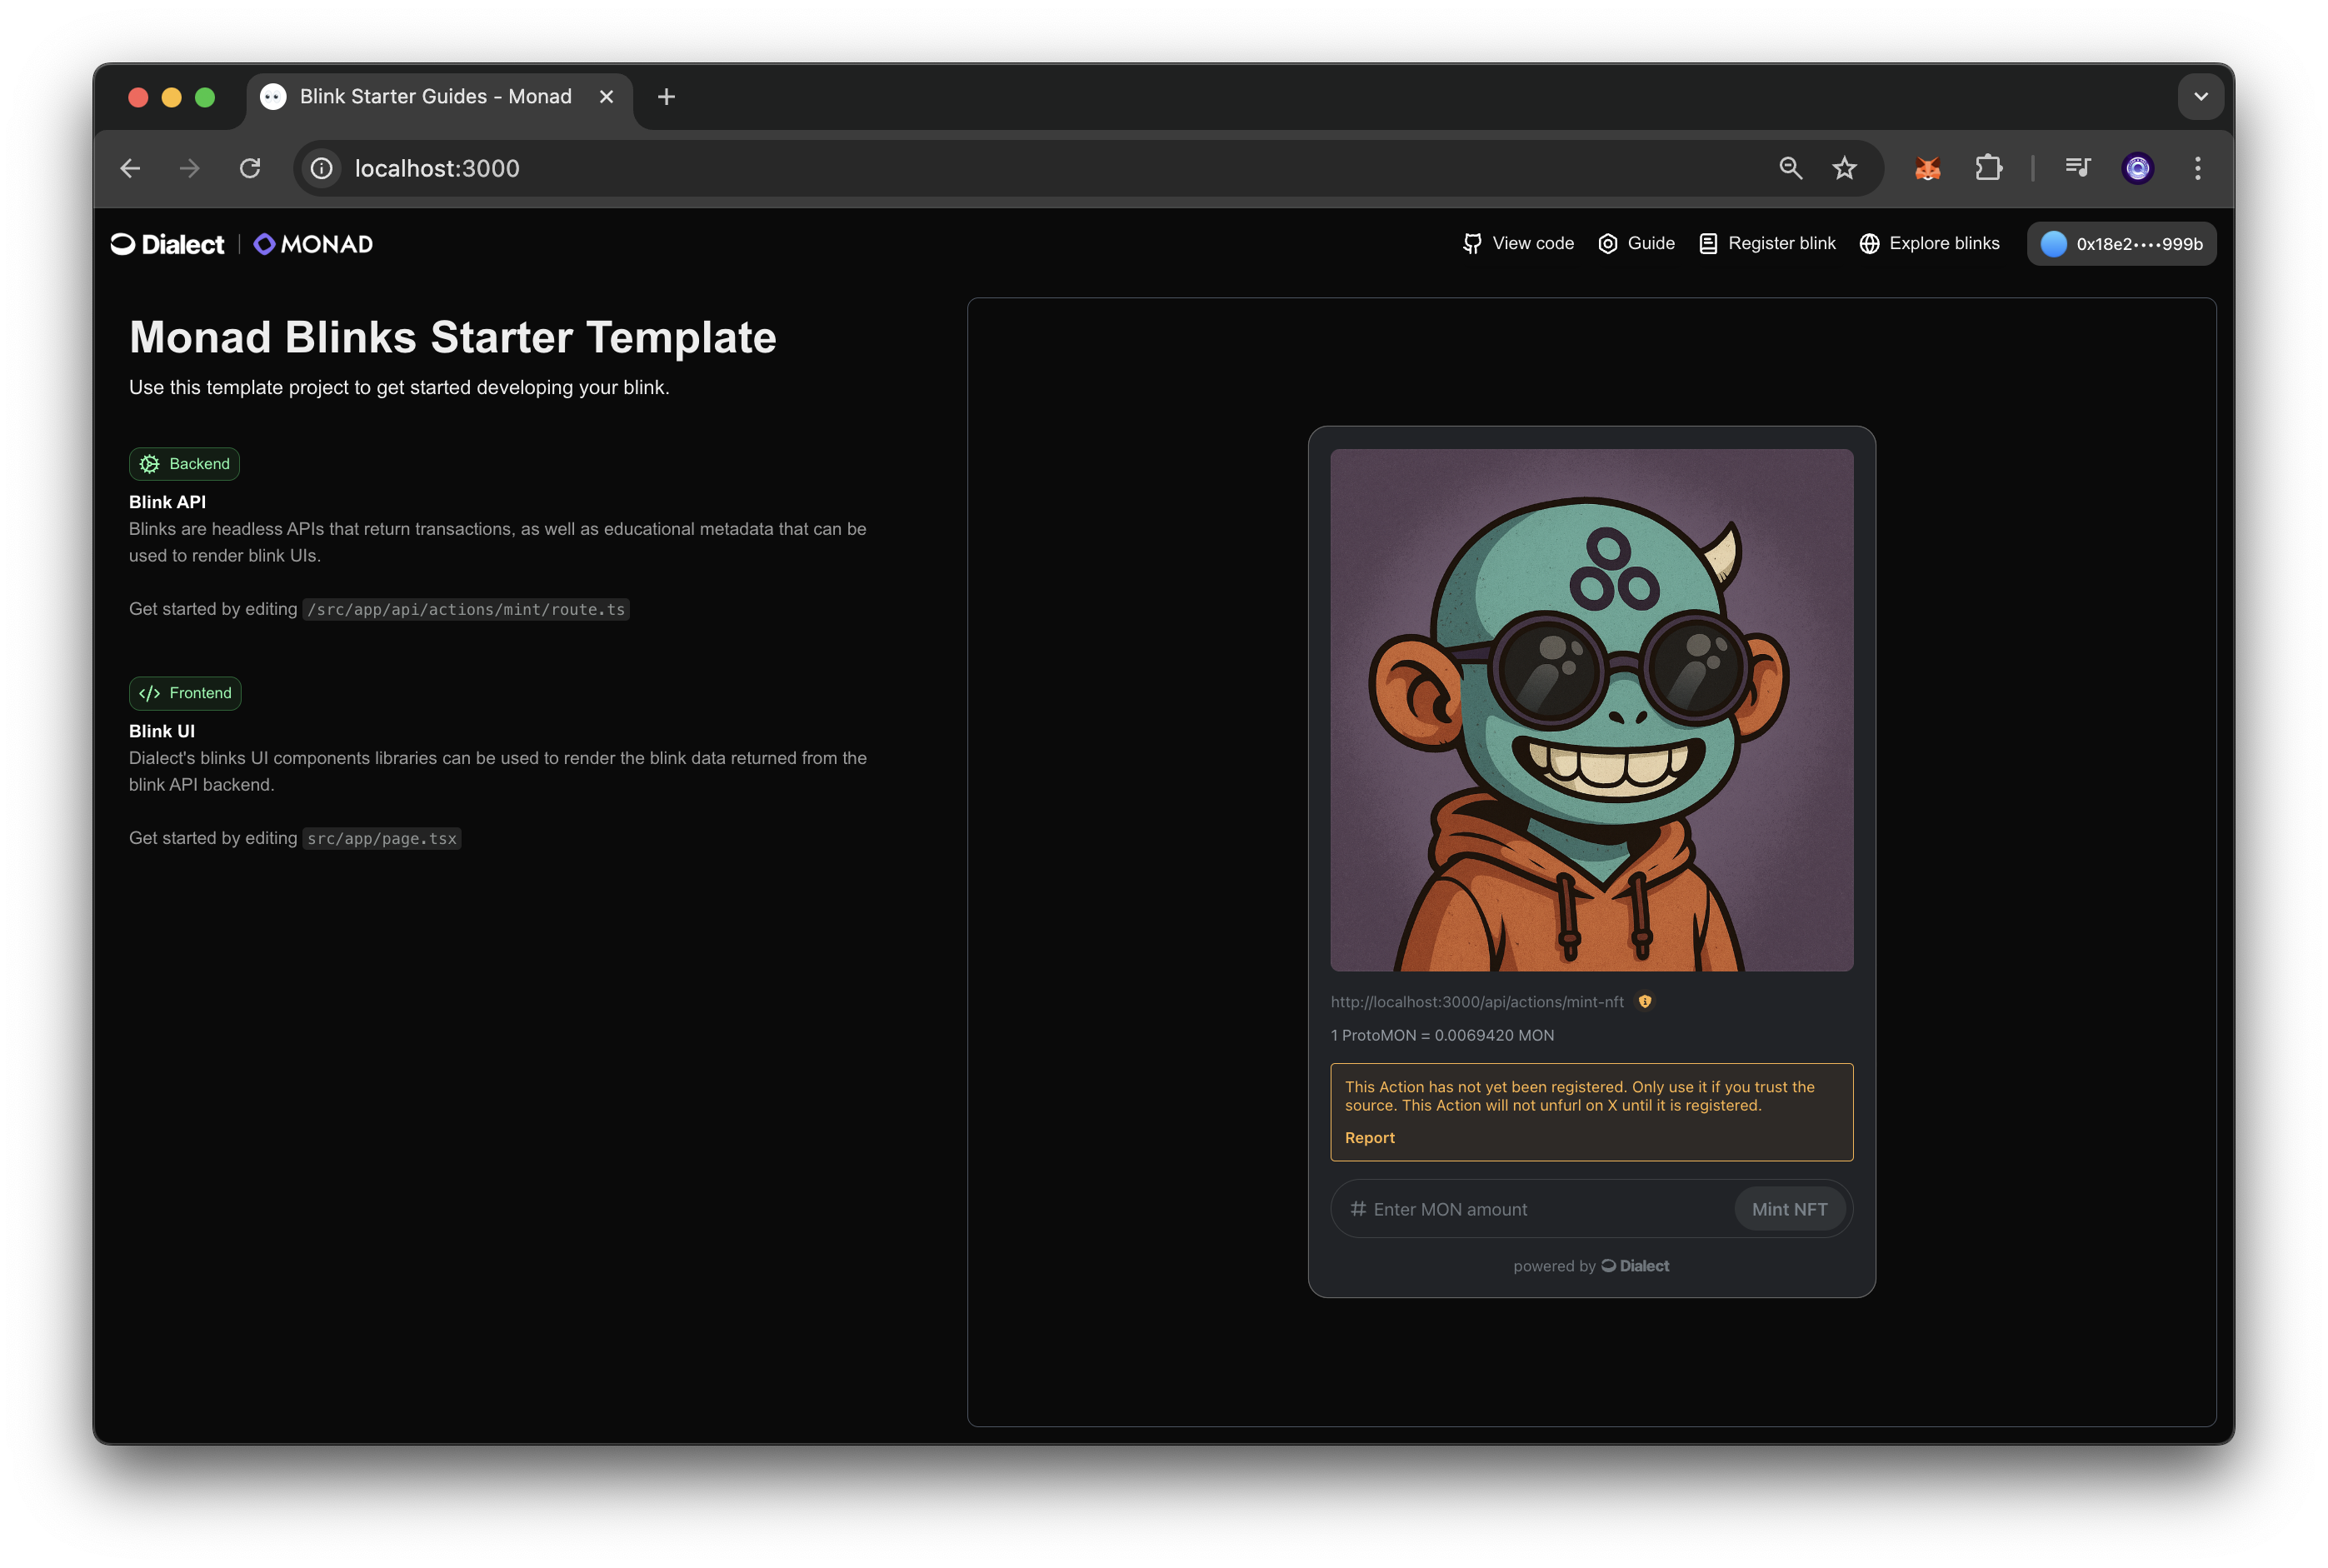
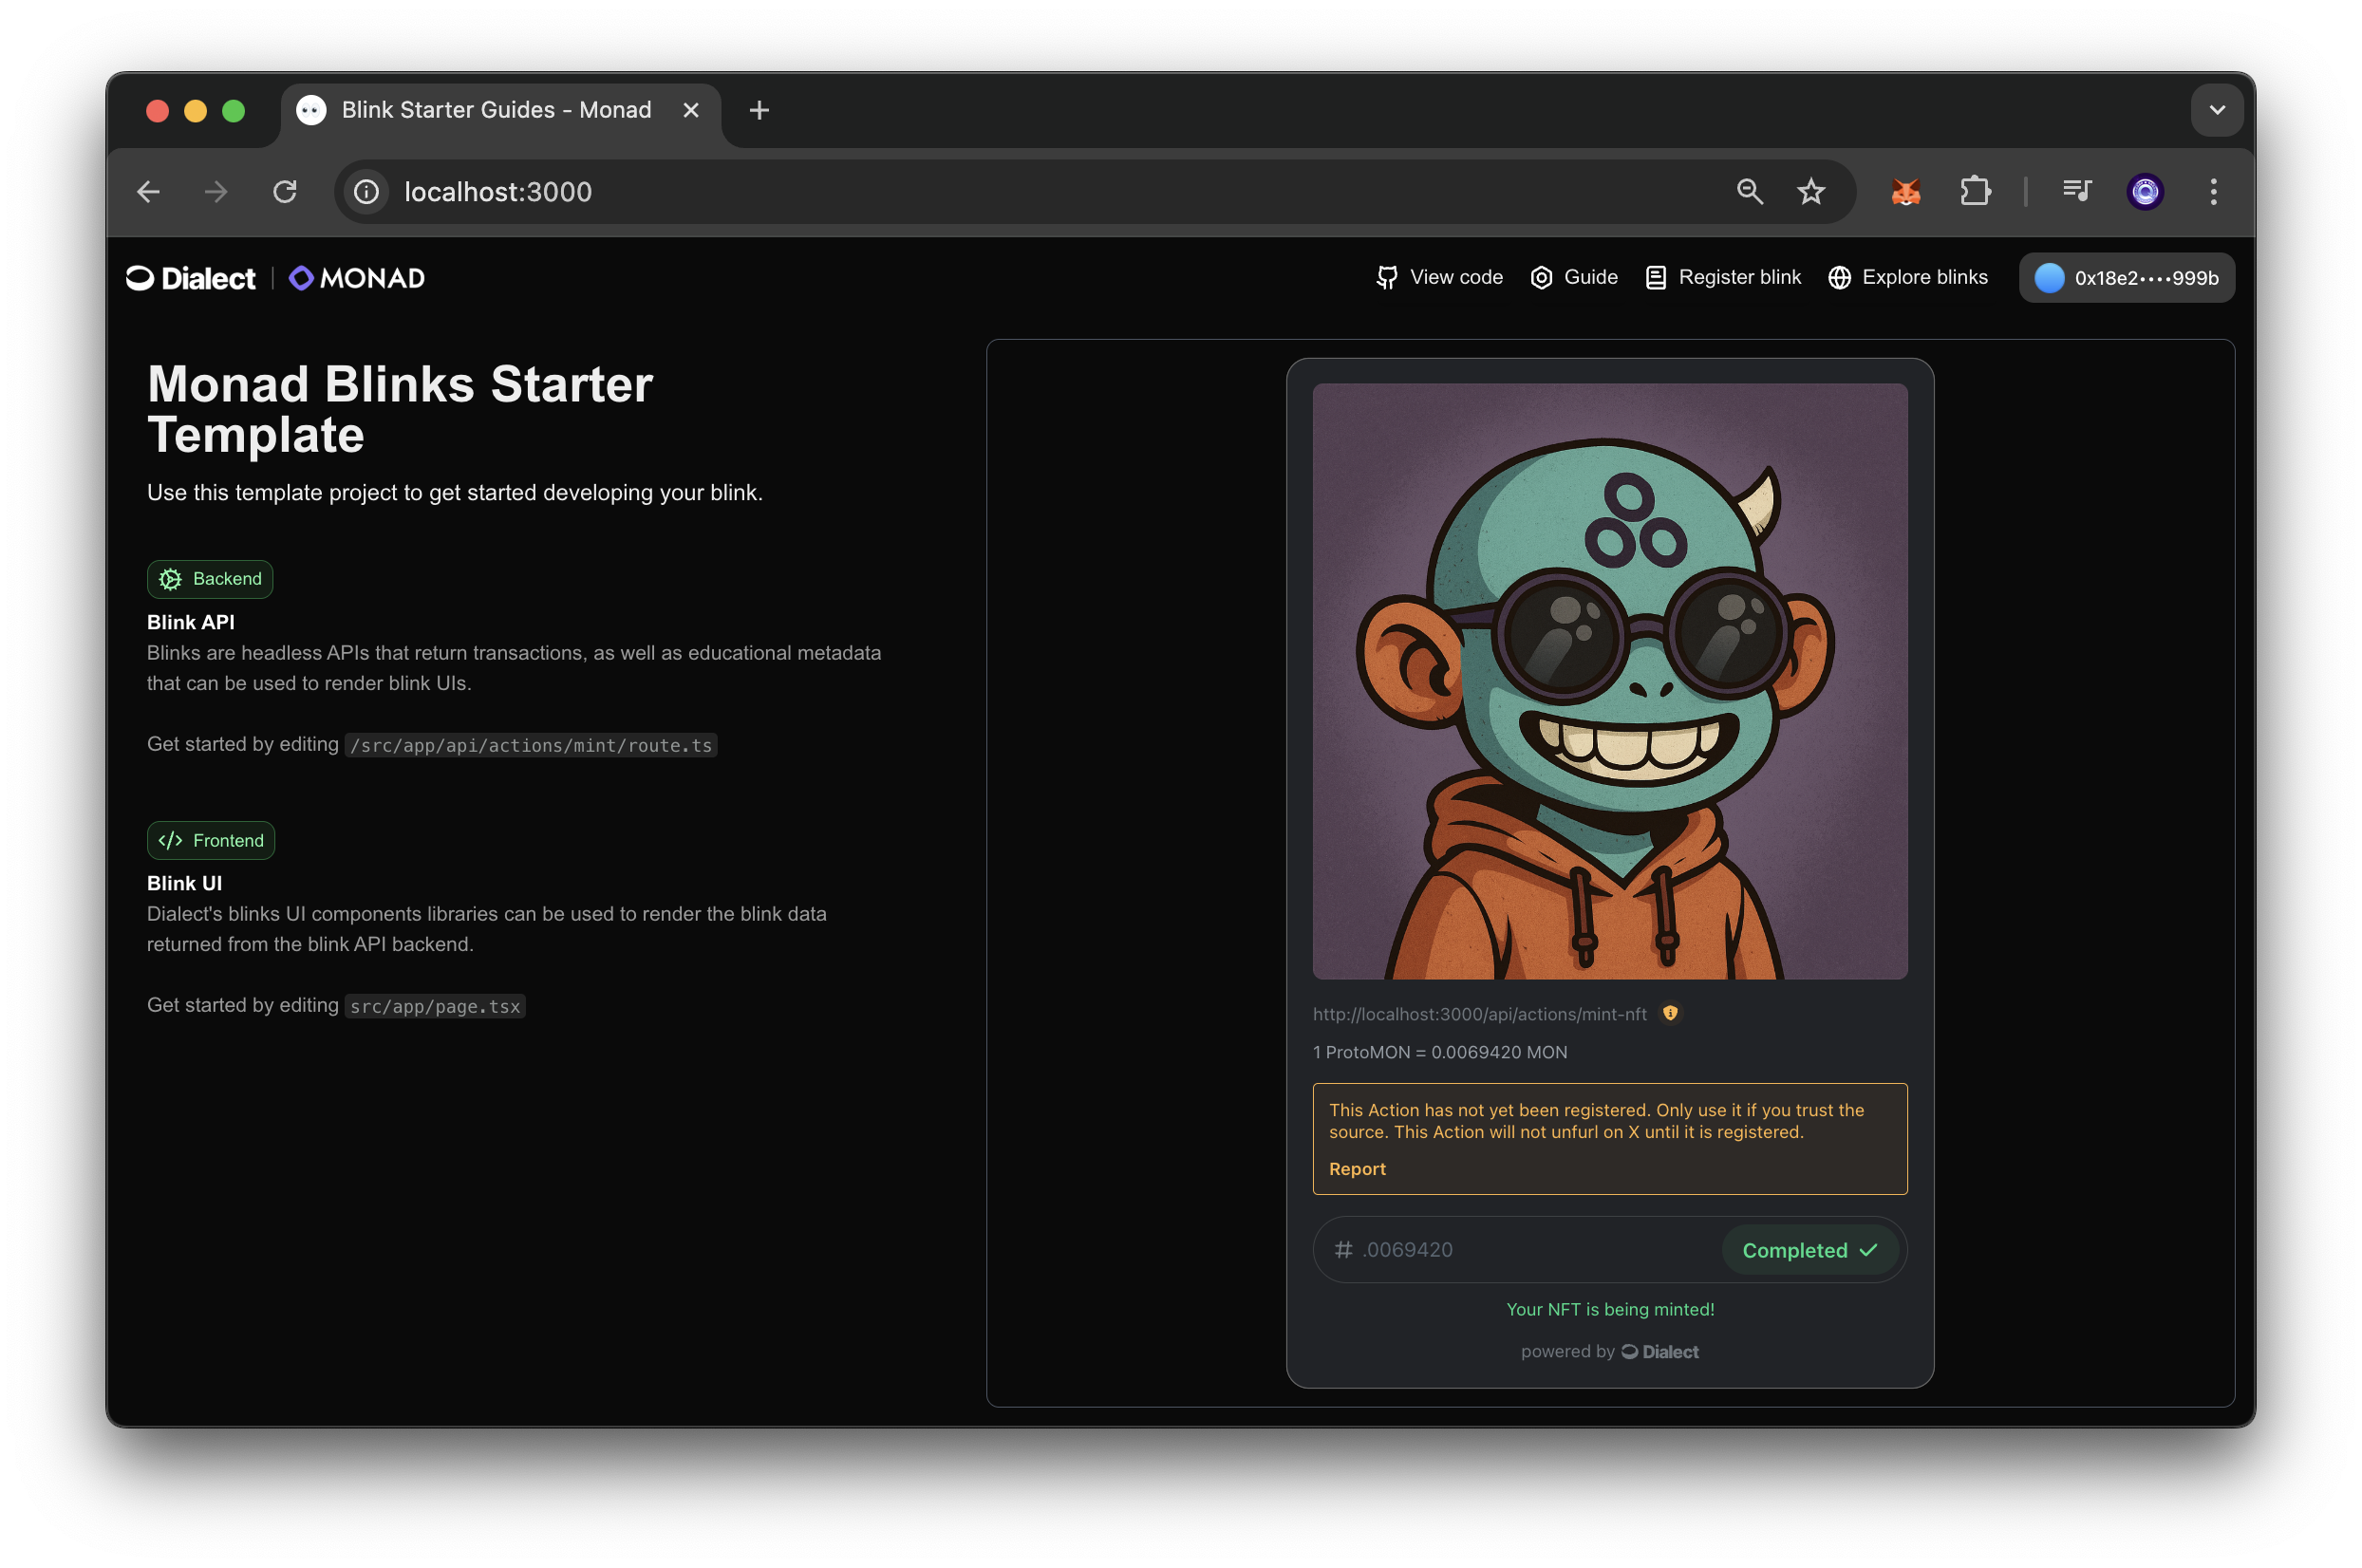
To start the server, run the command npm run dev in the terminal within the root folder of the project. Next, open your browser and navigate to http://localhost:3000. You should see the NFT minting interface.
Try inputting the minimum amount required to mint an NFT. Once you sign the transaction in your wallet, the Blink interface will update with transaction details:
There you have it! You now know how to create your own Blink using developer tools like Blinks, Wagmi, Viem, and more.
Register Your Blink
The next step to getting your Blink live so you can share with others is to register it on Dialect.
If you want to continue building on top of the knowledge you just learned, check out these additional resources.
Additional Resources
Final Thoughts
There you have it! You just created your own Blinks NFT interface on Monad! With the core concept of now understanding how to build a Blink with best practices, you can go on to experiment with other types of Blinks integrations such as creating DeFi actions (such as swapping, staking, lending, or other use cases like showcasing listed NFTs on marketplaces, crowdfunding, and more)
If you have a question or idea you want to share, drop us a line on Discord or Twitter!
We ❤️ Feedback!
Let us know if you have any feedback or requests for new topics. We'd love to hear from you.