
12 min read
Overview
Digital collectibles compatible with the ERC-721 standard have become very popular since the launch of Cryptokitties and have moved forward towards mass adoption in recent months. This guide will cover how to create and deploy an NFT (ERC-721) using the OpenZeppelin standard.
Prefer a video walkthrough? Follow along with Radek and learn how to create and deploy an ERC-721 (NFT) in 20 minutes.
What You Will Do
- Learn about Non-Fungible Tokens (NFTs) and their use-cases
- Create metadata for the ERC-721 token you will build
- Upload your files to a decentralized storage system (IPFS)
- Create and deploy an ERC-721 token using Remix.IDE
What You Will Need
- A Quicknode endpoint (you can create one for free here)
- A web3 wallet (e.g., MetaMask, Coinbase Wallet, Phantom, or a WalletConnect-compatible wallet) with test ETH (you can get some at the Multi-Chain Quicknode Faucet)
- IPFS CLI installed
- A modern web browser (e.g., Chrome)
What is a Non-Fungible Token?
Fungible means to be the same or interchangeable. For example, Ethereum tokens, all the members of a particular token class, have the same value. The same can be said of Cardano tokens. Fungible tokens are interchangeable 1:1.
With this in mind, NFTs are unique; each one is different. Every single token has unique characteristics and values. The types of things that can be NFTs are collectible cards, artworks, airplane tickets, etc. They are all clearly distinguishable from one another and are not interchangeable. Think of Non-Fungible Tokens (NFTs) as rare collectibles; each has unique characteristics, unusual attributes, and most times, its metadata.
What is ERC-721?
ERC stands for Ethereum Request for Comment, and 721 is the proposal identifier number. ERCs are application-level standards in the Ethereum ecosystem, they can be a smart contract standard for tokens such as ERC-20, the author of an ERC is responsible for building consensus with the Ethereum community, and once the proposal is reviewed and approved by the community, it becomes a standard. You can track the recent ERC proposal here. ERC-721 was created to propose the functionality to track and transfer NFTs within smart contracts.
ERC-721 is an open standard that describes how to build Non-Fungible tokens on EVM (Ethereum Virtual Machine) compatible blockchains; it is a standard interface for Non-Fungible tokens; it has a set of rules which make it easy to work with NFTs. NFTs are not only of ERC-721 type; they can also be ERC-1155 tokens.
The following are the set of functions and events defined in the ERC-721 standard:
ERC-721 Functions
balanceOf: This function is used to return the number of NFTs (Non-Fungible Tokens) owned by a specific address.
ownerOf: This function returns the address of the owner of a specific token. Each ERC721 token is unique, represented by an ID. This function allows users or applications to determine the owner of the token based on its unique ID.
safeTransferFrom (without data): This function safely transfers the ownership of a specific token from one address to another. This function checks if the recipient is a smart contract. If it is, it must implement a specific function (onERC721Received) to accept the transfer.
transferFrom: This function is used to transfer the ownership of a token from one address to another. It is generally used when the sender has been approved to transfer the token.
approve: This function is used to give approval to an address to transfer a specific token. This allows for delegated transfers, where an owner can allow another party to transfer a token on their behalf.
getApproved: This function is used to get the approved address for a specific token. If there is no approved address for the token, this function will return a null address.
setApprovalForAll: This function allows an owner of one or more tokens to approve or revoke approval for an operator to manage all of their tokens.
isApprovedForAll: This function is used to check if an operator is approved to manage all of an owner's tokens.
safeTransferFrom (with data): This function is similar to safeTransferFrom (without data) but with an additional data parameter. This extra data can be used to pass additional information during the transfer if the recipient is a smart contract. This function also checks if the recipient is a smart contract and whether it implements the onERC721Received function.
ERC-721 events
Transfer: This event is emitted when the ownership of a token changes from one address to another. The event includes details about the sender (from), the recipient (to), and the specific token (by ID) that was transferred. This event allows external listeners, like UIs or other contracts, to react to the transfer.
Approval: This event is triggered when an address is approved to transfer a specific token. It includes the current owner of the token (owner), the approved address that can now transfer the token (approved), and the specific token (by ID) that has been approved for transfer. This event enables applications to track approvals of tokens and react accordingly.
ApprovalForAll: This event is emitted when an owner either approves or revokes the approval for an operator to manage all of their tokens. It includes the owner's address (owner), the operator's address (operator), and a boolean indicating whether the operator was approved or not (approved). This event enables applications to track which addresses have been given rights to manage all tokens of a certain owner.
Use Cases of Non-Fungible Tokens (NFTs)
-
Digital art (or physical art): Art pieces are the most popular use cases of NFTs. Digital art auctions were the first application of NFTs and continue to grow.
-
Gaming: Providing in-game purchases and collectibles of games.
-
Real estate: Tokenizing properties and smart contracts and carry buying and selling.
-
Finance: Financial instruments like loans, futures, and other responsibilities.
-
Software titles: Software licenses to ensure anti-piracy and privacy.
-
Concert tickets/Sports match tickets: To ensure that no fraud happens in ticket selling and fans can have a single place to view past experiences.
-
KYC compliance: Creating a token for a specific user’s KYC.
Get Test ETH
Now that we know what ERC-721 tokens are and how they work, let’s see how we can build and deploy our own tokens.
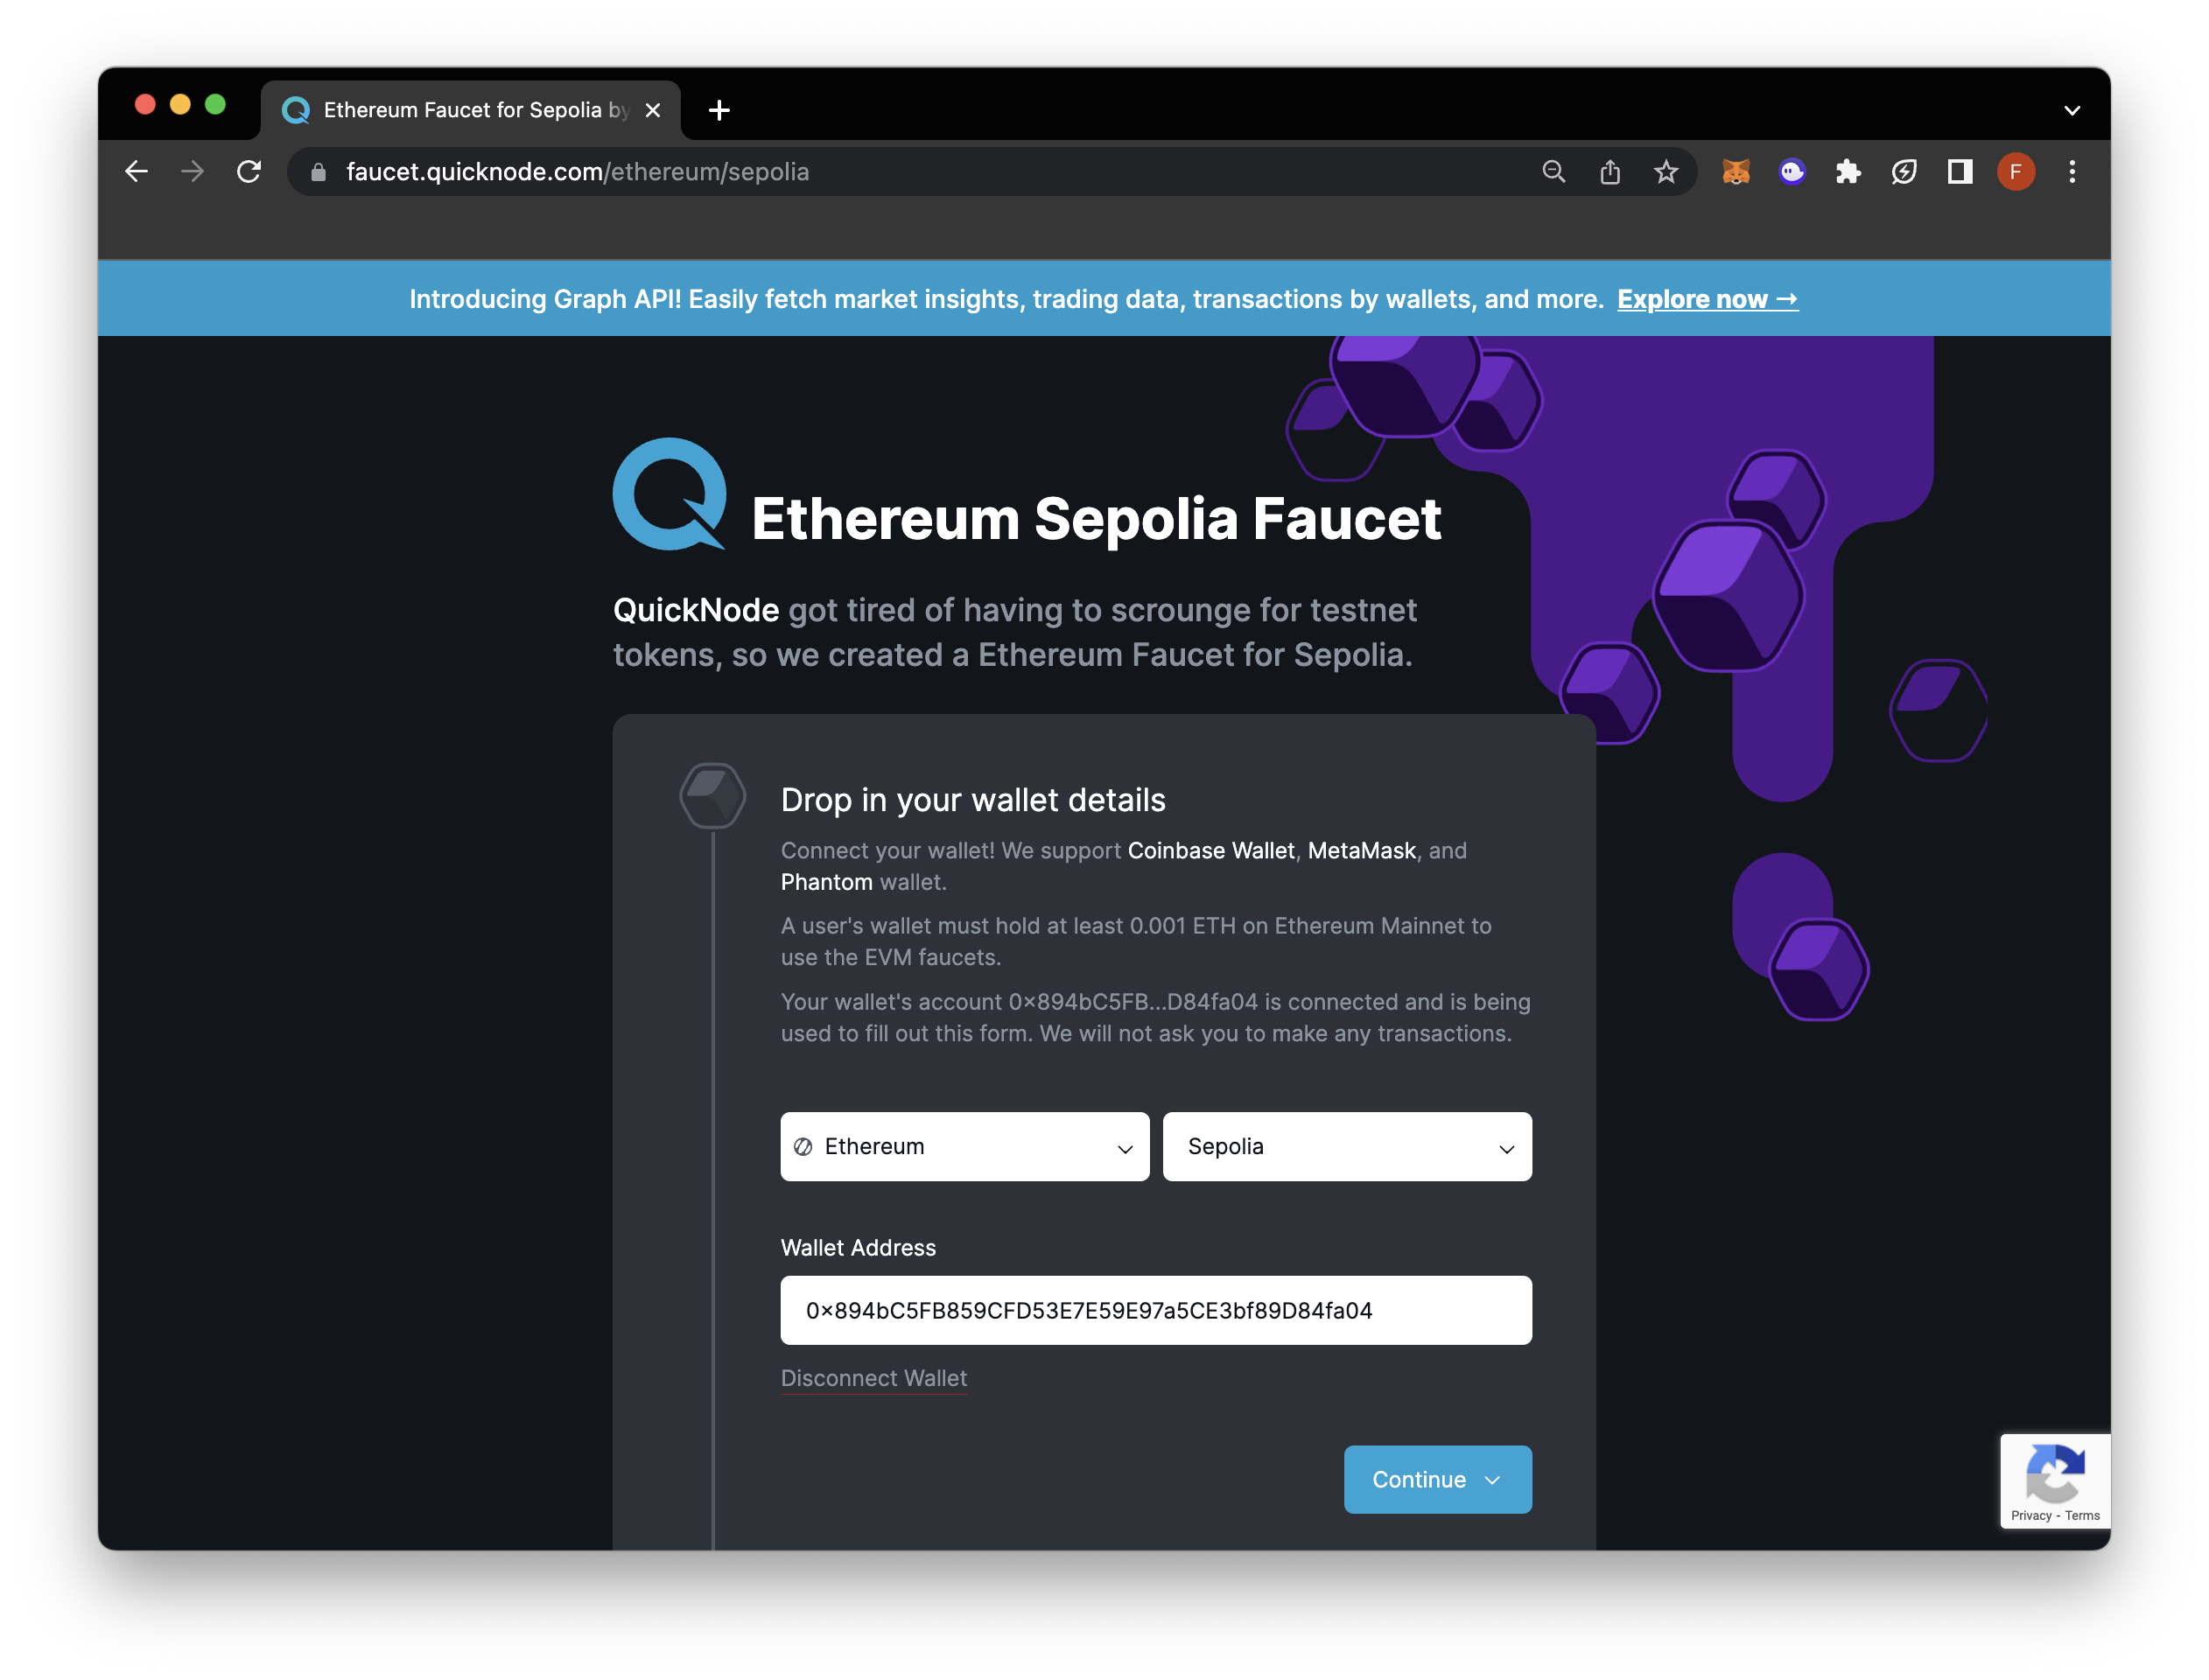
We’ll deploy our contract on the Ethereum Sepolia testnet. To get started, you will need the MetaMask browser extension (or another compatible web3 wallet; Phantom, WalletConnect-compatible) and some test ETH, which you can get by going to the Quicknode Multi-Chain Faucet. Just connect your wallet or paste in the address and click Continue. You will be prompted to share a tweet for a bonus (we recommend it!); otherwise, just click No thanks, just send me 0.05 ETH. Note that there is a mainnet balance requirement of 0.001 ETH on Ethereum Mainnet to use the EVM faucets.
Adding Files to IPFS
Before writing our NFT contract, we need to host our art for NFT and create a metadata file; for this, we’ll use IPFS - a peer-to-peer file storing and sharing distributed system. There are multiple methods for engaging with the IPFS protocol. You can either set up and operate IPFS on your own system, or opt for Quicknode as an easier solution. Quicknode simplifies your access to IPFS by managing the underlying infrastructure. This approach allows you to concentrate on your content, relieving you from the responsibilities of sustaining a local IPFS node for data pinning. With Quicknode, the technical complexities are handled for you.
We cover both ways ways to upload your files to IPFS: using the standard IPFS CLI or the streamlined Quicknode IPFS service.
Standard Method: Using IPFS CLI
Download and install IPFS CLI based on your Operating system by following the installation guide in IPFS docs.
Following are the steps for hosting the image and metadata file.
Step 1: Creating IPFS repo
Start the IPFS repo by typing the following in a terminal/cmd window.
ipfs init
Step 2: Starting the IPFS daemon
Start the IPFS daemon, open a separate terminal/cmd window, and type the following.
ipfs daemon
Step 3: Adding an image to IPFS
Go to the first terminal window and add the image to IPFS (art.png here).
ipfs add art.png

Copy the hash starting with Qm and add the “https://ipfs.io/ipfs/” prefix to it; it must look something like this https://ipfs.io/ipfs/QmQEVVLJUR1WLN15S49rzDJsSP7za9DxeqpUzWuG4aondg
Step 4: Adding JSON file to IPFS
Create a JSON file, called nft.json, and save it in the same directory as the image.
JSON file format:
{
	"name": "NFT Art",
	"description": "This image shows the true nature of NFT.",
	"image": "https://ipfs.io/ipfs/QmZzBdKF7sQX1Q49CQGmreuZHxt9sVB3hTc3TTXYcVZ7jC"
}
Now, add the JSON file.
ipfs add nft.json
Take the hash beginning with Qm and prefix it with “https://ipfs.io/ipfs/”; it must look something like this https://ipfs.io/ipfs/QmUFbUjAifv9GwJo7ufTB5sccnrNqELhDMafoEmZdPPng7
Save this URL. We'll need this to mint our NFT.
Quicknode IPFS Solution: An Easier Alternative
To learn more about the price information of Quicknode IPFS, view our pricing plans here.
If you're looking for a more straightforward approach, Quicknode's IPFS service offers an easy-to-use, efficient solution for uploading your NFT assets. With Quicknode, the complexity of managing infrastructure is taken care of, allowing you to concentrate on your content rather than maintaining a local IPFS node.
To begin using Quicknode for IPFS, follow these steps:
Step 1: Logging in to Quicknode
Log in to Quicknode and select the IPFS option from the sidebar on the left:
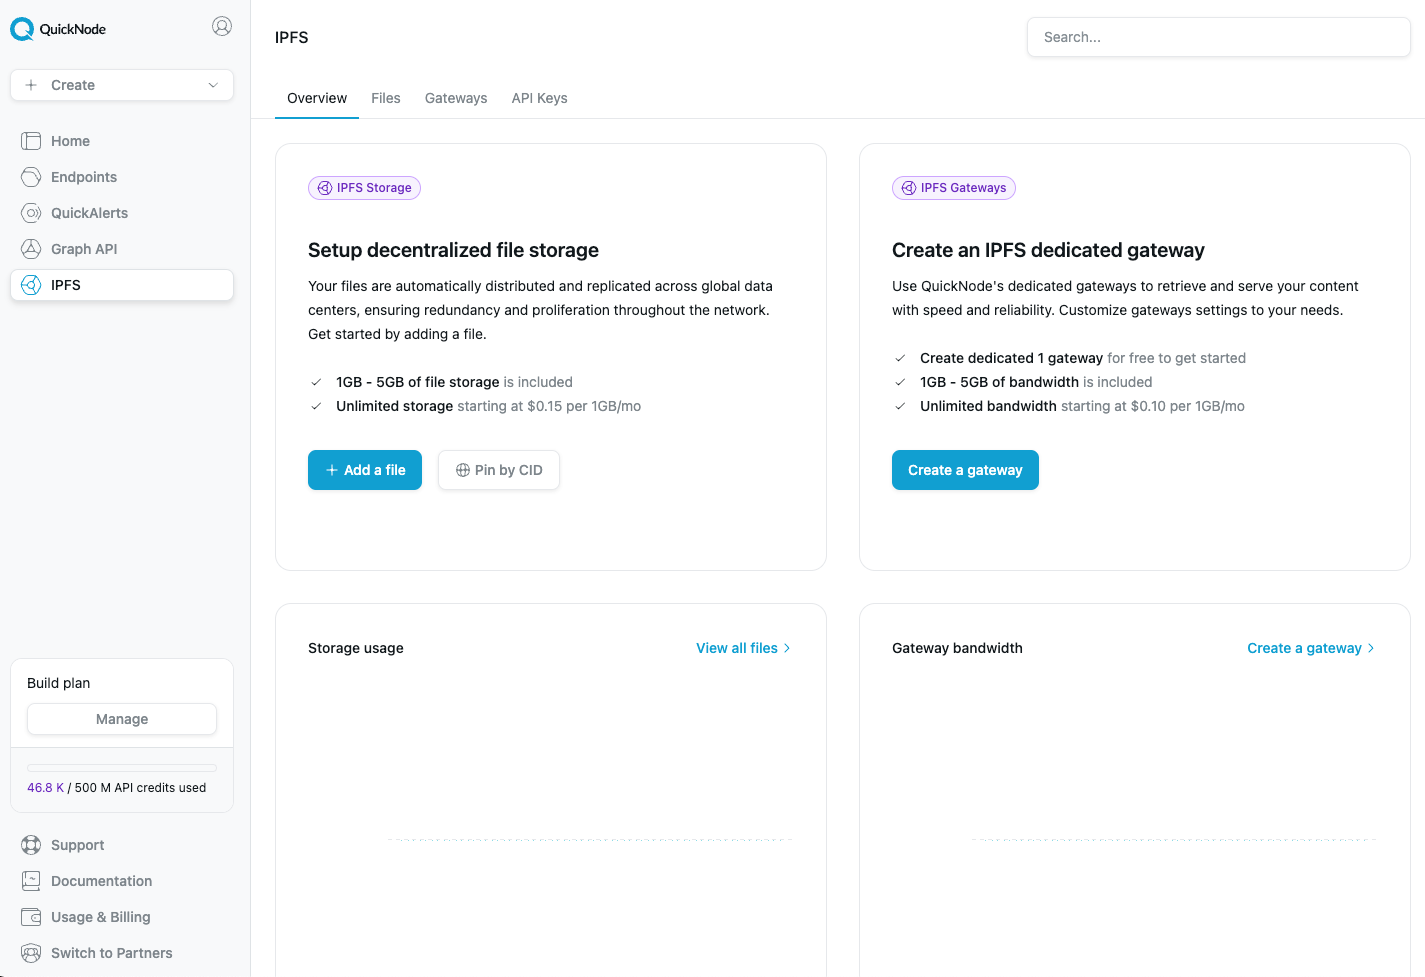
Step 2: Adding an image to IPFS with Quicknode
Upload your image file quickly by dragging and dropping it or clicking to select files from your Finder/File Explorer window. In this guide, we use the image below.
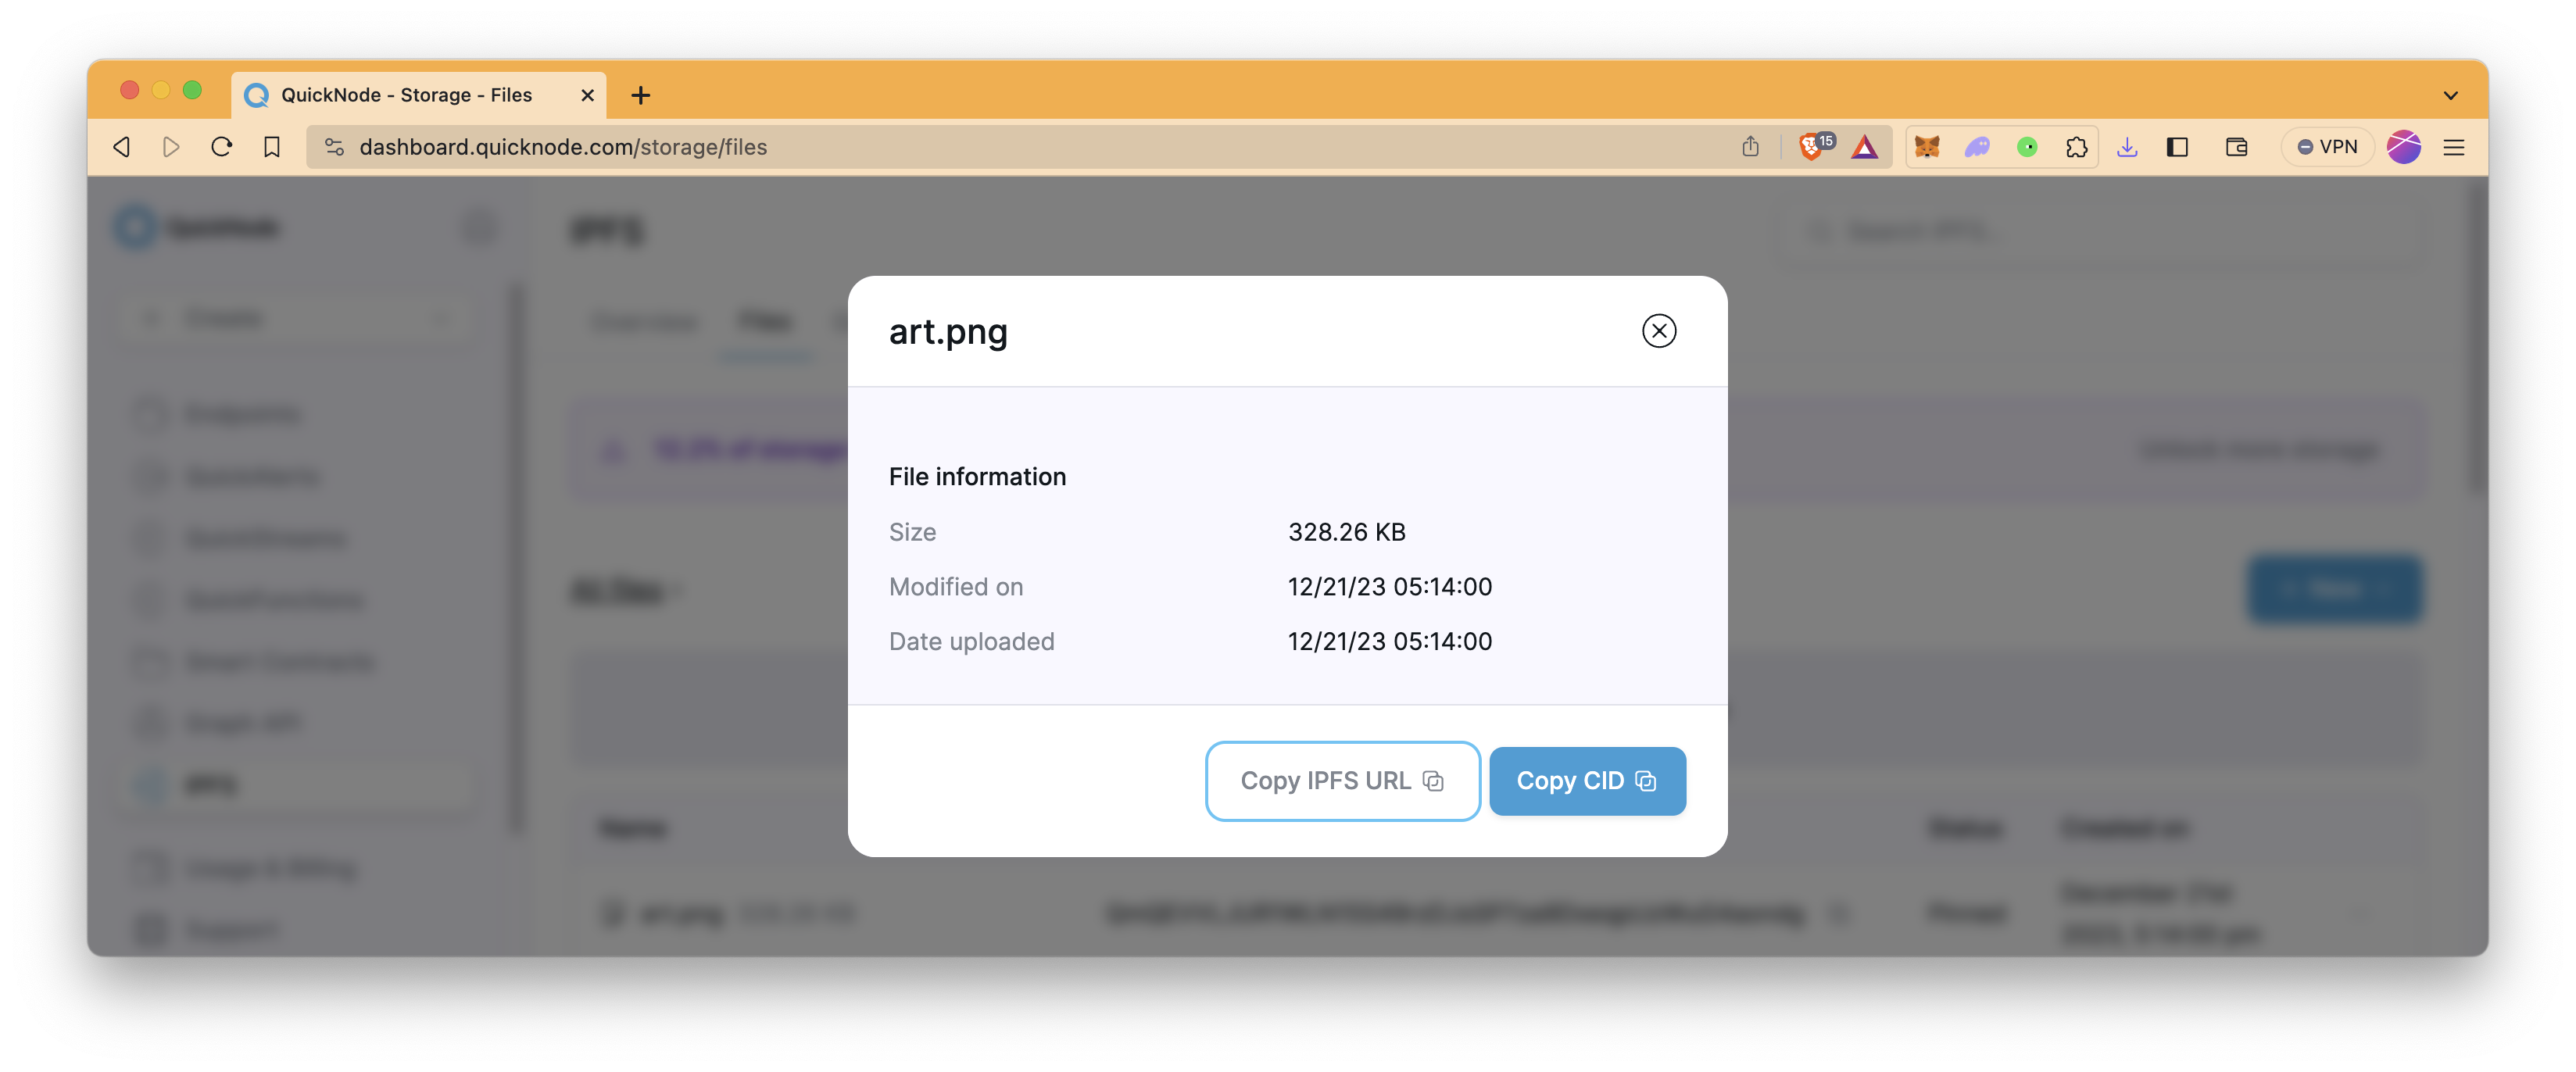
After uploading, click the file name in the Files tab and click the copy IPFS URL button. Similar to the screenshot below.
https://qn-shared.quicknode-ipfs.com/ipfs/QmQEVVLJUR1WLN15S49rzDJsSP7za9DxeqpUzWuG4aondg
Step 3: Adding JSON file to IPFS with Quicknode
Create a JSON file called nft.json, replace your IPFS URL in the image field, and save it. After saving, upload your JSON file to IPFS, similar to the previous step.
{
    "name": "NFT Art",
    "description": "This image shows the true nature of NFT.",
    "image": "https://qn-shared.quicknode-ipfs.com/ipfs/QmQEVVLJUR1WLN15S49rzDJsSP7za9DxeqpUzWuG4aondg"
}
After uploading, click the file name in the Files tab and copy the IPFS URL. It must look something like the one below.
https://qn-shared.quicknode-ipfs.com/ipfs/QmeVHZzKGEDbEbG5MVz4hUucNf4qZTRfW18AgdJNTrv22m
Save this URL. We'll need this to mint our NFT.
Creating Our Own Token
For ease and security, we’ll use the OpenZeppelin ERC-721 contract to create our NFT. With OpenZeppelin, we don’t need to write the whole ERC-721 interface. Instead, we can import the library contract and use its functions.
Head over to the Ethereum Remix IDE and make a new Solidity file, for example - MyToken.sol
Paste the following code into your new Solidity script:
// SPDX-License-Identifier: MIT
pragma solidity ^0.8.20;

import "@openzeppelin/contracts@5.0.0/token/ERC721/ERC721.sol";
import "@openzeppelin/contracts@5.0.0/token/ERC721/extensions/ERC721URIStorage.sol";
import "@openzeppelin/contracts@5.0.0/token/ERC721/extensions/ERC721Burnable.sol";
import "@openzeppelin/contracts@5.0.0/access/Ownable.sol";

contract MyToken is ERC721, ERC721URIStorage, ERC721Burnable, Ownable {
    constructor(address initialOwner)
        ERC721("MyToken", "MTK")
        Ownable(initialOwner)
    {}

    function safeMint(address to, uint256 tokenId, string memory uri)
        public
        onlyOwner
    {
        _safeMint(to, tokenId);
        _setTokenURI(tokenId, uri);
    }

    // The following functions are overrides required by Solidity.

    function tokenURI(uint256 tokenId)
        public
        view
        override(ERC721, ERC721URIStorage)
        returns (string memory)
    {
        return super.tokenURI(tokenId);
    }

    function supportsInterface(bytes4 interfaceId)
        public
        view
        override(ERC721, ERC721URIStorage)
        returns (bool)
    {
        return super.supportsInterface(interfaceId);
    }
}
Explanation of the code above:
Line 1: Specifying SPDX license type as MIT. This indicates that the code is licensed under the MIT License, which is a permissive open-source license allowing the code to be used, modified, and distributed with very few restrictions.
Line 2: Declaring the Solidity version as ^0.8.20. This indicates that the code is written using Solidity version 0.8.20 or a compatible version.
Line 4-7: Importing necessary contracts from the OpenZeppelin library.
-
ERC721.sol: This contract is imported from the OpenZeppelin library and represents the basic implementation of the ERC721 standard. ERC721 is the standard for non-fungible tokens (NFTs).
-
ERC721URIStorage.sol: This contract extends ERC721 and adds functionality for storing and managing metadata URIs associated with NFTs. Metadata URIs typically point to additional information about the NFT.
-
ERC721Burnable.sol: This contract also extends ERC721 and adds the ability to burn (destroy) NFTs. It provides a function for permanently removing NFTs from circulation, and only the owner can invoke it.
-
Ownable.sol: This contract is used for access control. It allows you to specify an owner who has special privileges within the contract. The owner can perform certain actions that other users cannot.
Line 9: Starting the contract named MyToken and mentioning that it extends the ERC721, ERC721URIStorage, and Ownable contracts. This means that the MyToken contract inherits the functionality and properties defined in these contracts.
Line 10: The constructor function begins here. Constructors are special functions in Solidity that are executed only once during contract deployment. This constructor takes one argument, initialOwner, which is an Ethereum address.
Line 11: This line calls the constructor of the ERC721 contract with the arguments "MyToken" and "MTK". It initializes the NFT contract with a name of "MyToken" and a symbol of "MTK."
Line 12: This line calls the constructor of the Ownable contract, setting the initial owner of the MyToken contract to the address provided as initialOwner.
Line 15: Declaring the function safeMint with three arguments: to (the address of the receiver of the NFT token), tokenId (the unique identifier for the token), and uri (the URI of the JSON file associated with the token). This function can only be called by the contract owner (specified by the onlyOwner modifier).
Line 19: Minting a new token by calling the _safeMint function inherited from the ERC721 contract. It creates a new token and assigns it to the specified receiver's address.
Line 20: Setting the token URI (metadata URI) associated with the token using the _setTokenURI function inherited from the ERC721URIStorage contract. The URI is set based on the provided tokenId and uri.
Line 25-32: Implementing overrides required by Solidity for the ERC721 and ERC721URIStorage contracts. tokenURI is a function that retrieves the metadata URI associated with a given tokenId. It's marked as public and view, indicating that it's a read-only function and can be called by anyone.
Line 34-41: Implementing the supportsInterface function, which is required by the ERC721 and ERC721URIStorage contracts. This function checks whether a given interfaceId is supported by the contract and returns a boolean value accordingly.
By combining these functionalities and contracts, the code creates a custom ERC721 token contract named MyToken. This contract allows the contract owner to safely mint new tokens, associate metadata URIs with them, and supports the necessary interfaces defined by the ERC721 standard.
Now, take a minute to customize the smart contract with your own details if you'd like. You can update the token name and symbol by updating the following line - ERC721("MyToken", "MTK").
When you're finished, compile the smart contract and deploy it using Injected Provider (make sure to select Sepolia testnet on Metamask before compiling the contract). Then, paste your wallet address into the box just near the Deploy button to define the initialOwner parameter of the constructor function. Lastly, click Deploy on Remix.IDE.
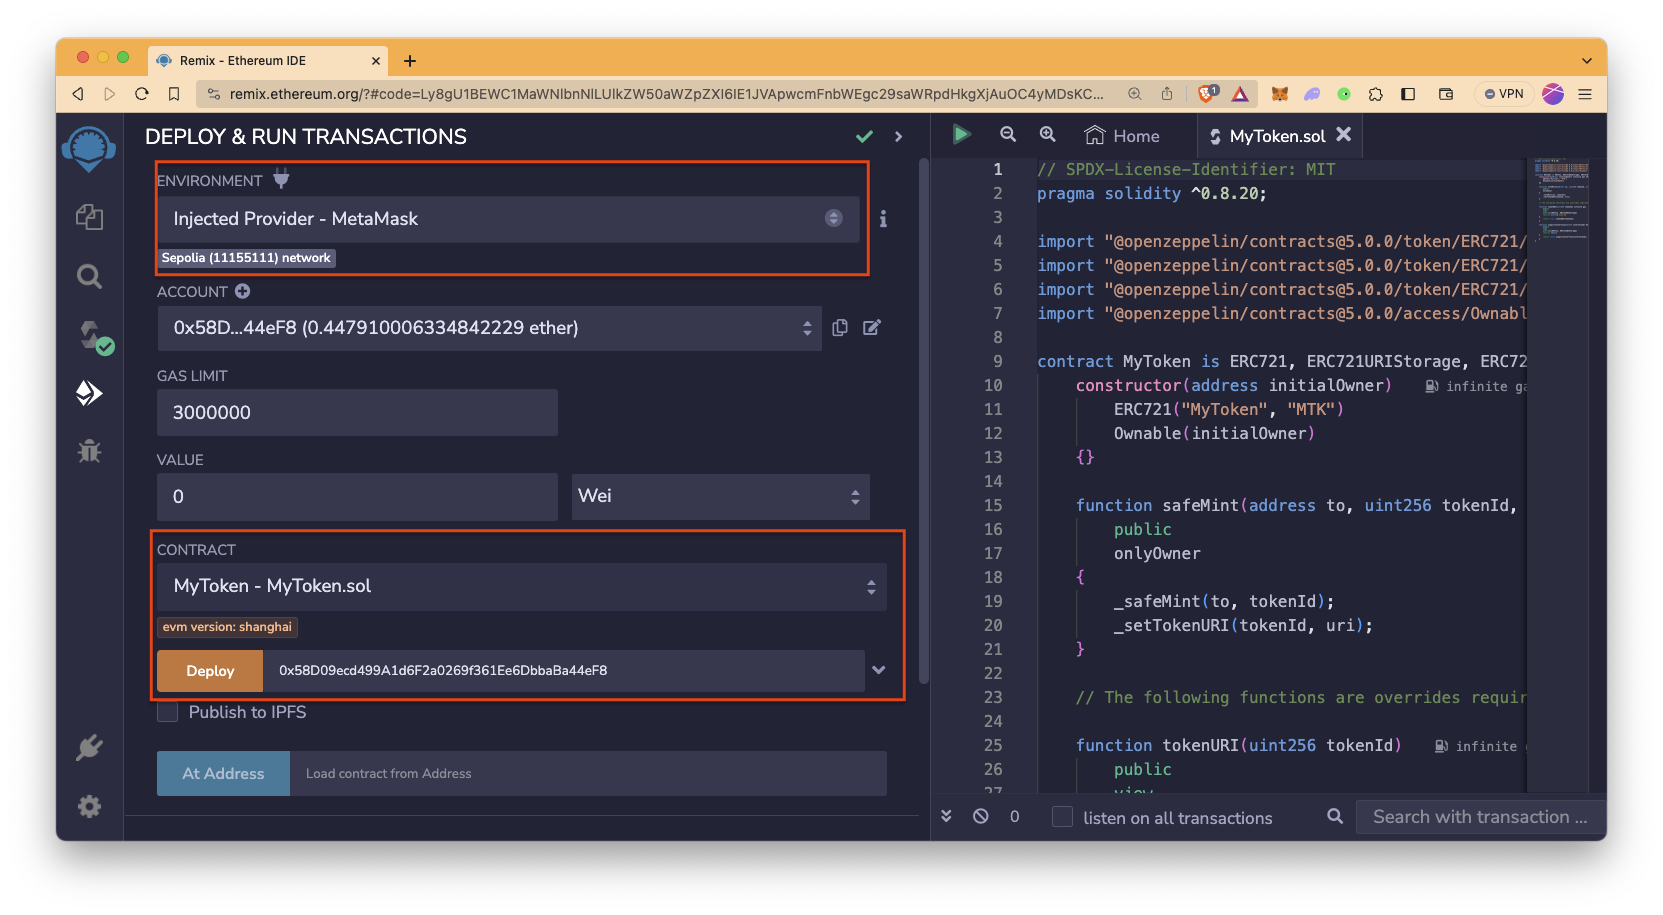
If you receive an error message before deployment - “This contract may be abstract”, make sure to select the appropriate contract under the Contract tab.
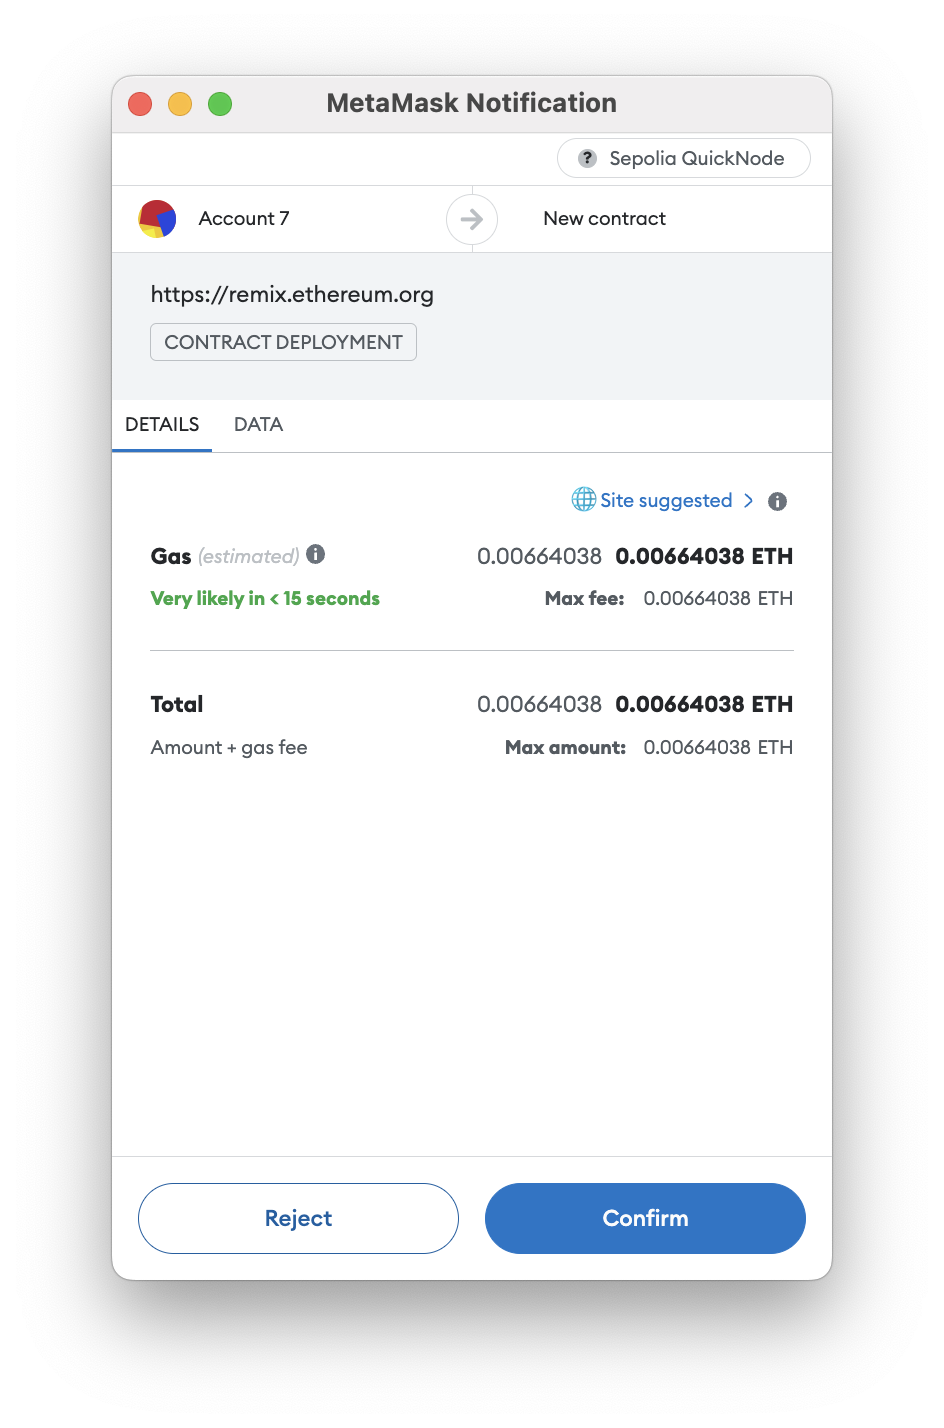
Confirm the transaction in Metamask:
Now go to the “Deployed Contracts” section in Remix and expand the deployed contract. You’ll see a bunch of functions/methods. Expand the safeMint function and add the following details:
- Add your wallet address in the _to the field.
- Enter any Big number value in the _tokenId field. We suggest using '1' as it represents the first token being minted.
- For the _uri field, input the URI of the JSON file that corresponds to the method you used in the previous steps:
- If you used the standard IPFS CLI method: Use the URI you obtained after uploading your file to IPFS in the Standard Method: Using IPFS CLI section. This will be the IPFS link prefixed with https://ipfs.io/ipfs/, followed by the hash of your file.
- If you chose Quicknode's IPFS service: Use the URI provided by Quicknode after you uploaded your file in the Quicknode IPFS Solution: An Easier Alternative section. Quicknode generates a unique URI for your file, which you should insert here.
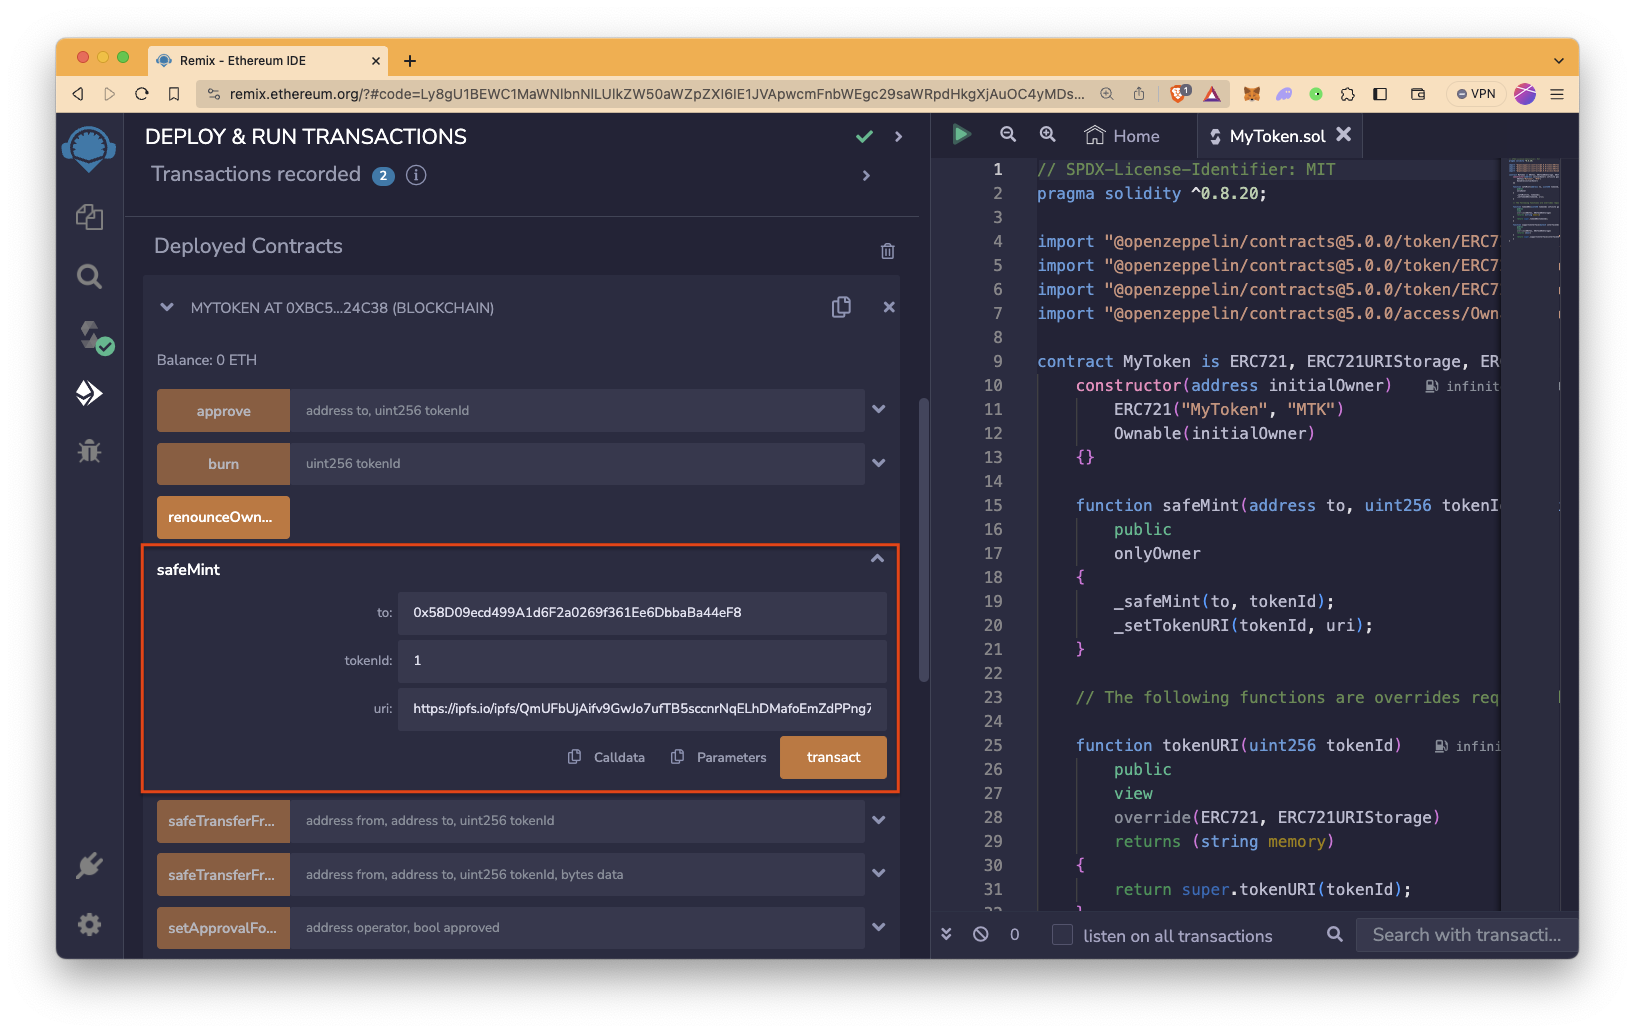
Click on transact and confirm the transaction from MetaMask. It could take a couple of minutes but you can always confirm the transaction was executed via a block explorer like Etherscan. Now you have the NFT on the Sepolia chain.
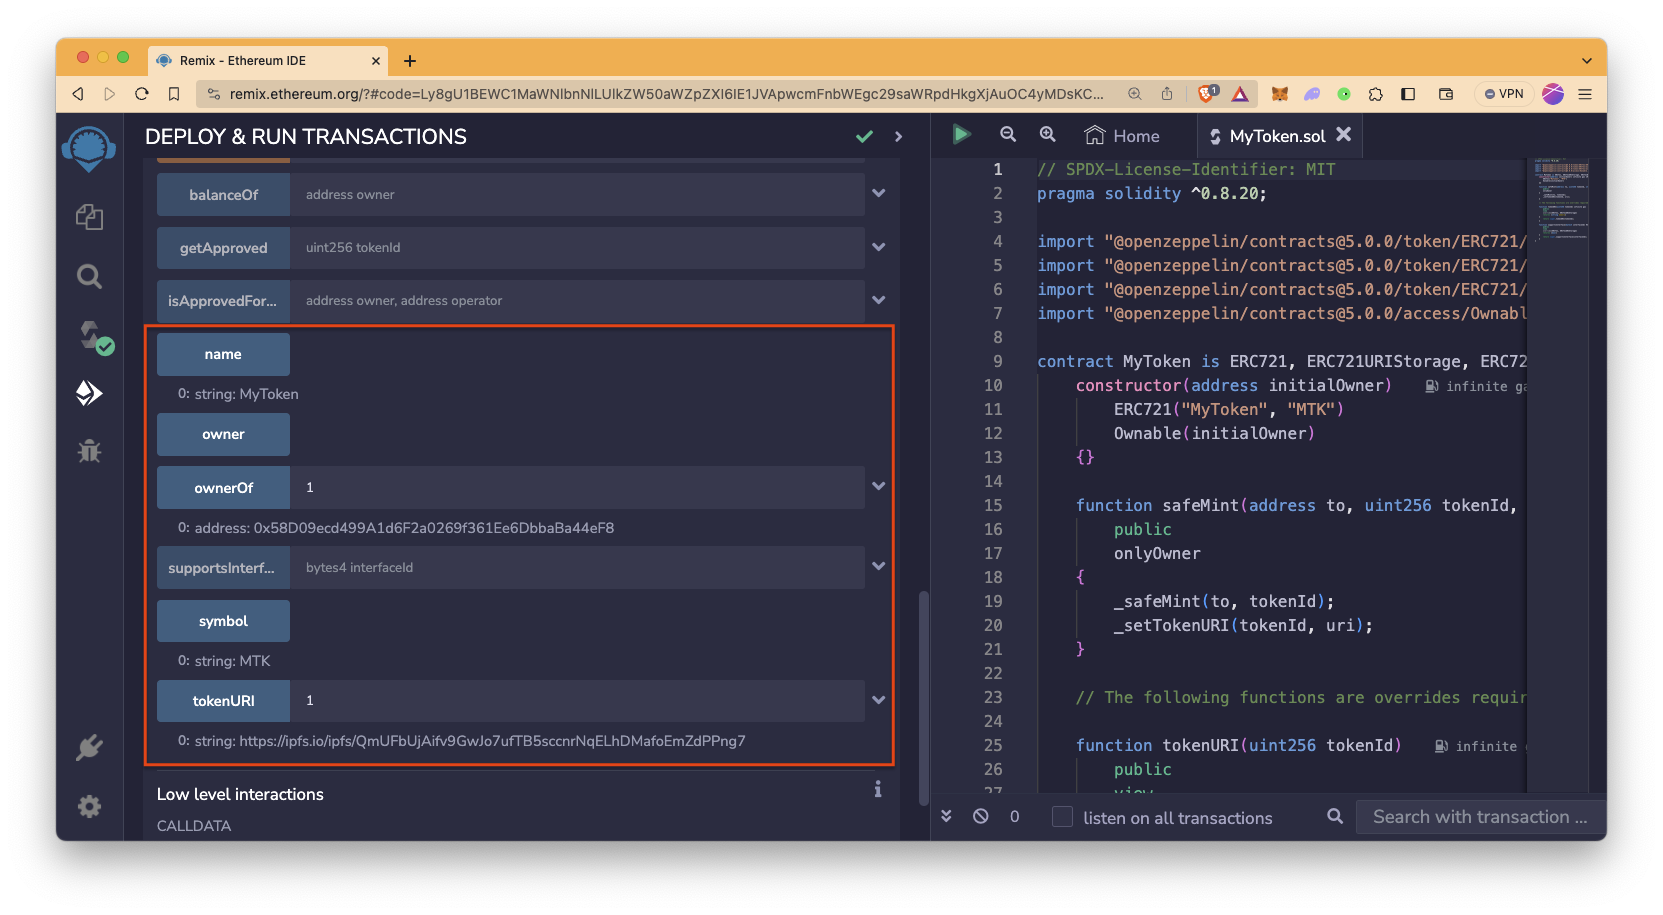
You can check other details like name, symbol, ownerOf, or tokenURI by entering the token id we mentioned earlier.
Conclusion
Congratulations on creating your very own NFT! Help your artist friends put their artistic work on the Ethereum blockchain, or become an artist yourself. Check out OpenZeppelin's Wizard for more examples.
Subscribe to our newsletter for more articles and guides on Ethereum. If you have any feedback, feel free to reach out to us via Twitter. You can always chat with us on our Discord community server, featuring some of the coolest developers you’ll ever meet :)
We ❤️ Feedback!
Let us know if you have any feedback or requests for new topics. We'd love to hear from you.