
11 min read
Overview
Imagine if an NFT you hold could not only represent the asset itself but could also act as a "wallet", allowing your asset to interact with other smart contracts and store other digital assets within itself. A new Ethereum Improvement Proposal, ERC-6551: Non-fungible Token Bound Accounts could enable that on Ethereum soon. This guide will introduce you to the specifics of the ERC-6551 proposal and help you navigate the steps of creating and deploying your own ERC-6551 compliant token using Hardhat and OpenZeppelin.
What You Will Need
- Basic understanding of Ethereum and Smart Contracts
- Basic understanding of ERC-721 and ERC-1155 standards
- A MetaMask wallet or access to your public/private key
- ETH on Sepolia testnet (you can get some here)
- A web-based browser (e.g. Chrome)
What You Will Do
- Learn about ERC-6551: Non-fungible Token Bound Accounts
- Learn how to use Quicknode to power your blockchain development
- Create an ERC-6551 compliant contract using OpenZeppelin
- Deploy your contract to the Ethereum Sepolia blockchain using Hardhat
- Test the Token Bound Account (TBA) by interacting with it
NFT & Token Standards Today
NFTs today are assets that live within user wallets (such as MetaMask, Coinbase Wallet, or Ledger). These tokens represent a specific asset and/or piece of content. Typically, they abide by a token standard ERC-721 or ERC-1155 standards, which dictate how they can be minted, transferred, and interacted with. However, their functionality has been historically limited to simple transfers and metadata updates.
What is ERC-6551: Non-fungible Token Bound Accounts
ERC-6551 enables Token Bound Accounts (TBAs). These are smart contracts that have their own address and are associated/managed with a specific NFT. Think of it as a mini-wallet that is directly tied to the NFT, opening up possibilities such as:
- NFTs can store assets (as compared to your wallet holding your assets)
- NFTs can interact with other dApps (DeFi, DAOs, etc.)
- NFTs contain their own transaction history (separate from your own wallet history)
Note that as ownership of the NFT changes, so does the assets within it.
ERC-6551 Use Cases
Some ideas that be implemented with ERC-6551 include:
- DeFi: Allowing NFTs to participate in yield farming or liquidity provision directly.
- Gaming: Where the in-game assets (NFTs) can own other assets or interact with other in-game smart contracts.
- Marketplaces: Where NFTs can place sell orders, bid on other assets, or even pay platform fees.
- DAOs: Where NFTs represent voting rights and can directly vote on proposals.
Let's now dig further technically into the core components that make up ERC-6551.
Specification
The diagram below shows the flow between the Registry, NFTs, NFT holders, and Token Bound Accounts:
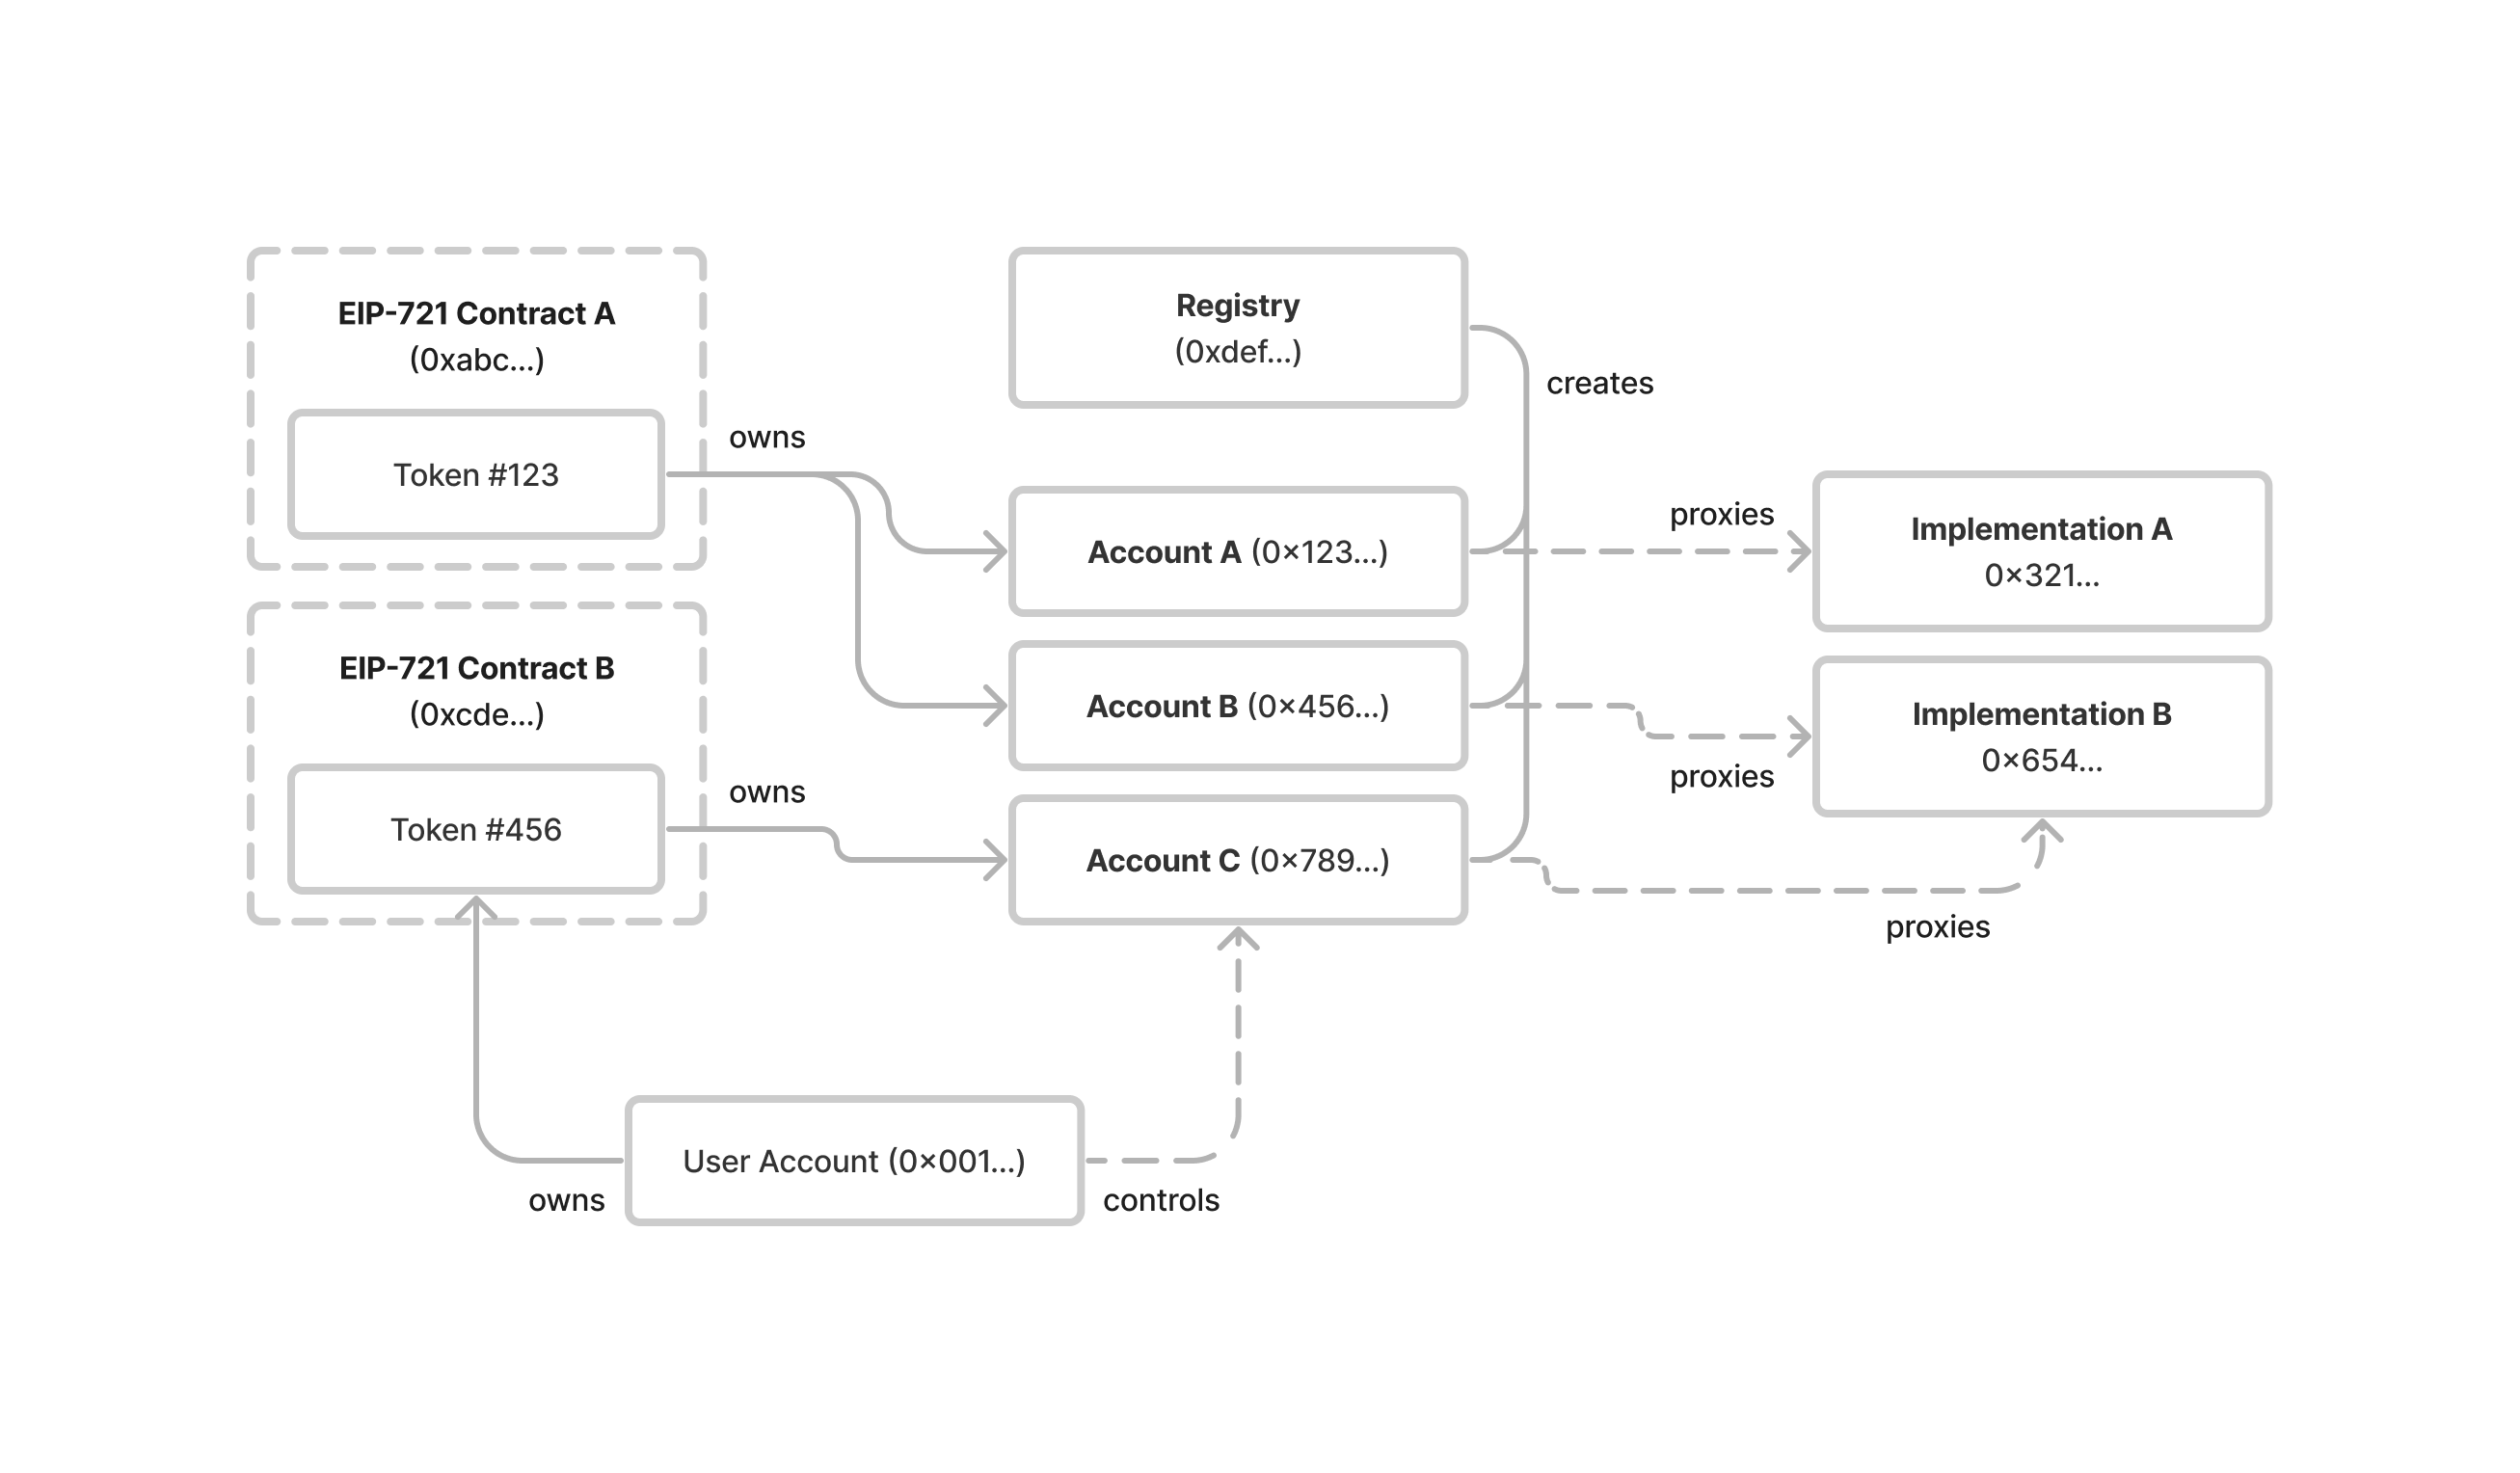
In the graph above, the User Account owns the ERC-721 tokens. These ERC-721 have their own Accounts (e.g. Token Bound Accounts), which act as the "wallet" that can store other assets. In order for the Account to conduct activity, the User Account must initiate a transaction. The activity an Account can perform is limited by its implementation logic, which is stored in another smart contract the Account will proxy. These Accounts are created by the Registry contract.
Now, let's cover the specifics of the Registry and Interface for Token Bound Accounts.
Registry
The registry, technically known as the Singleton Registry, can be thought of as a database of NFTs and their associated Token Bound Accounts. The registry is a smart contract that can be deployed to any EVM-compatible blockchain. It is permissionless, immutable, and has no owner. This registry ensures that a standard scheme is used for all Token Bound Account addresses.
Note the registry has been deployed to all main chains (the list can be found here). With this, developers don't need to re-deploy the registry unless they want a custom implementation. Developers looking to deploy more than one Token Bound Account under the same NFT can deploy their own custom registry contract.
The Singleton Registry contract contains two main functions:
createAccount- This function creates the Token Bound Account for an NFT given an implementation address. This function takes in 5 parameters, theimplementationaddress,chainId,NFTaddress,token ID,salt, andinitdata. ThechainIdparameter allows users to have persistent Token Bound Accounts across multiple chains. With this logic, Token Bound Accounts are able to communicate cross-chain if needed.account- Computes the Token Bound Account address for an NFT given an implementation address given theimplementationaddress,chainId,NFTaddress,token ID, andsalt.
Note that the registry requires all Token Bound Accounts to inherit an ERC-1167 implementation.
Account & Execution Interface/Implementation
To ensure consistency for all Token Bound Accounts, the standard prescribes specific interfaces to which all TBAs must adhere. These interfaces enable the TBAs to function reliably while ensuring interoperability and predictability.
Interface Requirements
ERC-165 Interface
This is a standard interface detection mechanism in Ethereum smart contracts. It allows smart contracts to publish the interfaces they implement and others to query said interfaces. By ensuring that TBAs implement this, we can reliably confirm at runtime that a contract does support the required interfaces.
interface IERC165 {
    function supportsInterface(bytes4 interfaceId) external view returns (bool);
}
ERC-1271 Signature Validation Interface
This standard enables smart contracts to validate signatures as if they were regular externally owned accounts. By integrating this interface, TBAs can effectively validate signatures and act based on their validity, thus enabling operations like transactions or interactions with other contracts.
interface IERC1271 {
    function isValidSignature(bytes32 hash, bytes memory signature) external view returns (bytes4 magicValue);
}
Execution Interface
This critical interface allows TBAs to execute arbitrary operations when a valid signature from a recognized signer is provided. The essence of this interface is to permit TBAs to perform actions on behalf of the account.
interface IExecutionInterface {
    function execute(address to, uint256 value, bytes memory data, bytes memory signature) external returns (bool success);
}
Account Implementation
Token Bound Account implementations have already been deployed to all major chains. If you do not require custom logic for your Token Bound Account, you can use one of the account implementation addresses referenced here.
The core functionality of the account implementation logic is execute and owner.
execute: The execute function checks that the signer making the call is authorized. This is done via the_isValidSignerfunction. It additionally checks that the operation argument being passed is0and sends the specified amount of ether along with a function call. It also tracks function invocations by incremintingstatevariable. In the case of a bad call, the entire transaction is reverted.owner: This function returns the current owner of the specific ERC721 tokenisValidSigner: This function checks that the signer is theowneraddressisValidSignature: This function checks that signature matches the one of theownertoken: This function returns details about which ERC721 token is linked to the token bound account
Some things to note: The owner of an NFT has control over its associated Token Bound Account (TBA). If the NFT is transferred to another owner, the control of the TBA would also transfer with it since the TBA is permanently bound to the NFT. Therefore, whoever holds or owns the NFT at any given time would have control over its associated TBA.
Proxy
The ERC-6551 standard also implements upgradeability (via a proxy). In the context of smart contracts and Ethereum, a proxy refers to a design pattern where a smart contract (the proxy) defers all calls to a logic contract. The proxy holds the state, but the business logic resides in the logic contract. The primary purpose of using a proxy pattern is upgradability. When the business logic needs to be changed or upgraded, a new logic contract is deployed, and the proxy is redirected to delegate calls to this new logic contract, all while retaining the original state.
With ERC-6551, this upgradeability/proxy mechanism is used to deploy each Token Bound Account. Specifically, a custom version of the ERC-1167 proxy is used. This allows each Token Bound Account (TBA) to share the same logic code, leading to gas savings and simpler upgrades. Each proxy retains unique state data (like chain id, token contract address, and token ID) by storing it as ABI-encoded constant data appended to the contract bytecode.
Now, for the remainder of the guide, we'll be covering technical steps for developers wanting to create and deploy their own ERC-6551 complaint smart contract.
Set Up Development Environment
Creating a Quicknode Endpoint
To deploy our smart contract on Ethereum’s Sepolia blockchain, we will need access to an Ethereum Sepolia node. For that, we could use the default RPC networks in MetaMask. However, to get up to 8x faster response times, we'll use Quicknode. Create an account and then click "Create an Endpoint". Choose the Ethereum Sepolia chain and create your endpoint.
Setting up Quicknode RPC in MetaMask
After you've created your Ethereum Sepolia endpoint, copy your HTTP Provider endpoint and navigate to your MetaMask wallet. From the homepage of your wallet, click on the network tab in the top left, and then click on "Add network". MetaMask will open in a new tab in fullscreen mode.
Locate the "Add network manually" button at the bottom of the network list. Then, complete the fields as below:
- Network name: Quicknode Sepolia
- New RPC URL: YOUR QUICKNODE HTTP PROVIDER ENDPOINT URL
- Chain ID: 11155111
- Currency symbol: ETH
- Block explorer URL (Optional): https://sepolia.etherscan.io/
Then click "Save" to add your custom network.
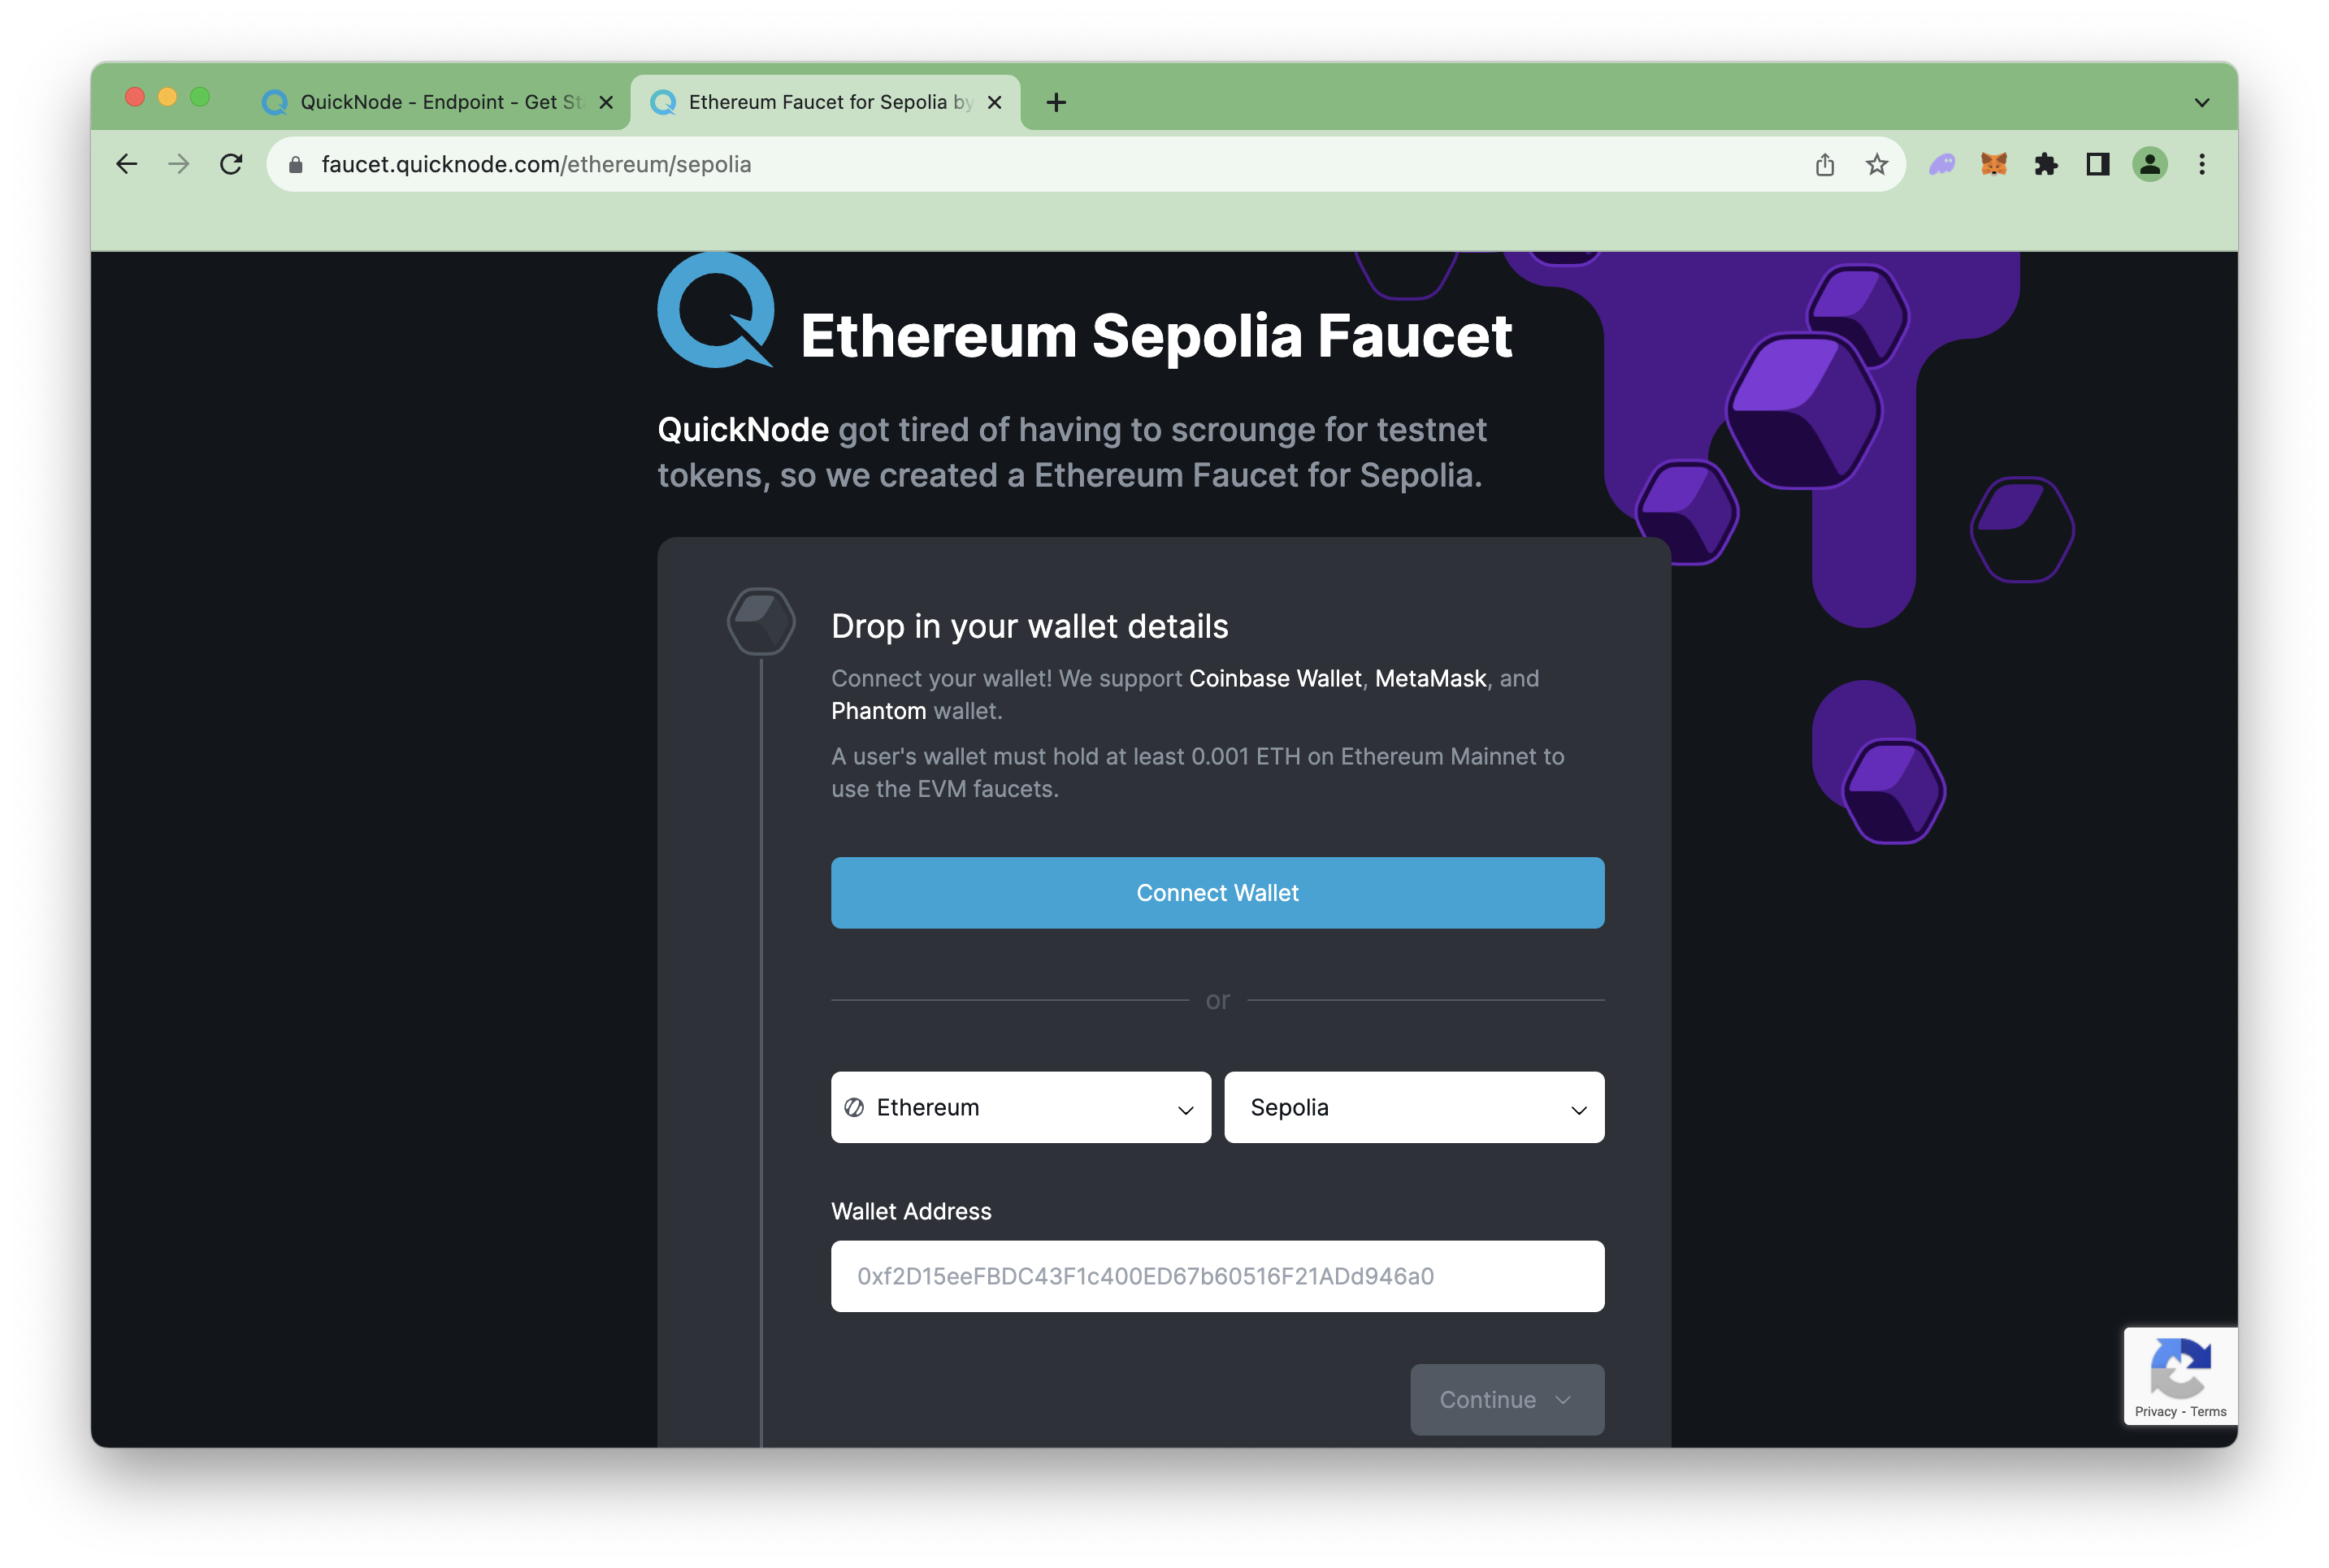
Funding Your Wallet with Quicknode's Multi-Chain Faucet
Now that we have our Quicknode Endpoint configured with MetaMask, the next step is retrieving some testnet ETH to pay for transaction fees.
Navigate to the Quicknode Multi-Chain Faucet, connect your wallet, and request ETH on Sepolia testnet.
Note: you will need a mainnet balance of at least 0.001 ETH in order to be eligible to use the faucet.
With our wallet funded and custom RPC set, let's move on to the code.
Clone the Repo
We'll be creating the smart contract using Hardhat, a smart contract development toolkit for developing smart contracts, and OpenZeppelin, an audited smart contract library.
Open a terminal window and clone the following GitHub repository:
https://github.com/quiknode-labs/qn-guide-examples
Navigate inside the erc-6551 directory within ethereum:
cd ethereum/erc-6551
Then, run the command below to navigate inside your repository and install dependencies:
npm install
Let's also create an .env file, which will hold our private key for creating transactions.
echo > .env
Inside the .env file, copy the following variables and input your RPC URL and private key credentials. To extract your private key from your MetaMask wallet, follow this guide.
RPC_URL=
PRIVATE_KEY=
Remember to save the file!
Now, with our development environment setup, we can move on to creating a Token Bound Account via the Registry contract.
Create a Token Bound Account (TBA)
Since ERC-6551 requires an ERC-721 token to be tied to it, we will need to deploy one as well. Do not worry. We have included a contract within the GitHub repository you clone; however, for future reference, you can also check out this Quicknode Guide - How to Create and Deploy an ERC-721 (NFT).
Now, within the main directory of your project, run the following command in your terminal:
npx hardhat run --network sepolia scripts/createAccount.js
The main components of the script being call above are these lines of code:
//Create an instance of the Registry contract
const RegistryContract = await hre.ethers.getContractAt('ERC6551Registry', registryAddress, signer);
...
//Deploy and mint an NFT which we'll later transfer to the TBA
const nftTokenContract = await hre.ethers.deployContract('MyToken', signer);
...
const mintTxn = await nftTokenContract.safeMint(signer.address);
...
//Call the createAccount function on the registry, creating our TBA address
const transaction = await RegistryContract.createAccount(implementationAddress, chainId, nftTokenContract.target, tokenId, salt, initData);
Reference the Github repository for the full code.
Once mined, you should see an output in your console similar to the following:
Deploying contract...
ERC-721 contract deployed to 0x8953A287122c2f76d077A94E9E007ABACF87B7C7
Mint successful: 0x49c157ab9b8fbd2e6fc2aaf8ef429b55d421e6605adf329f1ac7cc53a1f79a56
createAccount call successful. Tx Hash: 0xb8847e5a6d1687bad38f1303c31ef707a700714a45d6d785e061c6130cf800ac
Token Bound Account:  0xB992415D3BC7b19323bfE84c1A033303Ffe60E37
With the script above, we first deployed an ERC-721 contract, then minted an NFT from it. After, we called the createAccount function on the Registry contract to generate our Token Bound Account (TBA). Remember that the Registry contract is already deployed on several EVM chains, so unless you need your own private or custom implementation, you can interact with the main Registry contract.
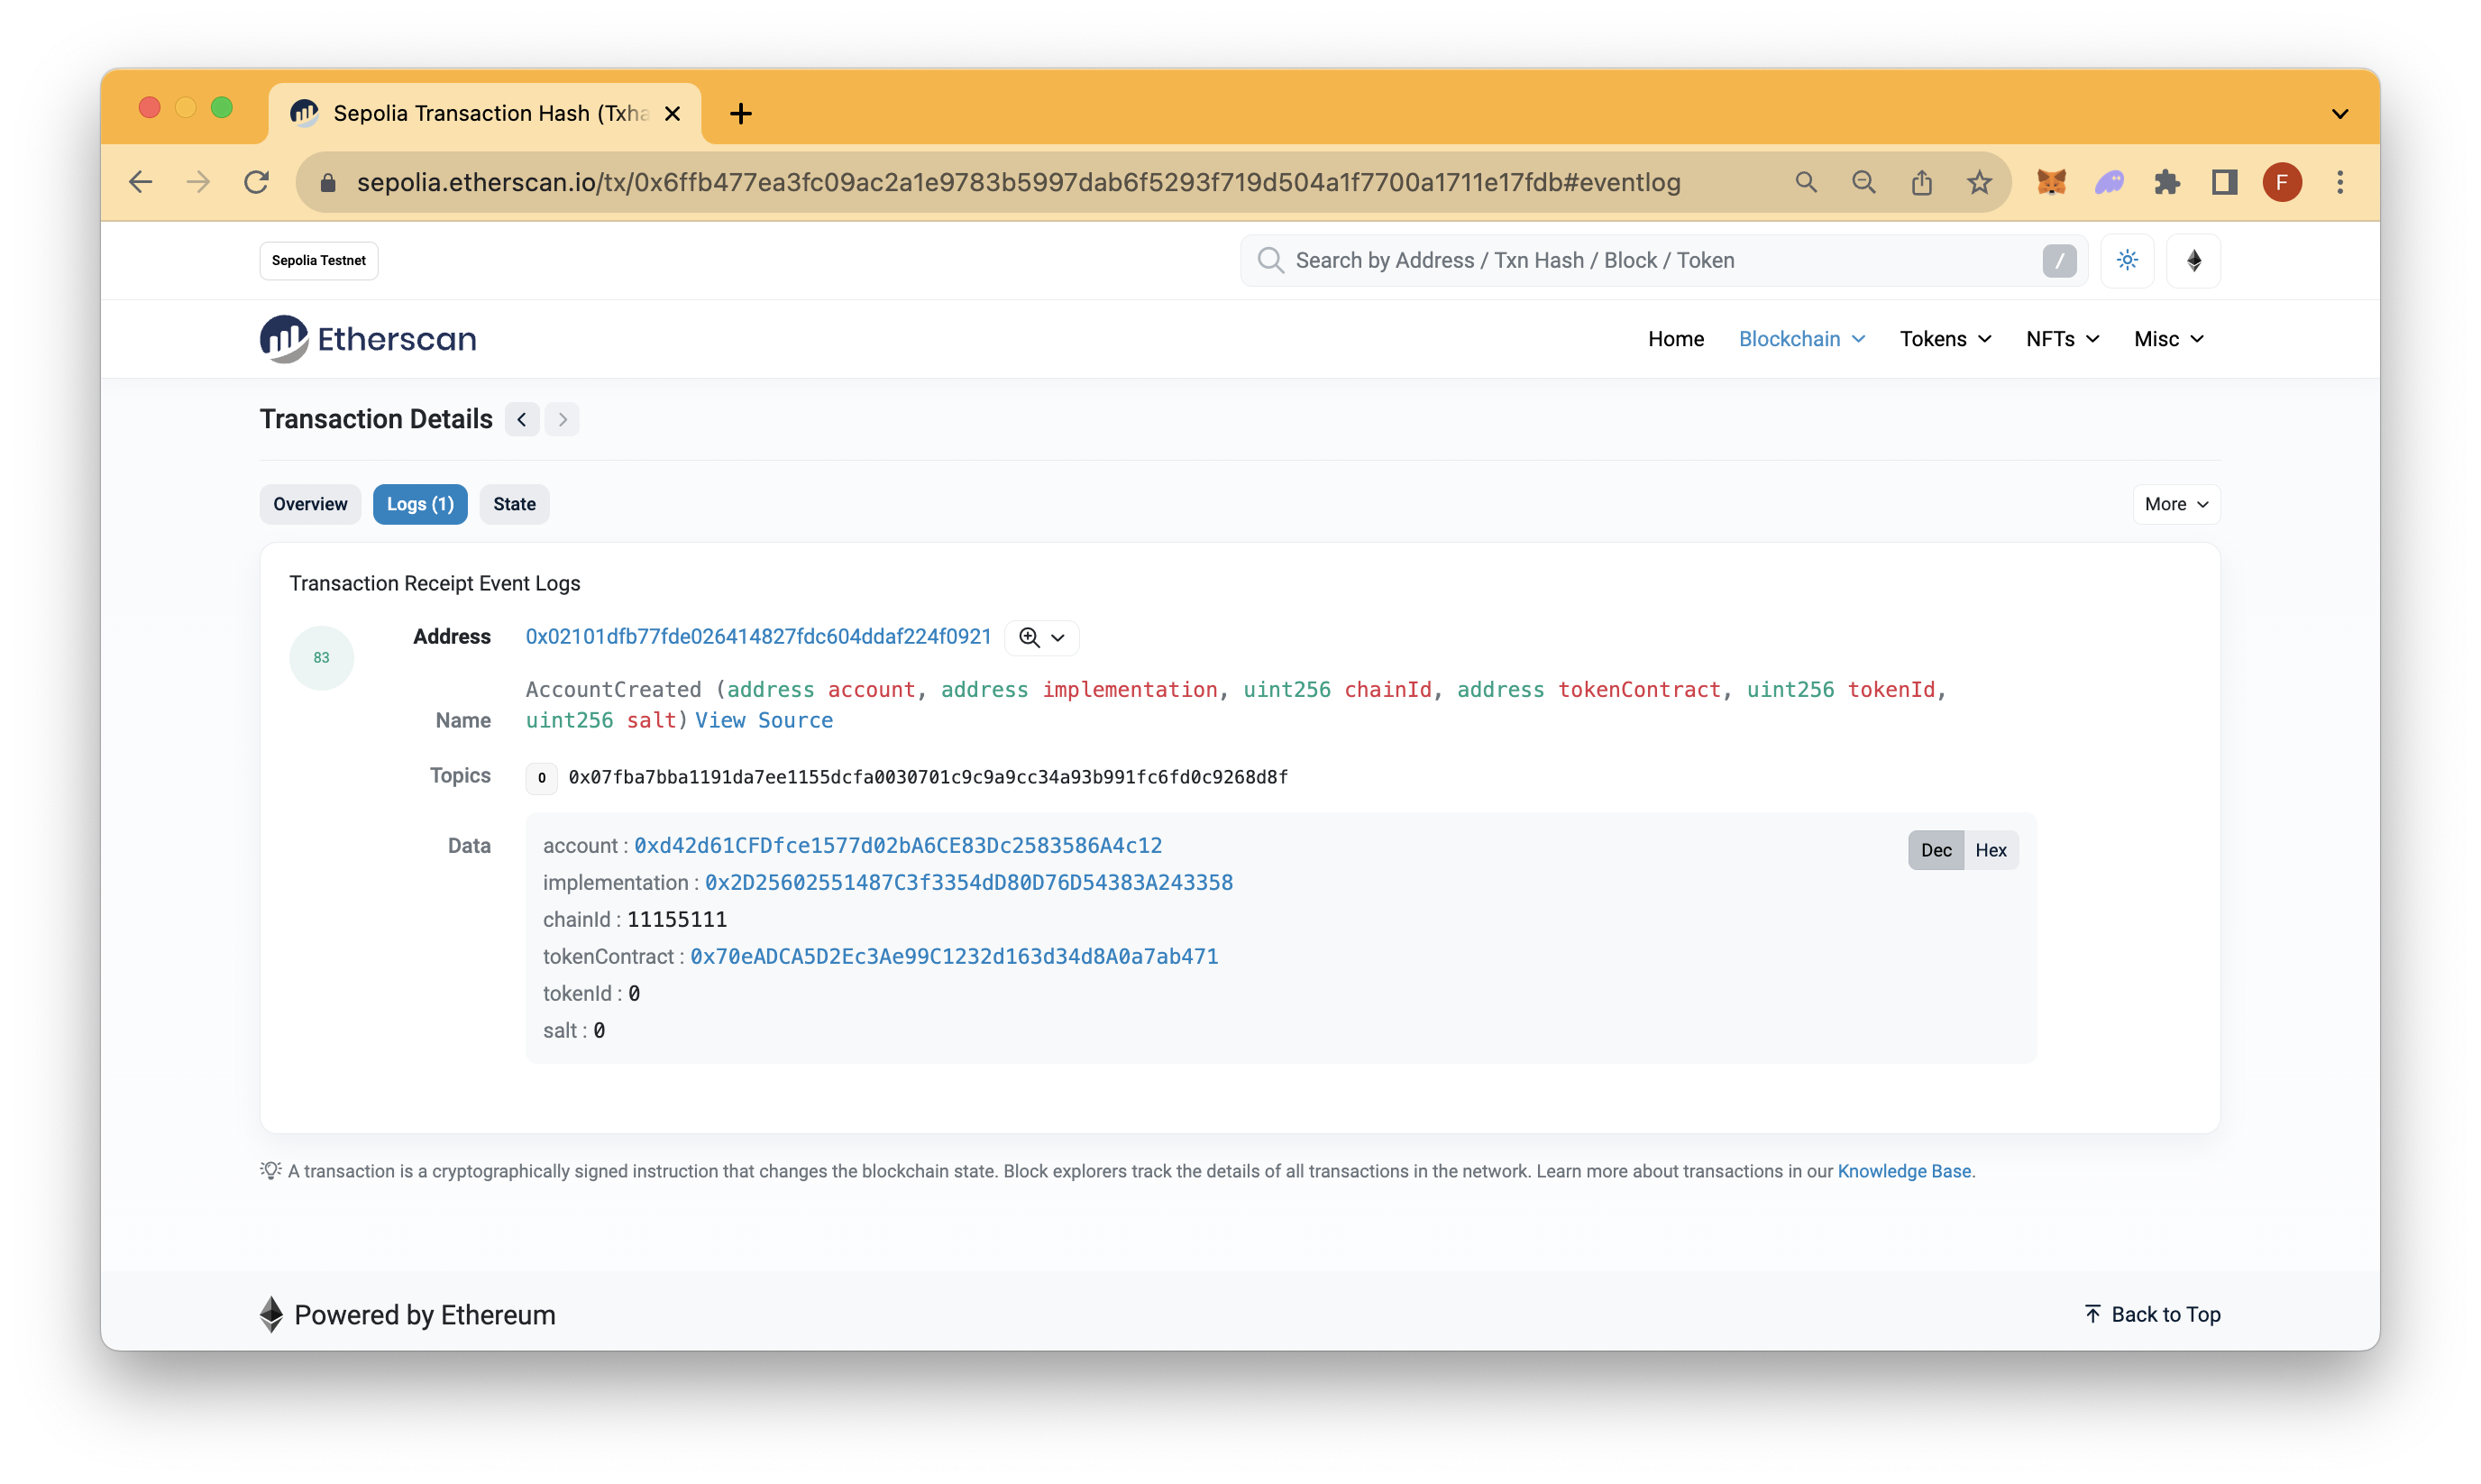
You now have an Token Bound Account that can interact with the blockchain and own assets. Check out Etherscan to verify the transaction was confirmed (here is an example transaction). If you navigate to the Logs tab, you'll see the AccountCreation event displaying the Token Bound Account address (e.g., account).
In the next section, we'll cover how to interact with the newly created Token Bound Account.
Interact With Your Deployed Token Bound Account (TBA)
With our NFT and Token Bound Account created, let's initiate a transfer of the NFT we minted from our personal wallet to the Token Bound Account contract.
Open the interactAccount.js file and fill-in the nftContractAddress (e.g., ERC-721 contract) and tokenBoundAccountAddress variables with proper values. These values were logged in the terminal in the previous script. Once finished, save the file.
Now, run the following interactAccount.js script to send ETH to your Token Bound Account (for gas fees), and then transfer the NFT from your wallet to your Token Bound Account.
npx hardhat run --network sepolia scripts/interactAccount.js
The main components of the script being call above are these lines of code:
//Compute the TBA address by calling the account function on the Registry contract
ERC6551Registry.account(accountImplementationAddress, chainId, nftContractAddress, tokenId, salt);
...
// Send funds to the TBA address and log the balances before and after
sendFundsToTokenAccount()
...
// Approve and transfer the minted NFT from our personal wallet to the TBA address
transferToken()
Reference the Github repository for the full code.
You should see an output similar to the following:
Token Bound Account Address: 0xd42d61CFDfce1557d02bA6CE83Dc2583586A4c12
Token account has 0 ETH before transfer
Token account has .01 ETH after transfer
Current owner of tokenId 0 is 0x351132C80b1e1De690A6dAe996649E0b2a1E7888
approve transaction successful. Hash: 0x426fa733d960a8f02e3291a6d318417d5de003e7f59ba466b9da526c11e53491
transfer transaction successful. Hash: 0x2b328af9eb0415801f57967ab541e6b0089ada2d549e5b232a0e25585ea0e981
New owner of tokenId 0 is 0xd42d61CFDfce1577d02bB5CE83Dc2583586A4c12
What happened? To recap, in this script we:
- Computed the TBA address by calling the
accountfunction on the Registry contract - Funded the TBA by transferring .01 ETH from our personal wallet to it
- Call the
approvefunction on the NFT, approving the transfer from our personal wallet to the the TBA address - Transfer the NFT to the TBA
Throughout the execution of the script, we logged data points to make sure balances were in check.
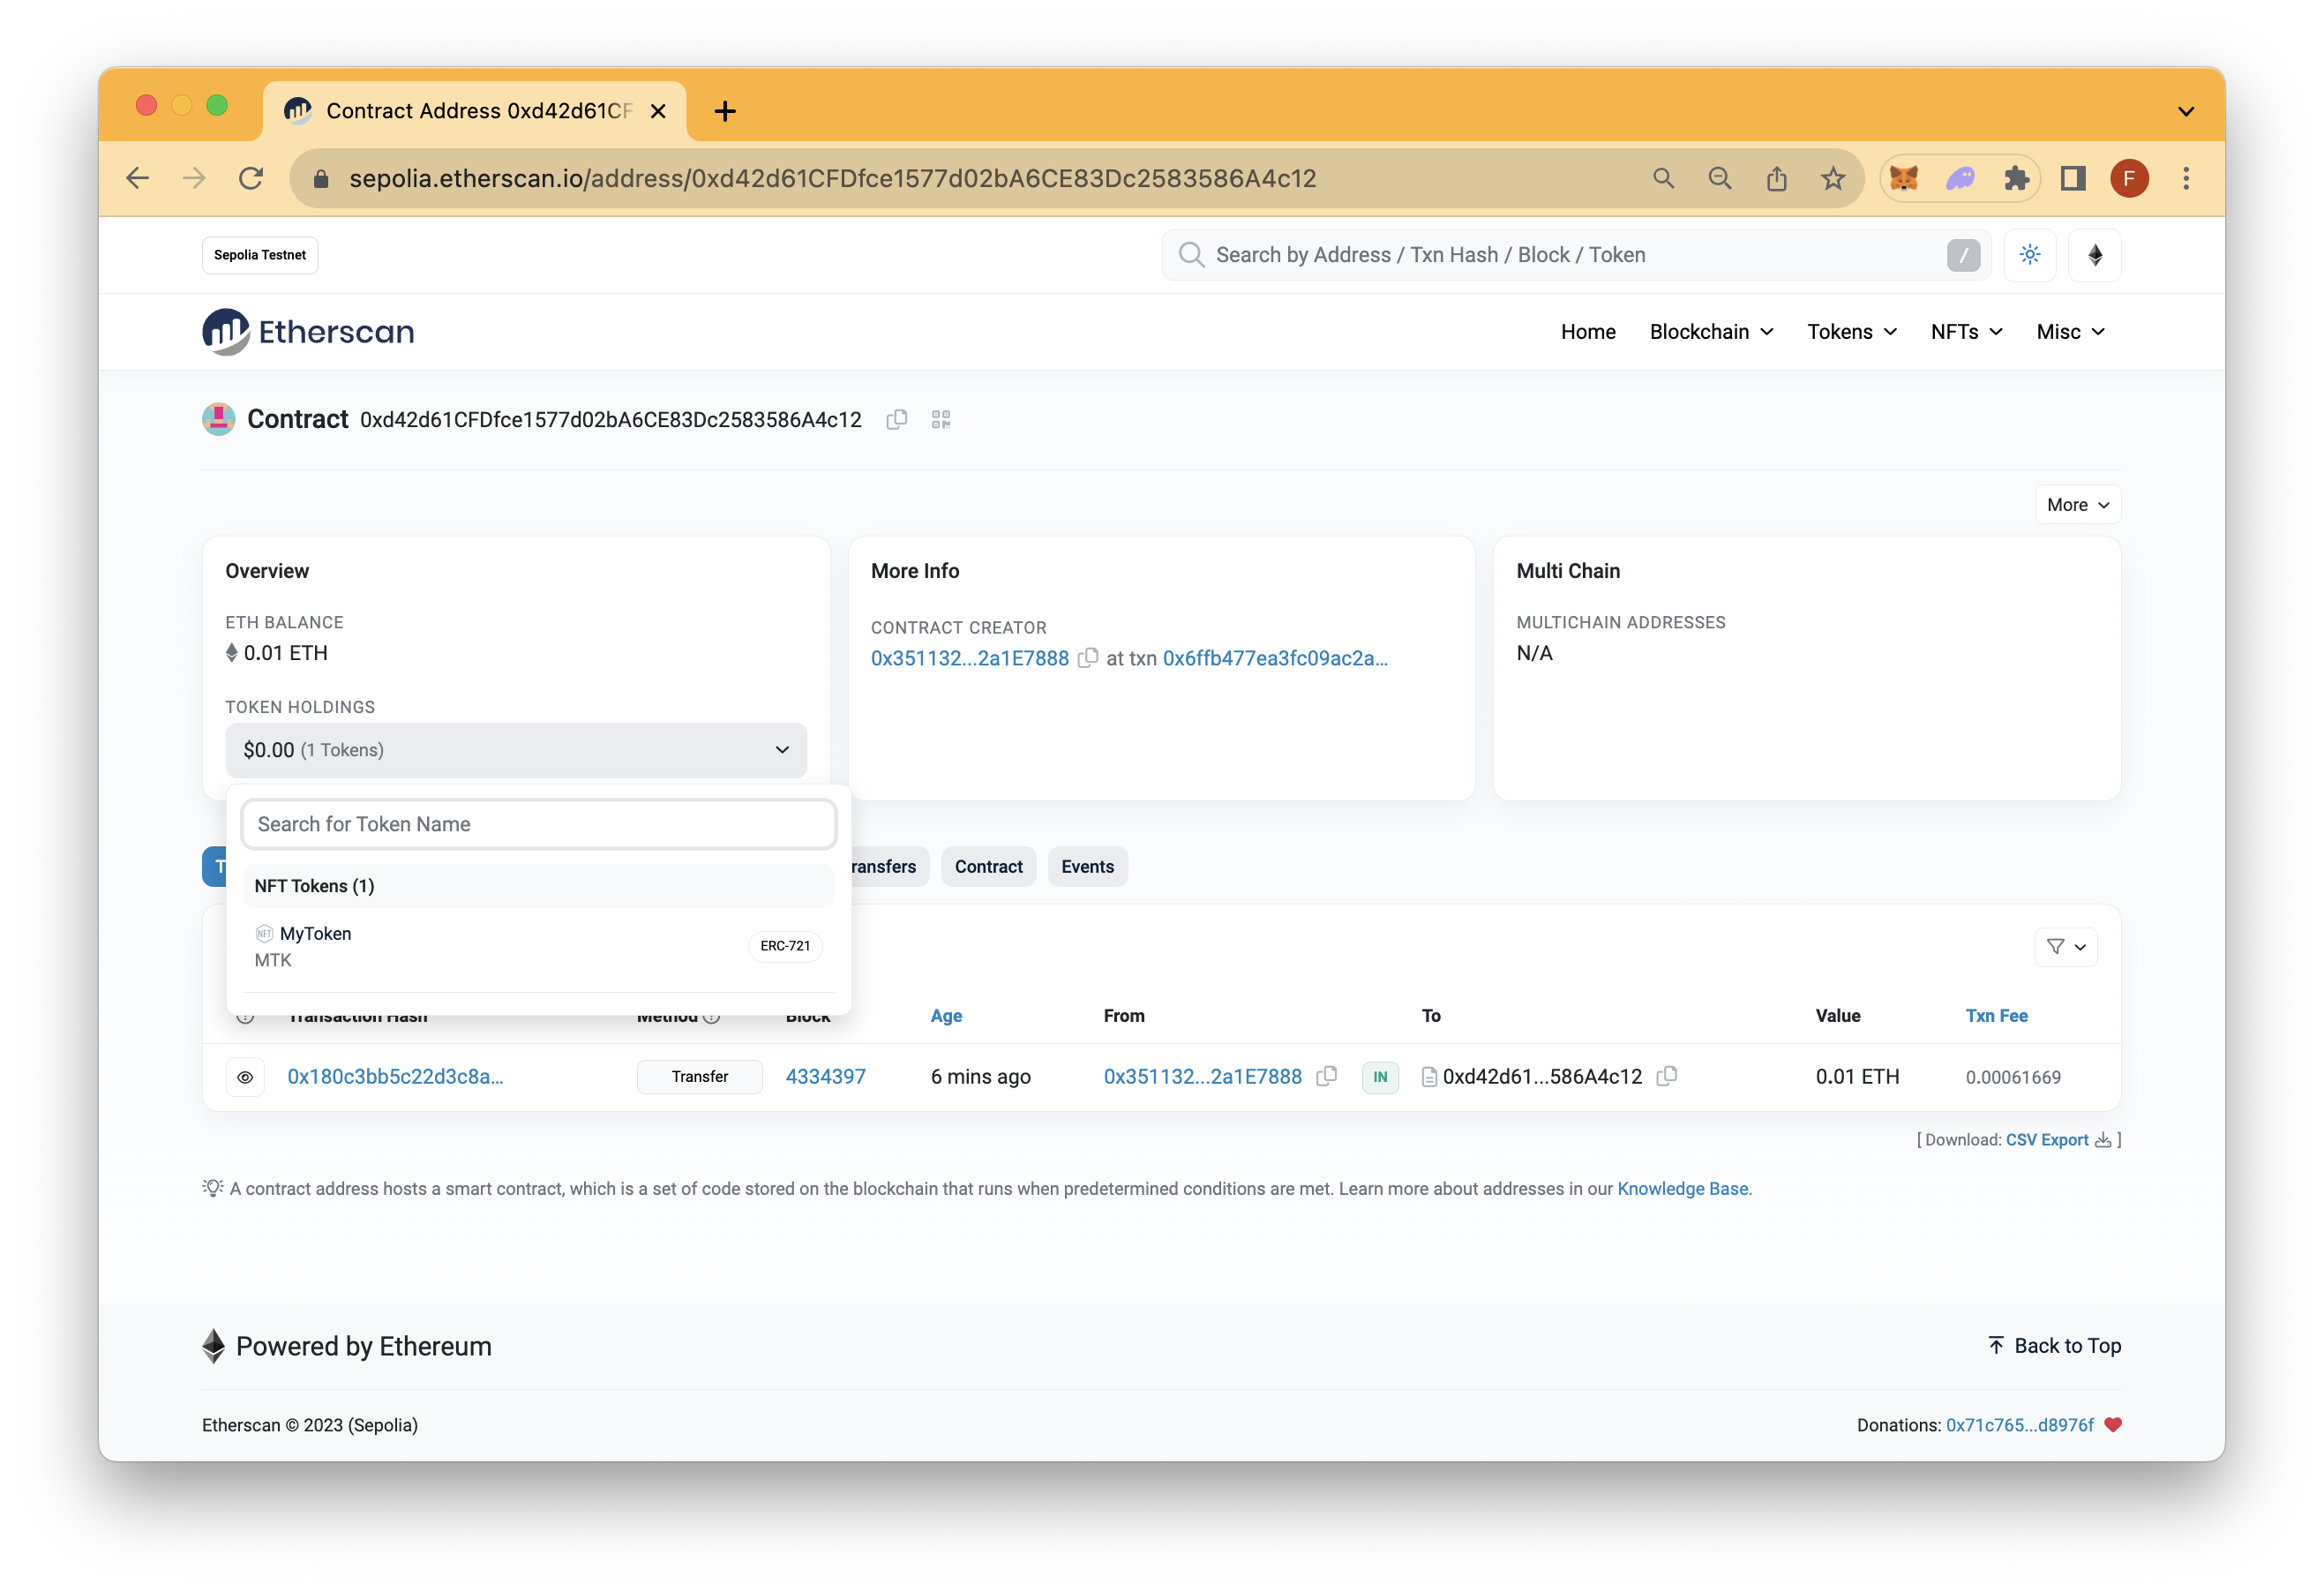
Upon checking our TBA on Etherscan, we can confirm the NFT (e.g., MyToken) is now within our TBA:
What's next? With what you've learned, you can try interacting with your Token Bound Account to transfer the NFT to another address.
Test Your Knowledge
With all that you've done in this guide, let's test your knowledge. Try attempting the short quiz below!
Wrap up
That's it! Up until this point, you've learned more about ERC-6551 and how to implement it. If you have any questions, feel free to use our dedicated channel on Discord or provide feedback using the form below. Stay up to date with the latest by following us on Twitter and our Telegram announcement channel.
We ❤️ Feedback!
Let us know if you have any feedback or requests for new topics. We'd love to hear from you.