
14 min read
Overview
In the evolving world of blockchain and Non-Fungible Tokens (NFTs), the ability to access and analyze NFT data across multiple chains is becoming increasingly valuable. This guide delves into building a multi-chain NFT analytics app, leveraging the advanced capabilities of the NFT API With Cached Metadata add-on on the Quicknode Marketplace. We aim to show how you can easily create a powerful NFT analytics application that can operate on a multi-chain level and provide NFT details such as NFT metadata, exchange data, transaction activity, historical pricing, scam/spam scores, rarity, and ownership information in real-time.
What You Will Learn
In this guide, you'll learn to:
- Utilize the NFT API With Cached Metadata add-on
- Build a multi-chain NFT analytics application that supports Ethereum, Polygon, Arbitrum, Optimism, and BSC.
- Fetch and display NFT metadata, exchange data, transaction activity, and more.
- Create an interactive and visually appealing frontend to showcase NFT collections across various blockchains.
What You Will Need
Before you begin, ensure you have the following:
- Basic knowledge of JavaScript/TypeScript and React
- A development environment set up for React (Node.js, npm, and a code editor)
- Access to the NFT API With Cached Metadata add-on with a Quicknode account (create an account here)
NFT API With Cached Metadata Add-on
Capabilities and Features
The NFT API With Cached Metadata add-on is a powerful tool for developers venturing into the NFT space. Its capabilities include:
- Direct Access to Real Time NFT Metadata: Retrieve detailed information about NFTs, including traits, rarity, and ownership, in real time.
- Exchange Data and Transaction Activity: Access comprehensive data from various marketplaces, including historical pricing and recent transactions.
- Scam/Spam Scores: Evaluate the legitimacy of NFTs with scam and spam scores.
- CDN Cached Assets: The API returns CDN cache URLs for NFT assets in web-optimized sizes, perfect for application development.
- Cross-Chain Support: Aggregate NFT information across Ethereum, Polygon, Arbitrum, Optimism, and BSC.
The Value for Developers
Utilizing the NFT API With Cached Metadata add-on offers significant benefits, particularly when compared to the manual process of extracting and managing blockchain data:
| Aspect | Manual Approach | With NFT API Add-on |
|---|---|---|
| Time and Resources | Requires setting up data scraping processes, parsing logs, and managing databases for each blockchain. | Provides aggregated and indexed data across multiple blockchains, eliminating the need for individual data management. |
| Development Complexity | Involves deep understanding of blockchain protocols and data normalization processes. | Simplifies development by abstracting the complexities of blockchain data extraction and normalization. |
| User Experience | Latency in real-time data scraping can hinder application responsiveness and feature richness. | Ensures fast, reliable access to optimized data, enabling the creation of responsive and feature-rich applications. |
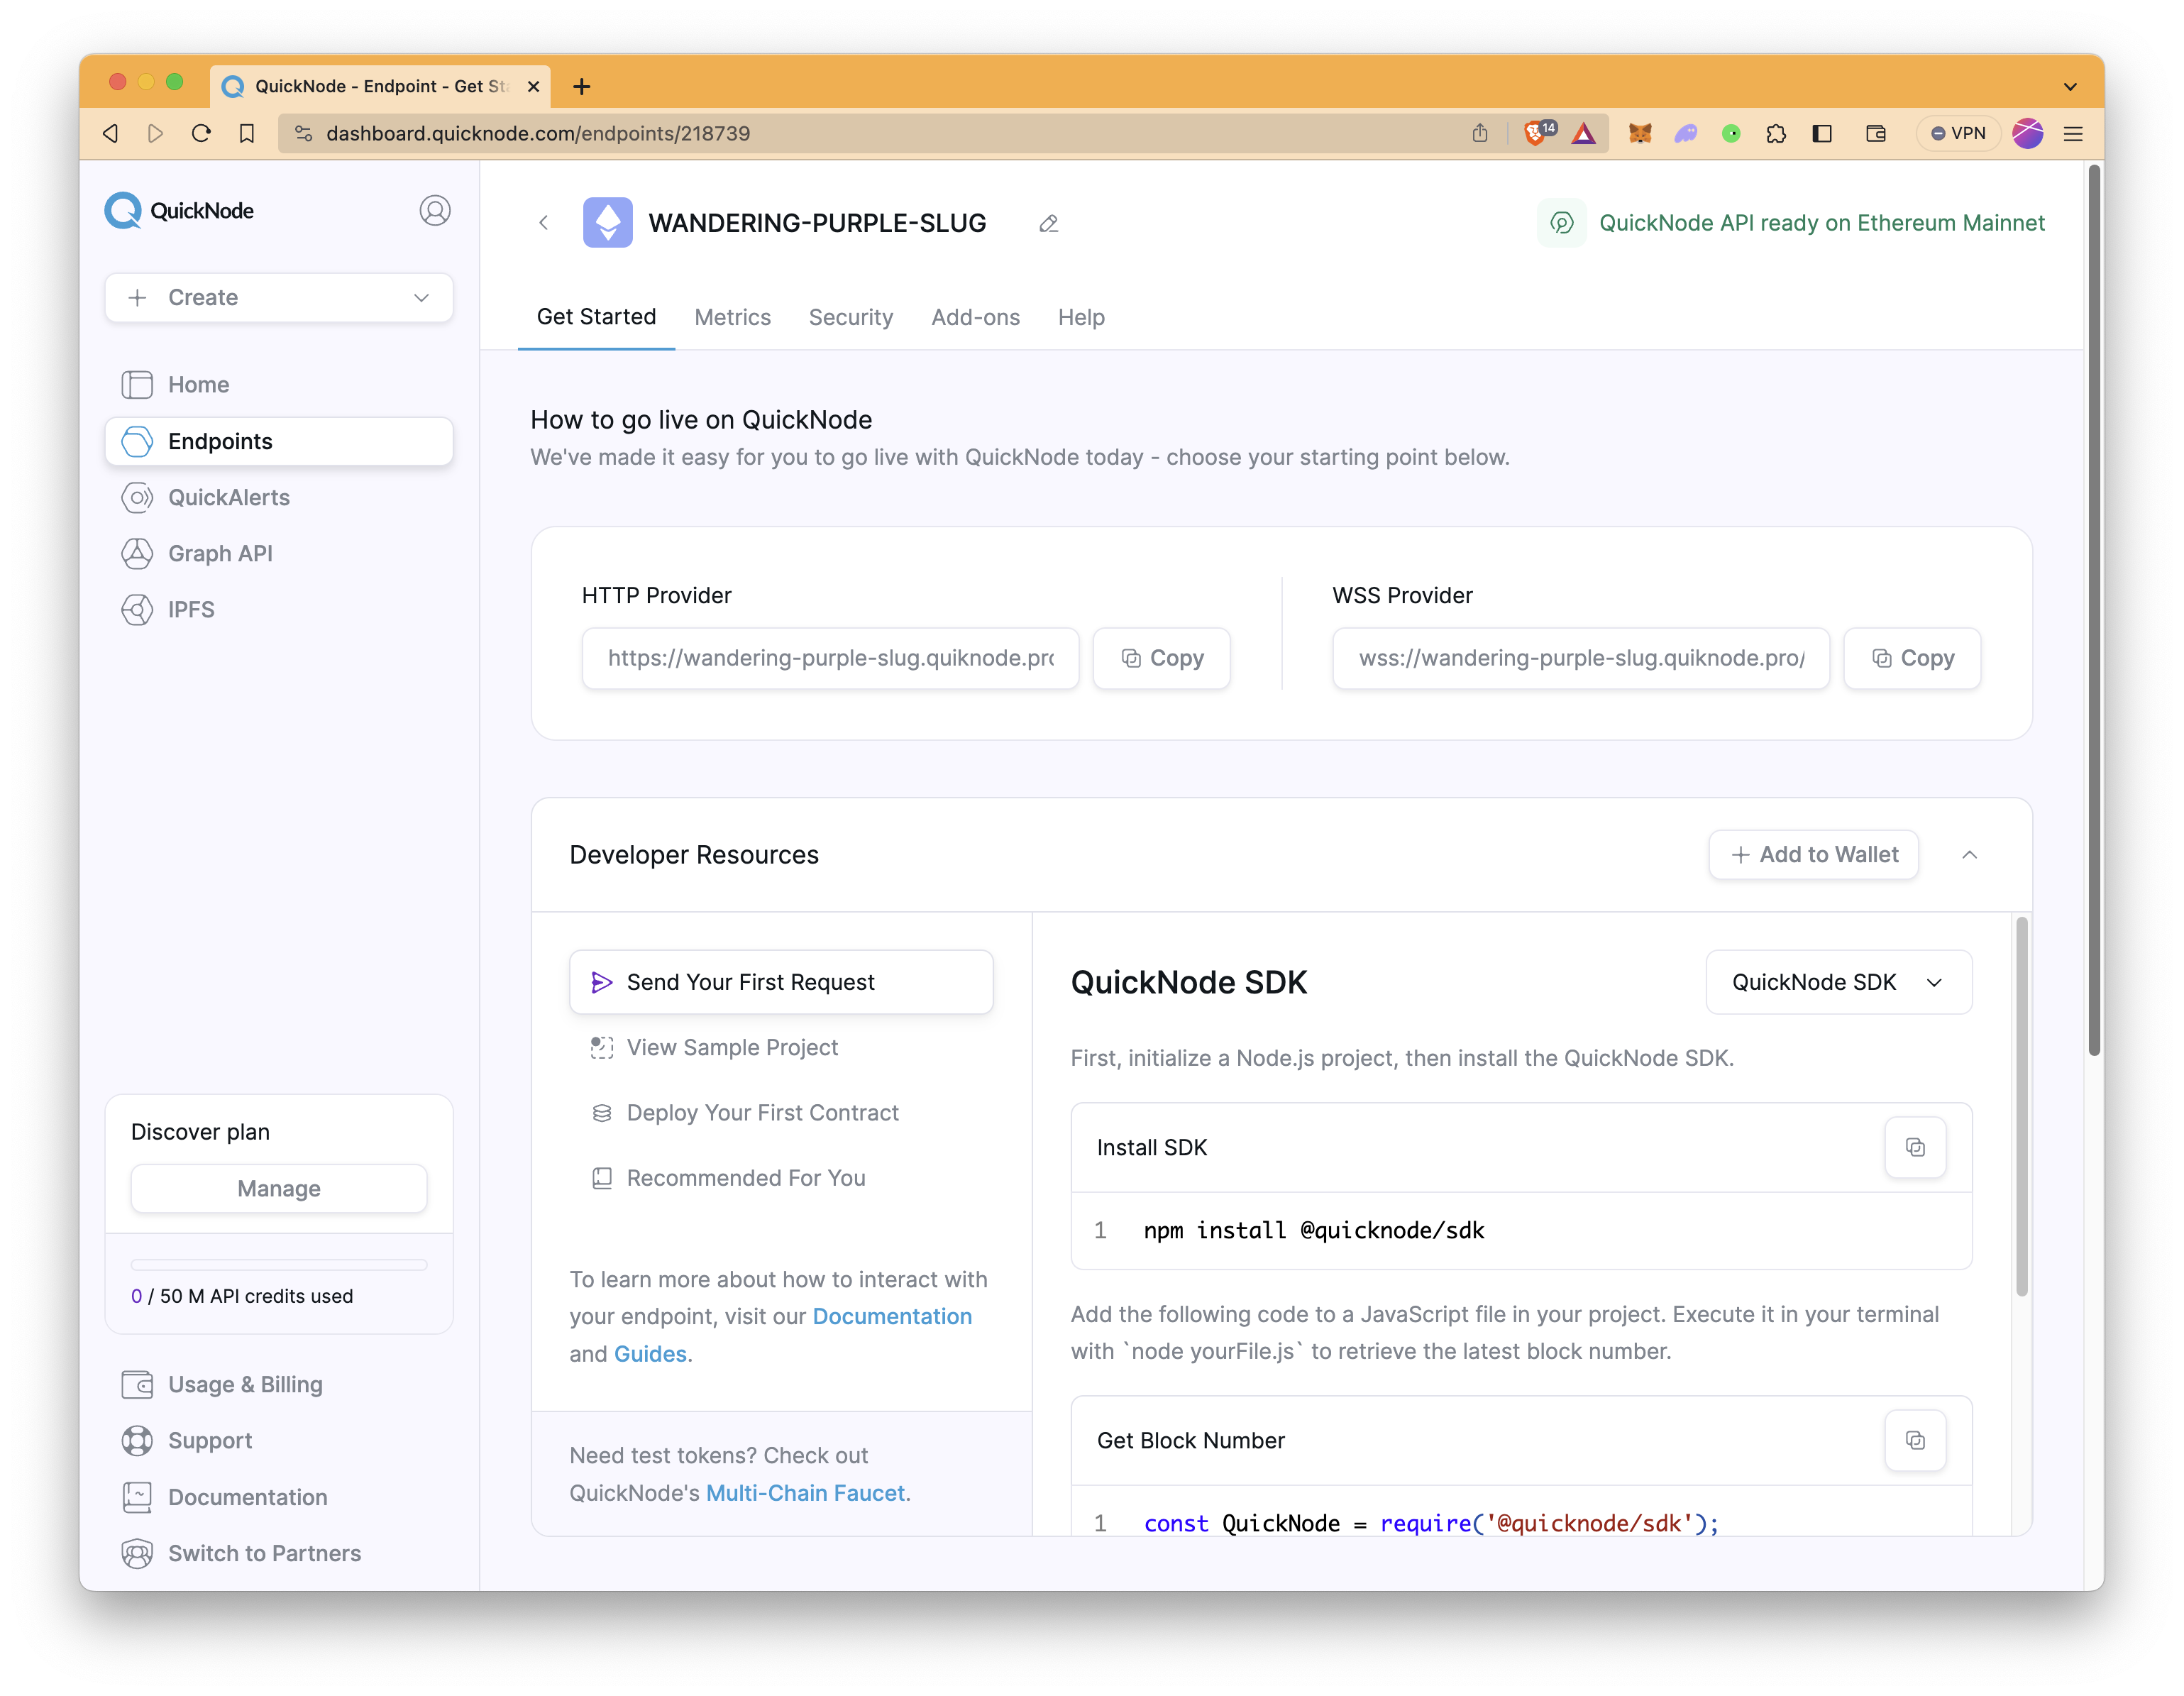
Setting Up an Endpoint
Setting up your endpoint with the NFT API With Cached Metadata is quite easy. If you haven't signed up already, you can create an account here.
Once you have logged in, navigate to the quicknode.com/endpoints page and click Create an endpoint. Select Ethereum mainnet (or one of the other supported networks), then click Next. Then, you'll be prompted to configure the add-on. Activate NFT API With Cached Metadata. Afterward, simply click Create Endpoint.
If you already have an endpoint without the add-on, go to the Add-ons page within your endpoint, select the NFT API With Cached Metadata, and activate it.
Once your endpoint is ready, go to the Add-ons page and copy your BlockSpan's API URL, which is near the NFT API With Cached Metadata add-on.
The URL should be similar to the one below. In the following section, you will need your secret API key.
https://api.blockspan.com/{YOUR_SECRET_TOKEN}/v1/
Depending on how many blockchains you want to use, you should repeat this process. So there will be different secret API keys for each chain.
Building the Application
To begin building your NFT analytics app, it's essential to set up a robust development environment. This will ensure a smooth and efficient workflow as you proceed.
Setting Up the Project
Install Node.js and npm
First, make sure you have Node.js and npm (Node Package Manager) installed. Node.js is the runtime environment for running JavaScript code outside a browser, and npm helps manage the packages your project will depend on.
- Download and install Node.js.
- npm is included with Node.js, so installing Node.js will automatically install npm.
Install React and Other Dependencies
Use the Create React App tool to set up the base of your project:
npx create-react-app my-app --template typescript
cd my-app
This command sets up a new React project with TypeScript, which adds static typing to your JavaScript code, enhancing its reliability and maintainability.
Install additional packages like Axios for API requests, React Social Icons, and Tailwind CSS for styling:
npm install -D tailwindcss postcss autoprefixer
npm install axios react-social-icons
Configure Tailwind CSS
Generate Tailwind config file. This will create a minimal tailwind.config.js file where you can customize your Tailwind setup, and a postcss.config.js file for PostCSS configurations.
npx tailwindcss init -p
Configure the tailwind.config.js file and add the paths to all of your template files.
/** @type {import('tailwindcss').Config} */
module.exports = {
	content: ['./src/**/*.{js,jsx,ts,tsx}'],
	theme: {
		extend: {},
	},
	plugins: [],
}
Configure Tailwind in CSS by replacing the contents of src/index.css with the below directives to include Tailwind’s base, component, and utility styles.
@tailwind base;
@tailwind components;
@tailwind utilities;
It is imported automatically, but it is always good practice to ensure that src/index.css is imported in your src/index.tsx file to include Tailwind CSS in your build:
import './index.css'
Building the Project
Designing the Application Structure
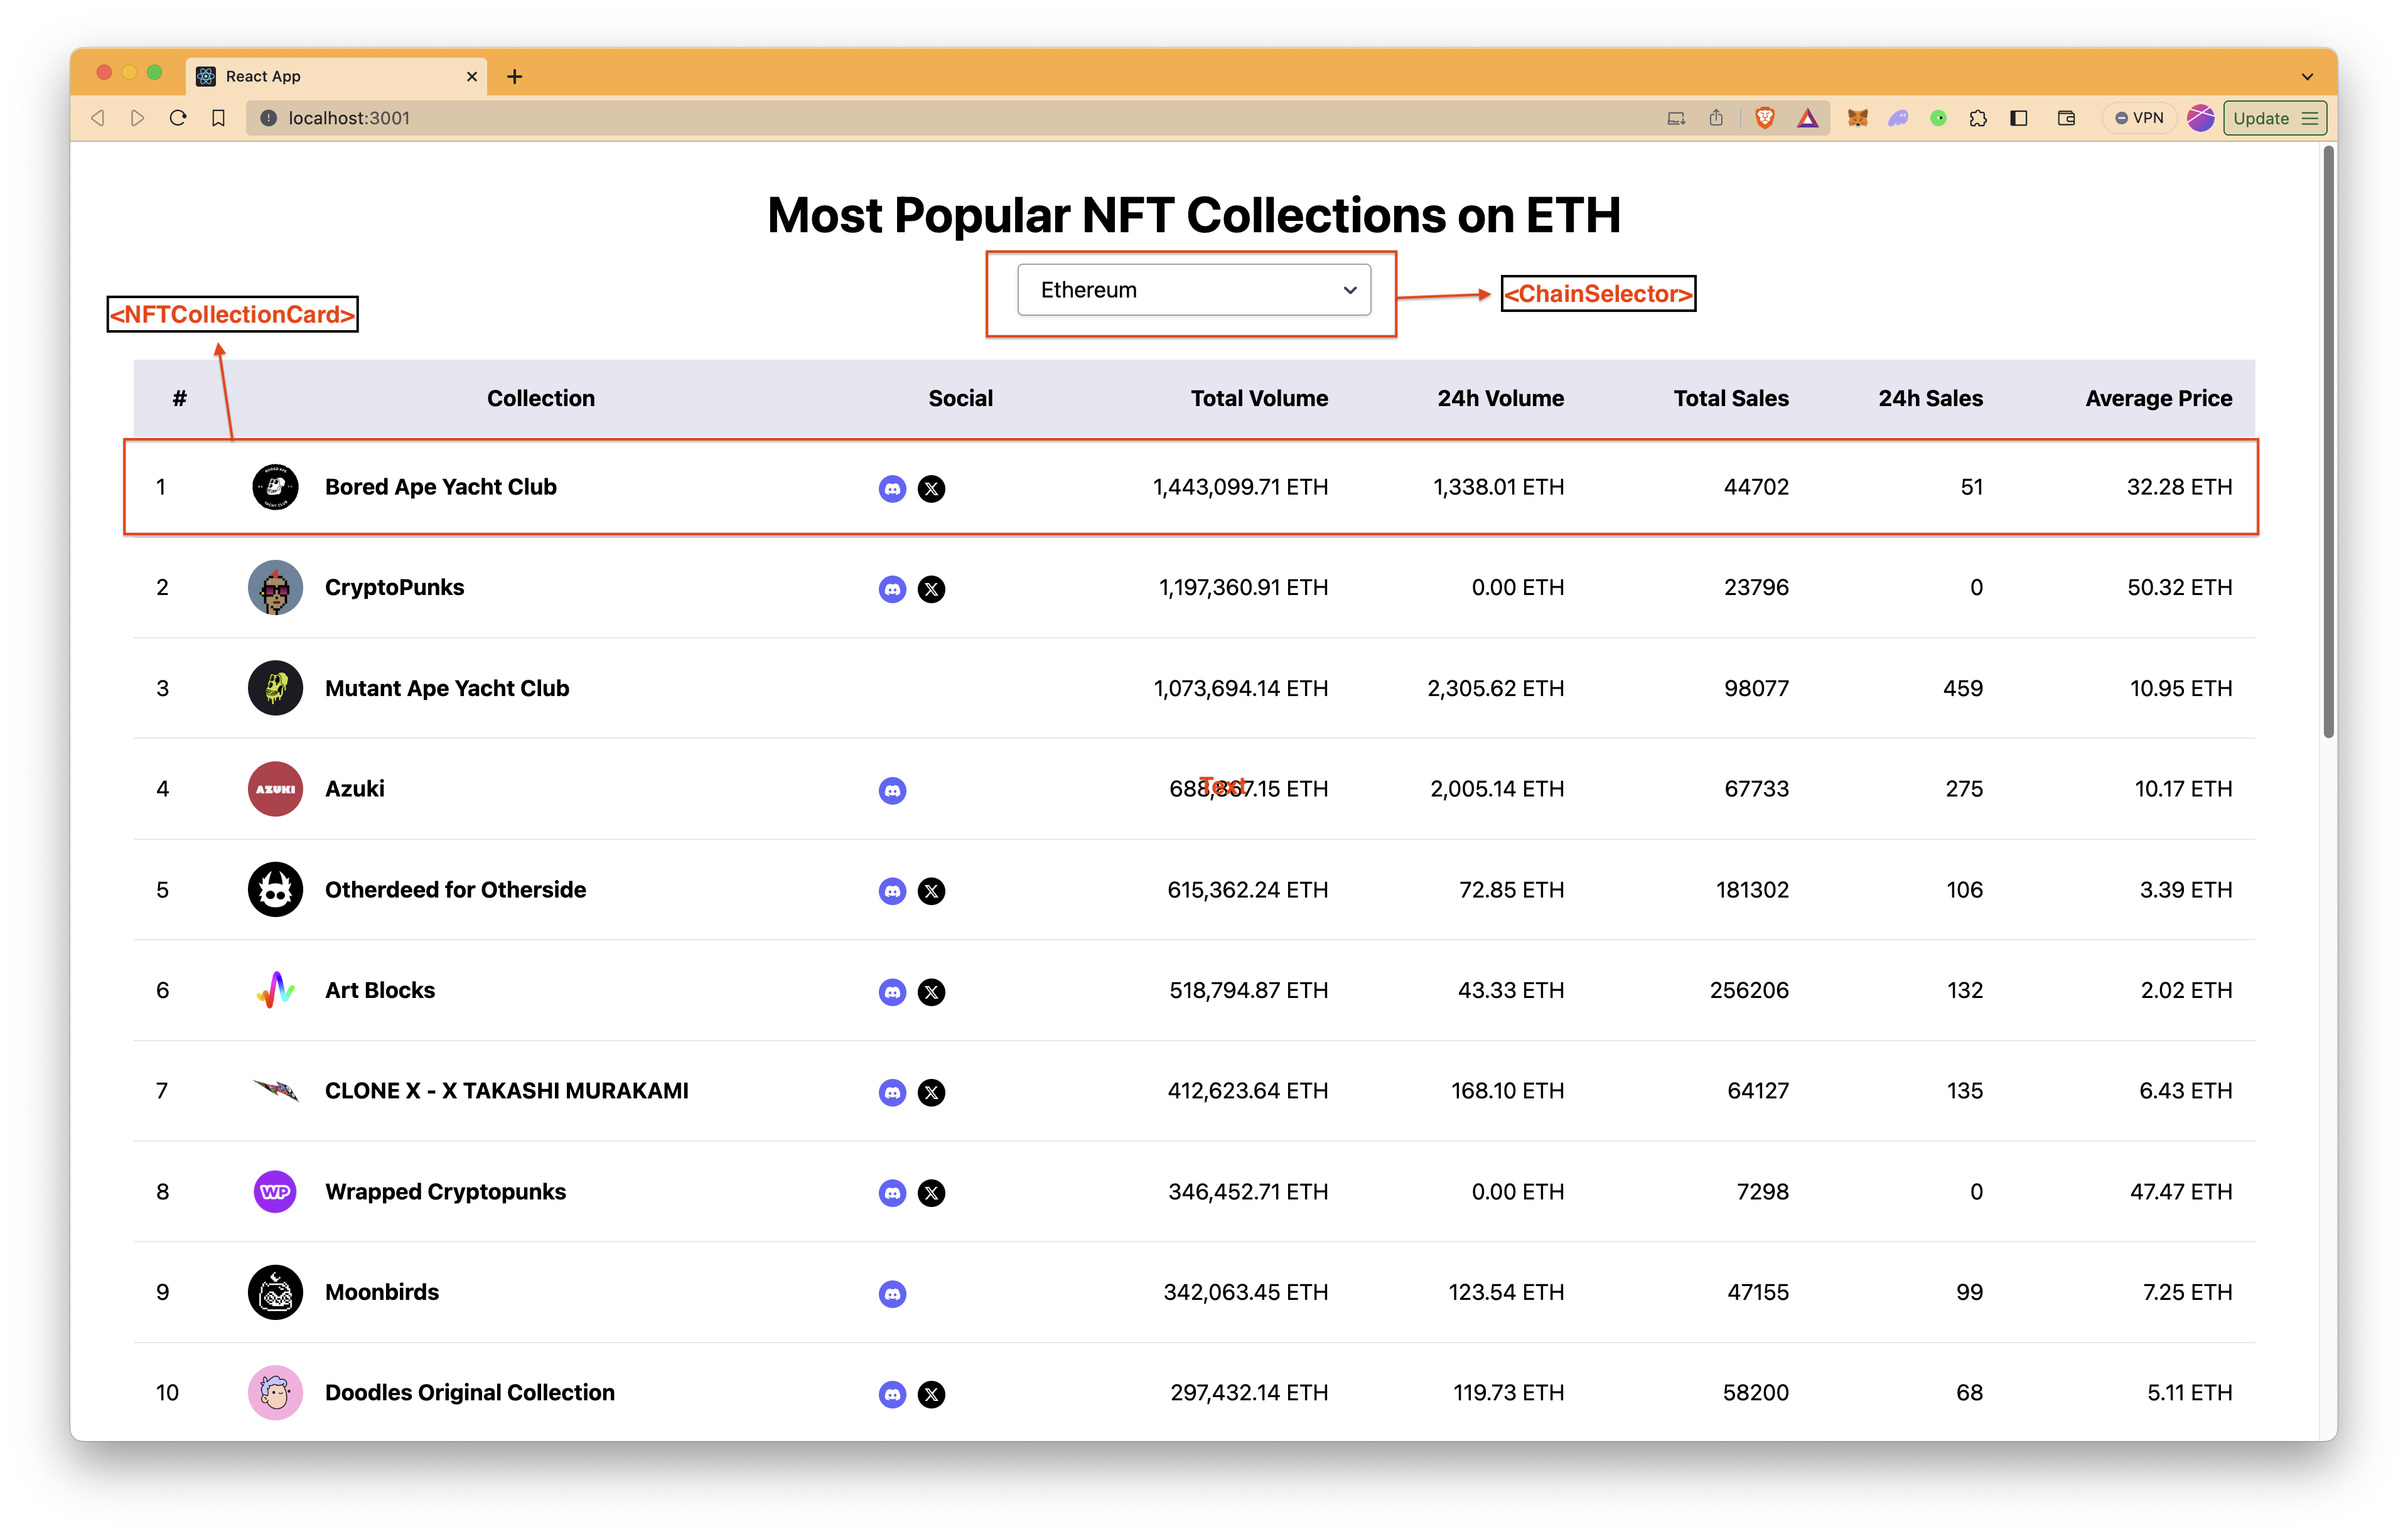
Having a well-planned application structure is crucial for development efficiency and future scalability. For the multi-chain NFT analytics app built in this guide, we will build components such as ChainSelector and NFTCollectionCard, which will act as the two main components of our app.
The flow of the application is like the one below.
- The user selects the blockchain.
- All data is fetched with the Get Exchange Collections By Ranking method.
- Fetched collection data is passed into the
NFTCollectionCardcomponent. - The data is displayed on the application.
Let's jump into coding.
Step 1: Creating Necessary Files and Folders
Create a components folder in the src folder. Then, create ChainSelector.tsx and NFTCollectionCard.tsx files in the components folder. You can do all of them once by running the commands below in your terminal in your project directory.
mkdir src/components
echo > src/components/ChainSelector.tsx && echo > src/components/NFTCollectionCard.tsx
Step 1: ChainSelector Component
The ChainSelector component takes the props onChainSelected function and blockchains, which is an object containing blockchain keys, names, and secrets.
Inside ChainSelector, we use Object.entries(blockchains) to iterate over the blockchains object and create a <option> element for each blockchain. The key of the blockchain is used as the value of the option, and the name is used as the displayed text.
When a user selects a different blockchain, the onChainSelected function is called with the new chain value. This allows the parent component to react to the selection and update the application state or re-fetch data based on the selected chain.
Open the src/components/ChainSelector.tsx file with your code editor and modify the file as follows.
import React from 'react'

type ChainSelectorProps = {
	onChainSelected: (chain: string) => void
	blockchains: { [key: string]: { name: string; secret: string } }
}

// The ChainSelector functional component
const ChainSelector: React.FC<ChainSelectorProps> = ({
	onChainSelected,
	blockchains,
}) => {
	const firstBlockchainKey = Object.keys(blockchains)[0]

	return (
		<div className="inline-block relative w-64">
			{/* Dropdown select element */}
			<select
				defaultValue={firstBlockchainKey}
				onChange={e => onChainSelected(e.target.value)}
				className="block appearance-none w-full bg-white border border-gray-400 hover:border-gray-500 px-4 py-2 pr-8 rounded shadow leading-tight focus:outline-none focus:shadow-outline"
			>
				{/* Dropdown options */}
				{Object.entries(blockchains).map(([key, { name }]) => (
					<option key={key} value={key}>
						{name}
					</option>
				))}
			</select>
			<div className="pointer-events-none absolute inset-y-0 right-0 flex items-center px-2 text-gray-700">
				<svg
					className="fill-current h-4 w-4"
					xmlns="http://www.w3.org/2000/svg"
					viewBox="0 0 20 20"
				>
					<path d="M5.516 7.548c0.436-0.446 1.045-0.481 1.576 0l3.908 3.747 3.908-3.747c0.531-0.481 1.141-0.446 1.576 0 0.436 0.445 0.408 1.197 0 1.615l-4.695 4.502c-0.531 0.481-1.141 0.481-1.672 0l-4.695-4.502c-0.408-.418-0.436-1.17 0-1.615z" />
				</svg>
			</div>
		</div>
	)
}

export default ChainSelector
Step 2: NFTCollectionCard Component
The NFTCollectionCard component is designed to display a row in a table layout, presenting detailed information about an NFT collection, including its index number, name, image, and key metrics like volume and sales.
The component also renders social media icons for Discord, Telegram, Twitter, and Instagram if URLs/usernames are provided. These icons open the respective social media pages in new tabs, enhancing user engagement.
Open the src/components/NFTCollectionCard.tsx file with your code editor and modify the file as follows.
import React from 'react'
import { SocialIcon } from 'react-social-icons'

// Define the types for the props of the NFTCollectionCard component
type NFTCollectionCardProps = {
	index: number // Index number of the NFT collection in the list
	name: string // Name of the NFT collection
	totalVolume: string // Total volume of sales for the collection
	dailyVolume: string // Daily volume of sales
	totalSales: string // Total number of sales
	dailySales: string // Daily number of sales
	averagePrice: string // Average price of the NFTs
	imageUrl: string // URL of the collection's image
	discordUrl?: string | null // URL for the collection's Discord (optional)
	telegramUrl?: string | null // URL for the collection's Telegram (optional)
	twitterUsername?: string | null // Username for the collection's Twitter (optional)
	instagramUsername?: string | null // Username for the collection's Instagram (optional)
}

const NFTCollectionCard: React.FC<NFTCollectionCardProps> = ({
	index,
	name,
	totalVolume,
	dailyVolume,
	totalSales,
	dailySales,
	averagePrice,
	imageUrl,
	discordUrl,
	telegramUrl,
	twitterUsername,
	instagramUsername,
}) => {
	// Function to format numerical values for better readability
	const formatNumber = (number: string) =>
		Number(number).toLocaleString(undefined, {
			minimumFractionDigits: 2,
			maximumFractionDigits: 2,
		})

	// Style for social media icons
	const iconStyle = { height: '20px', width: '20px' }

	return (
		// Each collection card is a table row
		<tr className="border-b">
			<td className="p-4">{index}</td> {/* Displaying the index number */}
			<td className="flex items-center p-4 space-x-4">
				<img
					className="w-10 h-10 rounded-full"
					src={imageUrl}
					alt={`Collection ${name}`}
				/>
				<span className="font-bold">{name}</span>
			</td>
			{/* Displaying social media icons */}
			<td className="p-4">
				{discordUrl && (
					<SocialIcon
						url={discordUrl}
						style={iconStyle}
						className="mr-2"
						target="_blank"
						rel="noopener noreferrer"
					/>
				)}
				{telegramUrl && (
					<SocialIcon
						url={telegramUrl}
						style={iconStyle}
						className="mr-2"
						target="_blank"
						rel="noopener noreferrer"
					/>
				)}
				{twitterUsername && (
					<SocialIcon
						url={`https://x.com/${twitterUsername}`}
						style={iconStyle}
						className="mr-2"
						target="_blank"
						rel="noopener noreferrer"
					/>
				)}
				{instagramUsername && (
					<SocialIcon
						url={`https://instagram.com/${instagramUsername}`}
						style={iconStyle}
						className="mr-2"
						target="_blank"
						rel="noopener noreferrer"
					/>
				)}
			</td>
			{/* Displaying collection data */}
			<td className="p-4 text-right">{formatNumber(totalVolume)} ETH</td>
			<td className="p-4 text-right">{formatNumber(dailyVolume)} ETH</td>
			<td className="p-4 text-right">{totalSales}</td>
			<td className="p-4 text-right">{dailySales}</td>
			<td className="p-4 text-right">{formatNumber(averagePrice)} ETH</td>
		</tr>
	)
}

export default NFTCollectionCard
Step 3: Main React Component - App.tsx
The App component is the main component of the application. It manages the state for the selected blockchain and the list of NFT collections.
The app fetches NFT collection data from an API based on the selected blockchain. This data is then displayed in a table format using the NFTCollectionCard component.
The ChainSelector component allows users to select a blockchain, which updates the data displayed in the app.
The app demonstrates how to effectively use React hooks like useState and useEffect for state management and side effects, respectively, and how to handle API requests with Axios.
Defining the blockchains Object
The blockchains object, which is defined in the code below, is a mapping of blockchain keys to their display names and secret tokens. Each key (like "eth-main", "arbitrum-main") corresponds to a specific blockchain.
Replace placeholder values ("ETH_SECRET_TOKEN", "ARBITRUM_SECRET_TOKEN", etc.) with actual secret keys obtained from the respective blockchain endpoints. You can remove blockchains that you do not intend to use from the blockchains object.
Typically, secret keys should not be stored directly in the frontend code. Consider backend solutions for handling sensitive keys and performing secure API calls, especially for production applications.
// Component and hook imports
import React, { useState, useEffect } from 'react'
import axios from 'axios'
import NFTCollectionCard from './components/NFTCollectionCard'
import ChainSelector from './components/ChainSelector'

// Type definitions for the NFT collection and blockchain information
type NFTCollection = {
	key: string
	name: string
	total_volume: string
	one_day_volume: string
	seven_day_volume: string
	thirty_day_volume: string
	total_sales: string
	one_day_sales: string
	seven_day_sales: string
	thirty_day_sales: string
	total_average_price: string
	one_day_average_price: string
	seven_day_average_price: string
	thirty_day_average_price: string
	image_url: string
	discord_url?: string | null
	telegram_url: string | null
	twitter_username?: string | null
	instagram_username?: string | null
}

type BlockchainInfo = {
	name: string
	secret: string
}

type BlockchainObject = {
	[key: string]: BlockchainInfo
}

const App: React.FC = () => {
	// State for storing NFT collections and the currently selected blockchain
	const [collections, setCollections] = useState<NFTCollection[]>([])
	const [selectedChain, setSelectedChain] = useState('eth-main')

	// Object mapping blockchain keys to their names and secret tokens
	// You can obtain your secret tokens from the URL that NFT API With Cached Metadata gives: https://api.blockspan.com/{YOUR_SECRET_TOKEN}/v1/
	const blockchains: BlockchainObject = {
		'eth-main': {
			name: 'Ethereum',
			secret: 'ETH_SECRET_TOKEN',
		},
		'arbitrum-main': {
			name: 'Arbitrum',
			secret: 'ARBITRUM_SECRET_TOKEN',
		},
		'optimism-main': {
			name: 'Optimism',
			secret: 'OPTIMISM_SECRET_TOKEN',
		},
		'poly-main': {
			name: 'Polygon',
			secret: 'POLYGON_SECRET_TOKEN',
		},
	}

	// Handler for updating the selected blockchain
	const handleChainSelected = (chain: string) => {
		setSelectedChain(chain)
	}

	// Effect for fetching NFT collections when the selected blockchain changes
	useEffect(() => {
		const fetchCollections = async (chain: string) => {
			try {
				const blockchainInfo = blockchains[chain]
				if (!blockchainInfo) {
					console.error('Invalid chain selected or details not found')
					return
				}

				const apiUrl = `https://api.blockspan.com/v1/exchanges/collectionsranking?chain=${chain}&exchange=opensea&ranking=total_volume&page_size=25`
				// Setting the secret key as a header
				const config = {
					headers: {
						'X-API-KEY': blockchainInfo.secret,
					},
				}
				const response = await axios.get(apiUrl, config)
				setCollections(response.data.results)
			} catch (error) {
				console.error('Error fetching NFT collections:', error)
			}
		}

		fetchCollections(selectedChain)
	}, [selectedChain]) // eslint-disable-line react-hooks/exhaustive-deps

	// JSX for rendering the application's UI
	return (
		<div className="App container mx-auto mt-8">
			<div className="mb-8">
				<h1 className="text-4xl font-bold text-center mb-4">
					Most Popular NFT Collections on{' '}
					{blockchains[selectedChain]?.name || 'Unknown Blockchain'}
				</h1>
				<div className="flex justify-center">
					<ChainSelector
						onChainSelected={handleChainSelected}
						blockchains={blockchains}
					/>
				</div>
			</div>

			<table className="min-w-full">
				<thead className="bg-gray-200">
					<tr>
						<th className="p-4">#</th>
						<th className="p-4">Collection</th>
						<th className="p-4">Social</th>
						<th className="p-4 text-right">Total Volume</th>
						<th className="p-4 text-right">24h Volume</th>
						<th className="p-4 text-right">Total Sales</th>
						<th className="p-4 text-right">24h Sales</th>
						<th className="p-4 text-right">Average Price</th>
					</tr>
				</thead>
				<tbody>
					{collections.map((collection, index) => (
						<NFTCollectionCard
							key={collection.key}
							index={index + 1} // Adding 1 since array indices start at 0
							name={collection.name}
							totalVolume={collection.total_volume}
							dailyVolume={collection.one_day_volume}
							totalSales={collection.total_sales}
							dailySales={collection.one_day_sales}
							averagePrice={collection.total_average_price}
							imageUrl={collection.image_url}
							discordUrl={collection.discord_url}
							telegramUrl={collection.telegram_url}
							twitterUsername={collection.twitter_username}
						/>
					))}
				</tbody>
			</table>
		</div>
	)
}

export default App
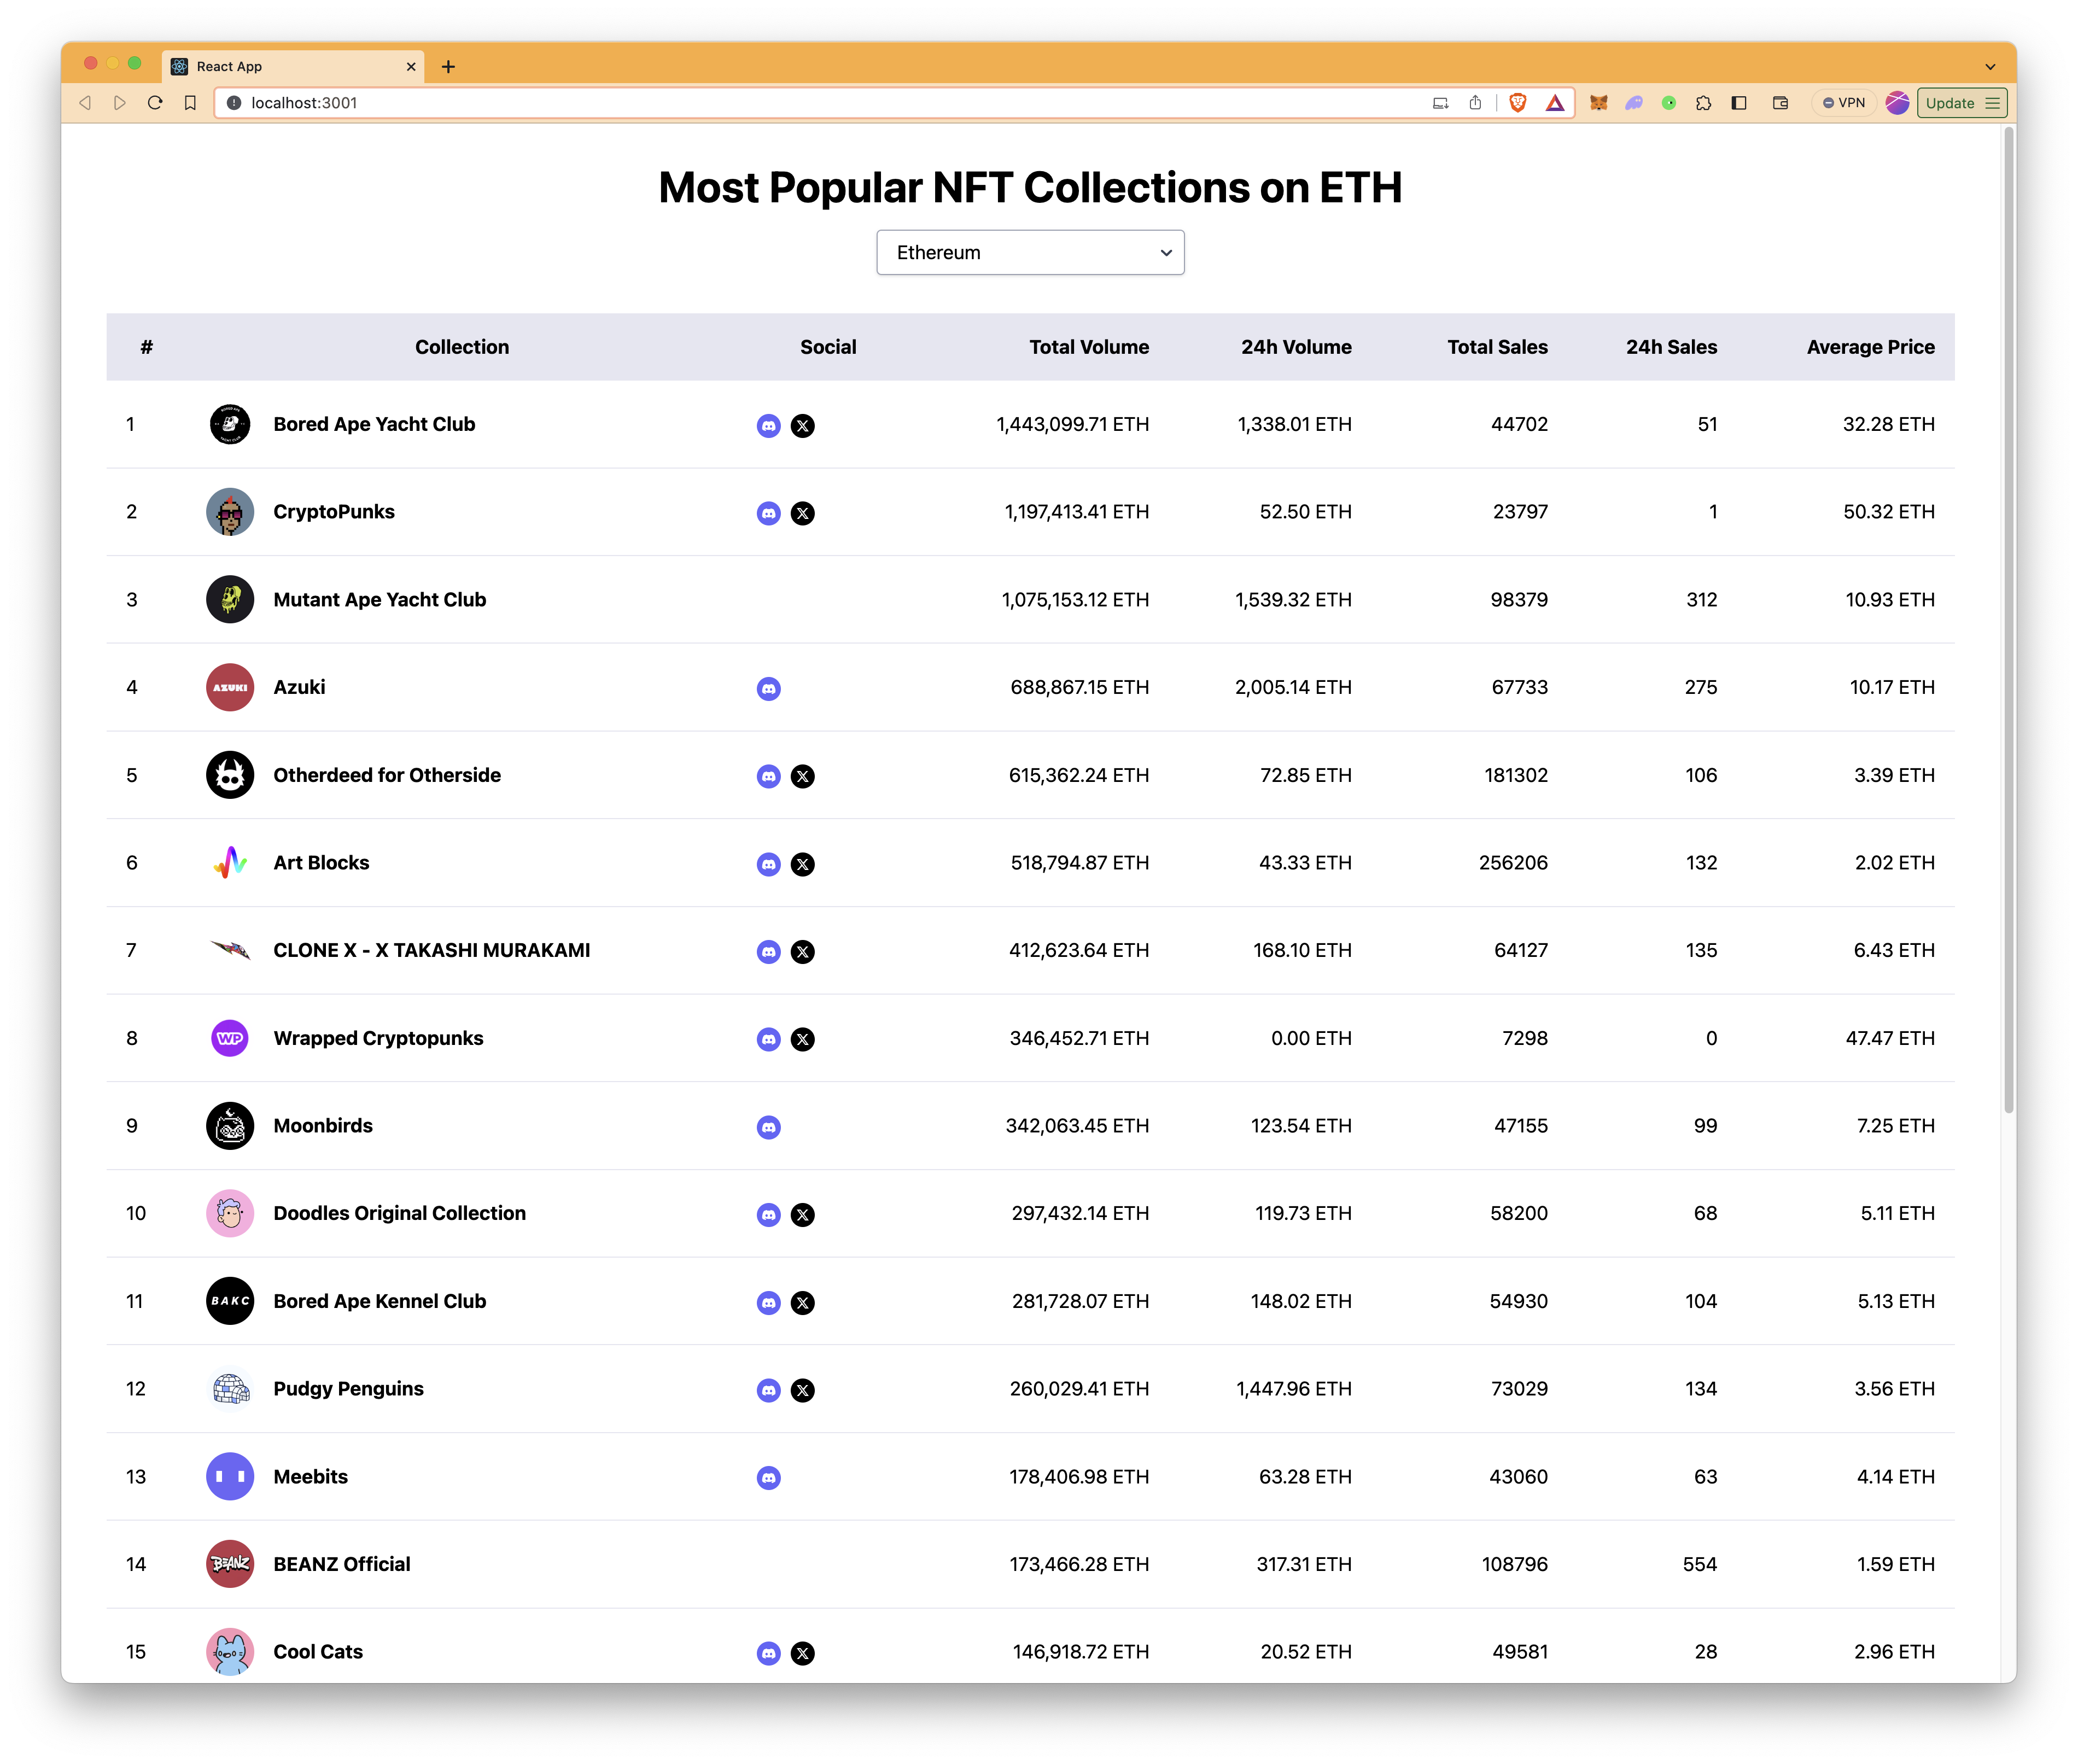
Run the App
Run the app by running the command below.
npm start
The app should now be running on http://localhost:3000
Conclusion
Congratulations on building your own multi-chain NFT analytics app! Throughout this guide, you've learned how to leverage the NFT API With Cached Metadata add-on to access comprehensive NFT data, integrate multi-chain functionality, and present this information in a user-friendly interface. Your journey into the world of NFT analytics doesn't have to stop here. There are numerous ways you can extend and improve your application.
Further Development Ideas
-
Implementing Pagination: Currently, the app displays a limited number of collections. Adding pagination would allow users to navigate through all available collections. Implement buttons or a scroll event to load more collections from the API as the user navigates through pages or reaches the bottom of the list.
-
Sorting Collections: Allow users to sort collections based on different parameters like total volume, average price, or total sales. Implement a dropdown or a set of buttons that enable users to choose the sorting parameter.
-
Filtering Options: Implement filters that let users view collections based on certain criteria, such as rarity, collection size, or scam/spam scores. This could involve additional UI components like sliders, checkboxes, or search bars.
-
Cross-Chain Analytics: Extend the analytics to compare data across different blockchains, providing insights into how different platforms compare in terms of NFT activity.
Subscribe to our newsletter for more articles and guides on Web3 and blockchain. If you have any questions or need further assistance, feel free to join our Discord server or provide feedback using the form below. Stay up to date with the latest by following us on Twitter (@Quicknode) and our Telegram announcement channel.
We ❤️ Feedback!
Let us know if you have any feedback or requests for new topics. We'd love to hear from you.